On this tutorial, we’ll train you how you can handle state in React. How one can create it and the way can we harness it in our react utility. With the intention to perceive react states, you have to be acquainted with React propos and elements. How one can create and render them. Should you don’t know these ideas, then you definitely don’t want to fret you may view my earlier tutorial by which I’ve taught about them.
These days, all the applying UIs are extremely dynamic they usually change in real-time. Any modification we did with the element class or we incorporate the extra options into our pre-defined element then this variation mechanically will get up to date to the browser UI. Herein the actual irony lies. You would possibly know that React props are solely read-only then the query arises how can we resolve this downside?
With the intention to grasp this idea, let’s first open our code editor and create a pupil class element in it. Then head over to the file index.js herein we’ll implement our render methodology. From this element, return a div tag that shows a textual content pupil element alongside we’ll additionally place a button with the textual content Add Scholar beneath this textual content.
Add a operate referred to as addStudent() to our pupil class element whereby we’ll show an alert message. With the intention to invoke this operate, we use the onClick occasion handler inside our button tag. Save all these modifications and let’s navigate to the browser to see how the output would look:
An instance of React State
|
1 2 3 4 5 6 7 8 9 10 11 12 13 14 15 16 17 18 19 20 21 22 23 24 25 26 27 28 29 30 31 32 33 34 35 36 37 38 39 40 41
|
import React from “react”;
import ReactDOM from “react-dom”;
//import App from “./App”;
class Scholar extends React.Element {
addStudent = () => {
alert(“Clicked on addStudent Methodology”);
};
render() {
return (
<div>
<h2>Scholar Element...</h2>
<button onClick={this.addStudent}>Add Scholar</button>
</div>
);
}
}
const element1 = <Scholar></Student>;
ReactDOM.render(element1, doc.getElementById(“root”)); |
Output:
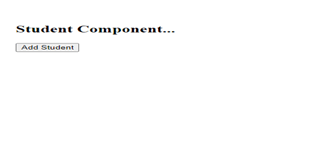
Click on on the addStudent button and we’ll see an alert message is displayed. Now let’s suppose we need to add another performance to our element which detects what number of instances somebody clicks to a button. With the intention to get this job completed, let’s introduce a rely variable in our Scholar element and initialize it with 0. In an addStudent() operate, this rely variable worth is incremented by one and will get displayed through an alert message.
|
|
rely=0;
addStudent = () => {
this.rely=this.rely+1;
alert(this.rely);
alert(‘Clicked on addStudent Methodology’);
} |
Let’s save all these modifications and navigate to the browser. Click on on the button fairly just a few instances to see whether or not the rely variable elevated by every click on or not. Now let’s delete all of the alert messages we’ll train you a extra productive strategy of displaying all of the alert messages in a single easy paragraph.
Save all this code and navigate to the browser, you’ll see rely variable isn’t get incremented all of the instances when the addStudent() button is clicked. Herein the actual downside arises. Every time we try to switch the rely variable worth, then this variation isn’t rendered to the element UI.
Now we’ll make an try and resolve this subject in an environment friendly method. With the intention to address this downside, React comes with a by-default answer often known as ‘State’ that updates the React element’s worth on account of person interplay. On the flip facet, the React state() object meticulously adhered to the React pre-defined guidelines.
Although generally State and props are sometimes used interchangeably, however in actuality, they’re completely completely different. The state is a personal and fully ruled by the React element. Information inside a state may be modified over time.
Whereas utilizing state() in your React programming, it’s pertinent to know that the state is a user-defined Javascript object.
By incorporating a neighborhood state to a category, we will switch knowledge from props onto a state that must be up to date. To place that in perspective, let’s first create a state object in our Scholar element, add rely variable in it and initialize it with 0.
In our code instance, after we click on the add a brand new Scholar button, addStudent() methodology is mechanically invoked. Then this operate ought to replace the rely variable worth and render it to the element UI.
setState() methodology updates the React element every time and re-render it to the applying UI when the person interacts with the applying UI. Now let’s go an object to a setState() methodology which accommodates a rely variable and increment the variable by one. Within the render() methodology, let’s show the worth of rely variable worth we’ve simply created with an help of state object that we’ve simply created.
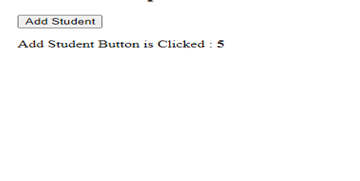
Save all these modifications and navigate to the browser and we’ll expertise that the rely variable is increment each time when the addStudent() button is clicked.
Code Instance:
|
1 2 3 4 5 6 7 8 9 10 11 12 13 14 15 16 17 18 19 20 21 22 23 24 25 26 27 28 29 30 31 32 33 34 35 36 37 38 39 40 41 42 43 44 45 46 47 48 49 50 51 52 53
|
import React from “react”;
import ReactDOM from “react-dom”;
//import App from “./App”;
class Scholar extends React.Element {
state = { rely: 0 };
addStudent = () => {
this.setState({ rely: this.state.rely + 1 });
};
render() {
return (
<div>
<h2>Scholar Element...</h2>
<button onClick={this.addStudent}>Add Scholar</button>
<p>
<label>
Add Scholar Button is Clicked : <b>{this.state.rely}</b>
</label>
</p>
</div>
);
}
}
const element1 = <Scholar></Student>;
ReactDOM.render(element1, doc.getElementById(“root”)); |
Output: