


Do you’ve gotten a macOS laptop for work or college and wish to put in Microsoft Groups for Mac? There are occasions when your IT division might set up the platform earlier than handing the pc to you, however not at all times.
On this article, you’ll discover ways to set up Microsoft Groups for Mac. You’ll additionally discover ways to login to your account and customise the Groups shopper that can assist you get began.
Stipulations
To comply with together with this tutorial, you have to to fulfill the next necessities.
- A pc that runs one of many three most up-to-date variations of macOS. As of this writing, the newest macOS model is macOS Massive Sur (11.2.1). If it’s essential to discover out which macOS model you’ve gotten, learn the best way to Discover out which macOS your Mac is utilizing.
- A Microsoft Groups account which you’ll use to log in to the platform. Should you’re utilizing Groups for work or college, you in all probability have already got an account supplied by your IT division.
- Your laptop person account have to be an administrator. Putting in it requires you to have admin privileges on the pc. If you wish to know whether or not you’ve gotten an admin account, go to How To Verify If You’re An Administrator.
Downloading the Microsoft Groups Installer
While you’ve squared away the necessities, you then’re able to proceed to put in Microsoft Groups for Mac. On this part, you’ll discover ways to obtain the Microsoft Groups for Mac installer from the official supply and carry out the set up.
For any software program set up, the really useful place to get a replica of the set up information is from an official supply (or sources). Though, for some organizations, the IT division might present the set up information to their customers.
On this instance, you’ll obtain the Microsoft Groups for Mac installer package deal from Microsoft. Observe the step-by-step directions under to start.
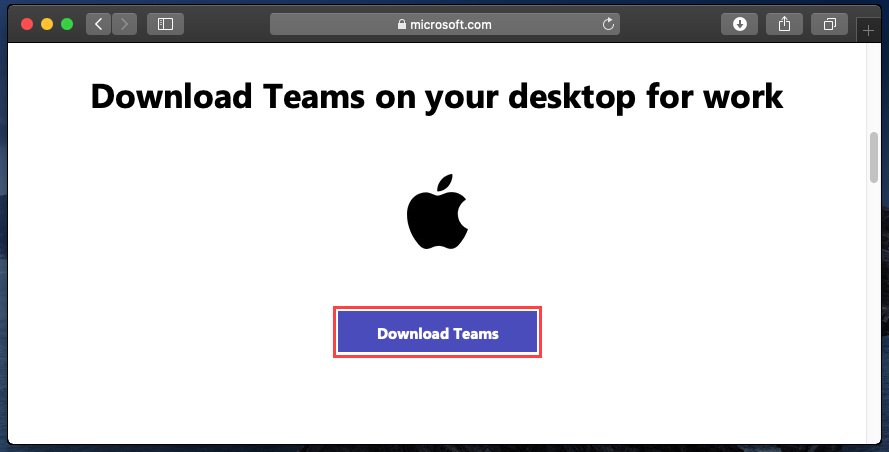
- Utilizing your internet browser, navigate to the Microsoft Groups obtain web page. This instance makes use of Safari as the online browser.
2. As soon as on the Groups web site, scroll down the web page to see the one accessible obtain possibility acceptable on your laptop’s working system.
3. Click on the Obtain Groups button to start out the obtain.
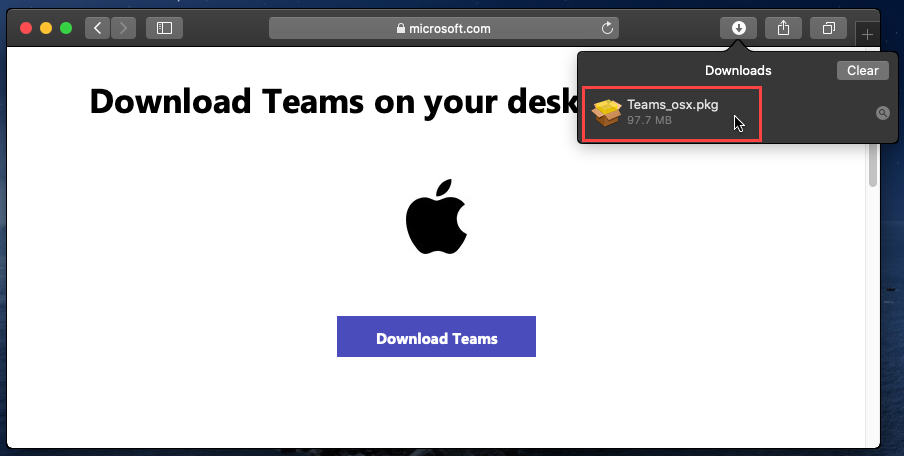
4. As soon as the obtain finishes, the set up file, named Teams_osx.pkg, might be in your default obtain location.

Good job for ending step one! Now that you simply’ve downloaded the Microsoft Groups for Mac installer, you’re able to go to the subsequent step, which is to put in Groups.
Operating the Microsoft Groups Installer
After downloading the Microsoft Groups installer, click on the file from the Downloads listing in Safari. Then, as you’ll be able to see under, and the set up will start.
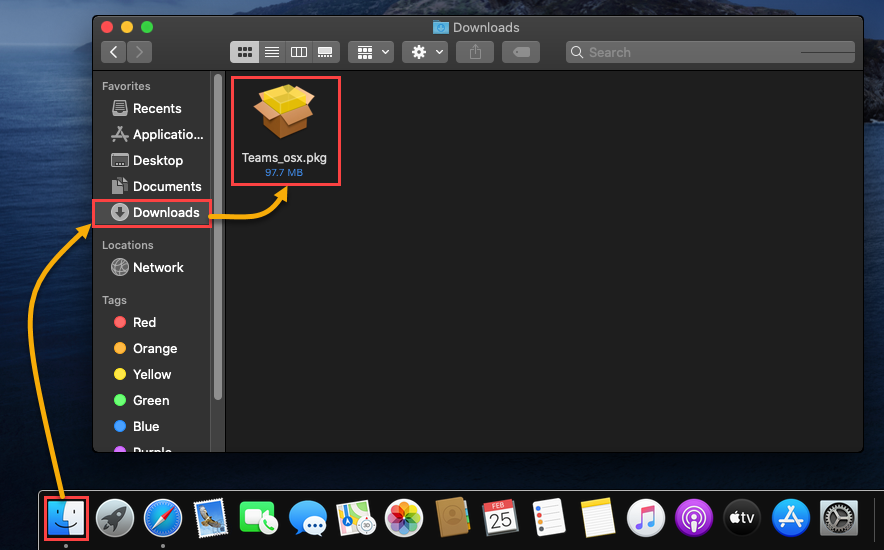
Should you downloaded the Groups installer however plan to put in it later, you’ll be able to find the Groups installer within the default obtain location, which is the Downloads folder in Finder, as proven under.
Putting in Groups for Mac
Upon getting positioned the downloaded Microsoft Groups folder, it’s time to start the set up of Groups. To take action:
- Click on the Teams_osx.pkg file in Safari, or double-click the file in Finder to start the set up.
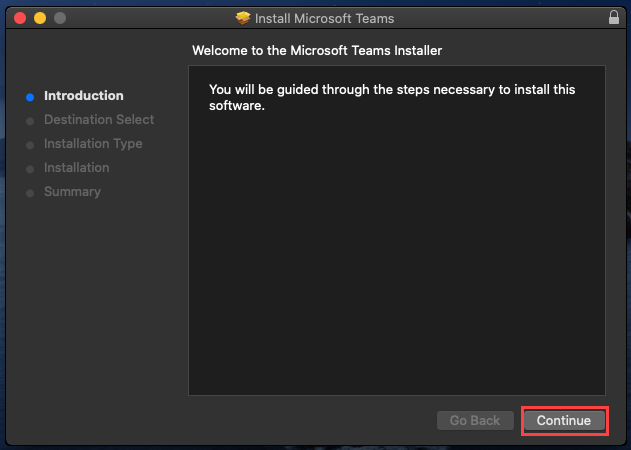
2. As soon as the installer begins, the primary web page you’ll see is the Introduction. The web page solely serves as a welcome web page, and there’s no motion required. Click on on Proceed to proceed.
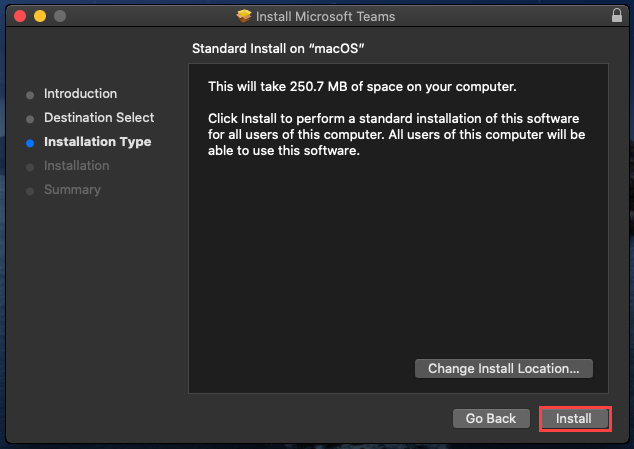
3. On the Set up Kind web page, you’d have the choice to vary the set up location. Nonetheless, the installer already selects the default set up location. Click on on Set up.
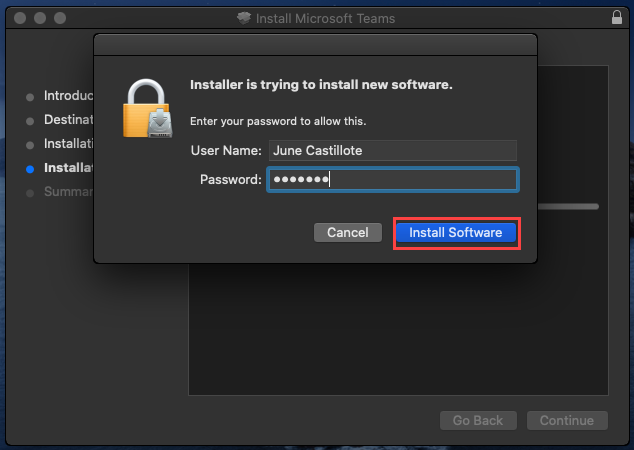
4. Subsequent, you can be requested to authorize the Microsoft Groups set up. To permit the set up to proceed, enter your username and password, then click on on Set up Software program.
5. When the installer is completed, you will notice a affirmation message within the Abstract window. Click on on the Shut button to exit the Microsoft Groups for Mac installer.

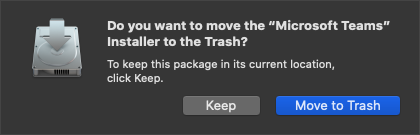
6. Lastly, the installer will ask you whether or not to maintain the Microsoft Groups for Mac installer package deal or transfer it to the trash. If you do not want the installer anymore, go forward and click on Transfer to Trash.
Beginning and Signing-in Microsoft Groups for Mac
Now that you simply’ve put in Microsoft Groups for Mac, there are just a few extra steps earlier than you can begin utilizing it. On this part, you’ll discover ways to launch Microsoft Groups and register to your Groups account for the primary time.
Possibility 1: Beginning Microsoft Groups from the Functions Folder
After putting in apps in macOS, an icon for the app usually seems within the Functions folders. The identical is true after putting in Microsoft Groups. Observe the steps under to launch Microsoft Groups for Mac from the Functions folder.
- Click on the Finder icon positioned on the dock.
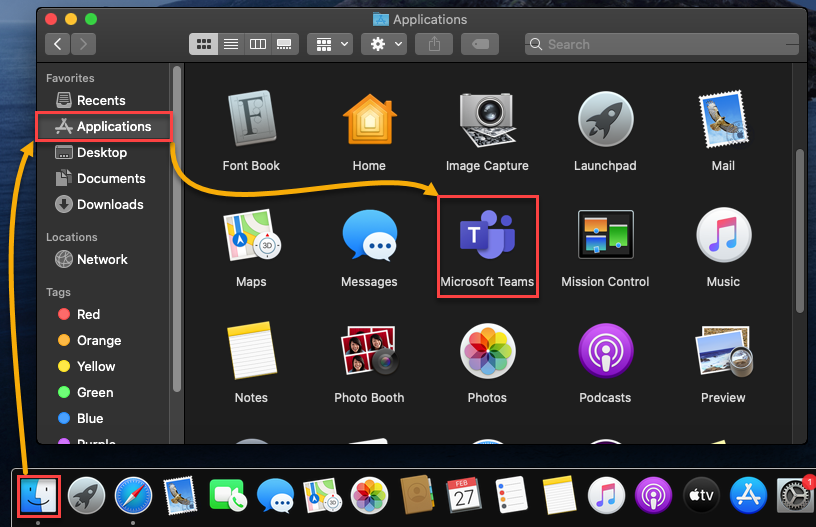
- As soon as the Finder window is proven, click on on the Functions folder within the left pane.
- Then, search for the Microsoft Groups icon on the proper pane and double-click the icon to launch.
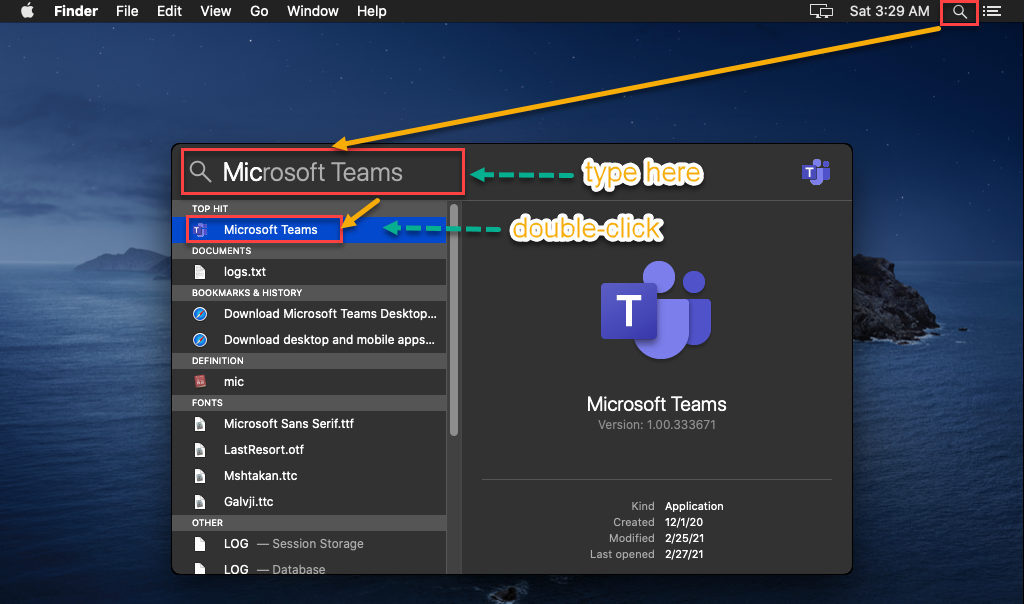
Possibility 2: Beginning Microsoft Groups from the Highlight Search
One other manner of discovering put in apps in macOS is thru the Highlight search. If you’re a person who would somewhat sort search phrases as a substitute of clicking-through home windows and icons, then this feature to launch Microsoft Groups might go well with you finest.
- On the desktop’s upper-right nook, click on on the magnifying glass icon to convey up the Spo
- tlight search window.
- Begin typing “Microsoft Groups” within the Highlight search field. It is best to instantly see the search outcomes as you sort. Search for Microsoft Groups within the search outcomes and double-click on it to launch.
For ease of future entry, take into account including the Microsoft Groups app icon to the Dock.
Signing-in along with your Microsoft Groups Account
Now that you simply’ve launched Microsoft Groups, the subsequent step is to undergo an preliminary setup that entails signing-in utilizing your Microsoft Groups account.
In case your group has enabled multifactor authentication (MFA), your login expertise will fluctuate. With MFA, you could must cross two or extra authentication strategies.
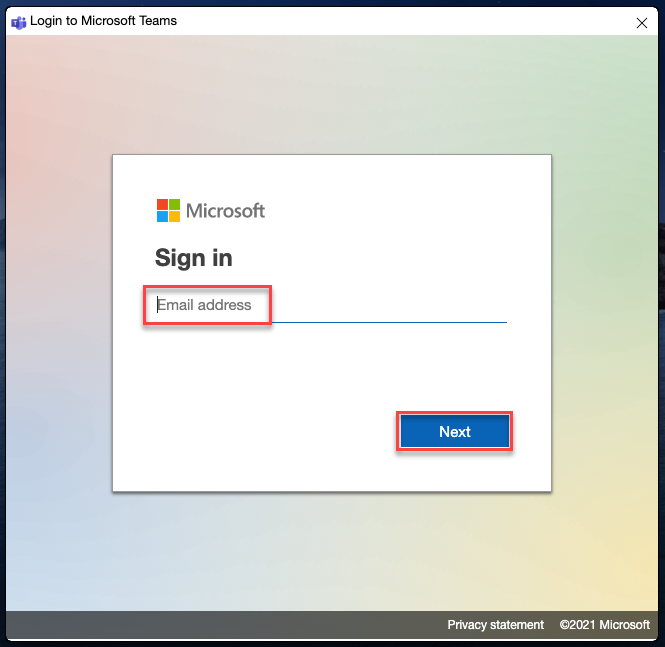
- When you’ve launched Microsoft Groups, you’ll see the Welcome to Microsoft Groups! web page first. Click on on the Get began button to proceed.

2. The following web page will ask you to enter your e-mail deal with. Enter your Workplace 365 e-mail deal with within the E mail deal with subject and click on on Subsequent.
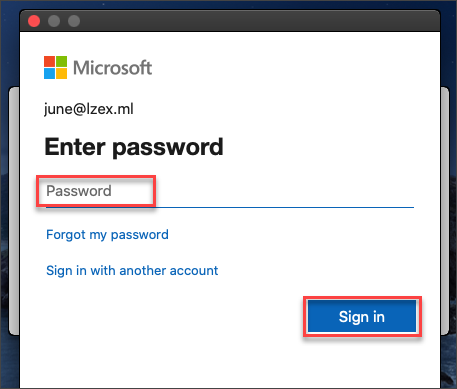
3. A brand new window will present the place you have to enter your password. Enter your Microsoft Groups account password and click on on Sign up.
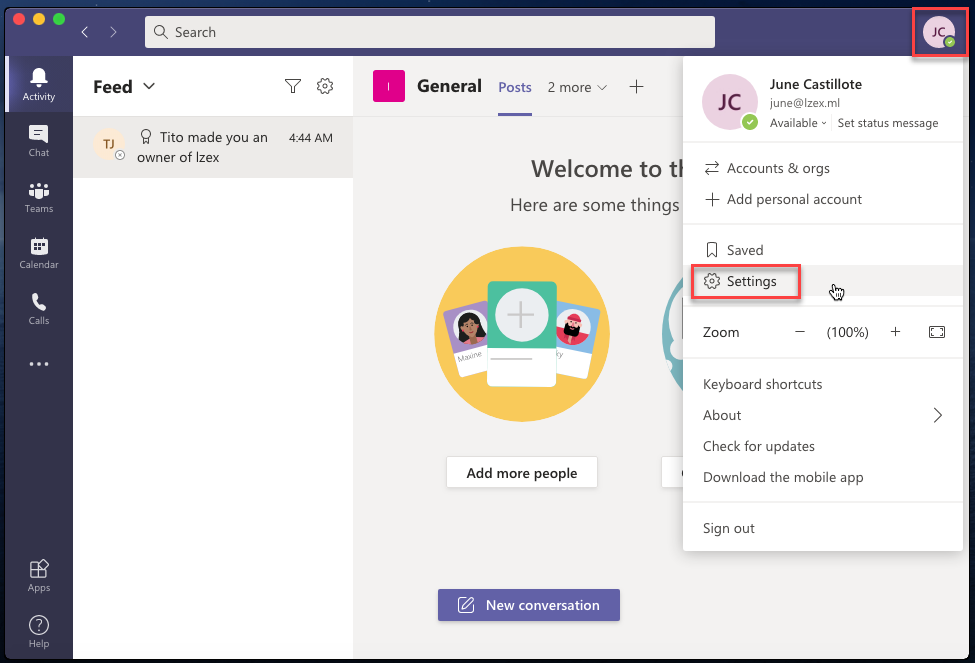
4. As proven within the screenshot under, watch for the sign-in course of to finish, and you need to see the Microsoft Groups window.

Configuring Microsoft Groups Settings
So that you’ve logged in to Groups. Now what? Should you’re new to Groups, you would examine the settings you’ll be able to tweak. Settings just like the show theme, notifications, privateness, and extra.
To open the Microsoft Groups settings, click on on the menu button along with your initials on the Microsoft Groups window’s upper-right nook.
Altering Privateness Settings
One of many first settings you could take into account altering is how Microsoft Groups handles your privateness. To alter privateness settings, go to the Privateness menu within the Settings window. Then, you’ll see an identical window because the screenshot under.
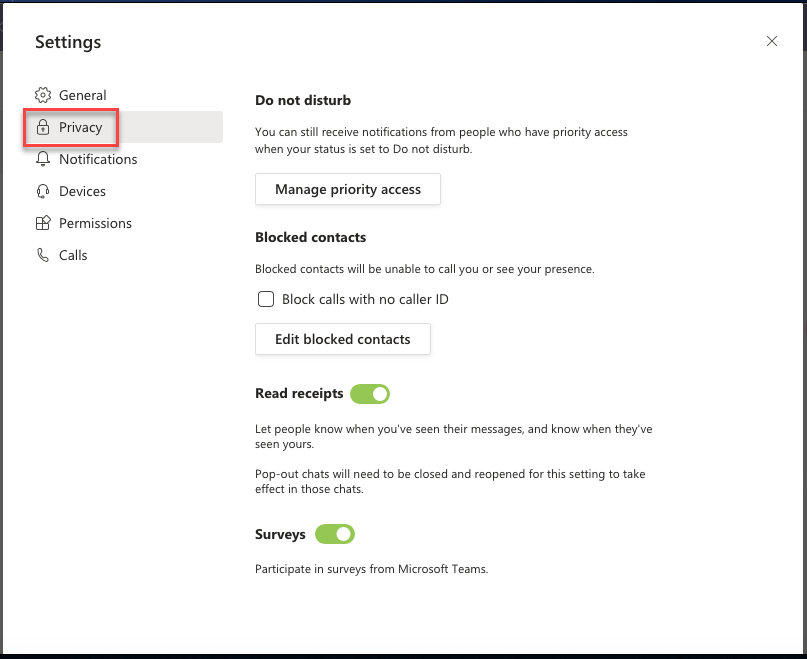
Microsoft Groups for Mac has a number of settings to assist along with your privateness preferences. Suppose you wish to conceal your presence. Or maybe you don’t need others to know you’ve learn their message. Microsoft Groups has bought you lined.
- Don’t disturb – This offers you the choice to avoid wasting an inventory of people that should still contact you even when your standing is about to Don’t disturb.
- Blocked contacts – This setting means that you can handle the listing of contacts that you simply beforehand blocked. Blocked contacts are unable to see your presence and name or point out you in a one-on-one chat.
- Learn receipts – Change this setting on or off relying on whether or not you need folks to know that you simply’ve learn their message.
- Surveys – When this setting is switched on, you could obtain surveys from Microsoft Groups.
Setting Auto-Begin, Theme, and Show
The default Microsoft Groups look will not be to your liking. Or maybe the transitions and animations are inflicting efficiency points. Fortunately there are a number of show customizations accessible to you in Microsoft Groups.
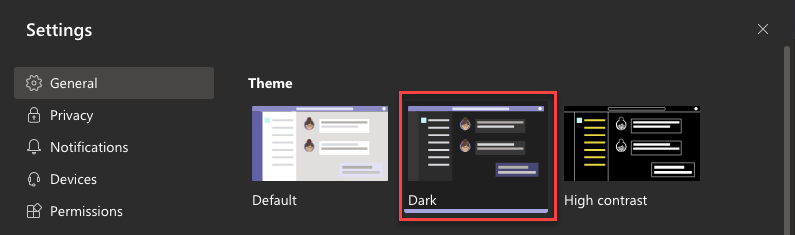
As proven earlier than, navigate to the Basic settings part within the Settings window’s left-hand facet. Listed under are a number of shopper settings accessible to customise.
Theme – Microsoft Groups comes with three themes; Default, Darkish, and Excessive distinction. Select your most popular theme by clicking on the theme thumbnail. As you’ll be able to see under, the lively theme is Darkish.
Auto-start utility – If this setting is on, Microsoft Groups will mechanically begin if you log in to your laptop. The auto-start default setting is turned off.

Flip off animations – Animations apply to window transitions, scrolling, menu pull-downs, GIFs, and so forth. Typically animations equivalent to these are pointless. If you wish to disable animations, examine the under setting.

Turning off animations doesn’t disable Microsoft Groups’ capability to play GIFs. Nonetheless, GIFs don’t auto-play anymore when animations are off.
Subsequent Steps
Microsoft Groups is a wonderful collaboration device that’s accessible in macOS in addition to on different platforms. On this article, you’ve realized the best way to obtain and set up Microsoft Groups. You’ve additionally realized the best way to log in and carry out the preliminary configuration of Microsoft Groups settings.
Now that you’ve got put in and configured Microsoft Groups, you can begin exploring the completely different Groups options you need to use. Beneath are some really useful options so that you can discover.
You can even study extra by visiting the Microsoft Groups assist & studying web site. Thanks for studying!