

Contact administration systematically shops and organizes contact particulars, together with names, telephone numbers, e mail addresses, and bodily addresses. This course of ensures easy accessibility to those particulars and clean communication. This weblog submit will discover creating and modifying contacts utilizing the Syncfusion .NET MAUI DataForm. We can even focus on how these contacts may be displayed within the .NET MAUI ListView. Final, we’ll see carry out CRUD (create, learn, replace, and delete) operations on the SQLite database, permitting us to maintain the contacts up to date.
SQLite is a light-weight, open-source, self-contained RDBMS (relational database administration system). It’s famend for its ease of use and effectivity, making it a preferred alternative in embedded methods, cellular apps, and desktop software program.
Observe: Earlier than we proceed, you must familiarize your self with the introductory documentation for the Syncfusion .NET MAUI DataForm and ListView.
Register the handler for Syncfusion core
First, we have to arrange the Syncfusion core handler. To make the most of the Syncfusion core, we should register the handler throughout the MauiProgram.cs file. This registration course of ensures the performance of the Syncfusion core.
public static MauiApp CreateMauiApp()
 {
     var builder = MauiApp.CreateBuilder();
     builder.ConfigureSyncfusionCore();
 }
Create SQLite connection and knowledge desk
This part will delve into loading contacts from an SQLite database utilizing the Syncfusion .NET MAUI DataForm and ListView controls. This entails connecting with the SQLite database and creating an information desk to retailer and handle the contact data.
Step 1: Set up the required bundle
First, set up the sqlite-net-pcl bundle to attach the SQLite database.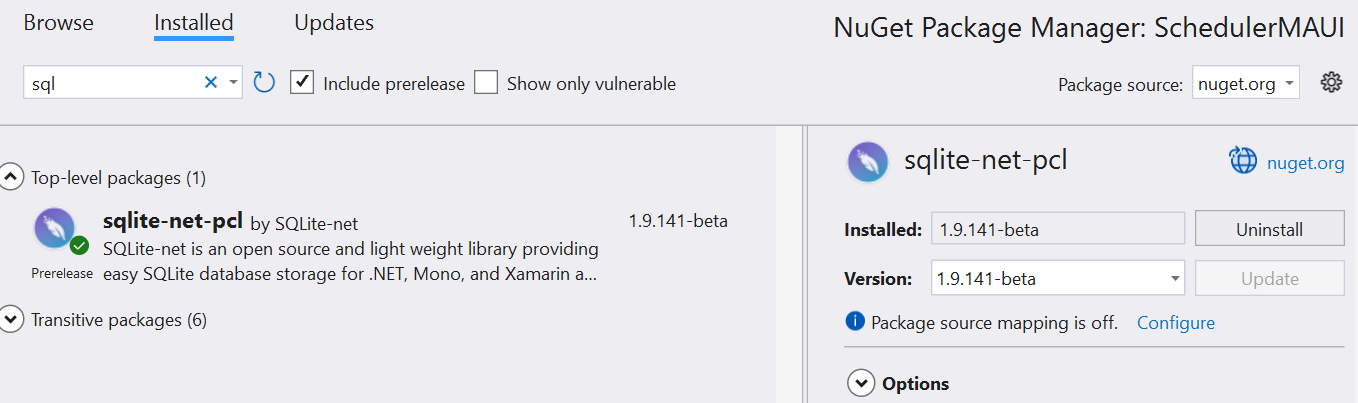
Step 2: Create the SQLite connection
Outline the SQLite connection utilizing the SQLiteConnection API and the database path property. This connection will function the bridge between our app and the SQLite database.
DatabaseConstants.cs
  public static class DatabaseConstants

          SQLite.SQLiteOpenFlags.SharedCache;

      public static string DatabasePath =>
          Path.Mix(Setting.GetFolderPath(Setting.SpecialFolder.LocalApplicationData), DatabaseFile-name);
SQLiteDatabase.cs
readonly SQLiteConnection _database;

public SQLiteDatabase()
 {
     _database = new SQLiteConnection(DatabaseConstants.DatabasePath, DatabaseConstants.Flags);
}
Subsequent, create an occasion for the SQLite reference to the database path property and initialize it within the App.xaml.cs file. This step permits us to make use of the database in our app.
App.xaml.cs
static SQLiteDatabase database;

 // Create the database connection as a singleton.
 public static SQLiteDatabase Database
 {
     get
     {
         if (database == null)
         {
             database = new SQLiteDatabase();
         }
         return database;
     }
 }
Step 3: Create the contact knowledge type mannequin
Outline a mannequin class named ContactFormModel. This class will function a container for contact data similar to names, telephone numbers, e mail addresses, and bodily addresses. The info saved on this mannequin shall be displayed within the contact knowledge type and saved within the SQLite database.
ContactFormModel.cs
    public class ContactFormModel : INotifyPropertyChanged
    {
        [PrimaryKey, AutoIncrement]
        [Display(AutoGenerateField = false)]
        public int ID { get; set; }

        [DataFormDisplayOptions(ColumnSpan = 2, ShowLabel = false)]
        public string ProfileImage { get; set; }

        [Display(ShortName = "“First name"”)]
        [Required(ErrorMessage = "“Name should not be empty"”)]
        public string Title { get; set; }

        [Display(ShortName = "“Last name"”)]
        public string LastName { get; set; }

        personal string cellular;

        [DataType(DataType.PhoneNumber)]
        [Required]
        [RegularExpression(@"”^(d{3}) d{3}-d{4}$"”, ErrorMessage = "“Invalid phone number"”)]
        public string Cell
        {
            get { return cellular; }
            set
            {
                cellular = worth;
                if (!string.IsNullOrEmpty(cellular))
                {
                    char[] specialCharacters = { '‘('‘, '‘)'’, '‘-'‘, '‘ '‘ };
                    if (cellular[0] == specialCharacters[0])
                    {
                        cellular = new string(worth.The place(c => Char.IsLetterOrDigit(c)©).ToArray());
                    }
                    if (cellular.Size == 10)
                        this.MaskedMobileText = string.Forma“t("({0}) {1}-{”2}", cellular.Substring(0, 3), cellular.Substring(3, 3), cellular.Substring(6));
                    RaisePropertyChanged(nameof(Cell));
                }
            }
        }

        [DataType(DataType.PhoneNumber)]
        public string Landline { get; set; }

        [DataFormDisplayOptions(ColumnSpan = 2)]
        public string Deal with { get; set; }

        [DataFormDisplayOptions(ColumnSpan = 2)]
        public string Metropolis { get; set; }

        public string State { get; set; }

        [Display(ShortName “= "Zip co”de")]
        public string ZipCode { get; set; }

        public string E-mail { get; set; }

        personal string maskedMobileText;

        [Display(AutoGenerateField = false)]
        public string MaskedMobileText
        {
            get { return maskedMobileText; }
            set
            {
                this.maskedMobileText = worth;
            }
        }

        public occasion PropertyChangedEventHandler PropertyChanged;

        personal void RaisePropertyChanged(string title)
        {
            if (PropertyChanged != null)
                this.PropertyChanged(this, new PropertyChangedEventArgs(title));
        }
    }
Then, create a desk throughout the SQLite database and title it ContactFormModel. This desk is used to retailer the contact data.
SQLiteDatabase.cs
_database.CreateTable<ContactFormModel>();
Step 4: Populate contacts with the SQLite database
Populate the contacts into the SQLite database. This shall be accomplished throughout the ContactsViewModel class, as demonstrated within the following code instance.
ContactsViewModel.cs
personal void GenerateContacts()
  {
      ContactsInfo = new ContactsInfoRepository().GetContactDetails(20);
      PopulateDB();
  }

    personal void PopulateDB()
    {
        foreach (ContactFormModel contact in ContactsInfo)
        {
            var merchandise = App.Database.GetContact(contact);
            if (merchandise == null)
                App.Database.AddContact(contact);
        }
    }
ContactsInfoRepository.cs
inner ObservableCollection<ContactFormModel> GetContactDetails(int rely)
        {
            ObservableCollection<ContactFormModel> customerDetails = new ObservableCollec-tion<ContactFormModel>();
            Random random = new Random();
            int girlsCount = 0, boysCount = 0;
            for (int i = 0; i < rely; i++)
            {
                var particulars = new ContactFormModel()
                {
                    ID = i + 1,
                    Cell = random.Subsequent(100, 400).ToString() + random.Subsequent(500, 800).ToString() + random.Subsequent(1000, 2000).ToString(),
                    ProfileImage = "People_Circle" + (i % 19) + ".png",
                };

                if (imagePosition.Incorporates(i % 19))
                    particulars.Title = CustomerNames_Boys[boysCount++ % 32];
                else
                    particulars.Title = CustomerNames_Girls[girlsCount++ % 93];

                customerDetails.Add(particulars);
            }
            return customerDetails;
        }
Then, retrieve contacts from the SQLite database within the SQLiteDatabase.cs file.
public Listing<ContactFormModel> GetContacts()
  {
      Listing<ContactFormModel> contacts = _database.Desk<ContactFormModel>().ToList();
      return contacts.OrderBy(x => x.Title[0]).ToList();
  }
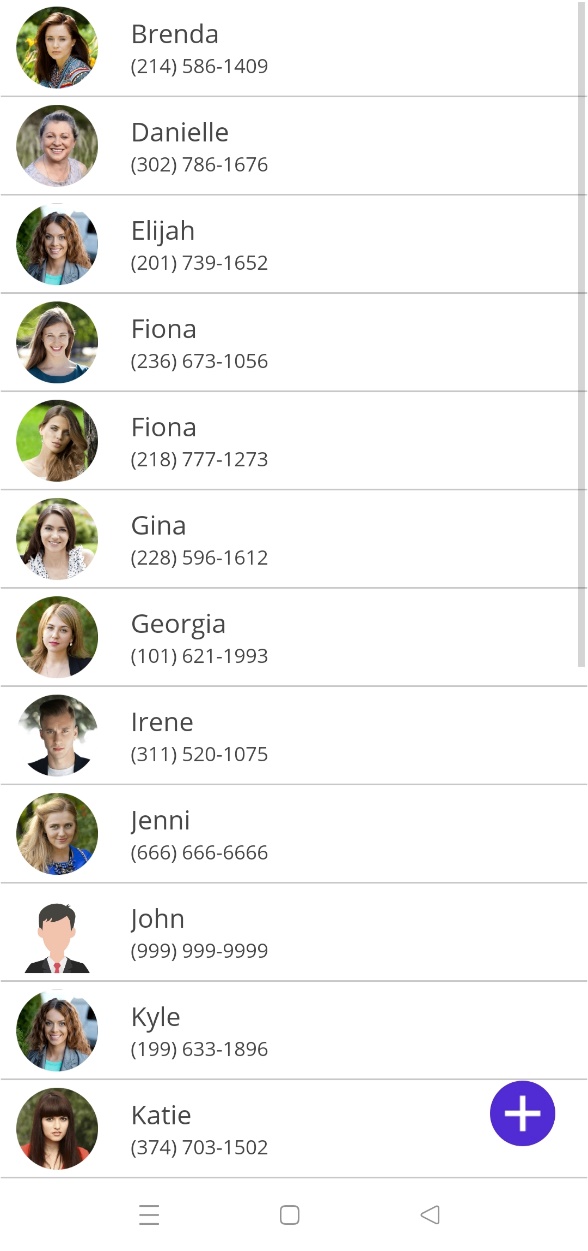
Show and handle the contacts within the ListView
We’ll use the Syncfusion .NET MAUI ListView management to show and handle contact particulars.
Discuss with the next code instance to initialize the SfListView and customise its template to show the title and telephone quantity particulars.
MainPage.xaml
xmlns:listView="clr-namespace:Syncfusion.Maui.ListView;meeting=Syncfusion.Maui.ListView"

 <listView:SfListView x:Title="listView"
                      TapCommand="{Binding EditContactsCommand}"
                      ScrollBarVisibility="All the time"
                      ItemSize="60">
  <listView:SfListView.ItemTemplate>
   <DataTemplate>
    <ViewCell>
     <ViewCell.View>
      <Grid  x:Title="grid" RowSpacing="0" RowDefinitions="*,1" >
       <Grid ColumnDefinitions="70,*,auto">
        <Picture Supply="{Binding ProfileImage}"
               VerticalOptions="Heart"
               HorizontalOptions="Heart"
               HeightRequest="50" WidthRequest="50"/>
        <Grid Grid.Column="1" RowDefinitions="*,*"
              RowSpacing="1"
              Padding="10,0,0,0"
              VerticalOptions="Heart">

         <Label LineBreakMode="NoWrap"
                TextColor="#474747"
                Textual content="{Binding Title}"
                FontSize="{OnPlatform Android={OnIdiom Telephone=16, Pill=18}, iOS={OnIdiom Telephone=16, Pill=18}, MacCatalyst=18, WinUI={OnIdiom Telephone=18, Pill=20, Desktop=20}}" />
         <Label Grid.Row="1"
                Grid.Column="0"
                TextColor="#474747"
                LineBreakMode="NoWrap"
                Textual content="{Binding MaskedMobileText}"
                FontSize="{OnPlatform Android={OnIdiom Telephone=12, Pill=14}, iOS={OnIdiom Telephone=12, Pill=14}, MacCatalyst=14, WinUI={OnIdiom Telephone=12, Pill=12, Desktop=12}}" />
        </Grid>
       </Grid>
       <Border Grid.Row="1"  BackgroundColor="#E4E4E4" HeightRequest="1"/>
      </Grid>
     </ViewCell.View>
    </ViewCell>
   </DataTemplate>
  </listView:SfListView.ItemTemplate>
 </listView:SfListView>
Use the next code instance to load the contacts within the checklist view.
MainPage.xaml.cs
listView.ItemsSource = App.Database.GetContacts();
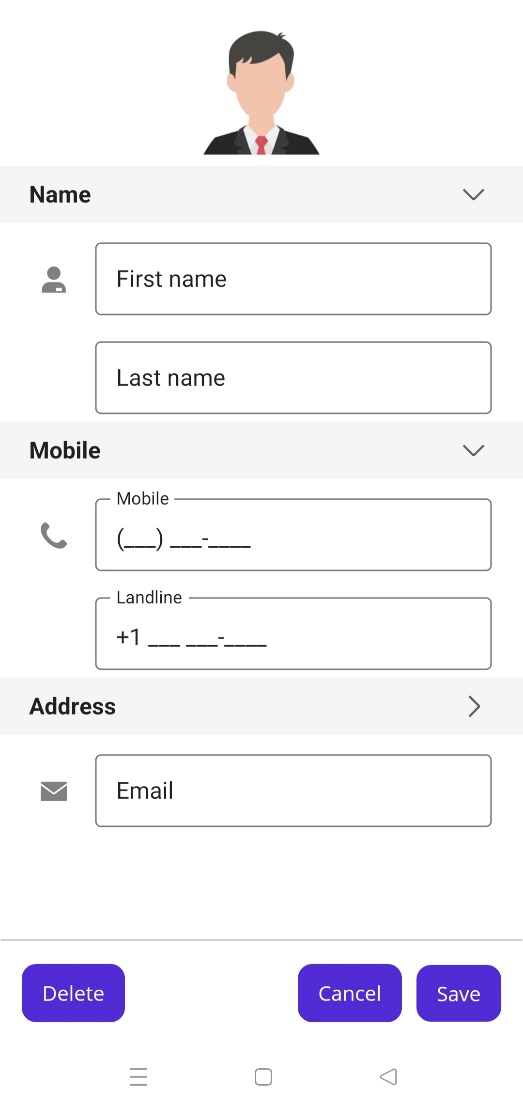
Making a contact knowledge type
Let’s design a contact knowledge type utilizing the Syncfusion .NET MAUI DataForm that allows customers so as to add, modify, and delete contacts.
EditPage.xaml
xmlns:dataForm="clr-namespace:Syncfusion.Maui.DataForm;meeting=Syncfusion.Maui.DataForm"

 <dataForm:SfDataForm x:Title="contactForm"
                      DataObject="{Binding SelectedItem}"
                      LayoutType="TextInputLayout"
                      AutoGenerateItems="False"
                      ValidationMode="PropertyChanged">
  <dataForm:SfDataForm.TextInputLayoutSettings>
   <dataForm:TextInputLayoutSettings ShowHelperText="True"
                                     FocusedStroke="{StaticResource Major}"/>
  </dataForm:SfDataForm.TextInputLayoutSettings>
  <dataForm:SfDataForm.Gadgets>
   <dataForm:DataFormCustomItem FieldName="ProfileImage" LayoutType="Default">
    <dataForm:DataFormCustomItem.EditorView>
     <Picture Supply="{Binding SelectedItem.ProfileImage}"
            HeightRequest="100"/>
    </dataForm:DataFormCustomItem.EditorView>
   </dataForm:DataFormCustomItem>

   <dataForm:DataFormGroupItem Title="Title">
    <dataForm:DataFormGroupItem.Gadgets>
     <dataForm:DataFormTextItem FieldName="Title" ShowLeadingView="True" >
      <dataForm:DataFormTextItem.LeadingView>
       <Label Textual content="F" FontSize="18" TextColor="Grey" FontFamily="InputLayoutIcons" HeightRequest="24" VerticalTextAlignment="Finish" />
      </dataForm:DataFormTextItem.LeadingView>
     </dataForm:DataFormTextItem>
     <dataForm:DataFormTextItem FieldName="LastName" ShowLeadingView="True">
      <dataForm:DataFormTextItem.LeadingView>
       <Label/>
      </dataForm:DataFormTextItem.LeadingView>
     </dataForm:DataFormTextItem>
    </dataForm:DataFormGroupItem.Gadgets>
   </dataForm:DataFormGroupItem>

   <dataForm:DataFormGroupItem Title="Cell">
    <dataForm:DataFormGroupItem.Gadgets>
     <dataForm:DataFormMaskedTextItem FieldName="Cell" Masks="(###) ###-####" Keyboard="Numeric">
      <dataForm:DataFormMaskedTextItem.LeadingView>
       <Label Textual content="E" FontSize="18" TextColor="Grey" FontFamily="InputLayoutIcons" HeightRequest="24" VerticalTextAlignment="Finish" />
      </dataForm:DataFormMaskedTextItem.LeadingView>
     </dataForm:DataFormMaskedTextItem>
     <dataForm:DataFormMaskedTextItem FieldName="Landline" Masks="+1 ### ###-####" Keyboard="Numeric">
      <dataForm:DataFormMaskedTextItem.LeadingView>
       <Label/>
      </dataForm:DataFormMaskedTextItem.LeadingView>
     </dataForm:DataFormMaskedTextItem>
    </dataForm:DataFormGroupItem.Gadgets>
   </dataForm:DataFormGroupItem>

   <dataForm:DataFormGroupItem Title="Deal with" ColumnCount="2" IsExpanded="False">
    <dataForm:DataFormGroupItem.Gadgets>
     <dataForm:DataFormMultilineItem FieldName="Deal with" RowSpan="2">
      <dataForm:DataFormMultilineItem.LeadingView>
       <Label Textual content="C" FontSize="18" TextColor="Grey" FontFamily="InputLayoutIcons" HeightRequest="24" VerticalTextAlignment="Finish" />
      </dataForm:DataFormMultilineItem.LeadingView>
     </dataForm:DataFormMultilineItem>
     <dataForm:DataFormTextItem FieldName="Metropolis" >
      <dataForm:DataFormTextItem.LeadingView>
       <Label/>
      </dataForm:DataFormTextItem.LeadingView>
     </dataForm:DataFormTextItem>
     <dataForm:DataFormTextItem FieldName="State">
      <dataForm:DataFormTextItem.LeadingView>
       <Label/>
      </dataForm:DataFormTextItem.LeadingView>
     </dataForm:DataFormTextItem>
     <dataForm:DataFormMaskedTextItem FieldName="ZipCode" Masks="#####-####" Keyboard="Numeric"/>
    </dataForm:DataFormGroupItem.Gadgets>
   </dataForm:DataFormGroupItem>

   <dataForm:DataFormTextItem FieldName="E-mail" Keyboard="E-mail">
    <dataForm:DataFormTextItem.LeadingView>
     <Label Textual content="G" FontSize="18" TextColor="Grey" FontFamily="InputLayoutIcons" HeightRequest="24" VerticalTextAlignment="Finish" />
    </dataForm:DataFormTextItem.LeadingView>
   </dataForm:DataFormTextItem>
  </dataForm:SfDataForm.Gadgets>
 </dataForm:SfDataForm>
The contact knowledge type shall be displayed upon tapping the ListView or tapping on the brand new icon (+) button.
Discuss with the next code instance to design an information type to edit a contact.
MainPage.xaml
<listView:SfListView x:Title="listView"
                     TapCommand="{Binding EditContactsCommand}"
…..
ContactsViewModel.cs
public Command<object> EditContactsCommand { get; set; }

            EditContactsCommand = new Command<object>(OnEditContacts);

   personal void OnEditContacts(object obj)
   {
       SelectedItem = (obj as Syncfusion.Maui.ListView.ItemTappedEventArgs).DataItem as ContactFormModel;
       var editPage = new EditPage() { BindingContext = this};
       App.Present.MainPage.Navigation.PushAsync(editPage);
   }
To design an information type so as to add a brand new contact, confer with the next code.
MainPage.xaml
<ImageButton Margin="20" CornerRadius="20" HeightRequest="40" WidthRequest="40" Again-ground="{StaticResource Major}" VerticalOptions="Finish" HorizontalOptions="Finish" Command="{Binding CreateContactsCommand}" Supply="add.png"/>
ContactsViewModel.cs
public Command CreateContactsCommand { get; set; }

            CreateContactsCommand = new Command(OnCreateContacts);

  personal void OnCreateContacts()
  {
      SelectedItem = new ContactFormModel() { Title = "", Cell = "", ProfileImage = "newcontact.png" };
      var editPage = new EditPage() { BindingContext = this };
      App.Present.MainPage.Navigation.PushAsync(editPage);
  }
Carry out CRUD operations with SQLite database and replace modifications in .NET MAUI ListView
Let’s see carry out CRUD (create, learn, replace, delete) operations on the SQLite database and replace the modifications to the .NET MAUI ListView management.
Modifying and saving a contact
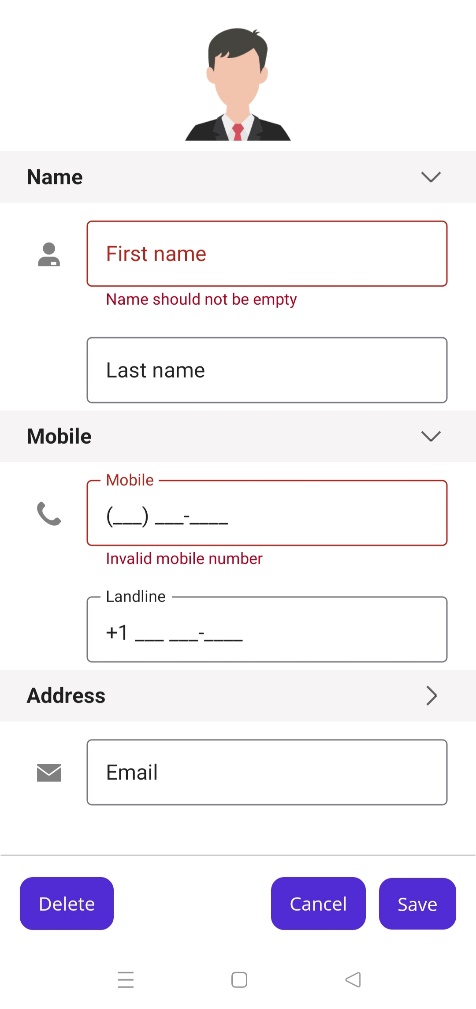
After we choose the Save button within the contact knowledge type, the small print entered shall be up to date within the SQLite database. Knowledge type validation is crucial to make sure the accuracy and validity of those particulars.
Discuss with the next code instance so as to add the info type validation.
ContactFormBehavior.cs
personal async void OnSaveButtonClicked(object? Sender, EventArgs e)
  {
      this.dataForm?.Validate();

      if(isValid)
      {
          await Job.Delay(500);
          await App.Present.MainPage.Navigation.PopAsync();
          await App.Present.MainPage.DisplayAlert(“”, “Contact saved”, “OK”);

      }
  }

  dataForm.ValidateProperty += this.OnDataFormValidateProperty;

personal void OnDataFormValidateProperty(object? Sender, DataFormValidatePropertyEventArgs e)
 {
     if (e.PropertyName == nameof(ContactFormModel.Cell) && !e.IsValid)

 }
Discuss with the next code instance to replace the contact particulars within the SQLite database.
EditPage.xaml.cs
(this.contactForm.DataObject as ContactFormModel).PropertyChanged += ContactFormBehav-ior_PropertyChanged;


personal void ContactFormBehavior_PropertyChanged(object sender, Sys-tem.ComponentModel.PropertyChangedEventArgs e)
 {
     App.Database.UpdateContact(this.contactForm.DataObject as ContactFormModel);
 }
Public int UpdateContact(ContactFormModel merchandise)
  {
      if (merchandise.ID != 0)
          return _database.Replace(merchandise);
      else
          return _database. Insert(merchandise);
  }
Creating a brand new contact
Discuss with the next code instance to create a brand new contact and replace it on the SQLite database.
SQLiteDatabase.cs
public int AddContact(ContactFormModel merchandise)
   {
       return _database. Insert(merchandise);
   }
Deleting a contact
When clicking the Delete button, the contact should be deleted from the SQLite database.
Discuss with the next code instance so as to add a command related to the Delete button within the contact knowledge type and carry out the delete operation within the SQLite database.
ContactsViewModel.cs
public Command DeleteItemCommand { get; set; }
            DeleteItemCommand = new Command(OnDeleteItem);

  personal async void OnDeleteItem()
  {
      App.Database.DeleteContact(SelectedItem);
      ContactsInfo.Take away(SelectedItem);
      await App.Present.MainPage.Navigation.PopAsync();
  }
Discuss with the next code instance to delete the content material within the SQLite database.
SQLiteDatabase.cs
//Delete a contact within the database.
  public int DeleteContact(ContactFormModel merchandise)
  {
      return _database. Delete(merchandise);
  }
Upon rerunning the app, the ListView will fetch the up to date contacts from the SQLite database, and the output shall be as follows.
GitHub reference
For extra particulars, confer with the GitHub demo.
Conclusion
Thanks for studying! On this weblog, we’ve seen handle contacts utilizing the .NET MAUI DataForm and ListView controls with SQLite and performs seamless CRUD actions. Attempt the steps outlined within the submit and go away your ideas within the feedback beneath.
You can even contact us by means of our help discussion board, help portal, or suggestions portal. We’re all the time completely satisfied to help you!