

Howdy! On this weblog, we’ll be replicating an immersive UI in .NET MAUI primarily based on this Dribbble design.
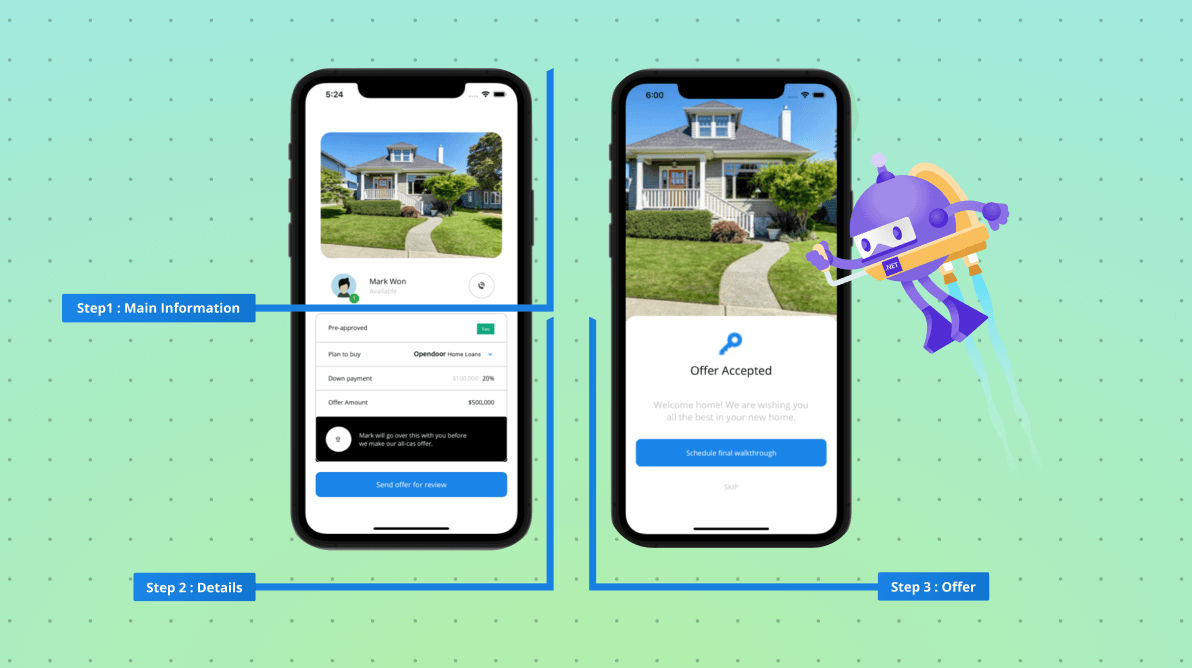
We’re going to break down this UI as proven within the following screenshot to implement it step-by-step.

We’ll make some modifications to the unique UI to get probably the most out of the controls with which we might be working.
Earlier than beginning, let’s have a look at what’s going to study on this weblog:
Let’s begin the coding!
Important structure
First, let’s design the primary structure of the UI.
Contained in the ScrollView, we are going to use a brand new structure that .NET MAUI offers us, the VerticalStackLayout. It helps us manage the controls on our display screen vertically.
Check with the next code instance.
 <ScrollView VerticalScrollBarVisibility="By no means">
<!--Important layout-->
<VerticalStackLayout Margin="20,0" VerticalOptions="Middle">
<!-- Add all of your UI content material right here -->
</VerticalStackLayout>
</ScrollView>
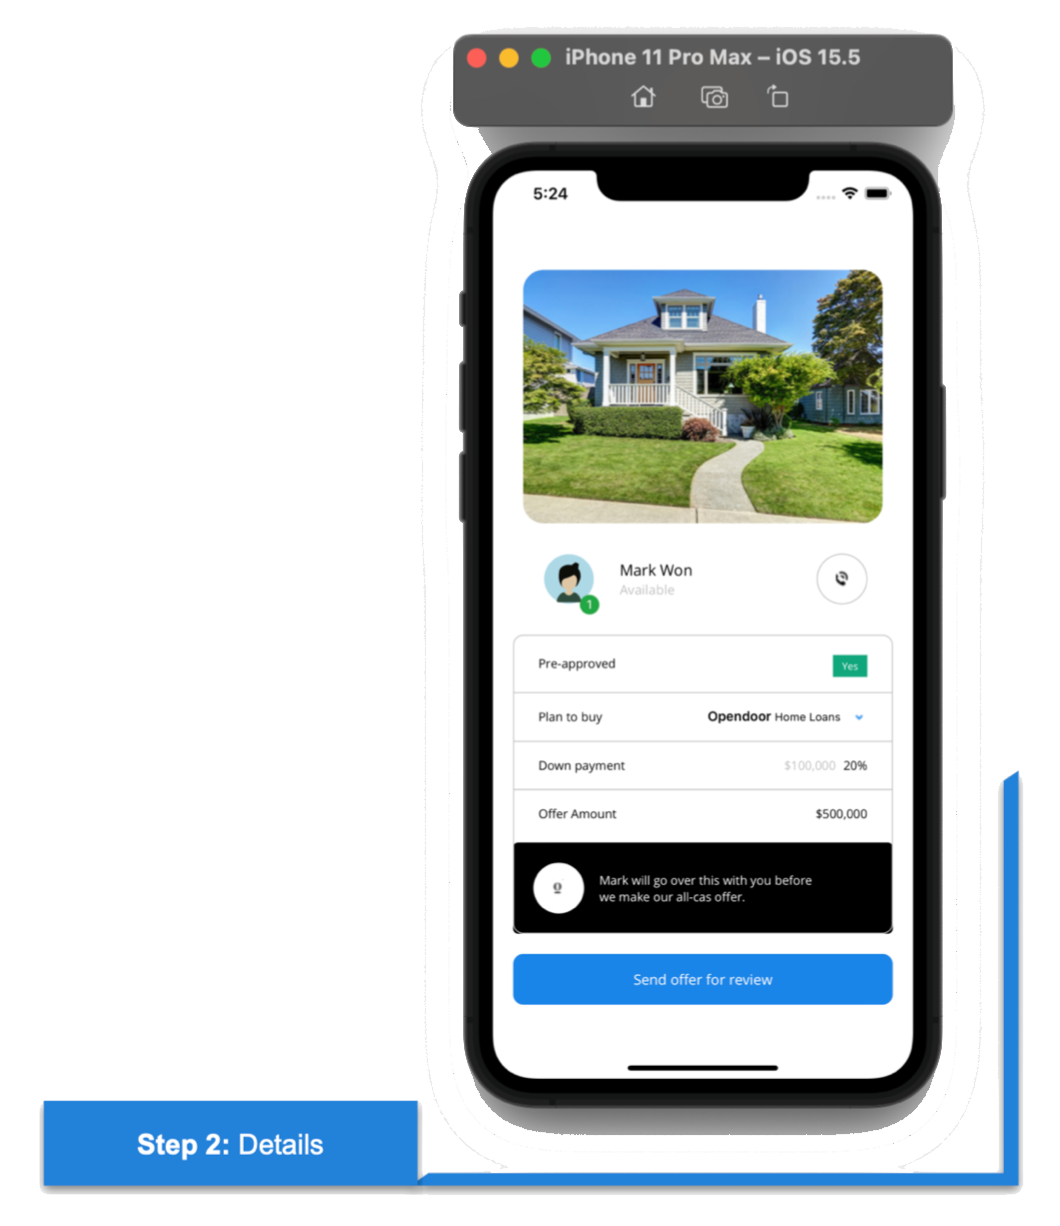
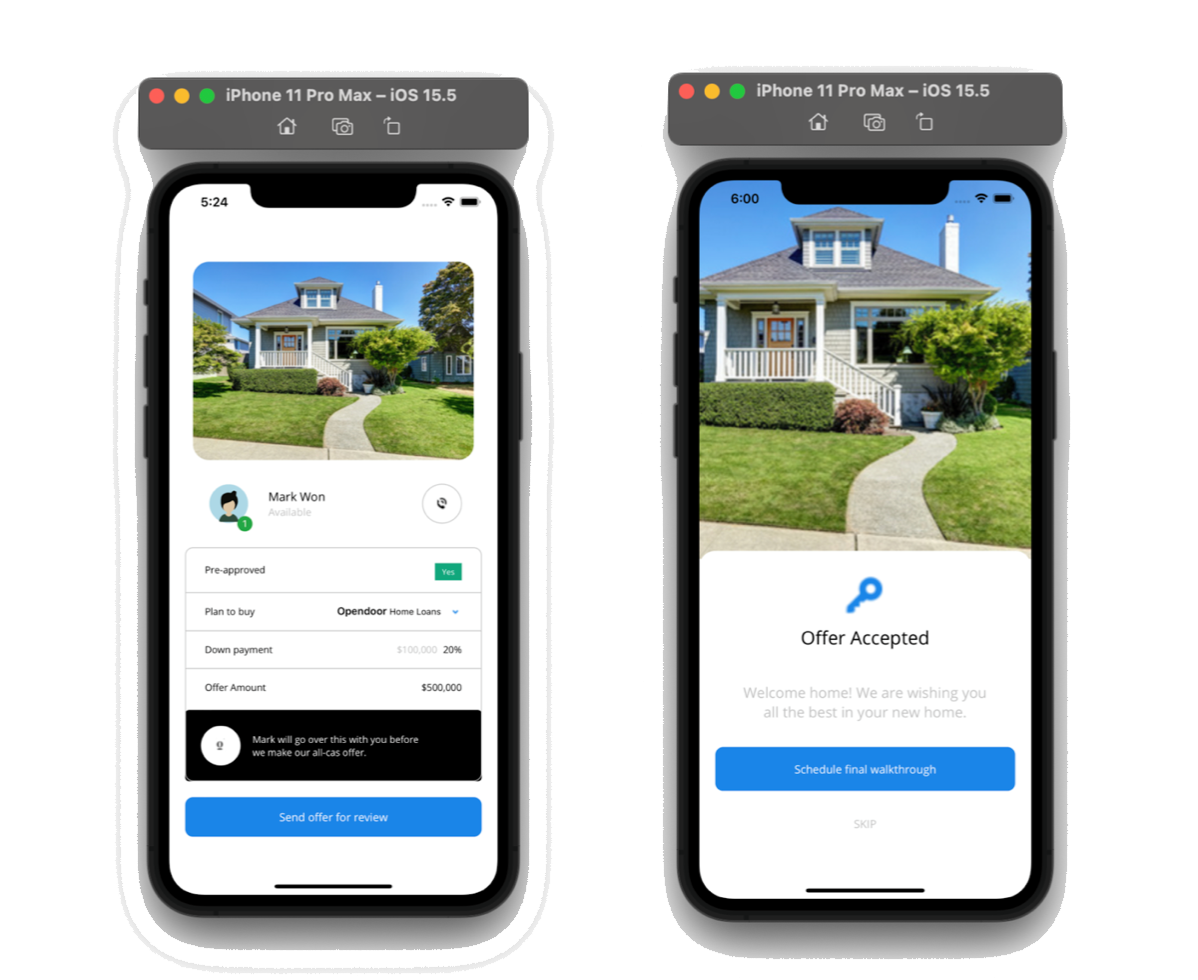
Step 1: Important info
 To know the code clearly, we’ve divided the implementation into a number of steps.
Rounding the sides of a picture
Photos with rounded borders present a extra trendy and recent look to our UI. To attain this, please comply with these steps:
Add a body.
First, let’s add a body and customise the next properties:
- Padding: Set the padding worth to 0. It will get rid of the clean areas and permit our picture to occupy your complete area of the body.
- IsClippedToBounds: Set this property with the worth True. This means that the content material might be clipped past its bounds.
- CornerRadius: This represents the worth that the sides will take to offer the rounded nook impact.
After including the body, add the picture. Check with the next code instance.
<!-- Important residence image-->
<Body Padding="0" IsClippedToBounds="True" HasShadow="False" CornerRadius="20" Margin="10,25,10,0">
<Picture Supply="mainhome.png" Side="AspectFill" HeightRequest="250"/>
</Body>
<!-- You need to write right here what's defined within the subsequent code block -->
Add profile picture with a badge
To design the profile picture, we’re going to use the Syncfusion .NET MAUI Avatar View and Badge View controls:
- Add the Syncfusion.Maui.Core NuGet bundle.

- Go to the MauiProgram.cs file and register the handler for Syncfusion core by going to the CreateMauiApp methodology and including the .ConfigureSyncfusionCore() methodology slightly below the .UseMauiApp<App>() line.
- Now, add the Syncfusion.Maui.Core namespace in your XAML web page.
xmlns:sfControl="clr-namespace:Syncfusion.Maui.Core;meeting=Syncfusion.Maui.Core"
- Then, add the Syncfusion .NET MAUI Avatar View and Badge View controls inside a grid to make it simpler to prepare the controls.
Check with the next code.
<!--Profile information-->
<Grid RowDefinitions="Auto,Auto,Auto" ColumnDefinitions="Auto,*,Auto" Padding="25,30">
<!-- Avatar & Badge view-->
<sfControl:SfBadgeView Grid.Row="0" Grid.Column="0" Grid.RowSpan="2" BadgeText="1" HeightRequest="70" WidthRequest="60" HorizontalOptions="Middle" VerticalOptions="Middle">
<sfControl:SfBadgeView.Content material>
<sfControl:SfAvatarView
ContentType="Default"
VerticalOptions="Middle"
HorizontalOptions="Middle"
BackgroundColor="LightBlue"
BorderColor="Clear"
WidthRequest="50"
HeightRequest="50"
CornerRadius="25"/>
</sfControl:SfBadgeView.Content material>
<sfControl:SfBadgeView.BadgeSettings>
<sfControl:BadgeSettings Kind="Success" Place="BottomRight"/>
</sfControl:SfBadgeView.BadgeSettings>
</sfControl:SfBadgeView>


<!-- Add the fundamental info right here: consumer's identify, standing, and cellphone button info right here. →
</Grid>
<!-- You need to write right here what's defined within the subsequent code block -->
Add identify, standing, and name button.
Now, add the fundamental consumer info: identify, standing, and name button.
<!-- Fundamental info: consumer's identify, standing, and cellphone button-->
<Label Grid.Row="0" Grid.Column="1" Textual content="Mark Received" FontAttributes="Daring" TextColor="Black" Padding="20,0,0,0" VerticalTextAlignment="Finish" FontSize="15"/>
<Label Grid.Row="1" Grid.Column="1" Textual content="Accessible" FontAttributes="Daring" TextColor="Silver" Padding="20,0,0,0" VerticalTextAlignment="Begin" FontSize="13"/>
<Button Grid.Row="0" Grid.Column="2" Grid.RowSpan="2" ImageSource="cellphone" CornerRadius="25" HeightRequest="50" WidthRequest="50"  BackgroundColor="White" BorderColor="Silver" BorderWidth="1" VerticalOptions="Middle"/>
Step 2: Particulars
 First, let’s construct the body by which all the knowledge of this block have to be added.
        <!-- Basic details-->
<Body CornerRadius="10" BorderColor="Silver" Padding="0,20,0,0" HasShadow="False">
<Grid RowDefinitions="Auto,Auto,Auto,Auto,Auto,Auto,Auto,Auto" ColumnDefinitions="Auto,*,Auto" VerticalOptions="Middle" HorizontalOptions="FillAndExpand" Padding="25,0">
<!-- You need to write right here what's defined within the particulars block →
</Grid>
</Body>
<!-- You need to write right here what's defined within the subsequent code block -->
Then, add a set of knowledge contained in the beforehand added body. For higher understanding, we divided the reason into sub-blocks.
Observe: The names of those sub-blocks would be the similar as these contained within the design line.
Pre-approved
We add two labels and a BoxView to attain a dividing line. We will additionally obtain this design utilizing the line form function in .NET MAUI.
Check with the next code instance.
<!--Pre-approved-->
<Label Grid.Row="0" Grid.Column="0" Textual content="Pre-approved" FontAttributes="Daring" TextColor="Black" FontSize="12"/>
<Label Grid.Row="0" Grid.Column="2" Textual content="Sure" TextColor="White" BackgroundColor="#00a77c" HorizontalOptions="Finish" FontSize="10"  Padding="9,4"/>
<BoxView Grid.Row="1" Grid.Column="0" Grid.ColumnSpan="3" HeightRequest="1" Shade="Silver" Margin="-25,15" />
<!-- You need to write right here what's defined within the subsequent code block -->
Plan to purchase
This info comprises the identical parts because the earlier code block, besides that this time, we may even begin working with the FormattedText.
Check with the next code so as to add totally different kinds to the identical label. This helps keep away from declaring totally different labels.
<!--Plan to buy-->
<Label Grid.Row="2" Grid.Column="0" Textual content="Plan to purchase" FontAttributes="Daring" TextColor="Black" FontSize="12"/>
<Label Grid.Row="2" Grid.Column="1"  HorizontalOptions="Finish" TranslationX="25">
<Label.FormattedText>
<FormattedString>
<Span Textual content="Opendoor" TextColor="Black" FontAttributes="Daring" FontSize="13"/>
<Span Textual content=" Dwelling Loans" TextColor="Black" FontSize="11"/>
</FormattedString>
</Label.FormattedText>
</Label>
<Picture Grid.Row="2" Grid.Column="2" HorizontalOptions="Finish" VerticalOptions="Middle" Supply="arrow"/>
<BoxView Grid.Row="3" Grid.Column="0" Grid.ColumnSpan="3" HeightRequest="1" Shade="Silver" Margin="-25,15" />
<!-- You need to write right here what's defined within the subsequent code block -->
Down fee
Check with the next code instance to render the down fee particulars.
<!--Down payment-->
<Label Grid.Row="4" Grid.Column="0" Textual content="Down fee" FontAttributes="Daring" TextColor="Black" FontSize="12"/>
<Label Grid.Row="4" Grid.Column="1" Textual content="$100,000" TextColor="Silver" FontSize="12" HorizontalTextAlignment="Finish" TranslationX="20"/>
<Label Grid.Row="4" Grid.Column="2" Textual content="20%" TextColor="Black" FontSize="12" HorizontalTextAlignment="Finish"/>
<BoxView Grid.Row="5" Grid.Column="0" Grid.ColumnSpan="3" HeightRequest="1" Shade="Silver" Margin="-25,15"  />
<!-- You need to write right here what's defined within the subsequent code block -->
Supply Quantity
Check with the next code instance to render the provide quantity particulars.
  <!--Supply amount-->
<Label Grid.Row="6" Grid.Column="0" Textual content="Supply Quantity" FontAttributes="Daring" TextColor="Black" FontSize="12"/>
<Label Grid.Row="6" Grid.Column="2" Textual content="$500,000" TextColor="Black" FontSize="12" HorizontalOptions="Finish" />
<!-- You need to write right here what's defined within the subsequent code block -->
Black area
Now, use one other body to simulate the footer of the primary body. This will need to have a black background.
Utilizing the Margin property, we get well the borders required by the earlier controls in order that this body will fully cowl the footer of the guardian body. We obtain that by including unfavourable values to the sides.
Right here, we additionally use one other new structure known as HorizontalStackLayout. It organizes the controls horizontally.
Check with the next code instance.
 <!--Black space-->
<Body Grid.Row="7" Grid.Column="0" Grid.ColumnSpan="3" HasShadow="False" BackgroundColor="Black" Margin="-25,20,-25,0">
<HorizontalStackLayout>
<Button ImageSource="mark" CornerRadius="25" HeightRequest="50" WidthRequest="50"  BackgroundColor="White"  VerticalOptions="Middle"/>
<Label Textual content="Mark will go over this with you earlier than
we make our all-cas provide." VerticalTextAlignment="Middle" FontSize="12" Padding="15,0,0,0" TextColor="White"/>
</HorizontalStackLayout>
</Body>
Ship for evaluate button
Lastly, add the Ship provide for evaluate button utilizing the next code.
<Button Textual content="Ship provide for evaluate" FontAttributes="Daring" TextColor="White" CornerRadius="10" HeightRequest="50" BackgroundColor="#1c85e8" Margin="0,20"/>
Step 3: Supply
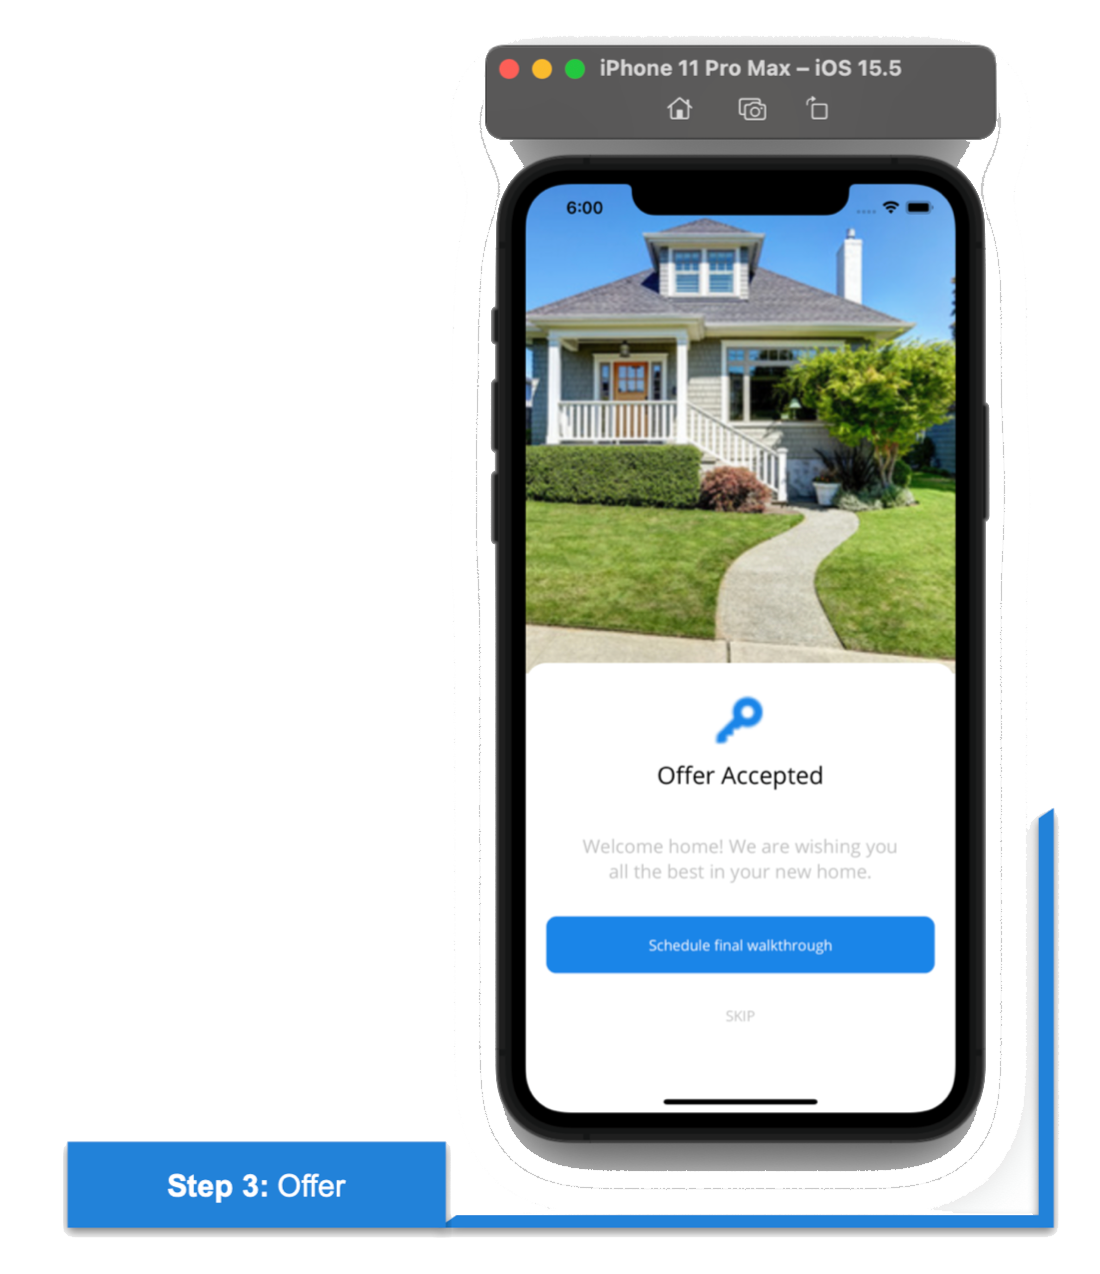 To complete with the third step, create one other web page named OfferPage.xaml. Add the next code to render the Supply particulars.
<Grid RowDefinitions="*,Auto">
<!-- Important image-->
<Picture Grid.Row="0" Supply="mainhome.png" Side="AspectFill" Margin="0,-50,0,0"/>
<!-- Basic information-->
<Body Grid.Row="1" CornerRadius="20" VerticalOptions="StartAndExpand" HasShadow="False" BackgroundColor="White" HeightRequest="400" Margin="0,-10,0,0">
<Grid RowDefinitions="*,*,*,*,*">
<Picture Grid.Row="0" Supply="key.png" WidthRequest="70" HeightRequest="70" Side="AspectFill" HorizontalOptions="Middle"/>
<Label Grid.Row="1" Textual content="Supply Accepted" FontSize="23" FontAttributes="Daring" TextColor="Black" HorizontalTextAlignment="Middle"/>
<Label Grid.Row="2" Textual content="Welcome residence! We're wishing you
all one of the best in your new residence." FontSize="18" HorizontalTextAlignment="Middle" TextColor="Silver"/>
<Button Grid.Row="3" Textual content="Schedule closing walkthrough" FontAttributes="Daring" TextColor="White" CornerRadius="10" HeightRequest="55" BackgroundColor="#1c85e8"/>
<Label Grid.Row="4" Textual content="SKIP" TextColor="Silver" HorizontalTextAlignment="Middle" Padding="0,15,0,0" />
</Grid>
</Body>
</Grid>
And our UI is finished! You’ll be able to see the total design right here.
GitHub reference
To see the entire code construction of this challenge, discuss with our Immersive UI in .NET MAUI demo on GitHub.
Conclusion
Thanks for studying! On this weblog, we’ve seen find out how to replicate an immersive UI utilizing Syncfusion .NET MAUI controls. Check out the steps mentioned on this weblog and depart your suggestions within the feedback beneath.
Syncfusion .NET MAUI controls have been constructed from scratch utilizing .NET MAUI, so that they really feel like framework controls. They’re fine-tuned to work with an enormous quantity of knowledge. Use them to construct your elite, cross-platform cell and desktop apps.
For present prospects, the brand new Important Studio model is obtainable for obtain from the License and Downloads web page. In case you are not but a Syncfusion buyer, you may all the time obtain our free analysis to see all our controls in motion.
For questions, you may contact us by means of our help discussion board, help portal, or suggestions portal. We’re all the time joyful to help you!
See you subsequent time!