

As part of my curious UI inspection, I thought of why not to take a look at standard web sites and see how they carried out the remark element structure. At first, I believed this might be a straightforward activity, nevertheless it wasn’t.
I spent lots of time attempting to grasp how this works and the way we are able to do it higher with fashionable CSS like :has, dimension container queries, and elegance queries. On this article, I’ll stroll you thru my thought course of and share my findings alongside the best way.
Let’s dive in!
Article sequence
Desk of contents
Introduction
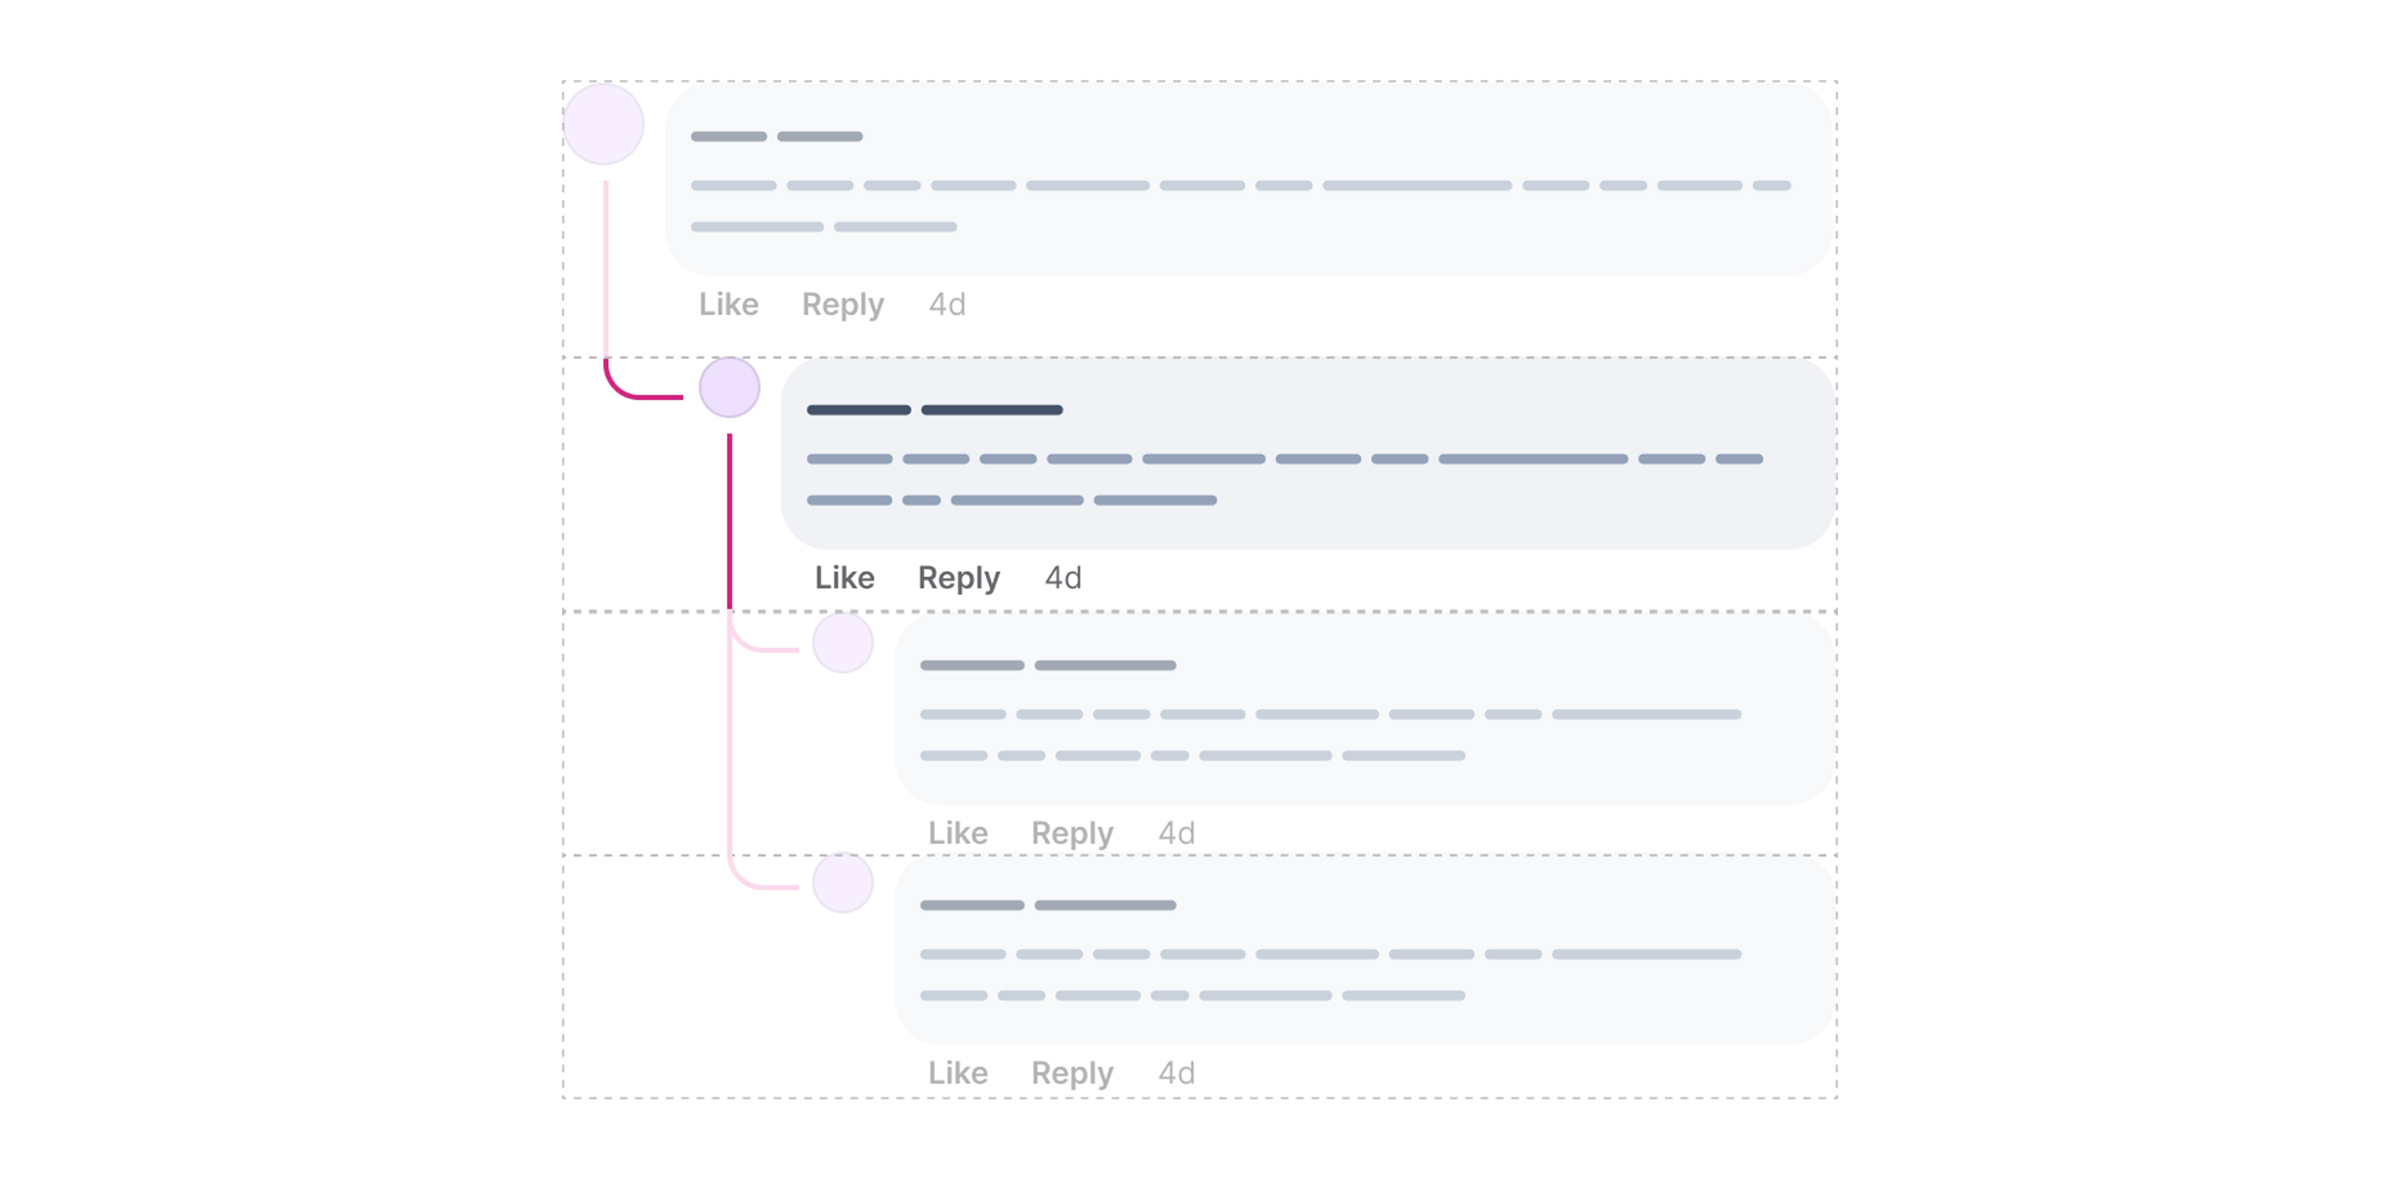
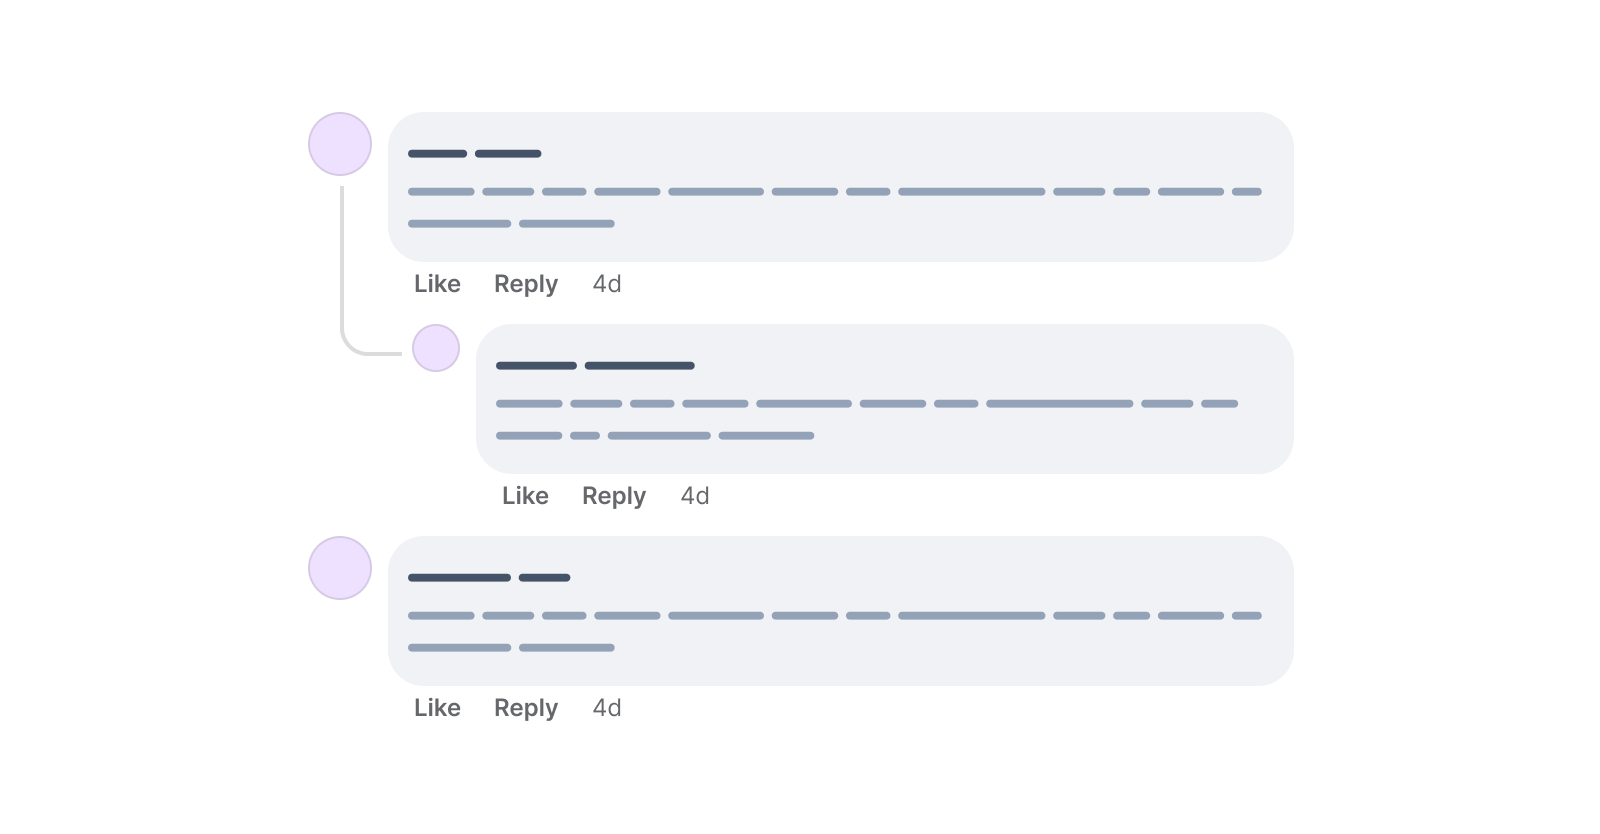
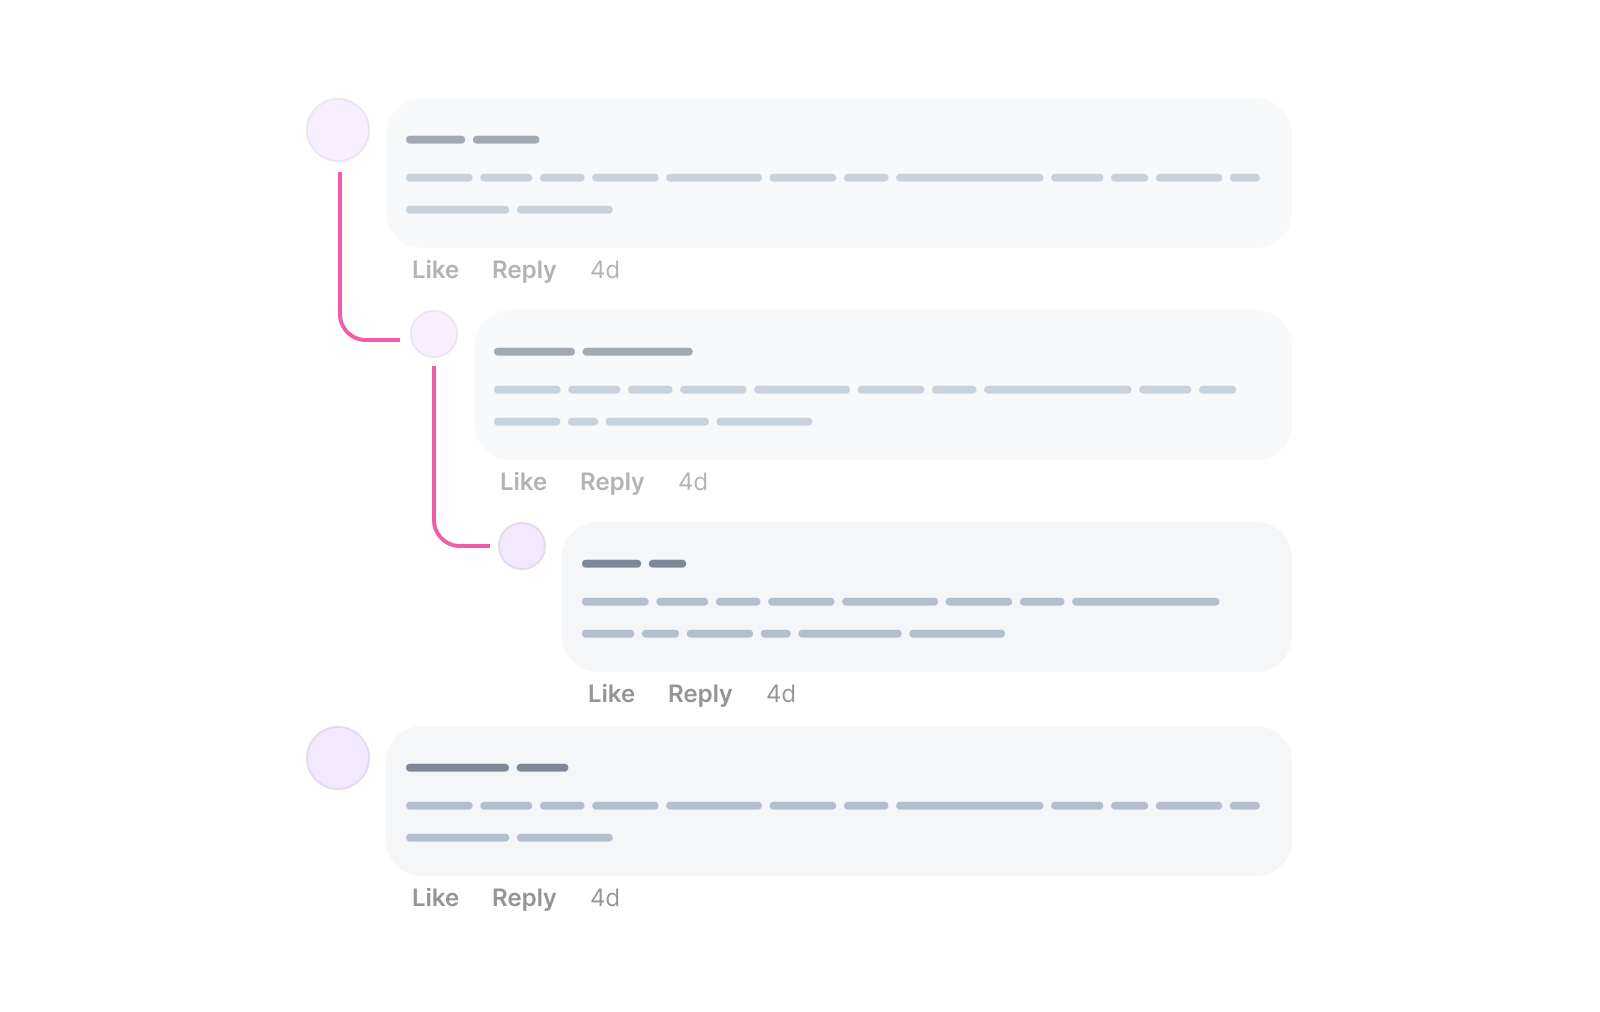
Right here is the structure that we’ll construct. At first look, it is likely to be easy, however there are lots of tiny particulars.
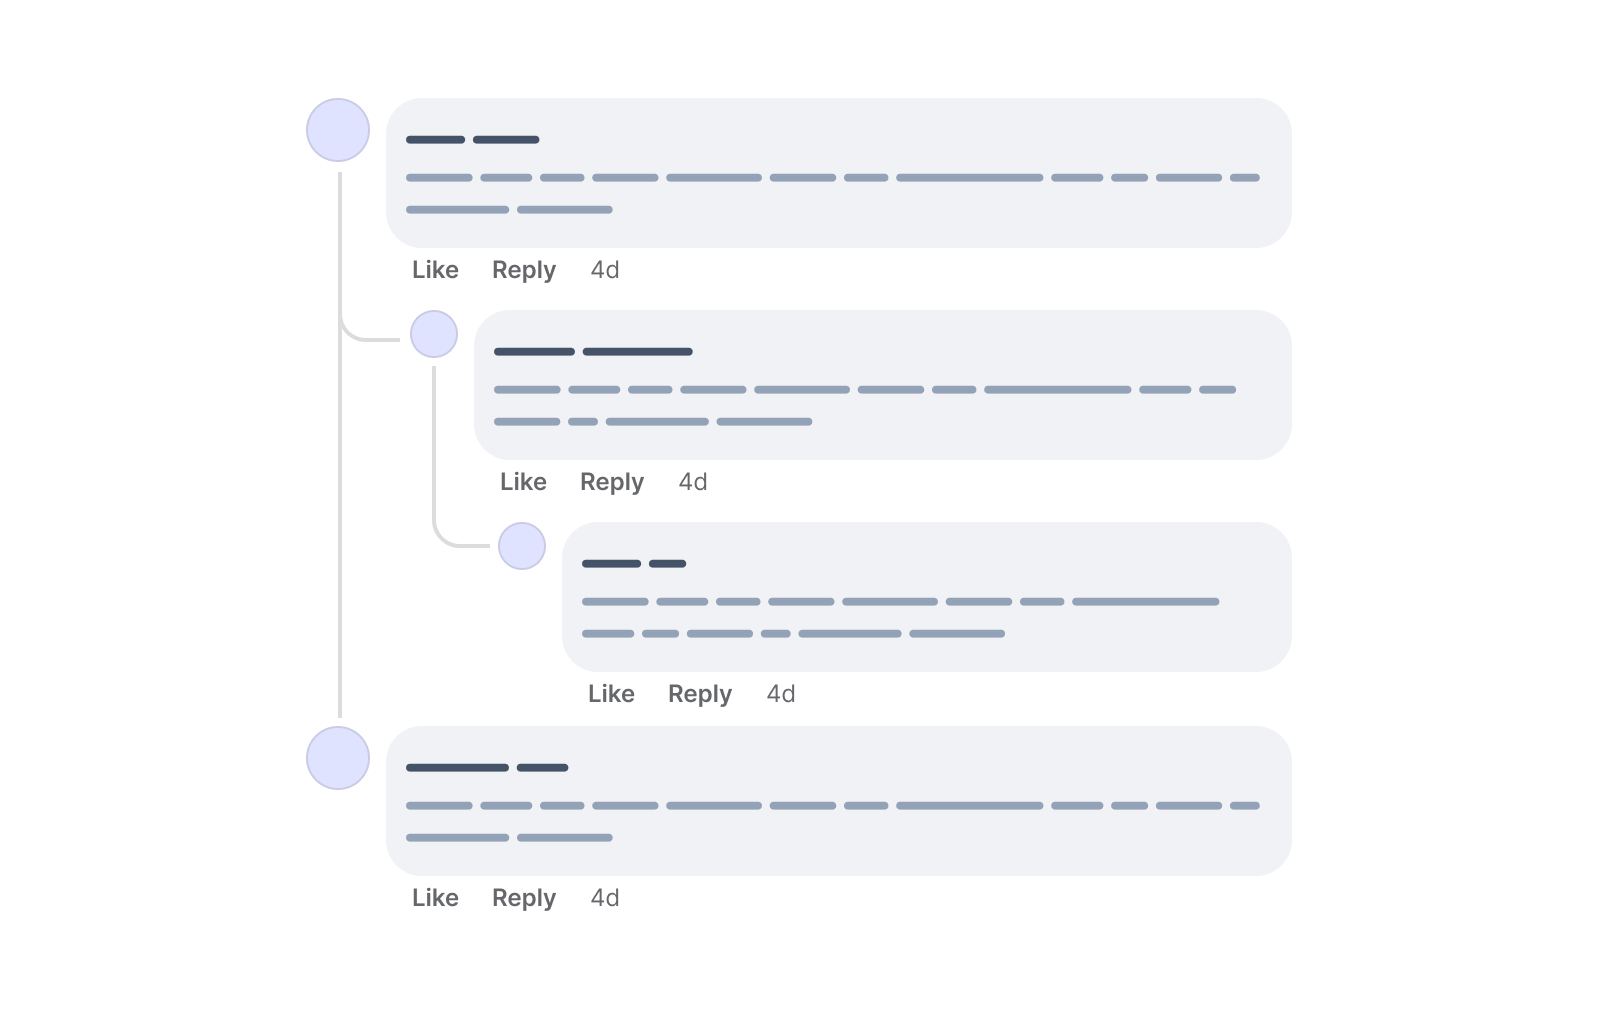
Now we have a remark that may be nested into two extra ranges. I’ll name these “depths” within the article.
Contemplate the next determine.
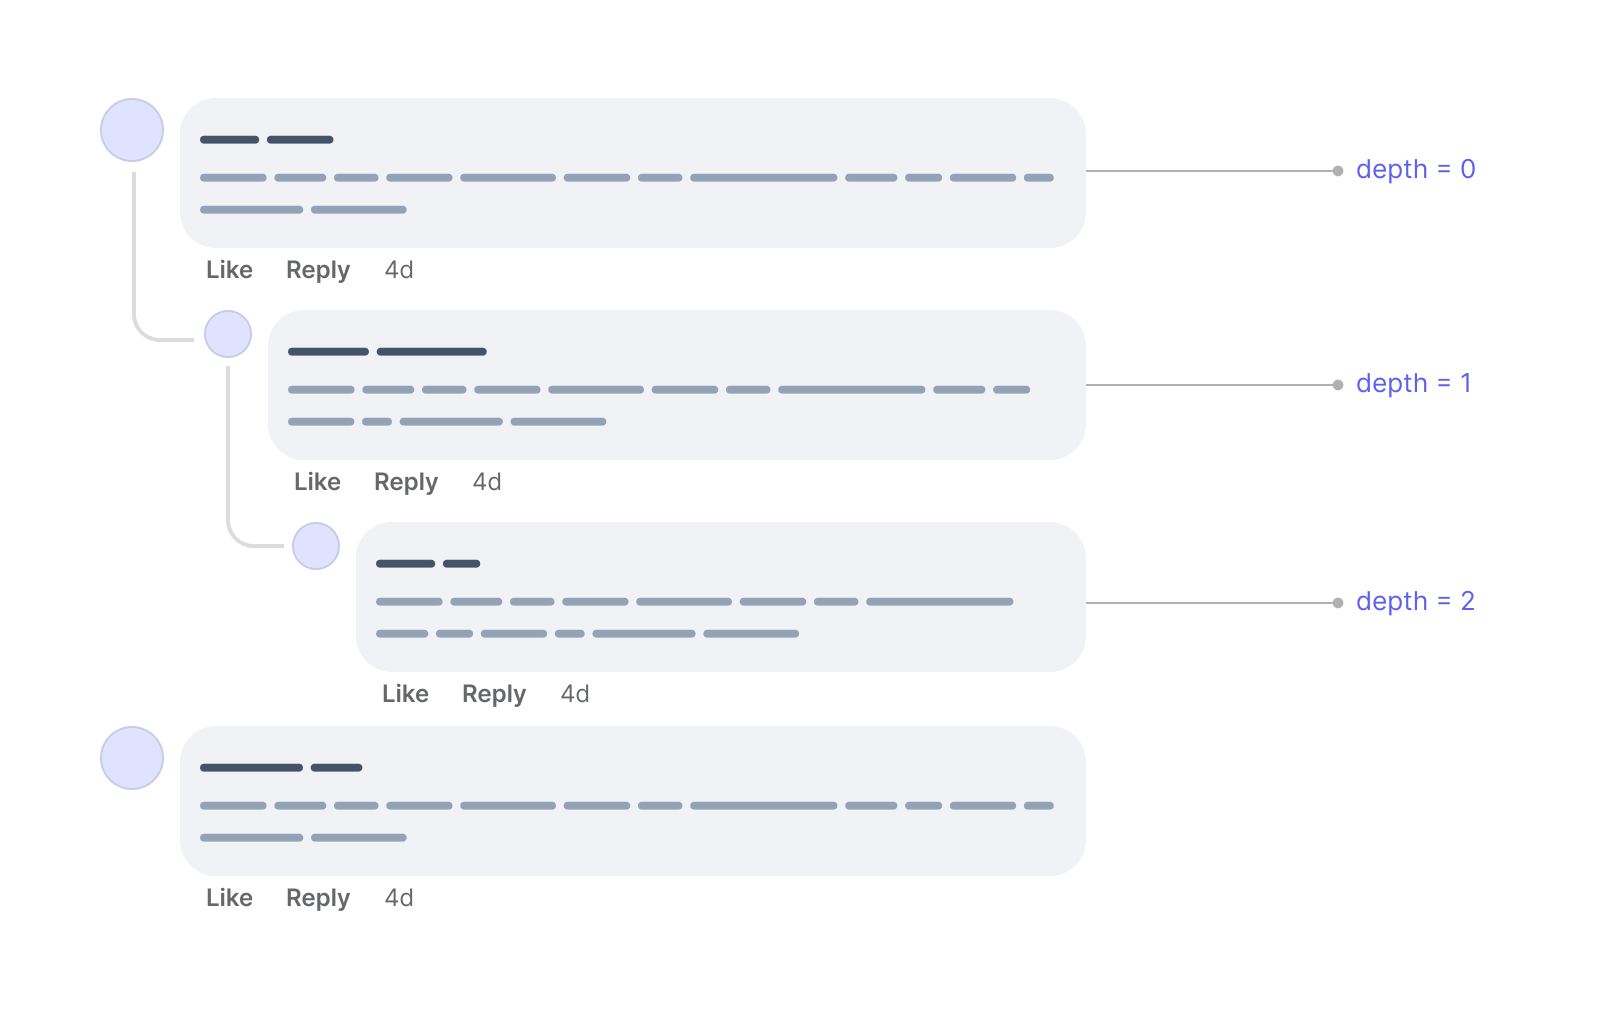
It exhibits how the depth is modified primarily based on the extent of nesting for every remark.
Excited about the structure
Earlier than diving into the effective particulars, I desire to work on the structure first and ensure it really works nice. The aim of this follow is to discover the potential of recent CSS to unravel that downside for me.
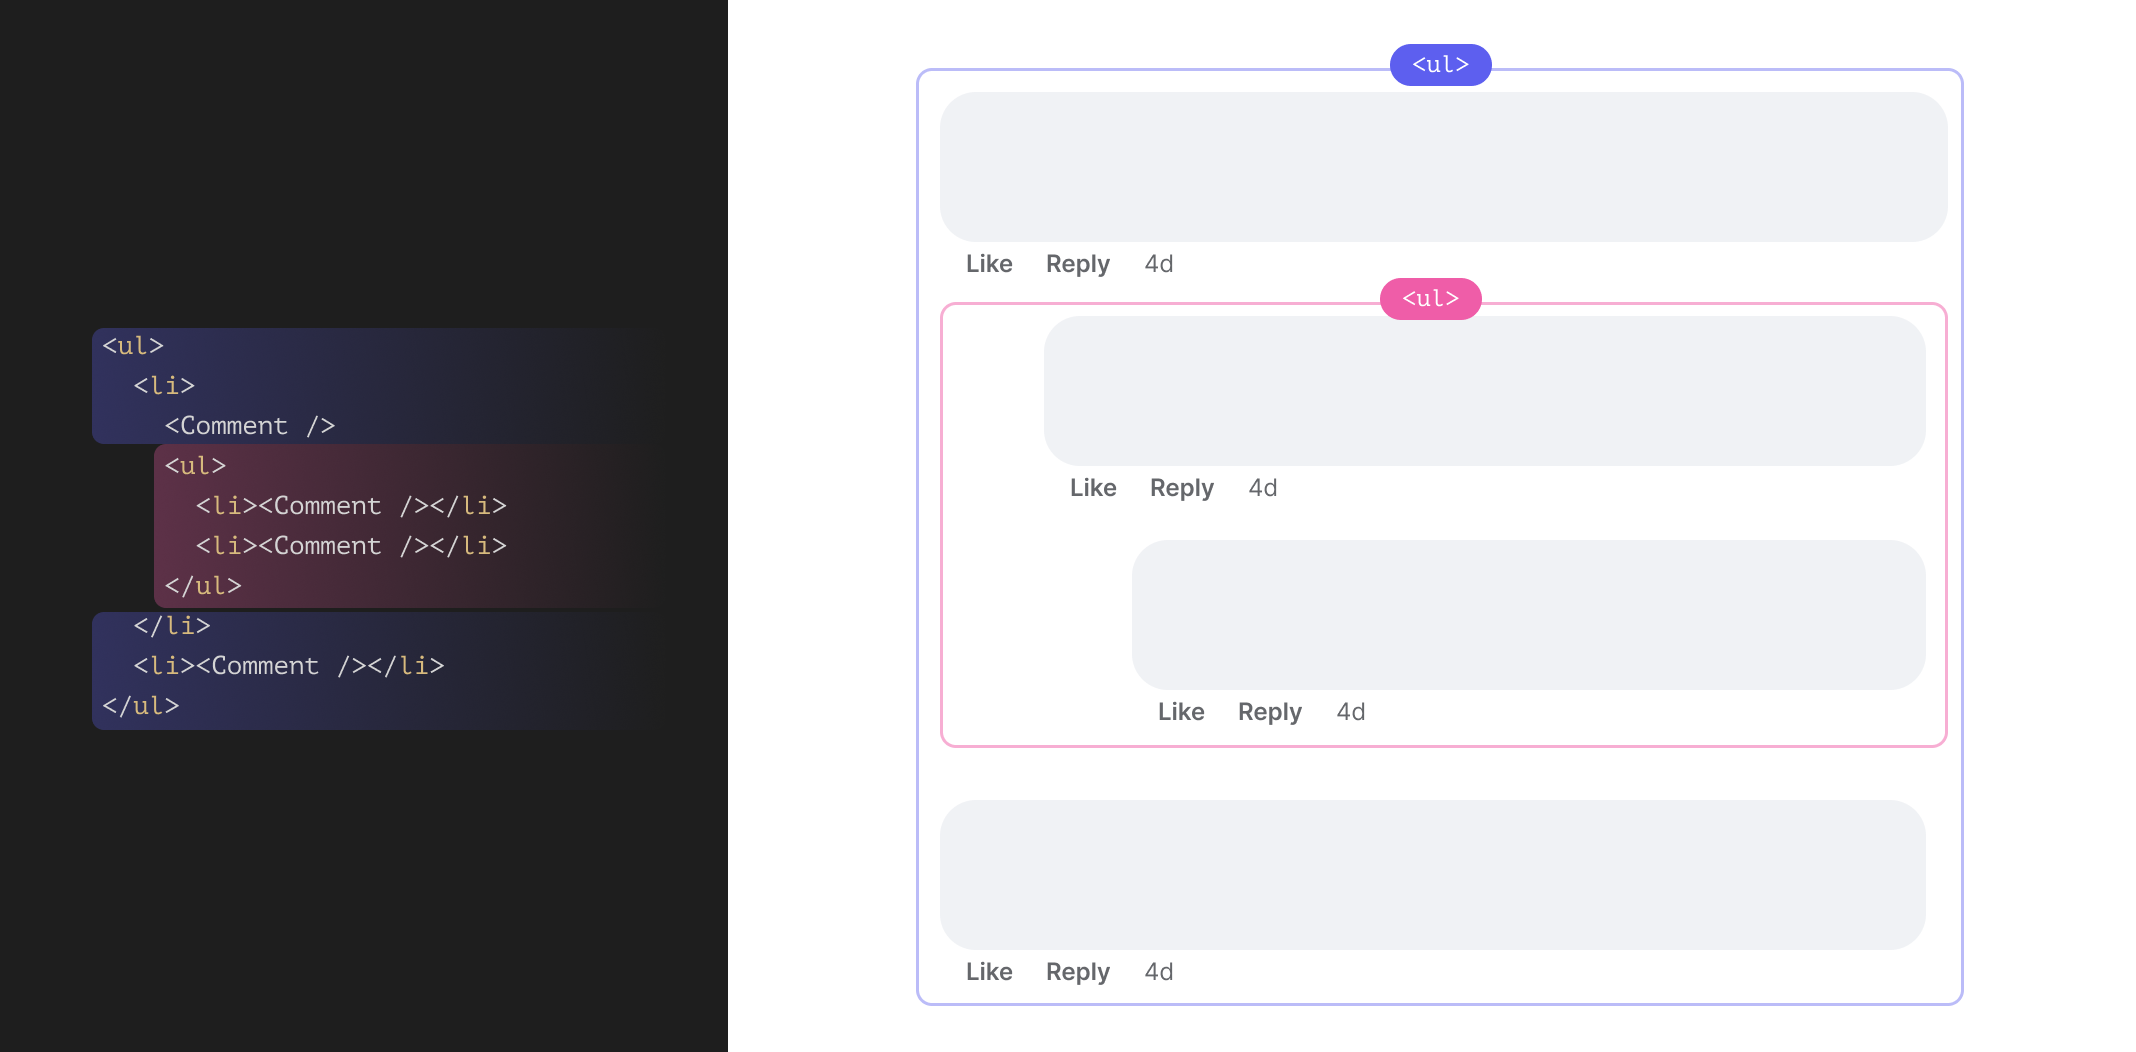
The primary to bear in mind is the HTML markup. The construction of the feedback is an efficient match for an unordered listing <ul>.
<ul>
  <li>
    <Remark />
  </li>
  <li>
    <Remark />
  </li>
</ul>
The <Remark /> acts as a placeholder for the remark element. That’s the HTML for an inventory of two feedback with none replies.
If we’ve got a reply or extra to one of many feedback, then a brand new <ul> might be appended.
<ul>
  <li>

    <Remark />
    <ul>

      <li>
        <Remark />
      </li>
    </ul>
  </li>
  <li>
    <Remark />
  </li>
</ul>
From a semantic viewpoint, the above sounds logical.
I known as the title “remark wrapper” to not confuse the which means of the remark element itself. Within the following part, I’ll clarify my considering on constructing the structure to deal with the indentation or spacing for the remark replies.
Contemplate the next markup:
<ul>
<li>
<Remark />
<ul>
<li>
<Remark />
</li>
</ul>
</li>
<li>
<Remark />
</li>
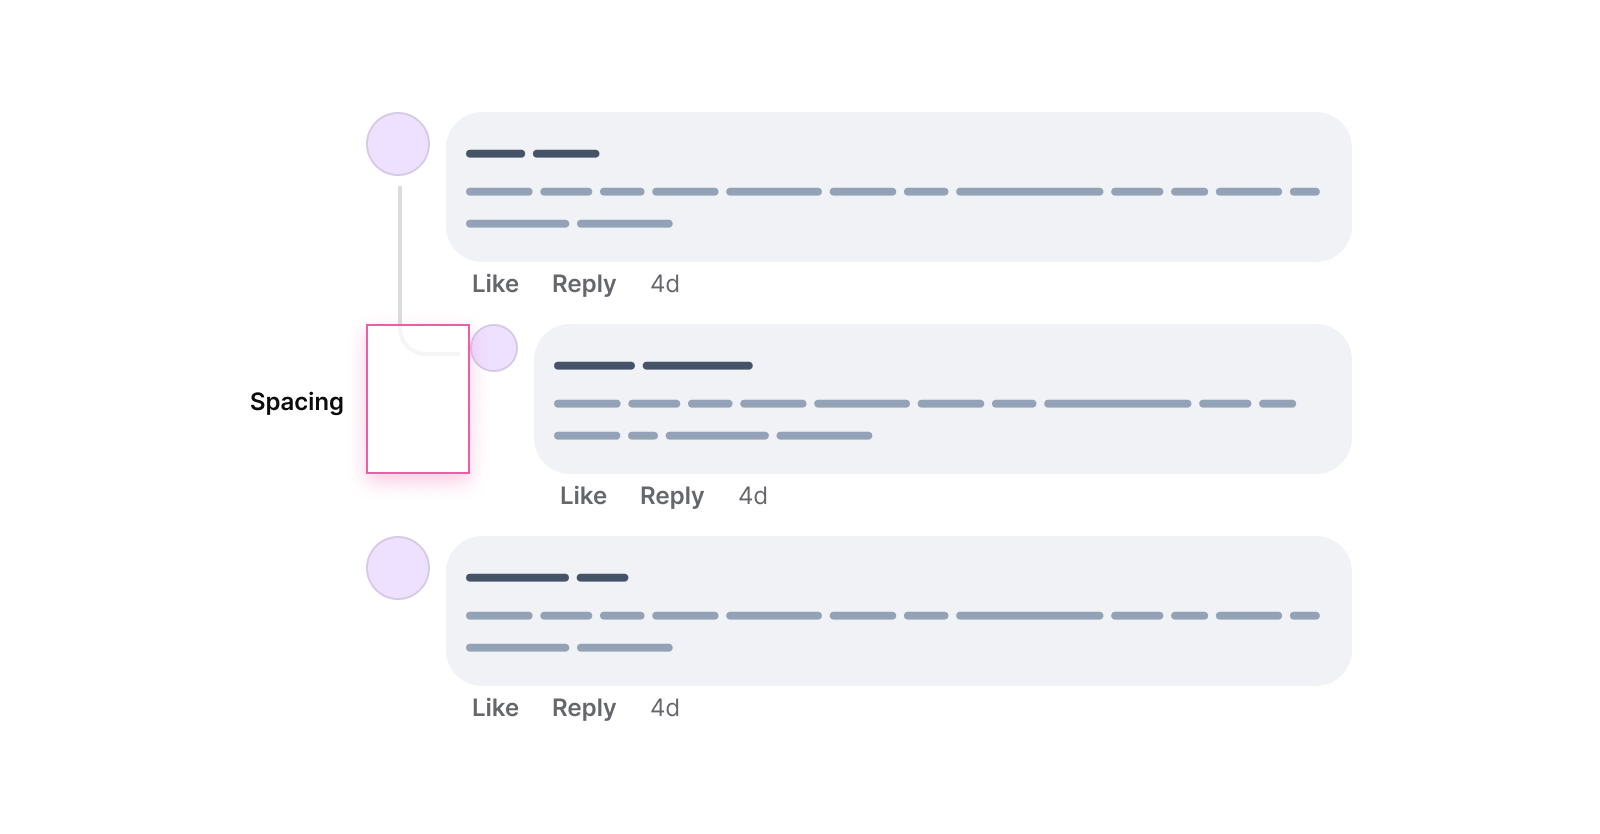
</ul>Now we have two foremost feedback and one reply. From a visible viewpoint, it should appear like the next:
I desire to maintain all of the spacing and indentation stuff to the <li> gadgets solely, as they act as a residence for the remark element.
Utilizing knowledge attributes to deal with the spacing
The very first thing I thought of is utilizing knowledge attributes on the <ul> and <li> components.
<ul>
  <li nested="true">

    <Remark />
    <ul>

      <li>
        <Remark />
      </li>
    </ul>
  </li>
  <li>
    <Remark />
  </li>
</ul>
We are able to name the <ul> and do particular styling as wanted. Within the determine under, the primary reply has a spacing on the left to point that it’s visually associated to the primary remark.
In CSS, we are able to do one thing like this:
li[data-nested="true],
li[data-nested="true]
  li {
  padding-left: 3rem;
}
Whereas which may work, we are able to do a lot better with CSS variables and elegance queries.
Utilizing CSS type queries
We are able to verify if the CSS variable --nested: true is added to the container and elegance the kid gadgets primarily based on that.
Contemplate the next markup the place I added an inline CSS variable --nested: true to the <ul> components.
<ul>
  <li type="--nested: true;">

    <Remark />
    <ul type="--nested: true;">

      <li>
        <Remark />
      </li>
    </ul>
  </li>
  <li>
    <Remark />
  </li>
</ul>
With type queries, I can verify if the CSS variable is there and elegance the <li> factor primarily based on that. That is supported in Chrome Canary solely, for now.
@container type(--nested: true) {

  li {
    padding-left: 3rem;
  }
}
Right here is why I desire type queries over knowledge attributes:
- It’s simpler to grasp. It reads
@container, and the plain phrases say it. If the container has the--nested: trueCSS variable, then apply the next stuff. - It’s attainable to mix a number of type queries for extra management over CSS.
- If wanted, we are able to use dimension container queries together with type queries, too.
One other answer is to make use of CSS subgrid to construct the nested feedback structure. Let me be trustworthy with you, it is going to be extra CSS code, nevertheless it’s cool to discover the potential of recent CSS options.
I’ll clarify about subgrid in a quick to offer you an thought. Contemplate the next CSS grid:
<ul>
  <li class="foremost">

    <Remark />
    <ul>

      <li>
        <Remark />
        <ul>
          <li>
            <Remark />
          </li>
        </ul>
      </li>
    </ul>
  </li>
</ul>
li.foremost {
show: grid;
grid-template-columns: 3rem 3rem 1fr;
}This might be added to the primary direct <li> factor of the <ul> listing. That grid will appear like this:
At present, in CSS grid, it’s not attainable to cross the principle grid to the kid gadgets. In our case, I wish to cross the grid columns to the primary <ul>, after which to the <li> of that <ul>.
Due to CSS subgrid, that is attainable now. It’s out there solely in Firefox and Safari. Chrome is on the best way!
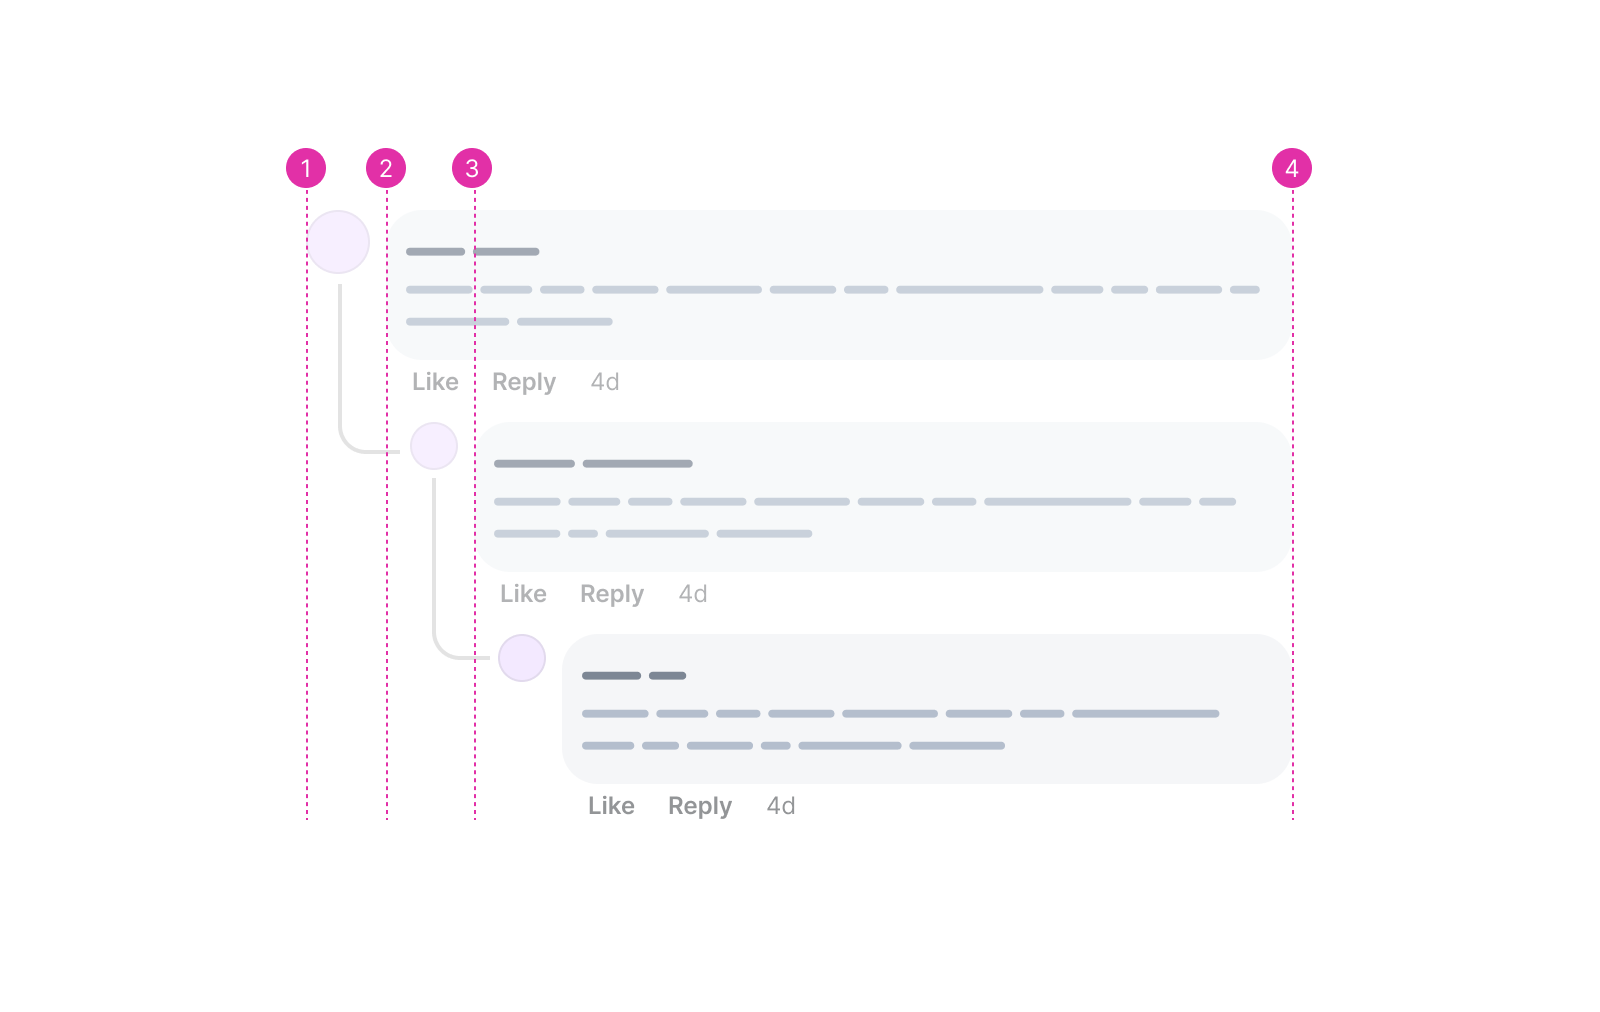
Contemplate the next determine:
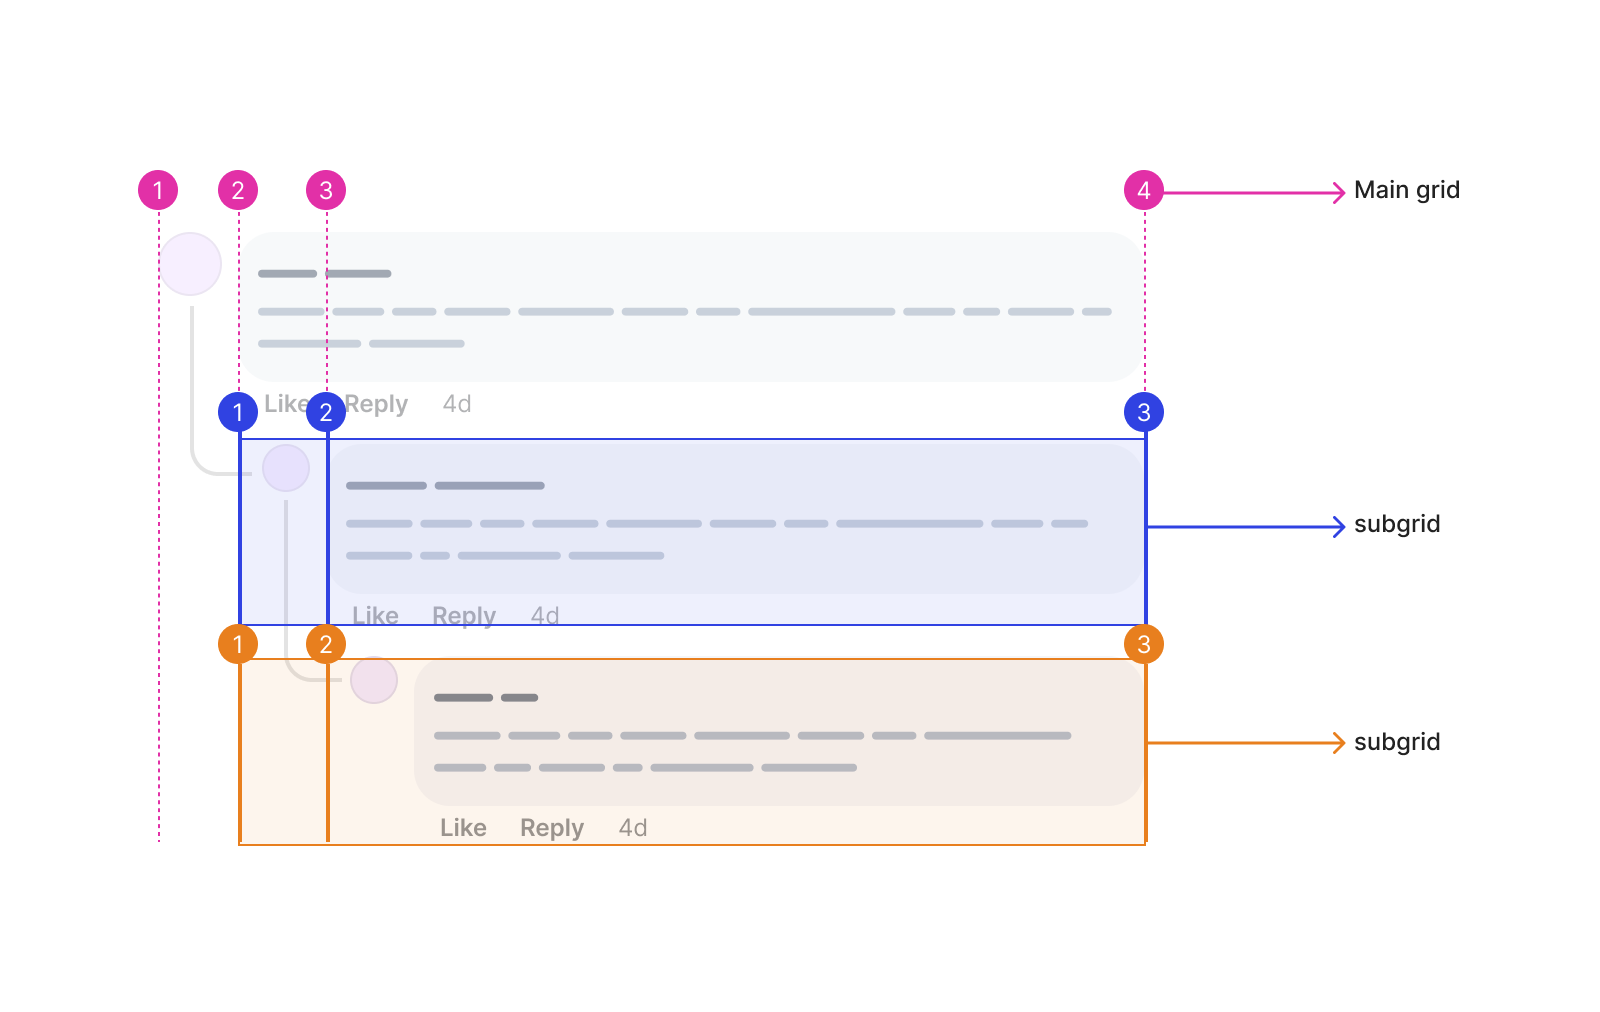
First, we have to arrange the principle grid as follows. Now we have 3 columns.
@container type(--nested: true) {
  li.foremost {
    show: grid;
    grid-template-columns: 3rem 3rem 1fr;

    .remark {
      grid-column: 1 / -1;
    }
  }
}
The .remark element will all the time span the total width. That’s why I added grid-column: 1 / -1. It means: “span the remark from the primary to the final column”. That is useful to keep away from coming into the column quantity manually for every depth within the nesting. One thing like this:
@container type(--nested: true) {
  li.foremost .remark {
    grid-column: 1 / 4;
  }

  ul[depth="1"] .remark,
  ul[depth="2"] .remark {
    grid-column: 1 / 3;
  }
}
Cool. The subsequent step is to place the depth=1 feedback inside the principle grid, after which add subgrid and place the interior <li>.
@container type(--nested: true) {
  ul[depth="1"] {
    grid-column: 2 / 4;
    show: grid;
    grid-template-columns: subgrid;

    > li {
      grid-column: 1 / 3;
      show: grid;
      grid-template-columns: subgrid;
    }
  }
}
Lastly, we have to place the depth=2 listing.
@container type(--nested: true) {
  ul[depth="2"] {
    grid-column: 2 / 3;
  }
}
That answer works, however I’m not a fan of all of that particulars. A easy padding can repair it.
Nonetheless undecided about the way it works? See the next video which exhibits me inspecting the grid within the DevTools.
Take a look at the Codepen demo.
That’s it! Now we’ve got feedback with spacing that displays their relationship.
Excited about the connecting strains
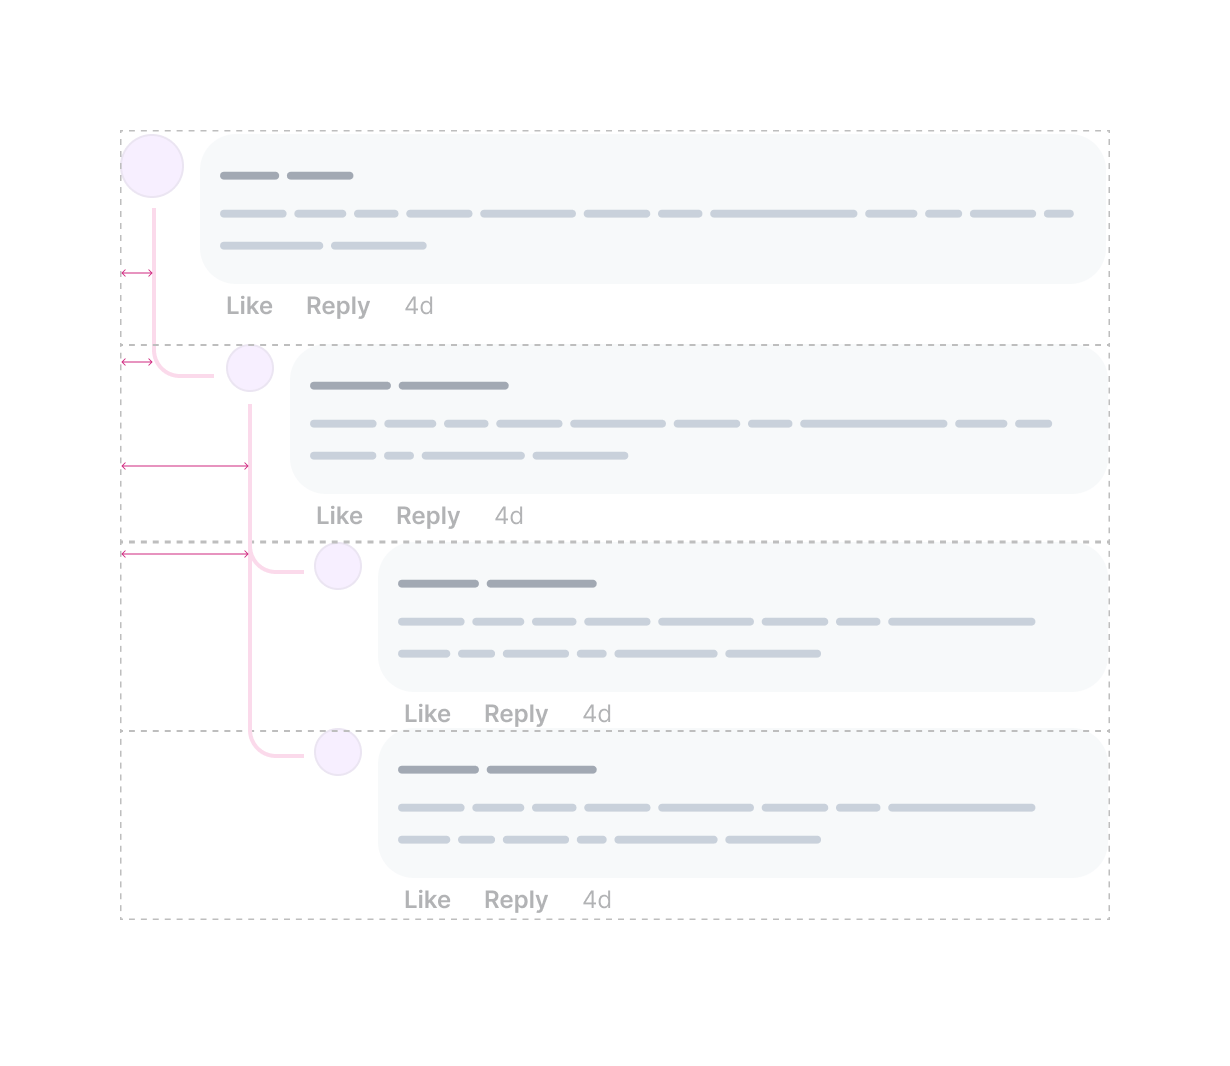
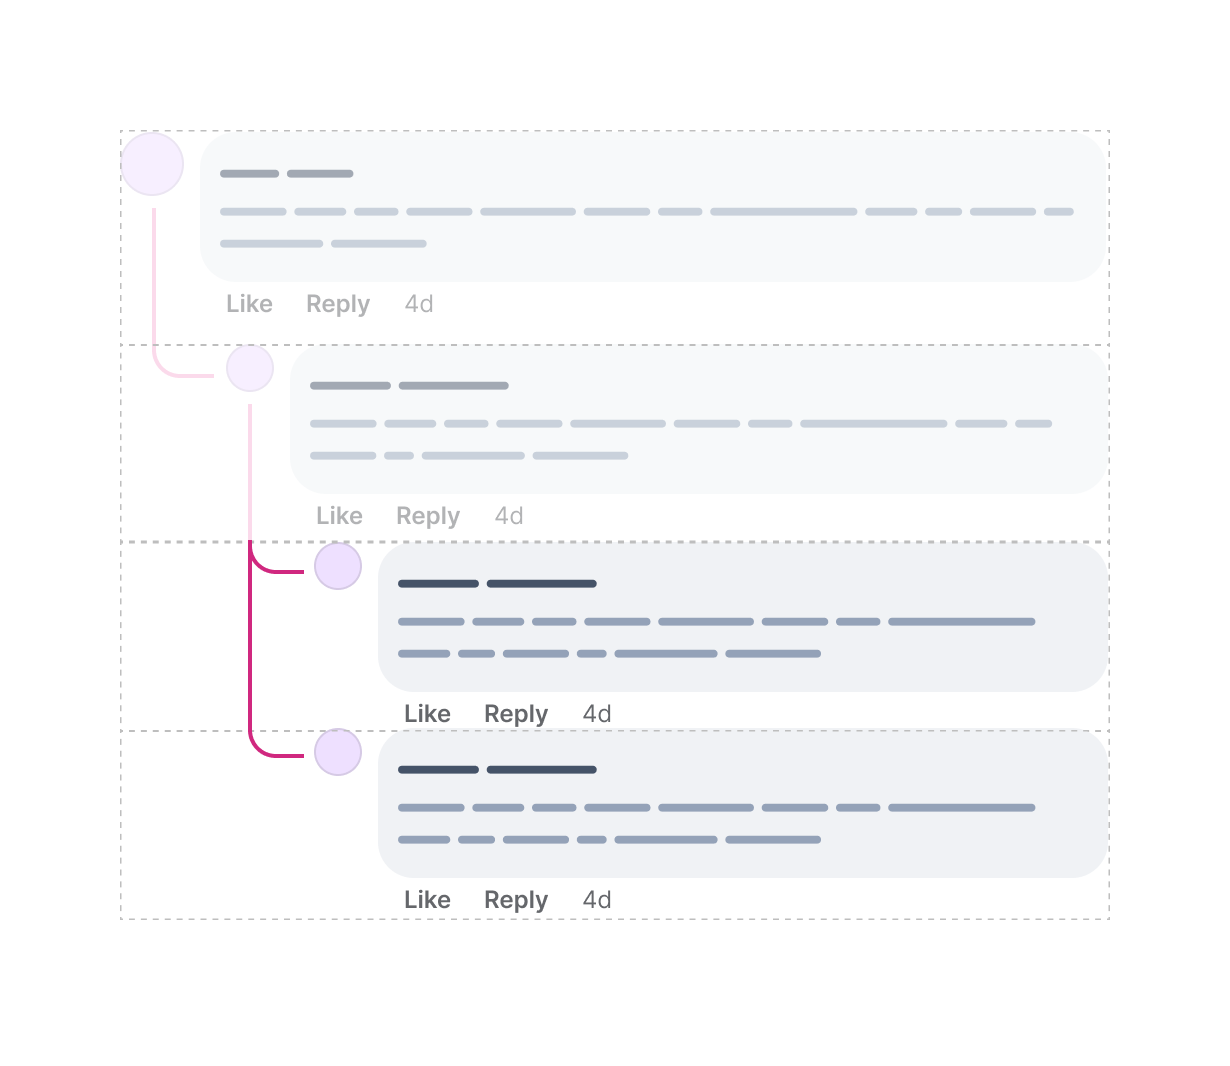
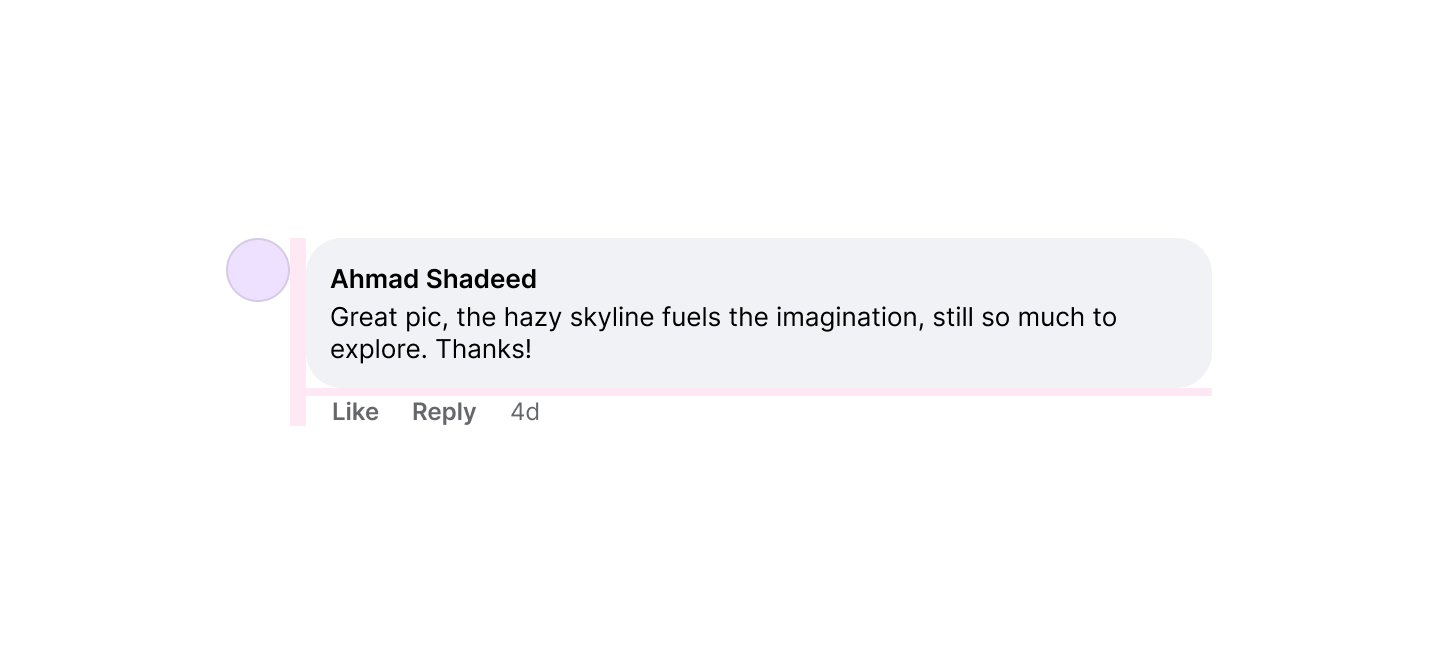
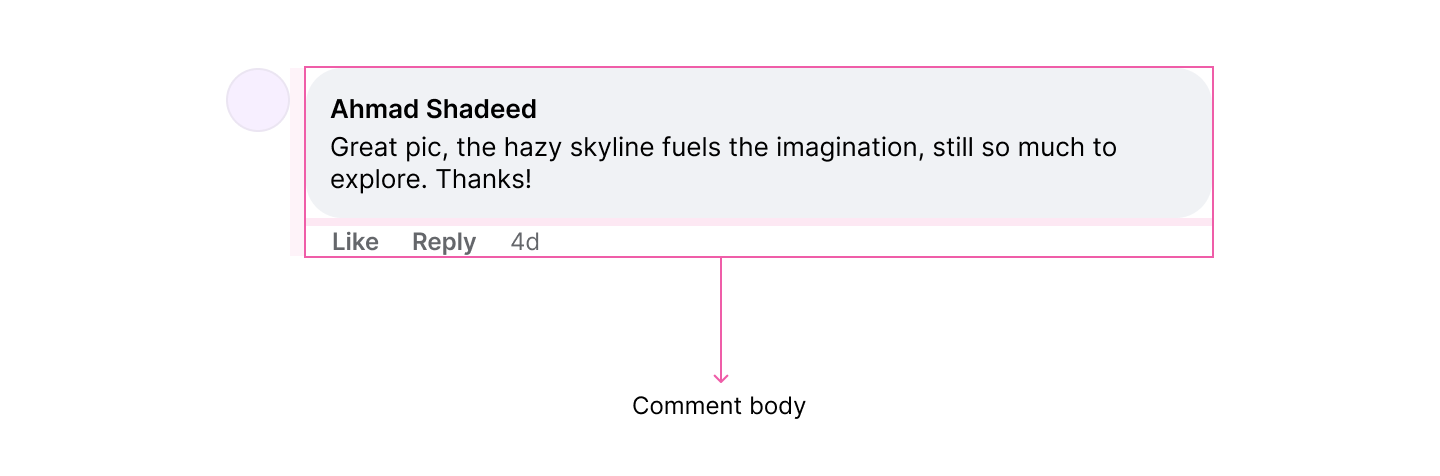
To make it extra clear that there’s a reply to a remark, there are connecting strains between the principle remark and replies. The Fb workforce used a <div> to deal with the strains. Can I do one thing completely different?
Contemplate the next determine:
At first, your thoughts would possibly attempt to trick you into: “Hey, this appears like a rectangle with a left and backside border and a border radius on the underside left nook”.
li:earlier than {
  content material: "";
  width: 30px;
  top: 70px;
  border-left: 2px stable #ef5da8;
  border-bottom: 2px stable #ef5da8;
  border-bottom-left-radius: 15px;
}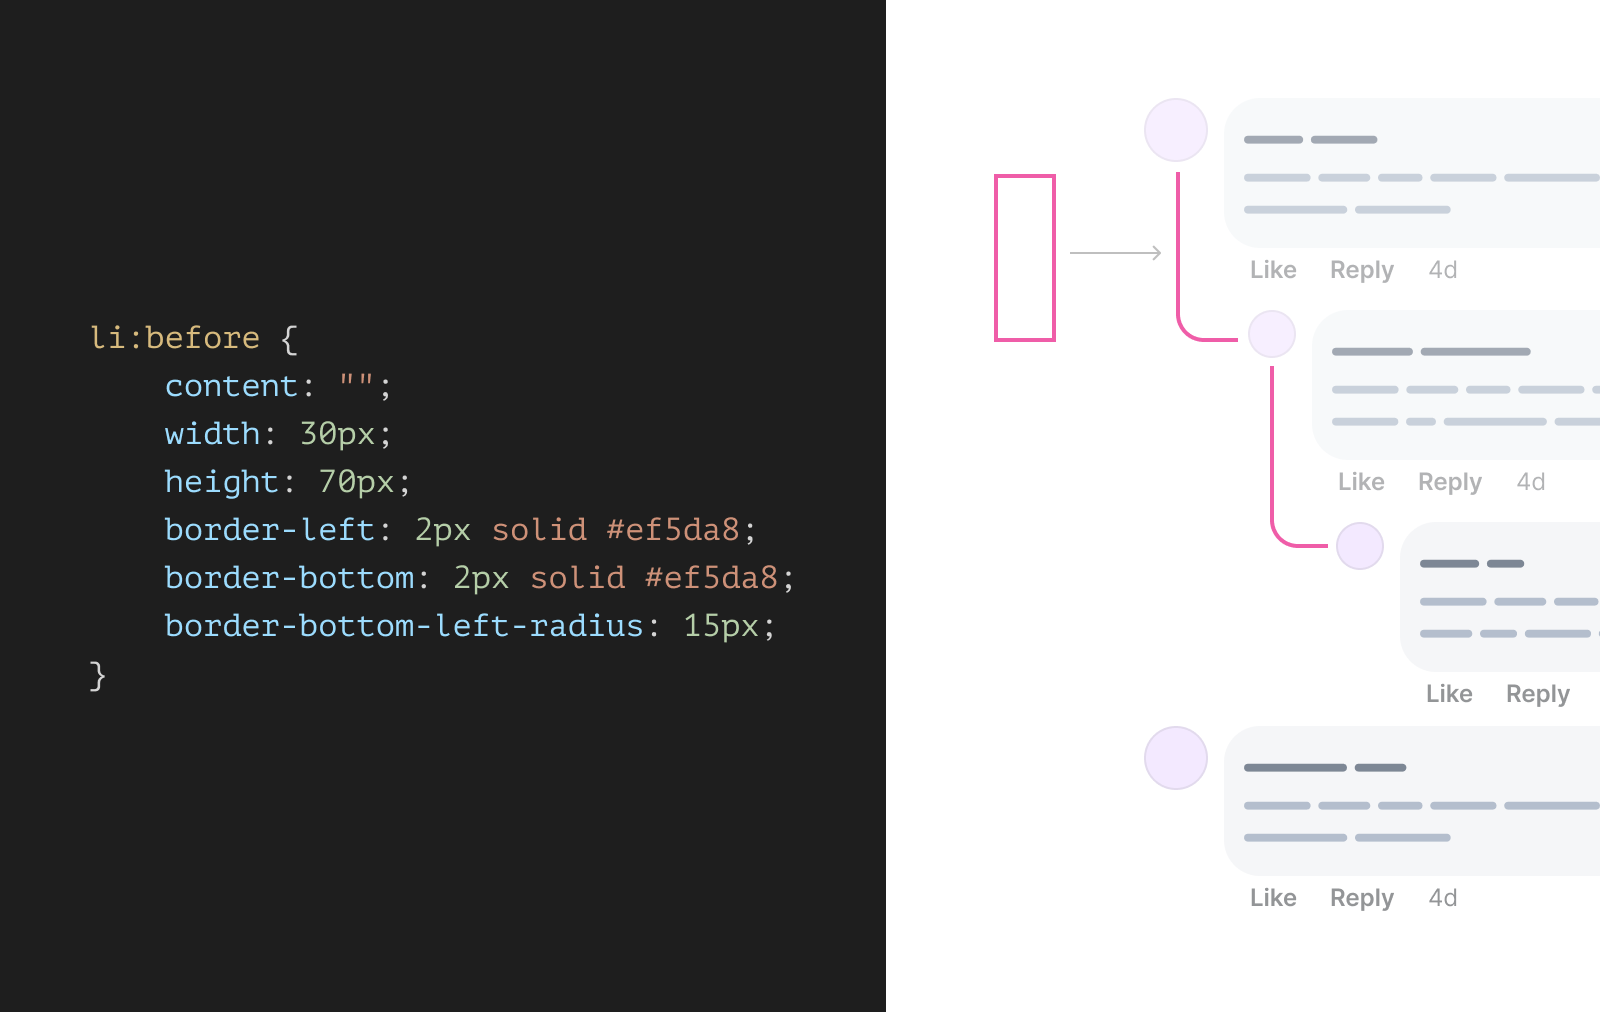
The second I typed top:.. within the above CSS, I spotted that this received’t work. How would I do know the peak? It’s not attainable with CSS, why? As a result of I have to make the underside fringe of the road aligned to the primary reply avatar.
Then, I thought of utilizing pseudo-elements for that goal. What if that curved line may be divided into two components?
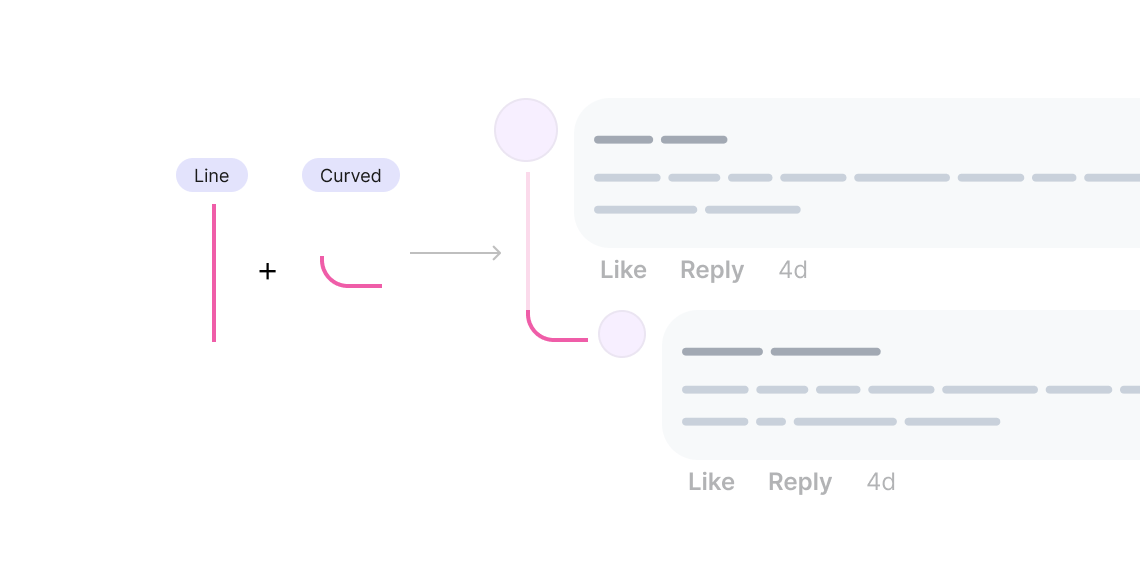
The line may be added to the principle remark, and the curved factor is for the reply.
Nicely, what if we’ve got one other reply to the primary reply? Here’s a visible that exhibits how the strains will work:
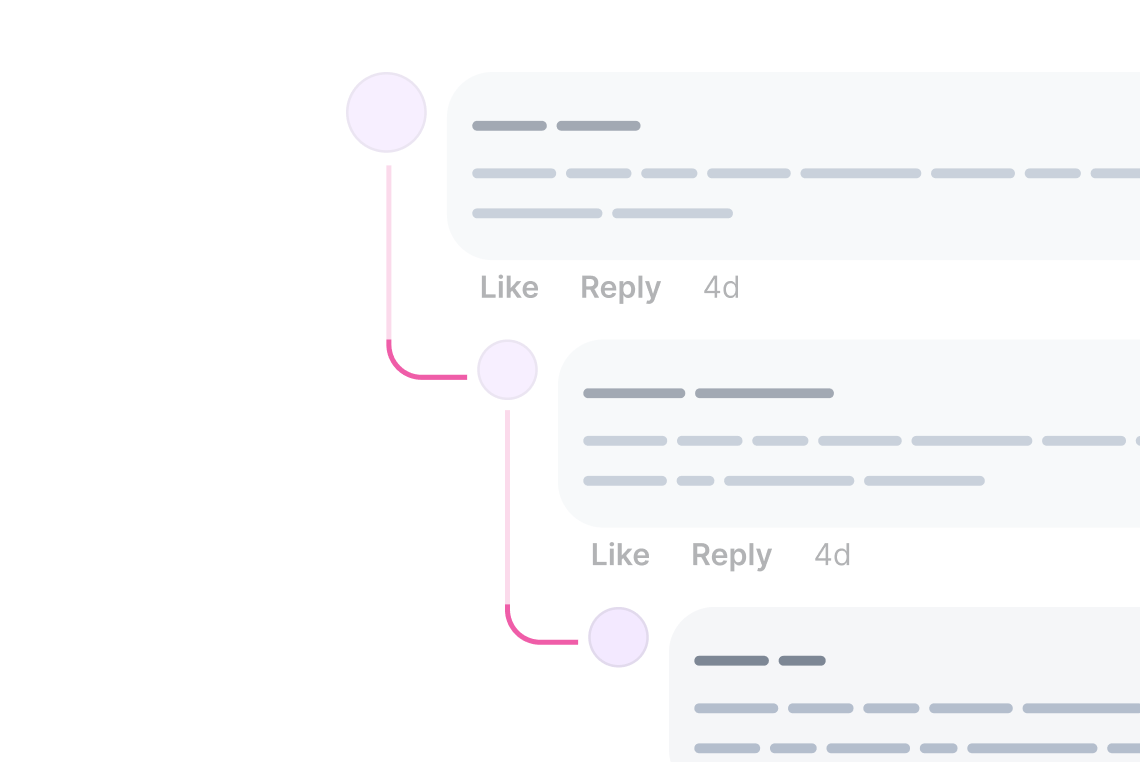
In CSS, we have to use pseudo-elements to attain the road impact. Earlier than diving into the CSS to implement that, I wish to spotlight that the road or the curve might be positioned based on the total row.
Dealing with the road added to the principle remark
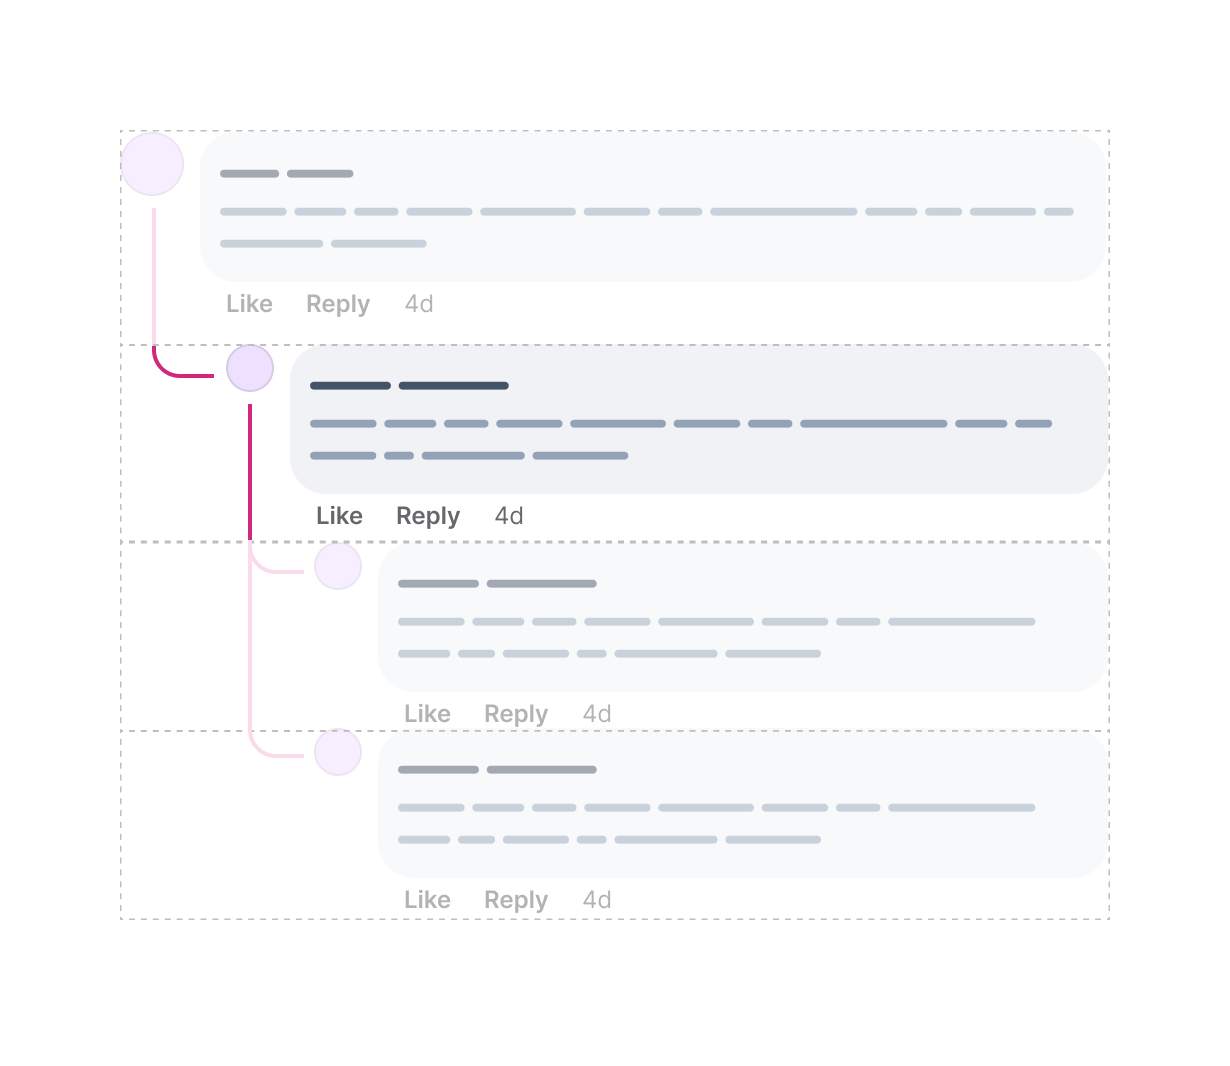
That is the primary problem to sort out. We have to add a line to the first remark if it has replies. How to do this? Due to CSS :has, we are able to verify if an <li> accommodates a <ul>, and if sure, we apply the CSS wanted.
Contemplate the next HTML:
<ul type="--depth: 0;">
  <li type="--nested: true;">
    <Remark />
    <ul type="--depth: 1;">
      <li>
        <Remark />
      </li>
    </ul>
  </li>
  <li>
    <Remark />
  </li>
</ul>
We have to type each <Remark /> with the next circumstances:
- it’s a direct youngster of an
<li> - the
<li>has a<ul>as a toddler - the father or mother is at
depth: 0ordepth: 1
Right here is how the above translate to CSS. CSS variables + type queries + has = a strong conditional styling.
@container type(--depth: 0) or type(--depth: 1) {
  li:has(ul) > .remark {
    place: relative;

    &:earlier than {
      content material: "";
      place: absolute;
      left: calc(var(--size) / 2);
      prime: 2rem;
      backside: 0;
      width: 2px;
      background: #222;
    }
  }
}
The above is simply an instance of why I desire utilizing type queries over HTML knowledge attributes for dealing with the depth of the remark and replies.
Subsequent, we want the road and curved factor for the depth: 1 replies. This time, the <li> will use each the :earlier than and :after pseudo-elements.
@container type(--depth: 1) {
  li:not(:last-child) {
    place: relative;

    &:earlier than {

    }
  }

  li {
    place: relative;

    &:after {

    }
  }
}
Lastly, We have to add the curved factor to every <li> of depth: 2, and the road to all <li>s besides the final one. We have to do the next logic:
- Add the curved factor to every
<li>indepth: 2. - Add the road to every
<li>besides the final one indepth: 2.
The curved line is a rectangle with a border and radius on the underside left. Let me clarify that:
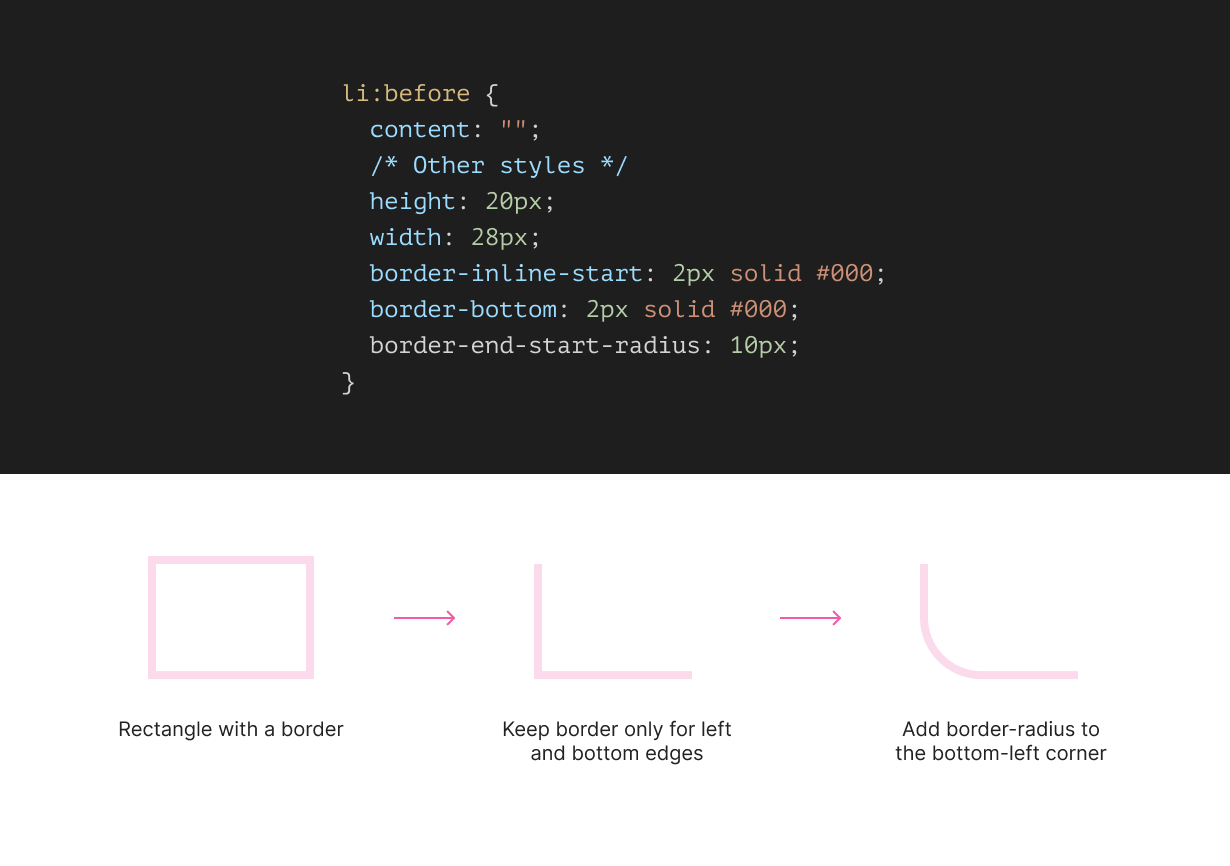
@container type(--depth: 2) {
li {
place: relative;
&:after {
content material: "";
place: absolute;
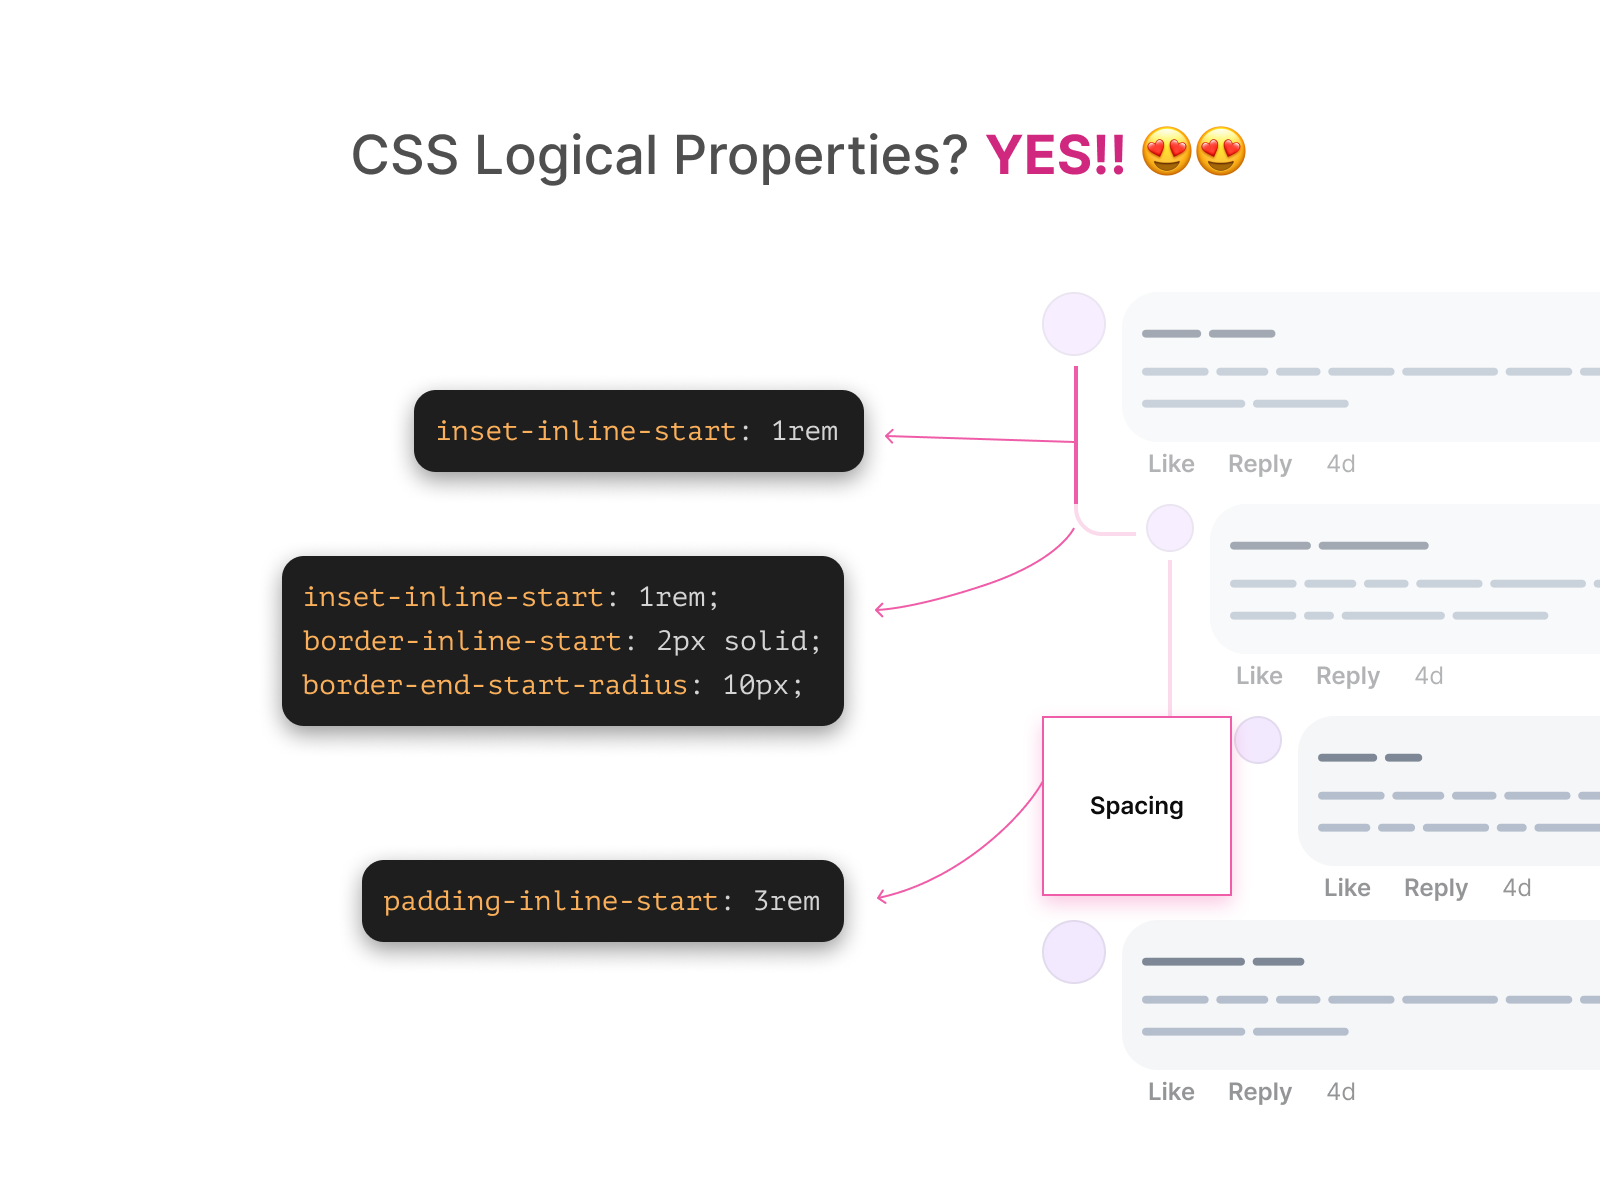
inset-inline-start: 15px;
prime: -2px;
top: 20px;
width: 28px;
border-inline-start: 2px stable #000;
border-bottom: 2px stable #000;
border-end-start-radius: 10px;
}
}
li:not(:last-child) {
&:earlier than {
}
}
}
Discover that I’m utilizing logical properties for the border and border-radius. That is helpful to make the UI dynamically flip when the doc language is RTL. I’ll come to this later within the article.
Take a look at the Codepen demo.
Disabling the strains
What if for some purpose we have to disguise connecting strains? Nicely, because of type queries, that is easy as toggling on and off a CSS variable.
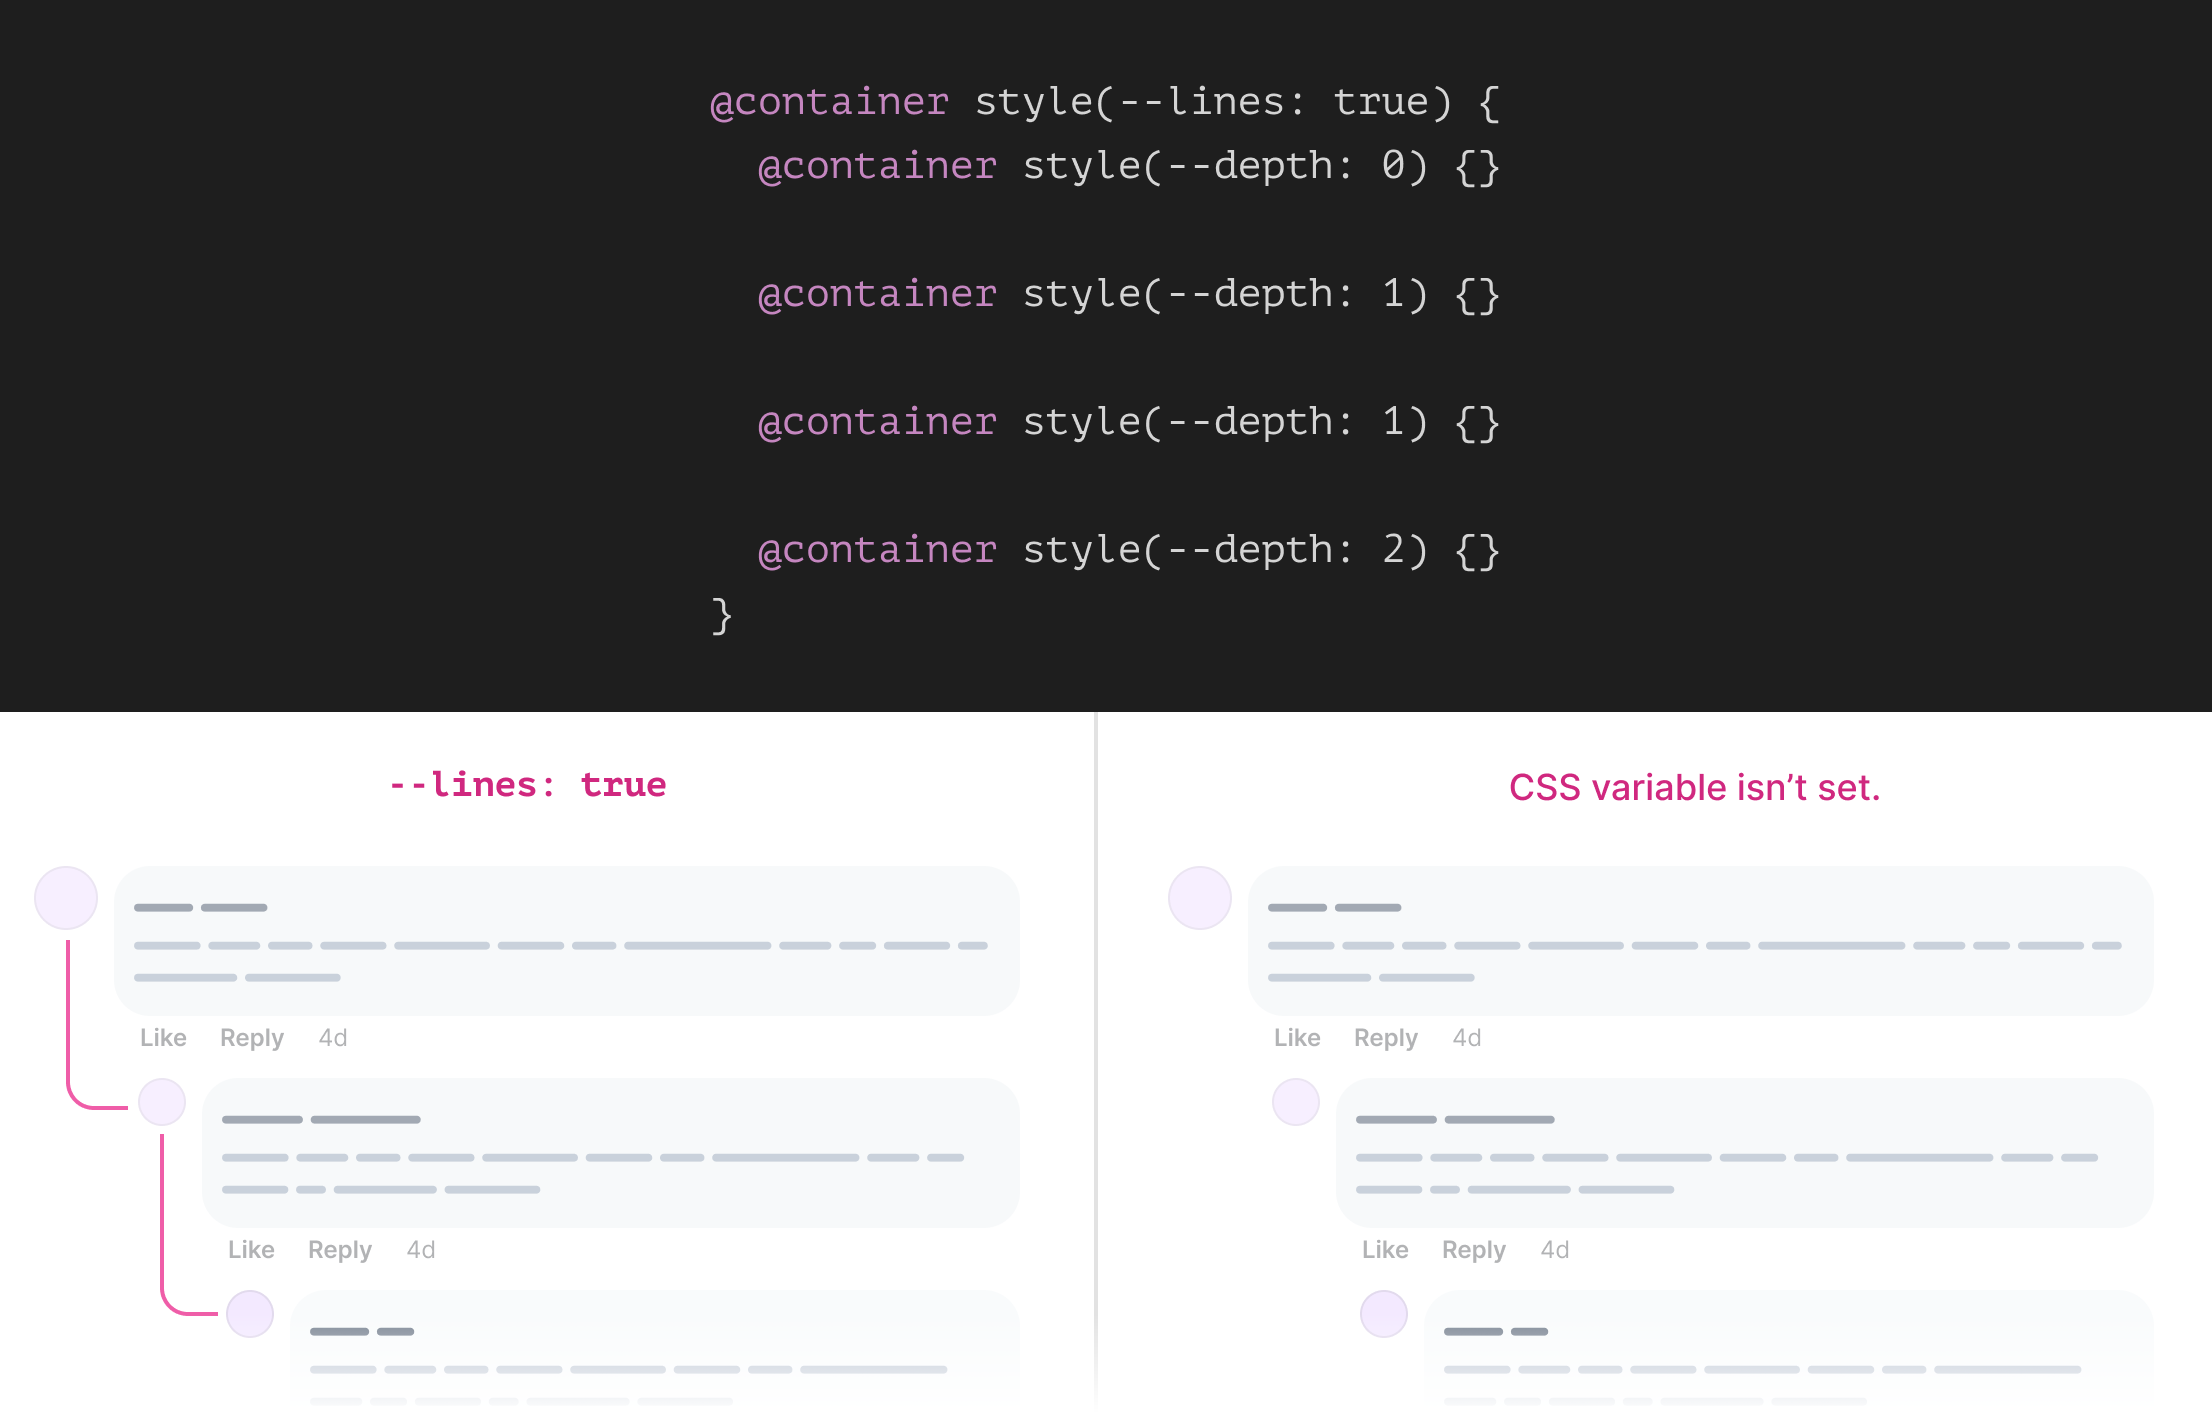
By nesting all of the depth associated type queries inside the --lines: true one, we are able to be sure that the limes might be proven solely when the CSS variable is ready.
@container type(--lines: true) {
  @container type(--depth: 0) {
  }

  @container type(--depth: 1) {
  }

  @container type(--depth: 1) {
  }

  @container type(--depth: 2) {
  }
}
Checkout the next video:
You is likely to be considering that all the above is only for the principle containing structure and features. Sure, that’s right! I haven’t even thought in regards to the remark element but.
Let’s discuss a better look:
At first look, this can be a good case for flexbox. We are able to have flexbox to show the avatar and remark field in the identical line.
<div class="remark">
  <div class="consumer"></div>

  <div>
    <div class="comment__body"></div>
    <div class="comment__actions">
      <a href="#">Like</a>
      <a href="#">Reply</a>
    </div>
  </div>
</div>
Please word that the HTML above could be very fundamental. It doesn’t mirror a production-level code, and it’s simply there to assist clarify the CSS stuff.
.remark {
  --size: 2rem;
  show: flex;
  hole: 0.5rem;
}

.avatar {
  flex: 0 0 var(--size);
  width: var(--size);
  top: var(--size);
  border-radius: 50%;
}
That’s the fundamental structure, however we’ve got much more than that. Nonetheless, on this article, I’ll focus solely on the issues which can be distinctive and necessary to elucidate.
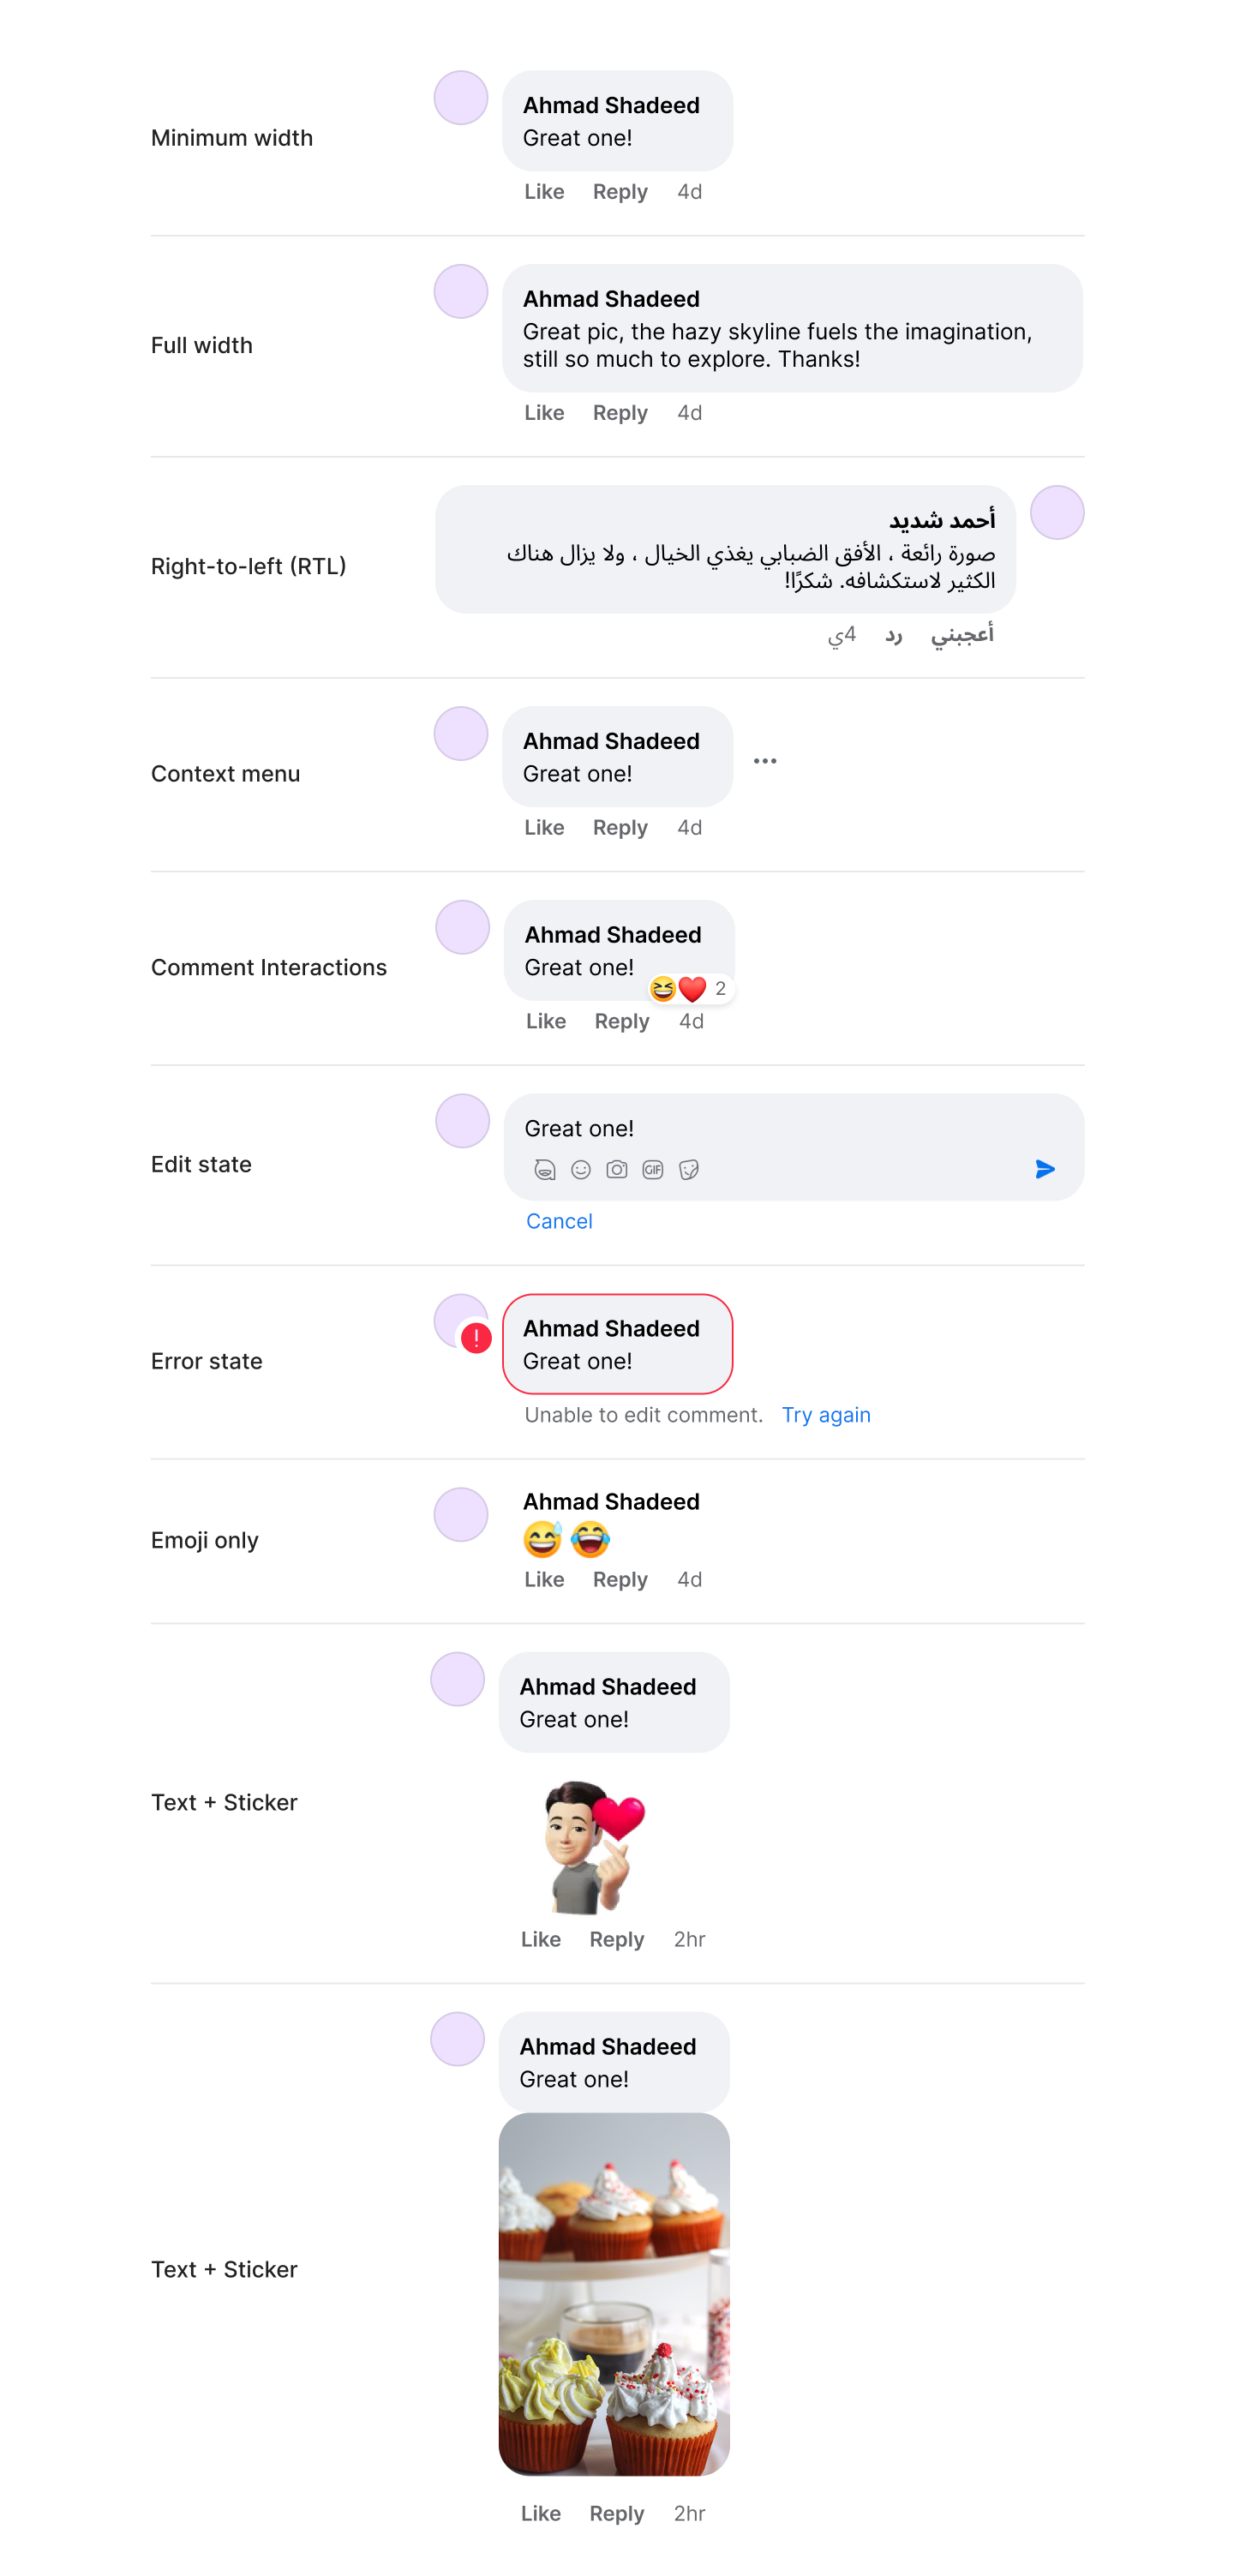
Subsequent are a number of issues for the remark physique element.
This half alone of the remark element might want to deal with:
- Minimal width
- Lengthy content material
- Multilingual content material (LTR vs RTL)
- Context menu
- Remark interactions
- Modifying state
- Error state
I received’t be capable to spotlight all the above on this article, as I would find yourself writing a guide.
What I’ll spotlight are some bets that I discovered attention-grabbing to be candidate for contemporary CSS.
Altering the consumer avatar dimension
When a reply is nested inside a remark, the consumer avatar dimension will develop into smaller. That is good to make it visually simple to tell apart between a foremost remark and a reply.
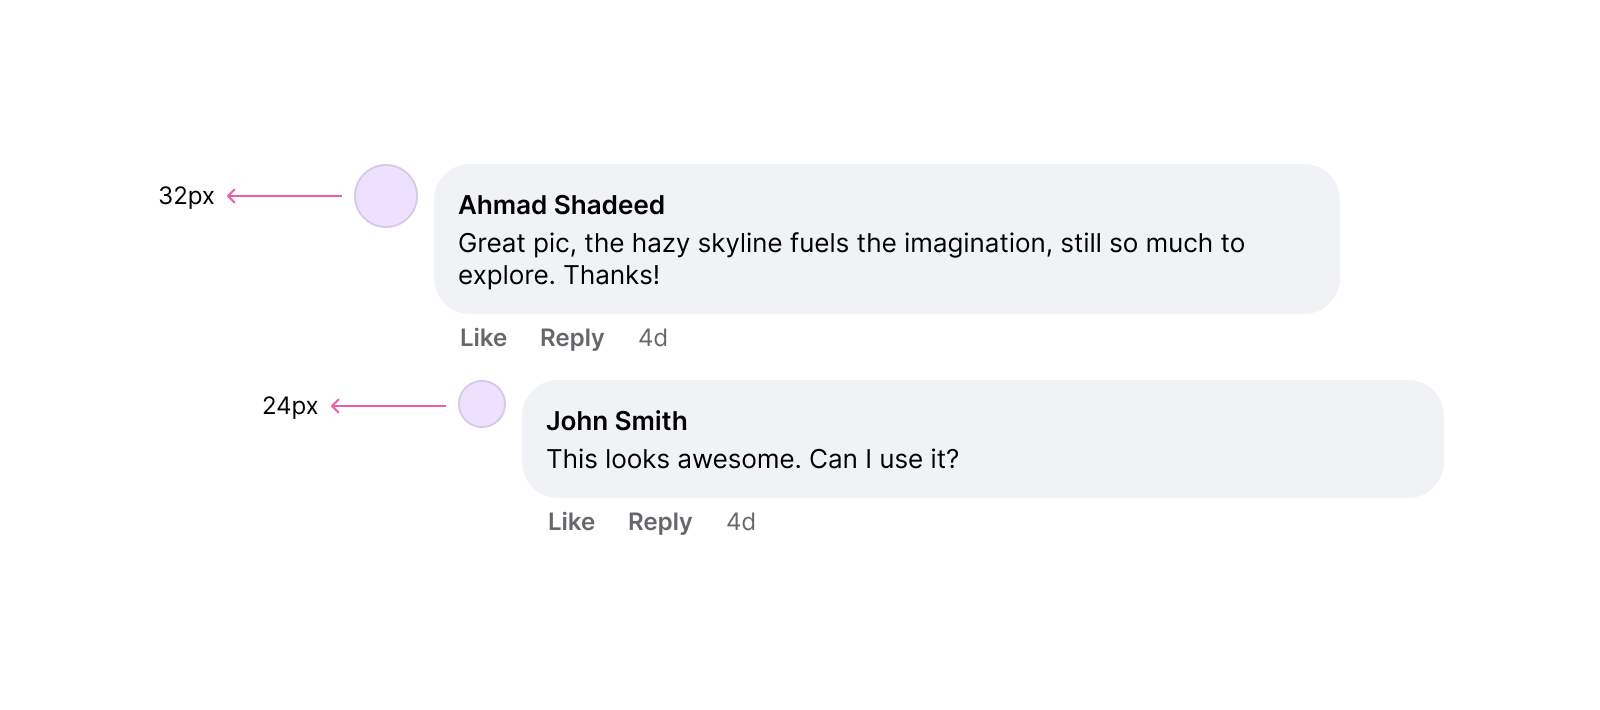
Utilizing type queries is ideal for that.
.consumer {
  flex: 0 0 var(--size);
  width: var(--size);
  top: var(--size);
}

.remark {
  --size: 2rem;

  @container type(--depth: 1) or type(--depth: 2) {
    --size: 1.5rem;
  }
}
Dynamic textual content alignment with dir=auto
A remark would possibly comprise a left-to-right (LTR) or right-to-left (RTL) language. The textual content alignment needs to be completely different primarily based on the content material language. Due to dir=auto HTML attribute, we are able to let the browser try this for us.
<div class="remark">
  <div class="consumer"></div>
  <div>
    <div class="comment__body">
      <p dir="auto"></p>
    </div>
    <div class="comment__actions"></div>
  </div>
</div>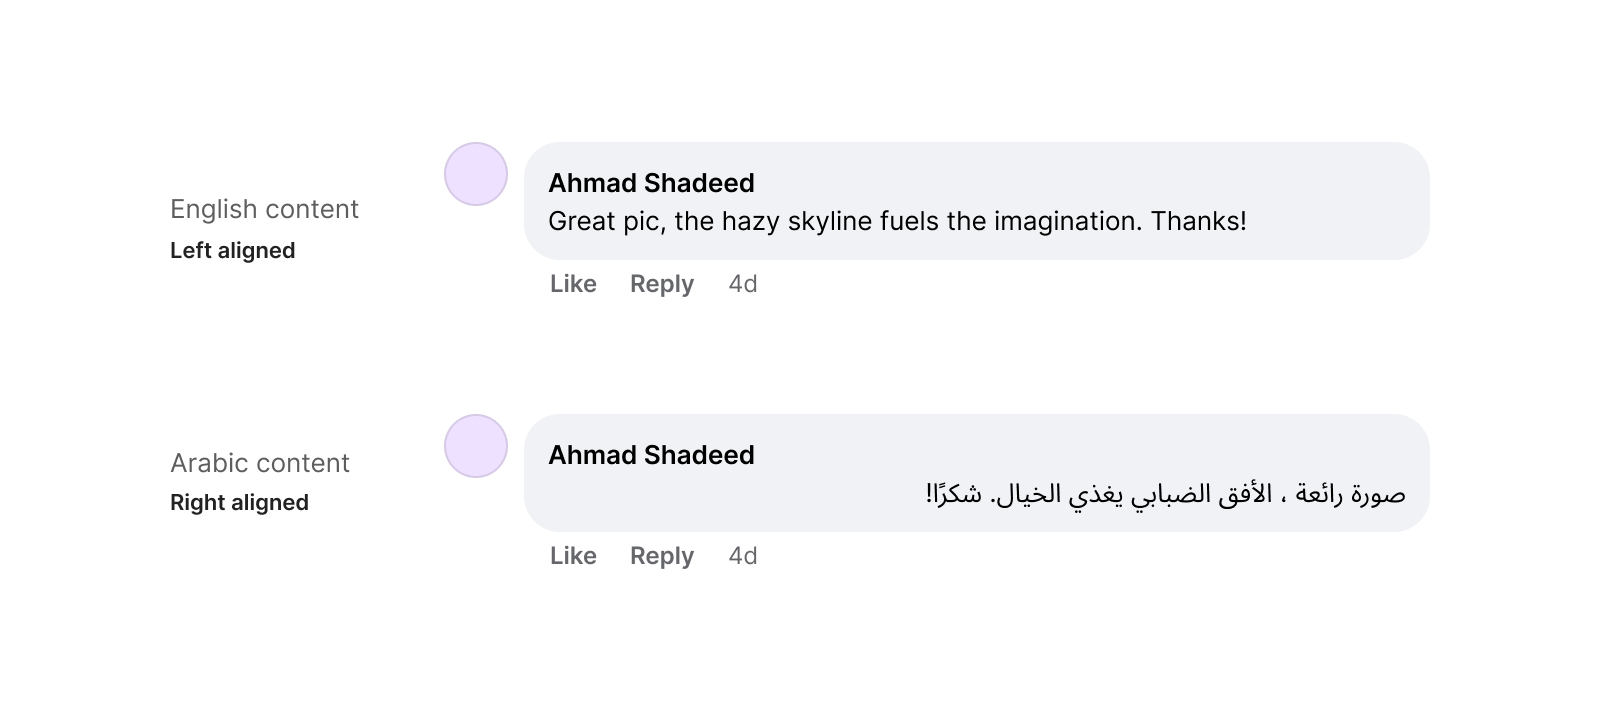
CSS Logical Properties
By utilizing CSS logical properties, we are able to construct the remark element in a manner that modifications primarily based on the doc path. The identical applies to the connecting strains, too.
Take a look at the next video. Discover the way it makes switching from LTR to RTL a breeze!
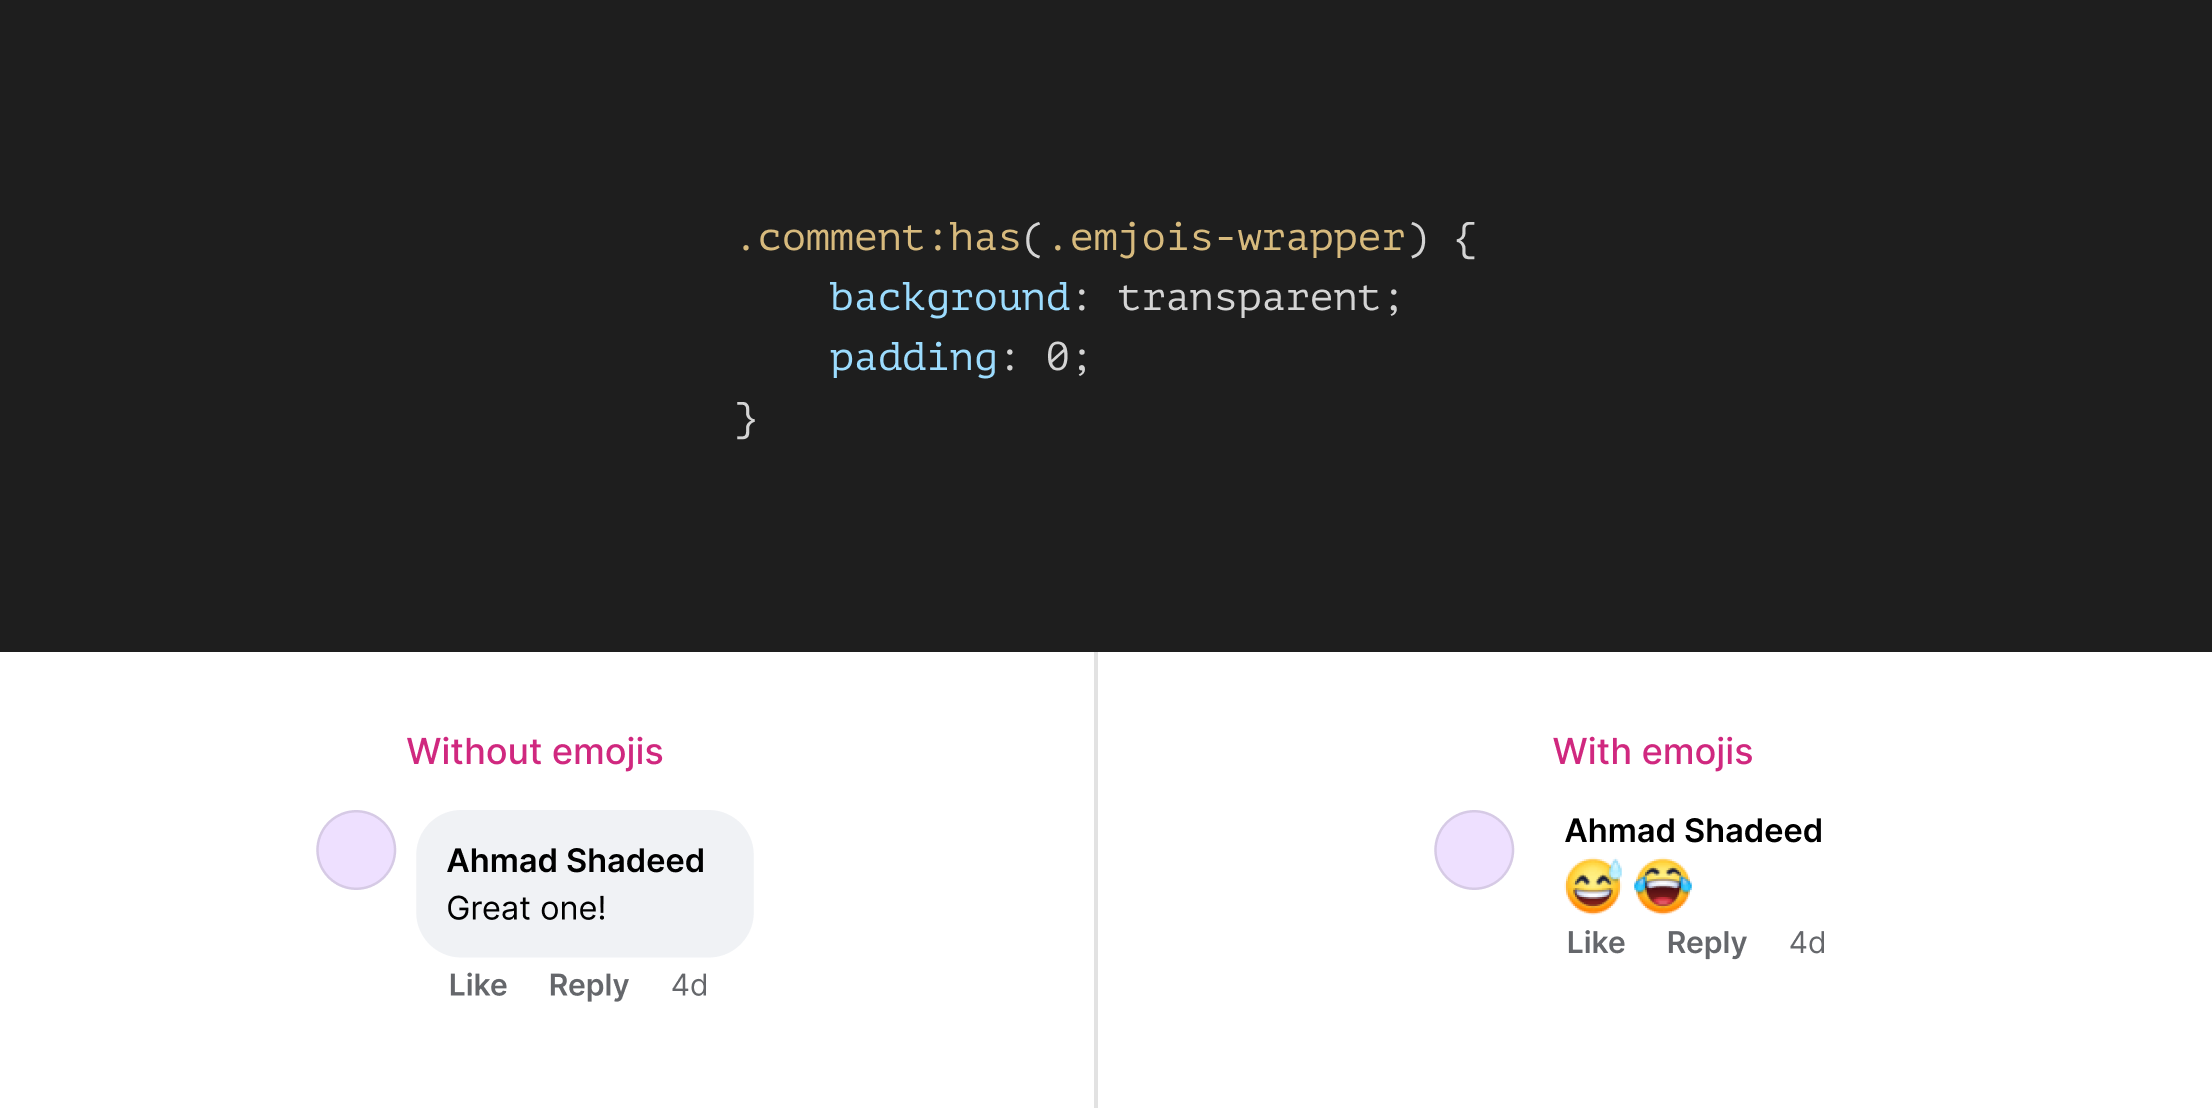
The emoji-only state
When the consumer provides a remark that consists of emojis solely, the containing wrapper will change a bit:
This can be a good use-case for CSS :has.
.remark:has(.emjois-wrapper) {
  background: var(--default);
  padding: var(--reset);
}
Conclusion
It’s all the time thrilling of what may be accomplished with fashionable CSS. Attempting to consider a element or a structure that’s already inbuilt a brand new methods is a good way to study new stuff. I discovered lots of new issues and loved the entire course of.
Thanks for studying.