

Animations are a vital a part of net design and growth. They will draw consideration, information customers on their journey, present satisfying and significant suggestions to interplay, add character and aptitude to make the web site stand out, and a lot extra!
Earlier than we start, let’s take a fast take a look at the next video and picture how a lot CSS and JavaScript would take to create an animation like this. Discover that the cart counter can be animated, and the animation runs proper after the earlier one completes.
JavaScript libraries like React and Vue most likely popped into your thoughts straight away, alongside JavaScript animation libraries like Framer Movement and GSAP. They do a strong job and positively simplify the method. Nevertheless, JavaScript is the costliest useful resource on the internet, and these libraries are bundled alongside the content material and first assets. Ultimately, it’s as much as the browser to obtain, parse and execute the animation engine earlier than it’s prepared to be used.
What if we might simply skip all that, use vanilla JavaScript and CSS, and let the optimized browser API do all of the heavy lifting whereas sustaining full management over how they carry out transitions between the assorted UI states? With the brand new Shared Ingredient Transitions API, implementing animations like it will turn into extremely simple and seamless.
On this article, we’ll dive deeply into this game-changing API which remains to be in its early phases, and discover its unimaginable potential by constructing 4 enjoyable and thrilling real-life examples from scratch.
Browser Assist And API Standing
On the time of this text, API is in its early “Editor’s draft” stage, so the usual will not be but finalized, and the specs may change as time goes on.
Shared Ingredient Transitions API is presently supported solely in Chrome model 104+ and Canary with the document-transition flag enabled. Examples shall be accompanied by a video, so you’ll be able to simply observe together with the article for those who don’t have the required browser put in.
Shared Ingredient Transitions API
Animating between UI states normally requires each the present and the following state to be current on the similar time. Let’s take a easy picture carousel that crossfades between the pictures for instance. We’ll even create that carousel later. Should you have been utilizing solely JavaScript with none libraries or frameworks, you’d have to make sure that each the present and subsequent picture are current, after which fade out the present picture and fade within the subsequent picture concurrently. You additionally must deal with a handful of edge instances and accessibility points that may come up because of that.
In a nutshell, Shared Ingredient Transitions API permits us to skip lots of prep work by guaranteeing that each outgoing and incoming states are visually current on the similar time. All we’ve got to do is deal with the DOM updates and animation types. The API additionally permits us to faucet into these particular person states and extra and offers us full management over the animation utilizing the usual CSS animation properties.
Let’s begin with a easy and enjoyable instance. We’ll create a picture gallery with the next animation – on card click on, the picture inside the cardboard will increase and transfer from its place within the grid into a hard and fast overlay. When the expanded picture within the overlay is clicked, it is going to return again into its place. Let’s see how we will create this animation in only a few strains of JavaScript and CSS.
Beginning Markup, Kinds And JavaScript
Let’s begin with the next markup and a few primary grid, card, and overlay types. For extra particulars, take a look at the supply code within the following CodePen:
See the Pen [Image gallery – vanilla (1) [forked]](https://codepen.io/smashingmag/pen/MWGJNaw) by Adrian Bece.
Let’s take a better take a look at our JavaScript code:
// Choose static & shared web page parts.
const overlayWrapper = doc.getElementById("js-overlay");
const overlayContent = doc.getElementById("js-overlay-target");

operate toggleImageView(index) {
    const picture = doc.getElementById(`js-gallery-image-${index}`);

    // Retailer picture guardian aspect.
    const imageParentElement = picture.parentElement;

    // Transfer picture node from grid to modal.
    moveImageToModal(picture);

   // Create a click on listener on the overlay for the lively picture aspect.
    overlayWrapper.onclick = operate () {
        // Return the picture to its guardian aspect.
         moveImageToGrid(imageParentElement);
    };
}

// Helper capabilities for transferring the picture round and toggling the overlay.

operate moveImageToModal(picture) {
    // Present the overlay.
    overlayWrapper.classList.add("overlay--active");

    overlayContent.append(picture);
}

operate moveImageToGrid(imageParentElement) {
    imageParentElement.append(overlayContent.querySelector("img"));

    // Disguise the overlay.
    overlayWrapper.classList.take away("overlay--active");
}
On card click on, we transfer the picture aspect from the grid markup into the overlay, leaving the container node empty. Visually, we’re making use of background-image CSS to the empty container to create an phantasm that the picture remains to be there. We might have achieved the identical impact with the duplicated picture aspect with the optimum loading technique, however I’ve chosen this method for simplicity.
We’re additionally setting the overlay onclick occasion, which strikes the picture again into its origin container, and are additionally toggling the visibility CSS class on the overlay aspect.
It’s necessary to notice that we’re transferring the picture aspect from the grid HTML aspect into the overlay HTML aspect, so we’ve got the identical DOM node within the grid and the overlay. We will seek advice from the picture as a “Shared Ingredient”.
Including A Easy Crossfade Transition
Now that we’ve got completed organising the markup, primary types, and JavaScript performance, we’re going to create our first state transition utilizing the Shared Ingredient Transitions API!
Let’s go into our toggleImageView operate. First, we have to create a transition utilizing the worldwide createDocumentTransition operate. After which, we simply must go the callback operate that updates the DOM to the begin operate:
// This operate is now asynchronous.
async operate toggleImageView(index) {
  const picture = doc.getElementById(`js-gallery-image-${index}`);
  const imageParentElement = picture.parentElement;

  // Initialize transition from the API.
  const moveTransition = doc.createDocumentTransition();

  // moveImageToTarget operate is now known as by the API "begin" operate.
  await moveTransition.begin(() => moveImageToModal(picture));

  // Create a click on listener on the overlay for the lively picture aspect.
  overlayWrapper.onclick = async operate () {
    // Initialize transition from the API.
    const moveTransition = doc.createDocumentTransition();

    // moveImageToContainer operate is now known as by the API "begin" operate.
    await moveTransition.begin(() => moveImageToGrid(imageParentElement));
  };
}
Let’s take a look at our instance with the Shared Ingredient Transitions API included.
See the Pen [Image gallery – crossfade (2) [forked]](https://codepen.io/smashingmag/pen/yLjgmJN) by Adrian Bece.
By altering only a few strains of code and calling our DOM replace capabilities by way of the API, we acquired this neat little crossfade animation proper out of the field. All we needed to do was to be sure that the DOM up to date and known as the required operate.
After we name the begin operate, the API takes the outgoing screenshot of the web page state and performs the DOM replace. When the replace completes, the second, incoming picture is captured. It’s necessary to level out that what we see in the course of the transition are screenshots of the weather, not the precise DOM parts. That means, we will keep away from any potential accessibility and usefulness points in the course of the transition.
By default, Shared Ingredient Transitions API will carry out a crossfade animation between these outgoing (fade-out) and incoming (fade-in) screenshots. This turns out to be useful because the browser ensures that each states can be found for the complete animation period, so we will focus extra on customizing it!

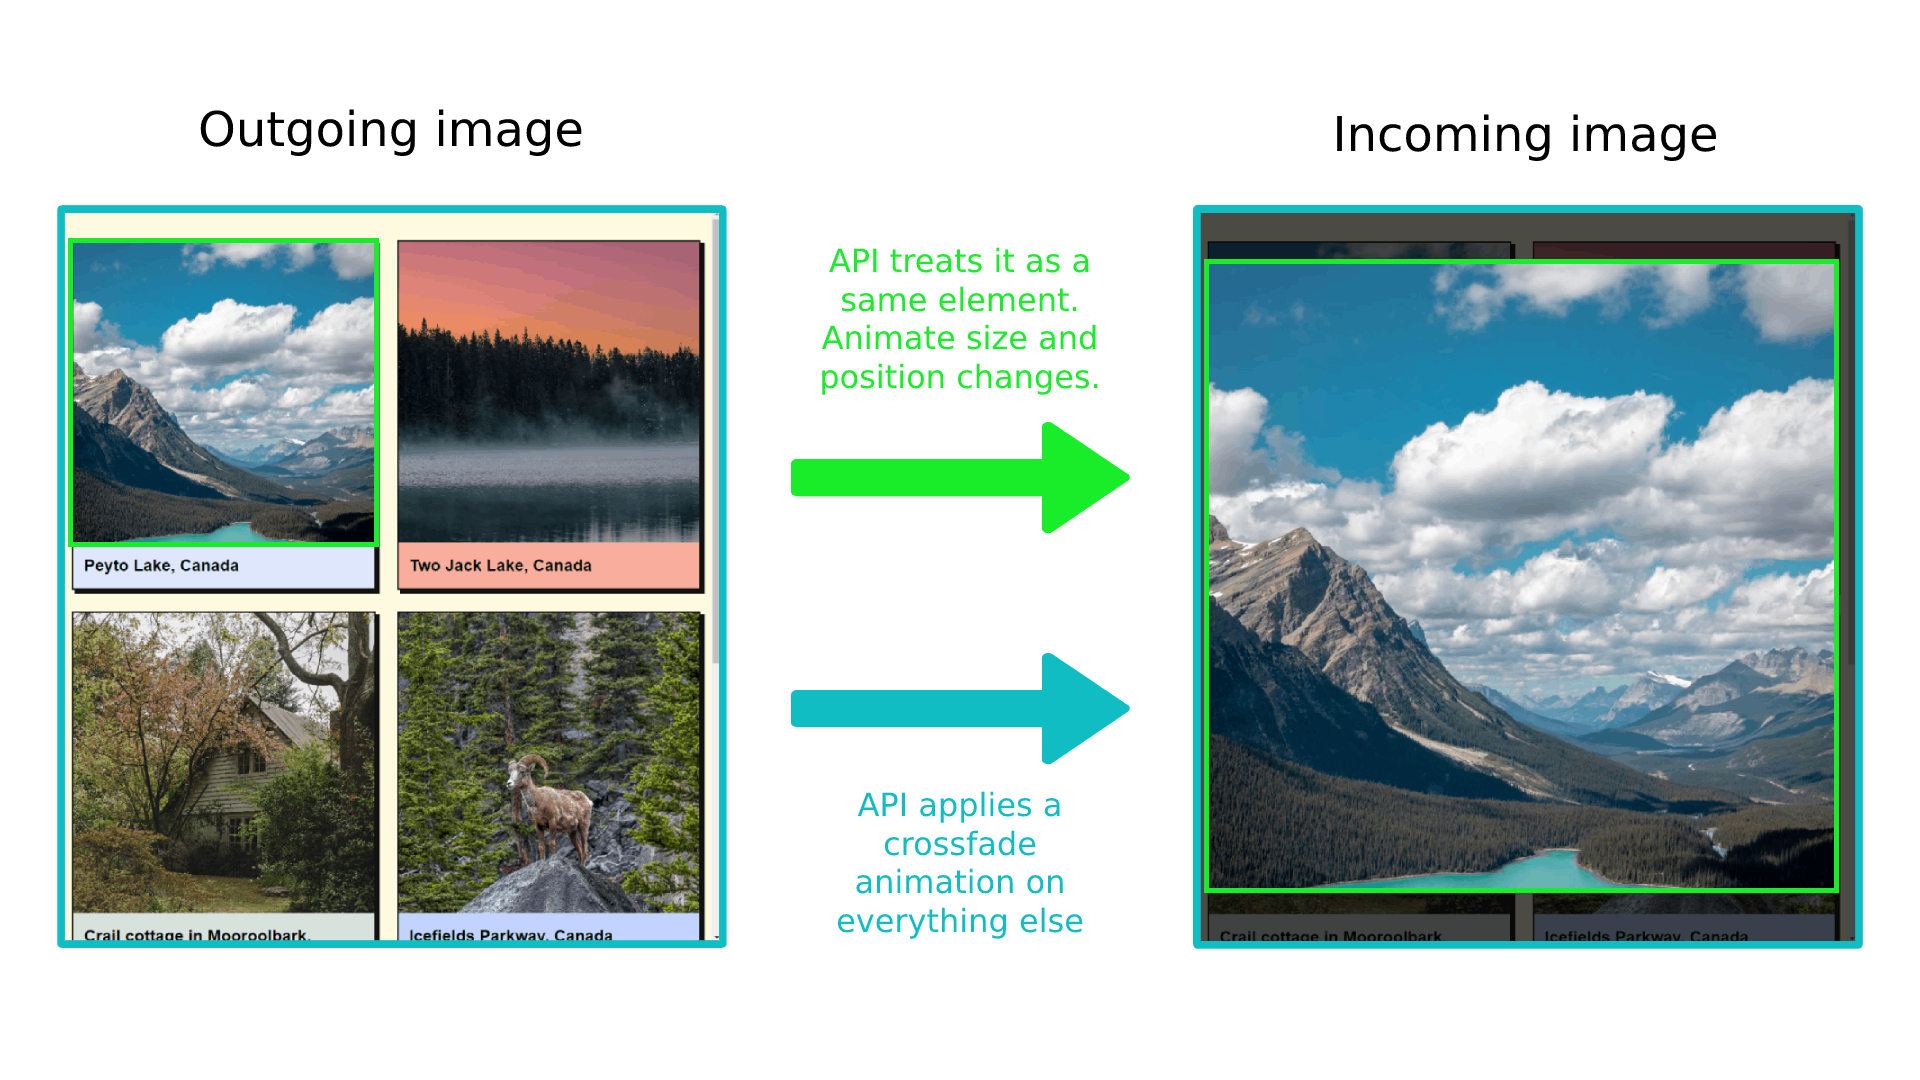
Though this animation seems alright, it’s only a minor enchancment. At the moment, the API doesn’t actually know that the picture (shared aspect) that’s being moved from the container to the overlay is similar aspect of their respective states. We have to instruct the browser to pay particular consideration to the picture aspect when switching between states, so let’s do this!
Creating A Shared Ingredient Animation
With page-transition-tag CSS property, we will simply inform the browser to observe for the aspect in each outgoing and incoming photos, preserve monitor of aspect’s measurement and place which are altering between them, and apply the suitable animation.
We additionally want to use the include: paint or include: format to the shared aspect. This wasn’t required for the crossfade animations, because it’s solely required for parts that can obtain the page-transition-tag. If you wish to be taught extra about CSS containment, Rachel Andrew wrote a very detailed article explaining it.
.gallery__image--active {
  page-transition-tag: active-image;
}

.gallery__image {
  include: paint;
}
One other necessary caveat is that page-transition-tag needs to be distinctive, and we will apply it to just one aspect in the course of the period of the animation. That is why we apply it to the lively picture aspect proper earlier than the picture is moved to the overlay and take away it when the picture overlay is closed and the picture is returned to its unique place:
async operate toggleImageView(index) {
   const picture = doc.getElementById(`js-gallery-image-${index}`);

  // Apply a CSS class that incorporates the page-transition-tag earlier than animation begins.
  picture.classList.add("gallery__image--active");

  const imageParentElement = picture.parentElement;

  const moveTransition = doc.createDocumentTransition();
  await moveTransition.begin(() => moveImageToModal(picture));

  overlayWrapper.onclick = async operate () {
    const moveTransition = doc.createDocumentTransition();
    await moveTransition.begin(() => moveImageToGrid(imageParentElement));

    // Take away the category which incorporates the page-transition-tag after the animation ends.
    picture.classList.take away("gallery__image--active");
  };
}
Alternatively, we might have used JavaScript to toggle the page-transition-tag property inline on the aspect. Nevertheless, it’s higher to make use of the CSS class toggle to utilize media queries to use the tag conditionally:
// Applies page-transition-tag to the picture.
picture.fashion.pageTransitionTag = "active-image";

// Removes page-transition-tag from the picture.
picture.fashion.pageTransitionTag = "none";
And that’s just about it! Let’s check out our instance with the shared aspect utilized:
See the Pen [Image gallery – crossfade + shared element (3) [forked]](https://codepen.io/smashingmag/pen/OJZWKaK) by Adrian Bece.
It seems significantly better, doesn’t it? Once more, with only a few further strains of CSS and JavaScript, we managed to create this advanced transition between the 2 states that might in any other case take us hours to create.
We’ve instructed the browser to observe for measurement and place adjustments between the UI states by tagging our shared lively picture aspect with a novel id and making use of particular animation. That is the default habits for parts with the page-transition-tag set. Within the subsequent few examples, we’ll discover ways to customise animation properties aside from opacity, place, and measurement.
Customizing Animation Period And Easing Operate
We’ve created this advanced transition with only a few strains of CSS and JavaScript, which turned out nice. Nevertheless, we count on to have extra management over the animation properties like period, easing operate, delay, and so forth to create much more elaborate animations or compose them for even better impact.
Shared Ingredient Transitions API makes use of CSS animation properties and we will use them to totally customise our state animation. However which CSS selectors to make use of for these outgoing and incoming states that the API is producing for us?
Shared Ingredient Transition API introduces new pseudo-elements which are added to DOM when its animations are run. Jake Archibald explains the pseudo-element tree in his Chrome builders article. By default (in case of crossfade animation), we get the next tree of pseudo-elements:
::page-transition
└─ ::page-transition-container(root)
   └─ ::page-transition-image-wrapper(root)
      ├─ ::page-transition-outgoing-image(root)
      └─ ::page-transition-incoming-image(root)
These pseudo-elements could seem a bit complicated at first, so I’m together with WICG’s concise rationalization for these pseudo-elements and their common function:
::page-transitionsits in a top-layer, over every thing else on the web page.::page-transition-outgoing-image(root)is a screenshot of the previous state, and::page-transition-incoming-image(root)is a stay illustration of the brand new state. Each render as CSS changed content material.::page-transition-containeranimates measurement and place between the 2 states.::page-transition-image-wrappersupplies mixing isolation, so the 2 photos can accurately cross-fade.::page-transition-outgoing-imageand::page-transition-incoming-imageare the visible states to cross-fade.
For instance, after we apply the page-transition-tag: active-image, its pseudo-elements are added to the tree:
::page-transition
├─ ::page-transition-container(root)
│  └─ ::page-transition-image-wrapper(root)
│     ├─ ::page-transition-outgoing-image(root)
│     └─ ::page-transition-incoming-image(root)
└─ ::page-transition-container(active-image)
   └─ ::page-transition-image-wrapper(active-image)
      ├─ ::page-transition-outgoing-image(active-image)
      └─ ::page-transition-incoming-image(active-image)
In our instance, we wish to modify each the crossfade (root) animation and the shared aspect animation. We will use the common selector * with the pseudo-element to vary animation properties for all obtainable transition parts and goal pseudo-elements for particular animation utilizing the page-transition-tag worth.
On this instance, we’re making use of 400ms period for all animated parts with an ease-in-out easing operate, after which override the active-image transition easing operate and setting a customized cubic-bezier worth:
::page-transition-container(*) {
  animation-duration: 400ms;
  animation-timing-function: ease-in-out;
}

::page-transition-container(active-image) {
  animation-timing-function: cubic-bezier(0.215, 0.61, 0.355, 1);
}
See the Pen [Image gallery – custom animation (4) [forked]](https://codepen.io/smashingmag/pen/gOzgVJV) by Adrian Bece.
Function Detection And Fallbacks
We acquired barely carried away and made this instance unusable on browsers that don’t assist the API, so let’s repair that. We have to add some function checks and fallbacks to be sure that the web site stays usable for all customers.
Function detection in JavaScript is so simple as checking if the createDocumentTransition operate exists:
const isSupported = "createDocumentTransition" in doc;

if(isSupported) {
    /* Shared aspect transitions API is supported */
} else {
    /* Shared aspect transitions API will not be supported */
}
In CSS, we will use the @helps tag to use types primarily based on function assist conditionally. That is helpful if you wish to present a much less splendid however nonetheless efficient normal CSS transition or animation:
@helps (page-transition-tag: none) {
    /* Shared aspect transitions API is supported */
    /* Use the Shared Ingredient Transisitons API types */
}

@helps not (page-transition-tag: none) {
    /* Shared aspect transitions API will not be supported */
    /* Use a easy CSS animation if potential */
}
If we have to assist even older browsers, we will conditionally apply the CSS class utilizing JavaScript:
if("createDocumentTransition" in doc) {
  doc.documentElement.classList.add("shared-elements-api");
}
html.shared-elements-api {
    /* Shared aspect transitions API is supported */
}

html:not(.shared-elements-api) {
    /* Shared aspect transitions API will not be supported */
}
We will take a look at our instance on a browser that doesn’t assist the API and see that the operate nonetheless runs however will not be animated.
See the Pen [Image gallery – fallback (5) [forked]](https://codepen.io/smashingmag/pen/yLjMBLb) by Adrian Bece.

@helps question to toggle the banner visibility for unsupported browsers. (Massive preview)Accessible Animations
It’s necessary to concentrate on accessibility necessities when working with animations. Some individuals desire searching the net with diminished movement, so we should both take away an animation or present a extra appropriate various. This may be simply carried out with a extensively supported prefers-reduced-motion media question.
The next code snippet turns off animations for all parts utilizing the Shared Ingredient Transitions API. This can be a shotgun resolution, and we have to be sure that DOM updates easily and stays usable even with the animations turned off:
@media (prefers-reduced-motion) {
    /* Flip off all animations */
    ::page-transition-container(*),
    ::page-transition-outgoing-image(*),
    ::page-transition-incoming-image(*) {
        animation: none !necessary;
    }

    /* Or, higher but, create accessible options for these animations  */
}
See the Pen [Image gallery -completed (6) [forked]](https://codepen.io/smashingmag/pen/RwypbPz) by Adrian Bece.
To-do Listing With Customized Animations
Now that we acquired acquainted with the fundamentals of the Shared Ingredient Transitions API, we will transfer on to extra advanced examples and deal with composing animations and using CSS animation properties and @keyframe to totally customise the animations.
Let’s create an interactive to-do checklist with 3 column containers: duties in progress, accomplished duties, and gained’t-do duties. We’ll use an identical method as earlier than and customise the animation to make the movement extra pure and bouncier. Clicked merchandise will subtly scale up because it leaves the guardian container and can reduce down and barely bounce when it strikes to a goal container. The remaining to-do checklist parts also needs to be animated easily to maneuver over to the empty house.
Beginning Markup, Kinds And JavaScript
We’ll use a really related method with transferring parts round as within the earlier instance, so we’ll begin with the Shared Ingredient API already applied with a default crossfade animation. Try the next CodePen for extra particulars.
See the Pen [To-do list – shared element transitions API (1) [forked]](https://codepen.io/smashingmag/pen/qBYrWbQ) by Adrian Bece.
Let’s dive proper into the JavaScript code. We’ve an identical setup right here as within the earlier instance. The one distinction is that we will have two potential goal containers for our gadgets within the to-do checklist: the second (“Achieved”) or the third column (“Received’t-do”).
async operate moveCard(isDone) {
  // Choose the lively card.
  const card = this.window.occasion.goal.closest("li");

  // Get the goal checklist id.
  const vacation spot = doc.getElementById(
    `js-list-${isDone ? "carried out" : "not-done"}`
  );

  //We'll use this class to cover the merchandise controls whereas the animation is working.
  card.classList.add("card-moving");

  if (doc.createDocumentTransition) {
    const moveTransition = doc.createDocumentTransition();

    // Run animation.
    await moveTransition.begin(() => vacation spot.appendChild(card));
  } else {
    // Fallback.
    vacation spot.appendChild(card);
  }
}
Discover how the Shared Ingredient Transitions API freezes rendering, and we can’t work together with some other aspect on the web page whereas the animation is working. This is a vital limitation to bear in mind, so it’s finest to keep away from creating prolonged animations that may hurt usability and annoy customers.
Creating Shared Ingredient Transition
Let’s begin by including page-transition-tag values to our card parts and organising a primary place animation.
We’ll use two completely different units of page-transition-tag values for this instance:
card-active: for a component that’s presently being moved to a different column. We’ll apply this tag proper earlier than the animation runs and take away it as soon as it ends;card-${index + 1}: for different parts that are being moved inside the first column to fill the empty house left by an animated card. They’ll have a novel tag primarily based on their index.
// Assign distinctive page-transition-tag values to all process playing cards.
// We might have additionally carried out this manually in CSS by concentrating on :nth-child().
const allCards = doc.querySelectorAll(".col:not(.col-complete) li");
allCards.forEach(
    (c, index) => (c.fashion.pageTransitionTag = `card-${index + 1}`)
);

async operate moveCard(isDone) {
  const card = this.window.occasion.goal.closest("li");
  const vacation spot = doc.getElementById(
    `js-list-${isDone ? "carried out" : "not-done"}`
  );

  //We'll use this class to cover the merchandise controls whereas the animation is working.
  card.classList.add("card-moving");

  if (doc.createDocumentTransition) {
    // Exchange the merchandise tag with an lively (transferring) aspect tag.
    card.fashion.pageTransitionTag = "card-active";

    const moveTransition = doc.createDocumentTransition();
    await moveTransition.begin(() => vacation spot.appendChild(card));

    // Take away the tag after the animation ends.
    card.fashion.pageTransitionTag = "none";
  } else {
    vacation spot.appendChild(card);
  }
}
After all, we additionally want so as to add a include property to our playing cards that are checklist parts in our instance. With out the property, the animation wouldn’t break, however it might fall again to the default crossfade animation.
Notice: Sooner or later, this habits may change, and the DOM replace will happen with out the animation.
li {
  include: paint;
}
And, identical to that, we’ve got a very nice place animation arrange for our card parts. Discover how we’re doing nothing extra than simply toggling page-transition-tag values and making use of the include: paint worth in our CSS, and we’re getting all these pleasant animations.
See the Pen [To-do list – with shared element (2) [forked]](https://codepen.io/smashingmag/pen/YzLZKpo) by Adrian Bece.
This animation seems alright, nevertheless it feels considerably inflexible on this instance. What provides? Generally the animation will look spectacular proper out of the field, like within the earlier instance. Different instances, nevertheless, it is going to require some tuning. It normally is dependent upon the movement, animation sort, goal appear and feel, and function of the animation.
Creating A Scaling And Bouncing Animation
We will take full benefit of CSS animation properties and create our customized keyframes for animation pseudo-elements to attain the bouncing impact.
First, we’ll barely enhance the animation-duration worth of the place animation. Despite the fact that ::page-transition-container animates the scale and place, we’re utilizing its direct youngster ::page-transition-image-wrapper for scaling animation, so we don’t override the default positioning and measurement animation. We’re additionally barely delaying the dimensions animation simply to make it stream higher.
And at last, we’re adjusting the animation-duration worth for all parts so every thing stays in sync, and we’re making use of a customized cubic-bezier timing operate to attain the ultimate bouncing impact:
/* We're making use of include property on all browsers (no matter property assist) to keep away from variations in rendering and introducing bugs */
li {
  include: paint;
}

@helps (page-transition-tag: none) {
  ::page-transition-container(card-active) {
    animation-duration: 0.3s;
  }

  ::page-transition-image-wrapper(card-active) {
    animation: popIn 0.3s cubic-bezier(0.64, 0.57, 0.67, 2) 0.1s;
  }
}

@keyframes popIn {
  from {
    rework: scale(1.3);
  }
  to {
    rework: scale(1);
  }
}
With only a few minor tweaks and a customized animation keyframe definition, we’ve created a pleasant and eccentric animation to make our to-do instance a bit extra thrilling.
See the Pen [To-do list – jumping & bouncing animation (3) [forked]](https://codepen.io/smashingmag/pen/YzLZKZm) by Adrian Bece.
Picture Carousel With Customized Crossfade Animation
Let’s transfer on to a less complicated instance during which we’ll preserve the deal with creating customized animation keyframes for each outgoing and incoming photos.
We’ll create a crossfading picture carousel. That is the primary concept that popped into my thoughts once I noticed the Shared Ingredient Transitions API announcement video. Final yr, I constructed an internet app to assist me preserve monitor of my music assortment, which shows a particulars web page for every launch. On that web page, I’ve added a easy picture carousel that exhibits photos of an album cowl, booklet, and packaging.
I grabbed the supply code and simplified it for this instance. So, let’s create a barely extra elaborate crossfade animation for this aspect and mess around with CSS filters.
Photosensitivity warning: This instance includes animating picture brightness to imitate a lightning flash. If this is applicable to you, skip the next video and embedded examples. You possibly can nonetheless observe the instance and create customized crossfade transition by omitting brightness values from CSS.
Beginning Markup, Kinds And JavaScript
On this instance, we’ll showcase how we will run Shared Ingredient Transitions API to animate even the smallest adjustments, like altering a single HTML property. As a proof of idea, we’ll have a single picture HTML aspect, and we’ll change its src property as lively picture adjustments:
<part class="gallery">
  <img src="https://smashingmagazine.com/2022/10/ui-animations-shared-element-transitions-api-part1/..." id="js-gallery" decoding="sync" loading="keen" />
  <apart class="gallery__controls">
    <div class="gallery__status">
      <span id="js-gallery-index">1</span> / 11
    </div>
    <button onclick="previousImage()" class="gallery__button">
      <!-- ... -->
    </button>
    <button onclick="nextImage()" class="gallery__button">
      <!-- ... -->
    </button>
  </apart>
</part>
Let’s take a look at our JavaScript file. Now we’ve got two capabilities, particularly for transferring backwards and forwards within the picture array. We’re working the identical crossfade animation on each capabilities, and every thing else is just about the identical as in earlier examples:
// Let's retailer all photos in an array.
const photos = [ "https://path.to/image-1.jpg", "https://path.to/image-2.jpg", "https://smashingmagazine.com/2022/10/ui-animations-shared-element-transitions-api-part1/..."];
let index = 0;

operate previousImage() {
  index -= 1;

  if (index < 0) {
    index = photos.size - 1;
  }

  updateIndex();
  crossfadeElements();
}

operate nextImage() {
  index += 1;

  if (index >= photos.size) {
    index = 0;
  }

  updateIndex();
  crossfadeElements();
}

// Util capabilities for animation, index replace and picture src replace.

async operate crossfadeElements() {
  if (doc.createDocumentTransition) {
    const imageTransition = doc.createDocumentTransition();
    await imageTransition.begin(updateImage);
  } else {
    updateImage();
  }
}

operate updateIndex() {
  const galleryIndex = doc.getElementById("js-gallery-index");
  galleryIndex.textContent = index + 1;
}

operate updateImage() {
  const gallery = doc.getElementById("js-gallery");
  gallery.src = photos[index];
}
We’ll begin with default crossfade animation, so we will focus extra on the CSS and customizing animation properties.
See the Pen [Crossfade image carousel – setup (1) [forked]](https://codepen.io/smashingmag/pen/YzLZzVN) by Adrian Bece.
Making use of Customized Keyframes
Let’s make this crossfade animation a bit extra elaborate by enjoying round with customized animation keyframes. We’re making a crossfade animation that imitates a lightning flash.
Let’s create the next keyframes:
fadeOut: the present picture will turn into blurrier and enhance in brightness as its opacity worth animates from1to0;fadeIn: the following picture will turn into much less blurry and reduce in brightness as its opacity worth animates from0to1.

@keyframes fadeOut {
    from {
        filter: blur(0px) brightness(1) opacity(1);
    }
    to {
        filter: blur(6px) brightness(8) opacity(0);
    }
}

@keyframes fadeIn {
    from {
        filter: blur(6px) brightness(8) opacity(0);
    }
    to {
        filter: blur(0px) brightness(1) opacity(1);
    }
}
Now, all we’ve got to do is assign the exit animation to the outgoing picture pseudo-element and the entry animation to the incoming picture pseudo-element. We will set a page-transition-tag on to the HTML picture aspect because it’s the one aspect that can carry out this animation:
/* We're making use of include property on all browsers (no matter property assist) to keep away from variations in rendering and introducing bugs */
.gallery img {
    include: paint;
}

@helps (page-transition-tag: supports-tag) {
    .gallery img {
        page-transition-tag: gallery-image;
    }

    ::page-transition-outgoing-image(gallery-image) {
        animation: fadeOut 0.4s ease-in each;
    }

    ::page-transition-incoming-image(gallery-image) {
        animation: fadeIn 0.4s ease-out 0.15s each;
    }
}
Even the seemingly easy crossfade animations can look cool, don’t you assume? I believe this explicit animation suits actually properly with the darkish theme we’ve got within the instance.
See the Pen [Crossfade image carousel – completed (2) [forked]](https://codepen.io/smashingmag/pen/gOzbZXB) by Adrian Bece.
Elaborate Add-to-cart Animation
In our last instance, we’ll construct the mission we launched within the very first video on this article. We lastly get to construct a neat add-to-cart animation!
In our earlier examples, we ran a single customized animation on a single aspect. On this instance, we’ll create two animations that run one after one other. First, the clicking occasion will activate the dot that strikes to the cart icon, after which the cart counter worth change shall be animated.
No matter animation complexity, Shared Ingredient Transitions API streamlines the entire course of and fingers us full management over the feel and appear of the animation.
Beginning Markup, Kinds And JavaScript
As within the earlier examples, we’ll begin with a primary markup and elegance setup and a primary crossfade animation:
// Choose static web page parts and initialize the counter.
const counterElement = doc.getElementById("js-shopping-bag-counter");
let counter = 0;

async operate addToCart() {
    const dot = createCartDot();
    const guardian = this.window.occasion.goal.closest("button");

    // Set the dot aspect to its beginning place in a button.
    guardian.append(dot);

    // Dot transition.
    if (doc.createDocumentTransition) {
        const moveTransition = doc.createDocumentTransition();
        // Transfer the dot to the cart icon.
        await moveTransition.begin(() => moveDotToTarget(dot));
    }

    // Take away the dot after the animation completes.
    dot.take away();

    // Counter transition.
    if (doc.createDocumentTransition) {
        const counterTransition = doc.createDocumentTransition();
        await counterTransition.begin(() => incrementCounter(counterElement));
    } else {
        incrementCounter();
    }
}

// Util capabilities for creating the dot aspect, transferring the dot to focus on, and incrementing the counter.

operate moveDotToTarget(dot) {
    const goal = doc.getElementById("js-shopping-bag-target");
    goal.append(dot);
}

operate incrementCounter() {
    counter += 1;
    counterElement.innerText = counter;
}

operate createCartDot() {
    const dot = doc.createElement("div");
    dot.classList.add("product__dot");
    return dot;
}
See the Pen [Add to cart animation – starting code (1) [forked]](https://codepen.io/smashingmag/pen/eYrvYXm) by Adrian Bece.
Creating Composed Animations
First, we have to toggle a page-transition-tag worth for our dynamic dot aspect and the cart aspect of their respective transition animations:
async operate addToCart() {
   /* ... */

  if (doc.createDocumentTransition) {
    const moveTransition = doc.createDocumentTransition();
    await moveTransition.begin(() => moveDotToTarget(dot));
    dot.fashion.pageTransitionTag = "none";
  }

  dot.take away();

  if (doc.createDocumentTransition) {
    counterElement.fashion.pageTransitionTag = "cart-counter";
    const counterTransition = doc.createDocumentTransition();
    await counterTransition.begin(() => incrementCounter(counterElement));
    counterElement.fashion.pageTransitionTag = "none";
  } else {
    incrementCounter();
  }
}

/* ... */

operate createCartDot() {
  const dot = doc.createElement("div");
  dot.classList.add("product__dot");
  dot.fashion.pageTransitionTag = "cart-dot";

  return dot;
}
Subsequent, we’ll customise each animations with CSS. For the dot animation, we’ll change its period and timing operate, and for cart-counter, we’ll add a slight vertical motion to a regular crossfade animation.
Discover how the dot aspect doesn’t have animations or CSS properties for altering dimensions. Its dimensions reply to the guardian container. Its preliminary place is within the button container, after which it’s moved to a smaller cart icon container, which is positioned behind the counter. Shared Components API understands how aspect place and dimensions change in the course of the animation and offers us this elegant transition animation proper out of the field!

dot aspect responds to container dimensions and the API detects this alteration in dimensions and positions and supplies a easy transition out of the field. (Massive preview)/* We're making use of include property on all browsers (no matter property assist) to keep away from variations in rendering and introducing bugs */
.product__dot {
include: paint;
}
.shopping-bag__counter span {
include: paint;
}
@helps (page-transition-tag: supports-tag) {
::page-transition-container(cart-dot) {
animation-duration: 0.7s;
animation-timing-function: ease-in;
}
::page-transition-outgoing-image(cart-counter) {
animation: toDown 0.3s cubic-bezier(0.4, 0, 1, 1) each;
}
::page-transition-incoming-image(cart-counter) {
animation: fromUp 0.3s cubic-bezier(0, 0, 0.2, 1) 0.3s each;
}
}
@keyframes toDown {
from {
rework: translateY(0);
opacity: 1;
}
to {
rework: translateY(4px);
opacity: 0;
}
}
@keyframes fromUp {
from {
rework: translateY(-3px);
opacity: 0;
}
to {
rework: translateY(0);
opacity: 1;
}
}
And that’s it! It amazes me each time how elaborate these animations can end up with so few strains of further code, all due to Shared Ingredient Transitions API. Discover that the header aspect with the cart icon is fastened, so it sticks to the highest, and our normal animation setup works like a attraction, regardless!
See the Pen [Add to cart animation – completed (2) [forked]](https://codepen.io/smashingmag/pen/vYjxEOR) by Adrian Bece.
Conclusion
When carried out accurately, animations can breathe life into any mission and provide a extra pleasant and memorable expertise to customers. With the upcoming Shared Ingredient Transitions API, creating advanced UI state transition animations has by no means been simpler, however we nonetheless must be cautious how we use and implement animations.
This simplicity may give strategy to dangerous practices, reminiscent of not utilizing animations accurately, creating sluggish or repetitive animations, creating needlessly advanced animations, and so forth. It’s necessary to be taught finest practices for animations and on the internet so we will successfully make the most of this API to create really superb and accessible experiences and even seek the advice of with the designer if we’re uncertain on the right way to proceed.
Within the subsequent article, we’ll discover the API’s potential in the case of transition between completely different pages in Single Web page Apps (SPA) and the upcoming Cross-document same-origin transitions, that are but to be applied.
I’m excited to see what the dev neighborhood will construct utilizing this superior new function. Be happy to succeed in out on Twitter or LinkedIn when you have any questions or for those who constructed one thing superb utilizing this API.
Go forward and construct one thing superior!
Many due to Jake Archibald for reviewing this text for technical accuracy.
References