

Hello everybody! 👋
I’ve been utilizing Mailchimp for my mailing record for some time and despite the fact that it’s nice, it’s tremendous costly. I’ve 5000+ folks in my record and that places me of their $78 plan. I ship the e-newsletter very hardly ever and don’t actually earn something from the mailing record so it was actually arduous for me to justify the $78. I had just lately built-in Amazon SES with a undertaking and came upon that SES offers you a free 50,000 e mail sending quota monthly. That sounded greater than sufficient for my functions and I assumed that certainly somebody will need to have made an open-source mailing record administration system on prime of SES. To my shock, there weren’t a ton of choices on the market.
Throughout my search, I got here throughout Sendy and listmonk. Sendy is mature however closed supply and paid. However, listmonk is opensource however is barely tough across the edges and lacks sure vital options like e mail bounce monitoring. It was powerful to resolve between these two however I finally figured I ought to give listmonk a attempt earlier than investing in Sendy.
Be aware: There may be additionally Mailtrain on the market however I didn’t go forward with it as a result of the beneficial necessities for the v2 are larger than the free ec2 occasion Amazon provides and I wished to maintain every thing free if attainable
I solely wished primary options in a mailing record package deal:
- E mail open fee
- Hyperlink click-through fee
- Mailing record/Subscribers administration
- Subscribe/Unsubscribe type
Listmonk checked all of those containers. There have been a few tough edges however it principally matches the invoice. I used to be not too assured with my selection listmonk however then once more listmonk is being utilized in manufacturing by the high-quality of us at Zerodha to ship thousands and thousands of emails every month. A serious disadvantage for listmonk is that there aren’t detailed directions about manufacturing setup. Contemplating that it’s open-source software program, I made a decision to doc my journey and present you the way I set it up.
For this tutorial, I’m assuming that you’re operating an ubuntu machine and have already got it up and going. And I’m additionally assuming that you’ve docker put in.
TLDR: You may get the ultimate setup code from this repository
Organising docker-compose
Listmonk helpfully has a picture up on Dockerhub that we will use. The GitHub repository incorporates a pattern docker-compose.yml file for us:
# NOTE: This docker-compose.yml is supposed to be simply an instance guideline
# on how one can obtain the identical. It's not supposed to expire of the field
# and you could edit the beneath configurations to fit your wants.

model: "3.7"

x-app-defaults: &app-defaults
  restart: unless-stopped
  picture: listmonk/listmonk:newest
  ports:
    - "9000:9000"
  networks:
    - listmonk

x-db-defaults: &db-defaults
    picture: postgres:11
    ports:
      - "9432:5432"
    networks:
      - listmonk
    surroundings:
      - POSTGRES_PASSWORD=listmonk
      - POSTGRES_USER=listmonk
      - POSTGRES_DB=listmonk
    restart: unless-stopped

companies:
  db:
    <<: *db-defaults
    volumes:
      - kind: quantity
        supply: listmonk-data
        goal: /var/lib/postgresql/knowledge

  app:
    <<: *app-defaults
    depends_on:
      - db

  demo-db:
    <<: *db-defaults

  demo-app:
    <<: *app-defaults
    command: [sh, -c, "yes | ./listmonk --install --config config-demo.toml && ./listmonk --config config-demo.toml"]
    depends_on:
      - demo-db

networks:
  listmonk:

volumes:
  listmonk-data:
If we merely save this file and run docker-compose up -d demo-app, we will entry the demo-app at localhost:9000. Nonetheless, we don’t need the demo-app. We need to provide our customized config file. We will try this by modifying the docker-compose.yml file like this:
  app:
    <<: *app-defaults
    depends_on:
      - db
    volumes:
      - ./config.toml/:/listmonk/config.toml
Afterward, we have to create a config.toml file and reserve it in the identical listing because the docker-compose.yml file. A pattern config.toml file seems like this:
[app]
    # Interface and port the place the app will run its webserver.
    deal with = "0.0.0.0:9000"

    # BasicAuth authentication for the admin dashboard. It will finally
    # get replaced with a greater multi-user, role-based authentication system.
    # IMPORTANT: Go away each values empty to disable authentication on admin
    # solely the place an exterior authentication is already setup.
    admin_username = "listmonk"
    admin_password = "listmonk"

# Database.
[db]
    host = "db"
    port = 5432
    consumer = "listmonk"
    password = "listmonk"
    database = "listmonk"
    ssl_mode = "disable"
    max_open = 25
    max_idle = 25
    max_lifetime = "300s"
Ensure you substitute the admin consumer/cross within the config file and use one thing distinctive. Now we will run docker-compose up -d app and have listmonk up and operating on port 9000 with our customized config.
Customized static information
By default listmonk sends out this e mail when somebody tries signing as much as a e-newsletter/mailing record:
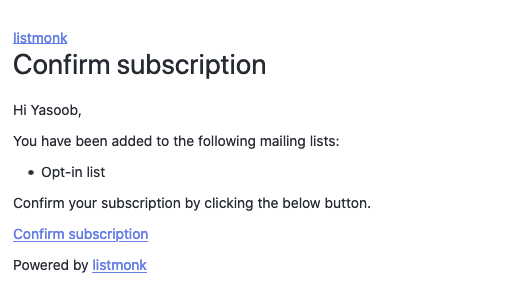
![]()
I didn’t like this opt-in e mail. I wished to provide it extra character and freshen it up a bit of bit. The answer is fairly easy. The listmonk GitHub repo incorporates a static listing with these templates. Obtain the static listing and place it proper subsequent to the docker-compose.yml file. Now go forward and make no matter modifications you need to the templates.
I up to date the subscriber-optin.html file and the outcome was this:
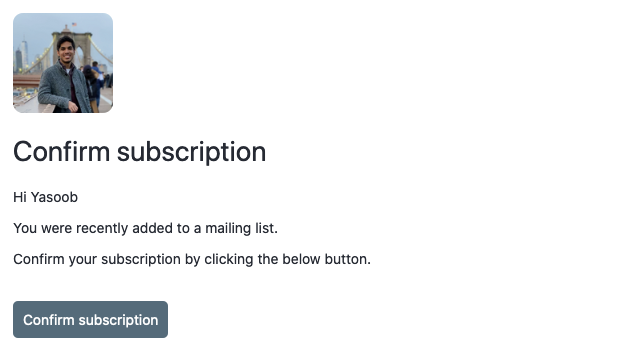
That appears a lot nicer than the unique optin e mail. However how will we inform listmonk to make use of these customized templates? Listmonk can take a --static-dir argument that specifies a customized static information listing. We will modify the docker-compose.yml file and replace the app service definition like this:
  app:
    <<: *app-defaults
    depends_on:
      - db
    command: "./listmonk --static-dir=/listmonk/static"
    volumes:
      - ./config.toml/:/listmonk/config.toml
      - ./static:/listmonk/static
And now we will ask docker to restart app service. It will guarantee that listmonk picks up our customized templates:
docker-compose up --force-recreate -d app
The present listing construction would look one thing like this:
.
├── config.toml
├── docker-compose.yml
└── static
    ├── email-templates
    │   ├── base.html
    │   ├── campaign-status.html
    │   ├── default.tpl
    │   ├── import-status.html
    │   ├── subscriber-data.html
    │   ├── subscriber-optin-campaign.html
    │   └── subscriber-optin.html
    └── public
        ├── static
        │   ├── favicon.png
        │   ├── brand.png
        │   ├── brand.svg
        │   ├── script.js
        │   └── fashion.css
        └── templates
            ├── index.html
            ├── message.html
            ├── optin.html
            ├── subscription-form.html
            └── subscription.html
Importing previous subscribers
In case you are migrating from one other mailing record answer like Mailchimp or Substack, you may have already got a ton of subscribers. It’s painful to assume that you’ll have to collect all of these subscribers once more or ask them for consent. They’ve already given you their consent to e mail them and also you need to change your mailing record supplier with none impact in your previous subscribers.
Fortunately, listmonk helps subscriber import. You’ve gotten the choice to both create a brand new subscriber utilizing the GUI or import a CSV file that incorporates names, emails, and attributes (further data) of subscribers.
The GUI seems like this:

Should you add a subscriber by way of the web wizard, they may obtain an opt-in e mail. Their standing within the GUI will appear to be this:

Discover the “Unconfirmed”. That simply tells us that the consumer hasn’t clicked on “verify” within the opt-in e mail they obtained. So far as I do know, we will’t at present add a consumer by way of the wizard and have listmonk not ship them an opt-in e mail. So what’s the choice? CSV imports!
A pattern CSV seems like this:
| identify | e mail |
|---|---|
| Yasoob | hello@yasoob.me |
We will import this CSV by way of the GUI and by-default listmonk won’t ship anybody an opt-in e mail. Nonetheless, listmonk may even not mark them as “confirmed” both. And you cannot ship the unconfirmed folks a e-newsletter. We’ve two choices at this level.
- Ship an opt-in e mail marketing campaign to everybody you simply imported
- Manually mark them as confirmed within the DB
Let’s speak in regards to the second choice. For manually marking the subscribers as confirmed, we should run a sql question. I’m assuming that you just had been capable of get listmonk working utilizing docker-compose and you might be at present on the identical server as the place listmonk is operating. The default docker-compose.yml file runs a postgresql container and docker-compose names it listmonk_db_1 on first run. You’ll be able to take a look at the record of at present operating containers by operating:
$ docker-compose ps

CONTAINER ID        IMAGE                      COMMAND                  CREATED             STATUS              PORTS                                      NAMES
f020015005a1        listmonk/listmonk:newest   "./listmonk --static…"   33 hours in the past        Up 33 hours         0.0.0.0:9000->9000/tcp                     listmonk_app_1
623c84d3d072        postgres:11                "docker-entrypoint.s…"   33 hours in the past        Up 33 hours         0.0.0.0:9432->5432/tcp                     listmonk_db_1
We will run bash within the listmonk_db_1 container and run psql (Postgresql command-line instrument)
$ docker exec -it listmonk_db_1 /bin/bash
root@623c84d3d072:/# psql -d listmonk  -U listmonk -W
Password:
psql (11.11 (Debian 11.11-1.pgdg90+1))
Sort "assist" for assist.

listmonk=#
The above instructions simply linked us to the listmonk db. We will record all of the tables within the db by typing:
dt
              Listing of relations
 Schema |       Identify       | Sort  |  Proprietor
--------+------------------+-------+----------
 public | campaign_lists   | desk | listmonk
 public | campaign_views   | desk | listmonk
 public | campaigns        | desk | listmonk
 public | link_clicks      | desk | listmonk
 public | hyperlinks            | desk | listmonk
 public | lists            | desk | listmonk
 public | media            | desk | listmonk
 public | settings         | desk | listmonk
 public | subscriber_lists | desk | listmonk
 public | subscribers      | desk | listmonk
 public | templates        | desk | listmonk
(11 rows)
The desk that we need to look into is the subscriber_lists. We will take a look at the contents of this desk by typing this:
SELECT * from subscriber_lists;
| subscriber_id | list_id | standing | created_at | updated_at |
|---|---|---|---|---|
| 11180 | 3 | unconfirmed | 2021-03-10 18:38:52.022231+00 | 2021-03-10 18:38:52.022231+00 |
| 11181 | 3 | unconfirmed | 2021-03-10 18:38:52.022231+00 | 2021-03-10 18:38:52.022231+00 |
| 11182 | 3 | unconfirmed | 2021-03-10 18:38:52.022231+00 | 2021-03-10 18:38:52.022231+00 |
| 11183 | 3 | unconfirmed | 2021-03-10 18:38:52.022231+00 | 2021-03-10 18:38:52.022231+00 |
| 11184 | 3 | unconfirmed | 2021-03-10 18:38:52.022231+00 | 2021-03-10 18:38:52.022231+00 |
| 11185 | 3 | unconfirmed | 2021-03-10 18:38:52.022231+00 | 2021-03-10 18:38:52.022231+00 |
| 11186 | 3 | unconfirmed | 2021-03-10 18:38:52.022231+00 | 2021-03-10 18:38:52.022231+00 |
| 11187 | 3 | unconfirmed | 2021-03-10 18:38:52.022231+00 | 2021-03-10 18:38:52.022231+00 |
We will replace the standing of all of the subscribers to confirmed by operating the next question:
UPDATE subscriber_lists SET standing="confirmed" WHERE list_id=4;
Candy! Working the SELECT question once more ought to replicate the change within the standing:
| subscriber_id | list_id | standing | created_at | updated_at |
|---|---|---|---|---|
| 11180 | 3 | confirmed | 2021-03-10 18:38:52.022231+00 | 2021-03-10 18:38:52.022231+00 |
| 11181 | 3 | confirmed | 2021-03-10 18:38:52.022231+00 | 2021-03-10 18:38:52.022231+00 |
| 11182 | 3 | confirmed | 2021-03-10 18:38:52.022231+00 | 2021-03-10 18:38:52.022231+00 |
| 11183 | 3 | confirmed | 2021-03-10 18:38:52.022231+00 | 2021-03-10 18:38:52.022231+00 |
| 11184 | 3 | confirmed | 2021-03-10 18:38:52.022231+00 | 2021-03-10 18:38:52.022231+00 |
| 11185 | 3 | confirmed | 2021-03-10 18:38:52.022231+00 | 2021-03-10 18:38:52.022231+00 |
| 11186 | 3 | confirmed | 2021-03-10 18:38:52.022231+00 | 2021-03-10 18:38:52.022231+00 |
| 11187 | 3 | confirmed | 2021-03-10 18:38:52.022231+00 | 2021-03-10 18:38:52.022231+00 |
Now we will go forward and ship emails to all of those folks with out asking them to opt-in first.
Organising SSL
By default, listmonk runs over HTTP and doesn’t implement SSL. It’s kinda required if you’re operating any service today. So the following factor we have to do is to arrange SSL help. I will likely be displaying you the way to try this by incorporating NGINX and certbot to listmonk by way of the docker-compose.yml. I used to be capable of set NGINX up by following this beneficial information by Philipp and by going by this accompanying repo on GitHub.
Step one is to create a knowledge/nginx folder in the identical folder that incorporates the docker-compose.yml file.
mkdir -p knowledge/nginx
Now create a nginx.conf file on this folder with the next content material:
server {
    pay attention 80;
    server_name instance.com;
    server_tokens off;

    location /.well-known/acme-challenge/ {
        root /var/www/certbot;
    }

    location / {
        return 301 https://$host$request_uri;
    }
}

server {
    pay attention 443 ssl;
    server_name instance.com;
    server_tokens off;

    ssl_certificate /and many others/letsencrypt/stay/instance.com/fullchain.pem;
    ssl_certificate_key /and many others/letsencrypt/stay/instance.com/privkey.pem;
    embody /and many others/letsencrypt/options-ssl-nginx.conf;
    ssl_dhparam /and many others/letsencrypt/ssl-dhparams.pem;

    location / {
        proxy_pass  http://app:9000;
        proxy_set_header    Host                $http_host;
        proxy_set_header    X-Actual-IP           $remote_addr;
        proxy_set_header    X-Forwarded-For     $proxy_add_x_forwarded_for;
    }
}
Ensure you substitute instance.com along with your customized area that you can be operating this on. This can be a CNAME.
Now we now have to obtain an init script from GitHub. You may get it from right here. Obtain it and substitute the area identify along with your area identify and the pattern e mail with your individual e mail. I needed to make one further change to this file to make it work: remark out nginx from line 42.
The ensuing init-letsencrypt.sh file will look one thing like this:
#!/bin/bash

if ! [ -x "$(command -v docker-compose)" ]; then
  echo 'Error: docker-compose will not be put in.' >&2
  exit 1
fi

domains=(customized.yasoob.me)
rsa_key_size=4096
data_path="./knowledge/certbot"
e mail="e-newsletter@yasoob.me" # Including a sound deal with is strongly beneficial
staging=0 # Set to 1 when you're testing your setup to keep away from hitting request limits

if [ -d "$data_path" ]; then
  learn -p "Present knowledge discovered for $domains. Proceed and substitute current certificates? (y/N) " choice
  if [ "$decision" != "Y" ] && [ "$decision" != "y" ]; then
    exit
  fi
fi


if [ ! -e "$data_path/conf/options-ssl-nginx.conf" ] || [ ! -e "$data_path/conf/ssl-dhparams.pem" ]; then
  echo "### Downloading beneficial TLS parameters ..."
  mkdir -p "$data_path/conf"
  curl -s https://uncooked.githubusercontent.com/certbot/certbot/grasp/certbot-nginx/certbot_nginx/_internal/tls_configs/options-ssl-nginx.conf > "$data_path/conf/options-ssl-nginx.conf"
  curl -s https://uncooked.githubusercontent.com/certbot/certbot/grasp/certbot/certbot/ssl-dhparams.pem > "$data_path/conf/ssl-dhparams.pem"
  echo
fi

echo "### Creating dummy certificates for $domains ..."
path="/and many others/letsencrypt/stay/$domains"
mkdir -p "$data_path/conf/stay/$domains"
docker-compose run --rm --entrypoint "
  openssl req -x509 -nodes -newkey rsa:$rsa_key_size -days 1
    -keyout '$path/privkey.pem'
    -out '$path/fullchain.pem'
    -subj '/CN=localhost'" certbot
echo


echo "### Beginning nginx ..."
docker-compose up --force-recreate -d # nginx
echo

echo "### Deleting dummy certificates for $domains ..."
docker-compose run --rm --entrypoint "
  rm -Rf /and many others/letsencrypt/stay/$domains &&
  rm -Rf /and many others/letsencrypt/archive/$domains &&
  rm -Rf /and many others/letsencrypt/renewal/$domains.conf" certbot
echo


echo "### Requesting Let's Encrypt certificates for $domains ..."
#Be a part of $domains to -d args
domain_args=""
for area in "${domains[@]}"; do
  domain_args="$domain_args -d $area"
completed

# Choose applicable e mail arg
case "$e mail" in
  "") email_arg="--register-unsafely-without-email" ;;
  *) email_arg="--email $e mail" ;;
esac

# Allow staging mode if wanted
if [ $staging != "0" ]; then staging_arg="--staging"; fi

docker-compose run --rm --entrypoint "
  certbot certonly --webroot -w /var/www/certbot
    $staging_arg
    $email_arg
    $domain_args
    --rsa-key-size $rsa_key_size
    --agree-tos
    --force-renewal" certbot
echo

echo "### Reloading nginx ..."
docker-compose exec nginx nginx -s reload
Subsequent, we have to add an NGINX and certbot service within the docker-compose.yml file. Add the next two companies to the docker-compose.yml file:
nginx:
    picture: nginx:mainline-alpine
    restart: unless-stopped
    ports:
      - "80:80"
      - "443:443"
    volumes:
      - ./knowledge/nginx:/and many others/nginx/conf.d
      - ./knowledge/certbot/conf:/and many others/letsencrypt
      - ./knowledge/certbot/www:/var/www/certbot
    networks:
      - listmonk
    depends_on:
      - app
    command: "/bin/sh -c 'whereas :; do sleep 6h & wait $${!}; nginx -s reload; completed & nginx -g "daemon off;"'"

  certbot:
    picture: certbot/certbot
    container_name: certbot
    volumes:
      - ./knowledge/certbot/conf:/and many others/letsencrypt
      - ./knowledge/certbot/www:/var/www/certbot
    networks:
      - listmonk
    depends_on:
      - nginx
    entrypoint: "/bin/sh -c 'lure exit TERM; whereas :; do certbot renew; sleep 12h & wait $${!}; completed;'"
The ensuing docker-compose.yml will appear to be this:
model: "3.7"

x-app-defaults: &app-defaults
  restart: unless-stopped
  picture: listmonk/listmonk:newest
  ports:
    - "9000:9000"
  networks:
    - listmonk

x-db-defaults: &db-defaults
    picture: postgres:11
    ports:
      - "9432:5432"
    networks:
      - listmonk
    surroundings:
      - POSTGRES_PASSWORD=listmonk
      - POSTGRES_USER=listmonk
      - POSTGRES_DB=listmonk
    restart: unless-stopped

companies:
  db:
    <<: *db-defaults
    volumes:
      - kind: quantity
        supply: listmonk-data
        goal: /var/lib/postgresql/knowledge

  app:
    <<: *app-defaults
    depends_on:
      - db
    command: "./listmonk --static-dir=/listmonk/static"
    volumes:
      - ./config.toml/:/listmonk/config.toml
      - ./static:/listmonk/static

  nginx:
    picture: nginx:mainline-alpine
    restart: unless-stopped
    ports:
      - "80:80"
      - "443:443"
    volumes:
      - ./knowledge/nginx:/and many others/nginx/conf.d
      - ./knowledge/certbot/conf:/and many others/letsencrypt
      - ./knowledge/certbot/www:/var/www/certbot
    networks:
      - listmonk
    depends_on:
      - app
    command: "/bin/sh -c 'whereas :; do sleep 6h & wait $${!}; nginx -s reload; completed & nginx -g "daemon off;"'"

  certbot:
    picture: certbot/certbot
    container_name: certbot
    volumes:
      - ./knowledge/certbot/conf:/and many others/letsencrypt
      - ./knowledge/certbot/www:/var/www/certbot
    networks:
      - listmonk
    depends_on:
      - nginx
    entrypoint: "/bin/sh -c 'lure exit TERM; whereas :; do certbot renew; sleep 12h & wait $${!}; completed;'"

networks:
  listmonk:

volumes:
  listmonk-data:
At this level your file and listing construction ought to resemble this:
.
├── README.md
├── config.toml
├── knowledge
│   └── nginx
│       └── nginx.conf
├── docker-compose.yml
├── init-letsencrypt.sh
└── static
    ├── email-templates
    │   ├── base.html
    │   ├── campaign-status.html
    │   ├── default.tpl
    │   ├── import-status.html
    │   ├── subscriber-data.html
    │   ├── subscriber-optin-campaign.html
    │   └── subscriber-optin.html
    └── public
        ├── static
        │   ├── favicon.png
        │   ├── brand.png
        │   ├── brand.svg
        │   ├── script.js
        │   └── fashion.css
        └── templates
            ├── index.html
            ├── message.html
            ├── optin.html
            ├── subscription-form.html
            └── subscription.html
The whole lot is in place and we will run the init-letsencrypt.sh file. It’s going to generate correct SSL certificates for us and can expose listmonk on port 8080.
Conclusion
I wished to contribute to the open-source mailing record ecosystem by writing this text. We want extra open supply instruments on this space. I’m at present testing out listmonk in manufacturing on this weblog. I’m not certain if the shortage of bounce monitoring and granular record administration will turn out to be a problem sooner or later however I’ll attempt to verify I give listmonk a correct attempt earlier than transferring on. I hope you all discovered one thing new and I made it a bit of bit simpler so that you can arrange listmonk. When you have any questions you may head over to the listmonk GitHub web page and open a problem. The builders are tremendous responsive. Kailash Nadh has completed a commendable job with this software program.
It’s also possible to get the ultimate setup code from this repository.
When you have any suggestions, feedback, or recommendations please remark beneath 😊