

Welcome to our Chart of the Week weblog collection!
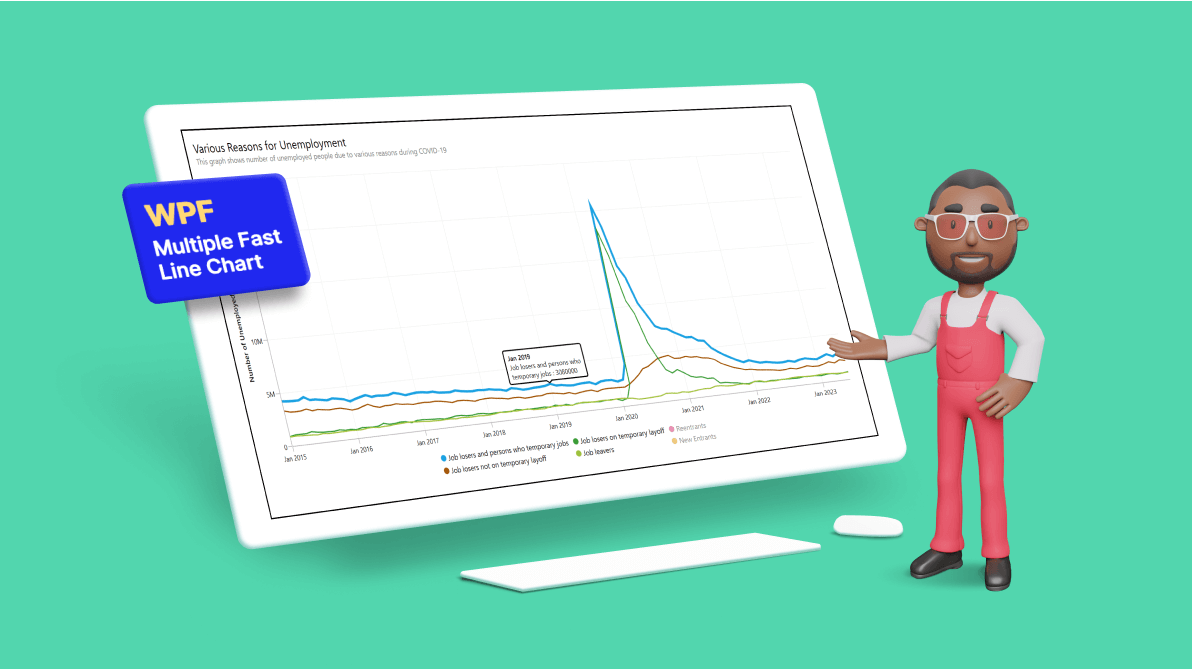
In as we speak’s weblog, we’ll use the Syncfusion WPF Quick Line Chart to create a multiple-line chart that examines the influence of COVID-19 on unemployment charges within the U.S. Please observe that this management is simply supported on Home windows desktops.
The Present Inhabitants Survey (CPS) web site describes the survey as “a month-to-month survey of households carried out by the Bureau of Census,” cosponsored by the U.S. Bureau of Labor Statistics. In keeping with the positioning, it affords a “complete physique of information on the labor pressure, employment, unemployment, individuals not within the labor pressure, hours of labor, earnings, and different labor pressure traits.”
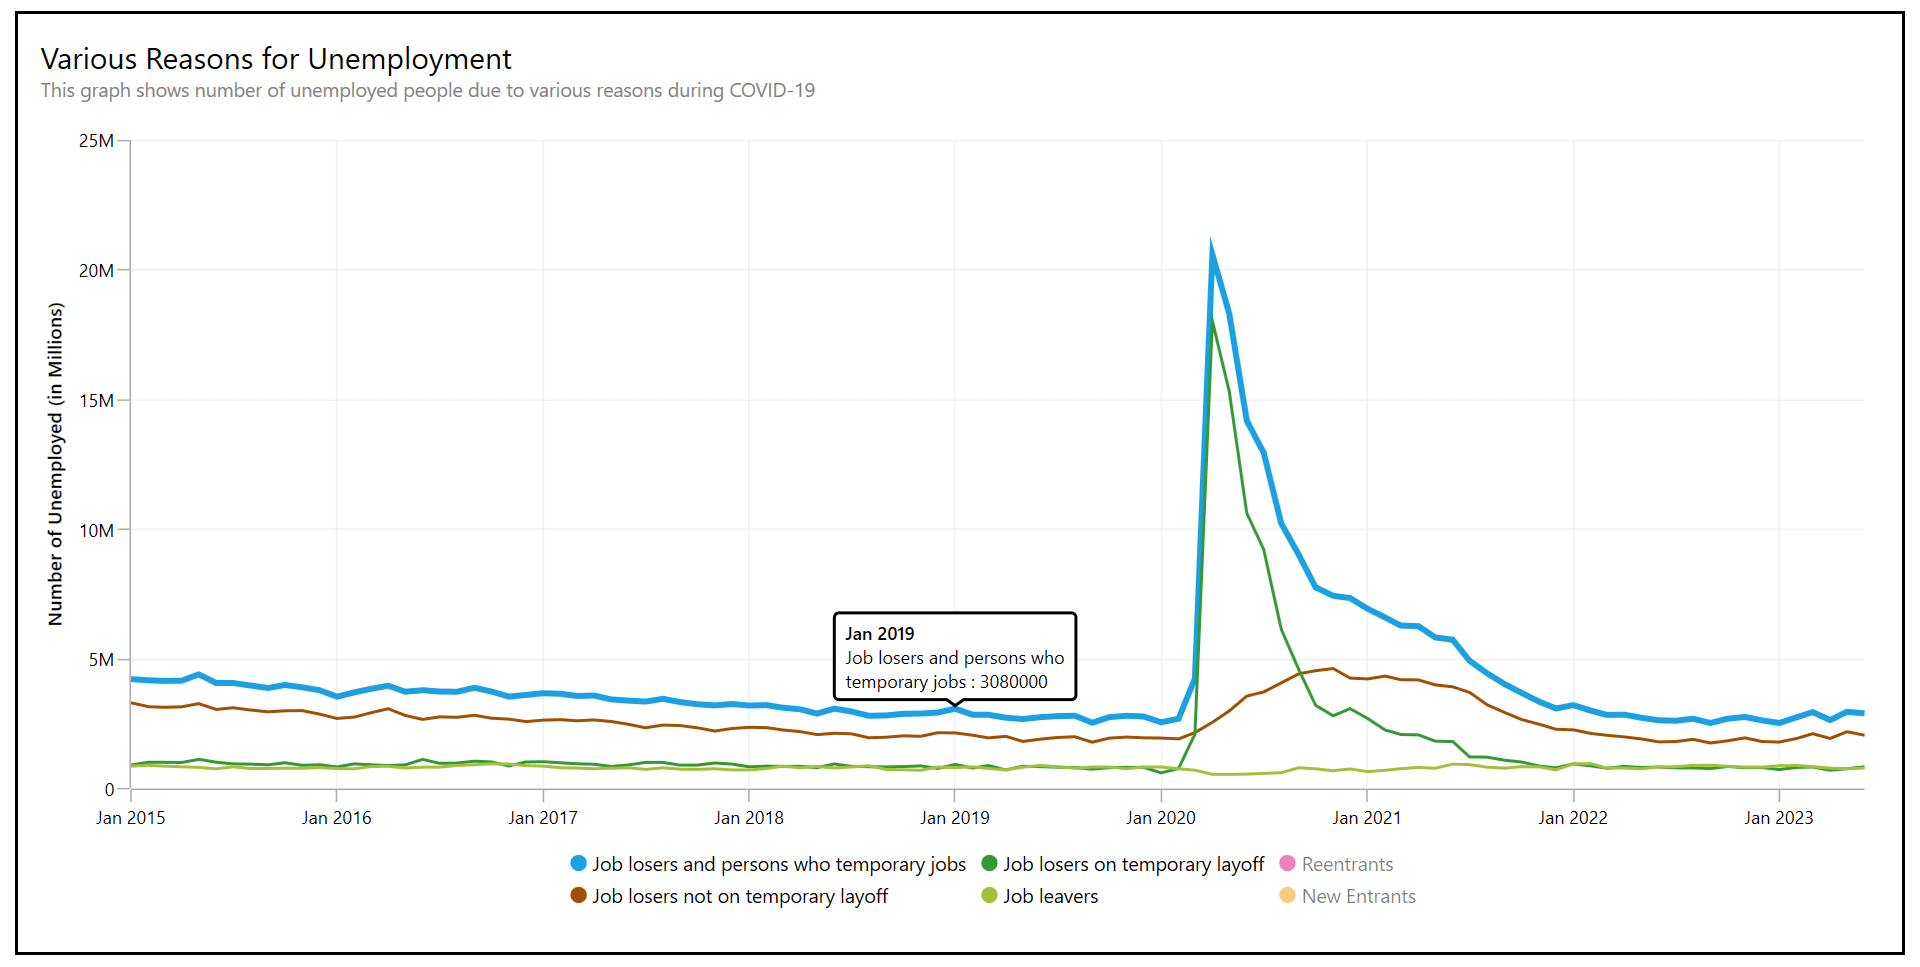
To evaluate the important thing indicators and the explanations for unemployment throughout COVID-19, the unemployment information has been visualized in a graph (as proven within the Desk of COVID-19 Financial Developments).
Let’s see find out how to create a multiple-line chart utilizing the Syncfusion WPF fast-line chart management to visualise COVID-19 financial developments. We have now chosen the quick line chart as a result of it shows an enormous quantity of information in a number of seconds and offers easy interactions.
Step 1: Gathering the information on unemployment
Earlier than creating the chart, we collect information on unemployment from the U.S. Bureau of Labor Statistics. As I mentioned above, we get hold of the COVID-19 Financial Developments information from this desk. You too can obtain the information desk as a CSV file.
Step 2: Getting ready the information for the WPF a number of Quick Line Chart
We have to convert the CSV information into a group to create a a number of quick line collection chart in WPF.
To take action, let’s outline the JoblessCategory mannequin class to carry month-to-month information on the unemployment causes (accomplished momentary jobs, not on momentary layoffs, job leavers, reentrants, and new entrants) utilizing the suitable property names.
Seek advice from the next code instance.
public class JoblessCategory
{
    public DateTime Month { get; set; }
    public double CompletedTempJobs { get; set; }
    public double NotOnTempLayoff { get; set; }
    public double OnTemporaryLayoff { get; set; }
    public double JobLeavers { get; set; }
    public double Reentrants { get; set; }
    public double NewEntrants { get; set; }

    public JoblessCategory(DateTime month, double jobless1, double jobless2, double jobless3, double
                                               jobless4, double jobless5, double jobless6)
    {
        Month = month;
        CompletedTempJobs = jobless1;
        NotOnTempLayoff = jobless2;
        OnTemporaryLayoff = jobless3;
        JobLeavers = jobless4;
        Reentrants = jobless5;
        NewEntrants = jobless6;
    }
}
To generate an ObservableCollection of the JoblessCategory mannequin kind and its properties, we have to load the CSV information into the WPF chart. To take action, learn the CSV information path file utilizing the ReadCSV technique within the ViewModel class. Then, convert every set of information to a group of strings; break up every line of string at a particular, comma-separated place; and retailer it within the Mannequin class objects. Add them to the gathering and return it.
Lastly, name the ReadCSV technique to set the gathering to the UnemploymentData assortment within the ViewModel class.
public class ViewModel
{
    non-public Listing<JoblessCategory> unemployedData = new Listing<JoblessCategory>();
    non-public JoblessCategory? mannequin;
    public Listing<JoblessCategory> UnemploymentData { get; set; }
    public ViewModel()
    {
        UnemploymentData = new Listing<JoblessCategory>(ReadCSV("C:.CSV file path location…"));
    }

    public IEnumerable<JoblessCategory> ReadCSV(string fileName)
    {
        Listing<string> traces = File.ReadAllLines(Path.ChangeExtension(fileName, ".CSV")).ToList();
        //First row containing column names.
        traces.RemoveAt(0);

        for (int i = 0; i < traces.Depend; i++)
        {
            string enter = traces[i];
            if (enter.EndsWith(","))
                enter = enter.TrimEnd(',');

            // Break up by comma, excluding those inside quotes
            string[] information = enter.Break up(new[] { "","" }, StringSplitOptions.None);

            // Take away main and trailing quotes from every half.
            for (int j = 0; j < information.Size; j++)
            {
                information[j] = information[j].Trim('"');
            }

            DateTime resultDate = DateTime.ParseExact(information[0], "MMM yyyy",
                                                               CultureInfo.InvariantCulture);
            mannequin = new JoblessCategory(resultDate, Convert.ToDouble(information[1]),
                        Convert.ToDouble(information[2]), Convert.ToDouble(information[3]), Convert.ToDouble(information[4]),
                        Convert.ToDouble(information[5]), Convert.ToDouble(information[6]));
                        unemployedData.Add(mannequin);
        }

        return unemployedData;
    }
}
Step 3: Configuring the WPF a number of Quick Line Chart
Let’s configure the Syncfusion WPF Charts management utilizing this documentation.
Right here, we’ll use the Syncfusion FastLineSeries occasion to visualise the variations among the many varied causes for unemployment through the COVID-19 pandemic.
Seek advice from the next code instance.
<sync:FastLineSeries ItemsSource="{Binding UnemploymentData}" XBindingPath="Month" YBindingPath="CompletedTempJobs" Label="Job losers and individuals who momentary jobs" ShowTooltip="True" . . . >
</sync:FastLineSeries>

<sync:FastLineSeries ItemsSource="{Binding UnemploymentData}" XBindingPath="Month" YBindingPath="NotOnTempLayoff" Label="Job losers not on momentary layoff" ShowTooltip="True" . . . >
</sync:FastLineSeries>

<sync:FastLineSeries ItemsSource="{Binding UnemploymentData}" XBindingPath="Month" YBindingPath="OnTemporaryLayoff" Label="Job losers on momentary layoff" ShowTooltip="True" . . . >
</sync:FastLineSeries>

<sync:FastLineSeries ItemsSource="{Binding UnemploymentData}" XBindingPath="Month" YBindingPath="JobLeavers" Label="Job leavers" ShowTooltip="True" . . . >
</sync:FastLineSeries>

<sync:FastLineSeries ItemsSource="{Binding UnemploymentData}" XBindingPath="Month" YBindingPath="Reentrants"  Label="Reentrants" ShowTooltip="True" IsSeriesVisible="False" . . . >
</sync:FastLineSeries>

<sync:FastLineSeries ItemsSource="{Binding UnemploymentData}" XBindingPath="Month" YBindingPath="NewEntrants" Label="New Entrants" ShowTooltip="True" IsSeriesVisible="False" . . . >
</sync:FastLineSeries>
Within the earlier code instance, we’ve certain the ItemsSource property to the UnemploymentData objects containing properties of assorted unemployment causes as double objects. We specified every Month as XBindingPath and unemployment causes as properties to every collection YBindingPath. This may inform the chart which information factors to make the most of for the x- and y-axes.
Step 4: Customizing the chart look
We are able to additionally customise the looks of the chart by including a customized tooltip, titles, and a legend.
Customizing the chart title
Seek advice from the next code instance to customise the chart’s title utilizing the Header property and set its place utilizing the HorizontalHeaderAlignment property.
<sync:SfChart HorizontalHeaderAlignment="Left">
   . . .
  <sync:SfChart.Header>
   <StackPanel Margin="0,0,0,20">
    <TextBlock Textual content="Numerous Causes for Unemployment" FontSize="20"/>
    <TextBlock Textual content="This graph exhibits variety of unemployed individuals attributable to varied causes throughout COVID-19"  FontSize="13" Foreground="Grey"/>
   </StackPanel>
  </sync:SfChart.Header>
   . . .
</sync:SfChart>
Customizing the chart axes
Let’s customise the DateTimeAxis components utilizing the IntervalType and LabelFormat properties and the NumericalAxis utilizing the Header, LabelExtent, and Interval properties and the LabelCreated occasion.
<sync:SfChart.PrimaryAxis>
 <sync:DateTimeAxis IntervalType="Years" LabelFormat="MMM yyyy">
 </sync:DateTimeAxis>
</sync:SfChart.PrimaryAxis>

<sync:SfChart.SecondaryAxis>
 <sync:NumericalAxis Header="Variety of Unemployed" LabelExtent="25"
                     Interval="5000000" LabelCreated="NumericalAxis_LabelCreated">
 </sync:NumericalAxis>
</sync:SfChart.SecondaryAxis>
Seek advice from the next code instance to format the numerical axis labels utilizing the LabelCreated occasion.
non-public void NumericalAxis_LabelCreated(object sender, LabelCreatedEventArgs e)
{
    if(e.AxisLabel is ChartAxisLabel label && label.LabelContent is string content material && content material != "0")
    {
        var worth = double.Parse(content material) / 1000000;
        label.LabelContent = worth.ToString()+"M";
    }
}
Customizing the chart tooltips
We are able to customise the background of the chart tooltip utilizing the Fashion property of the ChartTooltipBehavior. Create a method of goal kind Path as a useful resource and outline the specified background. Then, set the fashion key to the Fashion property, as proven within the following code instance.
<ResourceDictionary>
 <Fashion TargetType="Path" x:Key="tooltipStyle">
  <Setter Property="Stroke" Worth="Black"/>
  <Setter Property="Fill" Worth="White"/>
  <Setter Property="StrokeThickness" Worth="2"/>
 </Fashion>
</ResourceDictionary>

<sync:SfChart.Behaviors>
 <sync:ChartTooltipBehavior Fashion="{StaticResource tooltipStyle}" ShowDuration="5000" />
</sync:SfChart.Behaviors>
We are able to additionally design a customized tooltip utilizing the TooltipTemplate property. For this, create an information template to show the month and unemployment fee values. Create a separate tooltip template for every collection. We have to set a particular template key for every collection, as proven within the following code instance.
<ResourceDictionary>
 <DataTemplate x:Key="tooltipTemplate1">
  <StackPanel Orientation="Vertical">
   <TextBlock Textual content="{Binding Merchandise.Yr, StringFormat="MMM yyyy"}" Foreground="Black"
              FontSize="12" FontWeight="Medium"/>
    <StackPanel Orientation="Vertical">
     <TextBlock Textual content="Job losers and individuals who" Foreground="Black" FontSize="12"/>
     <StackPanel Orientation="Horizontal">
      <TextBlock Textual content="momentary jobs : " Foreground="Black" FontSize="12"/>
      <TextBlock Textual content="{Binding Merchandise.CompletedTempJobs}" Foreground="Black" FontSize="12"/>
     </StackPanel>
    </StackPanel>
  </StackPanel>
 </DataTemplate>
 <DataTemplate x:Key="tooltipTemplate2">
        . . .
 </DataTemplate>
 <DataTemplate x:Key="tooltipTemplate3">
        . . .
 </DataTemplate>
 <DataTemplate x:Key="tooltipTemplate4">
        . . .
 </DataTemplate>
 <DataTemplate x:Key="tooltipTemplate5">
        . . .
 </DataTemplate>
 <DataTemplate x:Key="tooltipTemplate6">
        . . .
 </DataTemplate>
</ResourceDictionary>

<sync:FastLineSeries ItemsSource="{Binding UnemploymentData}" ShowTooltip="True" TooltipTemplate="{StaticResource tooltipTemplate1}". . . >
</sync:FastLineSeries>
<sync:FastLineSeries ItemsSource="{Binding UnemploymentData}" ShowTooltip="True" TooltipTemplate="{StaticResource tooltipTemplate2}" . . . >
</sync:FastLineSeries>
<sync:FastLineSeries ItemsSource="{Binding UnemploymentData}" ShowTooltip="True" TooltipTemplate="{StaticResource tooltipTemplate3}" . . . >
</sync:FastLineSeries>
<sync:FastLineSeries ItemsSource="{Binding UnemploymentData}" ShowTooltip="True" TooltipTemplate="{StaticResource tooltipTemplate4}" . . . >
</sync:FastLineSeries>
<sync:FastLineSeries ItemsSource="{Binding UnemploymentData}" ShowTooltip="True" IsSeriesVisible="False" TooltipTemplate="{StaticResource tooltipTemplate5}" . . . >
</sync:FastLineSeries>
<sync:FastLineSeries ItemsSource="{Binding UnemploymentData}" ShowTooltip="True" IsSeriesVisible="False" TooltipTemplate="{StaticResource tooltipTemplate6}" . . . >
</sync:FastLineSeries>
Customizing the chart legend
To customise and wrap the ChartLegend gadgets, create an ItemsPanelTemplate as a WrapPanel with vertical orientation and set a particular top to separate gadgets evenly in rows and columns. Then, set the important thing worth to the legend ItemsPanel property.
Moreover, allow the ToggleSeriesVisibility help within the legend to filter the unemployment causes information of every collection.
<sync:SfChart.Sources>
 <ItemsPanelTemplate x:Key="itemPanelTemplate">
  <WrapPanel Orientation="Vertical" Top="50"/>
 </ItemsPanelTemplate>
</sync:SfChart.Sources>

<sync:SfChart.Legend>
 <sync:ChartLegend DockPosition="Backside" ToggleSeriesVisibility="True"
                   ItemsPanel="{StaticResource itemPanelTemplate}"
                   IconHeight="11" IconWidth="11" FontSize="13"/>
</sync:SfChart.Legend>
To cover sure collection, set the IsSeriesVisible property worth to false for that collection. Nonetheless, when toggling the legend icon, these hidden collection will change into seen once more. Within the following code, I’ve additionally modified the legend icon’s form to a circle utilizing the LegendIcon property.
<sync:FastLineSeries ItemsSource="{Binding UnemploymentData}" XBindingPath="Yr"
      YBindingPath="NewEntrants" IsSeriesVisible="False" LegendIcon="Circle" . . . >
</sync:FastLineSeries>
   . . .
//Related for all different collection. . .
Highlighting the chart collection based mostly on interplay
A collection can be highlighted when the tooltip is invoked on it. To attain this, we use the MouseEnter occasion in every collection. When the pointer hovers over a collection within the chart, the MouseEnter occasion of the collection can be known as. Then, the StrokeThickness of the mouse interacting collection will enhance, and the stroke thickness for the remaining collection can be set to the default worth.
When the pointer strikes out of the chart space, the MouseLeave occasion can be known as, resetting the StrokeThickness to default in all of the collection, as demonstrated within the following code instance.
XML
<sync:SfChart x:Identify="chart" HorizontalHeaderAlignment="Left" MouseLeave="FastLineSeries_MouseLeave">
    . . .
    //Chart header . . .
    . . .
    . . .
    //Chart axis and legend . . .
    . . .
    <sync:FastLineSeries ItemsSource="{Binding UnemploymentData}" XBindingPath="Yr"
          YBindingPath="CompletedTempJobs" MouseEnter="SfChart_MouseEnter" . . . >
    </sync:FastLineSeries>
    . . .
    //Related for all different collection. . .
    . . .
</sync:SfChart>
C#
non-public void SfChart_MouseEnter(object sender, MouseEventArgs e)
{
    if (sender is ChartSeries collection)
    {
        foreach(var chartSeries in chart.Collection)
        {
            if(chartSeries != collection)
            {
                chartSeries.StrokeThickness = 2;
            }
            else
            {
                collection.StrokeThickness = 4;
            }
        }
    }
}

non-public void FastLineSeries_MouseLeave(object sender, MouseEventArgs e)
{
    foreach (var chartSeries in chart.Collection)
    {
        chartSeries.StrokeThickness = 2;
    }
}
After executing these code examples, we’ll get the output as proven within the following picture.
GitHub reference
For extra particulars, check with the demo on GitHub.
Conclusion
Thanks for studying! On this weblog, now we have seen find out how to visualize the COVID-19 pandemic’s influence on unemployment utilizing the Syncfusion WPF a number of fast-line charts. Like this, it’s also possible to visualize different developments and modifications over time. We encourage you to attempt the steps mentioned and share your ideas within the feedback under.
In the event you require help, please don’t hesitate to contact us by way of our help discussion board, help portal, or suggestions portal. We’re at all times keen that can assist you!