


Within the earlier article, we talked about methods to enhance accessibility for keyboard customers utilizing HTML and CSS. These languages can do the job more often than not, however sure design necessities and the character of sure elements create the necessity for extra complicated interactions, and that is the place JavaScript comes into play.
For keyboard accessibility functions, a lot of the job is finished with primary instruments that open many prospects for keyboard interactivity. This text covers a toolset that you could combine into totally different elements to enhance accessibility for keyboard customers.
The Fundamentals
More often than not, your job with JavaScript to boost elements’ keyboard accessibility shall be performed with only a handful of instruments, together with the usage of occasion listeners and sure JavaScript strategies of a few Net APIs that may assist us on this job.
One of the crucial essential instruments we have now so as to add interactivity to our tasks is the existence of occasions, which is the execution of features that set off when the aspect you’re checking receives a change.
keydown Occasion
One instance of an occasion you’ll be able to hearken to with this Net API is the keydown occasion, which checks when a key’s pressed.
Now, this isn’t used so as to add keyboard accessibility to parts like buttons or hyperlinks as a result of, by default, whenever you add a click on occasion listener to them, this may also set off the occasion whenever you use the Enter (for button and hyperlinks) and House keys (button solely). As an alternative, the utility of the keydown occasion comes when it’s essential to add performance to different keys.
So as to add an instance, let’s come again to the tooltip we created within the first a part of this text. I discussed that this tooltip must be closed whenever you press the Esc key. We’d want a keydown occasion listener to verify if the pressed key’s Esc. For that, we have to detect the occasion’s pressed key. On this case, we’ll verify the occasion key’s property.
We’ll use keycode.information to verify the occasion dump for this key. For those who press the Esc key on this web page, you’ll discover that e.key is the same as "Escape".
Word: There are two different methods to detect the pressed key, and people are checking e.keyCode and e.which. They’ll return a quantity. Within the case of the Esc key, it’ll be 27. However, take note these are deprecated alternate options, and whereas they work, e.key is the popular choice.
With that, we have to choose our buttons and add the occasion listener. My strategy to this matter is to make use of this occasion listener so as to add a category to the button and add this class as an exception to point out it utilizing the :not() pseudo-class. Let’s begin altering our CSS a bit:
button:not(.hide-tooltip):hover + [role="tooltip"],
button:not(.hide-tooltip):focus + [role="tooltip"],
[role="tooltip"]:hover {
  show: block;
}
Now, with this exception added, let’s create our occasion listener!
const buttons = [...document.querySelectorAll("button")]

buttons.forEach(aspect => {
  aspect.addEventListener("keydown", (e) => {
    if (e.key === "Escape") {
      aspect.classList.add("hide-tooltip")
    }
  })
})
And there you’ve gotten it! With only a sprinkle of JavaScript, we have now added an accessibility perform to our tooltip. And that was simply the beginning of what we are able to do with a keydown occasion listener. It’ll be an important software to enhance keyboard accessibility for a number of elements, however there may be one other occasion listener we should always think about.
blur Occasion
There may be one other occasion we’ll use usually. This one detects when the aspect stops receiving focus. This occasion listener is essential, and more often than not, you’ll use it to reverse the potential modifications you’ve gotten made with the keydown occasion listener.
Let’s come again to the tooltip. Proper now, it has an issue: in case you press the Esc key to shut the tooltip, and then you definately deal with the identical aspect once more, the tooltip received’t seem. Why? As a result of we added the hide-tooltip class whenever you press the Esc key, however we by no means eliminated this class. That is the place blur comes into play. Let’s add an occasion listener to revert this performance.
aspect.addEventListener("blur", (e) => {
  if (aspect.classList.accommodates("hide-tooltip")) {
    aspect.classList.take away("hide-tooltip");
  }
});
Different Occasion Listeners (And Why You Would possibly Don’t Want Them)
I discussed that we’re going to want two occasion listeners in our toolkit, however there are different occasion listeners you could possibly use, like focusout or focus. Nevertheless, I believe use instances for them are fairly scarce. There’s a particular point out to focus as a result of even when you could find good use instances for it, it’s essential to be very cautious. In spite of everything, in case you don’t use it correctly, you’ll be able to trigger a change of context.
A change of context is outlined by WCAG as “main modifications that, if made with out consumer consciousness, can disorient customers who should not capable of view your entire web page concurrently.” Some examples of change of context embody:
- Opening a brand new window;
- Altering the format of your website considerably;
- Shifting the main target to a different a part of the positioning.
That is essential to bear in mind as a result of making a change of context in the intervening time of specializing in a component is a failure of WCAG standards 3.2.1:
When any consumer interface part receives focus, it doesn’t provoke a change of context.
— Success Criterion 3.2.1: Focus order
For those who’re not cautious, unhealthy use of a perform that listens to the focus occasion can create a change of context. Does that imply you shouldn’t use it? Probably not, however to be trustworthy, I can hardly discover a use for this occasion. More often than not, you’ll be utilizing the :focus pseudo-class to create related functionalities.
With that stated, there may be no less than one part sample that may profit from this occasion listener in some instances, however I’ll cowl it later after I begin speaking about elements, so let’s put a pin on that matter for now.
focus() Methodology
Now, this is one thing we’ll be utilizing with some frequency! This technique from the HTMLElement API permits us to convey the keyboard focus to a specific aspect. By default, it’ll draw the main target indicator within the aspect and can scroll the web page to the aspect’s location. This habits might be modified with a few parameters:
preventScroll
When it’s set totrue, will make the browser doesn’t scroll till the programmatically targeted aspect.focusVisible
When set tofalse, it is going to make the programmatically targeted aspect doesn’t show its focus indicator. This property works solely on Firefox proper now.
Remember that to focus the aspect, it must be both focusable or tabbable. If it’s essential to convey the main target to a usually not tabbable aspect (like a dialog window), you’ll want so as to add the attribute tabindex with a damaging integer to make it focusable. You’ll be able to take a look at how tabindex works in the primary a part of this information.
<button id="openModal">Carry focus</button>
<div id="modal" position="dialog" tabindex="-1">
  <h2>Modal content material</h2>
</div>
Then we’ll add a click on occasion listener to the button to make the dialog window targeted:
const button = doc.querySelector("#openModal");
const modal = doc.querySelector("#modal")

button.addEventListener("click on", () => {
  modal.focus()
})
And there you’ve gotten it! This technique shall be very helpful in a variety of elements in tandem with the keydown attribute, so understanding how each of them work is essential.
Altering HTML Attributes With JavaScript
Sure HTML attributes must be modified with JavaScript to create accessibility in complicated part patterns. Two of a very powerful ones for keyboard accessibility are tabindex and the extra just lately added inert. tabindex might be modified utilizing setAttribute. This attribute requires two parameters:
title
It checks the title of the attribute you wish to modify.worth
It can add the string this attribute requires if it doesn’t require a specific attribute (for instance, in case you add the attributeshiddenorcontenteditable, you’ll want to make use of an empty string).
Let’s verify a fast instance of methods to use it:
const button = doc.querySelector("button")

button.setAttribute("tabindex", "-1")
setAttribute will assist so much for accessibility usually. (I exploit it so much to alter ARIA attributes when wanted!) However, once we discuss keyboard accessibility, tabindex is sort of the one attribute you’ll be modifying with this technique.
I discussed the inert attribute earlier than, and this one works a bit in another way as a result of it has its personal property within the HTMLElement Net API. HTMLElement.inert is a boolean worth that can allow us to toggle the inert attribute.
Take note a few issues earlier than fascinated with utilizing this attribute:
- You’ll want a polyfill as a result of it’s not absolutely carried out in all browsers and continues to be fairly latest. This polyfill created by Chrome engineers works fairly nicely within the exams I’ve made, so in case you want this property, this can be a protected strategy, however remember the fact that it might need sudden behaviors.
- You need to use
setAttributeto alter this attribute as nicely! Each work equally nicely, even with a polyfill. Whichever you determine to make use of is as much as you.
const button = doc.querySelector("button")

// Syntax with HTMLElement.inert
button.inert = true

// Syntax with Ingredient.setAttribute()
button.setAttribute("inert", "")
This mixture of instruments shall be helpful for keyboard accessibility functions. Now let’s begin to see them in motion!
Part Patterns
Toggletips

We discovered methods to make a tooltip within the earlier half, and I discussed methods to improve it with JavaScript, however there may be one other sample for this type of part referred to as toggletip, which is a tooltip that works whenever you click on them, as an alternative of hovering on them.
Let’s verify a fast listing of what we’d like to ensure it occurs:
- Once you press the button, the knowledge ought to be introduced to display screen readers. That ought to occur whenever you press the button once more. Urgent the button received’t shut the toggletip.
- The toggletip shall be closed whenever you both click on exterior the toggletip, cease focusing the button, or press the Esc key.
I’ll take Heydon Pickering’s strategy that he talks about in his guide Inclusive Elements. So, let’s begin with the markup:
<p>If it's essential to verify extra info, verify right here
  <span class="toggletip-container">
    <button class="toggletip-button">
      <span class="toggletip-icon" aria-hidden="true">?</span>
      <div class="sr-only">Más información</div>
    </button>
    <span position="standing" class="toggletip-info"></span>
  </span>
</p>
The concept is to inject the required HTML contained in the aspect with the position="standing". That’ll make display screen readers announce the content material whenever you click on it. We’re utilizing a button aspect to make it tabbable. Now, let’s create the script to point out the content material!
toggletipButton.addEventListener("click on", () => {
  toggletipInfo.innerHTML = "";
  setTimeout(() => {
    toggletipInfo.innerHTML = toggletipContent;
  }, 100);
});
As Heydon mentions in his guide, we use this strategy of first eradicating the container’s HTML content material after which utilizing setTimeout so as to add it to ensure each time you click on it, it’ll be introduced for display screen reader customers. Now we have to verify that whenever you’re clicking elsewhere, the content material stops displaying.
doc.addEventListener("click on", (e) => {
  if (toggletipContainer !== e.goal) {
    toggletipInfo.innerHTML = ""
  }
})
With that out of the best way, it’s time so as to add keyboard accessibility to this part. We don’t have to make the toggletip’s content material present whenever you press the button as a result of HTML semantic does that for us already. We have to make the toggletip’s content material cease displaying whenever you press the Esc key and whenever you cease specializing in this button. It really works very equally to what we did for tooltips within the earlier part as examples, so let’s begin working with that. First, we’ll use the keydown occasion listener to verify when the Esc key’s pressed:
toggletipContainer.addEventListener("keydown", (e) => {
  if (e.key === "Escape") {
    toggletipInfo.innerHTML = ""
    }
})
And now, we have to verify the blur occasion to do the identical. This one ought to be on the button aspect as an alternative of the container itself.
toggletipButton.addEventListener("blur", () => {
  toggletipInfo.innerHTML = "";
});
And that is our consequence!
See the Pen [Toggletip demo [forked]](https://codepen.io/smashingmag/pen/WNyjeJK) by Cristian Diaz.
As I discussed, this works very equally to the tooltip we made, however I did that for a purpose. Except you’re making one thing very unconventional, these patterns will repeat themselves very often.
As Stephanie Eckles mentions in her article “4 Required Checks Earlier than Transport New Options”, there are some anticipated behaviors keyboard customers anticipate from elements, like having the ability to shut one thing you simply opened by urgent the Esc key, or having the ability to navigate a bunch of associated choices utilizing the Arrow keys.
For those who preserve these patterns in thoughts, you’ll discover overlap in sure elements’ behaviors, and that’ll repeat whenever you begin creating JavaScript code to make sure keyboard accessibility. So protecting this listing in thoughts will assist you to to know what necessities the elements you’re creating will want.
Talking of which, let’s verify one other widespread part sample.
Tabs
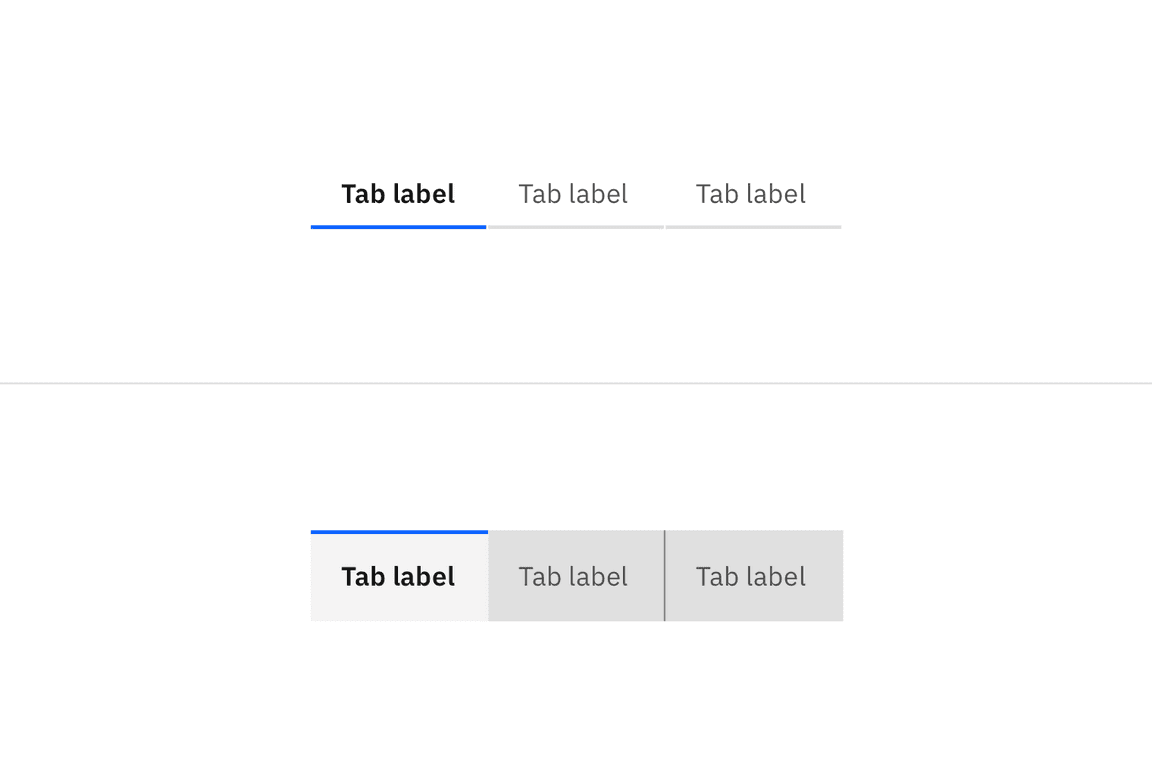
Roving tabindex
Tabbed interfaces are patterns that you could nonetheless see on occasion. They’ve a really fascinating performance once we discuss keyboard navigation: whenever you press the Tab key, it’ll go to the energetic tab panel. To navigate between the tab listing, you’ll want to make use of the Arrow keys. This can be a method referred to as roving tabindex that consists in eradicating the power of the non-active parts to be tababble by including the attribute tabindex="-1" after which utilizing different keys to permit the navigation between these gadgets.
With tabs, that is the anticipated habits for these:
- Once you press Left or Up keys, it’ll transfer the keyboard focus onto the earlier tab. If the main target is on the primary tab, it’ll transfer the main target to the final tab.
- Once you press the Proper or Down keys, it’ll transfer the keyboard focus onto the subsequent tab. If the main target is on the primary tab, it’ll transfer the main target to the final tab.
Creating this performance is a mixture of three strategies we noticed earlier than: modifying tabindex with setAttribute, the keydown occasion listener, and the focus() technique. Let’s begin by checking the markup of this part:
<ul position="tablist">
  <li position="presentation">
    <button id="tab1" position="tab" aria-selected="true">Tomato</button>
  </li>
  <li position="presentation">
    <button id="tab2" position="tab" tabindex="-1">Onion</button>
  </li>
  <li position="presentation">
    <button id="tab3" position="tab" tabindex="-1">Celery</button>
  </li>
  <li position="presentation">
    <button id="tab4" position="tab" tabindex="-1">Carrot</button>
  </li>
</ul>
<div class="tablist-container">
  <part position="tabpanel" aria-labelledby="tab1" tabindex="0">
  </part>
  <part position="tabpanel" aria-labelledby="tab2" tabindex="0" hidden>
  </part>
  <part position="tabpanel" aria-labelledby="tab3" tabindex="0" hidden>
  </part>
  <part position="tabpanel" aria-labelledby="tab4" tabindex="0" hidden>
  </part>
</div>
We’re utilizing aria-selected="true" to point out which is the energetic tab, and we’re including tabindex="-1" to make the non-active tabs unable to be chosen with the Tab key. Tabpanels ought to be tabbable if there is no such thing as a tabbable aspect inside it, so for this reason I added the attribute tabindex="0" and the non-active tabpanels are hidden by utilizing the attribute hidden.
Time so as to add the navigation with the arrow keys. For this, we’ll have to create an array with the tabs after which create a perform for it. Our subsequent step is to verify which is the primary and final tab within the listing. That is essential as a result of the motion that can occur whenever you press a key will change if the keyboard focus is on a type of parts.
const TABS = [...TABLIST.querySelectorAll("[role="tab"]")];

const createKeyboardNavigation = () => {
  const firstTab = TABS[0];
  const lastTab = TABS[TABS.length - 1];
}
After that, we’ll add a keydown occasion listener to every tab. I’ll begin by including the performance with Left and Up arrows.
// Earlier code of the createKeyboardNavigation perform
TABS.forEach((aspect) => {
  aspect.addEventListener("keydown", perform (e) {
    if (e.key === "ArrowUp" || e.key === "ArrowLeft") {
      e.preventDefault();
      if (aspect === firstTab) {
        lastTab.focus();
      } else {
        const focusableElement = TABS.indexOf(aspect) - 1;
        TABS[focusableElement].focus();
      }
    }
  }
}
That is what’s occurring right here:
- First, we verify that the pressed key’s the Up or Left arrow. For that, we verify the
occasion.key. - If that’s true, we have to stop these keys scroll the web page as a result of, bear in mind, by default, they try this. We will use
e.preventDefault()for this objective. - If the targeted key’s the primary tab, it’ll routinely convey the keyboard focus to the final one. That is made by calling the strategy
focus()to focus the final tab (which we retailer in a variable). - If it’s not the case, we have to verify which is the place of the energetic tab. As we retailer the tab parts in an array, we are able to use the strategy
indexOf()to verify the place. - As we’re making an attempt to navigate to the earlier tab, we are able to subtract
1from the results ofindexOf()after which search the corresponding aspect within theTABSarray and programmatically focus it with thefocus()technique.
Now we have to do a really related course of with the Down and Proper keys:
// Earlier code of the createKeyboardNavigation perform
else if (e.key === "ArrowDown" || e.key === "ArrowRight") {
  e.preventDefault();
  if (aspect == lastTab) {
    firstTab.focus();
  } else {
    const focusableElement = TABS.indexOf(aspect) + 1;
    TABS[focusableElement].focus();
  }
}
As I discussed, it’s a really related course of. As an alternative of subtracting one from the indexOf() consequence, we add 1 as a result of we wish to convey the keyboard focus to the subsequent aspect.
Exhibiting The Content material And Altering HTML Attributes
We created the navigation, and now we have to present and conceal the content material in addition to manipulate the attributes aria-selected and tabindex. Bear in mind, we have to make that when the keyboard focus is on the energetic panel, and also you press Shift + Tab, the main target ought to be within the energetic tab.
First, let’s create the perform that exhibits the panel.
const showActivePanel = (aspect) => {
  const selectedId = aspect.goal.id;
  TABPANELS.forEach((e) => {
    e.hidden = "true";
  });
  const activePanel = doc.querySelector(
    `[aria-labelledby="${selectedId}"]`
  );
  activePanel.removeAttribute("hidden");
};
<
    const showActivePanel = (aspect) => {
      const selectedId = aspect.goal.id;
      TABPANELS.forEach((e) => {
        e.hidden = "true";
      });
      const activePanel = doc.querySelector(
        `[aria-labelledby="${selectedId}"]`
      );
      activePanel.removeAttribute("hidden");
    };
What we’re doing right here is checking the id of the tab is being pressed, then hiding all of the tab panels, after which in search of the tab panel we wish to activate. We’ll understand it’s the tab as a result of it has the attribute aria-labelledby and makes use of the identical worth because the tab’s id. Then we present it by eradicating the attribute hidden.
Now we have to create a perform to alter the attributes:
const handleSelectedTab = (aspect) => {
  const selectedId = aspect.goal.id;
  TABS.forEach((e) => {
    const id = e.getAttribute("id");
    if (id === selectedId) {
      e.removeAttribute("tabindex", "0");
      e.setAttribute("aria-selected", "true");
    } else {
      e.setAttribute("tabindex", "-1");
      e.setAttribute("aria-selected", "false");
    }
  });
};
What we’re doing right here is, once more, checking the id attribute after which taking a look at every tab. We’ll verify if this tab’s id corresponds with the pressed aspect’s id.
If it’s the case, we’ll make it keyboard tabbable by both eradicating the attribute tabindex (as a result of it’s a button, so it’s keyboard tabbable by default) or by including the attribute tabindex="0". Moreover, we’ll add an indicator to display screen reader customers that that is the energetic tab by including the attribute aria-selected="true".
If it doesn’t correspond, tabindex and aria-selected shall be set to -1 and false, respectively.
Now, all we have to do is add a click on occasion listener to every tab to deal with each features.
TABS.forEach((aspect) => {
  aspect.addEventListener("click on", (aspect) => {
    showActivePanel(aspect),
    handleSelectedTab(aspect);
  });
});
And that’s it! We created the performance to make tabs work, however we are able to do some one thing else if wanted.
Activate Tab On Focus
Do you bear in mind what I discussed in regards to the focus occasion listener? You have to be cautious whenever you use it as a result of it could possibly create a change of context accidentally, nevertheless it has some use, and this part is an ideal alternative to make use of it!
In line with ARIA Authoring Practices Information (APG), we are able to make the displayed content material present whenever you deal with the tab. This idea is also known as a comply with focus and might be useful for keyboard and display screen reader customers as a result of it permits navigating extra simply via the content material.
Nevertheless, it’s essential to preserve a few concerns about it:
- If displaying the content material means making a variety of petitions and, by extension, making the community slower, making the displayed content material comply with the main target shouldn’t be desired.
- If it modifications the format in a major method, that may be thought of a change of context. That depends upon the type of content material you wish to present, and doing a change of context on focus is an accessibility concern, as I defined beforehand.
On this case, the quantity of content material doesn’t suppose an enormous change in both community or format, so I’ll make the displayed content material follows the main target of the tabs. This can be a quite simple job with the focus occasion listener. We will simply actually copy and paste the occasion listener we created and simply change click on to focus.
TABS.forEach((aspect) => {
  aspect.addEventListener("click on", (aspect) => {
    showActivePanel(aspect),
    handleSelectedTab(aspect);
  });

  aspect.addEventListener("focus", (aspect) => {
    showActivePanel(aspect),
    handleSelectedTab(aspect);
  });
});
And there you’ve gotten it! Now the displayed content material will work with out the necessity to click on the tab. Doing that or making it solely work with a click on is as much as you and is surprisingly a really nuanced query. Personally, I’d stick simply with making it exhibits whenever you press the tab as a result of I believe the expertise of adjusting the attribute aria-selected by simply specializing in the aspect might be barely complicated. Nonetheless, it’s only a speculation on my half so take what I say with a grain of salt and at all times verify it with customers.
Further keydown Occasion Listeners
Let’s come again to the createKeyboardNavigation for a second. There are a few keys we are able to add. We will make the Dwelling and Finish key brings the keyboard focus to the primary and final tab, respectively. That is fully non-obligatory, so it’s okay in case you don’t do it, however simply to reiterate how a keydown occasion listener helps out, I’ll try this.
It’s an easy job. We will create one other couple of if statements to verify if the Dwelling and Finish keys are being pressed, and since we have now saved the primary and final tabs in variables, we are able to you focus them with the focus() technique.
// Earlier code of the createKeyboardNavigation perform
else if (e.key === "Dwelling") {
  e.preventDefault();
  firstTab.focus()
} else if (e.key === "Finish") {
  e.preventDefault();
  lastTab.focus()
}
And that is our consequence!
See the Pen [Tab demo [forked]](https://codepen.io/smashingmag/pen/YzvVXWw) by Cristian Diaz.
With this code, we have now made this part accessible for keyboard and display screen reader customers. This exhibits how helpful the essential ideas of keydown occasion listener, the focus() technique, and the modifications we are able to make with setAttribute are to govern complicated elements. Let’s verify another, a really sophisticated one, and the way the inert attribute can assist us to deal with this job simply.
Modals

Opening And Closing The Modal
Modals are fairly a posh sample once we discuss keyboard accessibility, so let’s begin with a simple job — opening and shutting the modal.
It’s certainly straightforward, however it’s essential to preserve one thing in thoughts: it’s very seemingly the button opens the modal, and the modal is way away within the DOM. So it’s essential to handle the main target programmatically whenever you handle this part. There’s a little catch right here: it’s essential to retailer which aspect opened the modal so we are able to return the keyboard focus returns to this aspect in the intervening time we shut it.
Fortunately, there may be a simple method to try this, however let’s begin by creating the markup of our website:
<physique>
  <header>
    <!-- Header's content material -->
  </header>
  <primary>
    <!-- Major's content material -->
    <button id="openModal">Open modal</button>
  </primary>
  <footer>
    <!-- Footer's content material -->
  </footer>
  <div position="dialog"
    aria-modal="true"
    aria-labelledby="modal-title"
    hidden
    tabindex="-1">
    <div class="dialog__overlay"></div>
    <div class="dialog__content">
      <h2 id="modal-title">Modal content material</h2>
      <ul>
        <li><a href="#">Modal hyperlink 1</a></li>
        <li><a href="#">Modal hyperlink 2</a></li>
        <li><a href="#">Modal hyperlink 3</a></li>
      </ul>
      <button id="closeModal">Shut modal</button>
    </div>
  </div>
</physique>
As I discussed, the modal and the button are far-off from one another within the DOM. It will make it simpler to create a spotlight lure later, however for now, let’s verify the modal’s semantics:
position="dialog"will give the aspect the required semantics for display screen readers. It must have a label to be acknowledged as a dialog window, so we’ll use the modal’s title because the label utilizing the attributearia-labelledby.aria-modal="true"helps to make a display screen reader consumer can solely learn the content material of the aspect’s kids, so it blocks entry from display screen readers. Nevertheless, as you’ll be able to see on thearia-modalweb page for a11ysupport.com, it’s not absolutely supported, so you’ll be able to’t rely simply on that for this job. It’ll be helpful for display screen readers who help it, however you’ll see there may be one other method to make sure display screen reader customers don’t work together with something in addition to the modal as soon as it’s opened.- As I discussed, we have to convey the keyboard focus to our modal, so for this reason we added the attribute
tabindex="-1".
With that in thoughts, we have to create the perform to open our modal. We have to verify which was the aspect that opened it, and for that, we are able to use the property doc.activeElement to verify which aspect is being keyboard-focused proper now and retailer it in a variable. That is my strategy for this job:
let focusedElementBeforeModal

const modal = doc.querySelector("[role="dialog"]");
const modalOpenButton = doc.querySelector("#openModal")
const modalCloseButton = doc.querySelector("#closeModal")

const openModal = () => {
  focusedElementBeforeModal = doc.activeElement

  modal.hidden = false;
  modal.focus();
};
It’s quite simple:
- We retailer the button that opened the modal;
- Then we present it by eradicating the attribute
hidden; - Then we convey the main target to the modal with the
focus()technique.
It’s important that you just retailer the button earlier than bringing the main target to the modal. In any other case, the aspect that will be saved on this case could be the modal itself, and also you don’t need that.
Now, we have to create the perform to shut the modal:
const closeModal = () => {
  modal.hidden = true;
  focusedElementBeforeModal.focus()
}
That is why it’s essential to retailer the correct aspect. Once we shut the modal, we’ll convey again the keyboard focus to the aspect that opened it. With these features created, all we have now to do is add the occasion listeners for these features! Do not forget that we additionally have to make the modal closes whenever you press the Esc key.
modalOpenButton.addEventListener("click on", () => openModal())
modalCloseButton.addEventListener("click on", () => closeModal())
modal.addEventListener("keydown", (e) => {
  if (e.key === "Escape") {
    closeModal()
  }
})
Proper now, it seems quite simple. But when that had been all, modals wouldn’t be thought of a posh sample for accessibility, had been they? That is the place we have to create a really key job for this part, and we have now two methods to do it.
Creating A Focus Entice
A focus lure ensures the keyboard focus can’t escape from the part. That is essential as a result of if a keyboard consumer can work together with something exterior a modal as soon as it’s opened, it could possibly create a really complicated expertise. We now have two methods to try this proper now.
Certainly one of them is checking every aspect that may be tabbable with a keyboard, then storing that are the primary and the final, and doing this:
- When the consumer presses Shift + Tab and the keyboard focus is on the primary tabbable aspect (bear in mind, you’ll be able to verify that with
doc.activeElement), the main target will go to the final tabbable aspect. - When the consumer presses Tab, and the keyboard focus is on the final tabbable aspect, the keyboard focus ought to go to the primary tabbable aspect.
Usually, I’d present you methods to make this code, however I believe A11y options made an excellent script to create a spotlight lure. It kind of works because the keyboard navigation with the arrow keys we created for tab parts (as I discussed earlier than, patterns repeat themselves!), so I invite you to verify this web page.
I don’t wish to use this strategy as the principle answer as a result of it’s not precisely flawless. These are some conditions this strategy doesn’t cowl.
The primary one is that it doesn’t take into consideration display screen readers, particularly cell display screen readers. As Rahul Kumar mentions in his article “Focus Trapping for Accessibility (A11Y)”, Talkback and Voiceover permit the consumer of gestures and double faucets to navigate to the subsequent or earlier focusable aspect, and people gestures can’t be detected with an occasion listener as a result of these gestures are one thing that technically talking doesn’t occur within the browser. There’s a answer for that, however I’ll put a pin on that matter for a second.
The opposite concern is that this focus lure strategy can result in bizarre behaviors in case you use sure combos of tabbable parts. Take, for instance, this modal:
Technically talking, the primary tabbable aspect is the primary enter. Nevertheless, all of the inputs on this instance ought to deal with the final tabbable aspect (on this case, the button aspect) when the consumer presses the keys Shift + Tab. In any other case, it might trigger a bizarre habits if the consumer presses these keys when the keyboard focus is on the second or third enter.
If we wish to create a extra dependable answer, the most effective strategy is utilizing the inert attribute to make outer content material inaccessible for display screen readers and keyboard customers, guaranteeing they will work together solely with the modal’s content material. Bear in mind, it will require the inert polyfill so as to add extra robustness to this system.
Word: It’s essential to notice that regardless of the very fact a spotlight lure and utilizing inert in apply assist to make sure keyboard accessibility for modals, they don’t work precisely the identical. The primary distinction is that setting all paperwork however modal as inert, it’ll nonetheless allow you to transfer exterior of the web site and work together with the browser’s parts. That is arguably higher for safety issues however deciding if you wish to create a spotlight lure manually or use the inert attribute is as much as you.
What we’ll do first is choose all areas that don’t have the position dialog. As inert will take away all keyboard and display screen reader interplay with the weather and their kids, we’ll want to pick solely the direct kids of physique. That is why we let the modal container exist on the similar stage as tags like primary, header, or footer.
// This selector works nicely for this particular HTML construction. Adapt in response to your undertaking.
const nonModalAreas = doc.querySelectorAll("physique > *:not([role="dialog"])")
Now we have to come again to the openModal perform. After opening the modal, we have to add the attribute inert to these parts. This ought to be the final step within the perform:
const openModal = () => {
  // Beforehand added code
  nonModalAreas.forEach((aspect) => {
    aspect.inert = true
  })
};
What about whenever you shut the modal? You should go to the closeModal perform and take away this attribute. This must go earlier than all the things else within the code runs. In any other case, the browser received’t have the ability to deal with the button that opened this modal.
const closeModal = () => {
  nonModalAreas.forEach((aspect) => {
    aspect.inert = false;
  });
// Beforehand added code
};
And that is our consequence!
See the Pen [Modal test [forked]](https://codepen.io/smashingmag/pen/NWzjqYM) by Cristian Diaz.
Let’s suppose you don’t really feel comfy utilizing the inert attribute proper now and wish to create a spotlight lure manually, because the one A11y Options exhibits. What are you able to do to make sure display screen reader customers can’t get out of the modal? aria-modal can assist with that, however bear in mind, the help for this property is sort of shaky, particularly for Talkback and VoiceOver for iOS. So the subsequent neatest thing we are able to do is add the attribute aria-hidden="true" to all parts that aren’t the modal. It’s a really related course of to the one we made for the inert attribute, and you should utilize the identical parts within the array we used for this matter as nicely!
const openModal = () => {
  //Beforehand added code
  nonModalAreas.forEach((aspect) => {
    aspect.setAttribute("aria-hidden", "true")
  });
};

const closeModal = () => {
  nonModalAreas.forEach((aspect) => {
    aspect.removeAttribute("aria-hidden")
  });
  // Beforehand added code
};
So, whether or not you determine to make use of the inert attribute or create a spotlight lure manually, you’ll be able to guarantee consumer expertise for keyboard and display screen reader customers works at its finest.
<dialog> Ingredient
You may discover the markup I used and that I didn’t use the comparatively new <dialog> aspect, and there’s a purpose for that. Sure, this aspect helps so much by managing focus to the modal and to the button that opened simply, however, as Scott O’Hara factors out in his article “Having an open dialog”, it nonetheless has some accessibility points that even with a polyfill should not absolutely solved but. So I made a decision to make use of a extra strong strategy there with the markup.
For those who haven’t heard about this aspect, it has a few features to open and shut the dialog, in addition to some new functionalities that shall be helpful once we create modals. If you wish to verify the way it works, you’ll be able to verify Kevin Powell’s video about this aspect.
That doesn’t imply you shouldn’t use it in any respect. Accessibility’s state of affairs about this aspect is enhancing, however take note you continue to have to think about sure particulars to ensure it really works correctly.
Different Part Patterns
I might go on with many part patterns, however to be trustworthy, I believe it’ll begin getting redundant as a result of, as a matter of reality, these patterns are fairly related between the totally different sorts of elements you may make. Except it’s important to make one thing very unconventional, these patterns we have now seen right here ought to be sufficient!
With that stated, how are you going to know what necessities you’ll need for a part? That is a solution with many nuances that this text can not cowl. There are some assets like Scott O’Hara’s accessible elements’ repository or UK authorities’s design system, however this can be a query that doesn’t have a easy reply. Crucial factor about this matter is to at all times check them with disabled customers to know what flaws they will have when it comes to accessibility.
Wrapping Up
Keyboard accessibility might be fairly exhausting, nevertheless it’s one thing you’ll be able to obtain when you perceive how keyboard customers work together with a website and what rules you must take note. More often than not, HTML and CSS will do a terrific job of guaranteeing keyboard accessibility, however typically you’ll want JavaScript for extra complicated patterns.
It’s fairly spectacular what you are able to do for keyboard accessibility when you discover more often than not, the job is made with the identical primary instruments. When you perceive what it’s essential to do, you’ll be able to combine these instruments to create a terrific consumer expertise for keyboard customers!