


completely different frameworks like Spring Boot,
Quarkus, Jersey, Restlet, Swagger, and
Dropwizard
Frameworks. Microservices rely upon plan requirements, for instance, Area
Pushed Design, Failure Isolation, Steady conveyance, Decentralization,
and DevOps. Each microservice may be autonomously deployed, up to date,
changed, and scaled. (DURS)
Kind of, Microservices permits
us to convey utility code in little and smart items, freed from
others.
and we are going to make the most of this server to get setup knowledge like hostname, URL and
so on for our microservices.

2.1 Challenges With Microservice Architectures
Whereas fostering varied extra modest microservices may look easy, but
there are variety of intrinsic intricacies which can be associated with
microservices buildings. We should always take a look at at a portion of the
difficulties:
- Speedy Setup required : You may’t endure a month organising each microservice. You should have the choice to quickly make microservices.
-
Mechanization : As a result of there are numerous extra modest components
fairly than a stone monument, you need to computerize every thing –
Builds, Deployment, Monitoring and so forth. - Perceivability : You presently have varied extra modest components to ship and sustain with. Maybe 100 or maybe 1000 components. You should have the choice to consequently display screen and distinguish points. You need unimaginable perceivability round each one of many components.
-
Restricted Context : Deciding the bounds of a microservice is
positively not a easy errand. Restricted Contexts from Area Pushed
Design is a good starting stage. The way you would possibly interpret the
house develops all through some stretch of time. You need to
assure that the microservice limits develop. -
Association Administration : You actually need to sustain with
setups for a lot of components throughout situations. You’d require a
Configuration Administration association. -
Dynamic Scale Up and Scale Down : The advantages of
microservices could also be understood within the occasion that your purposes
can elevated and down successfully within the cloud. -
Bunch of Playing cards : If a microservice on the decrease a part of the
name chain falls flat, it could have thump on penalties for any
remaining microservices. Microservices should be subject lenient by
Design. -
Troubleshooting : When there is a matter that wants
examination, you can have to research quite a few providers throughout
varied components. Concentrated Logging and Dashboards are elementary
for make it easy to troubleshoot points. - Consistency : You may’t have numerous units tackling an identical subject. Whereas it’s important to domesticate development, it’s moreover very important to have some decentralized administration across the dialects, levels, innovation and units utilized for finishing up/conveying/checking microservices.
Making a Easy Microservice Undertaking in Java and Spring
Here’s a step-by-step information to create Microservices in Java utilizing Spring Boot:
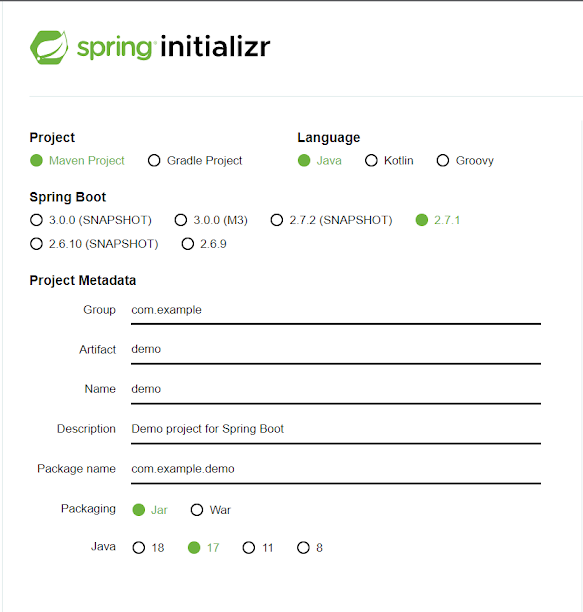
Step 1: Create a Maven mission using Spring Initializr
https://begin.spring.io/
spring.utility.title=demoProject //title of utility
Step 2: Select the Spring Boot type 2.2.0 M6 or increased
adaptation. Strive to not decide the Snapshot adaptation.
Step 3: Present the Group title.
Step 4: Present the Artifact id. We have now given demoProject.
DevTools,
Spring Boot Actuator, Config Consumer.

Step 6: Click on on Generate the mission button. A compress document
will obtain, separate it into the arduous plate.
Step 7: Now, open the eclipse. Import the made maven mission. It
requires an funding to obtain the anticipated data.
Step 8: As soon as the mission is downloaded, go to src/major/java.
Open the DemoProject.
Step 9: Now run the DemoProject.java as Java Software.
It started the Tomcat on port(s) 8080 (http).
Presently we are going to add two or three providers within the above mission. For
this we must always comply with the accompanying steps:
Step 1: Open utility.properties doc and compose the
accompanying code:
spring.utility.title=demoProject //title of utility
Step 2: Create a category doc with title
DemoProjectController.java within the envelope src/elementary/java beneath
the bundle com.instance.demoProject and compose the accompanying code:
1.	bundle com.instance.demoProject;
2.	import org.springframework.internet.bind.annotation.GetMapping;
3.	import org.springframework.internet.bind.annotation.RestController;
4.	import com.instance.demoProject.bean.DemoProject;
5.	@RestController
6.	public class DemoProjectController
7.	{
8.	@GetMapping("/demo")
9.	public DemoProject retriveValuesFromConfigurations()
10.	{
11.	return new DemoProject(100, 1);
12.	}
13.	}
Step 3: Create a category doc with title DemoProject.java within the
envelope src/elementary/java beneath the bundle
com.instance.demoProject.bean and compose the accompanying code:
1.	bundle com.instance.demoProject.bean;
2.	public class DemoProject
3.	{
4.	personal int max;
5.	personal int min;
6.	//no-argument constructor
7.	protected DemoProject()
8.	{
9.	}
10.	//producing getters
11.	public int getMax()
12.	{
13.	return max;
14.	}
15.	public int getMin()
16.	{
17.	return min;
18.	}
19.	//producing constructor utilizing fields
20.	public DemoProject(int max, int min)
21.	{
22.	tremendous();
23.	this.max = max;
24.	this.min = min;
25.	}
26.	}
get the JSON response as outcome.
Consequence:

That is all about
tips on how to create Microservice in Java and Spring Boot. On this
article, we noticed the rudiments of constructing microservices with Spring Boot.
Microservices accompanies a unprecedented benefit for an enormous framework.
Right here, engineers can chip away at their autonomous modules with out an
extreme quantity of reliance. What’s extra, on the off probability {that a} server
goes to down it will not down your entire system