

ASP.NET Identification is a .NET library that lets you simply implement a person administration system in your software. It affords out of the field the next: registration, login, two-factor authentication, exterior login suppliers, electronic mail affirmation, safety roles, and claims.
In case you create an software from begin, you might have the choice to decide on so as to add the Identification.
What for those who forgot to test that choice and also you wish to add Identification to an current challenge?
Configure Identification in .NET Core 6
Set up the NuGet Packages:
Set up-Package deal Microsoft.AspNetCore.Identification
Set up-Package deal Microsoft.AspNetCore.Identification.EntityFrameworkCore
Set up-Package deal Microsoft.EntityFrameworkCore.SqlServer
Set up-Package deal Microsoft.EntityFrameworkCore.Instruments
Set up-Package deal Microsoft.EntityFrameworkCore.Design

-- If you wish to use the default UI supplied by ASP, set up the next library
Set up-Package deal Microsoft.AspNetCore.Identification.UI

-- For scaffold
Set up-Package deal Microsoft.VisualStudio.Internet.CodeGeneration.Design
For this tutorial, I assume that you just use Entity Framework with the code first migrations strategy. I’ve used the SQL Server library, however you could find the corresponding library for different sorts. Additionally, I’ll scaffold the default views supplied by ASP, however you should use your customized views or you’ll be able to modify the scaffolded views.
Configure the connection string in appsettings file.
{
  "Logging": {
    "LogLevel": {
      "Default": "Info",
      "Microsoft.AspNetCore": "Warning"
    }
  },
  "ConnectionStrings": {
    "DefaultConnection": "Information Supply=localhostSQLEXPRESS;Preliminary Catalog=ProgrammingCsharp;Built-in Safety=True" // Modify along with your connection string
  },
  "AllowedHosts": "*"
}
In case you don’t have a database, set up the SQL Categorical. Comply with this tutorial for those who don’t know tips on how to do it.
Create the DbContext class
The Identification library comes with IdentityDbContext class which already extends the DbContext class. So, we now have to increase this class. Create the next class provided that you don’t have a DbContext already:
public class AppDbContext : IdentityDbContext<IdentityUser, IdentityRole, string>
{
    public AppDbContext(DbContextOptions<AppDbContext> choices): base(choices)
    {
    }
}
If you have already got a DbContext, just remember to inherit the IdentityDbContext class.
Register Database Context service within the Startup
builder.Providers.AddDbContext<AppDbContext>(choices =>
        choices.UseSqlServer(
            builder.Configuration.GetConnectionString("DefaultConnection")));
In case you don’t use SQL Server, change the UseSqlServer with the corresponding methodology.
Register the Identification service
builder.Providers.AddDefaultIdentity<IdentityUser>
    (choices =>
{
    choices.SignIn.RequireConfirmedAccount = true;
    choices.Password.RequireDigit = false;
    choices.Password.RequiredLength = 6;
    choices.Password.RequireNonAlphanumeric = false;
    choices.Password.RequireUppercase = false;
    choices.Password.RequireLowercase = false;
})
.AddEntityFrameworkStores<AppDbContext>();
For this demo, I don’t wish to verify the account with a affirmation electronic mail. Additionally, the password could be easy.
Configure the Authentification and Authorization middleware:
var app = builder.Construct();

if (!app.Atmosphere.IsDevelopment())
{
    app.UseExceptionHandler("/Error");
    app.UseHsts();
}

app.UseHttpsRedirection();
app.UseStaticFiles();

app.UseRouting();
app.UseAuthentication();
app.UseAuthorization();

app.MapRazorPages();
app.Run();
Just be sure you add the Authentification middleware after the Routing middleware.
Add the primary migration
Open the Package deal Supervisor Console and enter:
Add-Migration InitialMigration -verbose
The verbose choice isn’t obligatory, however you’ll be able to see step-by-step what was executed. Additionally, you’ll be able to see detailed errors. Test the generated class.
Replace the database
Replace-Database -verbose
After you execute the above command, the tables to retailer customers/roles have been created. You may test them within the database.
Add Scaffolded Merchandise
Proper-click on the challenge and choose Add New Scaffold Merchandise.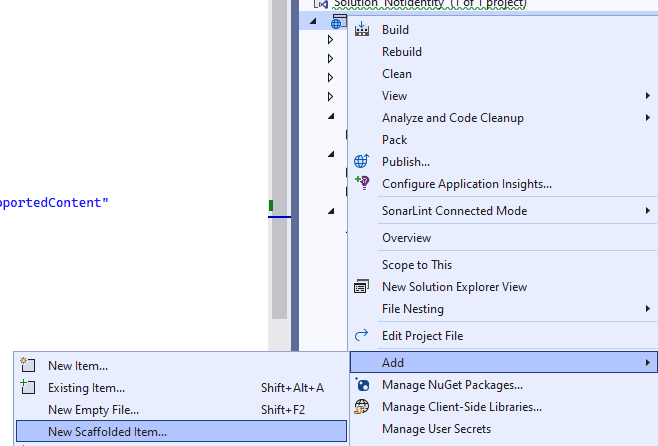 You should arrange the structure of your software and the information context class. Then you’ll be able to choose the views that you just wish to customise.
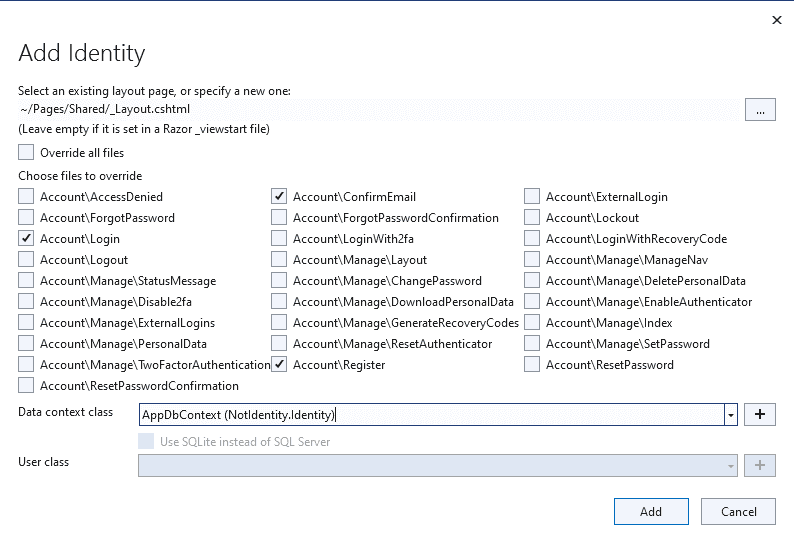
Fixing Identification Scaffold Errors
In all probability, you might have obtained the next error: Scaffolding failed. The trail is empty. (Parameter ‘path’)
To unravel this error, take away Microsoft.AspNetCore.Identification package deal from the csproj file:
Uninstall-Package deal Microsoft.AspNetCore.Identification
Strive once more so as to add the Scaffold merchandise (step 9). There’s a large likelihood to get one other error, telling you the next message: Lacking IdentityHostingStartup.cshtml.
The answer got here from this GitHub challenge.
-
- Copy this Razor view from GitHub.
- Add this file to the situation the place is lacking:
https://github.com/dotnet/Scaffolding/blob/essential/src/Scaffolding/VS.Internet.CG.Mvc/Templates/Identification/Bootstrap4/IdentityHostingStartup.cshtml
Now the scaffold ought to work. The information have been created within the Space folder and a LoginPartial was created within the Pages/Controllers folder.
Modify the structure and embrace the Login partial
Within the _Layout.cshtml file, just remember to embrace the login partial. This partial embrace the labels.
<nav class="navbar navbar-expand-sm navbar-toggleable-sm navbar-light bg-white border-bottom box-shadow mb-3">
    <div class="container">
        <a category="navbar-brand" asp-area="" asp-page="/Index">NotIdentity</a>
        <button class="navbar-toggler" sort="button" data-bs-toggle="collapse" data-bs-target=".navbar-collapse" aria-controls="navbarSupportedContent"
                aria-expanded="false" aria-label="Toggle navigation">
            <span class="navbar-toggler-icon"></span>
        </button>
        <div class="navbar-collapse collapse d-sm-inline-flex justify-content-between">
            <ul class="navbar-nav flex-grow-1">
                <li class="nav-item">
                    <a category="nav-link text-dark" asp-area="" asp-page="/Index">House</a>
                </li>
                <li class="nav-item">
                    <a category="nav-link text-dark" asp-area="" asp-page="/Privateness">Privateness</a>
                </li>
            </ul>
            <partial title="_LoginPartial" />
        </div>
    </div>
</nav>
Ultimately, you might have carried out the login system. Whenever you run the appliance you should see the login button. You may scaffold extra views for those who don’t wish to use the default ones.