


On this tutorial, we’re going to see how one can create a multi-step or wizard type in WordPress. There are numerous methods to create a multi-step type.
This tutorial supplies two strategies to realize this. These are,
- Create a multi-step type utilizing the WordPress plugin.
- Add a {custom} answer for multi-step type through features.php
The specialty of the {custom} instance is that it permits enabling/disabling the wizard view. The operate.php has the hook to allow or disable the wizard look. By commenting on the hook, it is going to present an extended type in a single step with none wizard.
In a earlier tutorial, we’ve seen how one can create a wizard type in PHP.
Technique 1: Create a multi-step type utilizing the WordPress plugin
This text makes use of the Multi Step Type plugin for implementing technique 1. Obtain this plugin from the WordPress plugin repository and add it to your weblog listing. See how one can set up a plugin into WordPress for the rules.
Steps to configure and construct a multi-step type
- Set up the plugin to have the “Multi-Step Type” within the WordPress menu.
- Navigate to “Multi-Step Type”->Settings to set e mail codecs, type styling, and extra.
- Construct a type with a number of steps and sections.
- Create a Shortcode for the shape.
- Create a type web page and add the Shortcode to the web page content material.
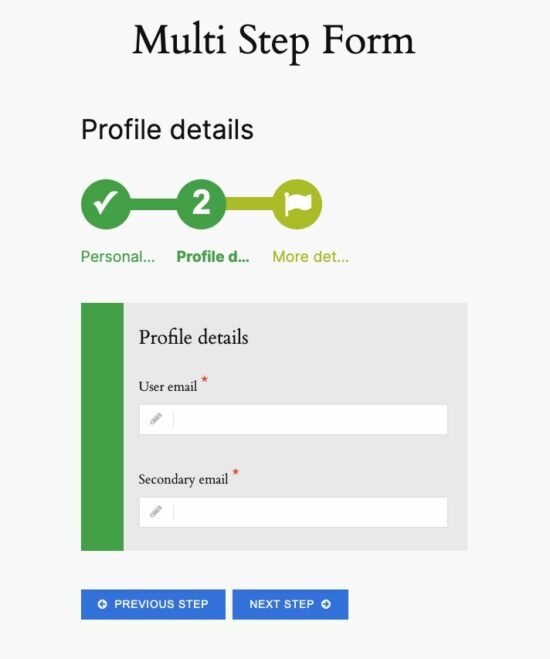
This technique will output a multi-step type as proven within the beneath screenshot.
Step 1: Set up the plugin to have the “Multi-Step Type” within the WordPress menu
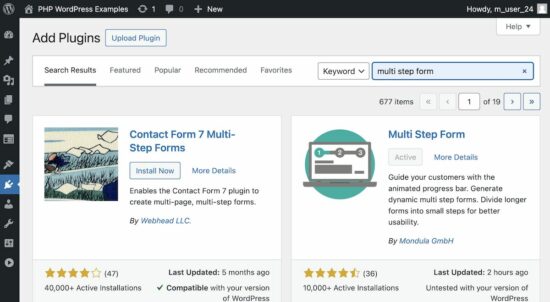
Obtain this plugin from the WordPress repository or by the WordPress admin interface.
The beneath screenshot exhibits the Multi Step Type plugin within the filtered outcome.
Set up and activate the plugin to have a brand new menu Multi Step Type within the left menu. This menu supplies options to create and handle types. It permits configuring type kinds and different properties.
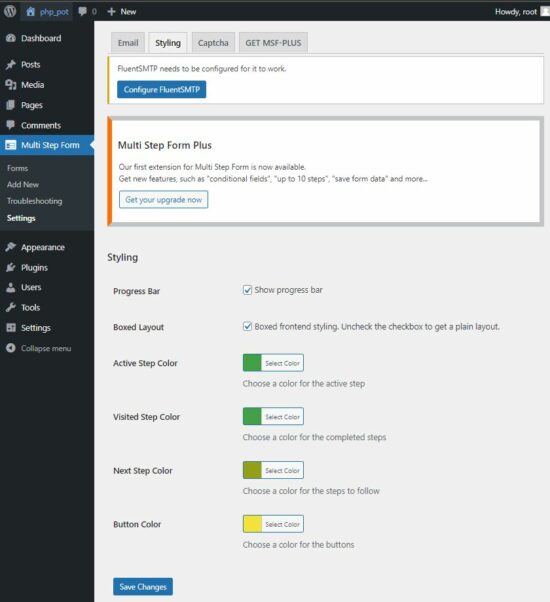
Step 2: Navigate to “Multi-Step Type”->Settings to set e mail codecs, type styling and extra
Navigate to the Multi-Step Type plugin pages to set the e-mail codecs.
The Styling characteristic permits you to customise the multi-step type format, colours, and extra UI settings.
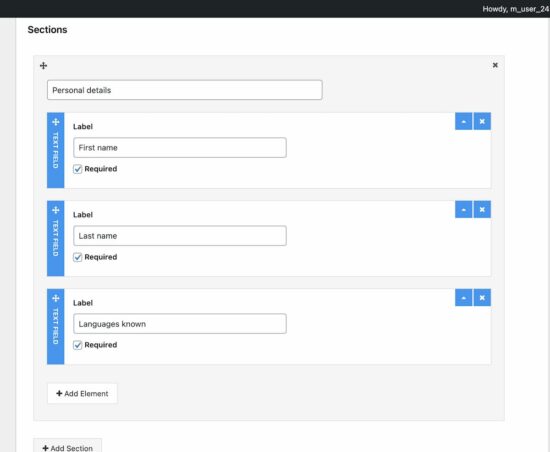
Step 3: Construct a type with a number of steps and sections
That is the prime step to construct a type through interface. This plugin supplies options to segregate types into subforms. It permits splitting every subform into sections.
Every subform of the wizard ought to no less than include one part and the part heading is obligatory.
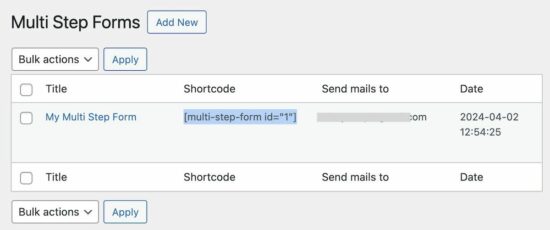
Step 4: Create a Shortcode for the shape
As soon as the shape is constructed the listing web page exhibits the created type with its WordPress shortcode.
The beneath screenshot highlights the shortcode created for the multi-step type occasion.
This code might be added to a web page’s content material within the editor. In any other case, we will print the shape HMTL through the WordPress operate do_shortcode() within the theme information.
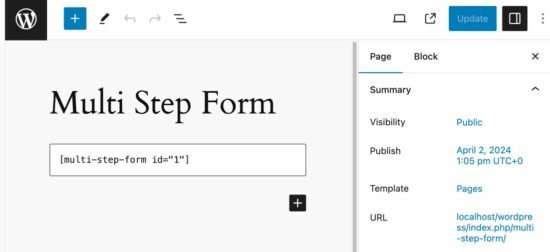
Step 5: Create a type web page and add the Shortcode to the web page content material
Technique 2: Add a {custom} answer for multi-step type through features.php
It is a {custom} answer that will probably be quite simple. I all the time desire {custom} options as an alternative of going with plugins or any third-party libraries.
This answer will probably be simple to know, and implement. Additionally it is simple to keep up when you add this to your WordPress software.
Steps to create a WordPress multi-step type with {custom} code
- Add a brand new WordPress web page to include multi-step type HTML.
- Create JavaScript code for the ‘earlier’ and ‘subsequent’ navigation.
- Create a jQuery type validation script.
- Add wizard type kinds
- Enqueue creates CSS and JS property through features.php.
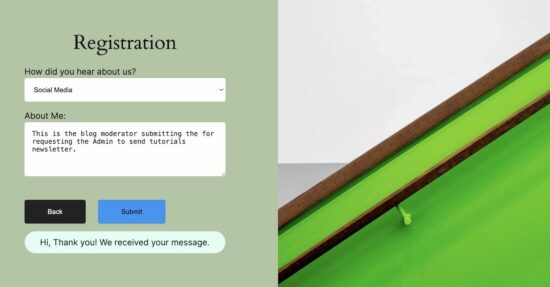
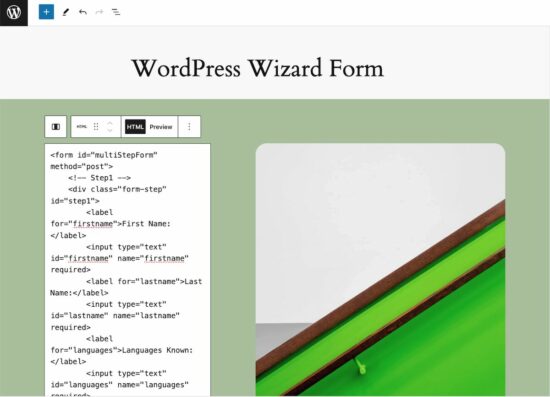
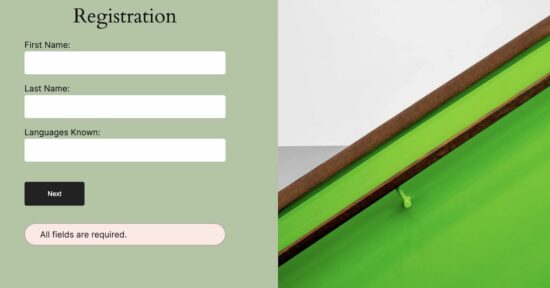
Step 1: Add a brand new WordPress web page to include a multi-step type HTML
Design a type in an HTML editor and paste the HTML into the WordPress web page content material. The beneath picture exhibits the WordPress {custom} HTML block with the shape markup.
This instance has a easy registration type in affordable size.
<h2 class="form-heading">Registration</h2>
<type id="multi-step-form" technique="put up" onSubmit="submitForm(occasion)">
    <!-- Private Data -->
    <div class="form-step" id="step1">
        <label for="firstname">First Title:</label>
        <enter sort="textual content" id="firstname" identify="firstname" class="required">
        <label for="lastname">Final Title:</label>
        <enter sort="textual content" id="lastname" identify="lastname" class="required">
        <label for="languages">Languages Recognized:</label>
        <enter sort="textual content" id="languages" identify="languages" class="required">
    </div>
    <!-- Extra Particulars -->
    <div class="form-step" id="step2">
        <label for="age">Age:</label>
        <enter sort="quantity" id="age" identify="age" class="required">
        <label for="gender">Gender:</label>
        <choose id="gender" identify="gender" class="required">
            <choice worth="male">Male</choice>
            <choice worth="feminine">Feminine</choice>
            <choice worth="others">Others</choice>
        </choose>
    </div>
    <!-- Affirmation & Submission -->
    <div class="form-step" id="step3">
        <label for="how_know">How did you hear about us?</label>
        <choose id="how_know" identify="how_know" class="required">
            <choice worth="social-media">Social Media</choice>
            <choice worth="articles">Articles</choice>
            <choice worth="google-ads">Google Adverts</choice>
            <choice worth="youtube-ads">Youtube Adverts</choice>
        </choose>
        <label for="about_me">About Me:</label>
        <textarea id="about_me" rows="5" identify="about_me" class="required"></textarea>
    </div>

    <!-- Navigation buttons -->
    <button sort="button" class="wizard-nav-btn" id="prev-btn" onclick="previousStep()"
        type="show: none;">Again</button>
    <button sort="button" id="next-btn" class="wizard-nav-btn" onclick="nextStep()" type="show: none;">Subsequent</button>
    <button sort="submit" class="wizard-nav-btn" id="submit-btn">Submit</button>
    <div id="js-validation-error"></div>
    <div id="wizard-success"></div>
</type>
Step 2: Create JavaScript code for the ‘earlier’ and ‘subsequent’ navigation
That is the core JS of this instance that permits the multi-step view of a type.
It has features for the ‘prev’ and ‘subsequent’ navigation to maneuver forwards and backwards together with the shape steps.
When switching to the subsequent step, it validates the present step. If the present step validation returns false it is not going to enable us to maneuver to the subsequent step.
wizard.js
let currentStep = 1;
let lastStep = jQuery(".form-step").size;
// Present step one initially
showStep(currentStep);


operate showStep(step) {
    currentStep = step;
    jQuery('.form-step').cover();
    jQuery('#step' + step).present();
    updateButtons();
}

operate nextStep() {
    if (validateFieldVisible()) {
        showStep(currentStep + 1);
    }
}

operate previousStep() {
    showStep(currentStep - 1);
}

operate updateButtons() {
    jQuery(".wizard-nav-btn").cover();

    if (currentStep === 1) {
        jQuery("#next-btn").present();
    } else if (currentStep === lastStep) {
        jQuery("#prev-btn").present();
        jQuery("#submit-btn").present();
    } else {
        jQuery("#next-btn").present();
        jQuery("#prev-btn").present();
    }
}
Step 3: Create jQuery type validation script
The on-submit occasion calls the validation operate to validate the seen part fields.
As soon as the validation returns true, it executes the AJAX script to ship an e mail and insert the shape information.
type.js
operate submitForm(occasion) {
    legitimate = validateFieldVisible();
    if(legitimate) {
        occasion.preventDefault();
        jQuery.ajax({
            sort: "POST",
            url: '/wordpress/wp-admin/admin-ajax.php?motion=wizard_form_action',
            information:  jQuery("#multi-step-form").serialize(),
            async: false,
            success: operate() {
                jQuery("#wizard-success").textual content('Hello, Thanks! We acquired your message.').present();
            }
        });
    }
    return false;
}

operate validateFieldVisible() {
    legitimate = true;
    jQuery("#js-validation-error").cover();
    jQuery(".required").every(operate(){
        if(jQuery(this).closest(".form-step").is(":seen") && !jQuery(this).val()) {
            legitimate = false;
            jQuery("#js-validation-error").textual content('All fields are required.').present();
        }
    })
    return legitimate;
}
Step 4: Add wizard type kinds
These are the minimal kinds added for the wizard type.
type.css
#multi-step-form {
    max-width: 500px;
    margin: 20px auto;
}


.form-step choose {
    width: 100%;
    margin-bottom: 15px;
    border: 1px stable #ccc;
    border-radius: 4px;
}


.form-step textarea {
    width: 100%;
    margin-bottom: 15px;
    border: 1px stable #ccc;
    border-radius: 4px;
    resize: vertical;
}


.form-step label {
    show: block;

}

.form-step enter[type="text"],
.form-step enter[type="email"],
.form-step choose,
.form-step textarea,
#age {
    width: 100%;
    padding: 15px;
    margin-bottom: 15px;
    box-sizing: border-box;
    border-radius: 4px;
    border: 1px;
}


.wizard-nav-btn {
    padding: 15px 45px;
    margin: 25px 20px 15px 0px;
    border-radius: 4px;
    background-color: #222222;
    border: #000 1px stable;
    coloration: #fff;
    cursor: pointer;
}

#submit-btn {
    background-color: #2196F3;
    border: #1d8ae0 1px stable;
    coloration: #000;
}

#js-validation-error {
    show: none;
    padding: 8px 30px;
    border-radius: 25px;
    background-color: #ffe7e7;
    border: 1px stable #a79494;
    coloration: rgb(40, 40, 40);
    margin: 20px 0px;
}

#wizard-success {
    show: none;
    background-color: #e3fff4;
    border: #d0ebe2 1px stable;
    padding: 8px 30px;
    border-radius: 25px;
    coloration: rgb(40, 40, 40);
}

.form-heading {
    margin: 20px;
    text-align: -webkit-center;
}
Step 5: Enqueue create CSS and JS property through features.php
The created JS and CSS property are enqueued into the WordPress on run time. The beneath script exhibits how one can enqueue the shape validation, wizard scripts.
By uncommenting the WordPress motion hook, wizard_form_action it is going to show all the shape fields in a single step.
features.php
...
...

operate enqueue_form_assets()
{
	wp_enqueue_style('theme-style', get_stylesheet_uri());
	wp_enqueue_script('custom-script', get_template_directory_uri() . '/type.js', array('jquery'), null, true);
}
add_action('init', 'enqueue_form_assets');


operate enqueue_wizard_script()
{
	wp_enqueue_script('wizard-script', get_template_directory_uri() . '/wizard.js', array('jquery'), null, true);
}
add_action('wp_enqueue_scripts', 'enqueue_wizard_script');

add_action("wp_ajax_wizard_form_action", "wizard_form_action");

operate wizard_form_action()
{
	if ($_SERVER['REQUEST_METHOD'] == 'POST' && !empty($_POST['firstname']) && !empty($_POST['lastname']) && !empty($_POST['languages']) && isset($_POST['age']) && isset($_POST['gender']) && !empty($_POST['how_know']) && !empty($_POST['about_me'])) {
		insertWizardFormData();

		// Ship e mail with type response
		sendMail();
	}
	exit();
}

operate insertWizardFormData() {
	international $wpdb;
	$table_name="tbl_wizard_form_response";

	$information = array(
		'firstname' => $_POST['firstname'],
		'lastname' => $_POST['lastname'],
		'languages' => $_POST['languages'],
		'age' => intval($_POST['age']),
		'gender' => $_POST['gender'],
		'how_know' => $_POST['how_know'],
		'about_me' => $_POST['about_me']
	);

	$format = array(
		'%s',
		'%s',
		'%s',
		'%d',
		'%s',
		'%s',
		'%s'
	);

	$wpdb->insert($table_name, $information, $format);
}

operate sendMail() {
	$to = 'RECIPIENT_EMAIL_HERE';
	$topic="New type submission";
	$message = "New type submission:nn" .
		"First Title: {$_POST['firstname']}n" .
		"Final Title: {$_POST['lastname']}n" .
		"Languages: {$_POST['languages']}n" .
		"Age: {$_POST['age']}n" .
		"Gender: {$_POST['gender']}n" .
		"How did you hear about us?: {$_POST['how_know']}n" .
		"About Me: {$_POST['about_me']}n";

	wp_mail($to, $topic, $message);
}
Database script
The database insert is an optionally available step. The features.php file that we’ve seen above comprises the insert operate.
This script is to import the required desk into the WordPress database to retailer the submitted type information.
CREATE TABLE `tbl_wizard_form_response` (
  `id` int(11) UNSIGNED NOT NULL,
  `firstname` varchar(255) NOT NULL,
  `lastname` varchar(255) NOT NULL,
  `languages` varchar(255) NOT NULL,
  `age` int(11) NOT NULL,
  `gender` varchar(255) NOT NULL,
  `how_know` varchar(255) NOT NULL,
  `about_me` textual content NOT NULL,
  `created_at` datetime NOT NULL DEFAULT current_timestamp()
);

--
-- Indexes for dumped tables
--
ALTER TABLE `tbl_wizard_form_response`
  ADD PRIMARY KEY (`id`);

ALTER TABLE `tbl_wizard_form_response`
  MODIFY `id` int(11) UNSIGNED NOT NULL AUTO_INCREMENT;