


Create as soon as; publish a number of occasions. Automate the guide work with Python
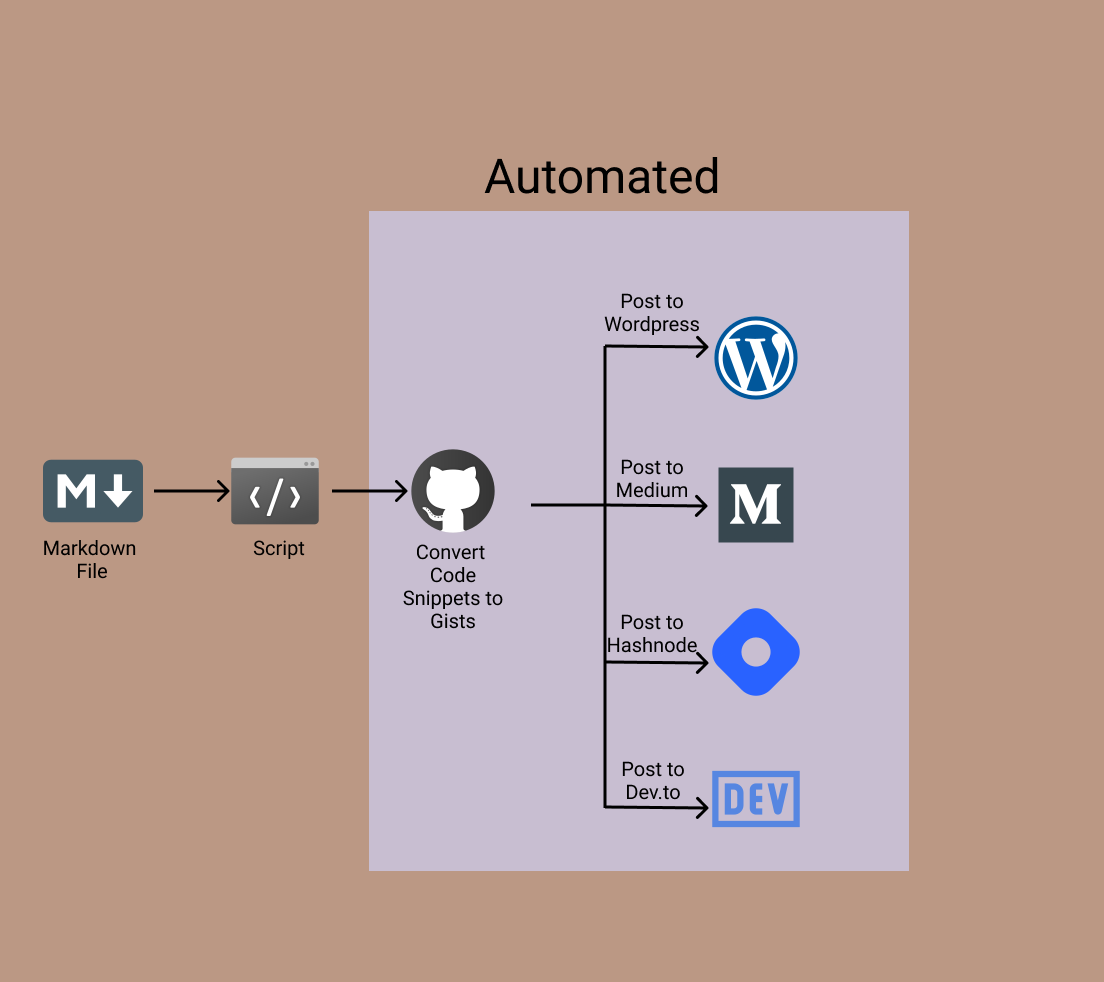
On this article, we are going to use Python to automate the next duties:
- Creating gists on your code snippets
- Embed gists into the article with totally different necessities for WordPress, Medium, Dev.to, and Hashnode
- Submit the article on WordPress
- Submit the article on Medium with WordPress canonical hyperlink
- Submit the article on Dev.to with WordPress canonical hyperlink
- Submit the article on Hashnode with WordPress canonical hyperlink
Primarily, we shall be utilizing Python to automate cross-posting to a number of web sites. We shall be utilizing varied APIs for doing the above duties.
You will discover all of the code in my GitHub repo.
First, create a brand new folder for the challenge:
mkdir crossPoster
cd crossPoster
Subsequent, create a digital setting and activate it, as proven under:
python3 -m venv venvsupply venv/bin/activate
Set up the required libraries, as proven under:
pip3 set up requests, Markdown, python-dotenv
Create a file named .env in your root listing. This shall be used to retailer all of your credentials. Additionally, you will want a take a look at markdown file to have the ability to cross-post. On this tutorial, I’m going to imagine that every one the photographs have public URLs and are usually not loaded from native recordsdata.
Earlier than continuing, we are going to want a GitHub token. Go to your developer settings token web page to get your GitHub token. When creating the token, be sure the choice “Create Gist” is checked. This lets you create gists utilizing your GitHub token. Copy the token and put it aside in your .env file.
GITHUB_TOKEN = "YOUR_GITHUB_TOKEN"
First, we might want to write a operate to get all of the code snippets from a markdown file. We are going to use a Regex sample to get the code snippet blocks. For now, ignore the operate “getSnippetName.” Simply assume it returns a tuple consisting of the file identify and precise code. If the code snippet has a language “bash,” we ignore it. You may lengthen the listing of languages to disregard.
We’re going to assume that the consumer will start their code snippet with a remark and the remark may have the identify of the gist (principally just like the above code snippet). If no such remark is offered, the gist may have a default identify, for instance, index.js for a JavaScript file, init.py for a Python file. Now, let’s have a look at the getSnippetName operate:
It searches for a remark within the first line of the code snippet. If a remark is current, it extracts the file identify from the primary line. If no remark is current, it makes use of a dictionary to return the default file identify. You may lengthen the code to assist feedback in different languages.
Now we have now an array of tuples. The primary component within the tuple is the identify of the gist and the second component is the content material of the gist. We are able to use this to create our gists.
We are going to make a put up request to the next endpoint:
https://api.github.com/gists
If you’d like the create gists to be non-public, you possibly can set the parameter “public” to False. The operate will return all of the URLs of the created gists.
Now, we have to change the code snippets within the markdown file with the related gist URLs. Medium, WordPress, Dev.to, and Hashnode have totally different codecs to embed gists, so let’s create a dictionary for that. Right here’s what it appears to be like like:
Every of the lambda features will settle for the gist URL as an argument and return the corresponding embed component. The logic to switch to code snippet is much like the logic to get all of the code snippets. Right here’s what it appears to be like like:
We hold a counter to maintain monitor of which code snippet corresponds to which gist URL. Since we ignored “bash” when creating the gists, we increment the counter by 1 with out really changing something. In all different instances, we change the code snippet with the gist URL on the “counter” index and increment the counter by 1. This operate goes to create new recordsdata for WordPress, Medium, Dev.to, and Hashnode.
Test the under code snippet that makes use of the above-created features. It would create public gists for the code snippets current in index.md and create a markdown for WordPress, a markdown for Medium, and so forth.
You will discover the documentation right here.
You’ll have to set up a plugin to generate an utility password on your account. Seek for the plugin Software Password, and set up it. After you put in it, go to your Customers>Profile. There must be an choice referred to as Software Passwords and a button to Add new utility password. Give it a reputation and create a brand new utility password. Copy the brand new password.
Replace your .env file
WP_USERNAME = "YOUR ADMIN USERNAME"
WP_PASSWORD = "YOUR NEW APPLICATION PASSWORD"
Your WordPress username is the one proven in Customers>Profile.
We are going to create a category to put up to WordPress. The WordPress API endpoint is of the next format:
{Your Web site Area}/wp-json/wp/v2/{route}
Take a look at the under code snippet that creates the category:
Now, we should add some strategies to this class that shall be used to put up to WordPress.
The primary technique shall be used to add our cowl picture or header picture to WordPress.
It has three inputs: the trail to the picture, different textual content, and the caption of the picture. A put up request needs to be made to the next endpoint:
{Your Web site Area}/wp-json/wp/v2/media
The response goes to have a area referred to as id. This shall be used after we are posting our article. It would have one other area referred to as jetpack_featured_media_url that incorporates the URL to the picture.
Subsequent, we want a technique to create tag IDs for our article. Right here’s what that appears like:
It has one enter — the listing of tags. For every tag, it should attempt to create a brand new tag. The response is both going to include the id of the newly created tag. If the tag already exists, the response will include the present tag id. We are going to mix the ids and return them.
The same operate might be created for classes as properly.
Lastly, we are going to add a technique to put up to WordPress.
The operate logic itself is fairly easy, let’s have a look at the JSON information we shall be including to our put up request:
title: A string that’s the title of your articlecontent material: Your article’s content material in HTML. (I’ll present you tips on how to convert your markdown file to HTML)standing: A string “publish” or “draft” relying on if you wish to put up your article as a draft or notclasses: The Class IDs returned by theget_category_idstechniquetags: The Tag IDs returned by theget_category_idstechniquefeatured_media: The ID of the duvet/header picture returned by theupload_mediatechnique
To transform your markdown file to HTML, we are going to use a library referred to as markdown:
pip3 set up Markdown
We might want to write the next helper operate to do the conversion. Right here’s the code:
Beneath is a pattern utilization of the wordpress class:
In case you are posting a draft, you possibly can create a brand new variable to retailer the put up slug. The put up slug is the URL to your article after it has been posted. The slug must be current within the response object.
We shall be utilizing Medium’s REST API for this half. You will discover the documentation right here.
To get your entry token, go to your profile settings and go to Integration Tokens. Enter an outline and click on on the ‘Get Integration Token’ button.
Save the token in your .env file.
MEDIUM_TOKEN = "Your Meidum Token"
Just like the category we created for WordPress, we are going to create a category for Medium as properly.
Now let’s outline the getUserID technique.
This merely makes a GET request to the next endpoint and returns your consumer ID. Notice: that is totally different out of your username.
https://api.medium.com/v1/me
Now, we will add the tactic to create a Medium put up. Right here’s the code:
Let’s check out the JSON information added to the put up request.
title: The title of your articlecontent material: The content material of your article in HTMLpublishStatus: A string ‘draft,’ ‘printed,’ or ‘unlisted’contentFormat: In our case, this shall be ‘HTML’tags: An inventory of strings which might be the tags of the article.notifyFollowers: A boolean worthcanonicalUrl: If relevant, the canonical URL. In my case, I’m going to set it to the WordPress put up’s URL.
Now, let’s check out a pattern utilization of the category:
The Dev.to implementation is fairly related and I’m not going to go a lot intimately. You will discover your token right here. Scroll to the underside to generate a token and replace your .env file.
DEVTO_TOKEN = "GCP1itdmDAmVzfTjEQRRnnFc"
You will discover the documentation right here
The next reveals the dev.to class:
For dev.to, we don’t have to convert our markdown file to HTML. We are able to instantly use the markdown content material.
A hashnode has a GraphQL API, and it took me fairly a while to determine the right question and tips on how to make the right request. It is best to have the ability to instantly use the code snippet proven on this part. You may generate your token right here.
You may mess around with their API over right here.
Right here’s the Hashnode class implementation:
In case you are not acquainted with GraphQL, attempt enjoying with the API of their API Playground. Let’s check out a number of the variables which might be handed to the question:
title: The title of your article.content material: Your article’s content material in markdown. Just like dev.to, you don’t want to transform to HTML.publicationID: It is a required parameter. If you don’t add it to your question, your article gained’t be listed below your profile, however it’ll nonetheless be posted. It’ll be belowhashnode.comand never your private hashnode weblog or account. To seek out your publication ID, go to your dashboard and replica it from the URL.
https://hashnode.com/{YOUR PUBLICATION ID}/dashboard
tags: An inventory of tagscanonicalUrl: The canonical URL of the articlehideFromHashnodeFeed: The API doesn’t assist posting drafts (or at the least I couldn’t discover a method to put up drafts). SettinghideFromHashnodeFeedtoTrueposts the article, however it gained’t present up on anybody else’s feed. You may toggle this within the hashnode editor as properly.
You will discover a pattern utilization of all of the above courses to create an “automated pipeline” on this file within the repo.
You may consider this as a POC to automate your course of. It clearly doesn’t cowl all use instances. Be at liberty to clone the repo and edit it as you want. Listed here are some enhancements that may be made:
- Help for native photographs — The logic must be much like how code snippets are transformed to gists. Both one of many current APIs can be utilized or a brand new API like Imgur can be utilized
- Lengthen this to routinely share your article to varied subreddits or Twitter as properly
- Add assist for different weblog editors
Please let me know within the feedback in case you discovered this text helpful or in case you have any ideas on options that may be automated, improved, and so forth.
Need to Join?Discover me on LinkedIn at https://www.linkedin.com/in/rahulbanerjee2699/This text was initially posted on https://www.realpythonproject.com/how-to-use-python-to-post-on-popular-blogging-websites/