


This text was written by an exterior contributor.

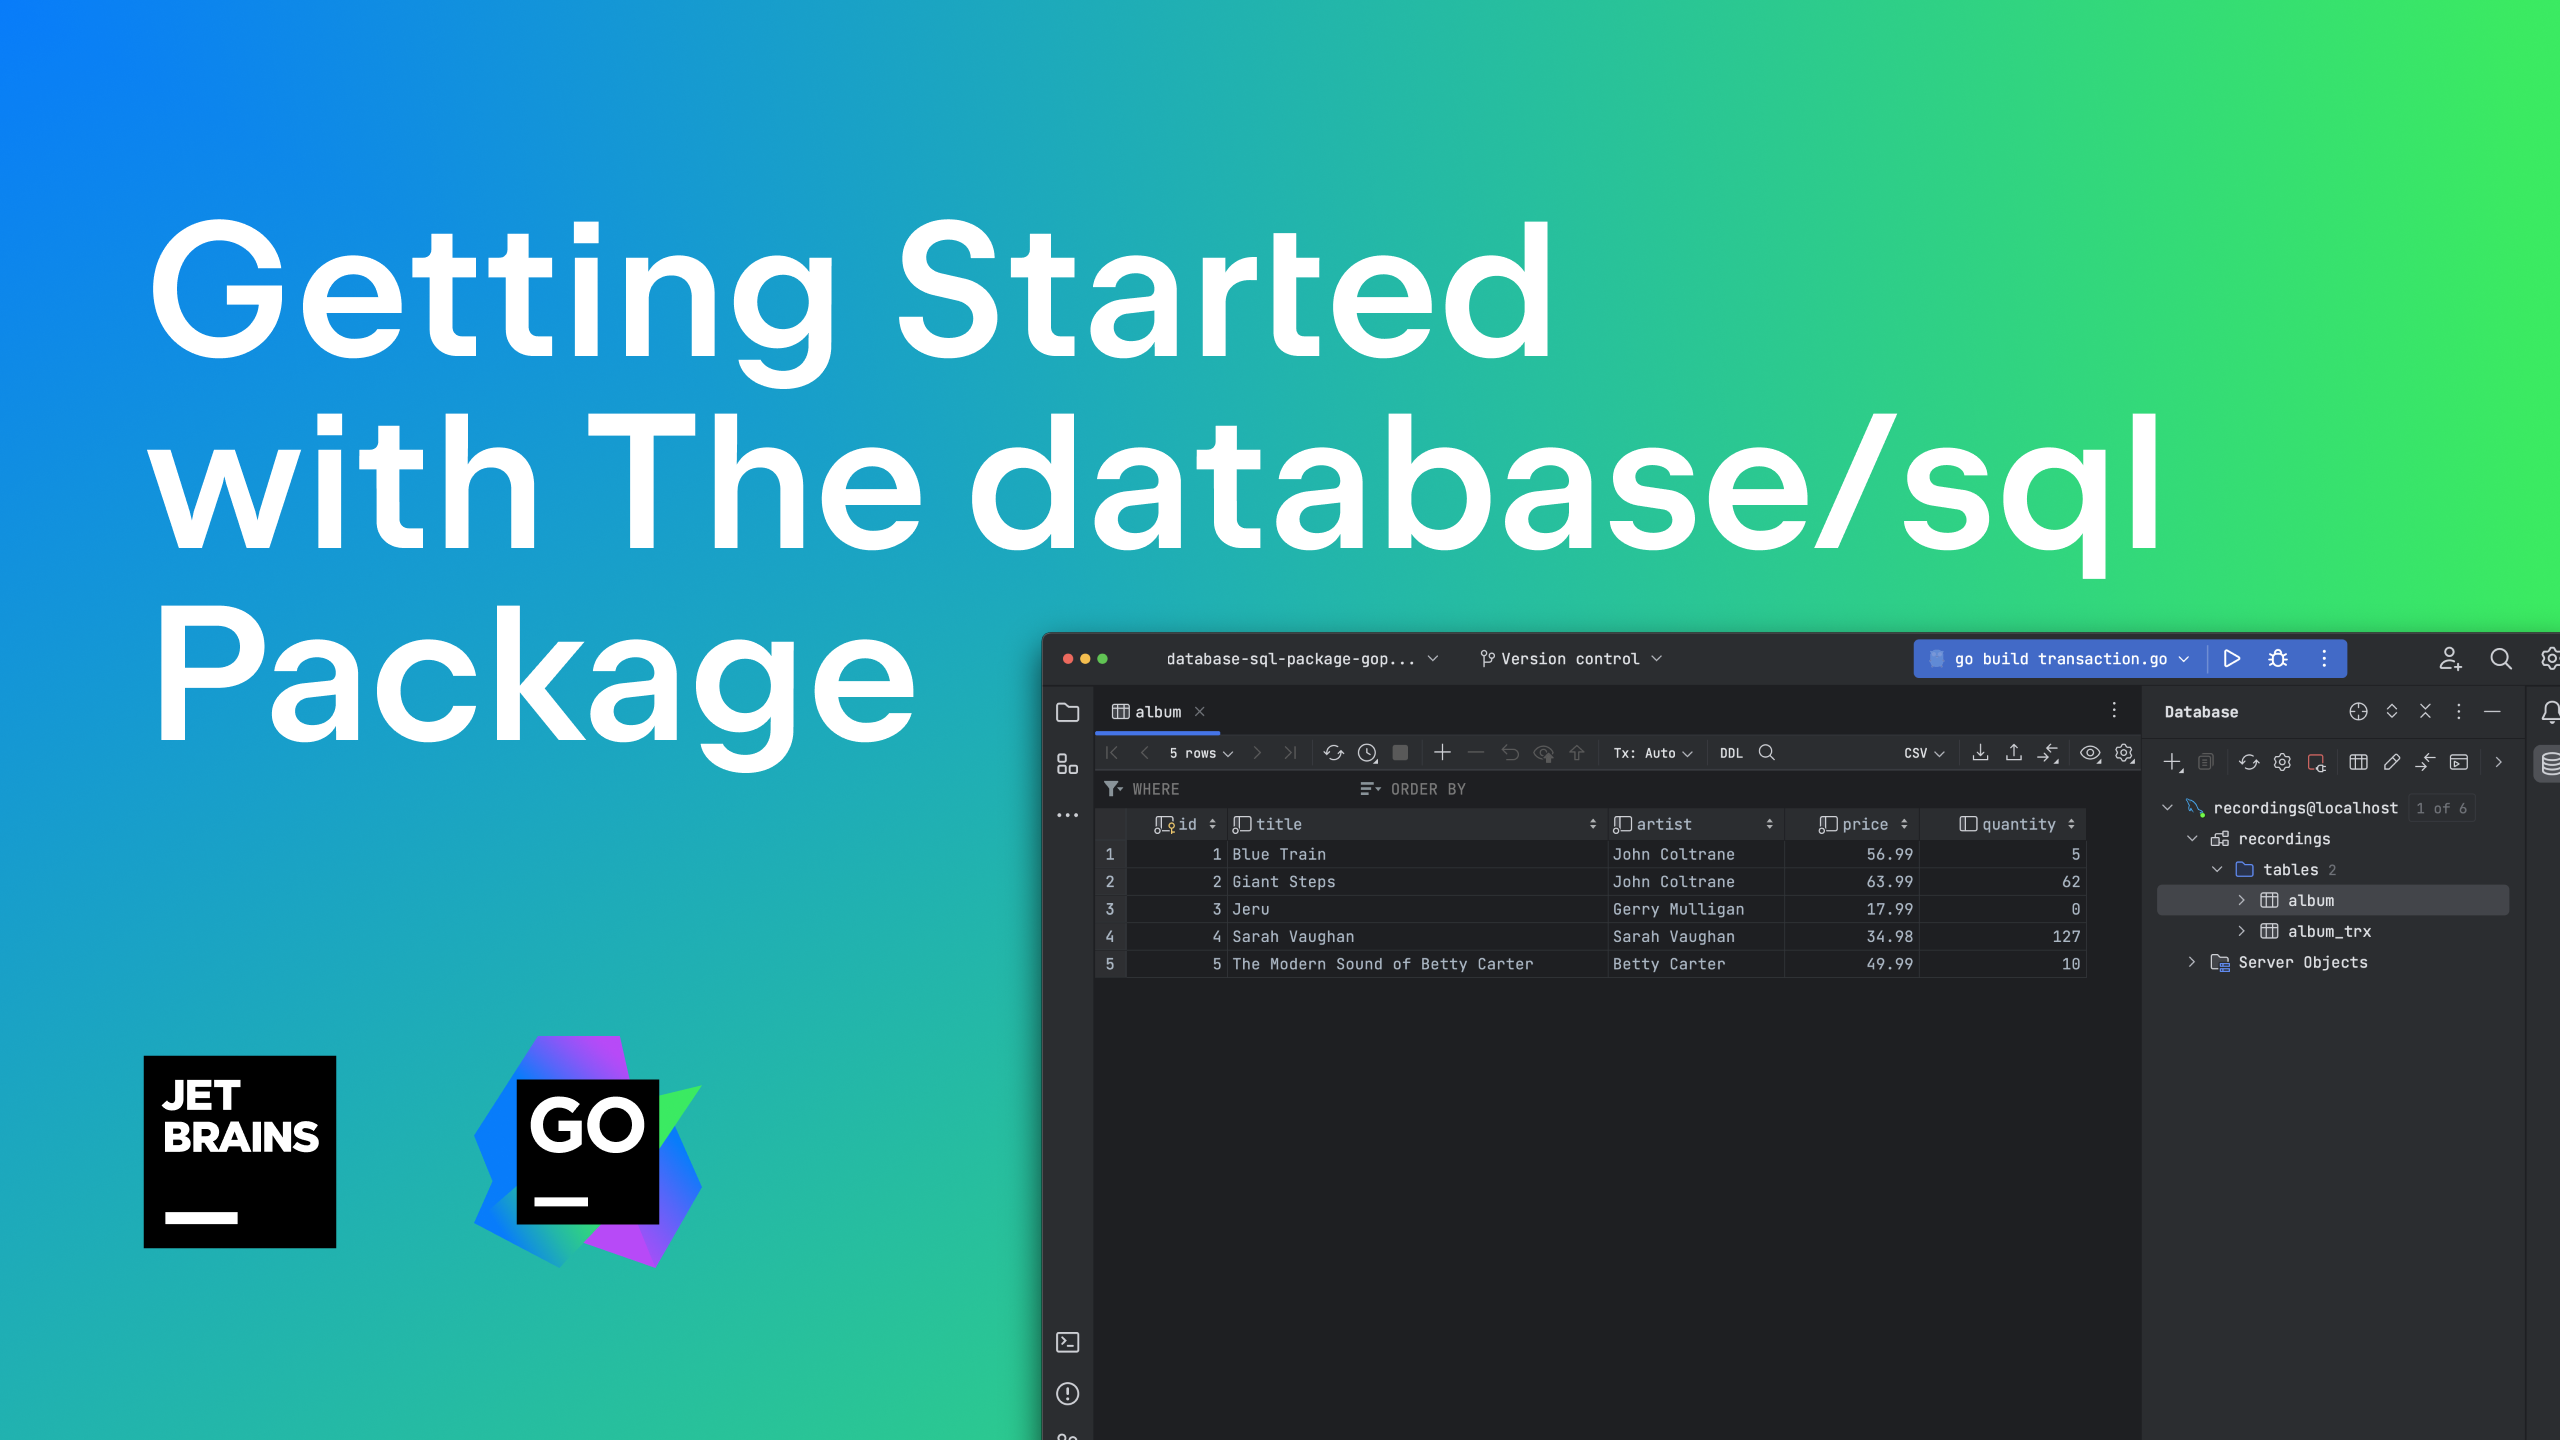
The database/sql package deal is an ordinary library that gives an interface for interacting with SQL databases. The package deal allows purposes to question and replace databases and supplies a transportable interface that works with varied SQL databases. The database/sql package deal is usually used together with a database driver, which supplies a concrete interface implementation permitting you to summary the database choices behind handy strategies.
This hands-on tutorial will present you find out how to get began with the database/sql package deal by educating you find out how to:
- Create a GoLand challenge.
- Arrange the database.
- Implement primary queries and transactions utilizing Go and GoLand.
- The way to assemble error messages.
Getting began with the database/sql package deal
Getting began with databases in Go is easy. Nonetheless, your native machine should meet sure stipulations.
Conditions
Earlier than getting began, you must just be sure you have put in all of the required instruments and have the suitable assets to finish the tutorial:
- Go: For those who haven’t already, obtain and set up Go in your native machine.
- MySQL server: Go helps common relational database administration methods comparable to MySQL, Oracle, Postgres, SQL Server, SQLite, and extra. Nonetheless, on this tutorial, you’ll use MySQL. Obtain the suitable MySQL Neighborhood Server to your working system right here. For directions on find out how to arrange MySQL, discuss with MySQL Getting Began.
- Vital word: Relying in your chosen set up technique, the MySQL server might begin mechanically and run within the background till you cease it. Likewise, it could be the case that it’s important to begin the MySQL service manually after putting in the service.
- MySQL db: You’ll want an empty database prepared to make use of. This tutorial refers back to the database as
recordings, however you should utilize no matter title you want. You’ll find data on making a DB in MySQL here. - GoLand IDE: You’ll be able to obtain GoLand for macOS, Linux, or Home windows right here.
- Tutorial repository: You’ll be able to clone the repository that incorporates the code used in the course of the tutorial to an applicable location.
As soon as the stipulations are met, you’ll be able to launch GoLand and begin your first challenge.
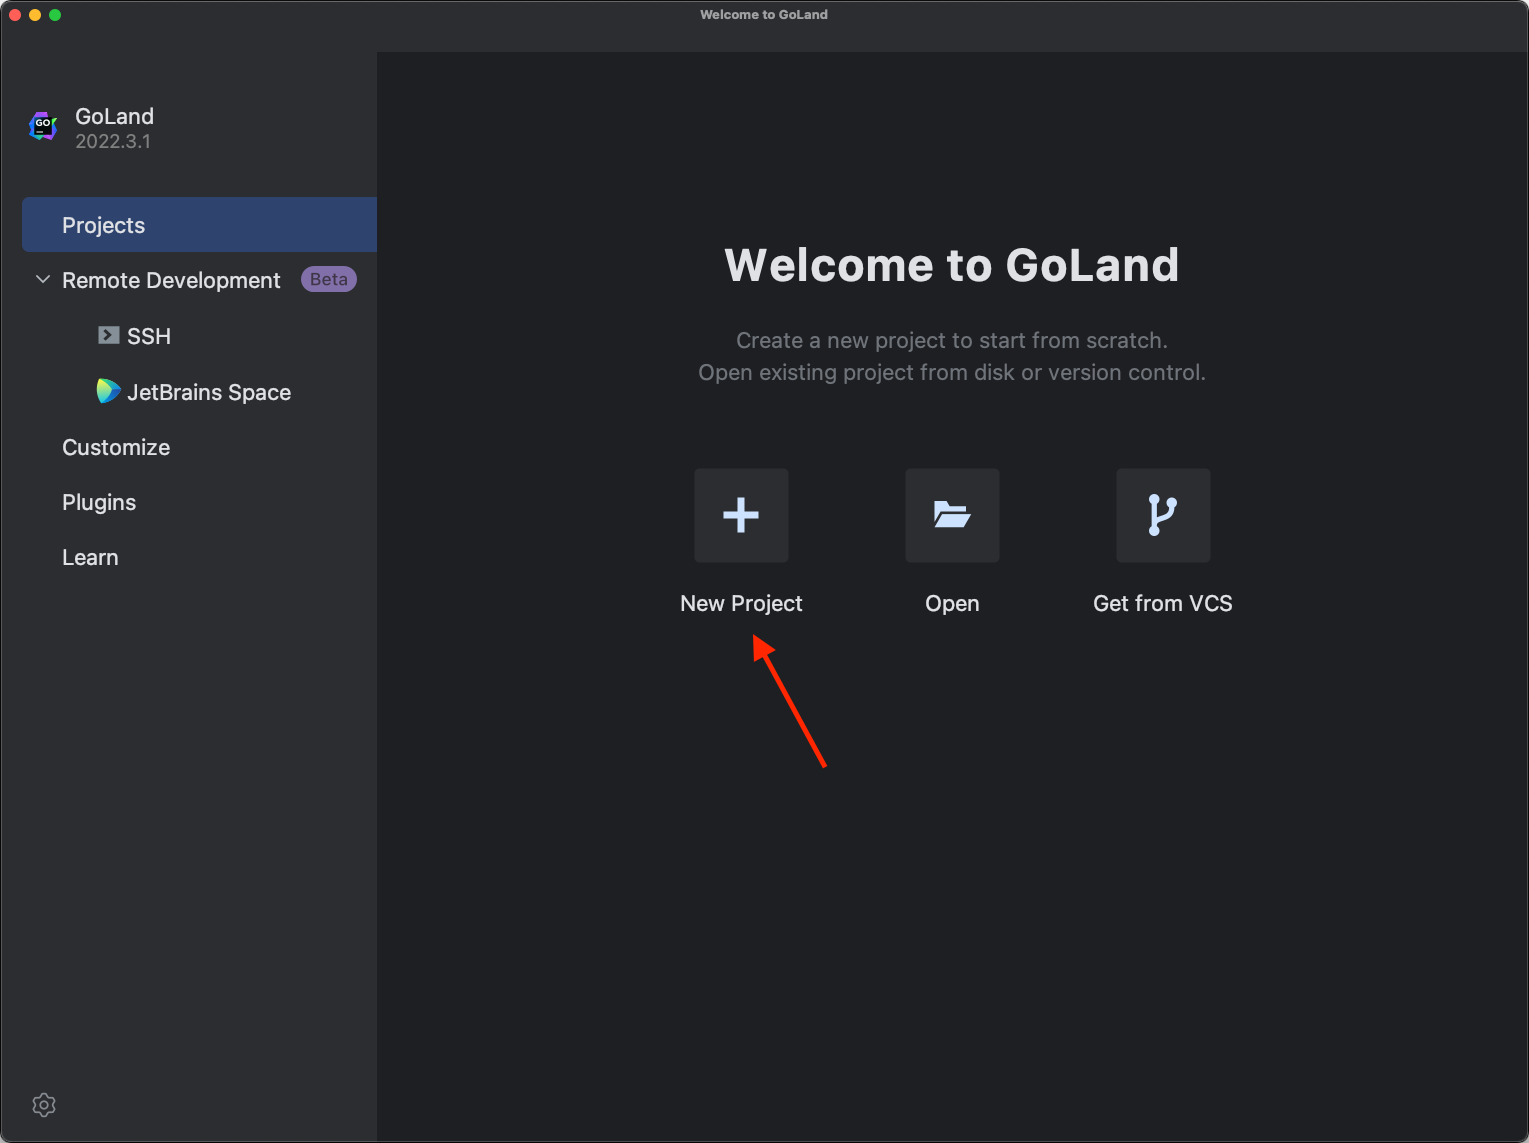
Creating a brand new challenge in GoLand
Step one is to create a brand new challenge in GoLand. To do that, press the New Undertaking button on the Welcome display screen.
Subsequent, you’ll be introduced with a display screen just like the next:
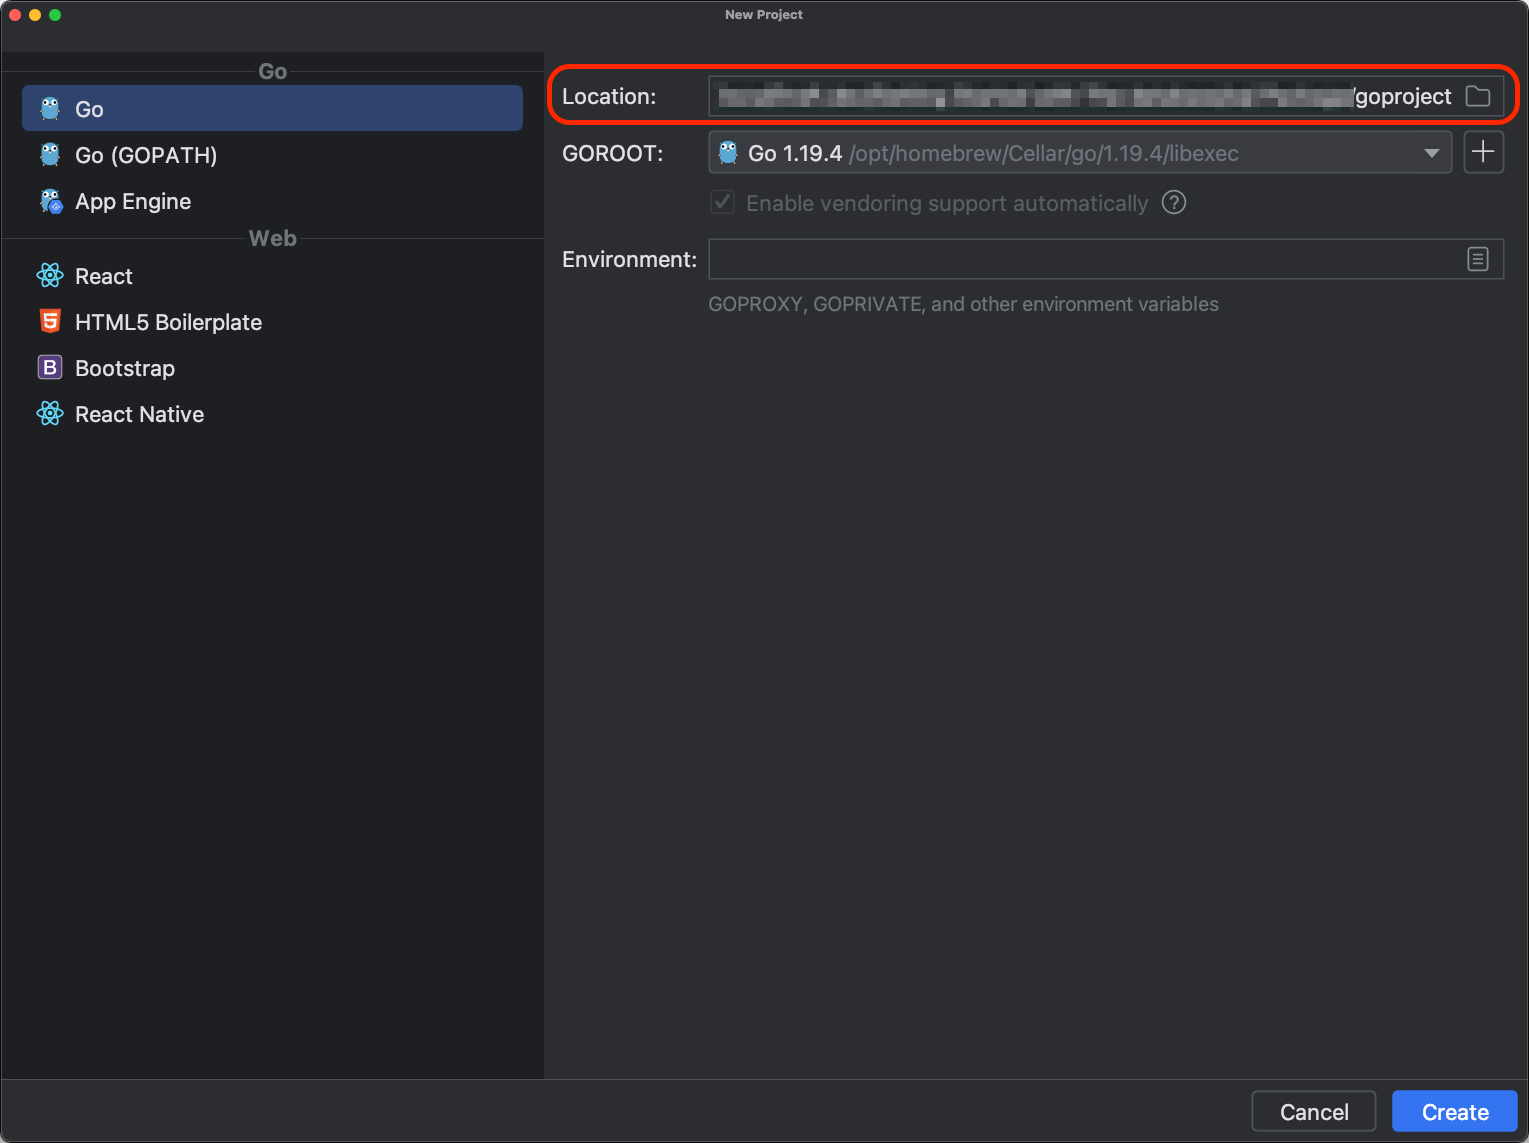
You’ll discover a number of fields on this display screen:
- Location. Use this discipline to decide on an appropriate location to your challenge. Nonetheless, for this tutorial, it’s essential to select the repository’s location.
- GOROOT. This discipline is prefilled when you’ve got put in Go within the default location to your OS. If not, choose the proper Go root location.
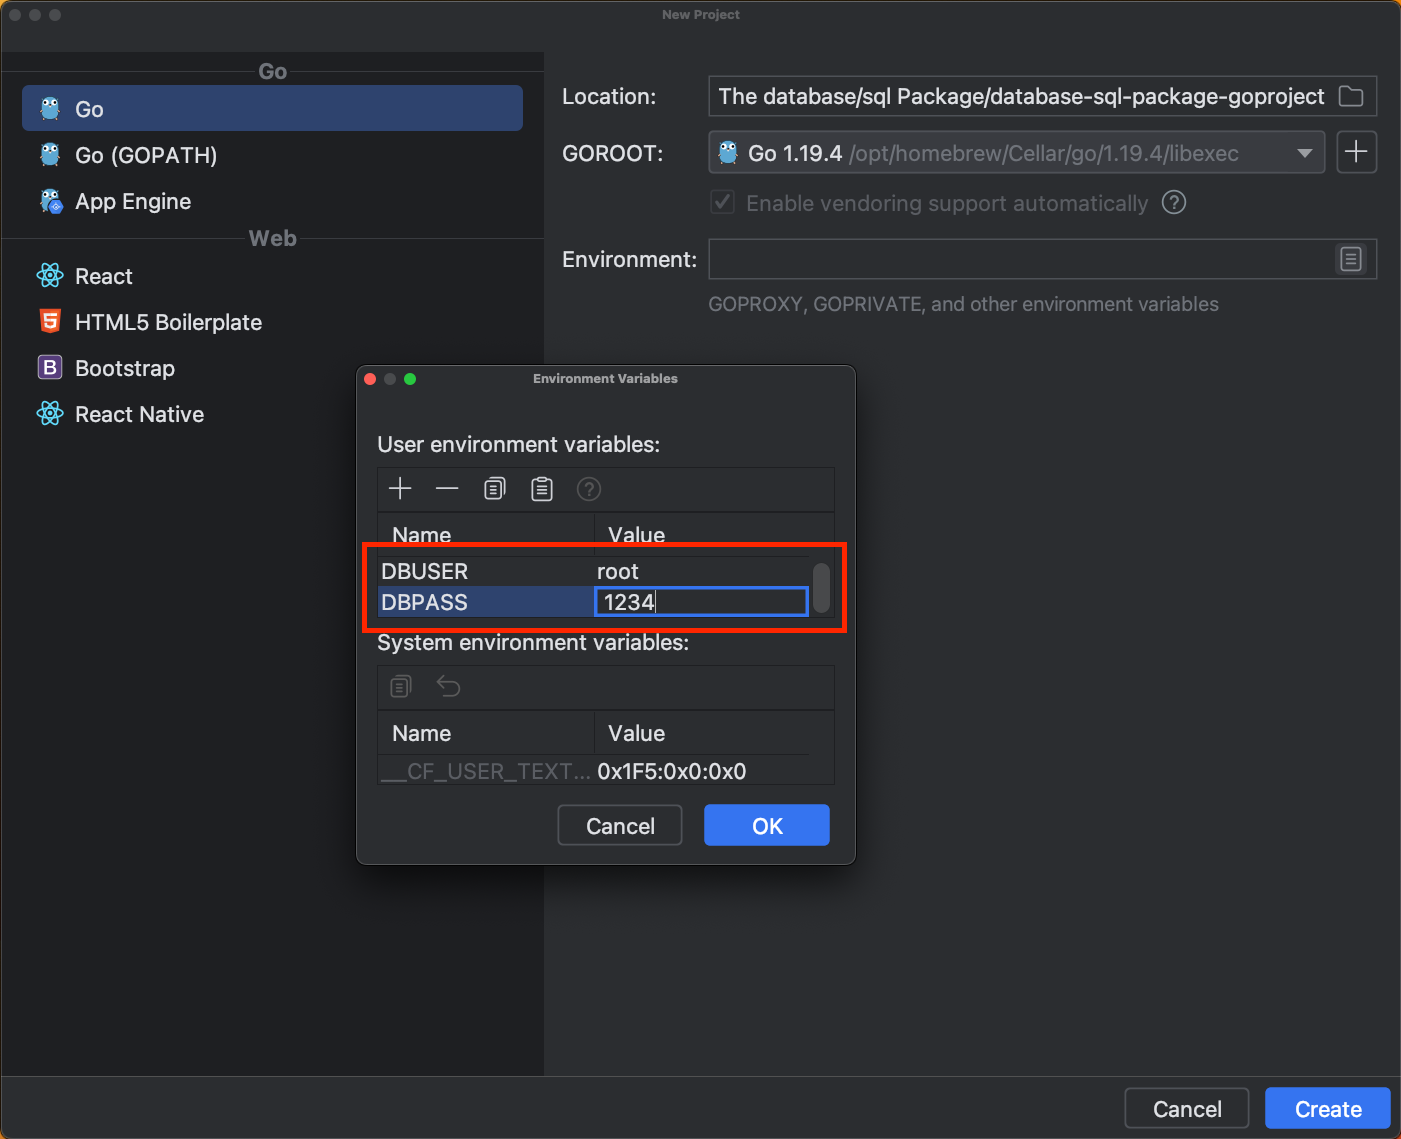
- Setting. That is an elective discipline that permits you to declare environmental variables comparable to GOPROXY or GOPRIVATE. On this tutorial, you employ this discipline to declare MySQL surroundings variables
DBUSERandDBPASSthat you simply’ll want later to attach with the database. To do that, it’s essential to enter the corresponding key-value pairs as proven under.
Remember to enter the proper values. For this tutorial, the next values are used:
When you create a challenge, GoLand mechanically creates the go.mod file for you.
Configuring MySQL information sources
Managing databases in GoLand could be very straightforward; all it’s important to do is be certain your information supply is configured correctly.
To configure the information supply, first, click on on the database icon in the suitable menu of GoLand, after which click on the plus signal (+) or on the configuration icon, adopted by the plus signal, and select MySQL from the record of accessible databases.
On the following display screen, enter your username and password to connect with MySQL. Subsequent, enter the title of the database, and click on Check Connection.
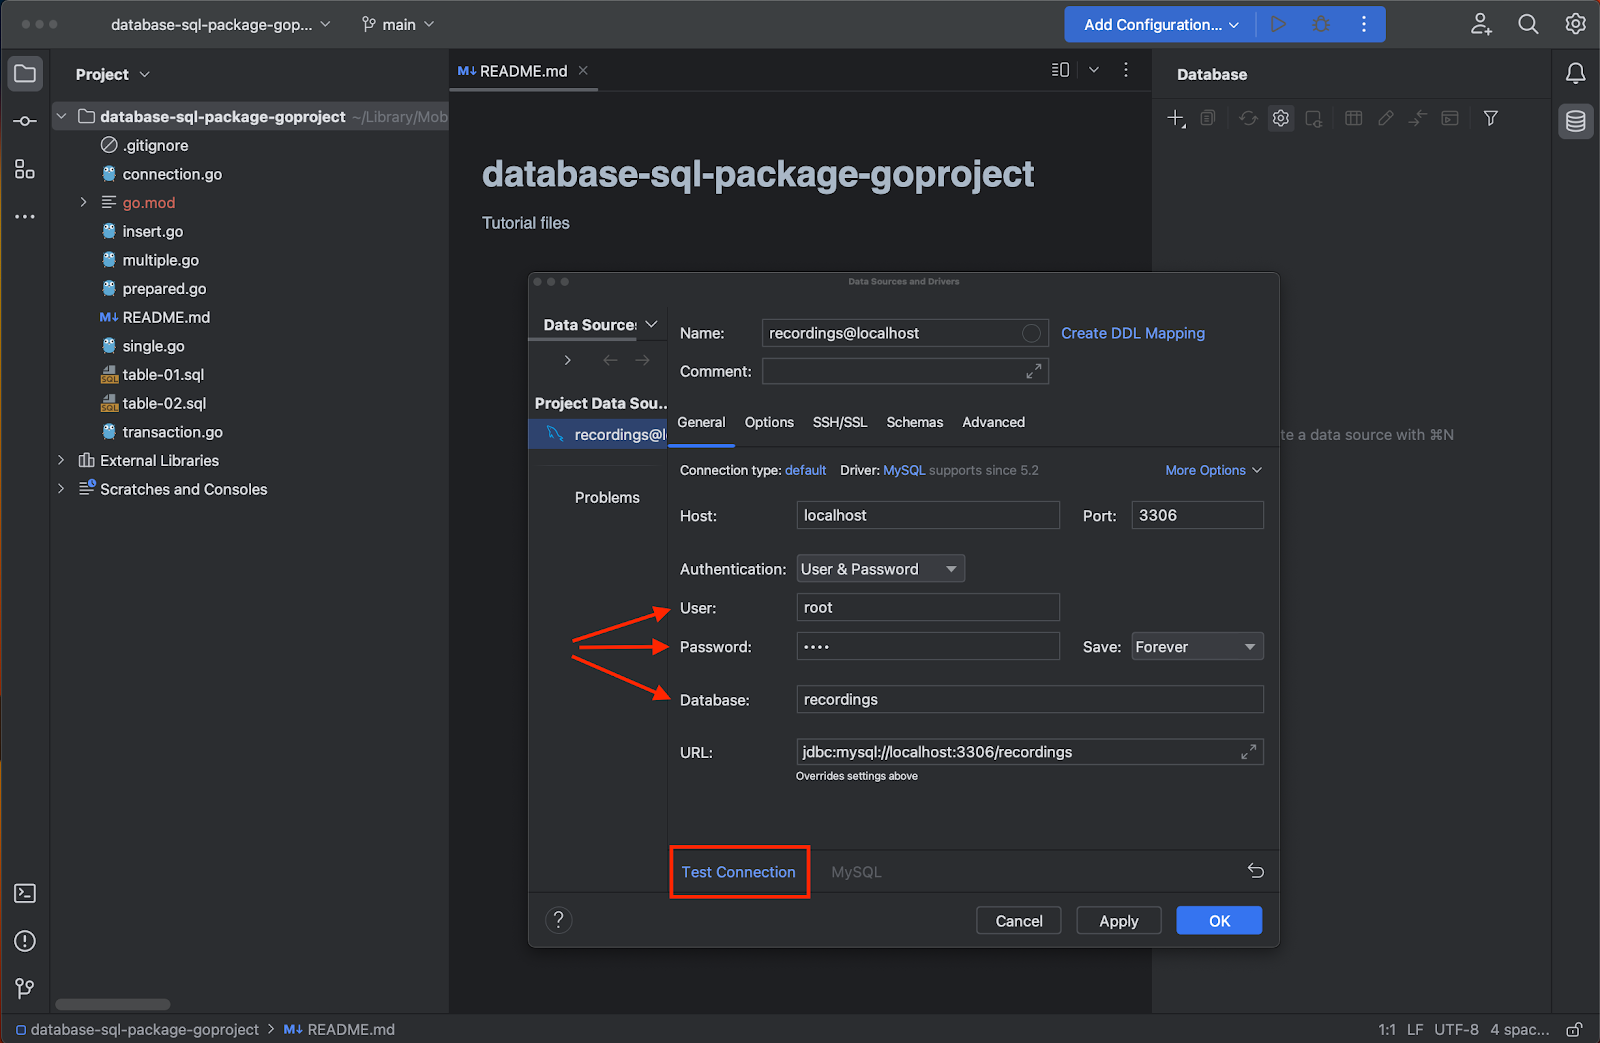
For those who haven’t beforehand configured MySQL, it’s possible you’ll get an error message. In that case, click on Obtain Driver Recordsdata, and GoLand will maintain the remainder.
As soon as the connection has been efficiently examined, click on on the OK button to proceed.

On the following display screen, a MySQL console mechanically seems, in addition to a notification suggesting to configure SQL dialect. You’ll be able to both set MySQL because the default dialect or click on configure to decide on another dialect.

Now that your information supply is about up, you’ll be able to run instructions from the MySQL console. Nonetheless, this is not going to be mandatory when you’ve got SQL scripts, as on this tutorial.
Organising database tables utilizing SQL scripts
You’ll be able to simply run SQL scripts with GoLand. To do that, merely right-click on the corresponding file and choose Run from the dropdown record. Attempt working the table-01.sql script. Earlier than executing the script, it’s essential to assign an information goal for it, on this case, the recordings database. The script’s output will mechanically show when the Run button is pressed.
The displayed script ought to look as follows:
DROP TABLE IF EXISTS album;
CREATE TABLE album (
                       id         INT AUTO_INCREMENT NOT NULL,
                       title      VARCHAR(128) NOT NULL,
                       artist     VARCHAR(255) NOT NULL,
                       value      DECIMAL(5,2) NOT NULL,
                       amount   INT UNSIGNED,
                       PRIMARY KEY (`id`)
);


INSERT INTO album
(title, artist, value, amount)
VALUES
    ('Blue Practice', 'John Coltrane', 56.99, 5),
    ('Large Steps', 'John Coltrane', 63.99, 62),
    ('Jeru', 'Gerry Mulligan', 17.99, 0),
    ('Sarah Vaughan', 'Sarah Vaughan', 34.98, 127);
Within the above SQL script:
- The primary line drops the album desk. This makes it straightforward to run the script as many occasions as mandatory with out worrying about errors for recreating an present desk.
- Strains 2 to 7 should do with the creation of the album desk in addition to the corresponding fields.
- Line 8 units
idas the first key. - The remainder of the script populates the desk with dummy information utilizing the
INSERTassertion.
Subsequent, repeat the process to run the second SQL script, table-02.sql.
The next code corresponds to the second SQL script:
DROP TABLE IF EXISTS album_trx;
CREATE TABLE album_trx (
                             trx_id    INT AUTO_INCREMENT NOT NULL,
                             trx_check     INT UNSIGNED,
                             PRIMARY KEY (`trx_id`)
);
As you’ll be able to see, this can be a less complicated script that creates a desk that solely has 2 fields. You’ll use this desk within the transactions part.
Up so far, you will have configured GoLand to connect with the native MySQL service, and because of this, you will have simply created and prepopulated tables utilizing SQL scripts. Equally, within the subsequent part, you’ll see how straightforward it’s to make use of the database/sql package deal in GoLand.
Connecting to the database utilizing database/sql
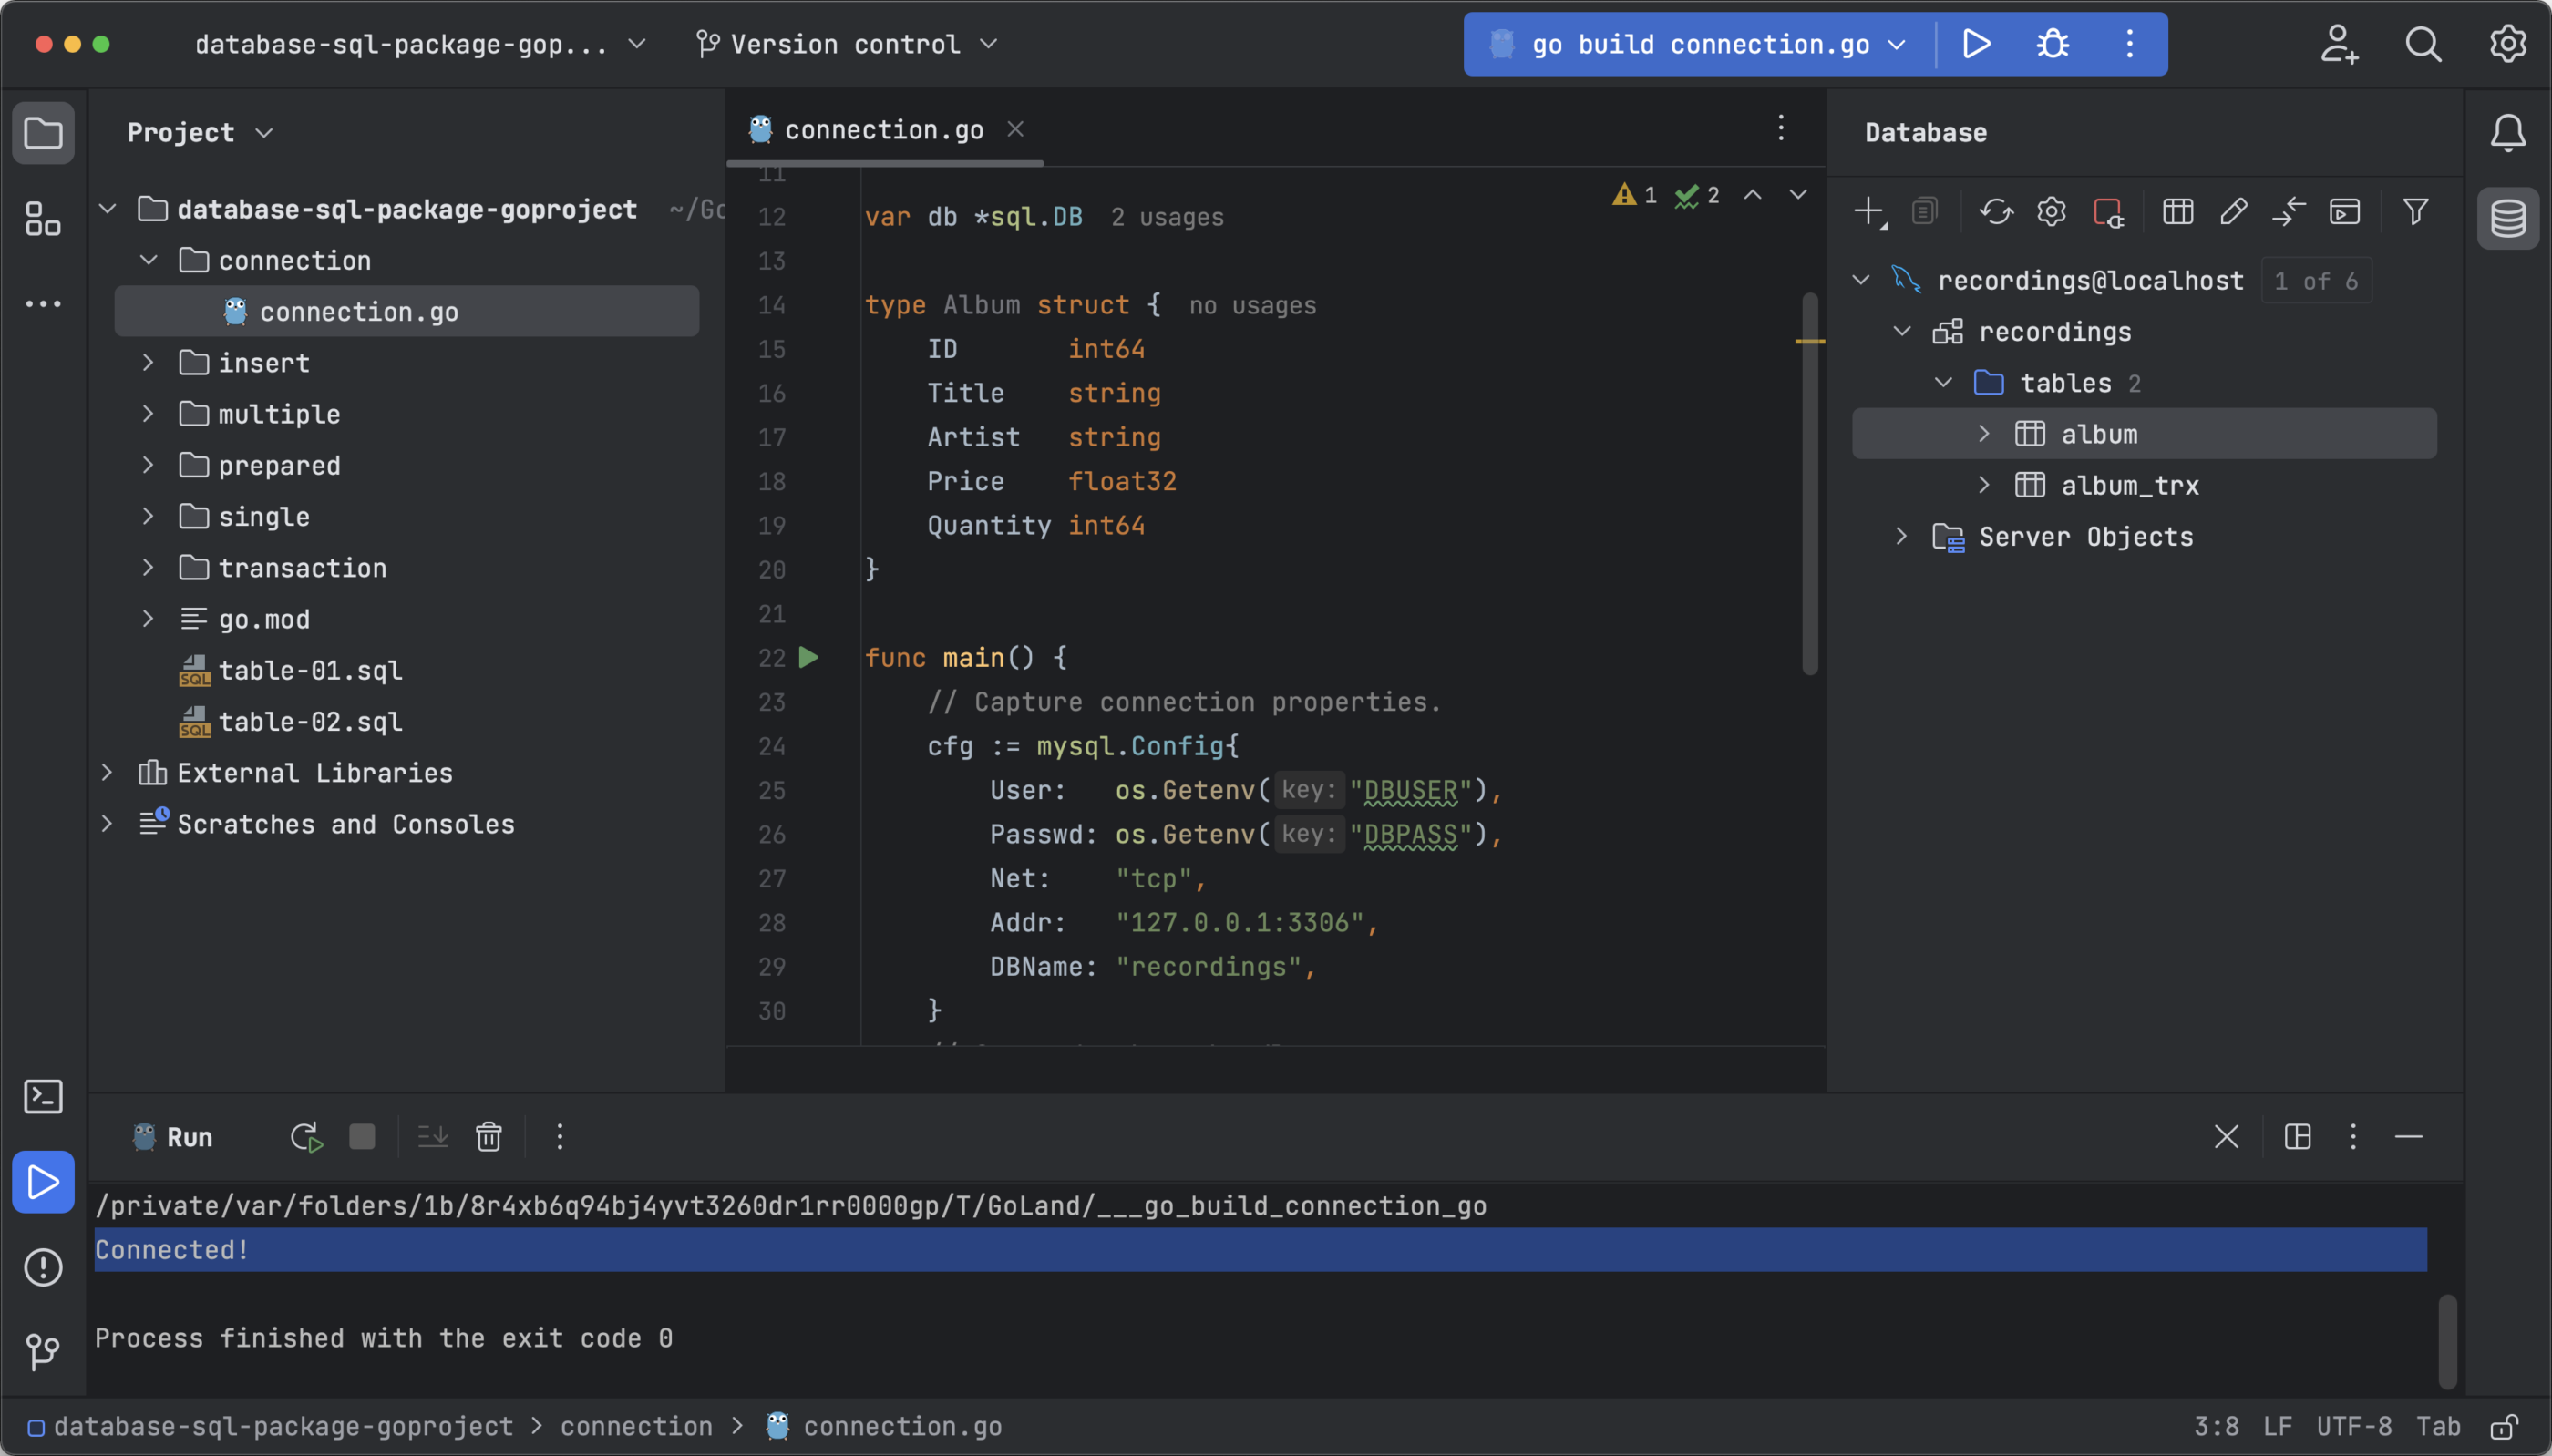
The database/sql package deal makes it quite simple to handle databases utilizing Go, as will be seen from the connection.go code:
package deal important
import (
    "database/sql"
    "fmt"
    "github.com/go-sql-driver/mysql"
    "log"
    "os"
)
var db *sql.DB
kind Album struct {
    ID       int64
    Title    string
    Artist   string
    Worth    float32
    Amount int64
}
func important() {
    // Seize connection properties.
    cfg := mysql.Config{
        Person:   os.Getenv("DBUSER"),
        Passwd: os.Getenv("DBPASS"),
        Web:    "tcp",
        Addr:   "127.0.0.1:3306",
        DBName: "recordings",
    }
    // Get a database deal with.
    var err error
    db, err = sql.Open("mysql", cfg.FormatDSN())
    if err != nil {
        log.Deadly(err)
    }
    pingErr := db.Ping()
    if pingErr != nil {
        log.Deadly(pingErr)
    }
    fmt.Println("Linked!")
}
Let’s overview the code. First, import the mandatory packages:
- database/sql – As talked about, supplies a generic interface round SQL (or SQL-like) databases.
- fmt – Is a package deal that implements formatted I/O with features analogous to C’s printf and scanf.
- github.com/go-sql-driver/mysql – The implementation of database/sql for MySQL (database driver).
- log – A regular library that gives logging capabilities.
- os – The package deal that supplies platform-independent interface to working system performance.
*var db sql.DB – This line is vital. The db variable is said utilizing the sql.DB struct, which features because the database connection pool. As talked about within the introduction, this lets you conveniently summary database choices.
kind Album struct {...} – That is the definition of the Album desk construction that may maintain row information from the database.
func important() – This operate takes benefit of the sql.DB struct declared above and makes use of the database/sql package deal and the MySQL driver.
The connection information is captured utilizing the DSN (Knowledge Supply Identify) format. The syntax is:
db, err := sql.Open("mysql", "consumer:password@/dbname")
To simplify the code, the cfg variable that collects the properties of the connection is said (together with the environmental you beforehand configured in GoLand), and it’s later used to get the database deal with utilizing the DSN format proven above. The ultimate portion of func important handles potential errors, one thing we’ll discuss in a later part.
Operating this file is so simple as right-clicking on it and deciding on Run ‘go construct connection.go’ from the dropdown record.
As anticipated, the output exhibits the message Linked!.
Now that you may connect with the database, you can begin performing operations like inserting new rows or querying for rows.
Inserting new rows
Let’s overview the code of insert.go, which inserts a brand new row:
package deal important
import (
    "database/sql"
    "fmt"
    "github.com/go-sql-driver/mysql"
    "log"
    "os"
)
var db *sql.DB
kind Album struct {
    ID       int64
    Title    string
    Artist   string
    Worth    float32
    Amount int64
}
func important() {
    // Seize connection properties.
    cfg := mysql.Config{
        Person:   os.Getenv("DBUSER"),
        Passwd: os.Getenv("DBPASS"),
        Web:    "tcp",
        Addr:   "127.0.0.1:3306",
        DBName: "recordings",
    }
    // Get a database deal with.
    var err error
    db, err = sql.Open("mysql", cfg.FormatDSN())
    if err != nil {
        log.Deadly(err)
    }
    pingErr := db.Ping()
    if pingErr != nil {
        log.Deadly(pingErr)
    }
    fmt.Println("Linked!")
    albID, err := addAlbum(Album{
        Title:    "The Fashionable Sound of Betty Carter",
        Artist:   "Betty Carter",
        Worth:    49.99,
        Amount: 10,
    })
    if err != nil {
        log.Deadly(err)
    }
    fmt.Printf("ID of added album: %vn", albID)
}
// addAlbum provides the desired album to the database,
// returning the album ID of the brand new entry
func addAlbum(alb Album) (int64, error) {
    consequence, err := db.Exec("INSERT INTO album (title, artist, value, amount) VALUES (?, ?, ?, ?)", alb.Title, alb.Artist, alb.Worth, alb.Amount)
    if err != nil {
        return 0, fmt.Errorf("addAlbum: %v", err)
    }
    id, err := consequence.LastInsertId()
    if err != nil {
        return 0, fmt.Errorf("addAlbum: %v", err)
    }
    return id, nil
}
This code block is similar to the earlier one, besides that it inserts a brand new row into the album desk. Run the code by right-clicking on the file and deciding on Run ‘go construct insert.go’.
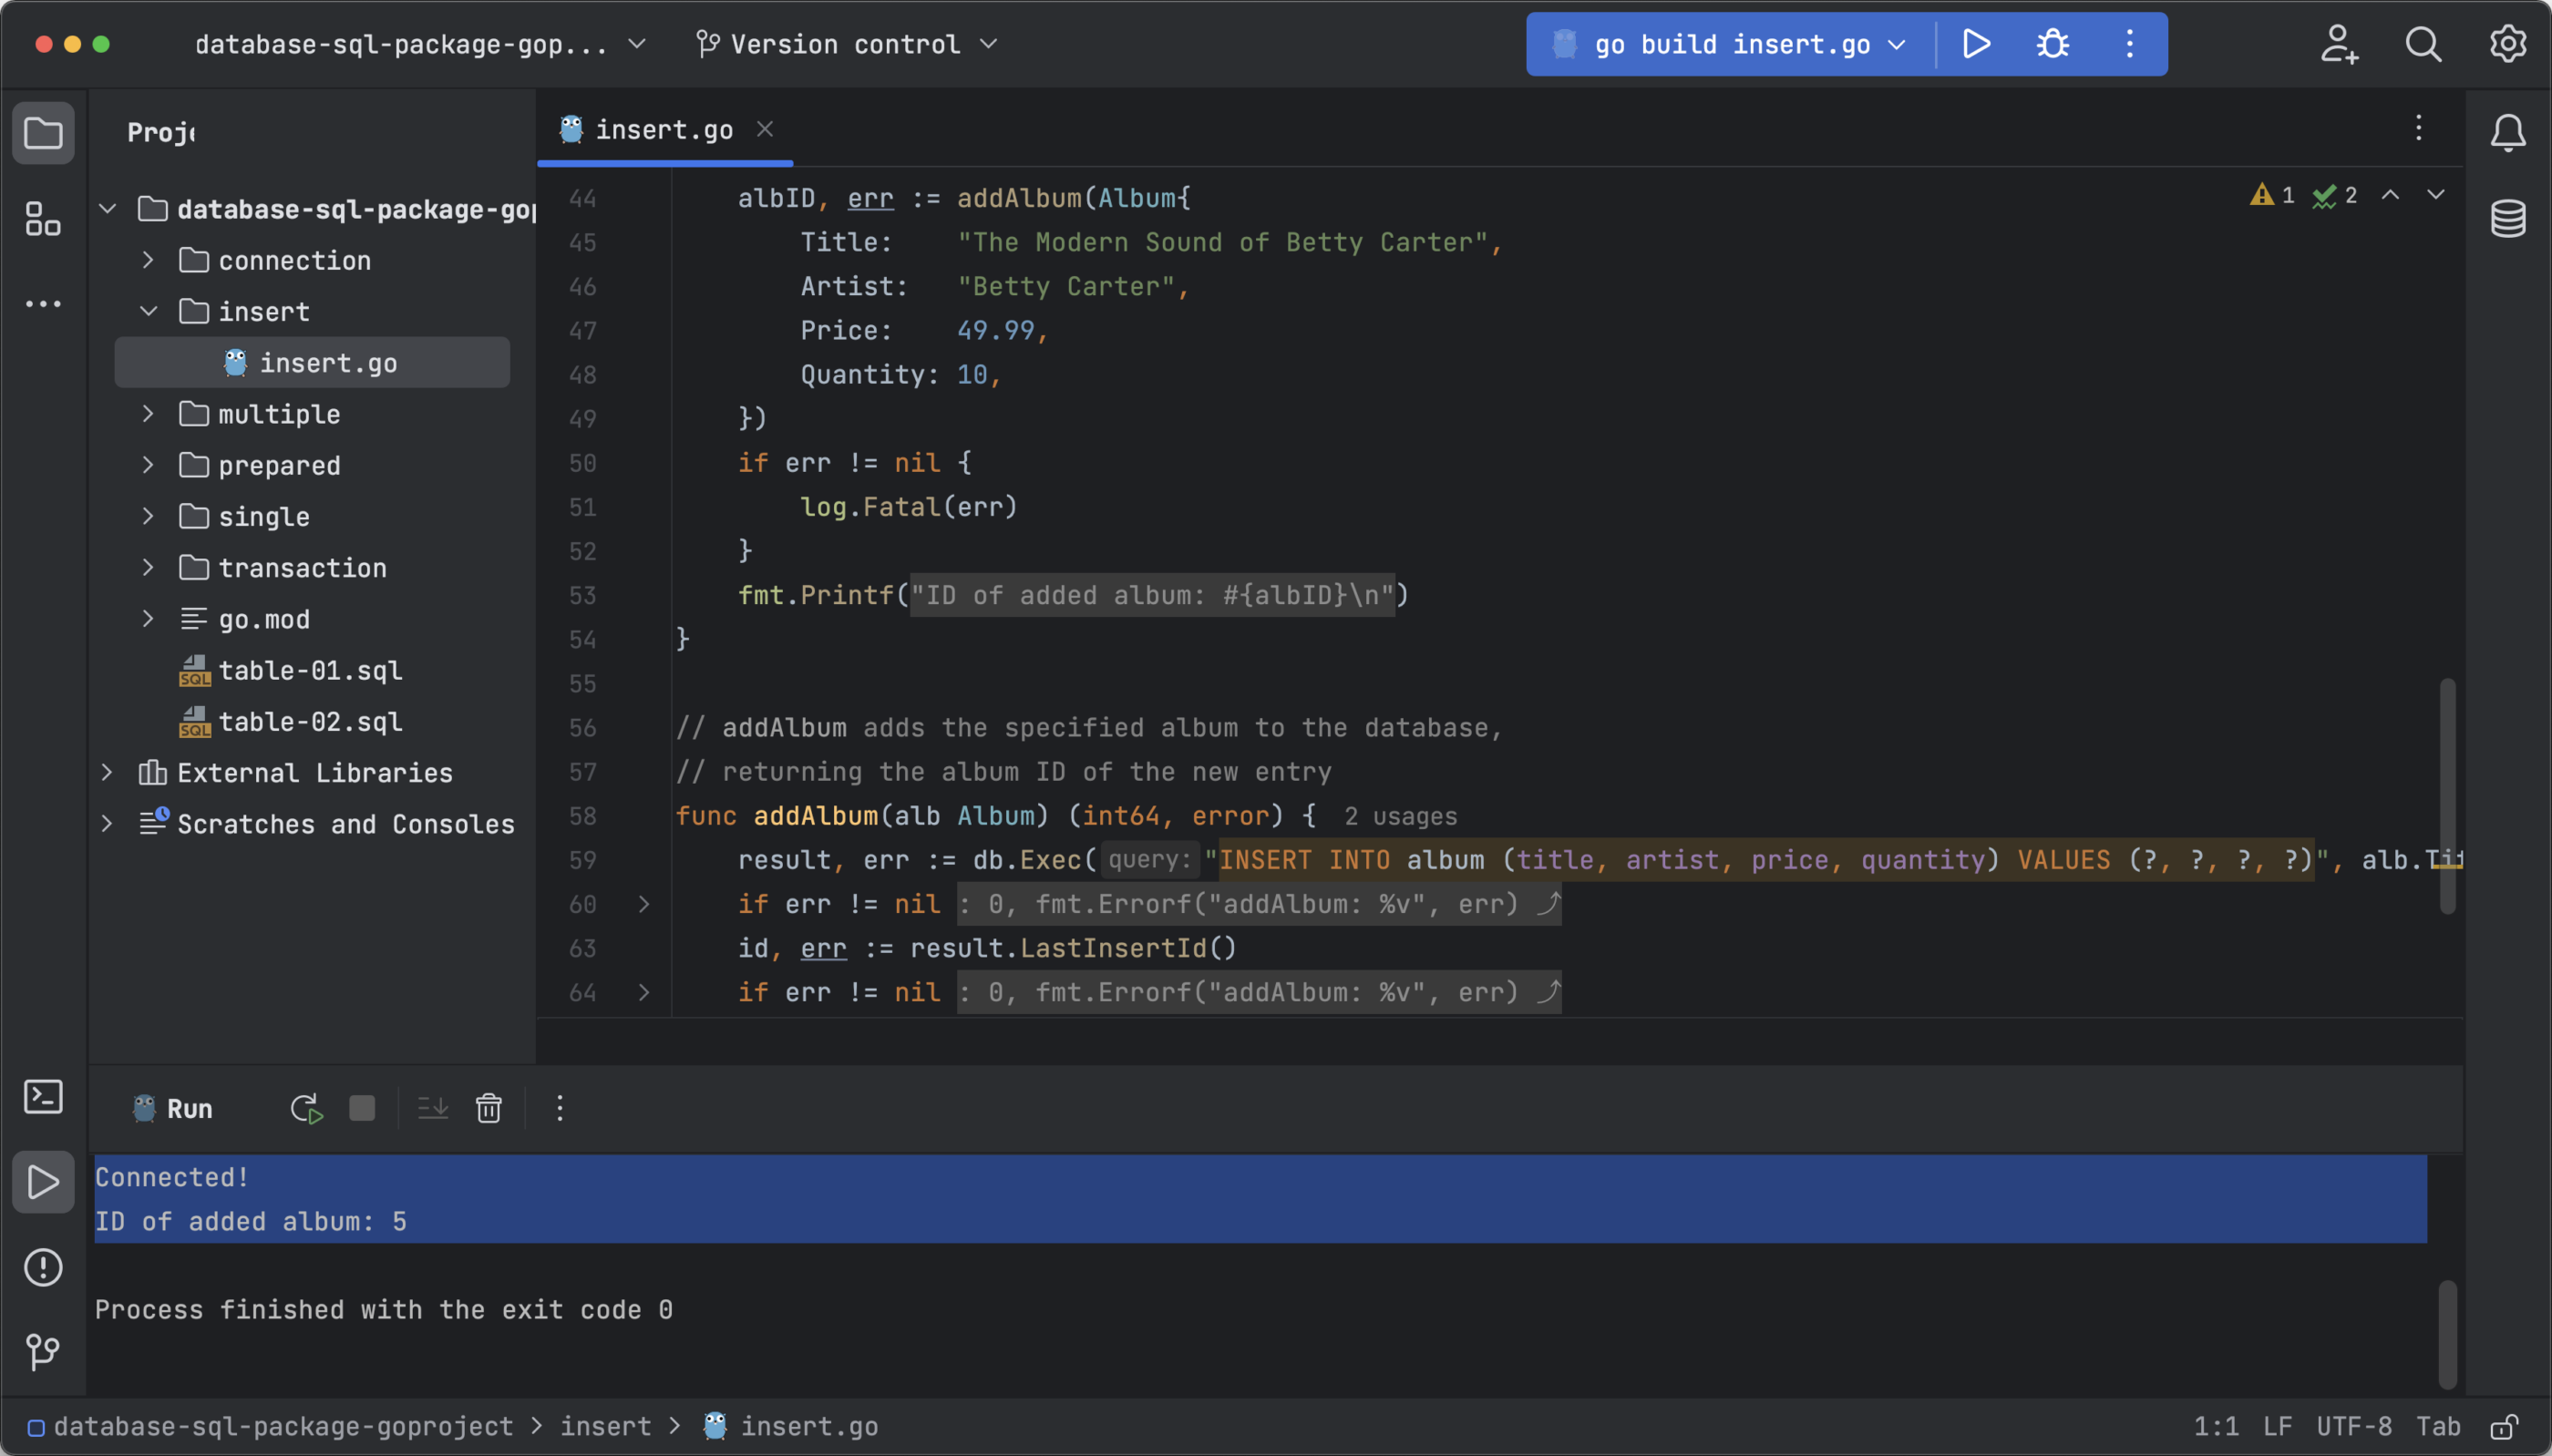
As anticipated, the output is:
Linked!
ID of added album: 5
As you’ll be able to see, managing the database connection utilizing database/sql is easy. You outline a database deal with, after which you should utilize SQL instructions, features, and conditionals to handle the database. Let’s reinforce what you’ve discovered by querying a single row within the database.
Querying a single row
As earlier than, let’s first overview the code of single.go, which queries a single row:
package deal important
import (
    "database/sql"
    "fmt"
    "github.com/go-sql-driver/mysql"
    "log"
    "os"
)
var db *sql.DB
kind Album struct {
    ID       int64
    Title    string
    Artist   string
    Worth    float32
    Amount int64
}
func important() {
    // Seize connection properties.
    cfg := mysql.Config{
        Person:   os.Getenv("DBUSER"),
        Passwd: os.Getenv("DBPASS"),
        Web:    "tcp",
        Addr:   "127.0.0.1:3306",
        DBName: "recordings",
    }
    // Get a database deal with.
    var err error
    db, err = sql.Open("mysql", cfg.FormatDSN())
    if err != nil {
        log.Deadly(err)
    }
    pingErr := db.Ping()
    if pingErr != nil {
        log.Deadly(pingErr)
    }
    fmt.Println("Linked!")
    // Exhausting-code ID 2 right here to check the question.
    alb, err := albumByID(2)
    if err != nil {
        log.Deadly(err)
    }
    fmt.Printf("Album discovered: %vn", alb)
}
// albumByID queries for the album with the desired ID.
func albumByID(id int64) (Album, error) {
    // An album to carry information from the returned row.
    var alb Album
    row := db.QueryRow("SELECT * FROM album WHERE id = ?", id)
    if err := row.Scan(&alb.ID, &alb.Title, &alb.Artist, &alb.Worth, &alb.Amount); err != nil {
        if err == sql.ErrNoRows {
            return alb, fmt.Errorf("albumsById %d: no such album", id)
        }
        return alb, fmt.Errorf("albumsById %d: %v", id, err)
    }
    return alb, nil
}
A number of blocks of code are value highlighting right here.
First, line 44 with the remark // Exhausting-code ID 2 right here to check the question. as its header, calls albumByID(2) to question which album corresponds to ID quantity 2.
The second block corresponds to the albumByID operate. This operate makes use of SELECT * FROM album WHERE id = ? to question the information for an album with a selected ID. Then if conditionals are used to show an error message in case the ID doesn’t exist.
Run the code to confirm that every part works as anticipated.

The output must be the next:
Linked!
Album discovered: {2 Large Steps John Coltrane 63.99 62}
Querying a number of rows
To learn to question a number of rows in Go along with database/sql, you’ll use a number of.go. The logic behind querying a number of rows is just like querying a single row.
The albumsByArtist operate finds all albums whose artist is hardcoded in the principle operate. Then, if there are matches, it prints them within the output, and if there usually are not, it prints an empty string.
Run a number of.go by right-clicking on the file and deciding on Run ‘go construct a number of.go’.
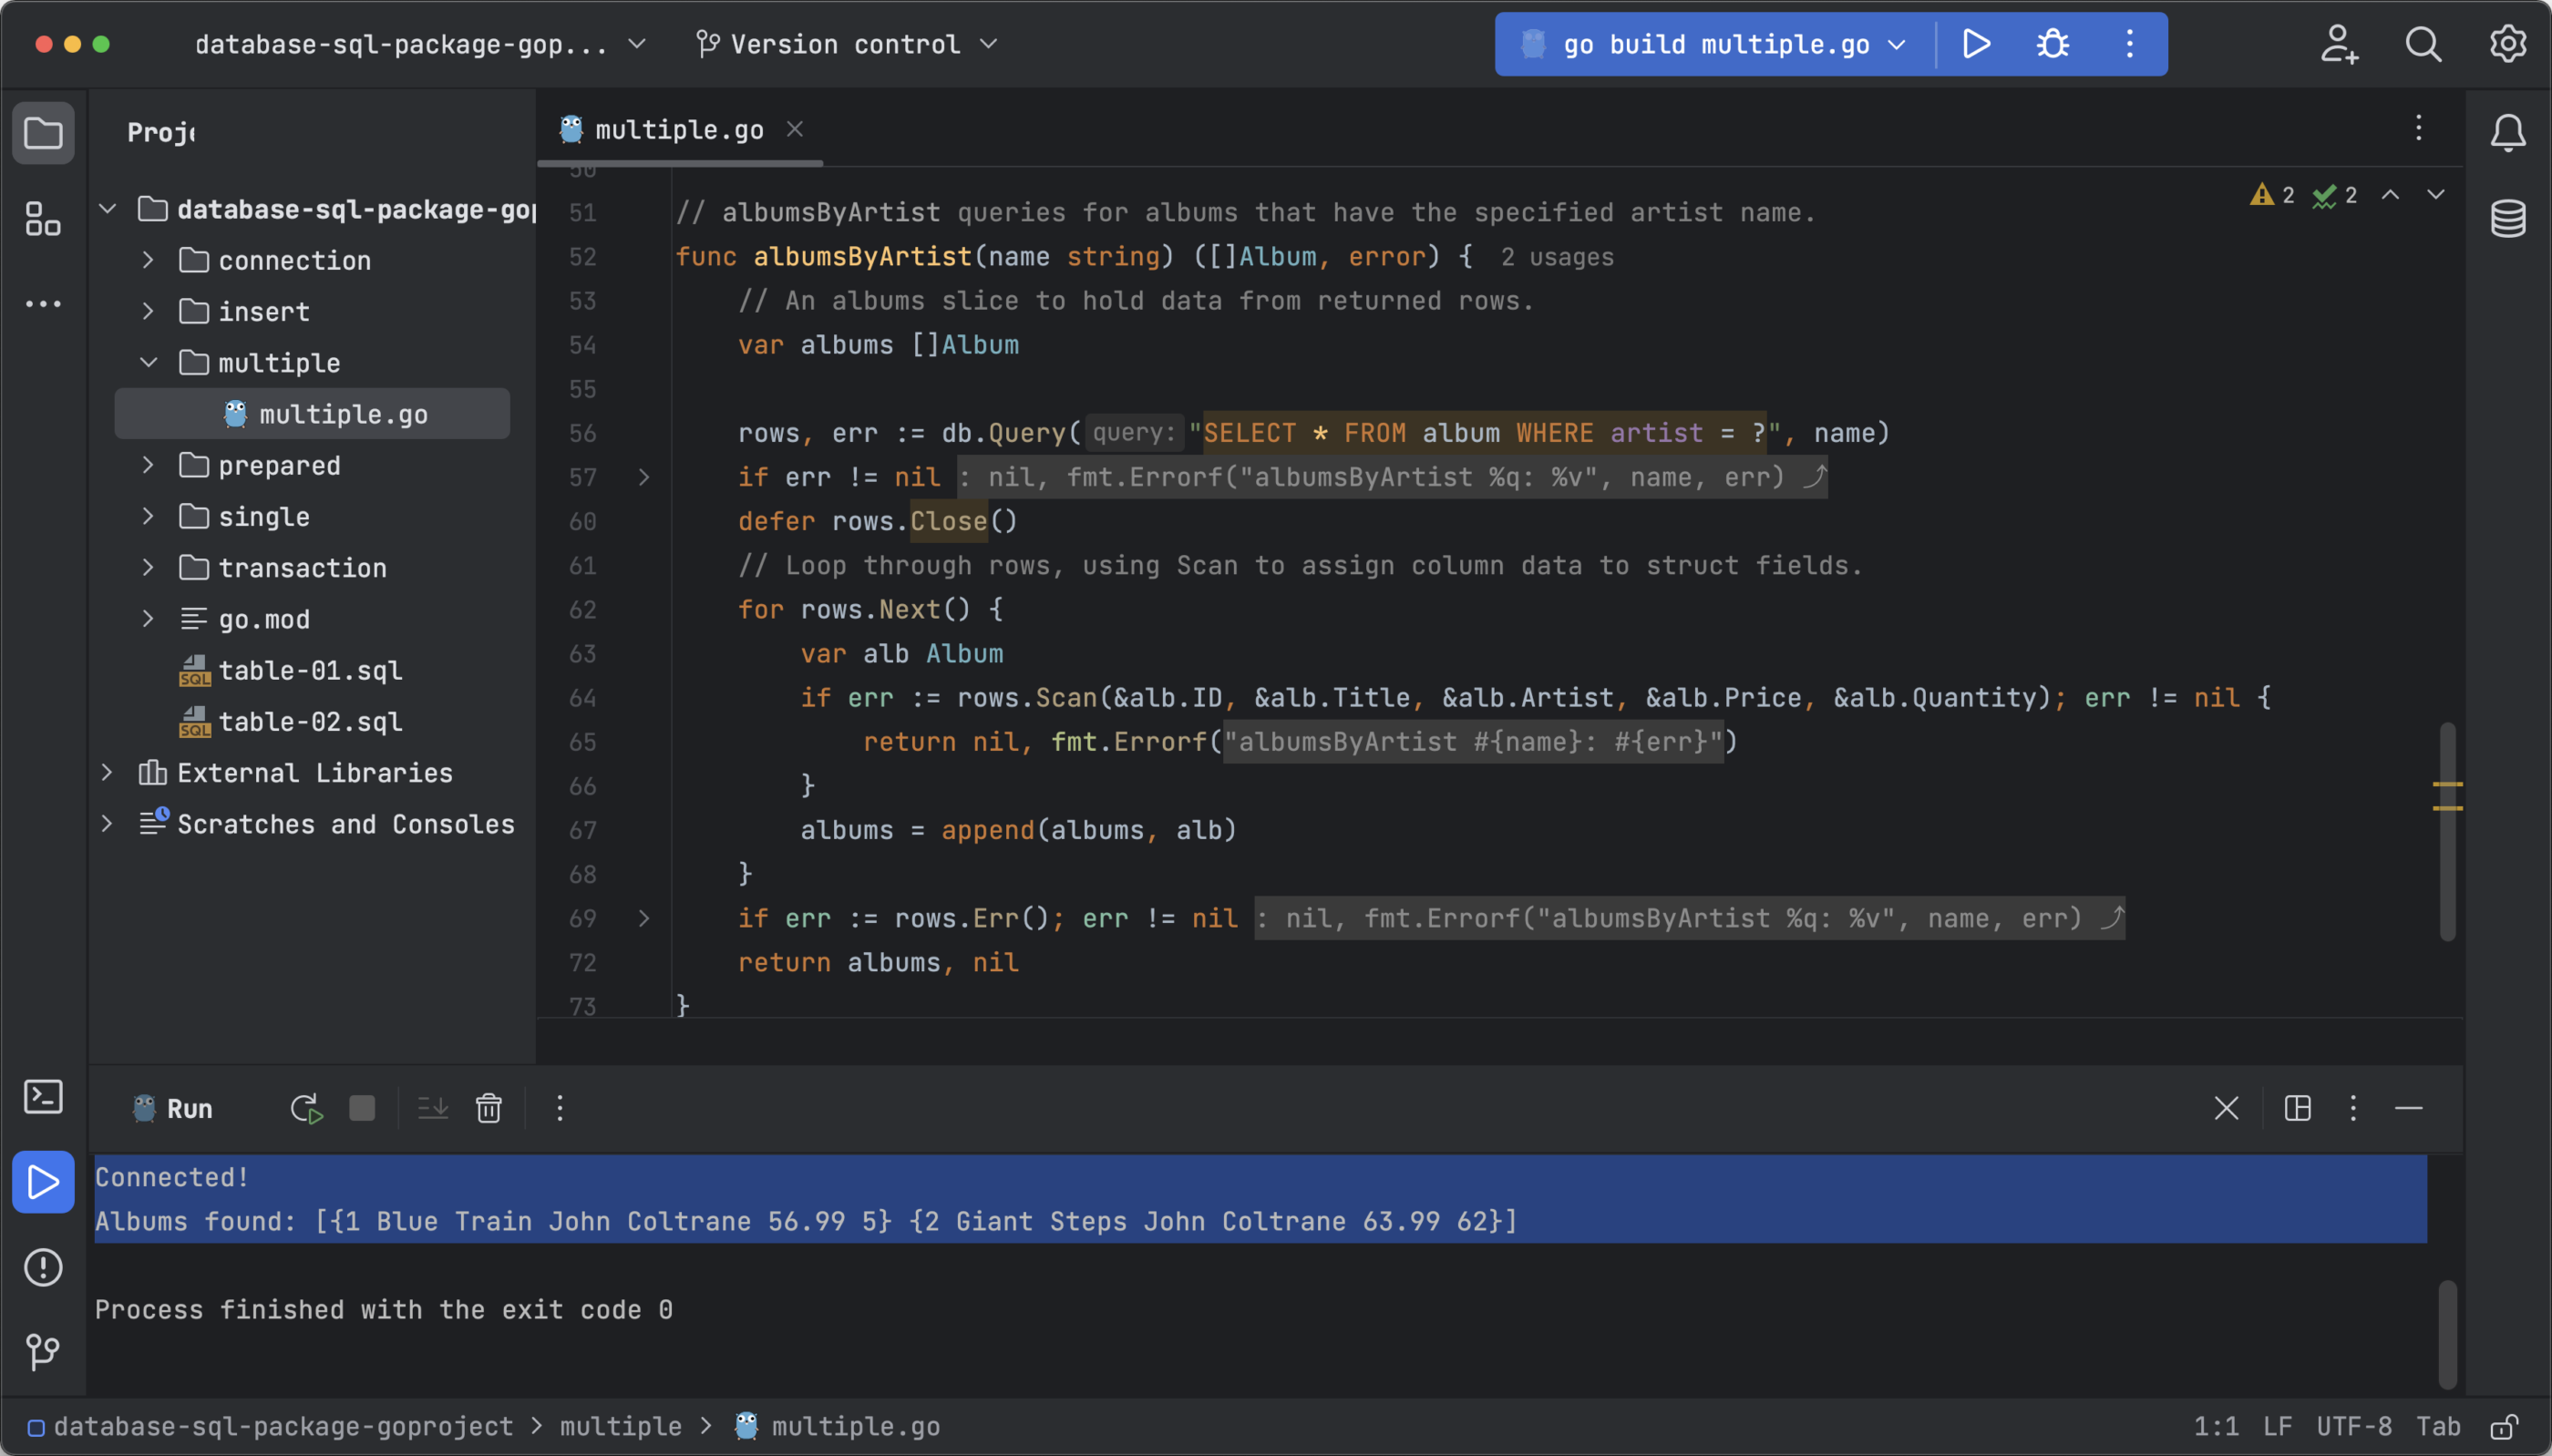
The output must be:
Linked!
Albums discovered: [{1 Blue Train John Coltrane 56.99 5} {2 Giant Steps John Coltrane 63.99 62}]
Now that you simply’ve discovered find out how to carry out single and multiple-row queries, it’s time to carry out extra superior operations comparable to ready statements.
Utilizing ready statements
In response to the Go documentation:
“A ready assertion is SQL that’s parsed and saved by the DBMS, usually containing placeholders however with no precise parameter values. Later, the assertion will be executed with a set of parameter values.”
In follow, ready statements are helpful to keep away from re-creating statements each time your code performs the identical database operation, thus enhancing efficiency.
For those who’re interested by what a ready assertion appears to be like like, take a look at the ready.go file.
package deal important
import (
    "database/sql"
    "fmt"
    "github.com/go-sql-driver/mysql"
    "log"
    "os"
)
var db *sql.DB
kind Album struct {
    ID       int64
    Title    string
    Artist   string
    Worth    float32
    Amount int64
}
func important() {
    // Seize connection properties.
    cfg := mysql.Config{
        Person:   os.Getenv("DBUSER"),
        Passwd: os.Getenv("DBPASS"),
        Web:    "tcp",
        Addr:   "127.0.0.1:3306",
        DBName: "recordings",
    }
    // Get a database deal with.
    var err error
    db, err = sql.Open("mysql", cfg.FormatDSN())
    if err != nil {
        log.Deadly(err)
    }
    pingErr := db.Ping()
    if pingErr != nil {
        log.Deadly(pingErr)
    }
    fmt.Println("Linked!")
    // Exhausting-code ID 2 right here to check the question.
    Album, err := albumByID(2)
    if err != nil {
        log.Deadly(err)
    }
    fmt.Printf("Album discovered: %vn", Album)
}
// AlbumByID retrieves the desired album.
func albumByID(id int) (Album, error) {
    // Outline a ready assertion. You'd usually outline the assertion
    // elsewhere and reserve it to be used in features comparable to this one.
    stmt, err := db.Put together("SELECT * FROM album WHERE id = ?")
    if err != nil {
        log.Deadly(err)
    }
    var album Album
    // Execute the ready assertion, passing in an id worth for the
    // parameter whose placeholder is ?
    err = stmt.QueryRow(id).Scan(&album.ID, &album.Title, &album.Artist, &album.Worth, &album.Amount)
    if err != nil {
        if err == sql.ErrNoRows {
            // Deal with the case of no rows returned.
        }
        return album, err
    }
    return album, nil
}
As you’ll be able to see, the code is similar to the one used to question a single row. The distinction lies within the albumByID operate, which now makes use of ready statements. The primary part of the operate defines the ready assertion utilizing sql.Stmt to organize the SQL assertion (db.Put together) after which executes it within the second portion when referred to as (stmt.QueryRow).
Test the consequence by working the code:
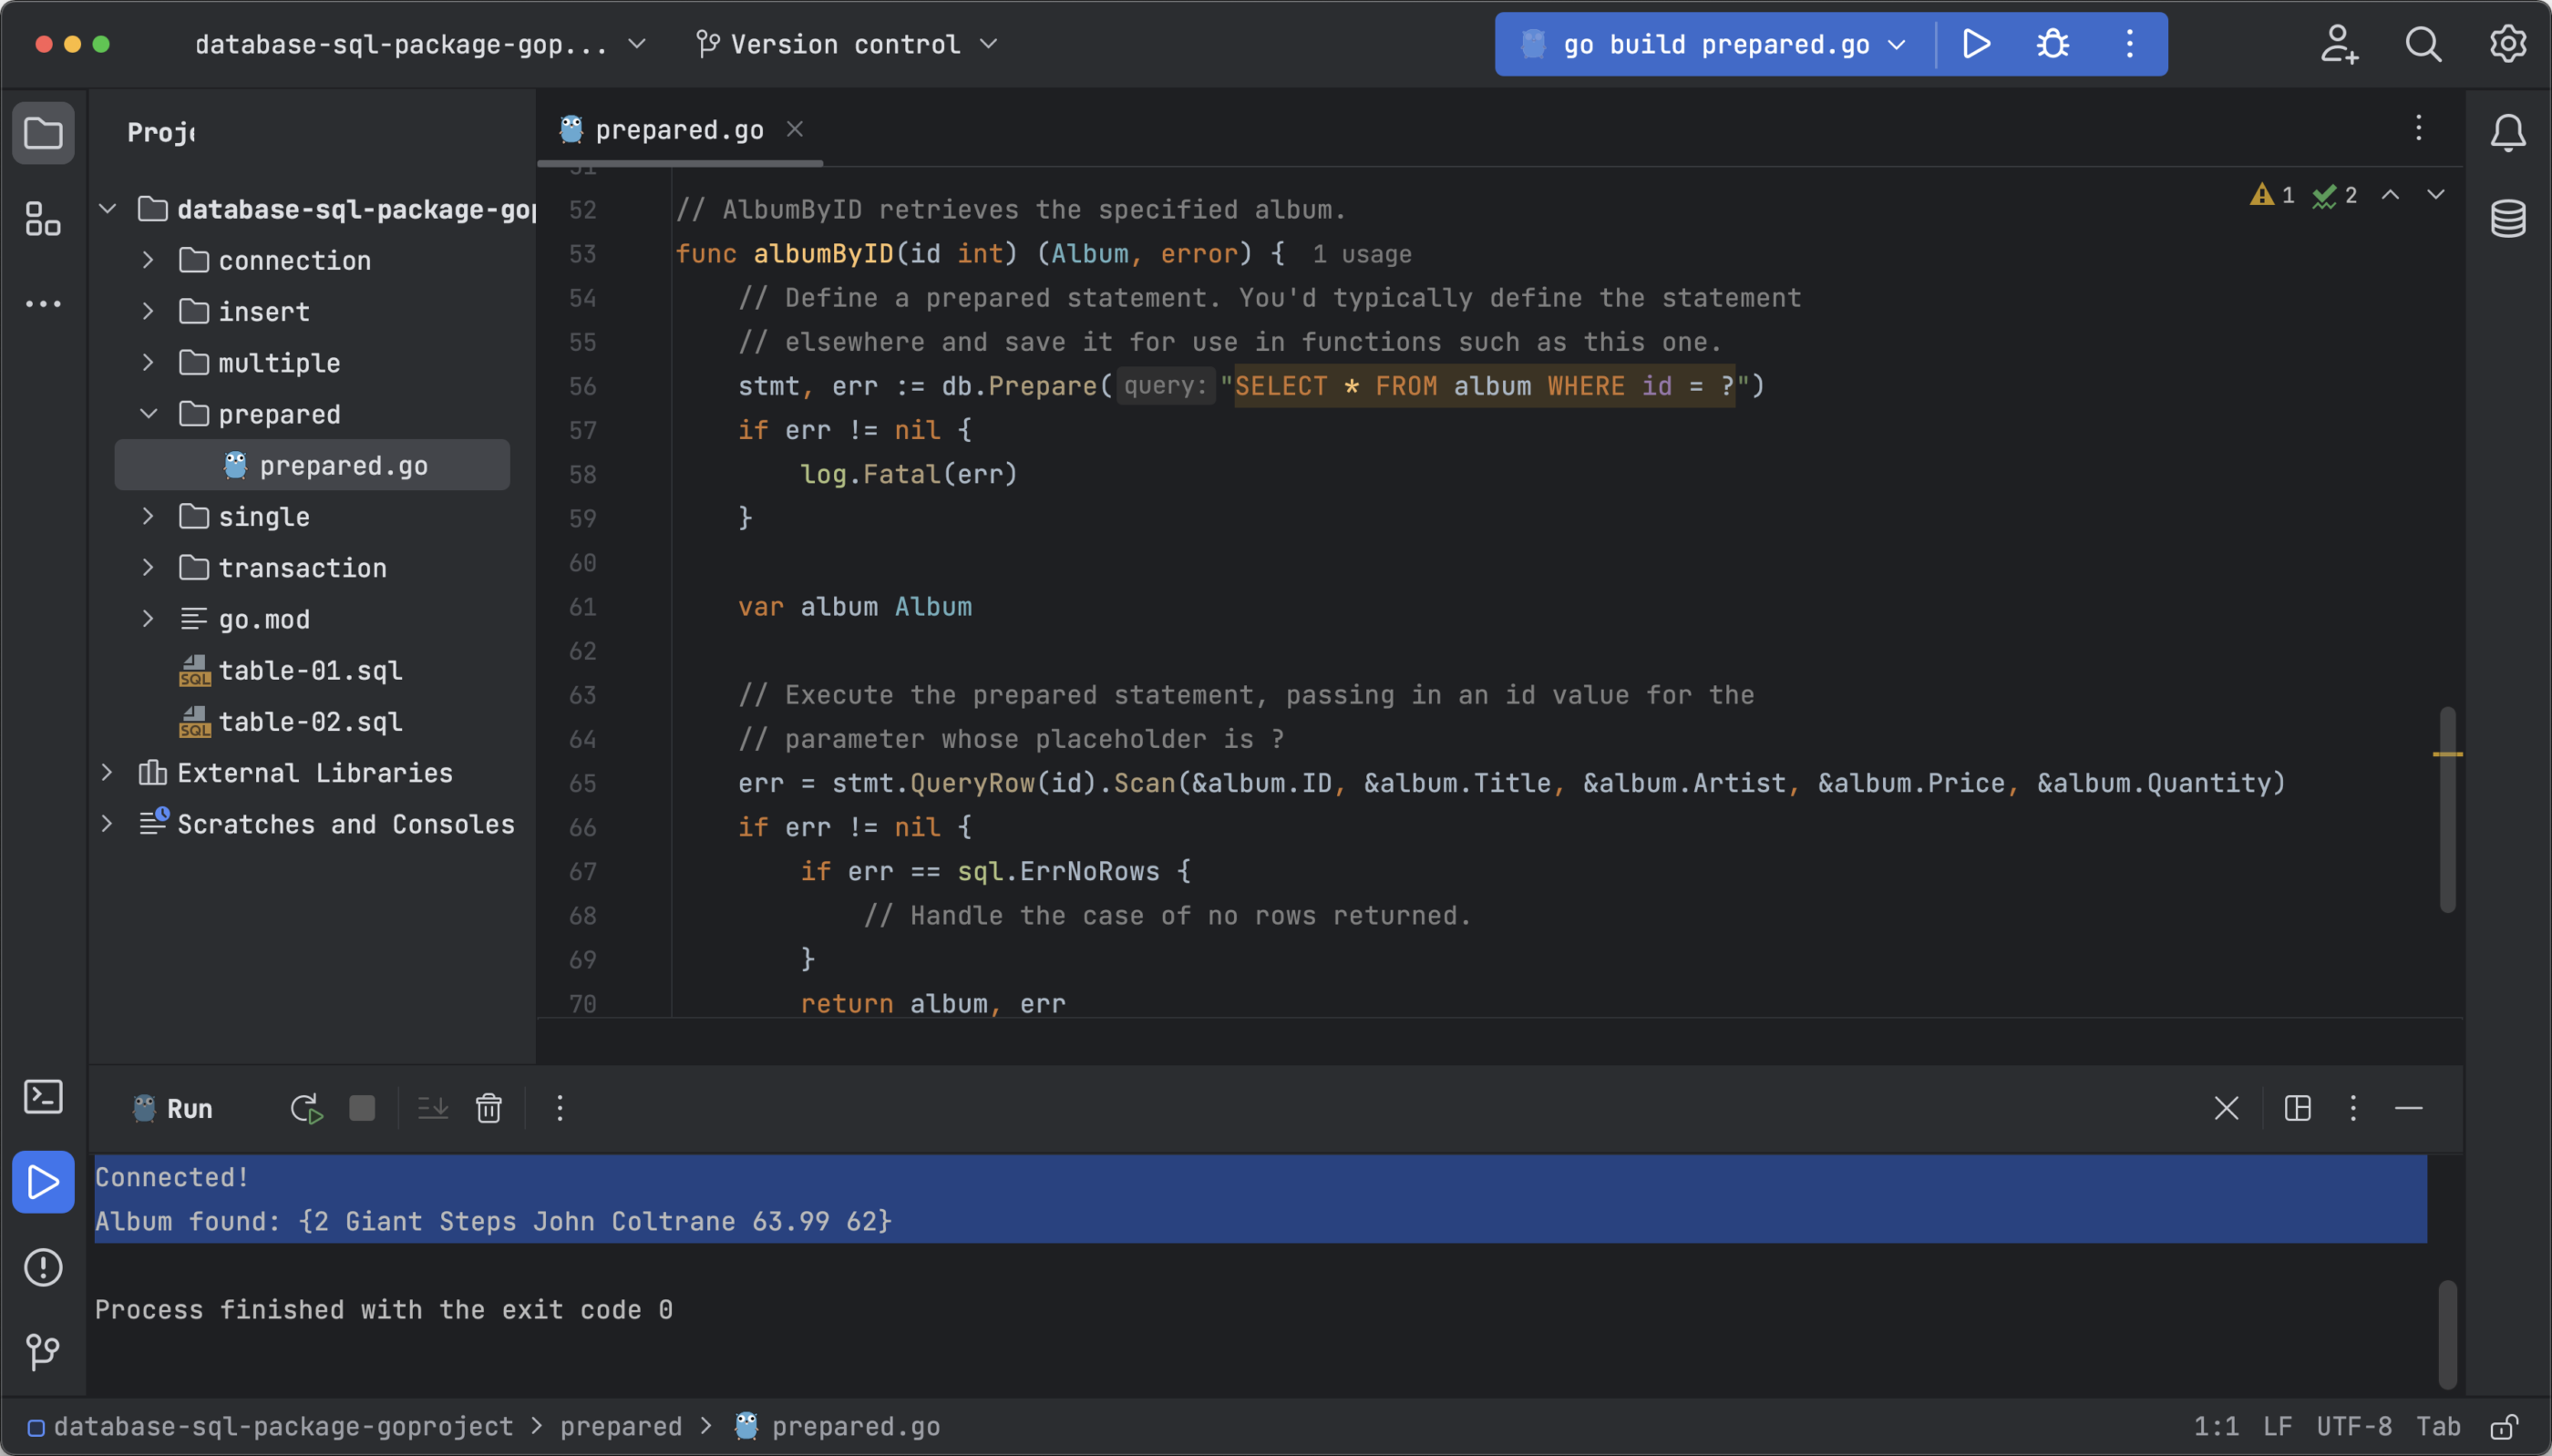
At first look, the consequence is similar because the earlier instance (Querying a single row), however underneath the hood, assets are being saved that may make a distinction when working with databases with hundreds of rows. To study extra about ready statements, learn the documentation right here.
Working with transactions
Transactions assist you to carry out all types of operations, comparable to inserting, updating, querying, or deleting desk rows. What makes transactions helpful is their capability to group a number of operations (queries) collectively in order that they’re solely executed if all of them move the desired situations. In any other case, no operation is carried out.
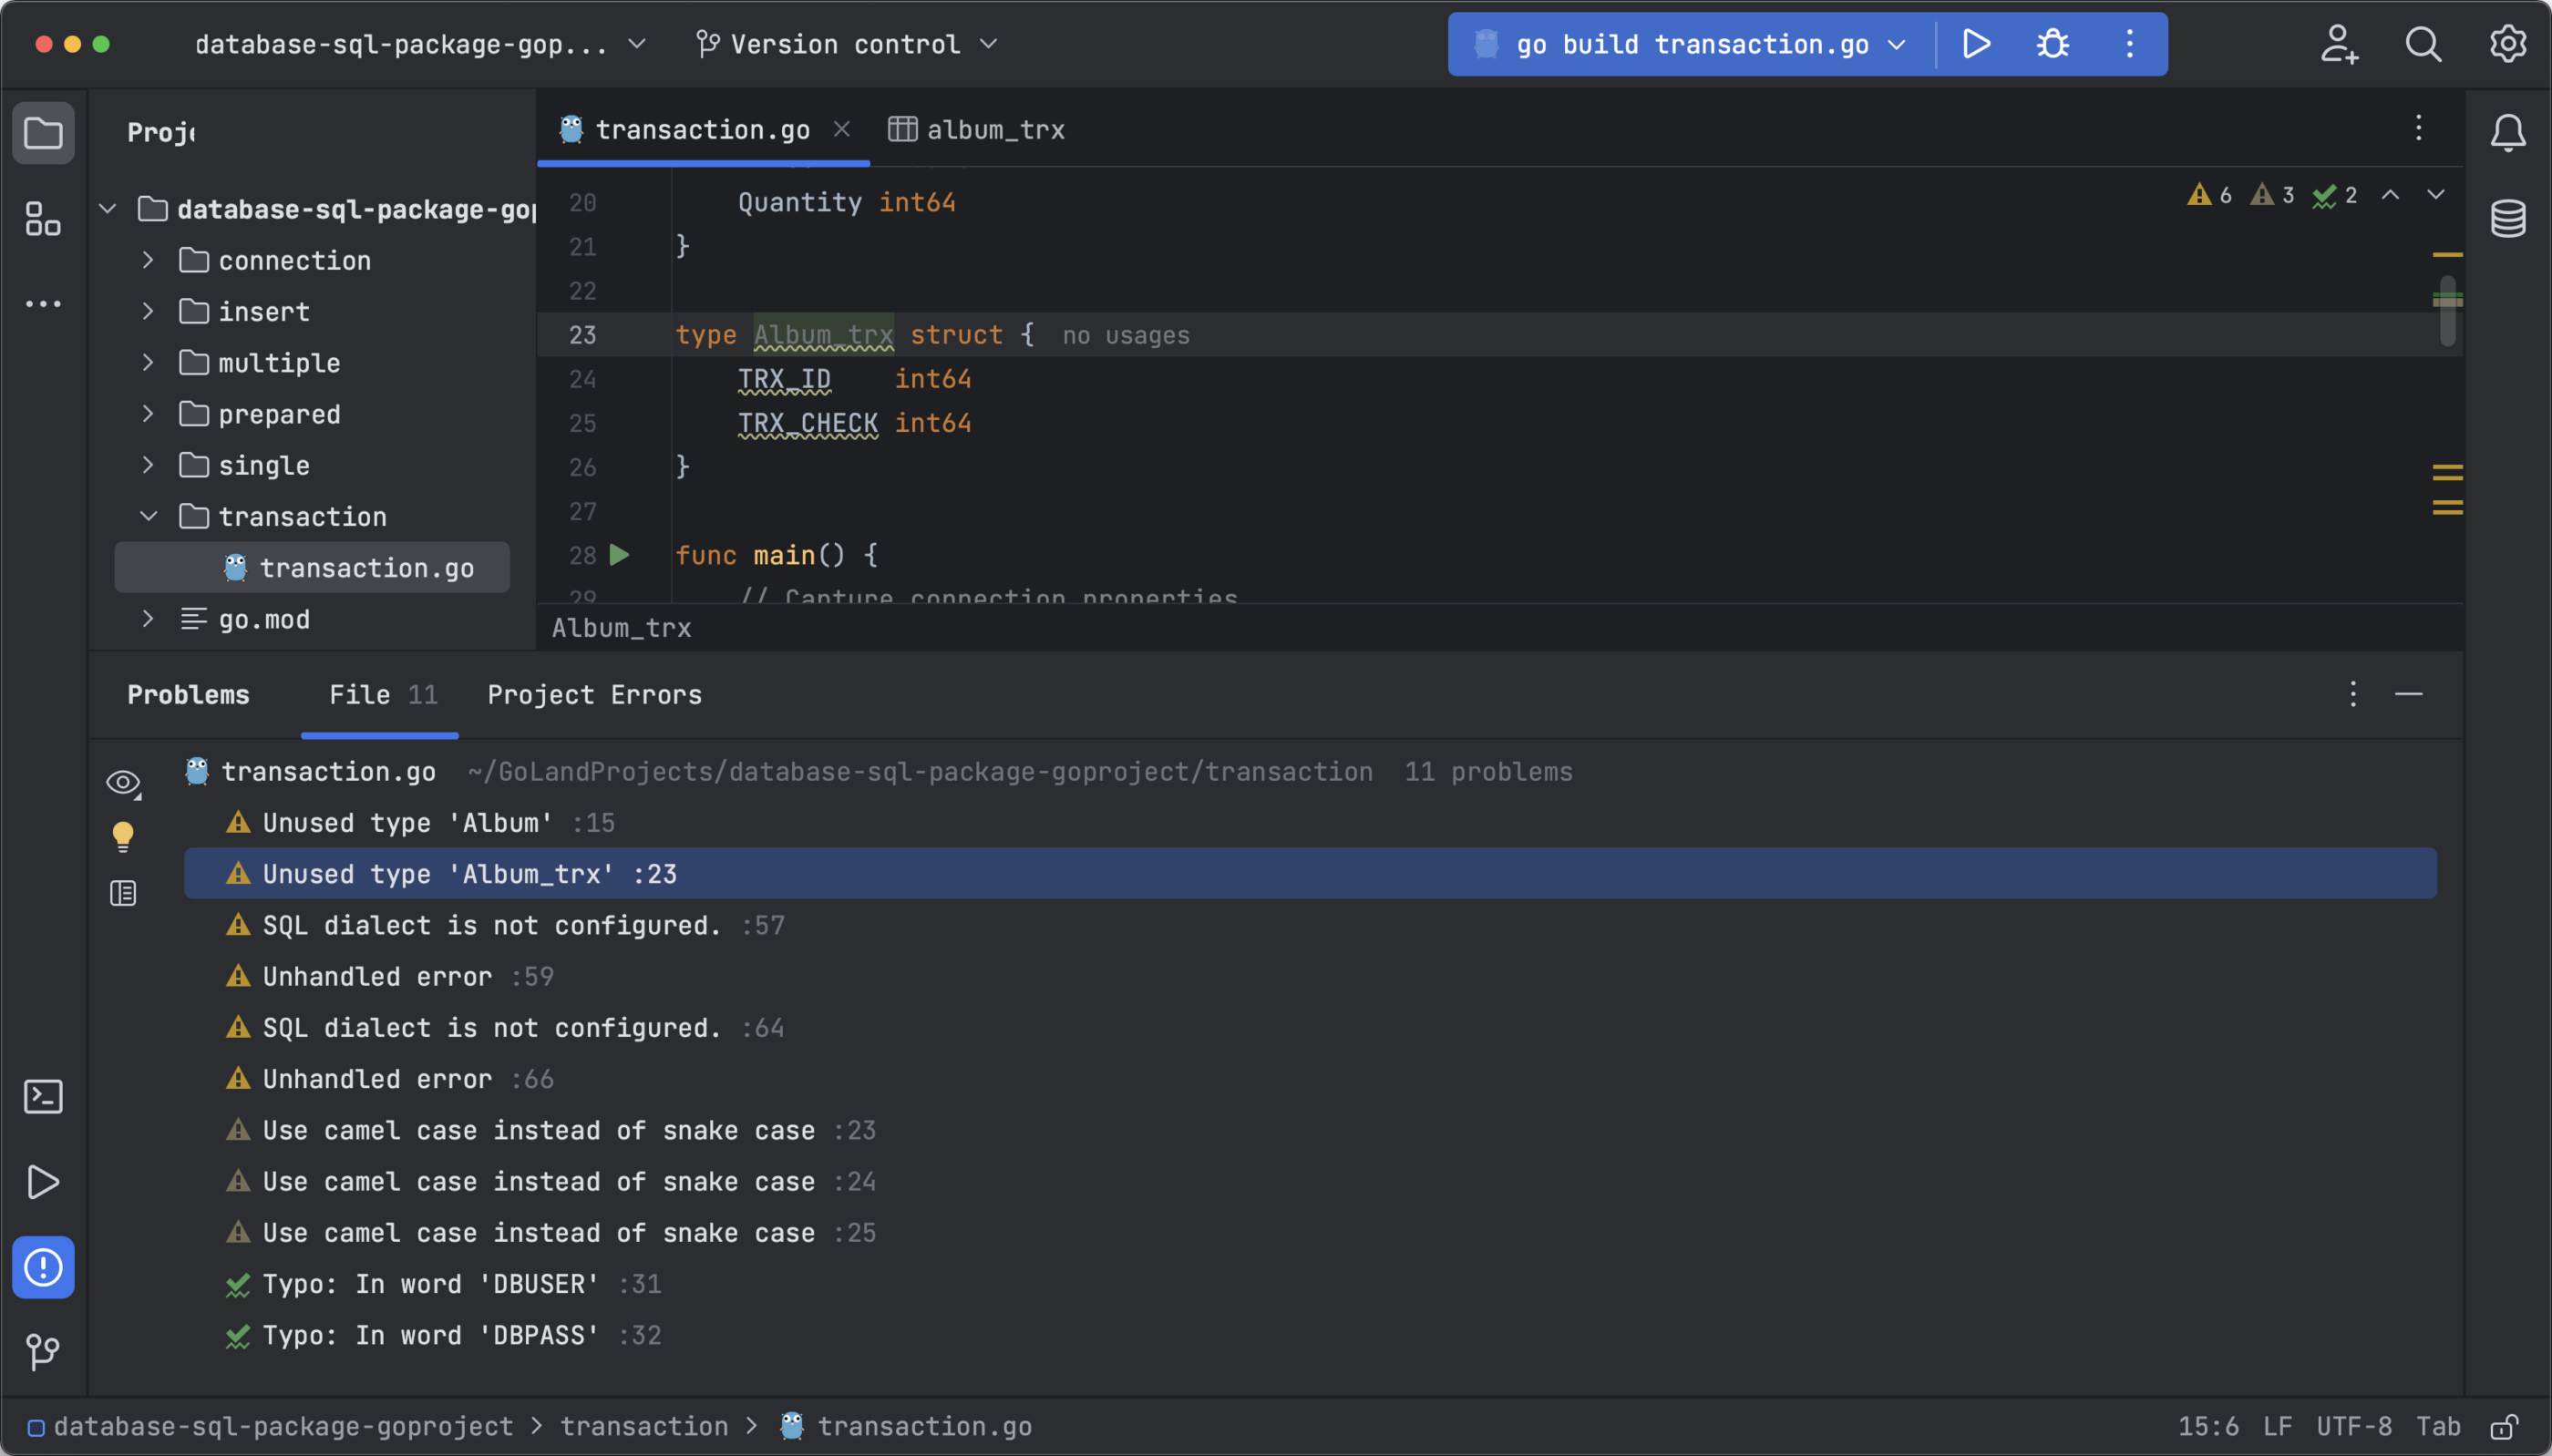
To grasp this idea, let’s overview transaction.go:
package deal important
import (
    "context"
    "database/sql"
    "fmt"
    "github.com/go-sql-driver/mysql"
    "log"
    "os"
)
var db *sql.DB
kind Album struct {
    ID       int64
    Title    string
    Artist   string
    Worth    float32
    Amount int64
}
kind Album_trx struct {
    TRX_ID    int64
    TRX_CHECK int64
}
func important() {
    // Seize connection properties.
    cfg := mysql.Config{
        Person:   os.Getenv("DBUSER"),
        Passwd: os.Getenv("DBPASS"),
        Web:    "tcp",
        Addr:   "127.0.0.1:3306",
        DBName: "recordings",
    }
    // Get a database deal with.
    var err error
    db, err = sql.Open("mysql", cfg.FormatDSN())
    if err != nil {
        log.Deadly(err)
    }
    pingErr := db.Ping()
    if pingErr != nil {
        log.Deadly(pingErr)
    }
    fmt.Println("Linked!")
    // Begin the transaction
    ctx := context.Background()
    tx, err := db.BeginTx(ctx, nil)
    if err != nil {
        log.Deadly(err)
    }
    // First question
    _, err = tx.ExecContext(ctx, "INSERT INTO album (title, artist, value, amount) VALUES ('Grasp of Puppets', 'Metallica', '49', '1')")
    if err != nil {
        tx.Rollback()
        return
    }
    // Second question
    _, err = tx.ExecContext(ctx, "INSERT INTO album_trx (trx_check) VALUES (-1)")
    if err != nil {
        tx.Rollback()
        fmt.Println("Transaction declined")
        return
    }
    // If no errors, commit the transaction
    err = tx.Commit()
    if err != nil {
        log.Deadly(err)
    }
    fmt.Println("Transaction accepted!")
}
The construction is just like the one mentioned in the course of the tutorial, excluding the ultimate portion, which incorporates 2 queries. In response to the documentation, you’ll be able to execute database transactions utilizing an sql.Tx, which represents a transaction.
Let’s overview the code to know how these transactions work, ranging from the remark // Begin the transaction. This code creates a context (ctx) which is used to start out a transaction utilizing the DB.BeginTx technique. Subsequent, there are 2 queries that use the tx.ExecContext technique.
If the transaction is profitable, the primary question merely inserts a brand new row within the album desk. Be aware that in case of error, the tx.Rollback() technique prevents the operation from executing.
On this instance, the second question is used to indicate the logic behind the transactions. Be aware that it additionally makes use of the INSERT assertion so as to add a brand new row, on this case, to the album_trx management desk. Nonetheless, the worth is unfavorable, and because the discipline trx_check doesn’t settle for unfavorable values (it’s outlined as INT UNSIGNED), this question is not going to proceed.
Consequently, the conditional will set off the tx.Rollback() technique which means that the Transaction declined error message will likely be displayed on the terminal. Furthermore, no matter whether or not the primary question handed with out errors, not one of the tables will likely be up to date.
Test the habits of the transaction by working the code.
As anticipated, the transaction was declined.
Now, edit the road _, err = tx.ExecContext(ctx, "INSERT INTO album_trx (trx_check) VALUES (-1)") altering the worth -1 for 1 and run the code once more.
You’ll be able to simply test if the tables had been modified by clicking on the database icon, increasing the database tables, after which double-clicking on every desk title.
The identical precept proven on this tutorial can be utilized to create complicated operations with a number of checks that have an effect on a number of tables concurrently. One question failing is sufficient to deliver down the transaction.
Dealing with errors in Go
Errors can occur for quite a lot of causes. For instance, you would possibly get an error in the event you attempt to use a variable that hasn’t been declared, you attempt to divide by 0, or due to a typo. Happily, to deal with code errors in Go, you should utilize the built-in error-handling features.
These features have been used extensively within the tutorial however simply haven’t been elaborated on. Let’s overview how error messages are managed when getting a MySQL database deal with:
 // Get a database deal with.
    var err error
    db, err = sql.Open("mysql", cfg.FormatDSN())
    if err != nil {
        log.Deadly(err)
    }
    pingErr := db.Ping()
    if pingErr != nil {
        log.Deadly(pingErr)
    }
    fmt.Println("Linked!")
On this code:
- The primary line declares the variables
erranderrorand initializes them to zero. - The second line makes use of the
database/sqlpackage deal to connect with the database by way of the Go MySQL Driver. - Within the third line, a conditional is used. If an error happens throughout authentication (boolean shouldn’t be null), then
log.Deadly(err)is used to retailer a log. Conversely, if there isn’t any error, the following code block is executed. - The final block of code assessments the connection to the database utilizing
Ping(). If an error happens,log.Deadly(pingErr)shops it within the log, but when not,fmt.Println("Linked!")is used to print the success message.
As you’ll be able to see, developing error messages utilizing packages like fmtlog
As simply as you’ll be able to construct error messages into your code, you’ll be able to debug issues in your code with GoLand. You’ll be able to open any of the tutorial recordsdata to search out a number of error message examples.
Conclusion
This tutorial defined find out how to implement the database/sql package deal to entry a database in Go, carry out various kinds of queries, insert information, and carry out transactions. Moreover, error dealing with in Go has been briefly reviewed. Furthermore, in the course of the tutorial, you will have seen how handy GoLand is for writing and working code. You’ll be able to study extra in regards to the instruments that JetBrains provides for builders right here.