

In in the present day’s publish, Maitreyee Mordekar joins us to speak about designing an invisibilty cloak. Over to you, Maitreyee..
Let’s get able to design an invisibility cloak phantasm! On this weblog, we are going to go over the method of implementing an phantasm of an Invisibility Cloak utilizing a easy picture processing strategy of color-based thresholding and segmentation. The answer implements the ideas of performing picture segmentation and analysing the areas of curiosity utilizing interactive apps. At this level, I solemnly swear that I’m as much as no good 😉

Fig 1: Showcasing the Simulink mannequin
Unlocking the Algorithm (Alohamora Algorithm)
The algorithm multiplies a color thresholder masks to a pre-configured background picture to show the background within the colored cloak space giving an phantasm of invisibility. If the above sentence was just a little overwhelming to grasp, don’t fear. We are going to go over this step-by-step!
The phantasm of making an invisibility cloak has 3 components:
- Setup of the Background Picture
- Tune the foreground colour (aka creating our invisible material)
- Manipulate the picture from the digicam video stream
1. Setup of the Background Picture
As soon as the digicam is setup, we take a snapshot of the background and put it aside into the MATLAB Workspace. Let’s say following is the picture that’s captured.
backgroundImage = snapshot(cam);
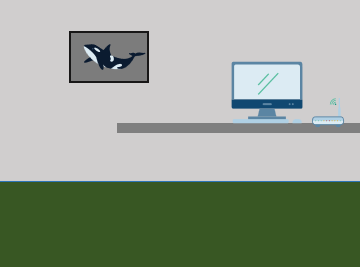
Fig 2: The background picture
Save this as backgroundImage.
save(‘backgroundImage’,‘backgroundImage’);
2. Tune the Foreground Colour
Now, we should tune to detect and phase colours from the material that we wish to use as our invisibility cloak. For this instance, we’re utilizing an orange object.

Fig 3: Tuning the orange-colored foreground
You should use the picture with the coloured object within the App and regulate the sliders to detect solely the orange colour. You may export the detected colour masks after which use it in Simulink.
Fig 4: Segmenting the foreground colour utilizing Colour-Thresholder App
The white pixels symbolize the areas which are detected as orange and the black are areas which are detected as not orange.

Fig 5: Segmented, orange-colored object
3. Picture Manipulation of the Digicam Video Stream
The above two steps had been carried out to setup the system through the use of the MATLAB Command Window. This step is the picture manipulation to assist us get the phantasm will likely be carried out utilizing Simulink. Right here, our foreground is the orange-colored object, and the background is every part else in a picture.
The tactic provides up two photographs that are separate from one another that finally leads us an phantasm of invisibility.
Revealing the background (Revelio Background)
Within the first picture, we take the background and multiply it with the orange-colored object masks. That leaves us with a picture which has the background picture on the area of the picture body which had the orange object. The remainder of the picture would have pixels that are black (i.e. a pixel worth of 0).
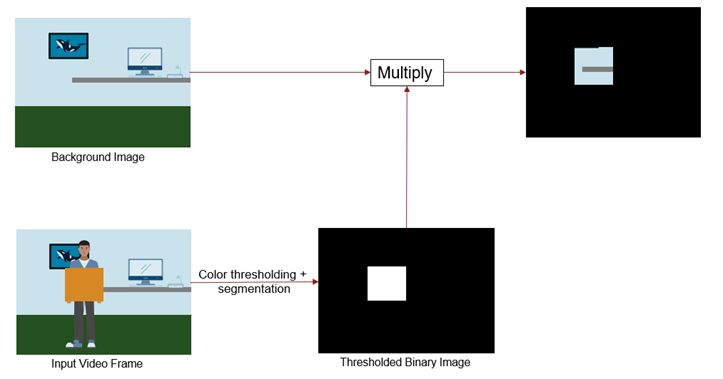
Fig 6: Algorithm for revealing the background
Obscuring the foreground (Obscuro Foreground)
For the second picture, we manipulate the streaming enter video to stream every part besides the a part of the picture which we have now in Picture 1. For this, we work with an operation that’s an inversion of the masks that we used within the final picture. We use the not operation in order that the 0s within the picture grow to be 1s and vice versa. We lastly multiply this picture with the incoming video body.
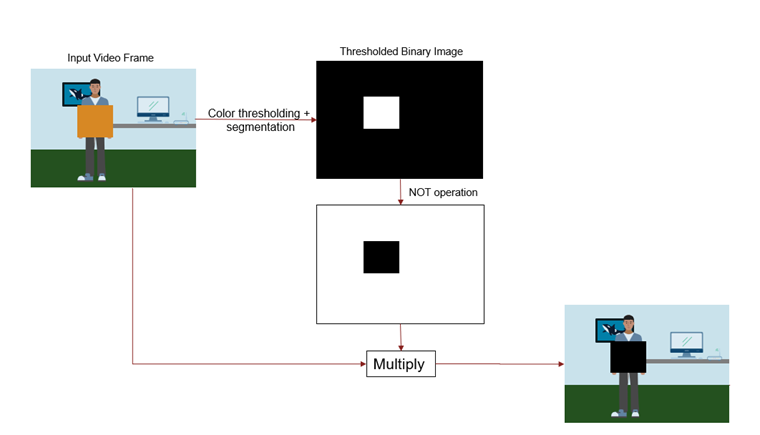
Fig 7: Algorithm for obscuring the foreground
Including the Pictures (Confirmarum Pictures)
The final step is so as to add the 2 photographs collectively. Right here, we add the foreground and the background photographs to present us the invisibility cloak phantasm.
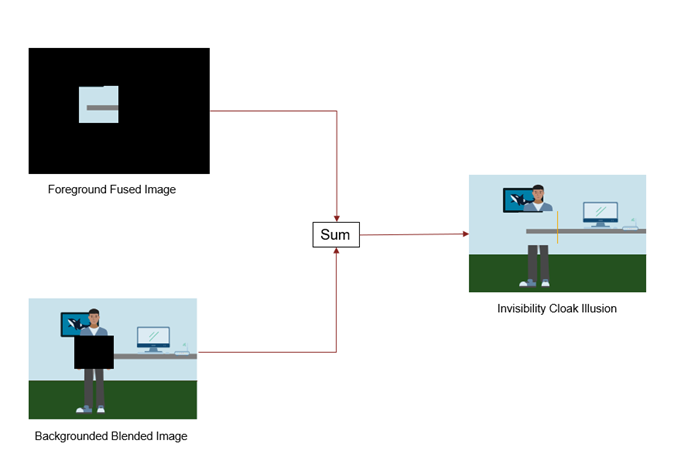
Fig 8: Including the background and foreground photographs
Last Simulink Mannequin
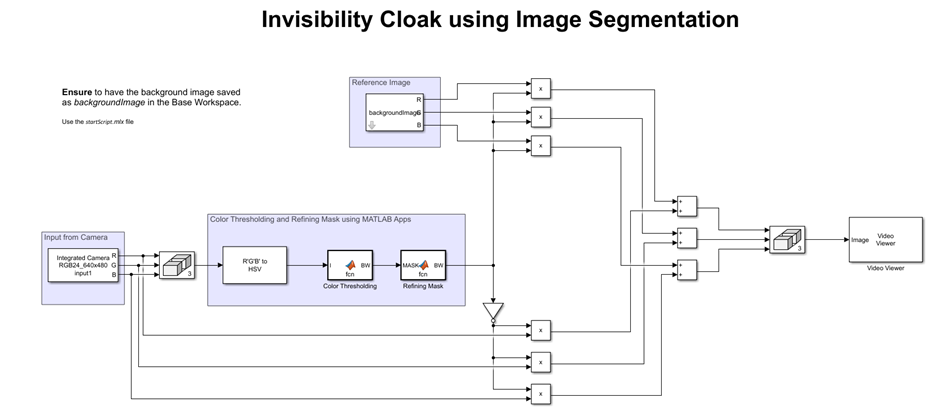
Fig 9: Last Simulink mannequin
Assumptions
Now, the large query is, at what situations does this algorithm work – what have we assumed? It is a easy algorithm that performs colour thresholding. We assume that:
- The online digicam is stationary
- The background of the picture is stationary doesn’t have any shifting objects
- The lighting circumstances don’t change
Do test the instance out to have some enjoyable with picture processing and make your self invisible 🙂 . Mischief managed!