


Nanny State is a tiny library that I wrote to assist make it simple to construct state-based net apps utilizing Vanilla JS. It’s just like React, however with far much less overhead and new syntax to study. It additionally makes use of a single app-wide state object as a substitute of every particular person part having its personal state. It was impressed by HyperApp and has many similarities to to Elm.
On this submit, I’m going to elucidate how Nanny State works after which exhibit what it may do with a few examples.
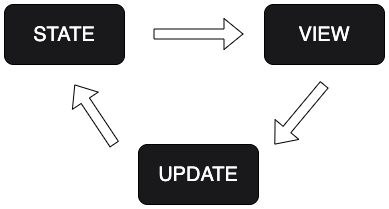
Nanny State makes use of a one-way knowledge circulate mannequin, made up of three elements:
- State – an object that shops all of the app knowledge
- View – a perform that returns a string of HTML based mostly on the present state
- Replace – a perform that’s the solely option to change the state and re-render the view
In Nanny State, the state is the whole lot. The state object is the only supply of reality in your app – each little bit of app knowledge is a property of this object. Even occasion handlers used within the View are strategies of the state object.
The View is a illustration of the state as HTML. It adjustments at any time when the state adjustments and permits customers to work together with the app.
The Replace perform is the one approach the state might be modified. It’s a single entry-point for updating the state and ensures that adjustments are deterministic, constant and predictable.
These 3 issues are all you want to construct an app in Nanny State. Actually, it may be summarised by asking your self the next 3 questions:
- What knowledge do I have to retailer in my app? This may make up the properties of the
Stateobject - How do I would like the app knowledge to be offered on the web page? This may make it easier to create the
Viewperform - How will the app knowledge change when the person interacts with it? The
Replaceperform can be wanted for this
Whats up Nanny State!
The best option to see how Nanny State works is to write down some code! We’ll begin with a fundamental instance after which have a go at making one thing a bit extra advanced.
The best option to run the next instance is to make use of a web based code editor corresponding to CodePen, or you’ll be able to run it regionally by putting in the nanny-state bundle utilizing NodeJS.
Copy the next code into the JS part of CodePen:
import { Nanny,html } from 'https://cdn.skypack.dev/nanny-state';

const View = state => html`<h1>Whats up ${state.title}</h1>`

const State = {
  title: "Nanny State",
  View
}

const Replace = Nanny(State)
This reveals how the three elements of Nanny-State work collectively. Let’s take an in depth have a look at every half individually:
const View = state => html`<h1>Whats up ${state.title}</h1>`
Nanny state makes use of µhtml to render HTML. The View perform all the time accepts the state objects as its solely parameter. It then makes use of the html perform offered by µhtml to create HTML based mostly on the template literal it’s offered as an argument.
Utilizing a template literal signifies that we are able to use the ${variable} notation to insert properties of the state into the view. On this instance we’re utilizing it to insert the worth of the title property contained in the <h1> aspect.
const State = {
  title: "Nanny State",
  View
}
The State object is the place all the app knowledge is saved. It consists of any properties and values that can be displayed within the View and may change over the life-cycle of the app, such because the title property on this instance.
Discover that View is as additionally a property of the State utilizing object shorthand notation. Bear in mind the state is the whole lot – each a part of the app is a property of the state.
const Replace = Nanny(State)
The ultimate line defines the Replace perform because the return worth of the Nanny perform. This could now be used to replace the worth of any properties of the State. Actually it’s the solely approach that any properties of the State might be up to date. It additionally performs the preliminary render of the View based mostly on the values offered within the State. Which means that a heading can be displayed that claims “Whats up Nanny State” as might be seen within the CodePen beneath:
See the Pen
Nanny State – Whats up Nanny State (SitePoint) by DAZ (@daz4126)
on CodePen.
This instance is principally only a static web page although. Let’s make it dynamic by including an enter field that enables the person to enter a reputation that they need to say hey to. Replace the code so it appears like the next:
import { Nanny,html } from 'https://cdn.skypack.dev/nanny-state';

const View = state => html`<h1>Whats up ${state.title}</h1><enter oninput=${state.changeName}>`

const changeName = occasion => Replace({title: occasion.goal.worth})

const State = {
  title: "Nanny State",
  changeName,
  View
}

const Replace = Nanny(State)
On this instance we’ve added an <enter> aspect to the View. Occasion listeners are outlined inline within the view, so on this instance now we have an oninput occasion listener hooked up to the <enter> aspect. This may name the changeName occasion handler, which is a technique of the state object, at any time when any enter is detected. This occasion listener wants defining, so let’s take a better have a look at it:
const changeName = occasion => Replace({title: occasion.goal.worth})
This can be a customary occasion handler written in Vanilla JS. It accepts an occasion object as a parameter as common and when it’s referred to as, we need to replace the State object, so we use the Replace perform, as that is the one approach we are able to replace the State.
The argument we offer to the Replace perform is an object that accommodates any properties that we need to replace within the state and the respective new values. On this case we need to replace the title property to the worth that was entered by the person into the enter area, which is a part of the occasion object and accessed utilizing occasion.goal.worth. This may replace the state with the brand new worth from the enter area and immediately re-render the web page. Utilizing µhtml for rendering signifies that solely the elements of the View which have truly modified get up to date. Which means that re-rendering after aState replace is each environment friendly and blazingly quick.
And that’s it – your first Nanny State app! Have a go at typing and also you’ll see how briskly it reacts to person enter … and all with only a few traces of code. You’ll be able to see the code within the CodePen beneath:
See the Pen
Nanny State – Whats up Nanny State with Enter (SitePoint) by DAZ (@daz4126)
on CodePen.
Nanny State makes it tremendous simple to write down reactive state-based apps. As you’ll be able to see, there’s not a lot code required to construct a dynamic state-based utility that reacts to person interplay. That is the great thing about Nanny State.
True or False Quiz
Now we’ve seen a fundamental instance, let’s strive making one thing a bit extra advanced. We’ll use Nanny State to construct a True or False quiz sport. Open up a brand new pen on CodePen and observe alongside.
We’ll begin in the identical approach, by importing the Nanny State library:
import { Nanny,html } from 'https://cdn.skypack.dev/nanny-state'
Subsequent, we’ll create the State object and fill it with the preliminary property values that the sport will use:
const State = {
  rating: 0,
  index: 0,
  questions: [
    {question: "A Nanny State is a country where nannies are employed by the state", answer: false},
    {question: "Nanny State is also the name of a beer", answer: true},
    {question: "Mila Kunis and Ashton Kutcher employ 16 nannies to help raise their children", answer: false},
    {question: "The Nanny McPhee films are based on the Nurse Matilda books", answer: true},
    {question: "Nanny State uses the µhtml library for rendering", answer: true},
]
}
This object accommodates 3 properties:
rating– this retains monitor of what number of questions the participant has answered accurately and begins at 0index– this retains monitor of which query the participant is as much as and corresponds to the final property which is thequestionsarray.questions– That is an array of objects withqueryandreplyproperties. Thequeryproperty is a string and thereplyproperty is a Boolean
Now we’ve created the info, let’s create the View to visualise that knowledge:
const View = state => html`
<h1>True or False?</h1>
<h2>Rating: ${state.rating}</h2>
${state.index < state.questions.size ?
html`<p>${index + 1}) ${state.questions[state.index].query}</p>
     <button onclick=${state.checkAnswer(true)}>TRUE</button>
     <button onclick=${state.checkAnswer(false)}>FALSE</button>`
:
html`<h2>Sport Over, you scored ${state.rating}</h2>`
}`
This can be a barely extra difficult View than we noticed within the earlier instance, however most of it needs to be pretty self-explanatory. After the title heading, we show the rating utilizing the rating property of the State object. Then we use a ternary operator to fork the view. As a result of the view is written utilizing template literals, you’ll be able to’t use if-else statements to fork code, so want to make use of ternary statements.
This ternary assertion checks if questionNumber is lower than the size of the questions array, which is principally checking to see if there are nonetheless any questions left to reply. If there are then the query is displayed with two buttons, on for TRUE and one for FALSE. If there aren’t any questions left then we present a GAME OVER message together with the participant’s rating.
One factor to notice when forking the view code utilizing ternary operators is that you want to use the html perform for every new fork.
The buttons each have an inline onclick occasion listener hooked up to them that calls the identical occasion handler, checkAnswer and accepts an argument of both true or false relying on which button was pressed. Let’s write this occasion handler now:
const checkAnswer = reply => occasion => Replace(state => ({
    rating: reply === state.questions[state.index].reply ? state.rating + 1 : state.rating,
    index: state.index + 1
}))
This occasion handler accepts an additional argument of reply in addition to the occasion object that every one occasion handlers settle for, so it must be curried utilizing the double arrow notation seen above. It calls the Replace perform which makes use of a ternary operator to verify if the reply offered as an argument matches the reply to the present query, if it does then the rating property is elevated by 1, if not then the rating stays the identical. It additionally will increase the worth of the index property, so the subsequent query can be displayed.
This occasion handler now wants including to the State, together with the View. We will do that utilizing the item shorthand notation, so long as checkAnswer and View are outlined earlier than State:
const State = {
  rating: 0,
  index: 0,
  questions: [
    {question: "A Nanny State is a country where nannies are employed by the state", answer: false},
    {question: "Nanny State is also the name of a beer", answer: true},
    {question: "Mila Kunis and Ashton Kutcher employ 16 nannies to help raise their children", answer: false},
    {question: "The Nanny McPhee films are based on the Nurse Matilda books", answer: true},
    {question: "Nanny State uses the µhtml library for rendering", answer: true},
],
  checkAnswer,
  View
}
Now that the whole lot is a part of the State, all that’s left to do is outline the Replace perform by calling the Nanny perform and offering State as an argument:
const Replace = Nanny(State)
And that’s it! The quiz ought to begin operating immediately and it’s best to have the ability to reply every query and the rating will change based mostly on if the reply is true or not. One other instance of an interactive app that’s fast to construct with minimal quantity of code. Have a go at answering the questions and see the way you get on. You’ll be able to see the completed code within the CodePen beneath:
See the Pen
True or False Quiz – SitePoint by DAZ (@daz4126)
on CodePen.
When you’ve had some enjoyable taking part in it and bought used to how Nanny State works, listed here are a couple of concepts for extending the sport:
- Add extra questions
- Add a ‘Begin’ and ‘Play Once more’ buttons to permit gamers to play once more
- Choose questions at random
- Hold monitor of the very best rating
- Add questions with different solutions, besides true or false
- Create a multiple-choice quiz
Nanny State consists of much more different goodies corresponding to built-in help for utilizing native storage and routing. See the docs for more information or get in contact you probably have any questions.
I’d love to listen to what you consider Nanny State. Would you think about using it for a undertaking? Is there something extra you’d wish to learn about it? Depart a remark in our group!