


My son was lately tasked with the accountability of taking care of his pre-school class teddy bear for the week, which comes with the duty to take mentioned teddy bear out on adventures and add your recollections to a scrapbook. I fairly loved creating this scrapbook format, and it received me occupied with how I’d construct one thing like this with CSS Grid!

Compound grids
Andy Clarke delivered a implausible discuss, Impressed by CSS Grid at this State of the Browser convention, which was actually illuminating for somebody like me, a developer with design roots. In it he talked about methods wherein concepts from print design will be utilized to the online to create hanging layouts, and the way CSS Grid makes it not solely attainable, however rather more easy than ever earlier than. A kind of rules was utilizing compound grids.
Most of us are in all probability accustomed to utilizing grids ultimately for net design and growth. Just about all web site designs I’ve been handed to construct have held on a regular 12-column (or sometimes 24-column!) grid, with all columns an equal width. Up to now, so predictable.
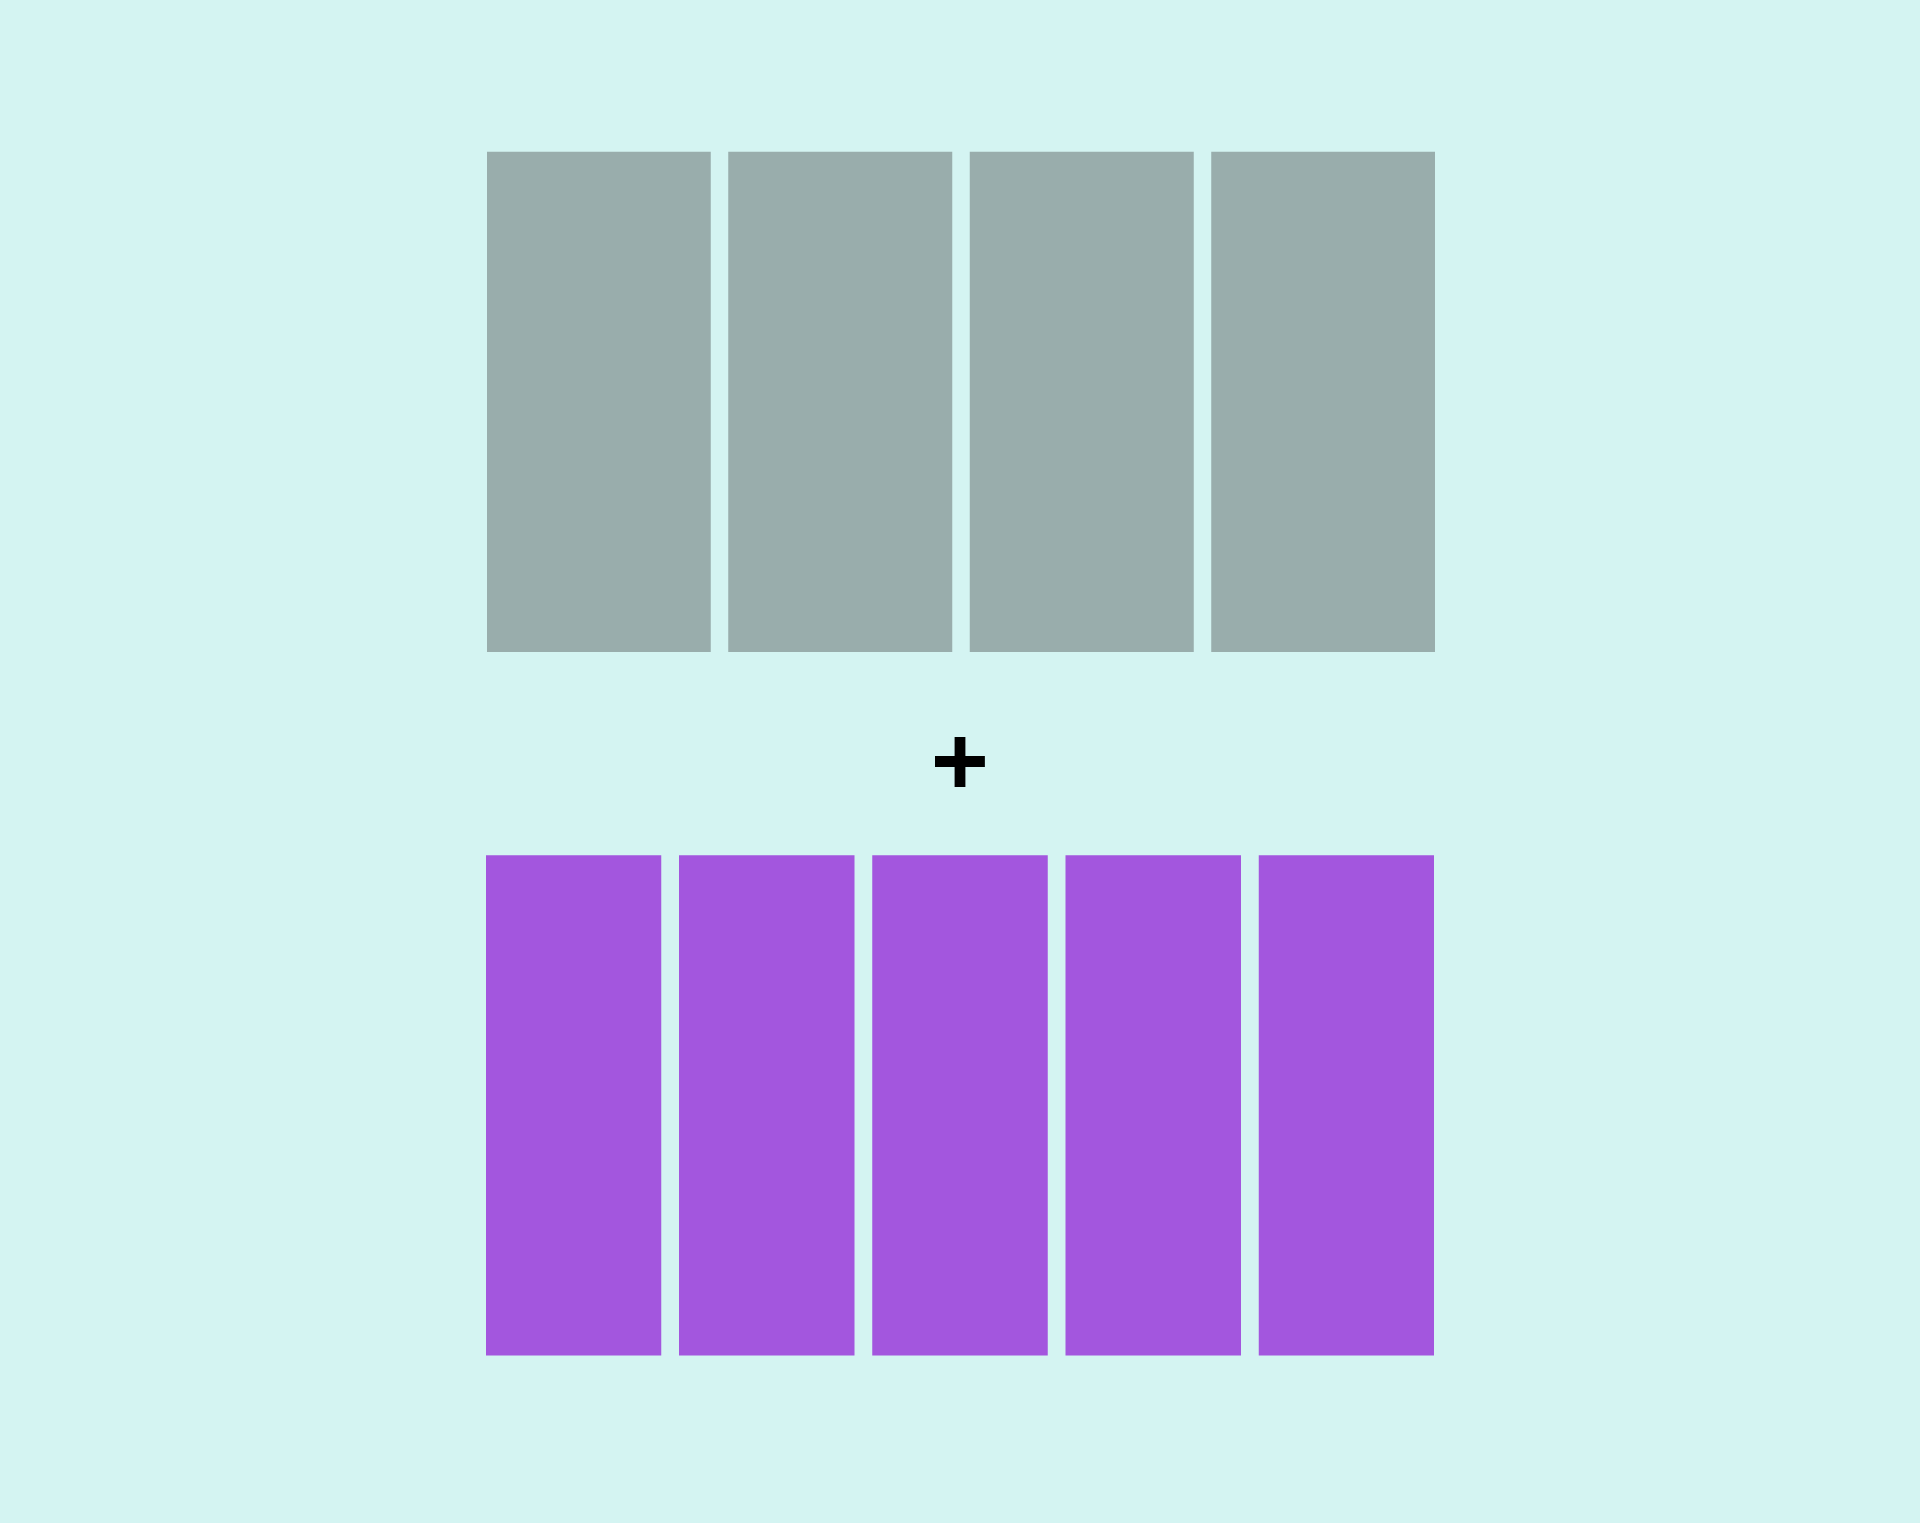
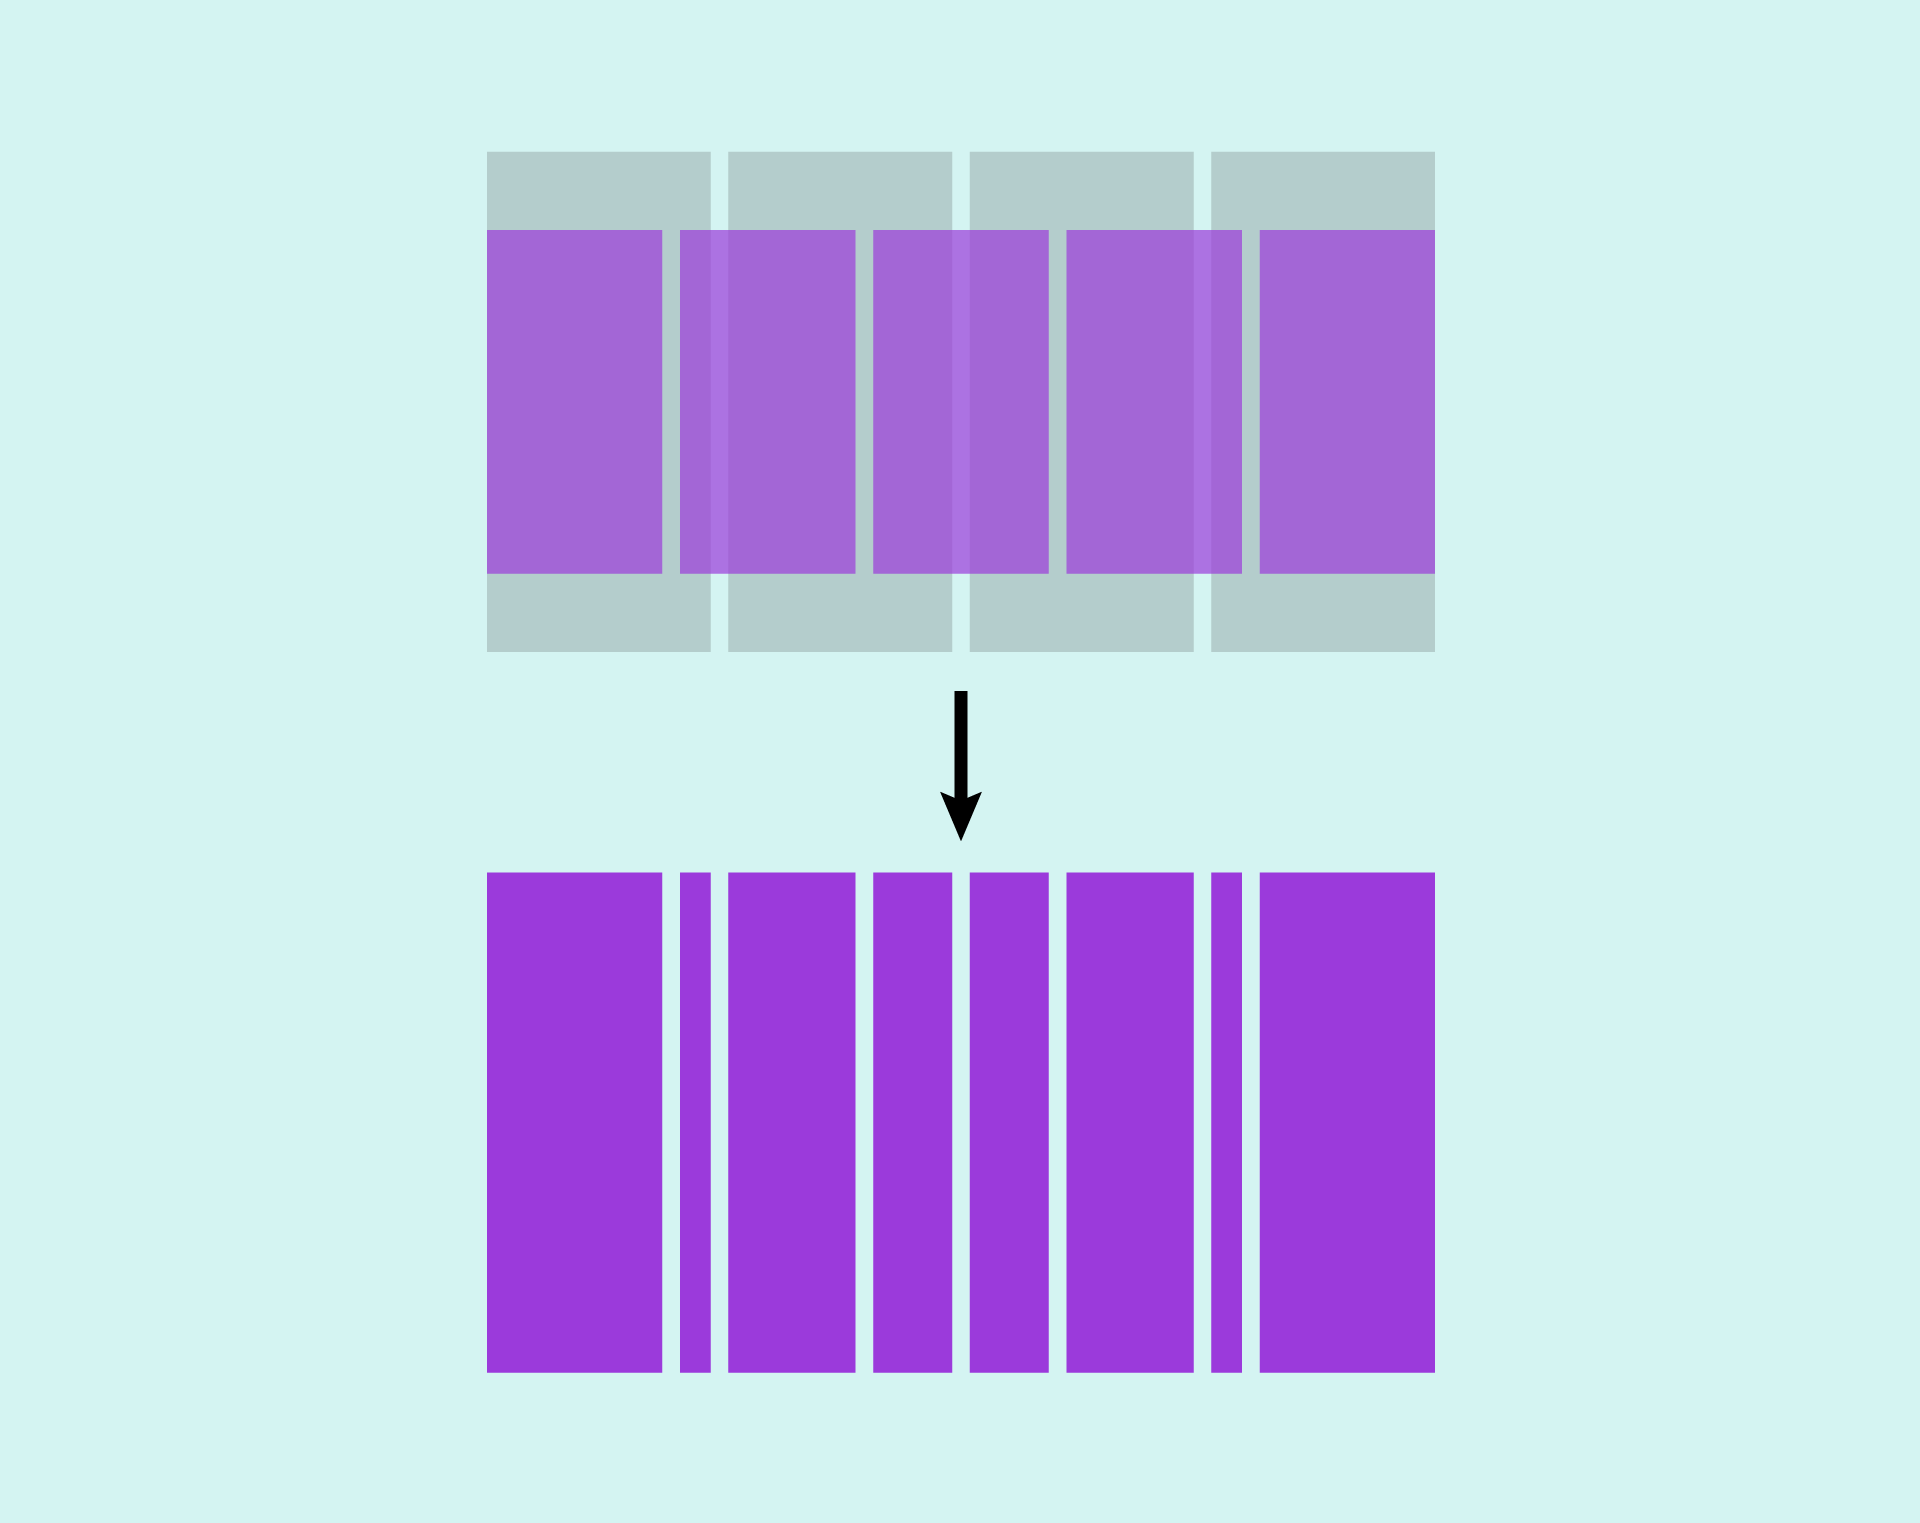
Compound grids, then again, are created by layering two or extra grids. Juxtapositions reminiscent of a 5-column grid superimposed onto a 4-column grid produce rhythmic patterns, and open up extra dynamic format potentialities than a daily grid.
This is applicable from a psychological in addition to a technical point-of-view – it’s completely presumably to constructed a really unusual format regardless of utilizing a compound grid, however one thing about having a extra fascinating grid to work with encourages the artistic juices to move! Andy has written an in depth article, Impressed Design Choices: Urgent Issues, which explains compound grids (and extra) in-depth. His discuss from State of the Browser can also be out there to observe.
Constructing a compound grid generator
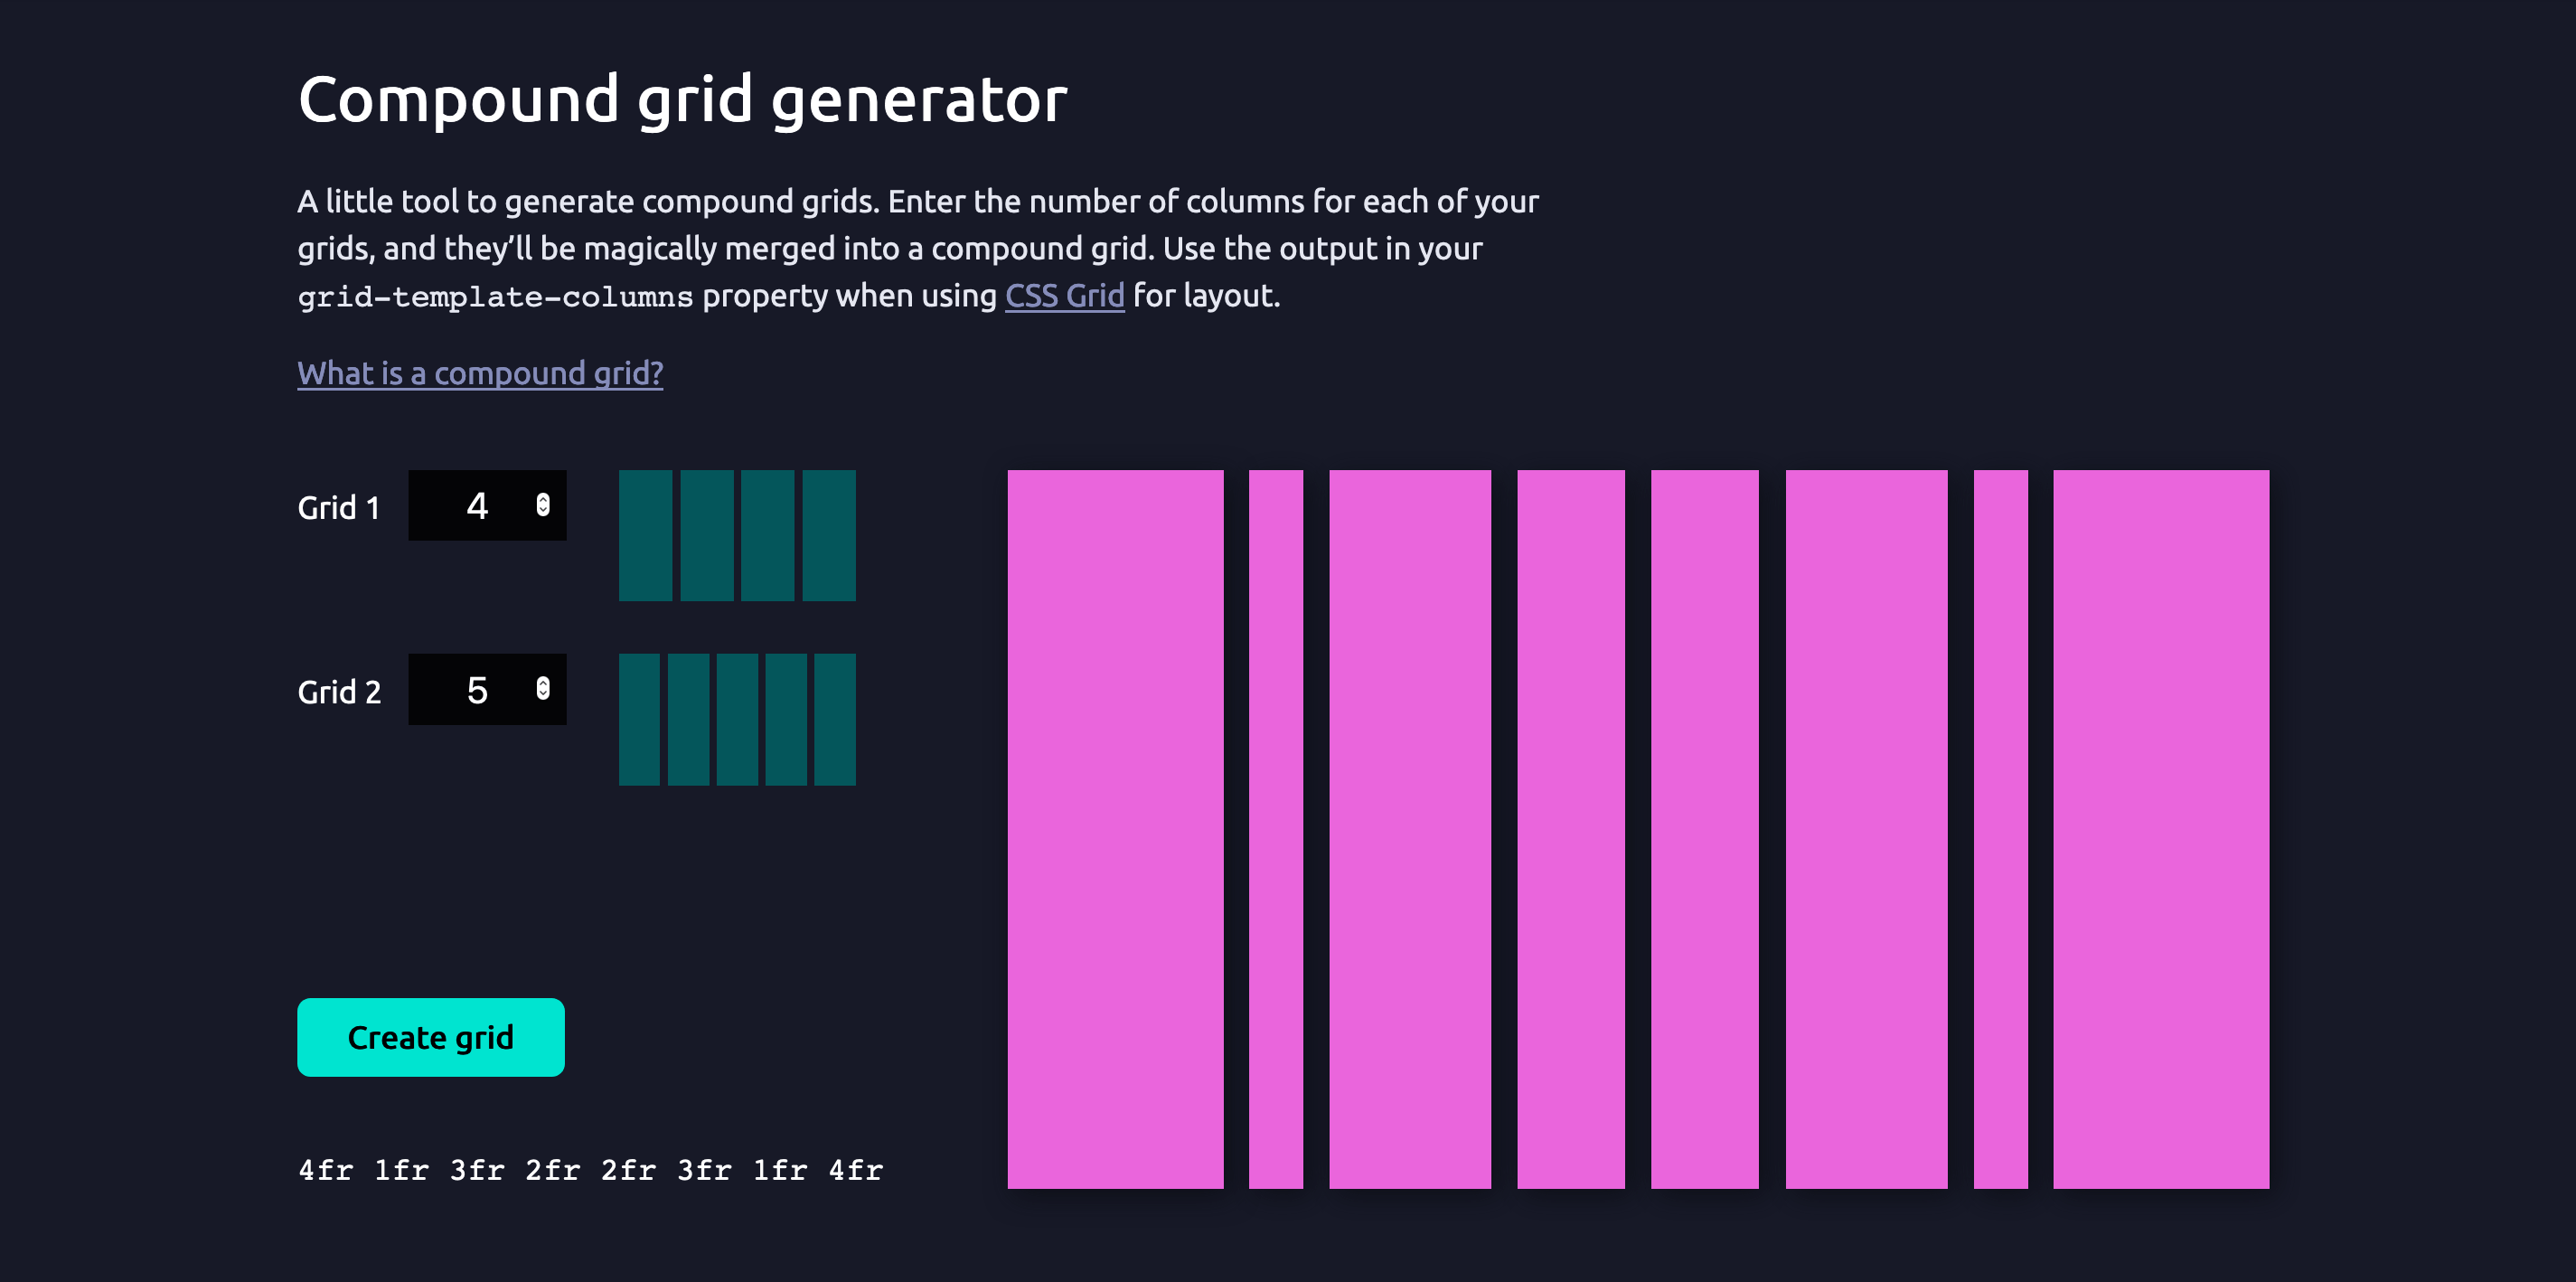
Compound grids translate rather well to CSS Grid, as utilizing fr items makes them quite simple to implement. I really like the thought of utilizing compound grids in net design, however I felt the method of calculating them (particularly the extra advanced the grid) may very well be a hindrance. I needed a solution to generate compound grids on demand so, impressed by Andy’s discuss, I rolled up my sleeves and constructed just a little instrument to generate and visualise compound grids. Enter the variety of columns for 2 completely different grids (with 10 columns as a most for anybody grid) and the generator combines them, spitting out a ensuing worth which can be utilized within the grid-template-columns property utilizing CSS Grid. For instance, a grid with 4 columns plus a grid with 5 columns will generate the worth 4fr 1fr 3fr 2fr 2fr 3fr 1fr 4fr.
This instrument is on Codepen, so be at liberty to make use of it or adapt it to fit your wants.
Creating the grid for a scrapbook format
A compound grid is right for a scrapbook format, the place I needed the format to really feel barely unpredictable and haphazard however nonetheless keep a way of rhythm and steadiness. After a little bit of experimentation with the compound grid generator, I settled on a 6/5 compound grid, which I felt gave me a great variety of columns to mess around with. That offers me an preliminary grid to work with:
.grid {
show: grid;
grid-template-columns: 5fr 1fr 4fr 2fr 3fr 3fr 2fr 4fr 1fr 5fr;
hole: 1rem;
}
Defining grid rows
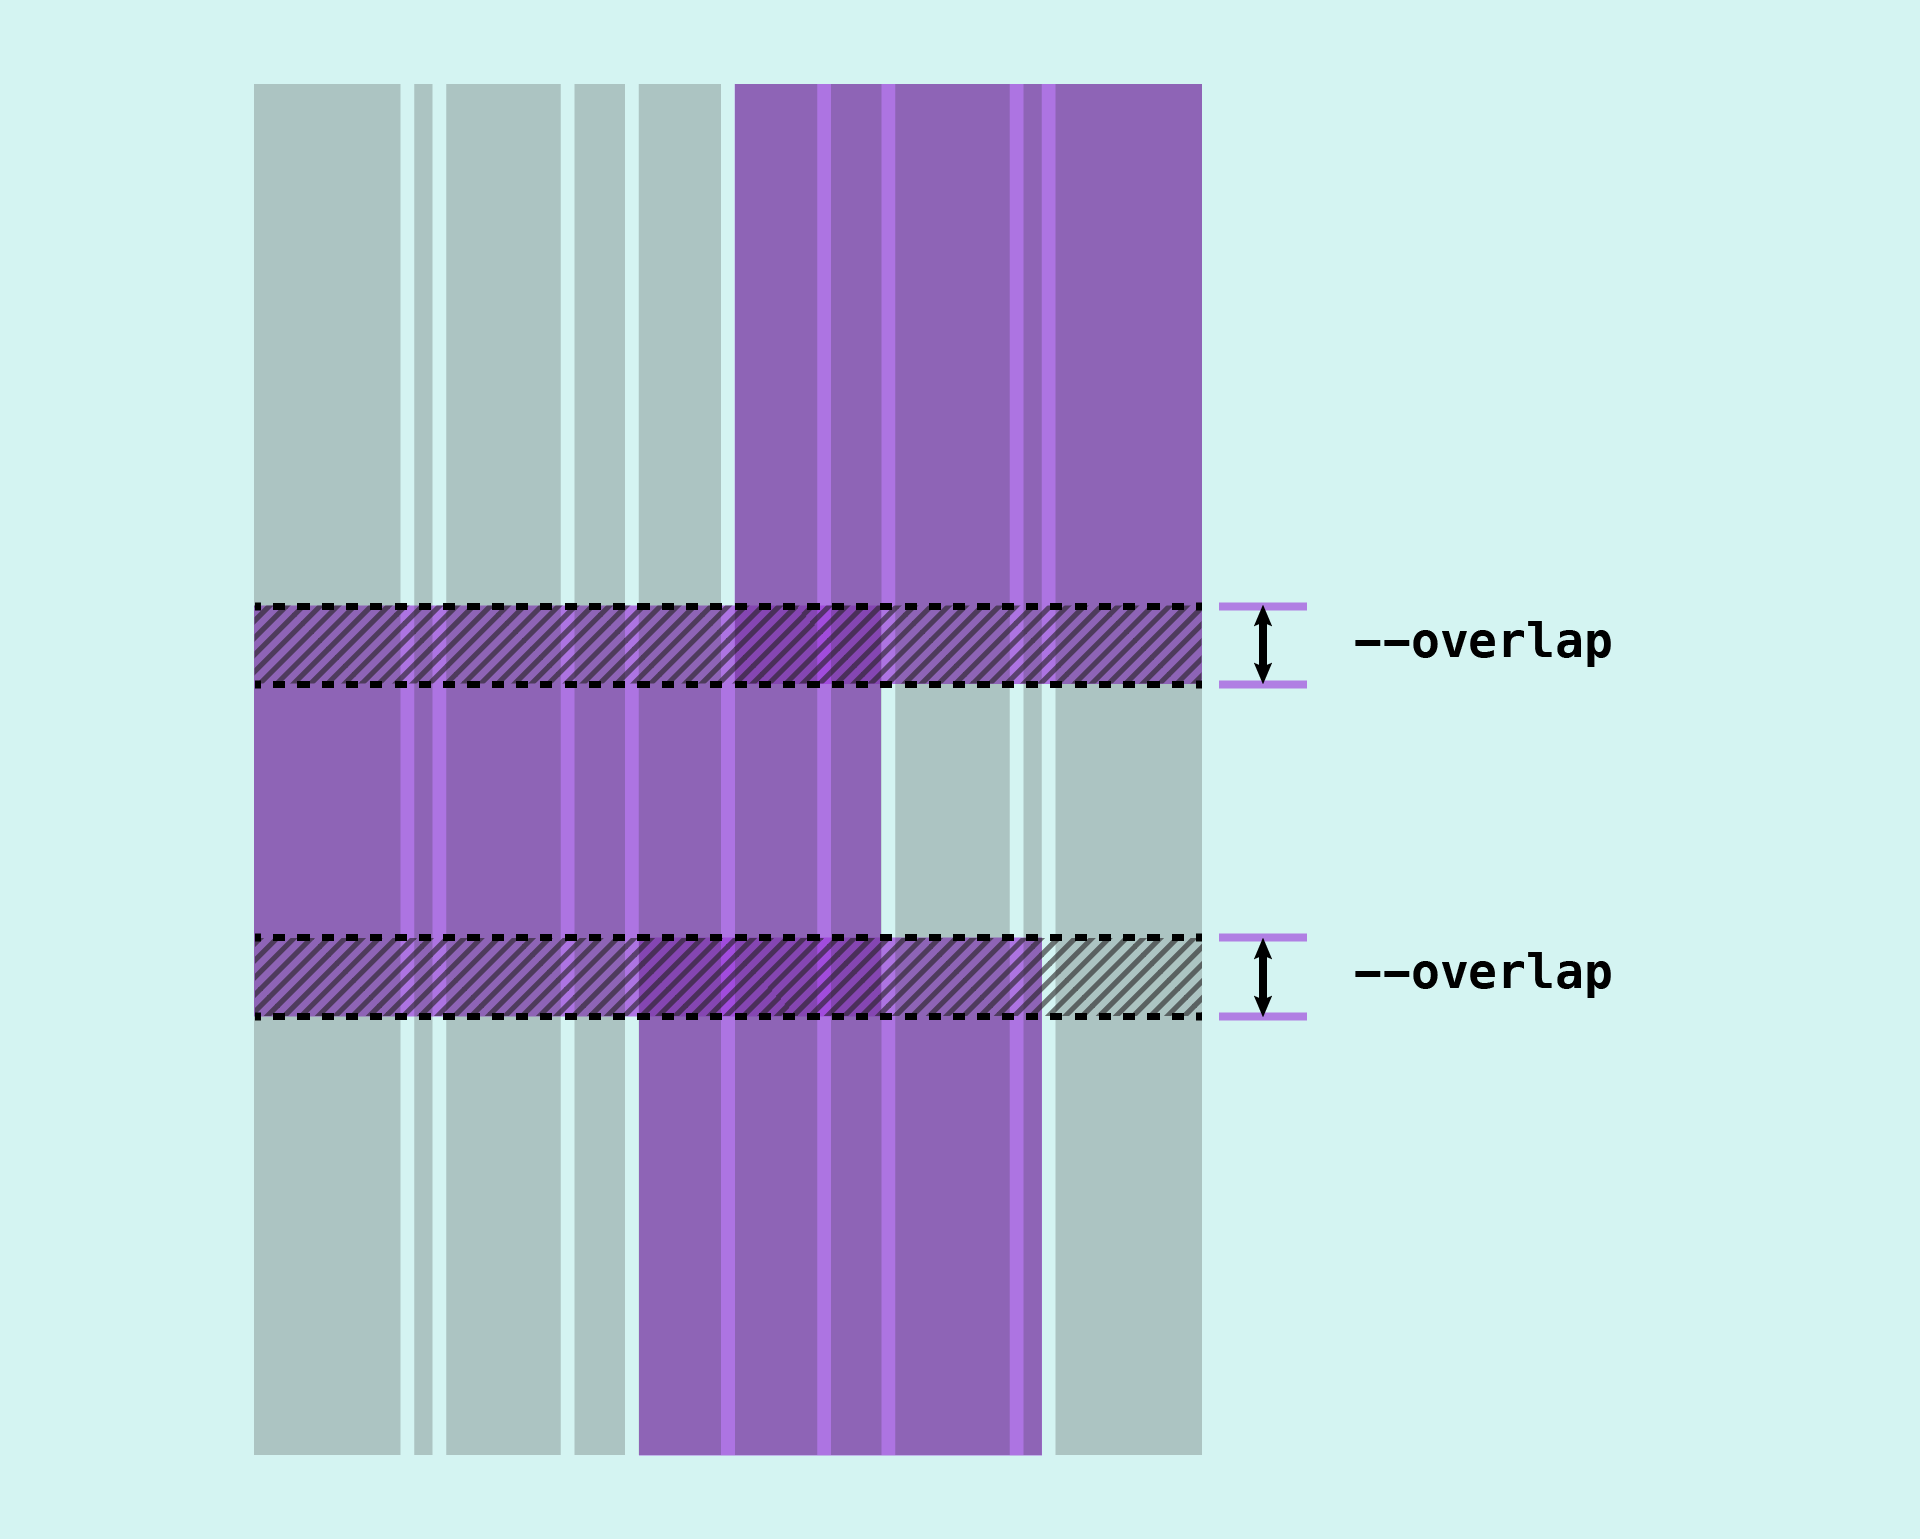
Defining the grid rows was trickier, and required a bit extra trial-and-error. Every picture within the grid must overlap one other. It was useful to roughly draw the grid out on paper to grasp what number of rows I would wish.
To take care of a way of vertical rhythm, I made a decision the pictures ought to every overlap by the identical quantity. I assigned this quantity to a customized property in order that it may very well be used thoughout the web page and up to date if essential (Fig 4).
.grid {
--verticalPadding: 2rem;
--overlap: 6rem;
}
Every picture additionally has an accompanying paragraph of textual content. This must have adequate area above and under, in order that it doesn’t overlap or crash into the earlier picture. This meant including a grid row above and under the caption, which I consider as a “padding” row. Now every picture would wish to span at the very least 4 grid rows – pictures that overlap on the high and backside would wish to span 5 rows.

However we’re not fairly carried out with constructing our grid but: I made a decision to power a side ratio on the photographs themselves, identical to actual pictures. Some could be panorama and others portrait. I needed the grid format to work whatever the picture side ratio or the size of textual content, so I wanted my grid rows to have the ability to adapt.
As a substitute of utilizing mounted values for the overlap and “padding” rows, we are able to make these tracks versatile by utilizing minmax(). This can guarantee these row tracks have a minimal dimension, however they may even increase if the content material necessitates it.
minmax(var(--padding, auto));
Inserting objects
As soon as we have now our grid “scaffolding” in place, it’s time to put some objects. One factor that may generally be tough with CSS Grid is knowing the easiest way to put objects on the grid for any given format. Now we have plenty of completely different choices out there to us – line numbers, the span key phrase, named traces or named grid areas – and a few work higher than others in several conditions. However there’s no proper or incorrect methodology, and it typically comes all the way down to discovering the strategy that makes to most sense to you.
So long as the format works, there’s no such factor as “doing it incorrect”!
Placement by grid line
I typically begin by putting objects utilizing begin and finish values – normally begin and finish line numbers, but when I do know the precise variety of tracks an merchandise must span then I’ll use that as an alternative, treating it as a continuing. I generally title grid traces for essential “landmarks” (e.g. wrapper-start and wrapper-end), however I hardly ever go as far as to call grid traces or create grid areas for each merchandise within the grid. A method that serves me very effectively is utilizing detrimental grid traces for once I wish to place an merchandise relative to the tip of the grid, which I’ve written about in a earlier article. I exploit detrimental grid traces most often on the column axis, as usually (for the grids I’m working with) the variety of columns in a recognized, mounted worth.
Inserting an merchandise from line 1 to line -1 with the grid-column property, for instance, would place that merchandise spanning all the column axis of our grid, from the primary line to the final:
.merchandise {
grid-column: 1 / -1;
}
One other case the place I could be extra inclined to call grid traces is for grids with a really giant variety of tracks. On this case we solely have 10 column tracks, so for me putting objects by line quantity on this axis feels manageable.
Utilizing a combination of constructive and detrimental grid traces, and span values, it’s pretty easy to put objects on the column axis. Switching on the grid inspector within the Firefox dev instruments panel could be very useful, because it permits us to see the road numbers.
Placement by grid space
If we check out the grid we are able to see that we have now fairly numerous rows to work with.

Though I began putting objects by line quantity on the row axis, this rapidly grew to become troublesome to handle. Objects have to overlap one another, and I discovered it troublesome to maintain monitor of the place one merchandise ought to finish and one other ought to start. Moreover, I didn’t wish to use detrimental grid traces as a result of there’s a great probability I’d wish to add to my format sooner or later. If I ended up including extra specific rows to the grid, then the detrimental line numbers would now not be appropriate, doubtlessly inflicting quite a lot of format bugs!
This was once I determined to create named grid areas on the row axis. Grid areas are created in two methods:
- With the
grid-template-areasproperty, which allows you to successfully “draw” your grid format as ascii artwork. - Utilizing named grid traces, by utilizing
-startand-endas suffixes to our line names.
The grid-template-areas property doesn’t permit us to outline areas for overlapping objects, so it doesn’t actually assist us with this specific format. Utilizing named grid areas will certainly make life simpler, nevertheless.
If we title traces on each the row and the column axis, we get a grid space (fig 8):
It’s then attainable to reference that space when putting an merchandise utilizing the grid-area property:
.merchandise {
grid-area: picture;
}
This makes our code extra concise and simpler to learn than utilizing grid-column and grid-row, and writing out the road names longhand:
.merchandise {
grid-row: image-start / image-end;
grid-column: image-start / image-end;
}
However we solely want the named grid space on the row axis this time. That’s high-quality, as we are able to simply reference it with the grid-row property:
.merchandise {
grid-row: picture;
}
As we have now numerous rows, I discover it a lot clearer to put in writing our grid-template-rows property vertically, in order that it mirrors the construction of the web page:
grid-template-rows:
auto
3rem
minmax(var(--verticalPadding), auto)
minmax(0, auto)
minmax(var(--verticalPadding), auto)
var(--overlap)
minmax(var(--verticalPadding), auto)
minmax(0, auto)
minmax(var(--verticalPadding), auto)
var(--overlap)
minmax(var(--verticalPadding), auto)
minmax(0, auto)
minmax(var(--verticalPadding), auto);
Now including the road names within the appropriate place turns into easier and fewer error-prone, as we are able to visualise the construction of the grid:
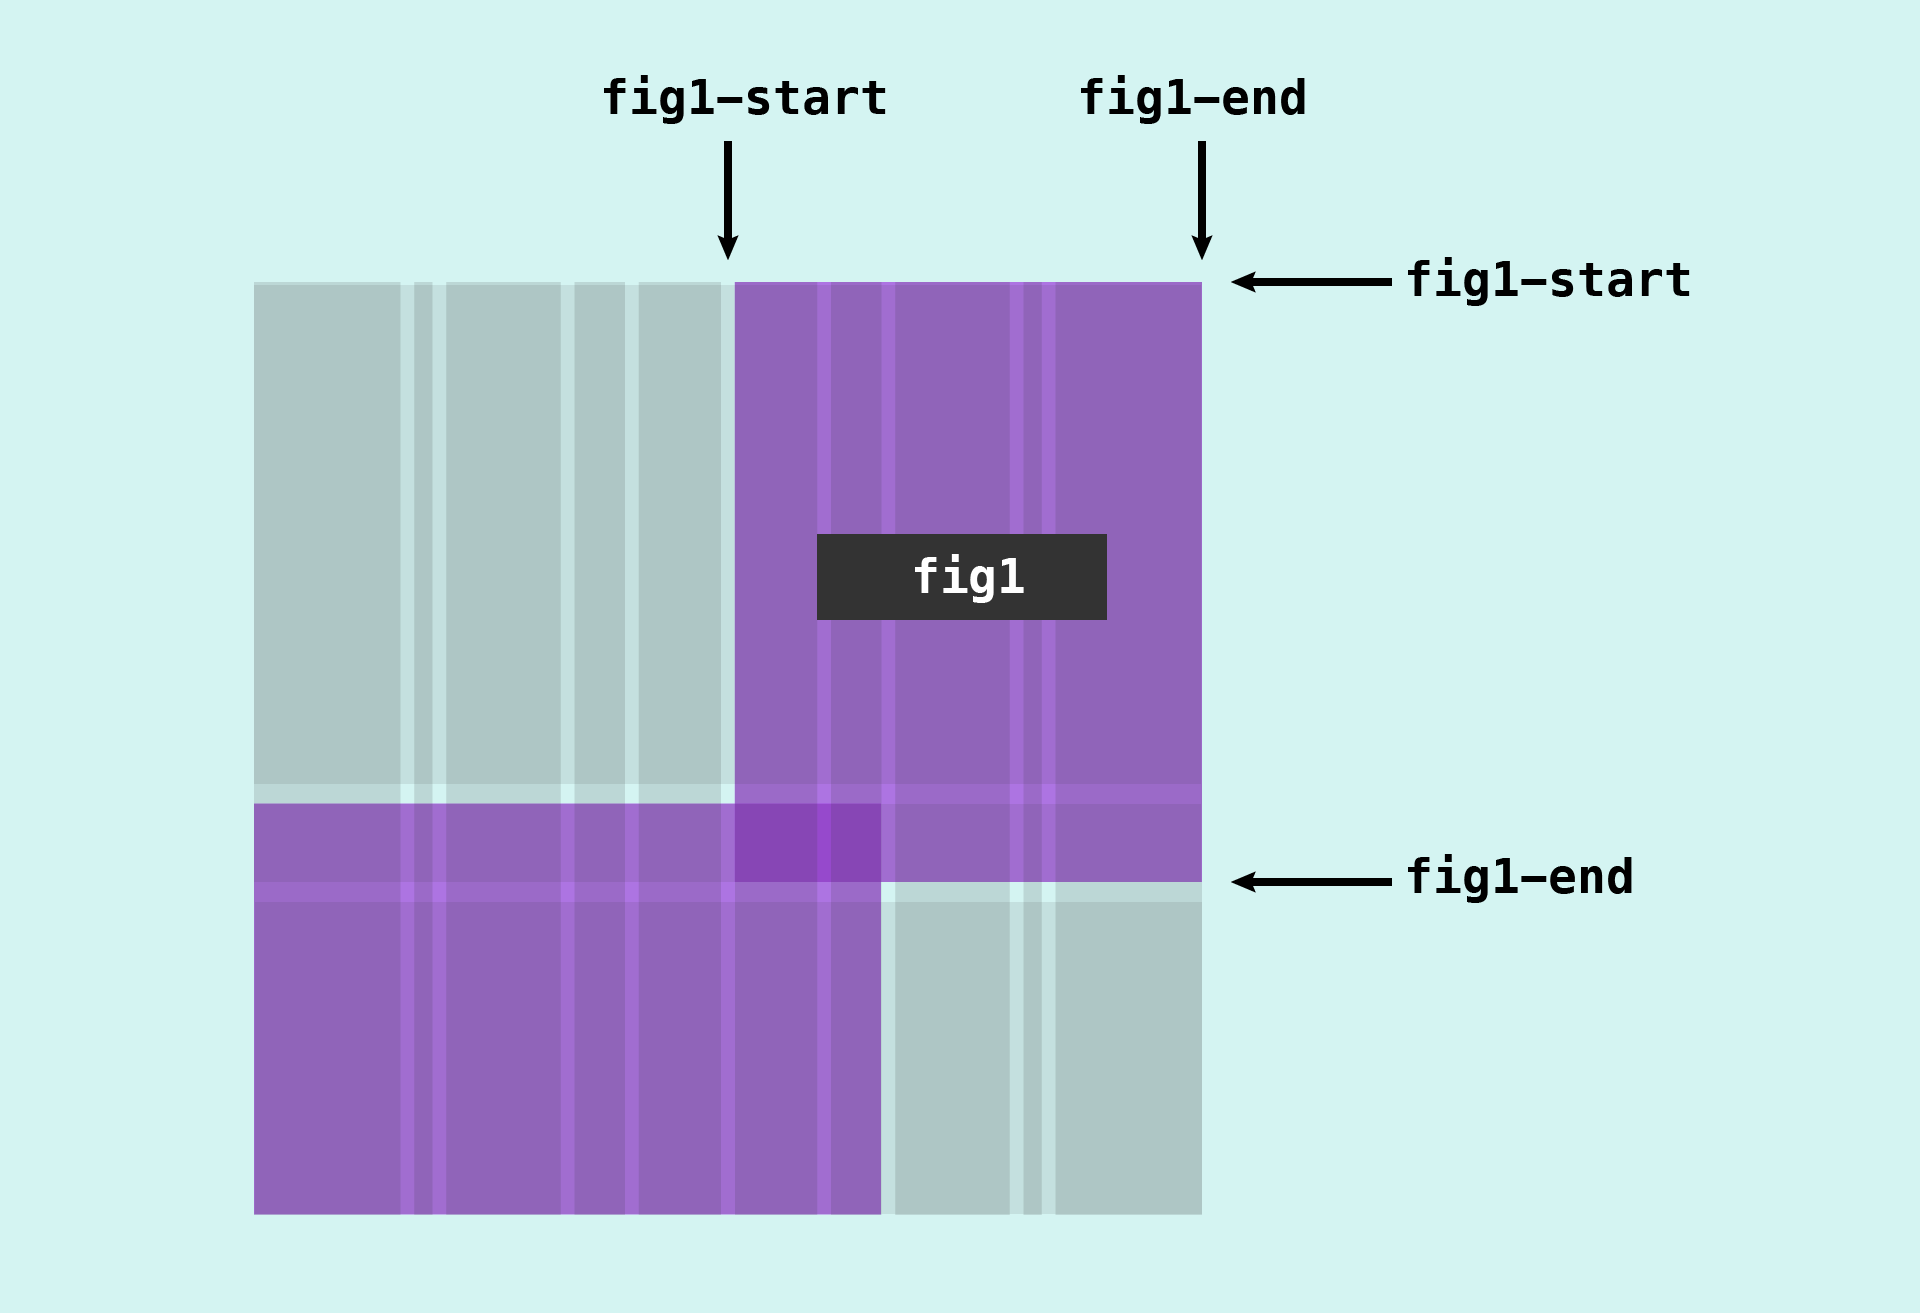
grid-template-rows:
[header-start]
auto
[fig1-start]
3rem
[header-end]
minmax(var(--verticalPadding), auto)
[p1-start]
minmax(0, auto)
[p1-end]
minmax(var(--verticalPadding), auto)
[fig2-start]
var(--overlap)
[fig1-end]
minmax(var(--verticalPadding), auto)
[p2-start]
minmax(0, auto)
[p2-end]
minmax(var(--verticalPadding), auto)
[fig3-start]
var(--overlap)
[fig2-end]
minmax(var(--verticalPadding), auto)
[p3-start]
minmax(0, auto)
[p3-end]
minmax(var(--verticalPadding), auto)
[fig3-end];
All that is still is to reference the world names on the row axis when putting our grid objects:
.fig--1 {
grid-column: span 5 / -1;
grid-row: fig1;
}.fig--2 {
grid-column: 1 / span 7;
grid-row: fig2;
}
.fig--3 {
grid-column: span 5 / -2;
grid-row: fig3;
}
The completed outcome (fig 10) is accessible to discover on Codepen.

Though I haven’t gone to the additional effort of creating this format responsive, it’s useable all the way down to smaller tablet-sized screens. Adjusting the format for small display screen sizes would now be comparatively straighforward. At smaller display screen sizes I’d personally go for a less complicated grid, as we might seemingly lose quite a lot of the visible nuance the coumpound grid. However as soon as once more, there’s no proper or incorrect – and even these of us who repeatedly work with CSS Grid are nonetheless determining as we go alongside!