

Tips on how to write and debug a Swift Package deal Command plugin
This 12 months, Apple launched a brand new function for the Swift Package deal Supervisor: Swift Package deal Plugins. We will now write two sorts of plugins which might be mechanically built-in with Xcode:
- Construct (and pre-build) Plugins.
- Command Plugins.
I already talked about constructing plugins in a few articles: “Implement Your First Swift Package deal Construct Plugin” and “Tips on how to Use Xcode Plugins in Your iOS App”.
As we speak, I need to share with you which of them steps are required to create a Command Plugin. The developer expertise for these plugins just isn’t nice, so I need to share additionally a way to debug them.
You could find extra details about Swift Package deal Plugins in these WWDC22 movies: Meet Swift Package deal Plugins, Create Swift Package deal Plugins
On this article, you’ll create a Command Plugin that generates some Swift code from a JSON specification.
To create a Command plugin, you want numerous items:
- A
Package deal.swiftfile to outline the construction of the Plugin. - A correct folder construction.
- A Swift
structthat conforms to theCommandPluginprotocol. - The enterprise logic to implement the plugin.
- Optionally, a further Package deal to check the plugin.
The Package deal.swift
Swift Package deal Plugins are outlined as Swift Packages. You have to create a brand new bundle in your plugin.
The everyday bundle construction for a Command Plugin is the next:
The vital particulars to note are:
- The
swift-tool-versionat line 1 should be no less than5.7. - The
goalis of kind.pluginwith the.commandfunctionality.
To utterly outline a command plugin, we have to add a pair extra properties: an intent and a set of permissions.
The intent is the explanation why the plugin exists. It’s structured with a verb and an outline.
- Instructions plugins could be additionally invoked by the
swift bundlecommand line software. Theverbproperty is the argument we are able to use within the command line to invoke this Command plugin. The syntax is the next:
swift bundle plugin <verb> [args...]
- The
descriptionproperty is a human-readable description of the plugin.
The set of permissions comes from an enum outlined within the Package deal API. The enum has no express instances, but it surely gives a single static perform: the writeToPackageDirectory. This tells Xcode that your plugin wants write entry and the IDE will immediate a message to the person at any time when the command is invoked. The immediate will present the motive String: a human readable description that explains to your customers what the plugin will do with this permission.
The Folder Construction
Like all of the Swift packages, Plugins wants to stick to a correct folder construction to be correctly constructed. You possibly can customise the construction within the Package deal.swift by utilizing the path property, however the default folder construction is that this one:
CodeGeneratorPlugin
├── Package deal.swift
└── Plugins
└── CodeGenerator
└── CodeGenerator.swift
The CodeGeneratorPlugin is the folder that incorporates the present bundle. The Plugins folder is the house for all of the Plugins outlined within the Package deal.swift. The code of every plugin should be situated in a folder with the identical identify of the plugin, CodeGenerator on this instance.
The CodeGenerator.swift file is the entry level for the plugin and it’ll include its enterprise logic. In a different way from the opposite folders, it isn’t essential to name it CodeGenerator: the Swift file can have any identify.
The CodeGenerator.swift
This struct is the entry level of the plugin. The fundamental construction is one thing like this:
The vital fragments are:
- The
import PackagePluginassertion. It imports the framework with all the brand new APIs for the plugins. - The
@predominantannotation. It defines the entry level for the plugin. - The conformance to
CommandPlugin. It marks the struct as a correct Command plugin and it forces to implement its strategies. - The
performCommandmethodology. It incorporates the logic of the plugin.
The performCommand has two parameters: the context and the arguments. The context can be utilized to learn info from the bundle, like its path. The arguments are an inventory of arguments that may be handed to the instructions from Xcode or from the command line.
The logic to generate code
That is the final step to create the plugin. You have to write the code that generates Swift code ranging from the JSON specs. To realize that, you might want some helper lessons and a few features.
The JSON Specification
Step one is to outline the information that represents your JSON entities. On this instance, you need to generate some Swift structs. These knowledge structs are quite simple: they solely have let properties.
The JSON you need to parse has this construction:
{
"fields": [{
"label": "<variable name>",
"type": "<variable type>",
["subtype": "<variable type>"]
}]
}
This can be a JSON object that represents a single struct. It has a fields property which incorporates one other object that utterly defines a Swift property. The label is the identify of the property within the struct; the kind is the primary kind of the property. In case of generics, it wants a subtype to specify the kind of the generic.
The identify of the struct would be the identify of the file. So, a legitimate JSON could be the next Individual.json file:
{
"fields": [
{
"label": "name",
"type": "String",
},
{
"label": "surname",
"type": "String",
},
{
"label": "age",
"type": "Int",
},
{
"label": "family",
"type": "Array",
"subtype": "Person"
}
]
}
This Individual kind has a reputation, a surname, an age and a household, which is an inventory of different Individual sorts. After the execution of the plugin, you anticipate to acquire the next swift struct:
struct Individual {
let identify: String,
let surname: String,
let age: Int
let household: [Person]
}
The Information Mannequin
To correctly deal with this JSON within the plugin logic, it’s essential to mannequin it correctly, in an effort to decode it.
To realize that, you want these two structs:
The primary struct is a wrapper to include the checklist of fields. It represents the top-level JSON object.
The Area struct is the information mannequin that defines the inside objects. It has a property for the label, a property for the kind, and an elective property for the subtype, in case it’s important to take care of a generic.
The logic
Lastly, we are able to implement the logic. You possibly can cut up it in numerous features inside the plugin itself to simplify it.
The primary perform is the performCommand, the entry level of the plugin:
You possibly can take a look at it because the Composition Root of your plugin: you possibly can fetch all of the related knowledge from the context, instantiate the dependencies, and go them to the remainder of the code.
The performCommand invokes the executeCommand:
This strategies extracts all of the structs that should be generated, by utilizing the drillDown methodology. If there aren’t any structs, it returns.
Then, it writes the structs to a file known as Struct.swift: all of the structs will probably be contained in a single file, for simplicity’s sake.
The drillDown methodology is accountable to crawls the folder construction of the bundle to search for JSON specs, in a recursive approach:
This instance works underneath the idea that each one the JSON specs are situated in a folder known as Definitions.
The drillDown methodology begins by getting the content material of the listing property which, by default, is the Package deal predominant folder. Then, if the final path element of the listing is Definitions, it retrieve the total path of each merchandise contained within the folder and, for every of them, it invokes the createSwiftStruct perform.
In any other case, it proceeds crawling the tree: for every merchandise within the present folder, it examine whether or not it’s a folder or not. If it’s a folder, it tries to drillDown into it and to build up the end in a variable that will probably be returned on the finish of the recursion.
The final methodology is the createSwiftStructure:
This methodology reads the content material of the file handed as parameter. It then tries to decode it utilizing the Information mannequin outlined above.
Then, it extracts the struct identify from the file identify and it creates the checklist of fields.
Lastly, it returns a String that could be a legitimate Swift struct.
Tips on how to Use It
Now, it’s time to attempt your command plugin in one other bundle.
First, create a brand new bundle within the Package deal.swift. To take action, you possibly can simply add a .goal to the Package deal.swift file:
The bundle additionally require a correct folder construction. It must be one thing like this:
CodeGeneratorPlugin
├── Package deal.swift
└── Plugins
│   └── CodeGenerator
│       └── CodeGenerator.swift
└── Sources
└── MyCode
└── HelloWorld.swift
HelloWorld.swift is simply an empty Swift file: each Swift bundle should have no less than a Swift file into its folder.
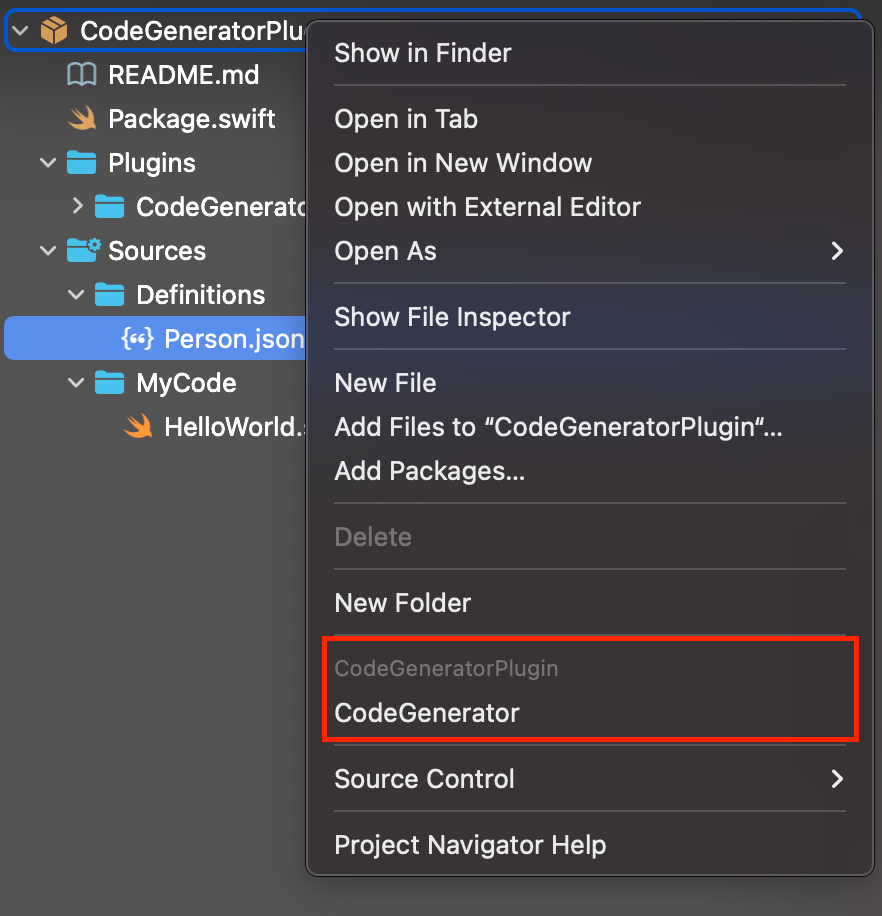
At this level, if you happen to right-click on the CodeGeneratorPlugin mission, you possibly can already see that Xcode exhibits your CodeGenerator customized plugin within the contextual menu!
The subsequent step is so as to add a Definitions folder with theIndividual.json file that we described above.
As soon as that’s finished, by clicking on the CodeGenerator menu merchandise within the contextual menu, Xcode will current a dialog to allow you to:
- Select on which goal the plugin ought to run.
- Cross further arguments, if they’re wanted.

On this case, we don’t want any further argument and we are able to safely click on on Run.
Now, Xcode asks whether it is allowed to run the Command.

The road that begins with From the writer of this dialog exhibits the motive you arrange within the Package deal.swift in your plugin in step one of this text.
By clicking on the Permit Command to Change Information, Xcode will execute the command. After just a few seconds, it’s best to see a Structs.swift file seem beneath the HelloWorld.swift.
The brand new file ought to have this content material:
Congratulations! You created your first command plugin and also you utilized it to a different goal utilizing Xcode.
Sadly, no person is ready to write excellent code and not using a little bit of trial and error. Whereas creating this plugin, I run it incessantly to see if it was working, however the developer expertise was very irritating:
- In the beginning, the plugin was not producing any output as a result of it was failing.
- Xcode was not emitting any error I can act on.
- It was not attainable to connect the debugger to see what was happening.
- The Swift
printperform was not writing something anyplace.
My resolution to debug this plugin was to write down each step right into a log file. To realize that I adopted these steps:
- I created a world
var log: [String]variable. That is recreated each time the command is run, so there is no such thing as a drawback of reminiscence sharing between processes. - I created a
log(_ message: String)perform to append messages into thelogvariable. - I created a
printLog()perform tobe part ofall of the logs and to write down them to alogsfile I can examine after the execution. - Lastly, I instrumented my code with calls to the
log(_:)perform to see what was happening.
Be aware: this can be a fast implementation and a non environment friendly one. It recreates the file each time, rewriting the entire content material. A greater resolution would have been to append the brand new logs to an present file.
With this trick, I used to be capable of log the varied errors I incurred into and to efficiently implement the plugin.
In at present’s article, you discovered learn how to configure a Command Plugin for Swift 5.7.
You discovered learn how to construction the Package deal and the fundamental ideas to implement it. You additionally discovered learn how to run it in Xcode. As a result of poor developer expertise, you discovered learn how to create a primary logger resolution to see the varied execution steps.
Command plugins are fairly helpful, however they might be much more helpful when used from the command line: we’d have the ability to combine customized Instructions in our Steady Integration environments, for instance.
I’m trying ahead to seeing what the group will create with these new highly effective instruments!