


Should you go to my profile on GitHub, you’ll discover that it incorporates photographs, social community hyperlinks, some GitHub statistics and hyperlinks to my blogs, which makes the GitHub profile stand out. That is attainable by way of the GitHub profile README characteristic. On this article, we’ll discover ways to create a GitHub profile README.
We’ll cowl the next:
- what a GitHub profile README is
- create a GitHub profile README
- including social badges, abilities and descriptions about oneself
- including GitHub stats
- making a GitHub workflow to tug newest printed blogs
To observe together with the tutorial, you’ll must have a primary understanding of HTML and Markdown. Should you’d like an introduction to Markdown, try this Markdown introduction. Additionally, you need to have a GitHub account. Should you don’t have one but, enroll at GitHub.
The code for this tutorial is out there on GitHub.
What a GitHub Profile README Really Is
A GitHub profile README is a characteristic of GitHub that permits customers to make use of a Markdown file named README to jot down particulars about themselves reminiscent of their abilities, pursuits, GitHub stats and showcase it to the GitHub group. It’s proven on the prime of your GitHub dwelling web page, above the pinned repositories. This can be a fancy method to showcase one’s abilities and stats on GitHub.
Pictured under is the ultimate look of the GitHub profile that we’ll create for this text.
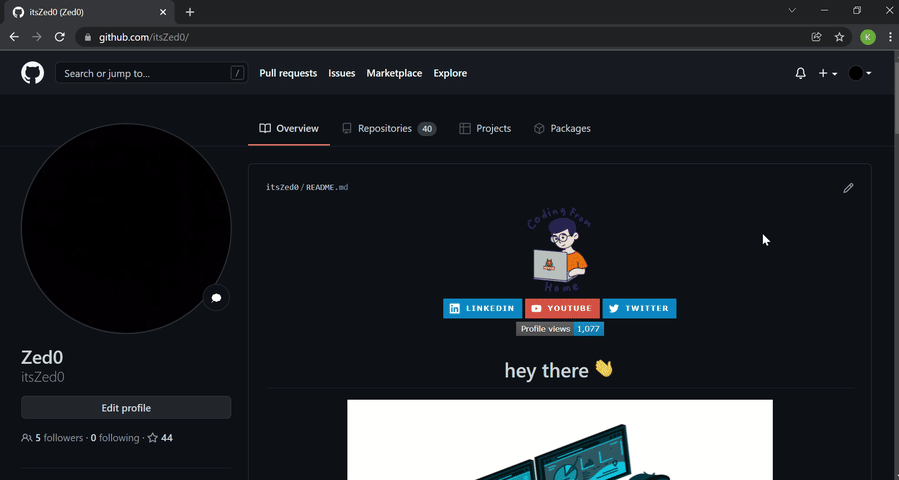
We’ll divide this into a number of sections and add contents for every part incrementally. The background colour will change primarily based on the GitHub theme settings of the person.
Within the subsequent part, we’ll have a look at the steps for creating the README file.
Making a GitHub Profile README
The README file resides in a GitHub repository, the title of which is identical because the username of your GitHub account. To create the repository, observe these steps:
- Log in to GitHub.
- Click on on + icon at prime proper of the web page and choose New Repository.

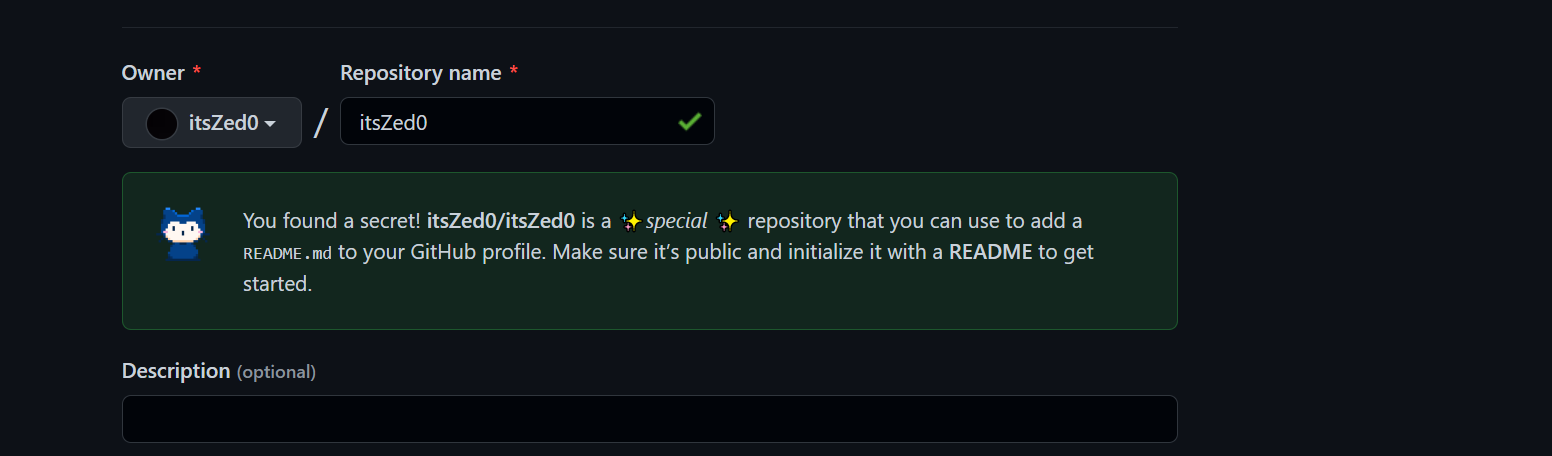
- A Create a brand new repository web page opens. Within the Repository title discipline, enter the username of your GitHub account. After getting into the username, GitHub shows a message describing that you just’re about to create a GitHub particular repository.
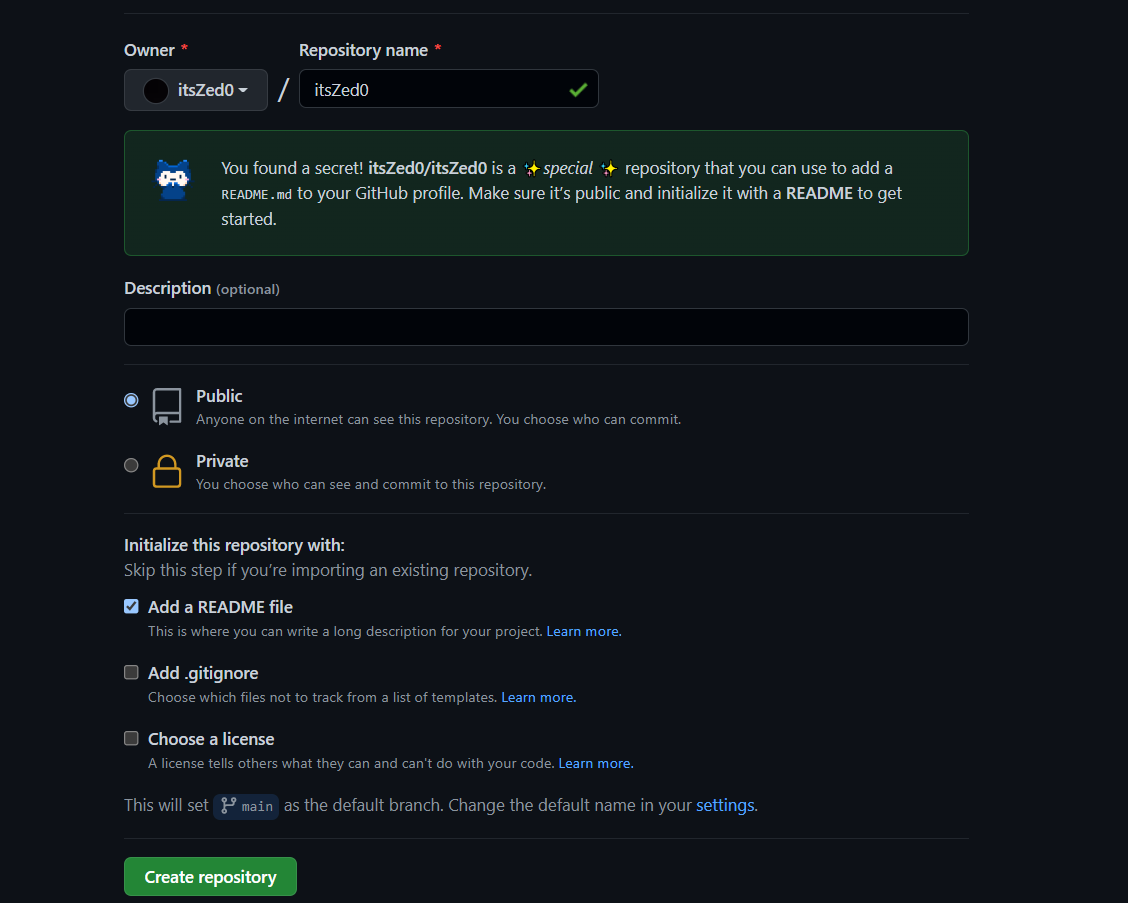
- Verify the Public checkbox underneath repository kind to make the GitHub profile README seen to everybody who visits the GitHub profile web page. Should you don’t need customers to see your GitHub profile README whereas it’s nonetheless in improvement, you possibly can select Personal. When you’re finished with the whole improvement of your README, be certain that to alter the visibility to Public.
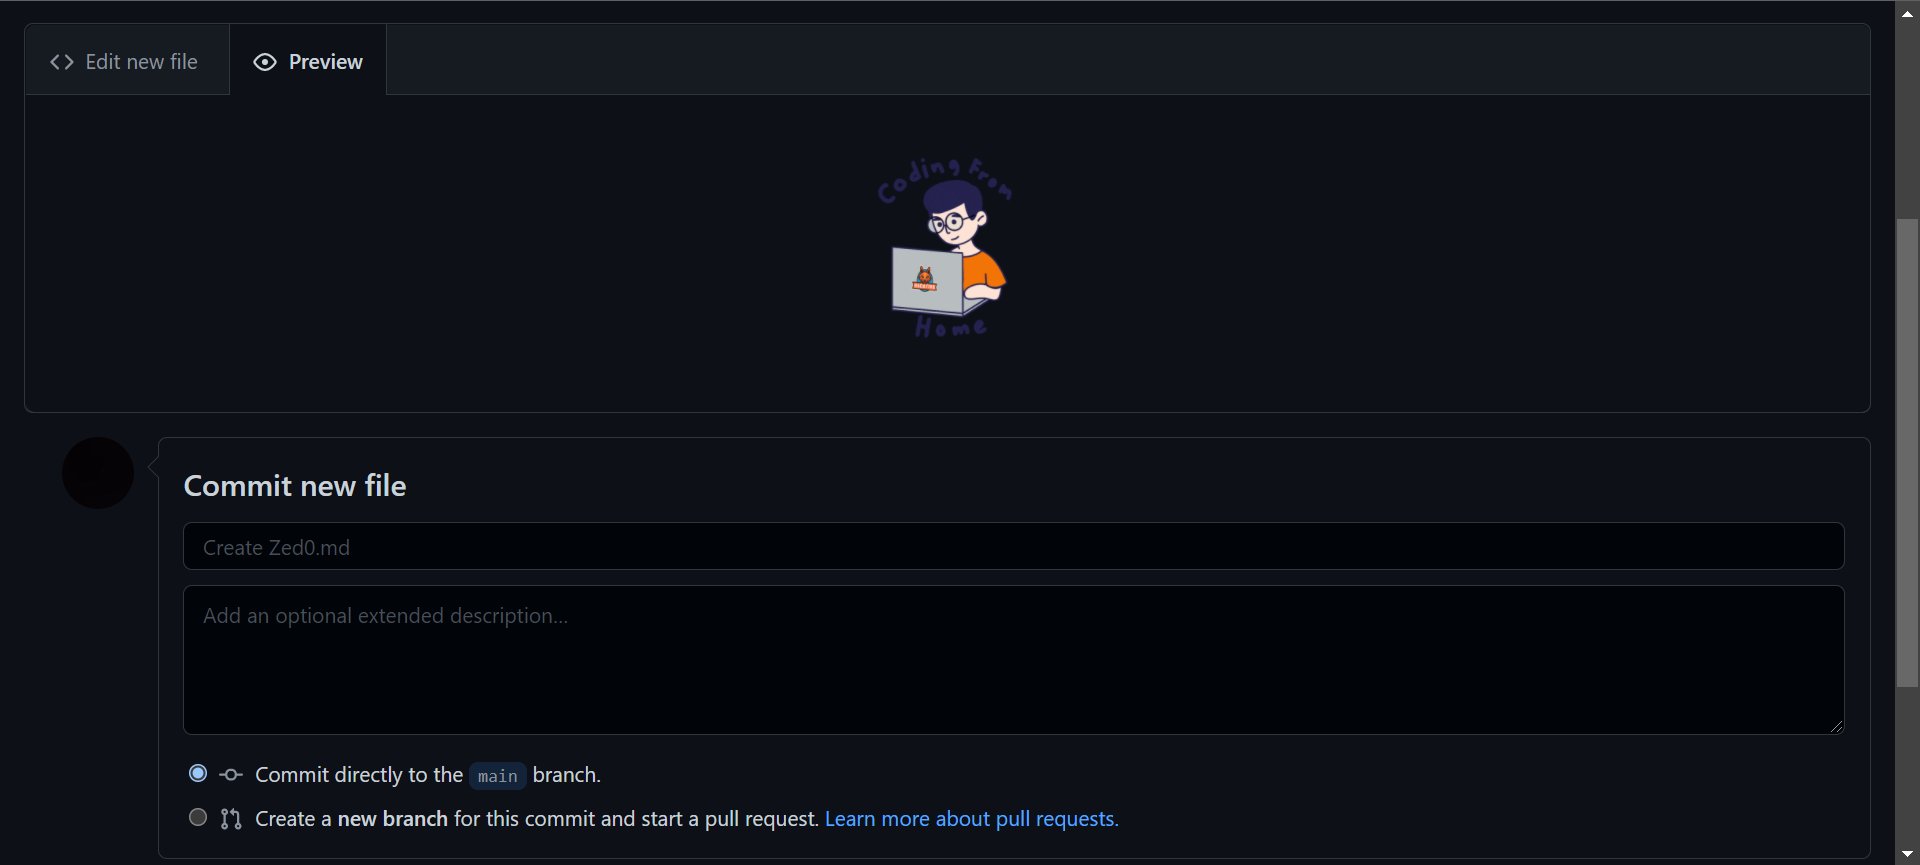
- Verify the Add a README file checkbox. This may add a
README.mdfile the place we’ll add the profile contents. The sphere values ought to look much like thepicture under.
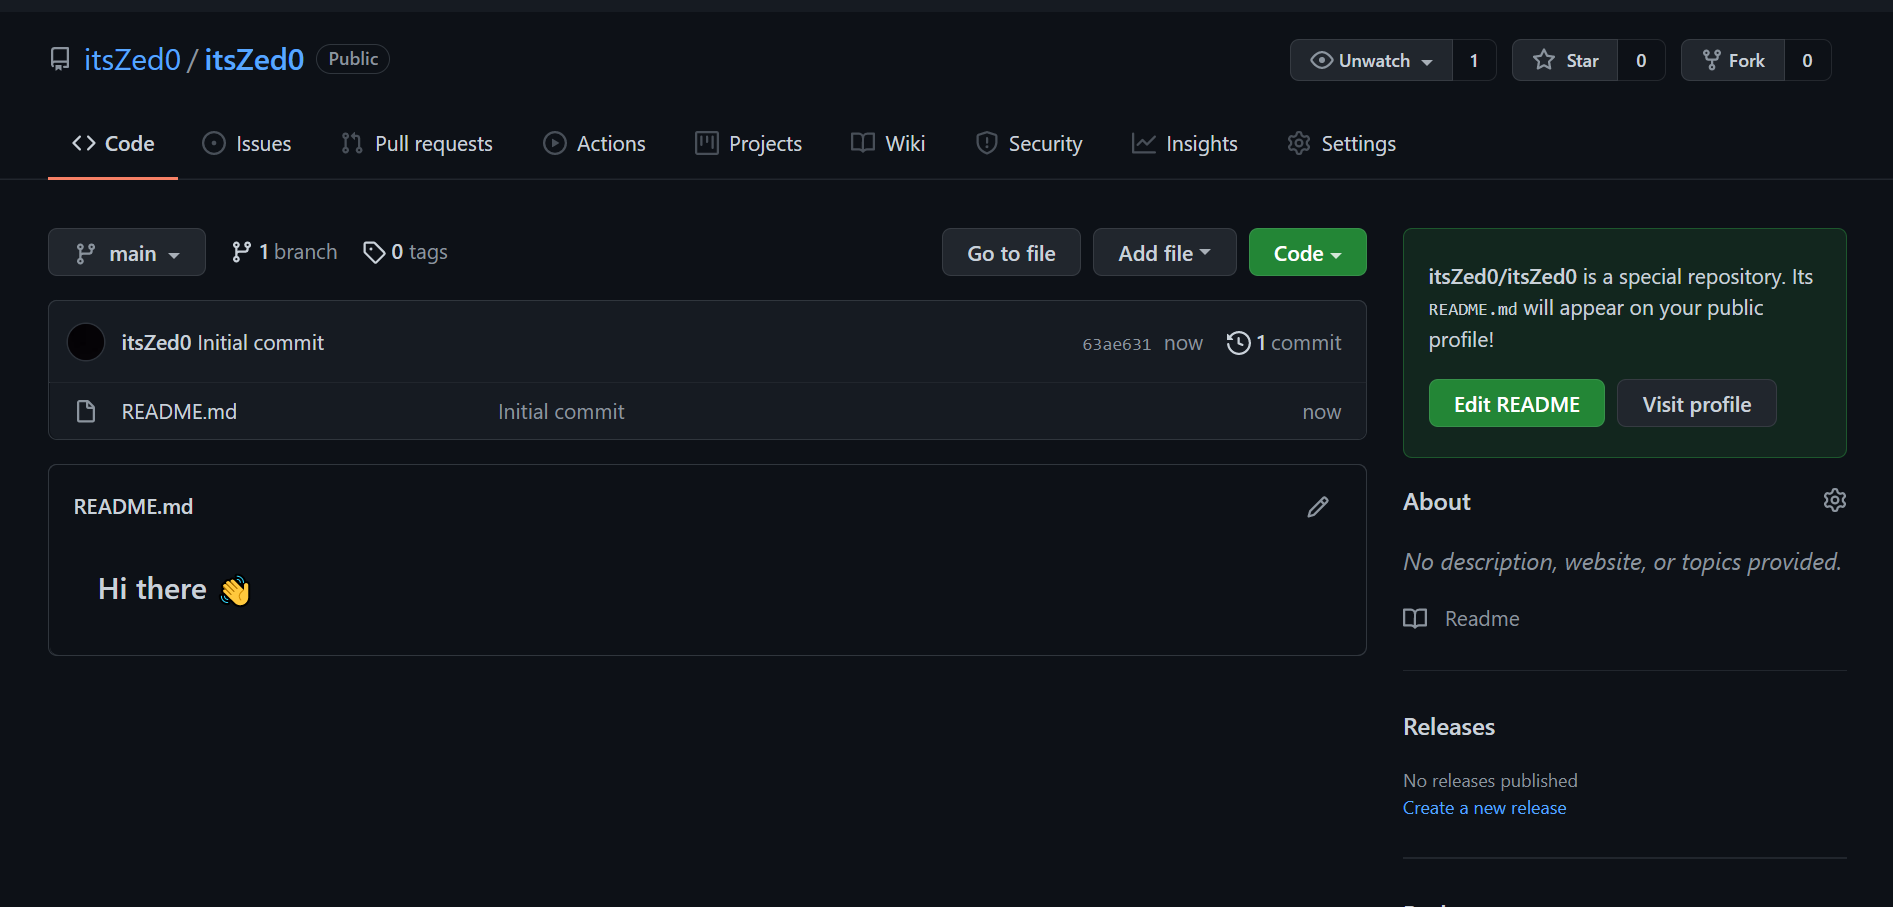
- Click on on the Create repository button. A particular repository is created efficiently. Go to the repository you simply created and also you’ll see a
README.mdfile added to the repository.
Within the subsequent few sections, we’ll add contents to our README.md file. We’ll use GitHub’s file editor to jot down and preview the adjustments. You should use every other textual content editor you’re snug with.
To make use of the GitHub file editor, open README.md and click on on the Edit this file icon (a pencil icon) on the highest proper of the web page. You’ll be able to learn extra about modifying GitHub information on the official GitHub documentation on modifying information.
Including GIFs and Badges to Your GitHub Profile README
Right here’s a picture of the content material that shall be added on this part:

The GIF used on this part might be discovered right here. I discovered this GIF on Giphy, which is stuffed with free GIFs to make use of.
Go to the GIF Hyperlink and click on on the Share button after which Copy GIF Hyperlink. We’ll add this copied hyperlink to an HTML img tag to show it within the Markdown file. We’re utilizing the img tag because it’ll assist us specify the width of the picture.
Within the GitHub file editor, substitute the README.md file content material with the next code:
<div id="header" align="middle">
  <img src="https://media.giphy.com/media/M9gbBd9nbDrOTu1Mqx/giphy.gif" width="100"/>
</div>
The src attribute factors to the URL we copied within the earlier step. Since all of the contents on this part are center-aligned, we’ve wrapped the picture in an HTML div tag with the align="middle" attribute.
Word: GitHub converts the README Markdown to HTML and renders it on GitHub. After conversion, the HTML is sanitized, and for safety causes, it ignores sure HTML tags and attributes reminiscent of <script>, <type>, type and many others. For that reason, we’ve used an align attribute as an alternative of CSS.
Now go to the preview tab. Pictured under is the output we get.
Subsequent, we’ll add social community badges. On clicking the badge, it is going to redirect to the respective social networking websites. You’ll be able to add social badges of varied web sites like Instagram, Fb, Twitter, and many others. For this tutorial, we’ll add three: Twitter, YouTube and LinkedIn.
To get the respective badges for every social community, we’ll use Shields.io, which gives numerous endpoints letting customers create and customise social badges. We’ll use the https://img.shields.io/badge/ URL and cross extra parameters to this URL to get the respective social badges.
The primary parameter we’ll cross is of the next format:
Label-Coloration
Label is the social community web site title proven on the badge.Coloration is the colour of the badge.
For the three social networks, the values for this parameter shall be:
- LinkedIn: LinkedIn-blue
- Twitter: Twitter-blue
- YouTube: YouTube-red
When mixed with https://img.shields.io/badge/, the next URL is created for LinkedIn:
https://img.shields.io/badge/LinkedIn-blue
After getting into the above URL within the browser, we get the next output:
Word that we don’t have the icon for the badge added but. So as to add it, we’ll use two question parameters within the following format:
brand={your social community icon title}
logoColor={colour of the icon}
We’ll add each the parameters to the URL as under:
https://img.shields.io/badge/LinkedIn-blue?brand=linkedin&logoColor=white
We’ll additionally add a method parameter to the above URL. There are numerous styling choices out there, the small print of which you’ll find at Shields.io. We’ll use for-the-badge styling.
The ultimate URL for LinkedIn shall be:
https://img.shields.io/badge/LinkedIn-blue?brand=linkedin&logoColor=white&type=for-the-badge
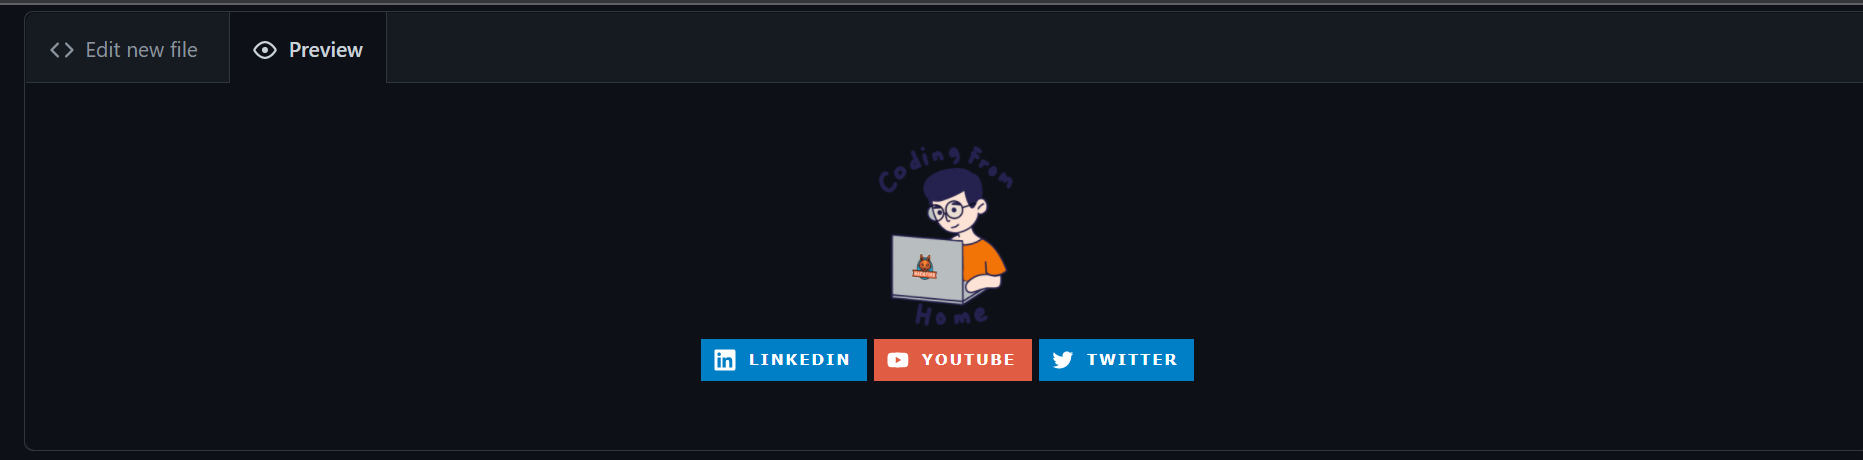
Now, after we hit this URL within the browser, we get the output pictured under.

Equally, we create URLs for different badges:
https://img.shields.io/badge/YouTube-red?type=for-the-badge&brand=youtube&logoColor=white
https://img.shields.io/badge/Twitter-blue?type=for-the-badge&brand=twitter&logoColor=white
We’ll wrap every URL in img tag like so:
<div id="badges">
  <img src="https://img.shields.io/badge/LinkedIn-blue?type=for-the-badge&brand=linkedin&logoColor=white" alt="LinkedIn Badge"/>
  <img src="https://img.shields.io/badge/YouTube-red?type=for-the-badge&brand=youtube&logoColor=white" alt="Youtube Badge"/>
  <img src="https://img.shields.io/badge/Twitter-blue?type=for-the-badge&brand=twitter&logoColor=white" alt="Twitter Badge"/>
</div>
We’ve wrapped the photographs in <div> tags to ensure all badges come on a single line. The above code will solely show the picture generated from the URL. So as to add hyperlinks for every of the badges, we’ll wrap every picture with an <a> tag.
Add the under code contained in the <div> tag with id="header" and after the GIF <img> tag. Be sure to alter the href attribute to level to your social profiles:
<div id="badges">
  <a href="https://www.sitepoint.com/github-profile-readme/your-linkedin-URL">
    <img src="https://img.shields.io/badge/LinkedIn-blue?type=for-the-badge&brand=linkedin&logoColor=white" alt="LinkedIn Badge"/>
  </a>
  <a href="https://www.sitepoint.com/github-profile-readme/your-youtube-URL">
    <img src="https://img.shields.io/badge/YouTube-red?type=for-the-badge&brand=youtube&logoColor=white" alt="Youtube Badge"/>
  </a>
  <a href="https://www.sitepoint.com/github-profile-readme/your-twitter-URL">
    <img src="https://img.shields.io/badge/Twitter-blue?type=for-the-badge&brand=twitter&logoColor=white" alt="Twitter Badge"/>
  </a>
</div>
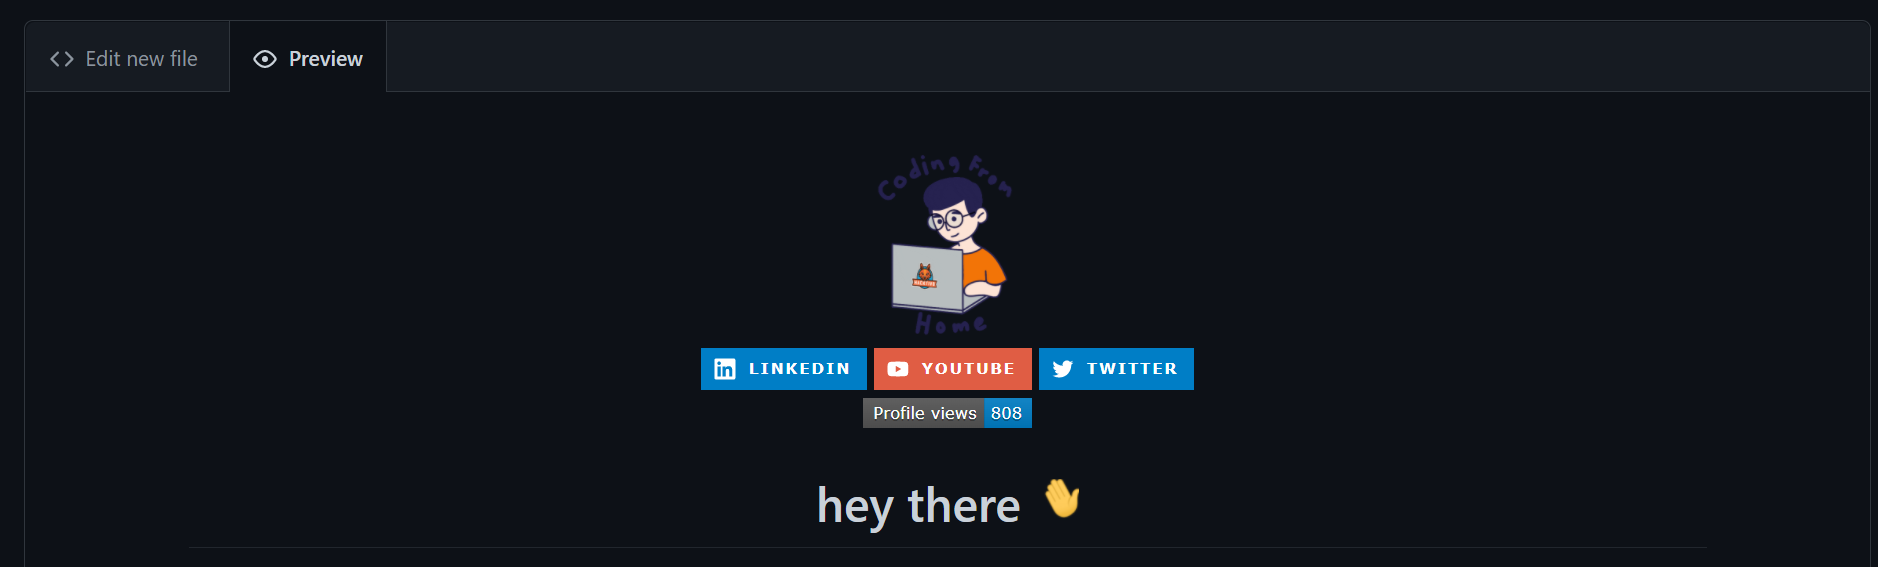
Pictured under is the output we get.
Subsequent on this part, now we have a profile views counter. It counts the variety of visits your GitHub profile will get. We’ll use an open-source challenge that gives the view-counter badge, the documentation of which is out there at GitHub Profile Views Counter. We use it in the same means we used the social badges. Beneath is the endpoint for a similar. We’ll additionally added some styling parameters to this URL:
https://komarev.com/ghpvc/?username=your-github-username
Add the under code after the <div> tag with id="badges". Be sure to switch your-github-username along with your username:
<img src="https://komarev.com/ghpvc/?username=your-github-username&type=flat-square&colour=blue" alt=""/>
Pictured under is the output we get.

The final a part of this sections is textual content with a wave (:wave:) GIF. The GIF is taken from Giphy and might be discovered right here.
Add the under code after the profile view counter <img> tag:
<h1>
  hey there
  <img src="https://media.giphy.com/media/hvRJCLFzcasrR4ia7z/giphy.gif" width="30px"/>
</h1>
The output is pictured under.
Save the adjustments by clicking on the Commit adjustments button. This completes the primary part of the GitHub profile README. Let’s transfer to including extra content material to our README.md file.
Including a Banner GIF and About Me Part
Right here’s what we’ll be including to our profile web page on this part:

On this part, we’ll add GIF and a few phrases describing particulars about ourself. You will discover the GIF right here.
So as to add the GIF, we’ll use an <img> tag, specify a peak and width and wrap it inside a <div> to middle the GIF utilizing align="middle". Add the next code to your README.md file:
<div align="middle">
  <img src="https://media.giphy.com/media/dWesBcTLavkZuG35MI/giphy.gif" width="600" peak="300"/>
</div>
The output of that is proven under.

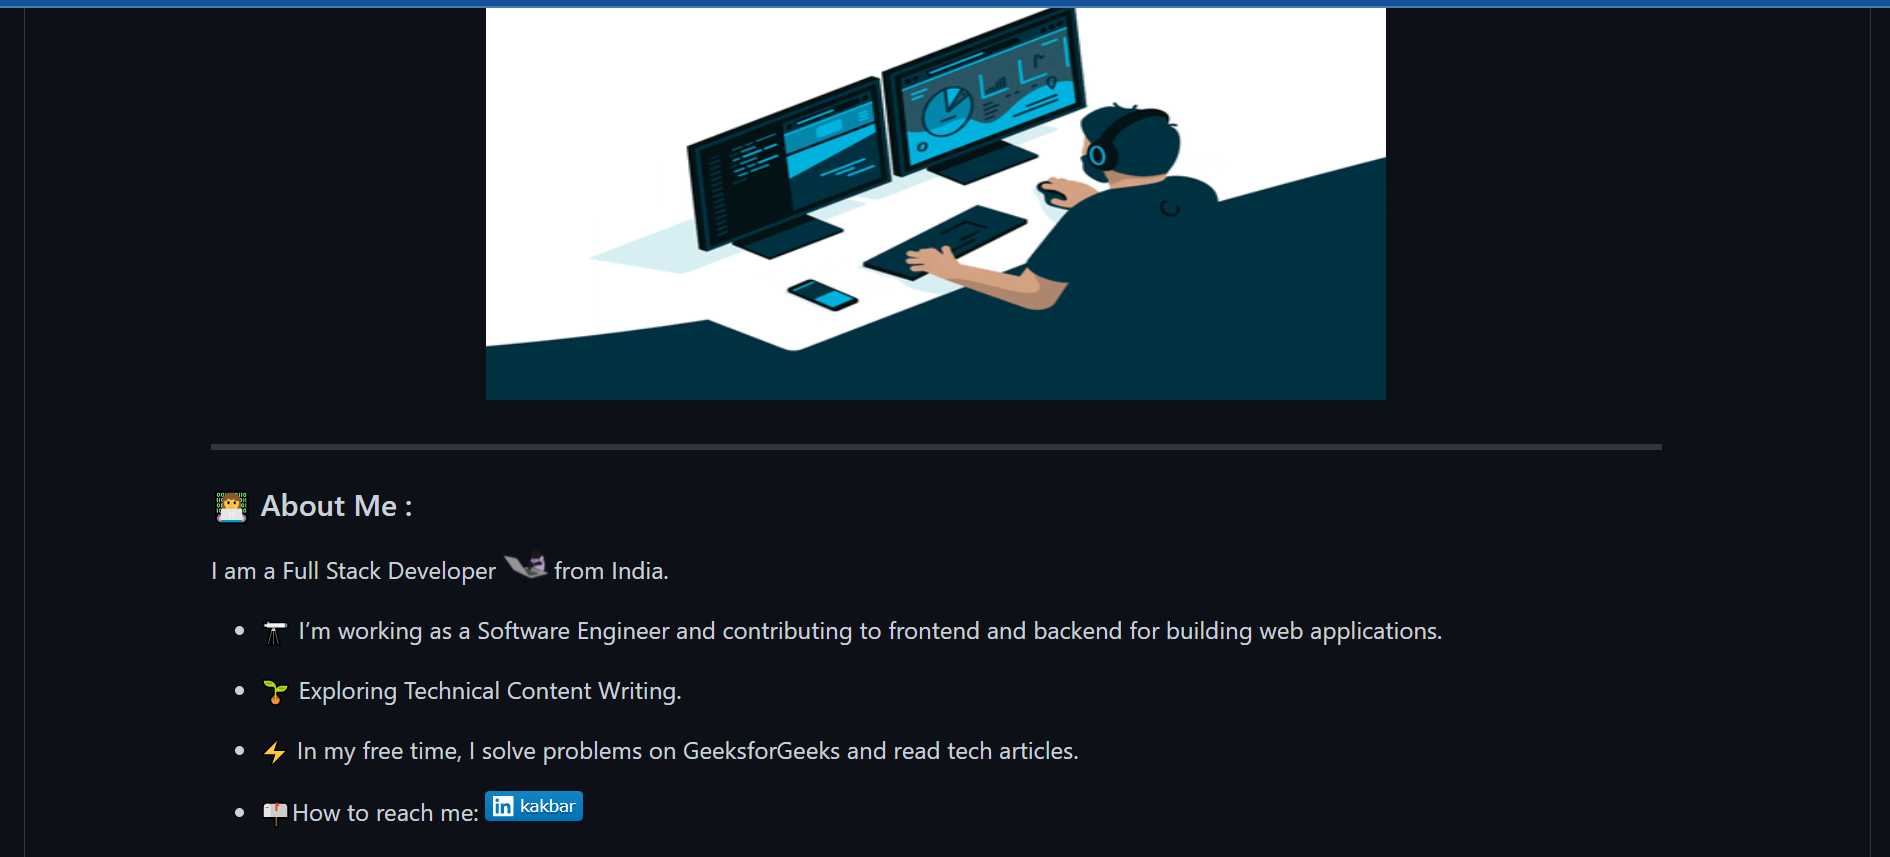
Subsequent, we’ll add the contents for the About Me part. For the outline textual content we’ll use Markdown syntax, as we don’t want any type of alignments. Append the under code in README.md:
---

### :woman_technologist: About Me :
--- is so as to add a horizontal rule earlier than a brand new part. A horizontal rule in Markdown needs to be surrounded by clean traces. :woman_technologist: is the shortcode for the emoji used. For a male model, you should use :man_technologist:. For others, you should use :technologist:. You will discover an inventory of emojis and the corresponding shortcodes within the GitHub repo.
Subsequent, we’ll add a private one-line introduction and use a wave (:wave:) GIF. Append the under code to README.md:
I'm a Full Stack Developer <img src="https://media.giphy.com/media/WUlplcMpOCEmTGBtBW/giphy.gif" width="30"> from India.
Subsequent is an inventory of factors about your self. To show an inventory, we’ll use - Markdown syntax. We’ll additionally prefix every line with an emoji. Add the next code to README.md and make adjustments in response to your profile. Additionally, change your-linkedin-url to your profile URL:
- :telescope: I’m working as a Software program Engineer and contributing to frontend and backend for constructing internet functions.
- :seedling: Exploring Technical Content material Writing.
- :zap: In my free time, I remedy issues on GeeksforGeeks and skim tech articles.
- :mailbox: attain me: [](your-linkedin-url)
Word that within the final line, the interior ![]() syntax is to show the LinkedIn badge picture. The outer []() is Markdown hyperlink syntax to make the badge level to the LinkedIn profile URL. We’ve used Shields.io right here for displaying a custom-made LinkedIn badge. You may as well add every other hyperlinks the place individuals can attain out to you.
See the output within the image under.
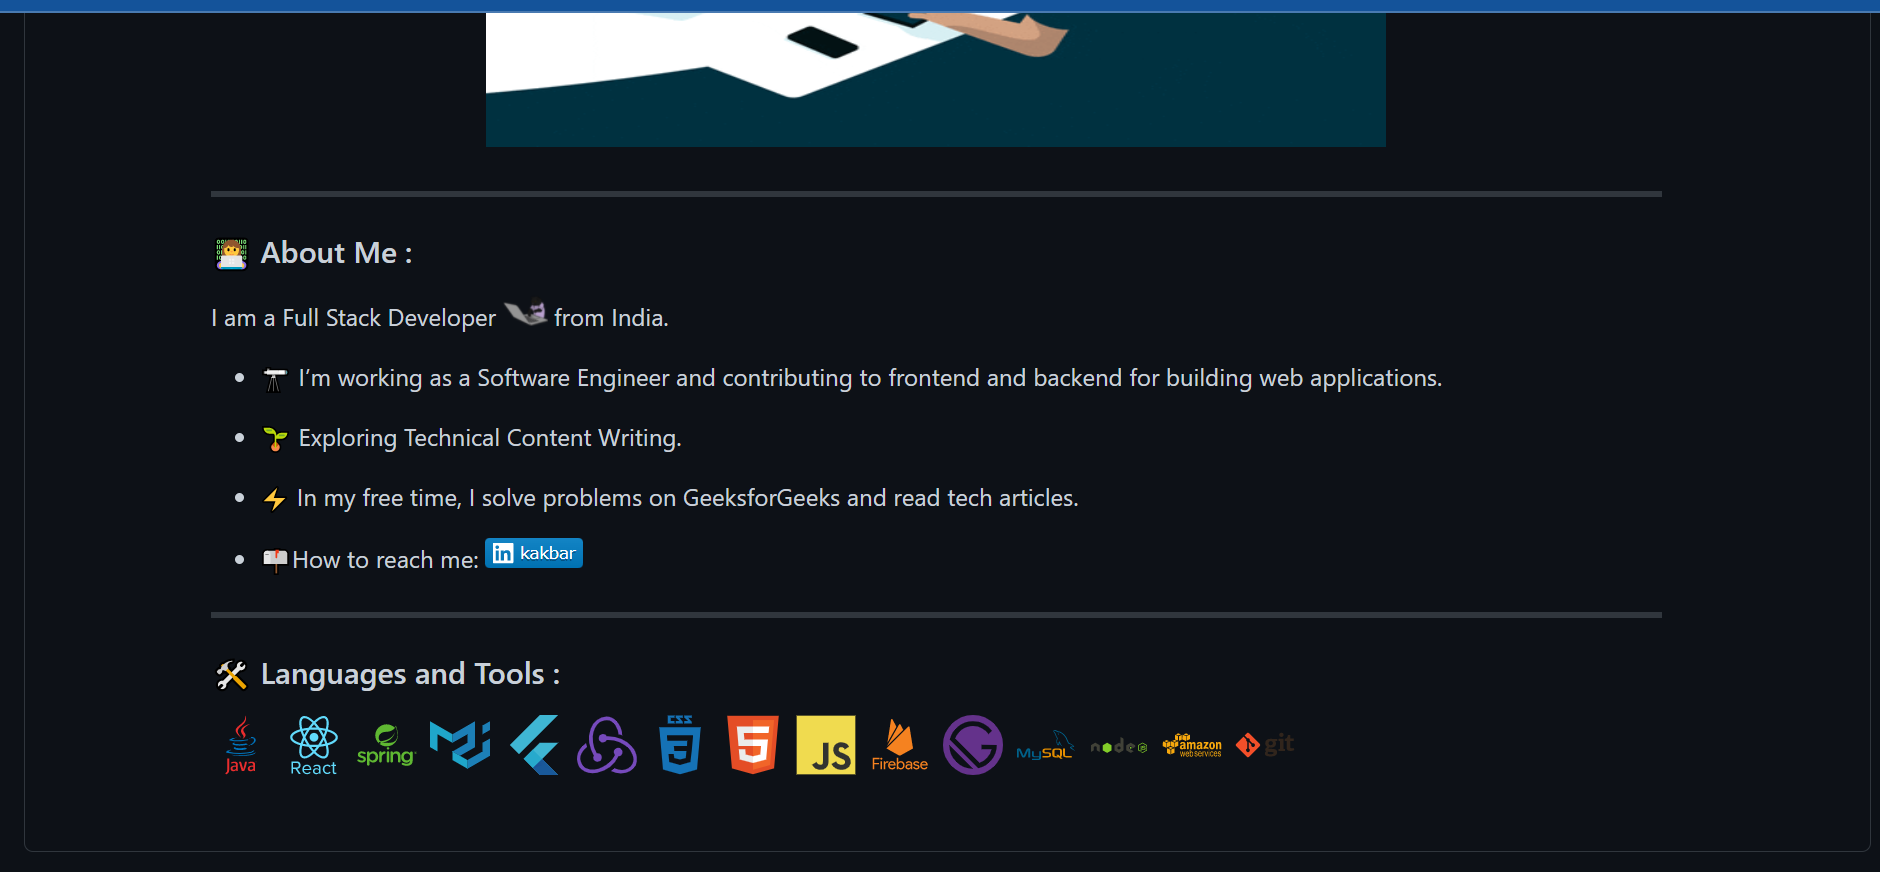
Right here’s an image of the content material that we’ll add on this part.

For the heading, add the next code to README.md:
---

### :hammer_and_wrench: Languages and Instruments :
We’ll add photographs representing applied sciences and abilities one holds. You will discover a number of free logos for a lot of languages and instruments within the DevIcons GitHub Repository.
Go to the icons folder and search and open the react folder. You’ll discover photographs in SVG and EPS format. Click on on any picture and replica the URL proven within the browser’s deal with bar.
We’ll use this URL within the <img> tag and specify the peak and width attribute accordingly. Equally, you possibly can seek for different abilities and add them in separate <img> tags.
Append the under code to README.md. Add/take away the mandatory abilities you need in your profile:
<div>
<img src="https://github.com/devicons/devicon/blob/grasp/icons/java/java-original-wordmark.svg" title="Java" alt="Java" width="40" peak="40"/>
<img src="https://github.com/devicons/devicon/blob/grasp/icons/react/react-original-wordmark.svg" title="React" alt="React" width="40" peak="40"/>
<img src="https://github.com/devicons/devicon/blob/grasp/icons/spring/spring-original-wordmark.svg" title="Spring" alt="Spring" width="40" peak="40"/>
<img src="https://github.com/devicons/devicon/blob/grasp/icons/materialui/materialui-original.svg" title="Materials UI" alt="Materials UI" width="40" peak="40"/>
<img src="https://github.com/devicons/devicon/blob/grasp/icons/flutter/flutter-original.svg" title="Flutter" alt="Flutter" width="40" peak="40"/>
<img src="https://github.com/devicons/devicon/blob/grasp/icons/redux/redux-original.svg" title="Redux" alt="Redux " width="40" peak="40"/>
<img src="https://github.com/devicons/devicon/blob/grasp/icons/css3/css3-plain-wordmark.svg" title="CSS3" alt="CSS" width="40" peak="40"/>
<img src="https://github.com/devicons/devicon/blob/grasp/icons/html5/html5-original.svg" title="HTML5" alt="HTML" width="40" peak="40"/>
<img src="https://github.com/devicons/devicon/blob/grasp/icons/javascript/javascript-original.svg" title="JavaScript" alt="JavaScript" width="40" peak="40"/>
<img src="https://github.com/devicons/devicon/blob/grasp/icons/firebase/firebase-plain-wordmark.svg" title="Firebase" alt="Firebase" width="40" peak="40"/>
<img src="https://github.com/devicons/devicon/blob/grasp/icons/gatsby/gatsby-original.svg" title="Gatsby" alt="Gatsby" width="40" peak="40"/>
<img src="https://github.com/devicons/devicon/blob/grasp/icons/mysql/mysql-original-wordmark.svg" title="MySQL" alt="MySQL" width="40" peak="40"/>
<img src="https://github.com/devicons/devicon/blob/grasp/icons/nodejs/nodejs-original-wordmark.svg" title="NodeJS" alt="NodeJS" width="40" peak="40"/>
<img src="https://github.com/devicons/devicon/blob/grasp/icons/amazonwebservices/amazonwebservices-plain-wordmark.svg" title="AWS" alt="AWS" width="40" peak="40"/>
<img src="https://github.com/devicons/devicon/blob/grasp/icons/git/git-original-wordmark.svg" title="Git" **alt="Git" width="40" peak="40"/>
</div>
The outcomes are pictured under.
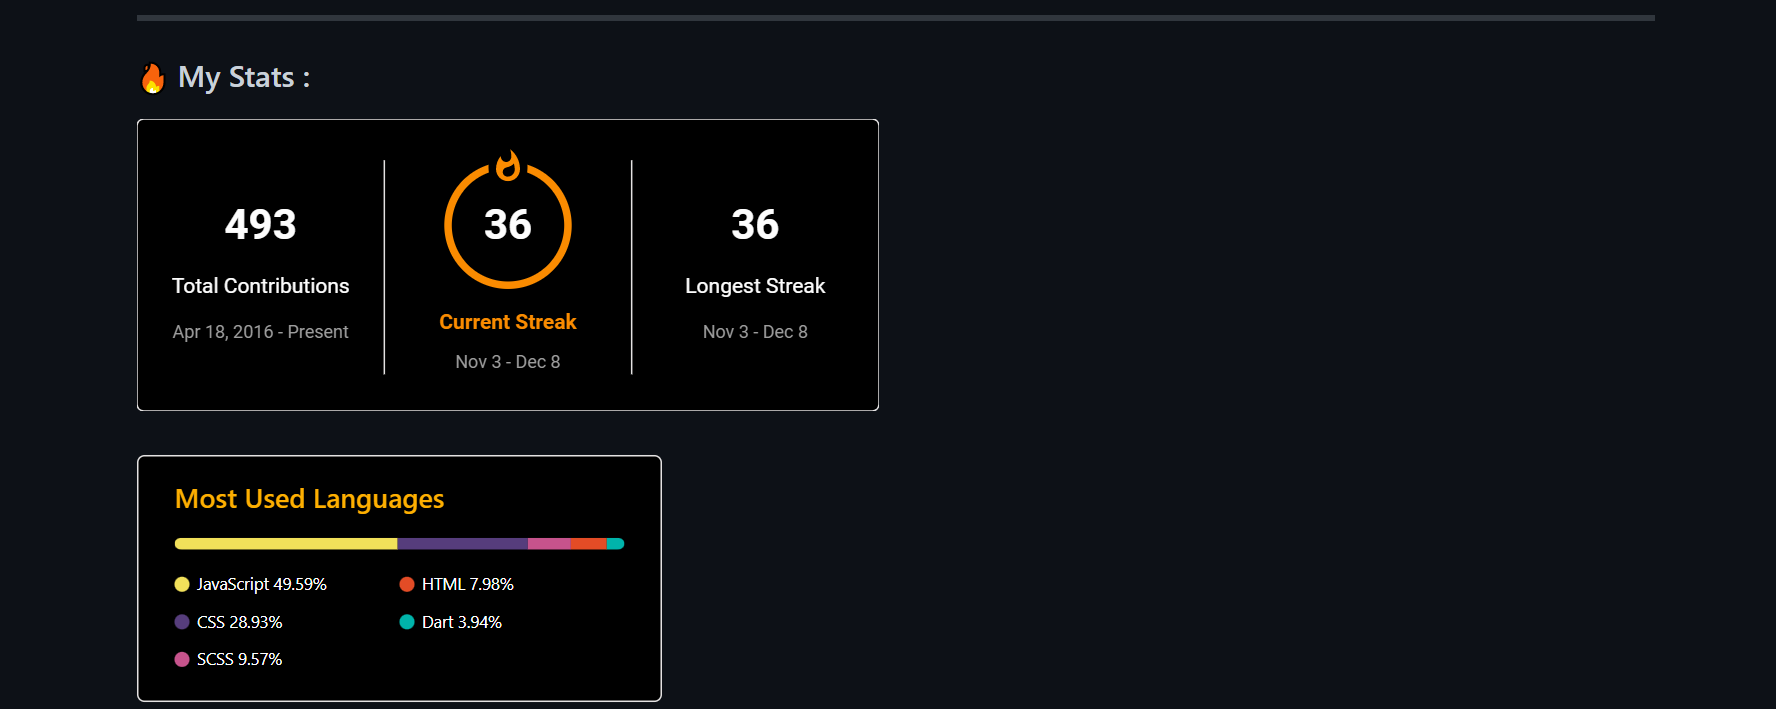
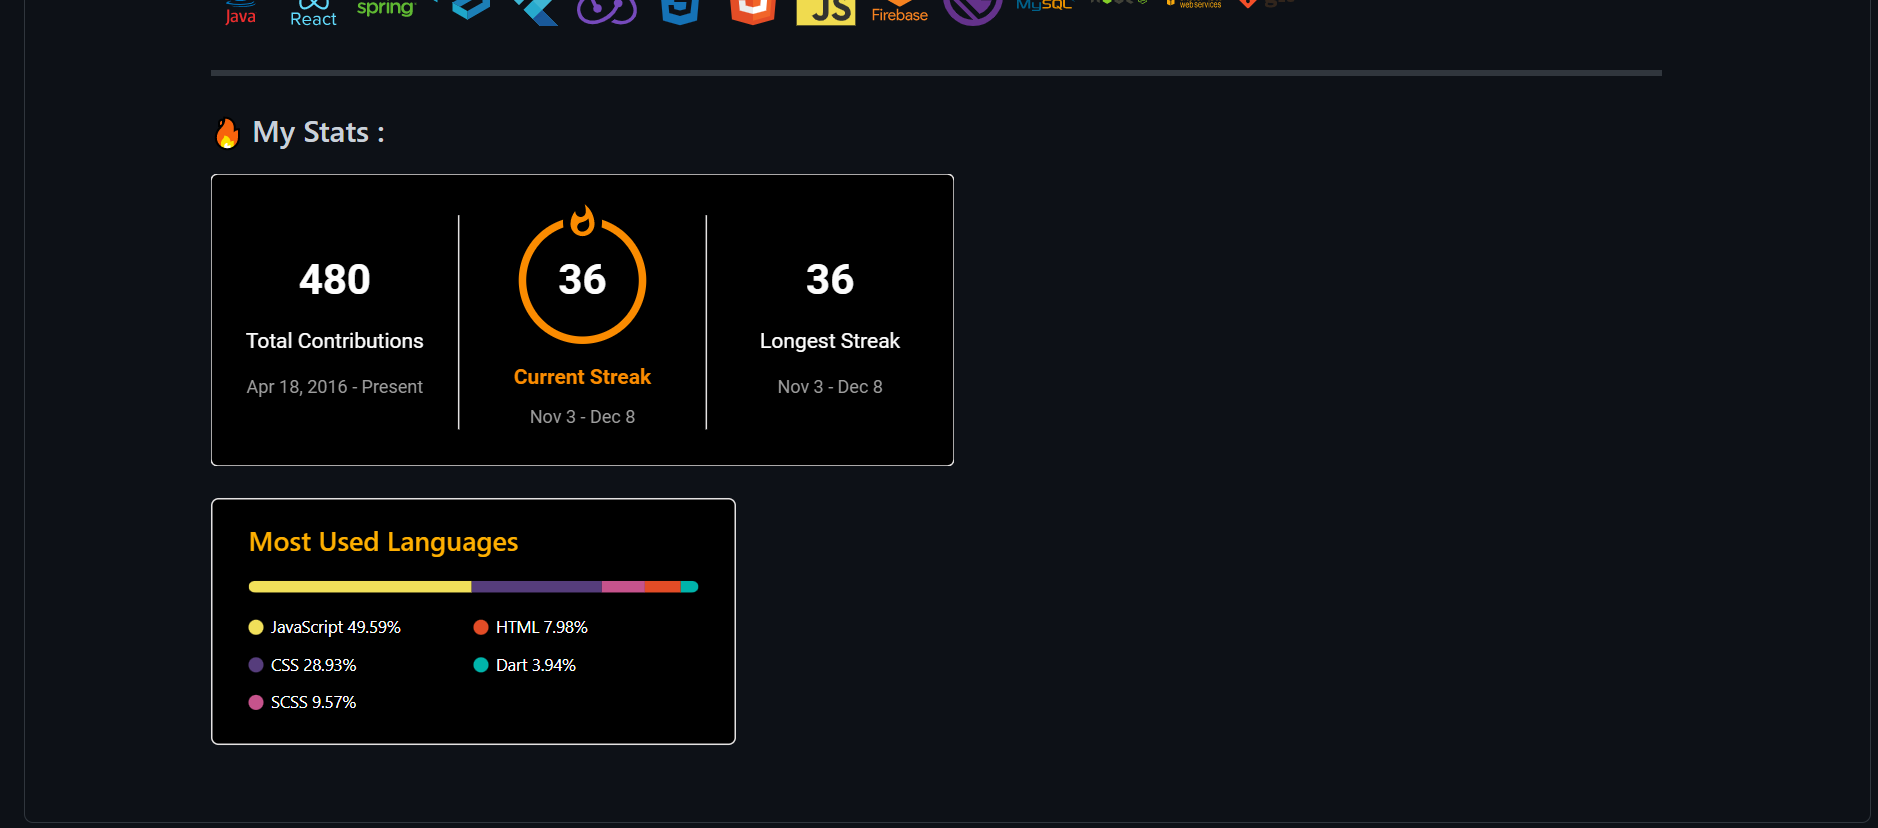
Including GitHub Stats
Right here’s a picture of what we’ll add on this part.
For heading, add the next code to README.md:
---

### :hearth: My Stats :
We’ll add some stats concerning the person’s GitHub exercise just like the variety of commits, variety of PRs, and many others., to this part. There are a lot of open-source tasks on GitHub that supply completely different stats for the GitHub profile. On this tutorial, we’ll see use two such open-source tasks.
The primary open-source challenge that gives GitHub stats is GitHub Streak Stats. This challenge gives the next three stats:
- complete variety of contributions by a person
- longest streak of contributions for a person
- present streak stat for a person
Entry the stats utilizing the next URL:
https://github-readme-streak-stats.herokuapp.com/?person=your-github-username
We are able to add customizations like theme, background colour, and so forth, by including question parameters to the above URL. Add the next code to README.md. Substitute the github-username along with your GitHub username:
[](https://git.io/streak-stats)
Right here’s a preview with itsZed0 because the username.
We are able to additionally use the Streak Stats Web site to generate the URL. To take action, observe these steps:
- Go to the Streak Stats Web site. Within the Username discipline, enter your GitHub username. Change the opposite fields as wanted.
- When you’ve custom-made all of the fields, click on on the Submit button.
- After the Markdown is generated, click on on the Copy To Clipboard button and add the copied Markdown to
README.md.

The subsequent open-source challenge that gives some extra GitHub stats of a person is GitHub Readme Stats by Anurag Hazra. This challenge gives many stats, however for this tutorial, we’ll solely use the one which shows the highest languages utilized by the GitHub person. If you wish to discover and use extra stats from this challenge, you possibly can undergo the detailed documentation out there of their repository.
Beneath is the Markdown to show the highest languages of a person:
[](https://github.com/anuraghazra/github-readme-stats)
We are able to customise it to offer a distinct colour, restrict the utmost variety of languages to point out, and so forth. For personalisation particulars, consult with the GitHub Readme Stats repository.
Add the next code to README.md. Substitute the your-github-username along with your username:
[](https://github.com/anuraghazra/github-readme-stats)
Pictured under is the preview for my itsZed0 account.
Including Current Blogs to Your GitHub Profile README
The image under exhibits what we’re aiming for on this part.

For the heading, add the next code to your GitHub profile README.md:
---

### :writing_hand: Weblog Posts :
This part will present the current weblog posts printed by a GitHub person at completely different running a blog platforms. To attain this, we’ll create a GitHub workflow, which is an automatic course of to execute jobs. Every job in a workflow can have a number of actions. A GitHub motion is a set of executable instructions mixed into steps. We are able to both create our personal GitHub motion or use an motion created by another person.
To fetch the weblog posts, we’ll use two already present actions:
- Checkout: used to take a look at all of the information within the present repository to a Git workspace the place our workflow can entry it.
- Weblog Put up Workflow: used to fetch current weblog posts printed by a person on numerous web sites.
The workflow might be run on a selected schedule or an occasion set off. For this tutorial, we’ll execute the workflow each one hour, to fetch the current weblog put up. You’ll be able to learn extra about GitHub actions from the official documentation.
To configure the GitHub workflow, observe these steps:
- Add the next code to your
README.md. The workflow will substitute the remark under with the listing of printed weblog posts: - Save the adjustments by clicking on the Commit adjustments button.
- The configuration of GitHub workflow is outlined in a
.ymlfile, which follows a YAML syntax. In your repository, within the Add File dropdown, choose Create New file.
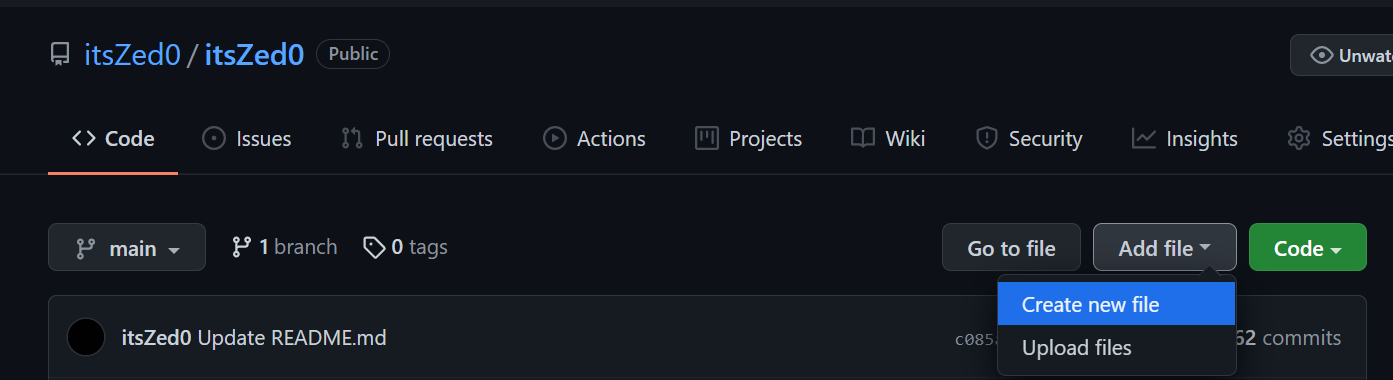
- In Identify your file.. discipline, enter
.github/workflows/blog-post-workflow.yml. All GitHub workflow’s.ymlconfiguration information reside underneath the.github/workflowslisting.
- Add the next code within the Edit new file tab:
title: Newest weblog put up workflow
on:
  schedule:

    - cron: '0 * * * *'
  workflow_dispatch:

jobs:
  update-readme-with-blog:
    title: Replace this repos README with newest weblog posts
    runs-on: ubuntu-newest
    steps:
      - makes use of: actions/checkout@v2
      - makes use of: gautamkrishnar/weblog-put up-workflow@grasp
        with:
          max_post_count: "4"
          feed_list: "https://dev.to/feed/itszed0"
Within the above code, we’ve outlined a workflow with title as “Newest weblog put up workflow”, which runs on a schedule talked about within the cron discipline. 0 * * * * is a POSIX cron syntax, which means that the schedule is to run on the 0th minute each hour.
workflow_dispatch: permits the person to set off the workflow manually. jobs allow us to outline a number of jobs that can run when the workflow is executed. In our case, now we have one job — that’s, update-readme-with-blog — which runs-on an Ubuntu atmosphere machine hosted by GitHub.
steps outline a set of actions or instructions to be executed. We’ve outlined two actions underneath steps: actions/checkout@v2 and gautamkrishnar/blog-post-workflow@grasp. The latter takes two enter parameters outlined underneath the with discipline. max_post_count defines the utmost variety of posts to point out within the README, feed_list is a comma-separated RSS feed of URLs for various running a blog platforms.
On this tutorial, we’ve fetched blogs from the dev.to platform. For the listing of all supported platforms, test this documentation.
To be taught extra about GitHub workflow syntax, try this Workflow Syntax documentation.
Substitute the feed_list along with your RSS feed URLs and click on on the Commit new file button. This may efficiently create the workflow. It should fetch new weblog posts from dev.to and add them to your README.md file each hour.
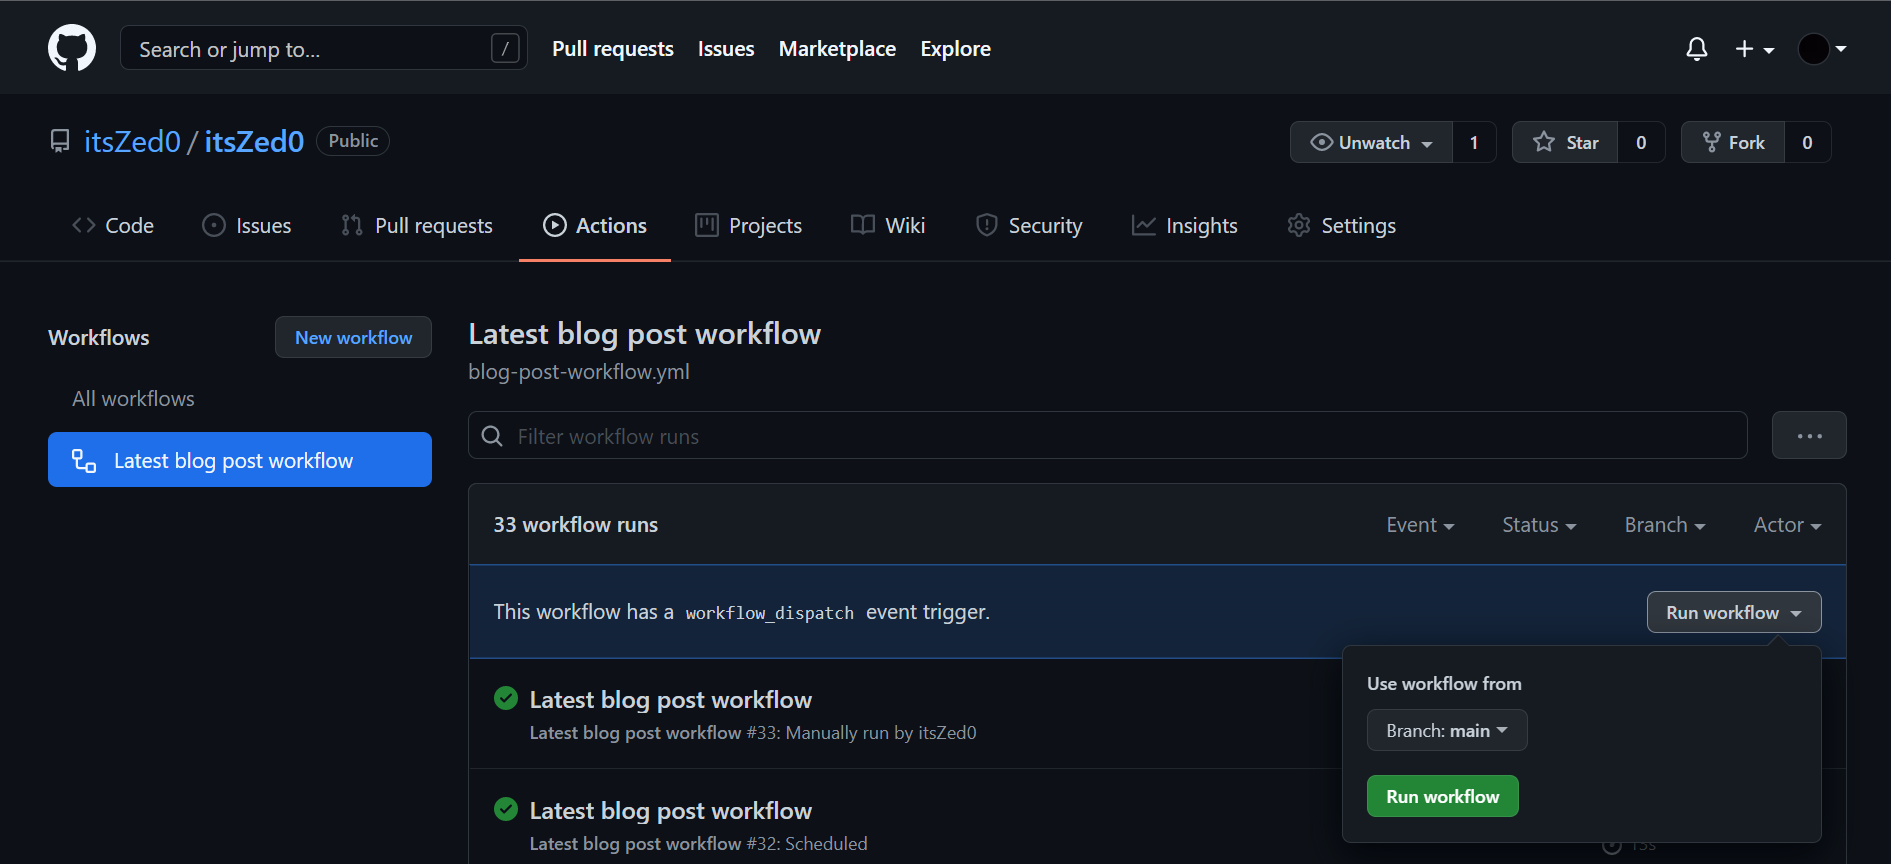
To set off the workflow manually, observe these steps:
- In your repository, go to the Actions tab.
- Beneath All workflows, click on on Newest weblog put up workflow.
- Within the Run workflow dropdown, click on on the Run workflow button. The workflow will begin executing.
- Go to your GitHub profile web page, and underneath the “Weblog Posts” part you’ll see an inventory of all of the weblog posts from the running a blog platforms outlined within the
blog-post-workflow.ymlfile. Beneath is the output for"https://dev.to/feed/itszed0"within thefeed_list.
Word that the person itsZed0 has one article titled “Take a look at Put up” at dev.to, which might be discovered right here. Therefore, the workflow fetches that one article and shows it within the GitHub profile README.
The ultimate GitHub profile is pictured under.
Conclusion
On this tutorial, we’ve realized what a GitHub profile README is and :
- create a GitHub profile README
- add GIFs, descriptions, abilities
- add GitHub Streak Stats and GitHub Readme Stats
- create a GitHub workflow to fetch the newest printed weblog posts
I hope this tutorial conjures up you to create an incredible GitHub profile README. Additionally, you possibly can undergo these open-source tasks that’ll allow you to add some extra cool options to your GitHub profile README: