


Make a well-documented, organized, scalable SwiftUI mission utilizing the MVVM structure that may make your code reviewers say “wow”.
SwiftUI is the booming new framework constructed by Apple, and it’s constructed on prime of their open-source coding language Swift. Whereas it nonetheless has some catching as much as do with UIKit when it comes to performance, SwiftUI supplies builders with declarative syntax for creating views. Because of this, it may have great-looking, scalable code that creates a nice-looking UI.
Let’s bounce into constructing an optimized mission.
MVVM (mannequin, view, view-model) structure options three main forms of information construction:
- Views are UI that show a view mannequin’s properties. The consumer interacts with the view, and the view handles the consumer’s interactions by calling the view mannequin.
- View Fashions encapsulate the view’s logic, together with making API calls, dealing with occasions or information, and storing essential properties.
- Fashions are consultant of the information. They’re objects which might be created from API outcomes, used to carry consumer data, or are summary objects in your software.
Let’s begin our optimized mission by making a pattern view, view mannequin, and mannequin system. Alongside the way in which, I’ll share some suggestions that will help you preserve it scalable and documented.
We’ll begin with the mannequin. Because you’re writing in Swift, you’ll wish to determine whether or not to make use of a category or struct.
Lessons are pass-by-reference; whereas Structs are pass-by-value.
Apple recommends you employ structs for a number of causes, together with reminiscence security and decreasing complexity. Nevertheless, the alternative is as much as you.
In my instance, I’ve created a Meals mannequin that has a reputation and whether or not it’s my favourite. I’m going to make use of it to make an app that exhibits all my favourite meals.
There’s loads occurring right here. However let’s pay attention to how issues had been arrange:
- The
Mealsstruct had multi-line documentation with/** */. Within the documentation’s prolonged dialogue, a hyperlink toFoodViewis supplied utilizing the double backtick notation. - Each property has single-line documentation with
///. Each methodology has multi-line documentation. - A
// MARK: —assertion demarks properties and strategies. We’ll use this to differentiate properties, strategies, initializers, nested courses/structs/enums, and different forms of implementation. - A computed property
emojireturns an emoji primarily based on the meals’s title. If you wish to show content material associated to solely the mannequin, it’s good apply to encapsulate computed properties or features inside your mannequin’s logic. You’ll see the good thing about this once we writeFoodView. - The mannequin additionally has useful strategies, like
eat().
And that’s it! Fashions are fairly easy. For those who’re working with Codable, you might also wish to manually implement CodingKeys, encode(to:) and init(from:) in your mannequin.
Now, our View Mannequin will take a bunch of Meals fashions, and it’ll permit us to show and alter them:
Issues to notice right here:
FoodViewModelconforms toObservableObject, offering us with@Revealedwrappers that permit us to maintain our app’s state up-to-date.- I used
// MARK: —to delimit wrapped and non-wrapped properties out of private desire. - A broadcast property
allFoodssupplies entry to all of my meals. place to load/save information like that is inside the view mannequin. toggleFavorite(meals:)takes in aBinding<Meals>object, so I can replace the meals’s favourite standing by way of reference (since structs are pass-by-value).
FoodView will show the consumer’s favourite meals. We’ll begin with a scrolling view that lists a bunch of things, displaying meals objects.
Since meals objects are impartial, I’ll create a supporting view that shows simply that object. I take advantage of supporting views in order that my physique property is sweet, clear, and readable.
Have a look:
And it shows:
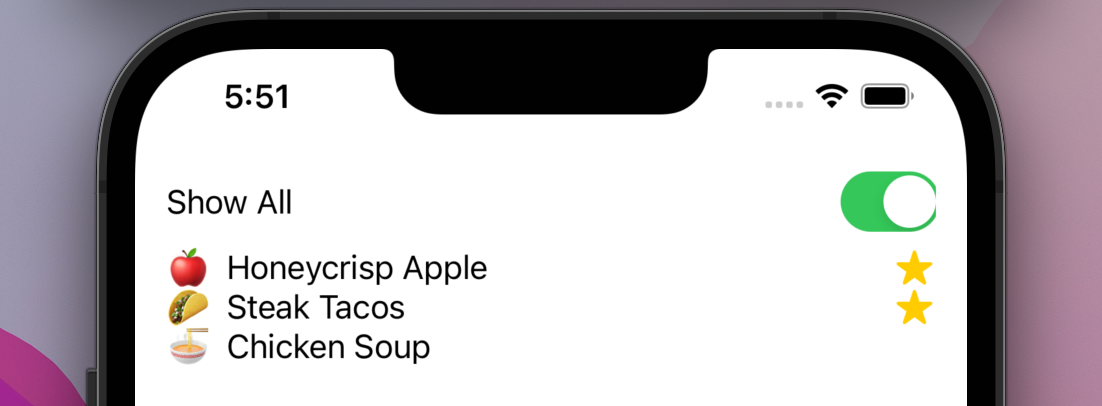
A number of suggestions concerning the above view:
- The
// MARK: —delimiter seperates wrapped properties, the physique view, and supporting views. - I extracted the person merchandise out right into a supporting view to assist enhance the readability and pace of
physique. Extracting views to variables/strategies additionally makes debugging a lot simpler, because the SwiftUI compiler typically struggles to compile giant, nested views. - Ultimate touches, like capitalizing the names of the meals, are used inside the view to enhance look. It’s good apply to make use of computed properties inside fashions or view fashions to enhance code readability.
And we’re performed. We’ve arrange our primary MVVM mission with a couple of optimizations. Let’s construct on this, including a couple of further particulars.
Now, we want an object to go round world data. I take advantage of a World @EnvironmentObject singleton to deal with this.
Sometimes, you’ll wish to retailer data used throughout your app inside World. In most my apps, I retailer consumer information in an activeUser property. Right here’s a easy instance of a World class:
Inside my views, I take advantage of the next code to outline the surroundings object and go it to my root view:
let world = World()
...
MyMainRootView().environmentObject(world)
Then, to entry my World object inside all my youngsters views:
/// The World `EnvironmentObject`.
@EnvironmentObject var world: World
For extra data on the best way to implement an EnvironmentObject in your views, take a look at this Hacking with Swift article.
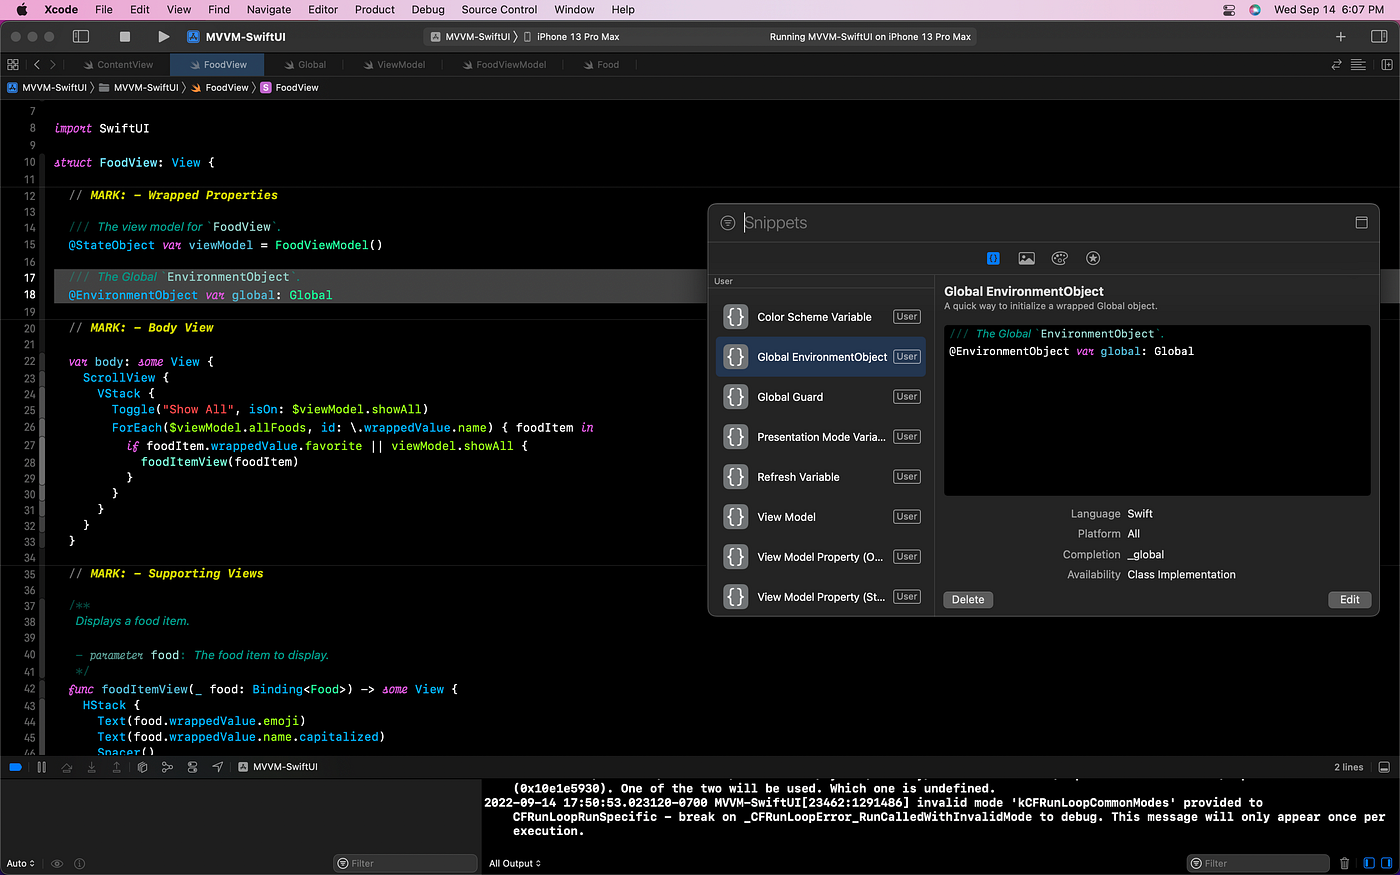
Since I’m consistently utilizing World in my tasks, I created a code snippet that helps make this quicker.
Code snippets are nice for getting into pre-written code with non-compulsory placeholders. Take a look at this text by Sarunw to study extra about creating your personal code snippets in Xcode.
To this point, we’ve outlined a view mannequin to assist handle varied logic associated to FoodView. However many tasks will use a number of view fashions. So, we’ll want a option to summary our view fashions to obey a single ViewModel protocol.
One factor we’ll need to remember whereas constructing out our ViewModel protocol is our occasional must entry our World object. Ideally, we’d go a world occasion into the view mannequin’s initializer.
Nevertheless, when you strive to do that, you’ll run into some issues. You may’t go world into the view mannequin’s initializer, as world is out there solely after the view’s properties, together with the view mannequin, have been initialized.
Meaning we should inject the world objects as a dependency for our view mannequin. And since we’re engaged on a basic view mannequin protocol, we will code this dependency injection so that each view mannequin we create robotically helps world injection:
protocol ViewModel: ObservableObject {  // MARK: - Properties  /// The worldwide occasion.
var world: World? { get set }
}extension ViewModel {  // MARK: - Strategies  /**
Prepares the view mannequin with the worldwide occasion.   - parameter world: The worldwide occasion, taken from a `View`
*/
func put together(with world: World) {
self.world = world
}
}
That is the code (with further documentation) I take advantage of to outline the ViewModel protocol in all of my tasks.
This view mannequin protocol equips a brand new methodology, put together(with:), which lets you present a World occasion to your view mannequin. Name it inside onAppear(carry out:) and also you’ll be capable of entry your world object inside your view mannequin!
You may set up and construction your mission in the way in which you favor. Since our mission is constructed off the MVVM structure, we will set up its contents into Mannequin, View Mannequin, and View folders. The remaining contents can go into different folders:
Lifecyclefolder, for entire-app related information likeAppDelegate,yourApp, orWorld.Utilitiesfolder, for helper strategies, further protocols, and so forth.Extensions, for Swift and module extensions.Parts, for small, extremely reusable (non-ViewModel reliant) SwiftUI views.View Modifiers, for customized view modifiers.Types, forButtonStyles,MenuStyles,PickerStyles,TextFieldStyles, and so forth.Enumerations, for project-wide enumerations.Belongings, when you want to group any belongings not appropriate along with your mission’s Asset Catalogue.
Right here’s how I structured the mission we constructed on this article:

If you wish to evaluation what was constructed, otherwise you wish to use this as a template, you possibly can take a look at your entire mission on GitHub.
As a further, larger-scaled instance, right here’s how my private mission Flowductive is structured:
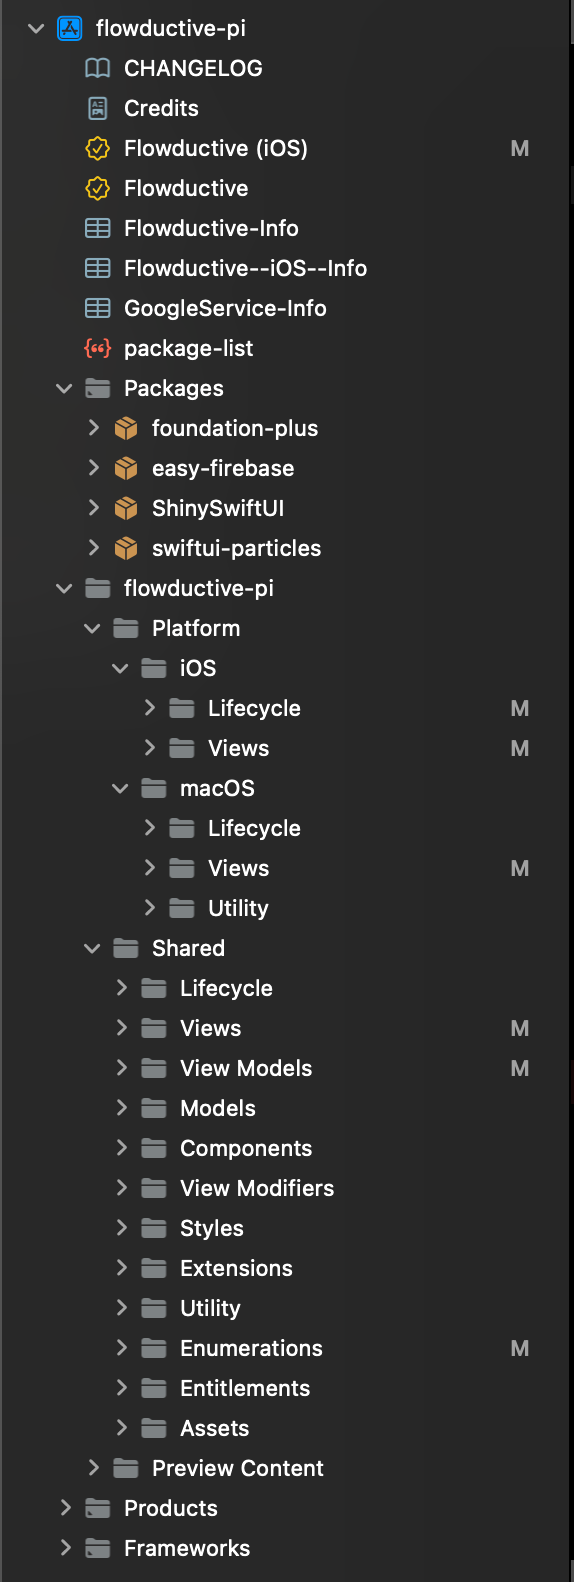
This mission makes use of the identical MVVM structure, however has cross-platform code separated into need-based Platform and Shared directories. For those who’re interested in writing multi-platform code, I’ll be writing articles concerning multi-platform growth within the close to future.
Thanks for studying.