

TL;DR: Discover create a visually hanging Flutter 3D Column Chart to showcase renewable power consumption by the highest 6 international locations. Study to construct, customise, and improve interactivity with customized knowledge labels, 3D results, and a tailor-made sequence renderer for distinctive visuals.
Welcome to Our Chart of the Week Weblog Collection!
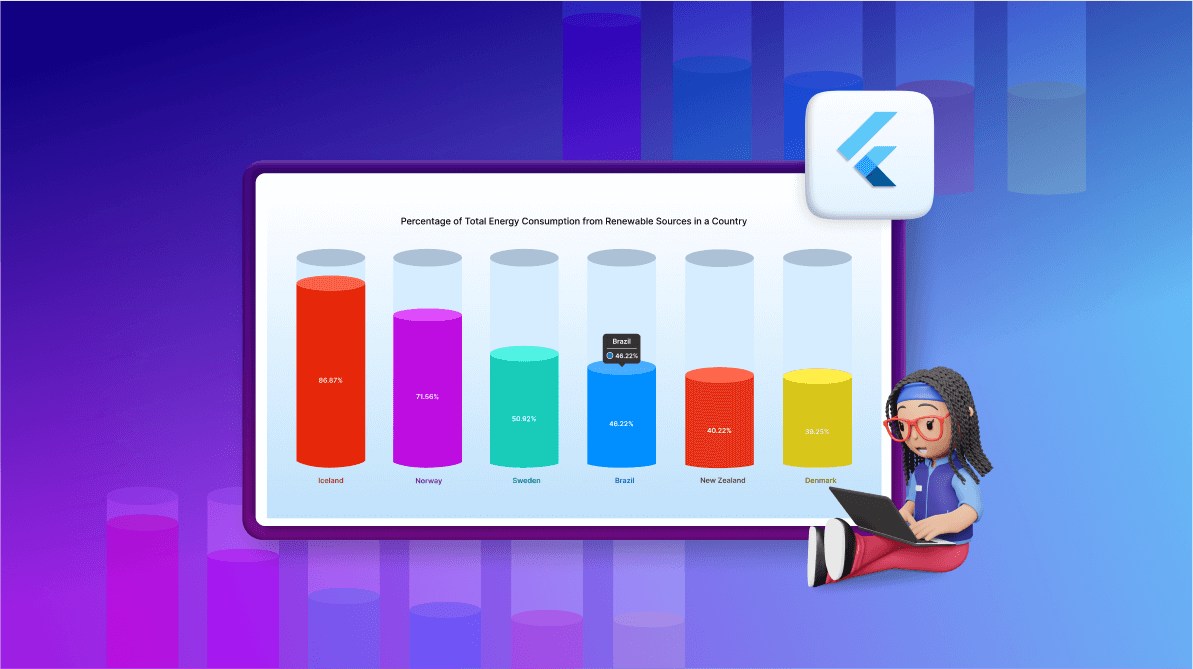
On this weblog, we’ll stroll you thru construct a visually partaking Flutter 3D Column Chart utilizing the Syncfusion Flutter Charts library. We’ll showcase the highest 6 renewable energy-consuming international locations, with customized knowledge labels and tooltips for enhanced interactivity.
Column Chart
A Column Chart is an efficient technique of representing categorical knowledge utilizing vertical bars. It’s splendid for evaluating knowledge throughout completely different teams, on this case, the renewable power consumption by numerous international locations.
3D Column sequence renderer
The onCreateRenderer callback means that you can assign a customized 3D sequence renderer to render distinctive shapes for every phase by making a customized renderer class, similar to _CustomColumn3DSeriesRenderer, which extends the ColumnSeriesRenderer class.
On this customized renderer, the important thing strategies embrace:
The customized sequence means that you can create distinctive visible results on your chart by extending the default chart sequence habits.
On this tutorial, we’ll give attention to making a 3D impact for each the column monitor and energy-consuming columns. By utilizing a customized sequence renderer, you’ll be able to outline a customized painter to render 3D parts that add depth and interactivity to your chart.
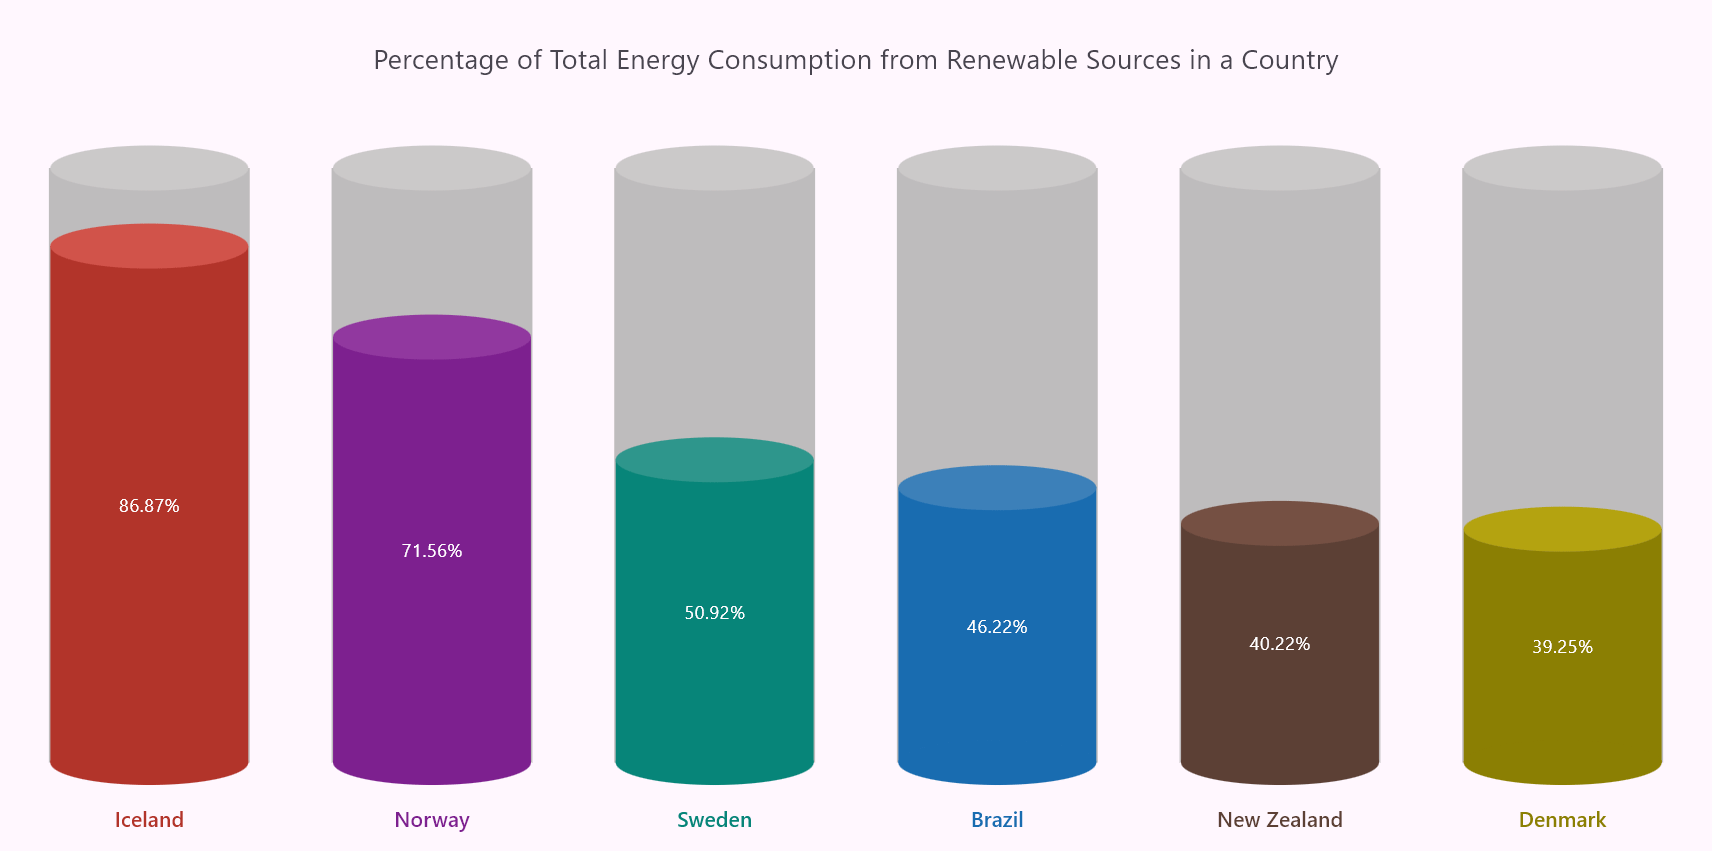
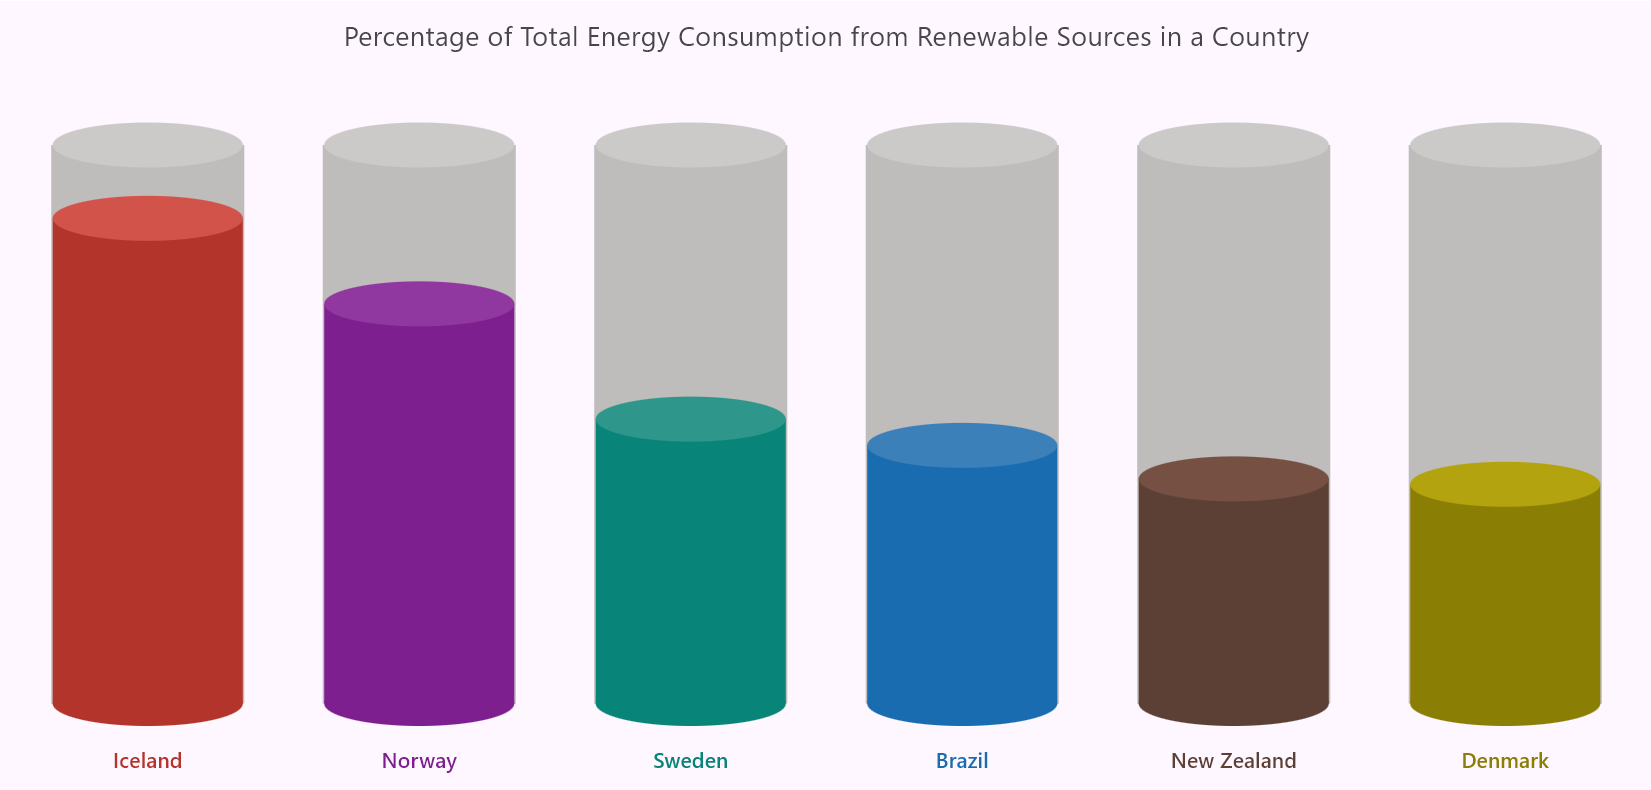
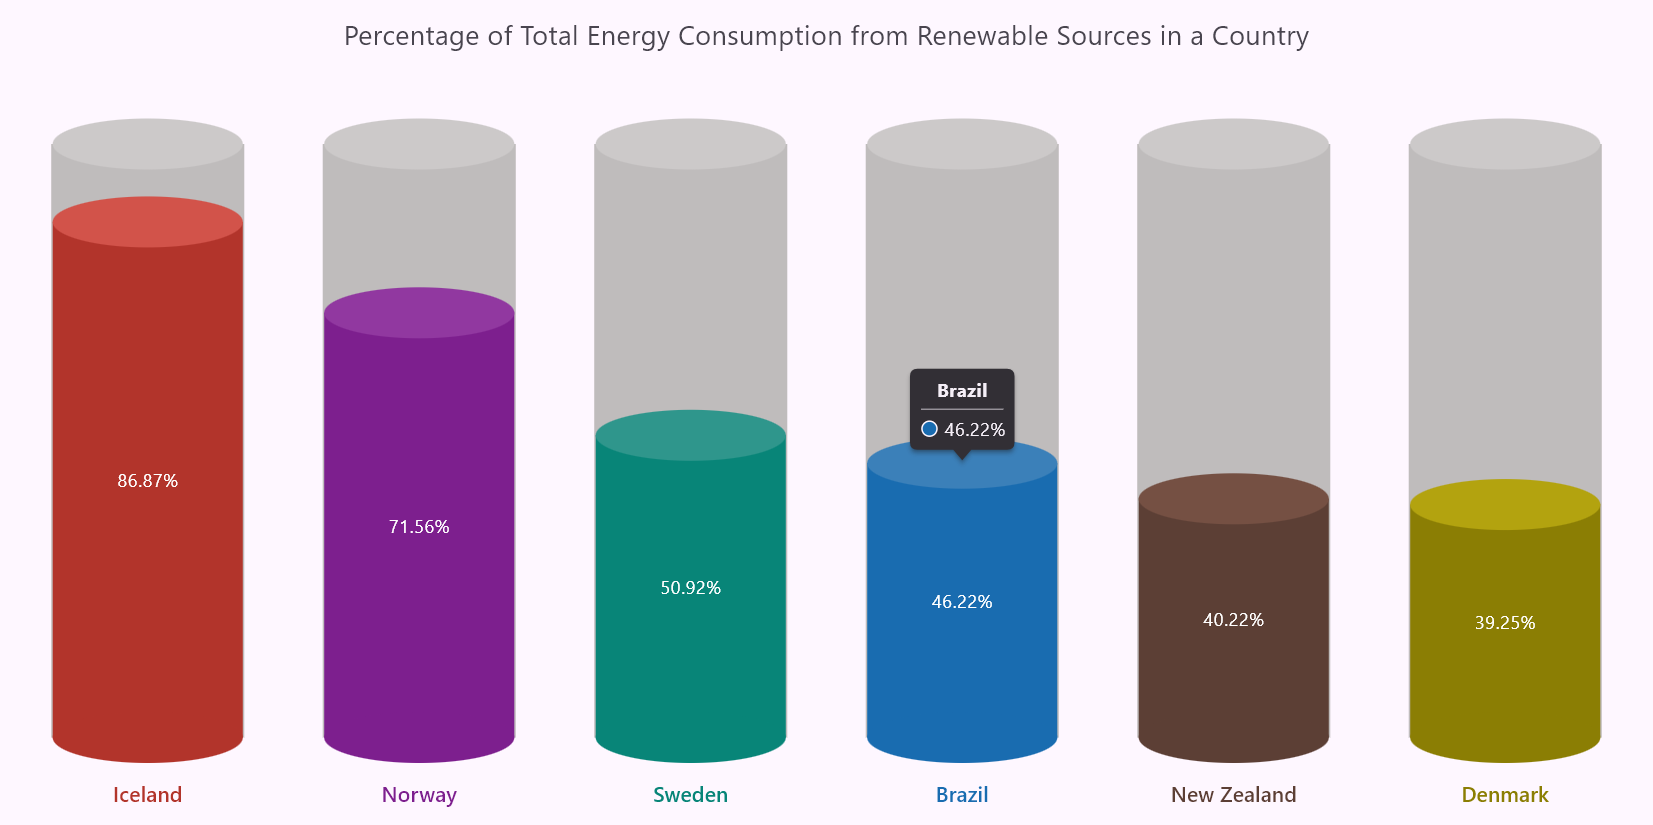
Let’s visualize the information of the highest 6 renewable energy-consuming international locations utilizing the Syncfusion Flutter Column Chart!
Consult with the next picture.
Let’s get began!
Step 1: Collect the information
First, let’s accumulate knowledge on the prime 6 renewable energy-consuming international locations.
Step 2: Initialize the information for the chart
Now, create an power knowledge mannequin that represents the nation’s identify and power consumed in percentages.
class EnergyData {
  EnergyData(this.nation, this.energyConsumedPercent);
  closing String nation;
  closing double energyConsumedPercent;
}
Subsequent, an inventory can be initialized to carry the nation’s power consumption knowledge, including coloration knowledge for the oval form on the prime and power consumed knowledge for every nation.
late Listing<EnergyData> _energyConsumedData;
late Map<String, Colour> _cylinderColors;
late Map<String, Colour> _ topOvalColors;

void initState() {
  _energyConsumedData = <EnergyData>[
    EnergyData('Iceland', 86.87),
    EnergyData('Norway', 71.56),
    EnergyData('Sweden', 50.92),
    EnergyData('Brazil', 46.22),
    EnergyData('New Zealand', 40.22),
    EnergyData('Denmark', 39.25),
  ];
  _cylinderColors = {
    'Iceland': const Colour.fromARGB(255, 178, 52, 43),
    'Norway': const Colour.fromARGB(255, 125, 31, 142),
    'Sweden': const Colour.fromARGB(255, 8, 133, 120),
    'Brazil': const Colour.fromARGB(255, 25, 108, 176),
    'New Zealand': const Colour.fromARGB(255, 92, 63, 53),
    'Denmark': const Colour.fromARGB(255, 139, 126, 4)
  };
  _topOvalColors = {
    'Iceland': const Colour.fromARGB(255, 210, 83, 74),
    'Norway': const Colour.fromARGB(255, 145, 56, 160),
    'Sweden': const Colour.fromARGB(255, 47, 150, 140),
    'Brazil': const Colour.fromARGB(255, 59, 128, 185),
    'New Zealand': const Colour.fromARGB(255, 117, 80, 67),
    'Denmark': const Colour.fromARGB(255, 179, 163, 15)
  };
  tremendous.initState();
}
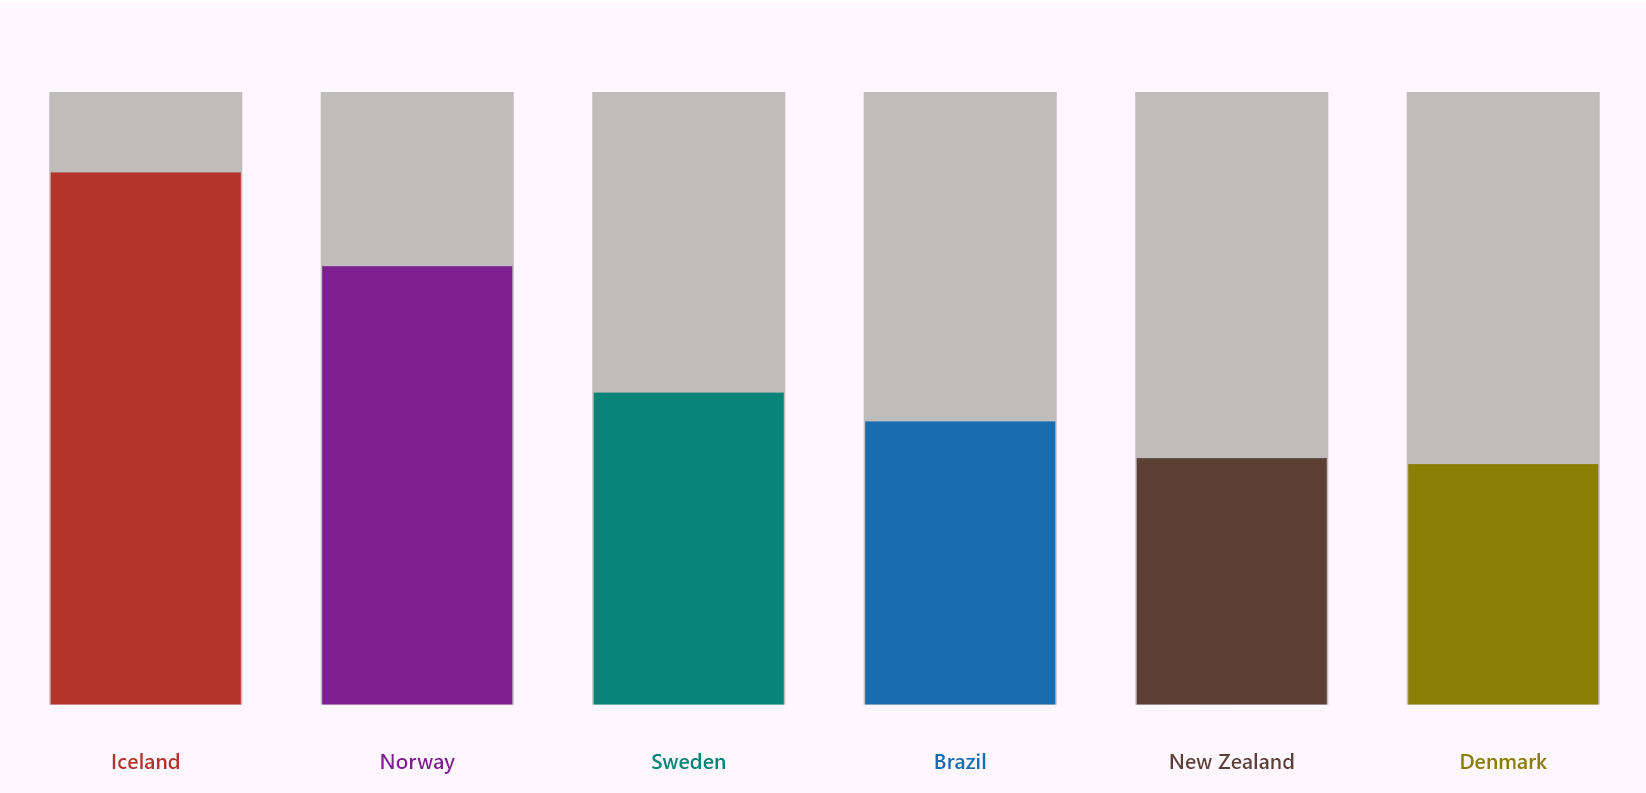
Step 3: Constructing a Flutter Column Chart
To render a Flutter Column Chart with a monitor, a single ColumnSeries is used to visualise power consumption knowledge alongside a visual background monitor. The X-axis is ready to CategoryAxis, representing categorical knowledge like nation names, whereas the Y-axis is ready to NumericAxis for numeric values to show the power consumption in proportion.
The ColumnSeries is configured to show a monitor by setting the isTrackVisible property to true. The monitor serves because the background layer, offering visible separation and context for the precise knowledge columns.
Create the energy-consumed knowledge sequence
This sequence overlays the energy-consumption knowledge onto the monitor. The yValueMapper is used to map the proportion of power consumed to the Y-axis, whereas the pointColorMapper dynamically assigns colours to the columns based mostly on the nation identify. This ensures every knowledge level is visually distinct and simple to interpret.
Consult with the next code instance.
@override
Widget construct(BuildContext context) {
  return Scaffold(
    physique: SfCartesianChart(
      primaryXAxis: const CategoryAxis(),
      sequence: <CartesianSeries<EnergyData, String>>[
        ColumnSeries<EnergyData, String>(
          dataSource: _energyConsumedData,
          xValueMapper: (EnergyData data, index) => data.country,
          yValueMapper: (EnergyData data, index) =>
              data.energyConsumedPercent,
          pointColorMapper: (EnergyData data, index) =>
              _cylinderColors[data.country],
          isTrackVisible: true,
          trackColor: const Colour.fromARGB(255, 191, 188, 188),
        ),
      ],
    ),
  );
}
Consult with the next picture.

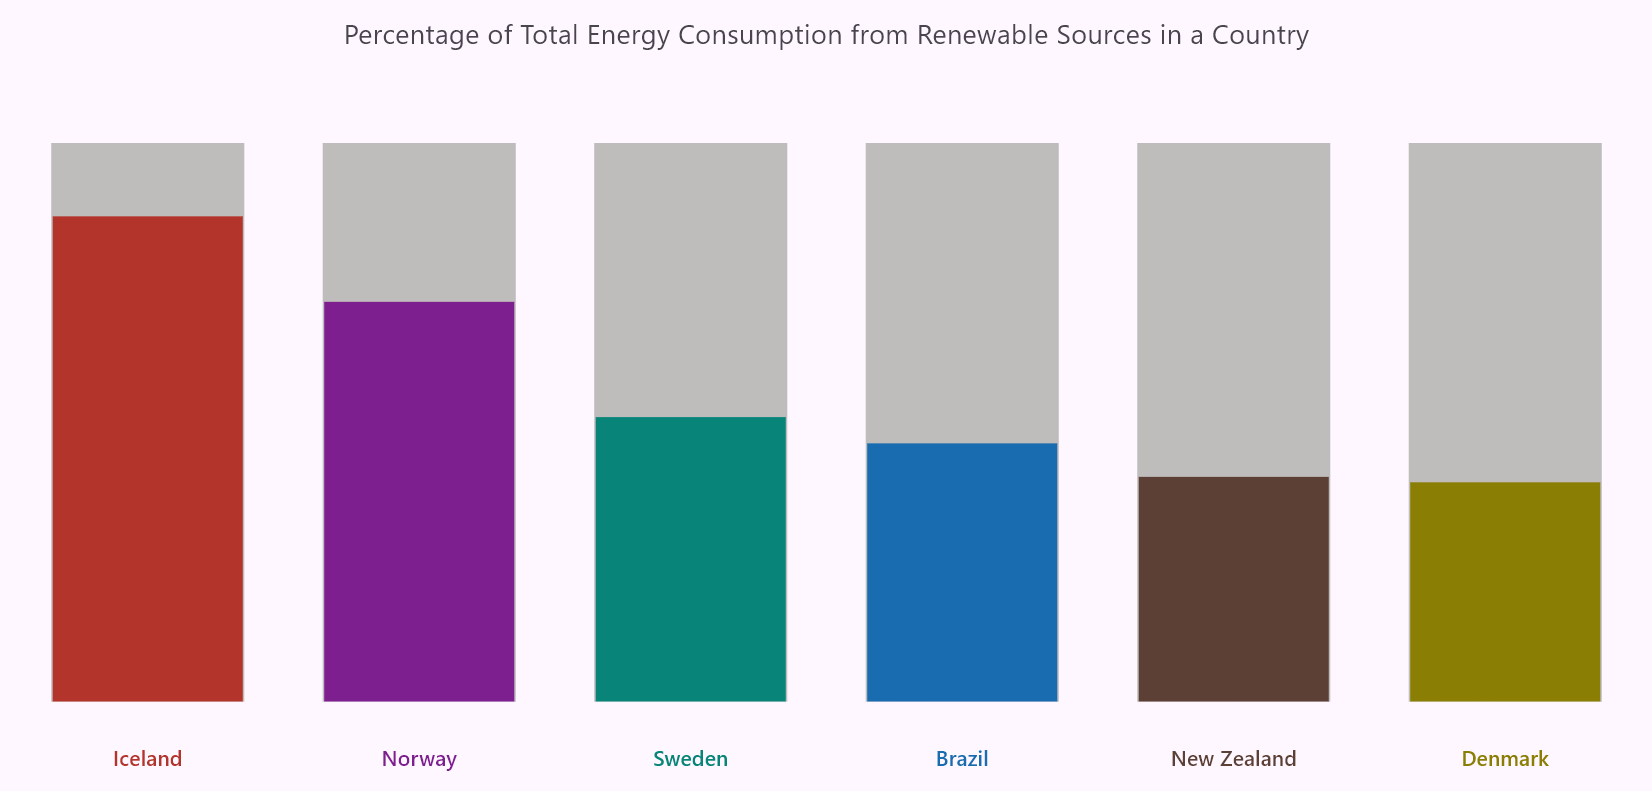
Step 4: Customise the axes look
For the primaryXAxis, we’ll use a CategoryAxis to symbolize international locations. We’ll customise the looks by eradicating the majorGridLines, majorTickLines, and axisLine. We’ll additionally customise the labelPosition to show it contained in the chart.
For the primaryYAxis, we’ll use a NumericAxis to symbolize the power consumed values in a proportion format. We’ll set the isVisible property to false to cover the Y-axis labels. Moreover, we’ll alter the plotOffsetStart and plotOffsetEnd values to 50 so as to add padding at the beginning and finish of the plot space, enhancing the chart’s visible enchantment.
Moreover, you’ll be able to customise the axis labels utilizing the axisLabelFormatter callback to make the most of the ChartAxisLabel class to regulate the textStyle of the axis labels in response to your wants. Then, set the plotAreaBorderWidth to 0 to take away the border across the sequence.
Consult with the next code instance.
plotAreaBorderWidth: 0,
primaryXAxis: CategoryAxis(
  majorGridLines: const MajorGridLines(width: 0),
  majorTickLines: const MajorTickLines(width: 0),
  axisLine: const AxisLine(width: 0),
  axisLabelFormatter: (axisLabelRenderArgs) {
    TextStyle textStyle = Theme.of(context)
        .textTheme
        .titleSmall!
        .copyWith(coloration: _cylinderColors[axisLabelRenderArgs.text]);
    return ChartAxisLabel(axisLabelRenderArgs.textual content, textStyle);
  },
  labelPosition: ChartDataLabelPosition.inside,
),
primaryYAxis: const NumericAxis(
  isVisible: false,
  plotOffsetStart: 50,
  plotOffsetEnd: 50,
),
Consult with the next picture.
Step 5: Including chart title
Let’s use the ChartTitle widget so as to add and customise the chart title. The title is aligned to the middle utilizing the alignment property, and we’ve set the ChartAlignment worth as the middle. The textual content property is used to set the chart’s title.
ChartTitle(
    alignment: ChartAlignment.middle,
    textual content: 'Share of Complete Vitality Consumption from Renewable Sources in a Nation'),
Consult with the next picture.
Step 6: Making a customized 3D sequence renderer
The onCreateRenderer callback allows the creation of a customized 3D sequence renderer, permitting you to render distinctive shapes for every phase. To realize this, we have to outline a customized renderer class, similar to _CustomColumnSeriesRenderer, that extends the ColumnSeriesRenderer class.
On this customized renderer, the important thing strategies embrace,
- createSegment: Creates segments for the sequence based mostly on knowledge factors.
- onPaint: Paints the sequence in response to customizations, together with the beforehand custom-made segments.
ColumnSeries(
  ...
  onCreateRenderer: (ChartSeries<EnergyData, String> sequence) {
    return _CustomColumn3DSeriesRenderer();
  },
),
Customized 3D sequence renderer for Column Chart
The _CustomColumn3DSeriesRenderer class extends the ColumnSeriesRenderer to create a customized 3D visualization for column sequence based mostly on the EnergyData mannequin. This renderer makes use of a topOvalColors map to specify the colours for the highest ovals of the 3D columns based mostly on the nation names. The createSegment technique is overridden to return a customized column phase, _CustomColumn3DSegment, which handles drawing 3D results for every column.
The _CustomColumn3DSegment class extends ColumnSegment and implements the onPaint technique so as to add a customized 3D phase. Inside the onPaint technique:
- The countryName is decided based mostly on the present phase index, mapping the X-values to their uncooked knowledge.
- The trackerTop, bottomOval, and topOval rectangles are calculated utilizing the ovalRect helper technique, which creates an oval based mostly on the Y-coordinate and radius.
- The portray logic contains:
- trackerTopOval – Drawing a light-weight grey oval on the prime of the tracker for the 3D shadow impact.
- bottomOval – Portray the underside oval utilizing the fill coloration on the backside of every phase.
- animatedTopOval – Portray the highest oval utilizing the colour outlined within the topOvalColors akin to the nation identify. The animation is utilized to the highest oval by calculating its place dynamically based mostly on the animationFactor. The segmentRect’s peak is interpolated to animate the oval’s place easily because the column grows.
The ovalRect helper technique generates an oblong bounding field for the ovals. It takes the middle Y-coordinate and calculates the scale utilizing a set radius of 15. The ensuing 3D sequence impact offers the columns a visually distinct look and makes the information illustration extra partaking and intuitive.
Consult with the next code instance.
class _CustomColumn3DSeriesRenderer
  extends ColumnSeriesRenderer<EnergyData, String> {
   _CustomColumn3DSeriesRenderer(this.topOvalColors);

   closing Map<String, Colour> topOvalColors;

   @override
   ColumnSegment<EnergyData, String> createSegment() {
     return _CustomColumn3DSegment(topOvalColors);
   }
}

class _CustomColumn3DSegment extends ColumnSegment<EnergyData, String> {
  _CustomColumn3DSegment(this.topOvalColors);

  closing Map<String, Colour> topOvalColors;

  @override
  void onPaint(Canvas canvas) {
    closing String countryName = sequence.xRawValues[currentSegmentIndex]!;
    closing double trackerTop = sequence.pointToPixelY(0, 100);
    closing Rect trackerTopOval = ovalRect(trackerTop);
    closing Rect bottomOval = ovalRect(segmentRect!.backside);
    closing Rect animatedTopOval = ovalRect(segmentRect!.backside -
        ((segmentRect!.backside - segmentRect!.prime) * animationFactor));

    tremendous.onPaint(canvas);
    canvas.drawOval(trackerTopOval,
        Paint()..coloration = const Colour.fromARGB(255, 204, 201, 201));
    canvas.drawOval(bottomOval, Paint()..coloration = fillPaint.coloration);
    canvas.drawOval(
        animatedTopOval, Paint()..coloration = topOvalColors[countryName]!);
  }

  Rect ovalRect(double ovalCenterY) {
    const double ovalRadius = 15;
    return Rect.fromLTRB(segmentRect!.left, ovalCenterY - ovalRadius,
        segmentRect!.proper, ovalCenterY + ovalRadius);
  }
}
Consult with the next picture.
Step 7: Customizing the information label
The onDataLabelRender callback is used to regulate the looks of knowledge labels. The textual content property is up to date to incorporate a proportion image alongside the displayed worth.
onDataLabelRender: (DataLabelRenderArgs dataLabelArgs) {
  dataLabelArgs.textual content="${dataLabelArgs.textual content}%";
},
Step 8: Including and customizing tooltip
Let’s allow the TooltipBehavior to show the extra knowledge when hovering over knowledge factors. The onTooltipRender callback customizes the tooltip textual content by splitting it right into a formatted header and worth. The textual content is cut up by ‘ : ‘, assigning the primary half because the header [Country name] and the second half because the textual content [energy consumed percent] on the tooltip.
tooltipBehavior: TooltipBehavior(allow: true),
onTooltipRender: (TooltipArgs tooltipArgs) {
  Listing<String> tooltipText = tooltipArgs.textual content!.cut up(' : ');
  tooltipArgs.header = tooltipText[0];
  tooltipArgs.textual content="${tooltipText[1]}%";
},
Consult with the next picture.
Step 9: Customizing knowledge label settings and animation controller within the sequence
Let’s present the power consumed knowledge on every ColumnSeries and place them in the midst of every phase by setting the labelAlignment property as center. Moreover, the animationDuration property is ready to 2000 milliseconds, which animates the column sequence easily over 2 seconds when the chart is rendered.
Consult with the next code instance.
sequence: <CartesianSeries<EnergyData, String>>[
 ColumnSeries<EnergyData, String>(
    ...
    dataLabelSettings: const DataLabelSettings(
      isVisible: true,
      labelAlignment: ChartDataLabelAlignment.middle),
    animationDuration: 2000,
  ),
],
Consult with the next picture.
GitHub reference
For extra particulars, discuss with the Flutter 3D Column Chart to visualise the highest 6 renewable power consuming international locations GitHub demo.

Attempt It Free
Conclusion
Thanks for studying! On this weblog, we’ve seen visualize the highest 6 renewable energy-consuming international locations’ knowledge by making a 3D Column Chart utilizing the Syncfusion Flutter Charts. We hope you discover the outlined steps useful in reaching comparable outcomes.
In case you’re an current buyer, you’ll be able to obtain the most recent model of Important Studio® from the license and downloads web page. For these new to Syncfusion, strive our 30-day free trial to discover all our options.
For queries, you’ll be able to contact us via our help discussion board, suggestions portal, or help portal. As at all times, we’re comfortable to help you!