


After Wordle overtook the world and my Twitter feed, I, like the remainder of the world, grew to become considerably obsessed. I grew to become so obsessed that I used to be struck with the thought of creating an app, related however with a concentrate on numbers. Two weeks later, Numble was born – A Wordle for numbers.
The Guidelines of Numble
It actually is kind of easy: guess the three-digit a number of of three.
You’ve 4 guesses, and after every guess the colours of every digit change relying its place and whether or not it’s truly within the Numble.
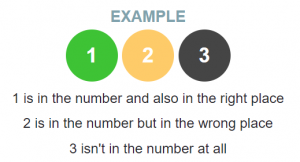
- Inexperienced: the digit is in the best place.
- Yellow: the digit is within the Numble however within the fallacious place.
- Gray: the digit isn’t within the Numble in any respect.
In case you’ve forgotten from faculty, the rule for understanding whether or not a quantity is a a number of of three, is that if the digits add as much as a a number of of three.
For instance:
123 is a a number of of three as a result of 1 + 2 + 3 = 6
Nanny State
To make constructing Numble simpler, I used a small library known as Nanny State. It’s written by Darren Jones, in case you missed it he wrote an article introducing it just lately. It shops all of the app knowledge in a single object known as State after which re-renders the HTML view routinely relying on any adjustments made to the State. For it’s velocity and efficiancy and no new syntax, it’s remarkably easy and straightforward to study.
First issues first, we have to import Nanny State and arrange State, View and Replace.
To import it you simply want to repeat this line of code into the very first line of your program:
import { Nanny,html } from 'https://cdn.skypack.dev/nanny-state'
If you wish to study a bit of bit extra about what you’re importing and the way the construction of the whole lot is working, make sure that to take a look at the hyperlink above. Subsequent, we have to create the View:
const View = state => html`
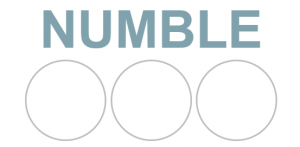
<h1>Numble</h1>`
The View is a operate that returns a string that’s mainly the HTML that can be displayed on our web page. This can be a fundamental format to get us began and as soon as the whole lot is in place, a heading of ‘Numble’ ought to seem. It takes State as a parameter, giving us entry to the info saved within the single object.
Now we have to create the State object, and that is the place any knowledge can be saved, however for now the one porperty it wants is View, linking them collectively.
const State = {
  View
}
And at last, we have to name the Nanny operate. This can render the preliminary view. We additionally assign the variable Replace to the return worth. This can enable us to replace the state afterward.
const Replace = Nanny(State)
Your web page ought to appear like this:
Right here’s what the code ought to appear like altogether:
Now Nanny State is about up, we will begin making the sport, which by the top must be a totally functioning ‘Guess the Quantity’ recreation.
Each Finish has a Begin
A number of issues earlier than we begin, one of many advantages of the View operate is that it makes use of template literals, which implies we will add logic inside the HTML itself. This is available in very helpful if you need to embody completely different views based mostly on the State. Sadly, a regular if Assertion received’t work and as an alternative we might want to use ternary operators.
In case you aren’t acquainted already, ternary operators work in the identical means as an if else assertion: situation ? what to do if true : what to do if false. In brief, commerce the if for a ? and the else for a :.
For instance, right here’s a terrific one I noticed on Twitter the opposite day:
const toDo = amIHungry ? "🍰" : "😴"
That is equal to:
if (amIHungry){
    const toDo = "🍰"
}
else{
    const toDo = "😴"
}
Ternary operators are about to develop into your finest pal so it’s fairly very important that you simply perceive how they work.
A begin button is an effective way so as to add some construction to a recreation, particularly one like Numble, and so to be able to do that we’ll want so as to add a property to State, began. The worth of began must be false, as the very first thing we wish the consumer to see is the menu web page (which, for now, will include the beginning button and the heading).
State ought to now appear like this:
const State = {
    began: false,
    begin, end,
    View
}
The View is what adjustments probably the most right here and we will use our first and principal ternary operator.
Discover that it consists of two variables known as begin and end. These are references to the occasion handlers that we’ll be writing quickly.
In Nanny State, any occasion handlers have to be referenced contained in the State object.
We mainly need two completely different views: one for when the consumer has began (in different phrases, the sport itself) and one for when the consumer hasn’t began (a menu web page, maybe). So we will use our Boolean property of began to do that.
const View = state => html`
<h1>Numble</h1>
${state.began ?
 html`<button onclick=${state.end}>END</button>`
:
 html`<button onclick=${state.begin}>START</button>`
}`
As you possibly can see, the heading is above the ternary operator – this implies it can stay seen for each pages of this system. So for the ternary operator, you may be capable of see precisely what it’s doing already, but when not, don’t fear, it’s quite simple.
It follows precisely the identical logic because the cake/hungry instance above: it checks if state.began is true. Whether it is, a button known as ‘Finish’ is displayed. If not, a button known as ‘Begin’ is displayed as an alternative.
The buttons themselves have inline occasion listeners: the ‘Begin’ button has one which calls the operate begin and the ‘Finish’ button has one which calls the operate end. Clearly, these capabilities don’t exist but, which leads us on to our subsequent job: creating the occasion handlers.
We’ll do the begin operate first. It’s quite simple, as all we have to do is replace the began property to true. The code ought to appear like this:
const begin = occasion => Replace({began: true})
This makes use of the Replace operate we wrote earlier, and adjustments the State in order that the worth of began is now true. When this occurs, the View can be re-rendered, displaying the ‘Finish’ button on account of our ternary operator.
It’s possible you’ll need to have a go at writing the end occasion handler your self, as it really works nearly identically to the begin operate, the one distinction is what the Replace operate is altering.
Right here’s what the end operate ought to appear like:
const end = occasion => Replace({began: false})
Wonderful! You’ve now acquired the world’s most boring recreation!
In all seriousness, now you can have a go at urgent the beginning and finish buttons and interacting together with your recreation, even when it isn’t probably the most riveting expertise.
Once more, right here’s an instance of what the code ought to appear like:
Step 2: Producing a Random Quantity
We are able to now make our recreation a bit of bit extra thrilling with some of the vital points of Numble: the quantity itself.
This step entails a little bit of maths and logic, nevertheless it’s actually not too arduous when you get your head round it. The operate itself ought to appear like this (and I’ll clarify what’s occurring under):
const generateNumber = () => (3*Math.ceil(Math.random()*299+34)).toString()
That is an arrow operate that returns a three-digit, a number of of three as a string.
Wanting particularly at Math.ceil(Math.random()*299+34), this generates a random quantity between 1 and 299 utilizing Math.random() and rounds it up utilizing Math.ceil. 34 is added after which that is multiplied by three, ensuring that the quantity is a a number of of three between 102 and 999, i.e. a 3-Digit a number of of three, or a ‘numble’.
Lastly, the entire thing is wrapped in a .toString() operate, turning it right into a string. It may appear stange to retailer a quantity as a string, however this can make it simpler to paint every particular person digit later within the recreation.
Our subsequent problem is to show a quantity each time the consumer presses ‘begin’.
One of the best ways to do that is add a property to the state object known as quantity. Nevertheless, we don’t want to do that within the authentic State, we simply want to do that when the ‘Begin’ button is pressed, so within the begin occasion handler.
This can change our begin operate to appear like this:
const begin = occasion => Replace({
    began: true,
    quantity: generateNumber()
  })
The worth of the brand new property, quantity, is the return worth of the operate we simply created generateNumber(): the random three-digit, a number of of three.
As a way to show this, we have to add a line to View, particularly within the HTML part of when state.began is true, making View now appear like this:
const View = state => html`
<h1>Numble</h1>
${state.began ?
 html`<div id="quantity">${state.quantity}</div>
 <button onclick=${state.end}>END</button>`
:
 html`<button onclick=${state.begin}>START</button>`
}`
All we’ve achieved right here is add a <div> with an id of "quantity", that shows state.quantity which is the randomly generated three-digit, a number of of three.
In case you take a look at out the code now, it is possible for you to to see a special quantity each time you click on the ‘Begin’ button, and when you add up the digits you’ll discover that the numbers are multiples of three!
Examine your code in opposition to my codepen:
Step 3: Inputs and Keyboards
It begins to get a bit of trickier now, and earlier than we start it’s most likely a good suggestion to verify that you’re conversant in the Array.map() operate. Like ternary operators, they’re going to develop into you’re finest pal on this step and within the subsequent article, as a result of Numble requires loads of mapping over arrays to course of the info within the state.
In case your Array.map() expertise are a bit of rusty otherwise you haven’t even heard of it, don’t fear, they’re fairly simple to know and you’ll learn extra about them right here.
There are three principal elements to this step:
- Create a digital keyboard
- Show the consumer’s guess
- Checking if the consumer’s guess is correct
Regardless that all of them rely on one another, it’s a lot simpler to know when you break the whole lot up into smaller chunks.
First, we have to add the capabilities we’re going to use and three extra properties in State:
const State = {
  began: false,
  digits: Array(10).fill("gray"),
  guess: Array(3).fill(null),
  rely: 0,
  begin, end, take away, verify, seem,
  View
}
Working by way of them in that order, the worth of digits is now an array of size 10, with every area crammed with the string “gray”. It is because we can be utilizing this to maintain observe of what shade every digit must be within the recreation and the index of the array will symbolize every attainable digit from 0-9.
The preliminary worth of guess can also be an array of size 3, every area crammed with null.
And at last, rely is about to 0, and this can be used to maintain a rely of what number of digits the participant has guessed.
We’re going to map over the digits array to create our onscreen keyboard, so we’ll want so as to add a couple of issues to View. Though earlier than we do this, we have to eliminate the <div> that reveals the quantity, in any other case that will simply defeat the entire level of the sport.
const View = state => html`
<h1>Numble</h1>
${state.began ?
html`<div id="guesses">
${state.guess.map(quantity => html`<div>${quantity}</div>`)}
</div>
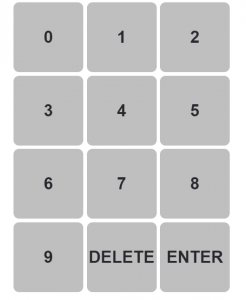
<div id="keyboard">
${state.digits.map((digit,index) => html`<button onclick=${seem(index)}>${index}</button>`)}
<button onclick=${take away}>DELETE</button>
<button onclick=${verify}>ENTER</button>
</div>
<button onclick=${end}>END</button>`
:
html`<button onclick=${begin}>START</button>`
}`
Rather than the <div> that confirmed the quantity, we now have two <div>s one with an id of "guesses" and one with an id of "keyboard".
Inside the ‘guesses’ <div> we have now the primary of many .map() capabilities, and it maps over the array of size 3, making a separate <div> for every merchandise within the array, displaying the merchandise. Because of this at the beginning, when the worth of all of the gadgets within the array is null, there can be three empty areas displayed.
Right here is an instance of what it ought to appear like (with my CSS):
Finally, when the worth of every merchandise within the array adjustments, what’s displayed can even be modified to match.
And inside the ‘Keyboard’ <div> we have now three issues:
${state.digits.map((digit,index) => html`<button onclick=${state.seem(index)}>${index}</button>`)}
This maps over the array of size 10, making a button for every merchandise and displaying the index of every merchandise. In different phrases, the digits 0 to 9. Every button additionally has an inline occasion listener that calls the occasion handler seem and offers index as an argument. Nevertheless, we are going to absolutely discover this in a second.
Then, we have now two buttons, one known as ‘Delete’ and the opposite known as ‘Enter’.They each have inline occasion listeners that decision their respective occasion handlers take away and verify. And once more, we are going to absolutely discover these in a second.
Firstly, that is an instance of what you’re keyboard might appear like:
Wanting on the seem occasion handler, we wish this operate to show the digit the participant clicks into the primary area of the guess.
const seem = guess => occasion => {
  Replace(state => ({
    guess: state.guess.map((digit,index) => index === state.rely ? guess : digit),
    rely: state.rely + 1
  }))
}
Initially, the one distinction between this occasion handler and those we made earlier than is that this operate has an additional parameter guess. That is the index of the digits array that was supplied as an argument. In different phrases, it’s the digit that the participant clicked on.
The Replace operate seems a bit completely different. It is because it wants entry to the state, so it is supplied with an arrow operate that maps the previous state to the brand new state (Nanny State calls these ‘transformer capabilities’)
By way of what it’s truly updating, the guess property maps over the unique array of three nulls and if the index of the merchandise is the same as the rely (the place of guess), the worth of null is changed with the guess (which would be the variety of the button the consumer clicked). If the index is just not equal to rely, the worth of the merchandise is left because it was: null.
It then increments rely by 1, permitting the consumer to enter their second guess into the second area.
That is what the row will appear like as soon as the consumer has clicked a couple of numbers:
The take away occasion handler is (sarcastically) nearly equivalent:
const take away = occasion => {
  Replace(state => ({
    guess: state.guess.map((digit,index) => index === state.rely - 1 ? null : digit),
    rely: state.rely - 1
  }))
}
Following the logic of the seem operate, you need to be capable of work out what’s occurring right here, however don’t fear if not. It updates guess by mapping over the unique array, and if the index is the same as the earlier variety of guesses (i.e. the rely – 1), it replaces the worth of the merchandise with null, successfully deleting the guess.
And this time, it decrements rely by one, permitting the consumer to proceed to make guesses.
Simply the verify operate to go.
The occasion handler for the ‘Enter’ button is named verify, and we wish this to (shock) verify whether or not the consumer’s guess is right, however we additionally need it to reset the guess, so the consumer can strive once more.
The operate seems like this:
const verify = occasion => {
  Replace(state => {
    const numble = state.guess.be a part of("") === state.quantity
    return {
      suggestions: numble ? "NUMBLE!" : "Unsuitable!",
      guess: Array(3).fill(null),
      rely: 0
    }
  })
}
Like earlier than, the Replace makes use of a transformer operate and takes state as a parameter, giving us direct entry to all of the app knowledge held within the state. It then creates a Boolean fixed known as numble. It could not appear like it however state.guess.be a part of("") === state.quantity is definitely a situation (checks if the consumer’s guess is the same as the quantity we generated) and if it meets this situation the worth of numble can be true and if not, it is going to be false.
Then it returns three up to date properties of the state:
suggestionstakes the Boolean worth we’ve simply created and whether it istrueit units the worth to be the string “NUMBLE!” and whether it isfalseit units the worth to be a string “Unsuitable!”guessis modified again to an array of size 3 crammed withnull. This can successfully reset the consumer’s guess, permitting them to guess once morerelycan also be reset to 0, which means this system can work as if ranging from the start.
Our last step is to place some HTML in View in order that suggestions may be displayed.
A great place to place it’s under the guess and above the keyboard. So, your last View ought to look one thing like this:
const View = state => html`
<h1>Numble</h1>
${state.began ?
 html`<div id="guesses">
${state.guess.map(quantity => html`<div>${quantity}</div>`)}
</div>
<p id="suggestions">${state.suggestions}</p>
<div id="keyboard">
${state.digits.map((digit,index) => html`<button onclick=${state.seem(index)}>${index}</button>`)}
  <button onclick=${state.take away}>DELETE</button>
  <button onclick=${state.verify}>ENTER</button>
</div>
 <button onclick=${state.end}>END</button>`
:
 html`<button onclick=${state.begin}>START</button>`
}`
And in order for you you need to use suggestions to set a message at the beginning of the sport, for instance within the begin occasion handler you possibly can add the suggestions property with a string worth (“Guess 3 digits”):
const begin = occasion => {
  Replace({
    began: true,
    quantity: generateNumber(),
    suggestions: "Guess 3 digits"
  })
}
And that’s it! You now have a totally functioning guess the quantity recreation!
Earlier than you go on to the second article, there are only a couple of notes about CSS and bugs.
If you wish to add your personal CSS that’s completely nice, however when you simply need to concentrate on the code, you possibly can copy my CSS from the ultimate codepen:
In case you’re a very good programmer you’ll most likely be capable of choose up on some bugs right here, for instance, what if the consumer clicks ‘Enter’ earlier than they’ve guessed three digits? And when you begin taking part in with it, you’ll positively be capable of discover some extra.
They aren’t arduous to repair in any respect, you’ll simply want a few situations the place applicable. For instance, to repair the issue of checking earlier than there are three digits, within the verify operate you possibly can write:
const verify = occasion => {
  Replace(state => {
    const numble = state.guess.be a part of("") === state.quantity
    return state.rely < 3 ? {
      suggestions: "too brief"
    }
    :
    {
      suggestions: numble ? "NUMBLE!" : "Unsuitable!",
      guess: Array(3).fill(null),
      rely: 0
    }
  })
}
This simply checks if the variety of guesses is lower than 3 and returns completely different properties with completely different values accordingly.
We now have a totally functioning ‘Guess the Quantity’ recreation and subsequent we are going to make it extra like the total Numble.
4 Guesses
Our first job is to permit the consumer 4 guesses. In Wordle, 6 guesses are allowed for a 5-letter phrase so for Numble we are going to enable 4 guesses for a three-digit quantity.
As a way to do that we must take away the guess property and add two extra properties to the State object:
const State = {
  began: false,
  digits: Array(10).fill("gray"),
  guesses: Array(4).fill(Array(3).fill(null)),
  guessCount: 0,
  rely: 0,
  begin, end, verify, seem, take away,
  View
}
As you possibly can see, we now have a guesses property rather than the guess we had earlier than. The worth of guesses is a 2D-array, of 4 arrays, every of size three and crammed with null. If you’re unfamiliar with the Array.fill() operate, it’s a shortcut to creating an array which means we would not have to jot down out the array in full.
Every of the 4 nested arrays symbolize one of many 4 guesses the consumer will make. For instance, if the primary guess was 123, the guesses array would appear like this:
[[1,2,3], [null, null, null], [null, null, null], [null, null, null]]
Each time the consumer makes a guess, this array can be up to date to match the their guess, successfully preserving a document of all of the guesses they’ve made within the recreation.
Moreover, we have now a guessCount property, set with a price of 0. Though much like the rely property, it can enable us to maintain observe of the variety of guesses the consumer has made.
This diagram ought to provide help to visualise and absolutely perceive the necessity for each the rely and the guessCount properties:
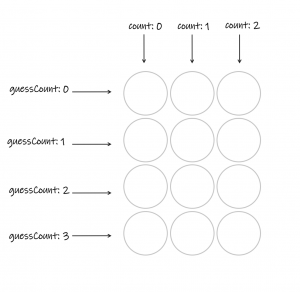
As you possibly can see, guessCount is the index of which nested array the guess is saved in and rely is the index of every particular person digit of every guess.
Now we have to make some adjustments to the View operate:
const View = state => html`
<h1>Numble</h1>
${state.began ?
 html`<div id="guesses">
${state.guesses.map((guess, i) => html`<div class="row">${guess.map((quantity,j)=> html`<div class="gray">${quantity}</div>`)}</div>`)}
</div>
<p id="suggestions">${state.suggestions}</p>
<div id="keyboard">
${state.digits.map((digit,index) => html`<button onclick=${state.seem(index)}>${index}</button>`)}
  <button onclick=${state.take away}>DELETE</button>
  <button onclick=${state.verify}>ENTER</button>
</div>
 <button onclick=${state.end}>END</button>`
:
 html`<button onclick=${state.begin}>START</button>`
}`
That is nearly equivalent to the View we created earlier, nonetheless the div with an id of ‘guesses’ has modified. The truth that we are actually utilizing a 2D-array to show the 4 guesses like a grid, we’re going to want a nested map.
Coding tip: when utilizing a nested map, for the index of every map we are going to use i for the primary map and j for the second. You need to use no matter you assume is best for you, as long as they aren’t the identical!
The primary map loops over every guess as a row of the grid. The second map then loops over every particular person digit of that guess and shows the relevent HTML to point out the digit that has been guessed or an empty circle. With this, your display ought to appear like this:
This new format means we even have to vary the seem and take away capabilities. It’s comparatively easy however once more requires a double map.
const seem = guess => occasion => {
  Replace(state => ({
    guesses:  state.guesses.map((array,i) => i === state.guessCount ? array.map((digit,j) => j === state.rely ? guess : digit) : array) ,
  rely: state.rely + 1
  }))
}
We’re updating the guesses property right here and that is the place having the 2 completely different rely properties goes to develop into actually helpful.
The primary map checks which row to vary: if the index of the array matches to the guess of the consumer, then the second map can happen, in any other case preserve the worth the identical.
The second map performs the very same logic because the seem we created in article two.
Similar to earlier than, the take away operate works nearly identically.
const take away = occasion => {
  Replace(state => ({
    guesses: state.guesses.map((array,i) => i === state.guessCount ? array.map((digit,j)=> j === state.rely - 1 ? null : digit) : array),
    rely: state.rely - 1
  }))
}
The primary map right here once more simply identifies which guess the consumer is making and the second follows the identical logic as our authentic take away operate.
The rely property decrements, nonetheless, to make sure the consumer can re-make the guess.
Lastly, we have to make some adjustments to the verify operate. That is the operate that runs each time the consumer submits a guess.
const verify = occasion => {
  Replace(state => {
    const numble = state.guesses[state.guessCount].be a part of("") === state.quantity
    return {
      suggestions: numble ? "NUMBLE!" : state.guessCount < 3 ? "Maintain going..." : `Nope! It was ${state.quantity}`,
      guessCount: state.guessCount + 1,
      rely: 0
    }
  })
}
There are solely two issues which have modified right here and each are within the object returned. The suggestions property has some added logic to make the app a bit extra dynamic. The suggestions will now show a message to let the consumer understand how they’re getting on.
On this case we have now: if numble is true in different phrases if the consumer’s guess is right, the suggestions turns into “NUMBLE”; if numble is false, verify if the guess lower than three (this basically checks if the consumer has made their last guess). Whether it is, the suggestions is “Maintain going…”, in any other case it’s “Nope! It was (the reply)”.
And that’s it for the primary half! You may see the total code within the codepen under:
Shade logic
As outlined on the very starting of the article, colours are the principle focus of Wordle and subsequently Numble. In case you haven’t already performed Numble or Wordle would extremely recommend that you simply do, to be able to correctly perceive the way in which the colours work.
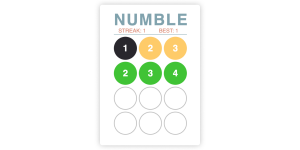
That is the instance of the coloring system, utilized by Numble:
After the consumer makes a guess the colours are up to date in two locations: the precise guess and on the keyboard. The logic for the 2 is precisely the identical, so we will create an arrow operate known as getColors that takes the guess and the precise quantity as parameters .
const getColors = (guess,quantity) => guess.map((digit,index) => quantity.consists of(digit) ? digit.toString() === quantity[index] ? "inexperienced" : "yellow": "black")
We map over the ‘guess’ array and utilizing the ‘String.consists of(merchandise)’ methodology, we verify first if the reply consists of the digit of the guess. If it does, then we verify if the digit is within the right place. Whether it is, the colour is assigned “inexperienced”. If not, the colour is “yellow”. In any other case, the digit is just not within the reply in any respect, and so the colour is “black”.
This arrow operate ought to then return an array with three gadgets being both “inexperienced”, “yellow” or “black”, corresponding to every digit within the ‘guess’.
For instance, if we known as the operate utilizing getColors([1,2,3], "327") then the array we must be returned is ["black", "green", "yellow"]
It’s possible you’ll discover we needed to change the digit to a string. It is because we have to evaluate it to the reply that’s saved as a string, and you can not evaluate two components if they’re of various varieties. Properly you possibly can strive, however be ready to enter a complete world of JavaScript Sort coercion ache.
Observe: Wordle offers with duplicates in another way, so when you needed to make this a bit more durable, you could possibly attempt to mimic Wordle’s methodology.
For this subsequent half, we don’t need to make any adjustments or add something to State, however the View does get a bit extra advanced. As talked about briefly within the first article, we’re going to be utilizing CSS lessons to permit us to vary the colours.
const View = state => html`
<h1>Numble</h1>
${state.began ?
 html`<div id="guesses">
${state.guesses.map((guess, i) => html`<div class="row">${guess.map((quantity,j)=> html`<div class=${state.guessCount > i ? getColors(guess,state.quantity)[j] : "gray"}">${quantity}</div>`)}</div>`)}
</div>
<p id="suggestions">${state.suggestions}</p>
<div id="keyboard">
${state.digits.map((digit,index) => html`<button class=${digit} onclick=${state.seem(index)}>${index}</button>`)}
  <button onclick=${state.take away}>DELETE</button>
  <button onclick=${state.verify}>ENTER</button>
</div>
 <button onclick=${state.end}>END</button>`
:
 html`<button onclick=${state.begin}>START</button>`
}`
As you possibly can see, the one two issues which have modified are the CSS lessons for each the keyboard buttons and the person sections of every row.
Starting with the “guesses” div, we have now the next logic:
state.guessCount > i ? getColors(guess,state.quantity)[j] : "gray"
Initially this checks if guessCount is larger than the index, that is to make sure that each time the web page is rerendered any earlier guesses are recolored. If there must be a shade, we name the getColors operate with the guess the consumer has made and the reply as parameters and take the merchandise on the index of every digit, j.
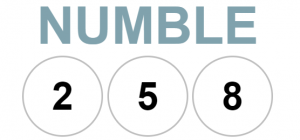
Here’s what your display ought to appear like after the consumer has made one guess:
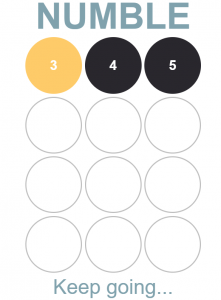
The array from the getColors operate is:
["yellow", "black", "black"]
Subsequently, the consumer will now know that 3 is within the quantity however within the fallacious place, and 4 and 5 aren’t within the quantity in any respect.
The keyboard logic is far easier, nevertheless it nonetheless makes use of the identical getColor operate that we wrote earlier than. Bear in mind earlier than how we crammed the digits array with “gray”? Properly this is the reason we did it.
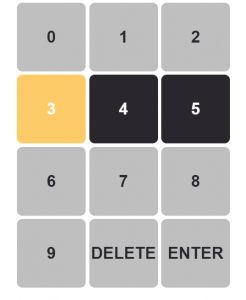
Because the keyboard is drawn on the display, the category is just the worth on the key’s index within the digits array. In a while we are going to run by way of how we will change the colour, however utilizing the instance above after the primary guess the digits array ought to appear like this:
["grey", "grey", "grey", "yellow", "black", "black", "grey", "grey", "grey", "grey"]
We’re very almost there! Our last job is to vary the verify operate.
const verify = occasion => {
  Replace(state => {
    const guess = state.guesses[state.guessCount]
    const numble = guess.be a part of`` === state.quantity
    const colours = getColors(guess,state.quantity)
    return {
      suggestions: numble ? "NUMBLE!" : state.guessCount < 3 ? "Maintain going..." : `Nope! It was ${state.quantity}`,
      digits: state.digits.map((color,digit) => guess.consists of(digit) ? colours[guess.indexOf(digit)] : color),
      guessCount: state.guessCount + 1,
      rely: 0
    }
  })
}
Within the Replace operate, there are two extra constants. This simply makes it simple for the logic within the returned object.
Now we have guess which is the array of three digits the consumer has simply guessed (therefore using state.guessCount). We even have numble from earlier than, however this time utilizing the guess fixed we simply created. This simply helps having cleaner code and avoiding repetition. Lastly, we have now colours which is the array returned when the getColors operate is run with the customers present guess and the reply.
This can replace the digits array and make sure that the digits on the keyboard get coloured accurately after every guess.
Now, the return object is equivalent to the one above however we’re additionally updating the digits property.
state.digits.map((shade,digit) => guess.consists of(digit) ? colours[guess.indexOf(digit)] : shade)
That is our last mapping operate! And it basically checks if the quantity on the keyboard (which is the digit) is within the guess. If it’s the present shade must be changed by the colour generated from the getColors operate, in any other case the colour ought to stay the identical.
Utilizing the identical guess as above, we will see what the keyboard ought to appear like:
And that’s it! A completely practical model of Numble!
Once more, right here’s what the code ought to appear like in its entirety:
Within the precise model of Numble, I added a lot of options simply to make the sport much more dynamic. If you wish to problem your self and add some further options listed below are some recommendations from the my last model of Numble:
- Play once more – enable the consumer to play as many instances as they need or make it so there’s just one problem per day
- Streak – that retains observe of what number of right solutions you will have in a row
- Greatest streak – the longest streak the consumer has saved
- Darkish mode – extra of a CSS problem however fascinating nontheless
- Show Statistics – a breakdown of what number of guesses it took the consumer for each recreation
- Share function – lets customers share their finest streak
I actually hope you had as a lot enjoyable making Numble as I did!