


Wouldn’t it’s cool to construct a Python sport that solely requires preliminary person enter after which appears to tackle a thoughts of its personal, creating mesmerizing patterns alongside the best way? You are able to do precisely that with Conway’s Sport of Life, which is concerning the evolution of cells in a life grid.
Implementing the Sport of Life algorithm is an effective train with many fascinating challenges that you simply’ll have to determine. Particularly, you’ll have to construct the life grid and discover a method to apply the sport’s guidelines to all of the cells on the grid in order that they evolve by way of a number of generations.
On this tutorial, you’ll:
- Implement Conway’s Sport of Life algorithm with Python
- Construct a
cursesview to show the Sport of Life grid - Create an
argparsecommand-line interface for the sport - Arrange the sport app for set up and execution
To get essentially the most out of this tutorial, you must know the fundamentals of writing object-oriented code in Python, creating command-line interface (CLI) apps with argparse, and establishing a Python venture.
You possibly can obtain the whole supply code and different sources for this venture by clicking the hyperlink under:
Demo: Conway’s Sport of Life With Python
On this tutorial, you’ll implement Conway’s Sport of Life in your command line utilizing Python. When you’ve run all of the steps to construct the sport, then you definately’ll find yourself with a completely working command-line app.
The demo exhibits how the app works and walks you thru the evolution of a number of life patterns or seeds, which outline the sport’s preliminary state and work as beginning factors for evolving the cells within the life grid:
All through this tutorial, you’ll run by way of a number of challenges associated to the sport’s algorithm and in addition to writing and establishing a command-line software in Python. On the finish, you’ll have a Sport of Life app that can work just like the demo above.
Venture Overview
The Sport of Life by the British mathematician John Horton Conway isn’t a sport within the conventional sense. In technical phrases, it’s a mobile automaton, however you may consider Sport of Life as a simulation whose evolution will depend on its preliminary state and doesn’t require additional enter from any gamers.
The sport’s board is an infinite, two-dimensional grid of cells. Every cell could be in certainly one of two doable states:
- Alive
- Useless
Every cell evolves to the subsequent technology relying on the state of itself and its neighbor cells. Right here’s a abstract of the evolution guidelines:
- Alive cells die if they’ve fewer than two (underpopulation) or greater than three dwelling neighbors (overpopulation).
- Alive cells keep alive if they’ve two or three dwelling neighbors.
- Useless cells with precisely three dwelling neighbors turn into alive (copy).
The sport’s preliminary state is the seed, or preliminary life sample. On this implementation, the life sample will likely be a set of alive cells. The primary technology outcomes from making use of the above guidelines to each cell within the seed. The second technology outcomes from making use of the foundations to the primary technology, and so forth. So, every technology is a pure perform of the previous one.
The problem on this venture is to program the evolution algorithm in Python after which present a command-line interface (CLI) to run the sport with completely different life patterns.
Stipulations
The venture that you simply’ll construct on this tutorial would require familiarity with basic Python programming and particularly with object-oriented programming. So, you must have primary data of the next subjects:
Nevertheless, should you don’t have all this data but, then that’s okay! You may be taught extra by going forward and giving the venture a shot. You possibly can all the time cease and evaluate the sources linked right here should you get caught.
With this quick overview of your Sport of Life venture and its stipulations, you’re prepared to start out Pythoning. Have enjoyable whereas coding!
Step 1: Set Up the Sport of Life Venture
Each time you begin a brand new Python venture, you must take a while to consider the way you’ll manage the venture itself. You must create your venture format, which is the listing construction of your venture.
For a Python venture that implements Conway’s Sport of Life, you could find yourself with many various layouts. So, it’s finest to consider what you wish to or have to do first. Right here’s a abstract:
- Implement the Sport of Life algorithm, together with the life grid and the seeds or patterns
- Present a method to visualize the life grid and its evolution
- Enable the person to set a sample and run the sport a given variety of generations
Following these concepts, you’ll create the next listing construction in your Sport of Life venture:
rplife/
│
├── rplife/
│   ├── __init__.py
│   ├── __main__.py
│   ├── cli.py
│   ├── grid.py
│   ├── patterns.py
│   ├── patterns.toml
│   └── views.py
│
├── README.md
└── pyproject.toml
On this tutorial, you’ll identify the venture rplife, which is a mixture of Actual Python (rp) and life. The README.md file will comprise the venture’s description and the directions for putting in and working the applying.
The pyproject.toml file is a TOML file that specifies the venture’s construct system and plenty of different configurations. In fashionable Python, this file replaces the setup.py script that you will have used earlier than. So, you’ll use pyproject.toml as an alternative of setup.py on this venture.
Contained in the rplife/ listing, you might have the next recordsdata:
__init__.pypermitsrplife/as a Python bundle.__main__.pyworks as an entry-point script for the sport.cli.pyincorporates the command-line interface for the sport.grid.pygives the life grid implementation.patterns.pyandpatterns.tomldeal with the sport’s patterns.views.pyimplements a method to show the life grid and its evolution.
Now go forward and create all these recordsdata as empty recordsdata. You are able to do this out of your favourite code editor or IDE. When you end creating the venture’s format, then you can begin implementing the Sport of Life’s guidelines in Python.
Word: If you begin a brand new Python venture, it’s a finest observe to create a devoted Python digital atmosphere for the venture. You are able to do this by working the suitable command in your present working system:
With these two instructions, you create and activate a Python digital atmosphere referred to as venv in your working listing.
All the venture code for this Sport of Life venture is obtainable on GitHub. To obtain the venture’s skeleton first step, click on the next hyperlink and navigate to the source_code_step_1/ folder:
Step 2: Code the Sport of Life’s Grid
As you already realized, the principle part of the Sport of Life is an infinite, two-dimensional grid of cells. This part might sound onerous to implement as a result of it’s infinite. So, you want a method to summary out this requirement. To do that, you’ll concentrate on the alive cells reasonably than on all of the cells within the grid.
To symbolize the preliminary set of alive cells, you’ll use a category referred to as Sample, which represents the sport’s seed. Then, you’ll code a LifeGrid class that can take the sample and evolve it to the subsequent technology of alive cells by making use of the sport’s guidelines. This class will even present a string illustration of the grid to be able to show it in your display screen.
To obtain the code for this step, click on the next hyperlink and look contained in the source_code_step_2/ folder:
Sketch the Sample and LifeGrid Courses
To start out implementing the sport’s algorithm, fireplace up your code editor and go to patterns.py. As soon as there, create the Sample class utilizing the @dataclass decorator from the dataclasses module:
At this level, Sample solely wants to carry the sample’s identify and the dwelling cells. The .alive_cells attribute is a set of two-value tuples. Every tuple represents the coordinate of an alive cell within the life grid. Utilizing a set to carry the alive cells permits you to use set operations to find out the cells that will likely be alive within the subsequent technology.
Now, you want the LifeGrid class, which can maintain two particular duties:
- Evolving the grid to the subsequent technology
- Offering a string illustration of the grid
So, your class could have the next attributes and strategies. Do not forget that this class will reside within the grid.py module:
Right here, you’ve used move to arrange the skeleton of LifeGrid. The category initializer takes a sample as an argument. This argument will likely be a Sample occasion. Then, you might have .evolve(), which can verify the at the moment alive cells and their neighbors to find out the subsequent technology of alive cells.
Lastly, in .as_string(), you’ll present a method to symbolize the grid as a string which you can show in your terminal window. Word that this technique takes an argument that gives a bounding field for the life grid. This field will outline which a part of the grid you show in your terminal window.
Evolve the Life Grid to the Subsequent Technology
Now it’s time to jot down the .evolve() technique, which should decide the cells that can move to the subsequent technology as dwelling cells. So, it has to verify the at the moment alive cells and their neighbors to find out the variety of alive neighbors and determine which cell stays alive, which dies, and which comes alive. Recall the foundations of how cells evolve:
- Alive cells die if they’ve fewer than two (underpopulation) or greater than three dwelling neighbors (overpopulation).
- Alive cells keep alive if they’ve two or three dwelling neighbors.
- Useless cells with precisely three dwelling neighbors turn into alive (copy).
Wait, you solely have the coordinates of dwelling cells. How are you going to verify the neighbors of a given dwelling cell? Take into account the next diagram, which represents a small portion of the grid:
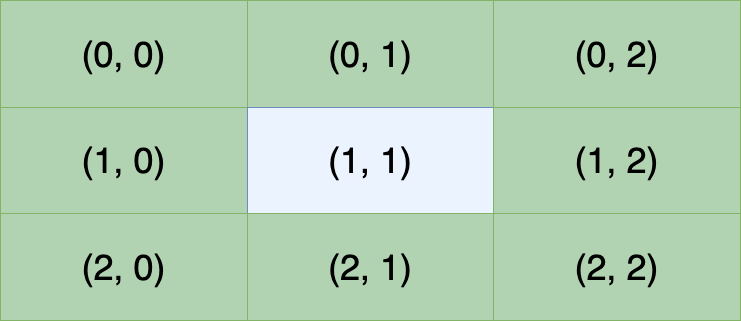
Now, say that you simply’re checking the neighbors of the cell at (1, 1), that are all of the inexperienced cells. How are you going to decide their coordinates within the grid? For instance, to compute the coordinate of the primary row of cells, you are able to do one thing like this:
- For
(0, 0), add(-1, -1)to(1, 1)worth by worth. - For
(0, 1), add(-1, 0)to(1, 1)worth by worth. - For
(0, 2), add(-1, 1)to(1, 1)worth by worth.
From these examples, you may conclude that the tuples (-1, -1), (-1, 0), (-1, 1) symbolize the distinction between the goal cell and its neighbors. In different phrases, they’re deltas which you can add to the goal cell’s coordinates to seize its neighbors. You possibly can prolong this considering to the remainder of the neighbors and discover the suitable delta tuples.
With these concepts in thoughts, you’re able to implement the .evolve() technique:
Right here’s a breakdown of what this code does line by line:
- Traces 6 to fifteen outline the delta coordinates for the neighbors of the goal cell.
- Line 16 creates a dictionary for counting the variety of dwelling neighbors. On this line, you employ the
defaultdictclass from thecollectionsmodule to construct the counter with theintclass as its default manufacturing facility. - Line 17 runs a loop over the at the moment alive cells, that are saved within the
.sampleobject. This loop permits you to verify the neighbors of every dwelling cell to be able to decide the subsequent technology of dwelling cells. - Line 18 begins a loop over the neighbor deltas. This inside loop counts what number of cells the present cell neighbors. This rely permits you to know the variety of dwelling neighbors for each dwelling and lifeless cells.
- Traces 21 to 23 construct a set containing the cells that can keep alive. To do that, you first create a set of neighbors which have two or three alive neighbors themselves. Then, you discover the cells which are frequent to each this set and
.alive_cells. - Traces 24 to 26 create a set with the cells that can come alive. On this case, you create a set of neighbors which have precisely three dwelling neighbors. Then, you identify the cells that come alive by eradicating cells which are already in
.alive_cells. - Line 28 updates
.alive_cellswith the set that outcomes because the union of the cells that keep alive and people who come alive.
To verify whether or not your code works as anticipated, you want a method to know the dwelling cells in every technology. Go forward and add the next technique to LifeGrid:
The .__str__() particular technique gives a method to symbolize the containing object in a user-friendly method. With this technique in place, while you use the built-in print() perform to print an occasion of LifeGrid, you get the identify of the present sample and the set of alive cells within the subsequent line. This data provides you an thought of the present state of the life grid.
Now you’re able to check out your code. Go forward and begin a brand new terminal window on the venture’s root listing. Then begin a Python REPL session and run the next code:
On this code snippet, you first import the grid and patterns modules from the rplife bundle. Then, you create a Sample occasion. You’ll get to discover the number of patterns in a second. However for now, you employ the Blinker sample as a pattern.
Subsequent up, you create a LifeGrid object. Word that while you print this object, you get the sample’s identify and reside cells. You could have a working grid with a correct seed. Now, you may evolve the grid by calling .evolve(). This time, you get a unique set of dwelling cells.
When you evolve the grid once more, then you definately get the identical set of reside cells that you simply use because the preliminary seed for the sport. It is because the Blinker sample is an oscillator sample that evolves like this:

The Blinker sample shows three horizontal alive cells in a single technology and three vertical alive cells within the subsequent technology. Your code does the identical, so it really works as anticipated.
Characterize the Life Grid as a String
Now that you simply’ve carried out .evolve() to maneuver the sport to the subsequent technology, you’ll want to implement .as_string(). As you already realized, this technique will construct a illustration of the life grid as a string to be able to show it in your display screen.
Beneath is the code snippet the place you outline the strategy:
On this code, you first outline two constants, ALIVE and DEAD. These constants maintain the characters that you simply’ll use to symbolize the alive and lifeless cells on the grid.
Inside .as_strings(), you unpack the bounding field coordinates into 4 variables. These variables outline which a part of the infinite grid your program will show on the display screen. Then, you create the show variable as a listing containing the sample’s identify. Word that you simply use .middle() to middle the identify over the grid’s width.
The for loop iterates over the vary of rows contained in the view. Within the loop, you create a brand new listing containing the alive and lifeless cells within the present row. To determine if a given cell is alive, you verify if its coordinates are within the set of alive cells.
Then, you append the row as a string to the show listing. On the finish of the loop, you be a part of collectively each string utilizing a newline character (n) to create the life grid as a string.
To provide your updates a strive, go forward and run the next code in your interactive session:
If you print the life grid, you get an oblong space containing dots and hearts. When you name .evolve() and print the grid once more, then you definately get a illustration of the subsequent technology. That’s cool, isn’t it?
Step 3: Outline and Load the Life Patterns
Up so far, you’ve coded the LifeGrid class and the primary half of the Sample information class. Your code works. Nevertheless, offering the seed manually looks like an excessive amount of work. It’d be good to have some predefined patterns and cargo them as a part of the sport execution.
Within the following sections, you’ll create a couple of pattern patterns in a TOML file and write the required code to load the patterns into Sample situations.
Click on the hyperlink under to obtain the code for this step to be able to observe together with the venture. You’ll discover what you want within the source_code_step_3/ folder:
Outline Life Patterns in a TOML File
To construct a sample in your Sport of Life, you want the sample’s identify and a set of coordinates for the dwelling cells. For instance, utilizing the TOML file format, you are able to do one thing like the next to symbolize the Blinker sample:
On this TOML file, you might have a desk named after the goal sample. Then, you might have a key-value pair containing an array of arrays. The inside arrays symbolize the coordinates of the dwelling cells within the Blinker sample. Word that the TOML format doesn’t help units or tuples, so you employ arrays as an alternative.
Following this similar construction, you may outline as many patterns as you need. Click on the next collapsible part to get the patterns that you simply’ll use on this tutorial:
The patterns.toml file above defines eight completely different patterns. You possibly can outline a couple of extra if you would like, however these are sufficient for the aim of this tutorial.
Load the Life Patterns From TOML
You could have a TOML file with a bunch of patterns in your Sport of Life. Now, you want a method to load these patterns into your Python code. First, you’ll add an alternate constructor to your Sample class, which can permit you to create situations from TOML information:
The .from_toml() technique is a class technique since you’re utilizing the @classmethod decorator. Class strategies are nice when you’ll want to present an alternate constructor in a category. Some of these strategies obtain the present class as their first argument, cls.
Then, you’re taking the sample’s identify and the TOML information as arguments. Inside the strategy, you create and return an occasion of the category utilizing the cls argument. To supply the .alive_cells argument, you employ a set comprehension.
Within the comprehension, you create a set of tuples from the listing of lists that you simply get from the TOML file. Every tuple will comprise the coordinates of a dwelling cell on the life grid. Word that to entry the alive cells within the TOML information, you should use the dictionary lookup notation with the identify of the goal key in sq. brackets.
Subsequent up, you’ll want to create two features. The primary perform will permit you to load all of the patterns from the TOML file. The second perform will load a single sample at a time.
To parse a TOML file and browse its content material into Python objects, you should use the standard-library module tomllib should you’re utilizing Python 3.11 or later. In any other case, you must use the third-party library tomli, which is suitable with tomllib.
In your code to work with both device, you may wrap the import statements for the TOML libraries in a strive … besides block:
The import within the strive clause targets the standard-library module tomllib. If this import raises an exception since you’re utilizing a Python model decrease than 3.11, then the besides clause imports the third-party library tomli, which you’ll want to set up as an exterior dependency of your venture.
With the TOML library in place, it’s time to jot down the required features. Go forward and add get_pattern() to patterns.py:
This perform takes the identify of a goal sample and the identify of the TOML file as arguments and returns a Sample occasion representing the sample whose identify matches the identify argument.
Within the first line of get_pattern(), you load the content material of patterns.toml utilizing the TOML library of selection. The .masses() technique returns a dictionary. Then, you create the occasion of Sample utilizing the .from_toml() constructor and return the end result.
Word that the filename argument has a default worth that you simply present utilizing a continuing. Right here’s how one can outline this fixed after your imports:
This fixed holds a pathlib.Path occasion that factors to the patterns.toml file. Do not forget that this file lives in your rplife/ listing. To get the trail to this listing, you employ the __file__ attribute, which holds the trail to the file from which the module was loaded, patterns.py. Then, you employ the .mother or father attribute of Path to get the specified listing.
The get_pattern() perform retrieves a single sample from the TOML file utilizing the sample’s identify. This perform will likely be helpful while you wish to run your Sport of Life utilizing a single sample. What if you wish to run a number of patterns in a row? In that case, you’ll want a perform that will get all of the patterns from the TOML file.
Right here’s the implementation of that perform:
This perform takes the trail to the TOML file as an argument. The primary line is similar as in get_pattern(). Then, you create a listing of situations of Sample utilizing a comprehension. To do that, you employ the .objects() technique on the dictionary that .masses() returns.
After getting these two features in place, you can provide them a strive:
Nice! Each features work as anticipated. On this instance, you first get the Blinker sample utilizing the get_pattern() perform. Then, you get the whole listing of accessible patterns utilizing get_all_patterns().
Step 4: Write the Sport’s View
You’ve carried out a lot of the back-end code in your Sport of Life venture. Now, you want a method to show the sport’s evolution in your display screen. On this tutorial, you’ll use the curses bundle from the normal library to show the evolution of the sport. This bundle gives an interface to the curses library, enabling you to construct a text-based person interface (TUI) with moveable superior terminal dealing with.
To obtain the code for this step, click on the hyperlink under, then try the source_code_step_4/ folder:
To kick issues off, you’ll begin by defining a category referred to as CursesView:
The category initializer takes a number of arguments. Right here’s a breakdown of them and their meanings:
samplerepresents the life sample that you simply wish to show in your display screen. It must be an occasion ofSample.genis the variety of generations that you really want the sport to evolve by way of. It defaults to10generations.frame_raterepresents the frames per second, which is an indicator of the time between displaying one technology and the subsequent. It defaults to7frames per second.bboxis the bounding field for the life grid. This can be a tuple that represents which a part of the life grid will likely be displayed. It must be a tuple of the shape(start_col, start_row, end_col, end_row).
This class could have just one technique as a part of its public interface. The .present() technique could have the accountability of displaying the life grid on the display screen:
The .present() technique is sort of quick. It solely features a name to the wrapper() perform from curses. This perform initializes curses and calls one other callable object. On this case, the callable object is the private ._draw() technique, which has the accountability of displaying consecutive generations of cells.
Right here’s a doable implementation of the ._draw() technique:
There’s rather a lot occurring on this code snippet. Right here’s a line-by-line breakdown:
- Line 2 imports the
sleep()perform from thetimemodule. You’ll use this perform to manage the frames per second of your view. - Line 4 imports the
LifeGridclass from thegridmodule in yourrplifebundle. - Line 8 defines
._draw(), which takes a display screen orcurseswindow object as an argument. This object is mechanically handed in while you namecurses.wrapper()with._draw()as an argument. - Line 9 defines the life grid by instantiating the
LifeGridclass with the present sample as an argument. - Line 10 calls
.curs_set()to set the cursor’s visibility. On this case, you employ0as an argument, which implies that the cursor will likely be invisible. - Traces 13 to 18 outline a
strive…besidesblock that raises aValueErrorexception when the present terminal window doesn’t have sufficient area to show the life grid. Word that you’ll want to run this verify solely as soon as, so that you don’t have to incorporate the verify within the loop on line 20. - Line 20 begins a loop that can run as many occasions because the variety of generations.
- Line 21 calls
.evolve()on the grid to evolve the sport to the subsequent technology. - Line 22 calls
.addstr()on the present display screen object. The primary two arguments outline the row and column the place you wish to begin drawing the life grid. On this tutorial, you’ll begin the drawing at(0, 0), which is the higher left nook of the terminal window. - Line 23 refreshes the display screen by calling
.refresh(). This name updates the display screen instantly to mirror the modifications from the earlier name to.addstr(). - Line 24 calls
sleep()to set the body price that you simply’ll use to show consecutive generations within the grid.
Together with your view in place, you can provide your Sport of Life one other strive by working the next code:
On this snippet, you import the CursesView class from views and the get_pattern() perform from patterns. Subsequent, you create a brand new occasion of CursesView utilizing the Glider Gun sample and 100 generations. Lastly, you name the .present() technique on the view occasion. This code will run the sport and show its evolution by way of 100 life generations.
The output will look one thing like this:
Wow! That appears nice! Your Sport of Life venture is shaping up. Within the following two steps, you’ll outline the command-line interface (CLI) in your customers to work together with the sport, and eventually, you’ll put all the things collectively within the sport’s entry-point script, __main__.py.
Step 5: Implement the Sport’s CLI
On this part, you’ll create the command-line interface (CLI) in your Sport of Life venture. This interface will enable your customers to work together with the sport and run it with completely different life patterns. You’ll use the argparse module from the usual library to construct the CLI. It’ll present the next command-line choices:
--versionwill present this system’s model quantity and exit.-p,--patternwill take a sample for the Sport of Life, with a default of Blinker.-a,--allwill present all accessible patterns in a sequence.-v,--viewwill show the life grid in a particular view, with a default ofCursesView.-g,--genwill take the variety of generations, with a default of10.-f,--fpswill take the frames per second, with a default of7.
To obtain the code for this step, click on the next hyperlink and look into the source_code_step_5/ folder:
To start out penning this CLI, you’ll add the next code to cli.py:
On this code snippet, you first import the argparse module. Then, you import some required objects from the rplife bundle.
Up so far, you haven’t outlined the __version__, so go forward and open the __init__.py file. Then, write __version__ = "1.0.0" originally of the file. This attribute will energy the --version command-line choice, which is commonplace in CLI apps and permits you to show the app’s present model.
Subsequent, you outline the get_command_line_args() perform to wrap up the CLI definition. Inside get_command_line_args(), you create an argument parser by instantiating ArgumentParser. On this instance, you solely present this system’s identify and outline as arguments within the class instantiation.
With this code in place, you can begin including command-line choices. Right here’s the required code to implement the deliberate choices:
On this piece of code, you add all of the deliberate choices to your sport’s CLI by calling .add_argument() on the parser object. Every choice has its personal arguments relying on the specified performance.
It’s vital to notice that the -p, --pattern choice is a selection choice, which implies that the enter worth should match the precise identify of an accessible sample. To get the identify of all of the accessible patterns, you employ a listing comprehension and the get_all_patterns() perform.
The get_command_line_args() perform returns a namespace object containing the parsed command-line arguments and their corresponding values. You possibly can entry the arguments and their values utilizing dot notation on the namespace. For instance, if you wish to entry the --view argument’s worth, then you are able to do one thing like get_command_line_args().view.
The -v, --view choice can be a selection choice. On this case, you get the accessible views from the __all__ attribute outlined within the views module. After all, you haven’t outlined __all__ but, so you’ll want to do this now. Open views.py and add the next project assertion proper after your imports:
The particular __all__ attribute permits you to outline the listing of names that the underlying module will export as a part of its public interface. On this instance, __all__ incorporates just one view object as a result of that’s what you might have up to now. You possibly can implement your individual views as a part of your observe and add them to this listing in order that the person can use them when working the sport.
Nice! Your sport now has a user-friendly command-line interface. Nevertheless, there’s no method to check out this interface. You must write an entry-point script first. That’s what you’ll do within the following part.
Step 6: Write the Sport’s Entry-Level Script
In Python, executable applications have an entry-point script or file. As this identify suggests, an entry-point script is a script that incorporates the code that begins this system’s execution. On this script, you sometimes put this system’s major() perform.
Once more, you may obtain the code for this step by clicking the hyperlink under and looking out into the source_code_step_6/ folder:
In fashionable Python, you’ll sometimes discover that the __main__.py file is the suitable place for this entry-point code. So, go forward and open __main__.py in your code editor. Then add the next code to it:
Right here’s a line-by-line rationalization of the above code:
- Line 1 imports the
sysmodule from the usual library. You’ll use this module to entry thesys.stderrfile object the place you’ll be writing any error that happens in the course of the app’s execution. - Line 3 imports the
patternsandviewsmodules fromrplife. You’ll use them to outline the life sample and consider to make use of. - Line 4 imports
get_command_line_args()from theclimodule. You’ll use it to parse the command-line arguments and choices. - Line 6 defines the
major()perform. - Line 7 calls
get_command_line_args()and shops the ensuing namespace object inargs. - Line 8 makes use of the
args.viewcommand-line argument to entry the specified view on theviewsmodule. To entry the view, you employ the built-ingetattr()perform. This fashion, you’re guaranteeing that your code is scalable, permitting new views with out having to switchmajor(). Word that as a result of the decision togetattr()returns a category, you’ve used a capital letter inViewto indicate this reality. - Line 9 defines a conditional assertion to verify if the person has chosen to run all of the accessible patterns in a row. If that’s the case, then strains 10 and 11 run a loop over all of the patterns and show them on the display screen utilizing the
_show_pattern()helper perform. You’ll outline this perform in a second. - Traces 13 to 17 run at any time when the person selects a particular life sample to run the sport.
The _show_pattern() helper perform is a crucial a part of major(). Right here’s its definition:
On this perform, you’re taking the present view, sample, and command-line arguments as enter. Then, you employ a strive … besides block to create the view object and run its .present() technique. This block will catch and deal with any exception that will happen in the course of the sport’s evolution and print an error message to the usual error stream. This fashion, you present a user-friendly error message as an alternative of an advanced exception traceback.
Nice! The entry-point script is nearly prepared. You simply want so as to add a tiny element. You must name major() in order that this system’s execution can begin:
The Pythonic method to run major() in an executable script is to make use of the name-main idiom as you probably did within the above code snippet. This idiom ensures that the major() perform runs solely while you run the file as an executable program.
With the entry-point script in place, you can provide your Sport of Life a strive. Go forward and execute the next command to run the sport with all of the accessible life patterns:
This command will run your Sport of Life with all of the at the moment accessible life patterns. You’ll see one thing like this in your terminal window:
That appears actually superb, doesn’t it? You possibly can discover how the remainder of the command-line choices work. Go forward and provides it a strive! The --help choice will let you understand how to make use of the app’s CLI.
Step 7: Set Up the Sport for Set up and Execution
Up so far, you’ve run all of the required steps to have a completely useful implementation of Conway’s Sport of Life. The sport now has a user-friendly command-line interface that permits you to run it with completely different choices. You possibly can run the sport with a single sample, with all of the accessible patterns, and extra.
Though your Sport of Life works properly, you continue to want to make use of the python command to run the sport. This can be a bit annoying and may make you’re feeling like the sport isn’t an actual CLI app.
Within the following sections, you’ll learn to arrange your Sport of Life venture for set up utilizing a pyproject.toml file. You’ll additionally learn to set up the sport in a Python digital atmosphere to be able to run it as a stand-alone CLI software.
To obtain the code for this remaining step, click on the next hyperlink and look into the source_code_step_7/ folder:
Write a pyproject.toml File
Lately, the Python neighborhood has been shifting to the adoption of pyproject.toml recordsdata because the central configuration file for packaging and distributing Python initiatives. On this part, you’ll learn to write a minimal pyproject.toml file in your Sport of Life venture.
As its extension signifies, pyproject.toml makes use of the TOML format. You will discover the whole specification for writing pyproject.toml recordsdata in PEP 621. Following this specification, right here’s a pyproject.toml file in your Sport of Life venture:
The primary desk on this file defines the construct system that you simply wish to use when constructing the venture. On this tutorial, you’ll use the setuptools bundle for constructing functions.
Within the venture desk, you outline the venture’s identify as rplife. Then, you declare the venture’s model as a dynamic discipline, which you’ll load in a while within the device.setuptools.dynamic desk on the finish of the file.
Subsequent, you present a venture description, README file, and authors. The dependencies key holds a listing of exterior dependencies for this venture. On this case, you’ll want to set up the tomli library to course of the TOML file if the Python model is lower than 3.11.
Within the venture.scripts desk, you outline the app’s entry level, which is the major() perform from __main__.py within the rplife bundle.
Lastly, you load the applying’s model quantity from the __version__ dunder fixed that you simply outlined within the __init__.py file of your rplife bundle.
That’s it! You could have a minimal viable pyproject.toml file in your Sport of Life venture. Now, you and your customers can set up the applying and use it as a daily command-line app.
Set up and Run Your Sport of Life
When you’ve created an appropriate pyproject.toml file in your Sport of Life venture, then you may proceed to put in the venture in a devoted Python digital atmosphere. Go forward and run the next instructions in your terminal should you didn’t accomplish that within the first step of this tutorial:
With these instructions, you create and activate a brand new digital atmosphere. As soon as the atmosphere is energetic, you put in the venture in editable mode with the -e choice of pip set up.
The editable mode is sort of useful while you’re engaged on a Python venture. It permits you to set up the venture as a stand-alone app and take a look at it out as you’d do in manufacturing. This mode permits you to proceed including options and modifying the code whilst you take a look at it in actual time.
Now, you may run your Sport of Life as a daily command-line app. Go forward and run the next command:
Right here, you employ the rplife command on to run the sport with the Glider Gun sample for 100 generations. Word that you simply don’t have to make use of the python command any longer. Your venture now works as a daily command-line software. Isn’t that cool?
Conclusion
You’ve carried out Conway’s Sport of Life utilizing Python and object-oriented programming. To make the sport usable, you’ve constructed a user-friendly command-line interface utilizing argparse. Within the course of, you’ve realized tips on how to construction and manage a CLI app and arrange the applying for distribution and set up. That’s an important set of abilities for you as a Python developer.
On this tutorial, you’ve realized tips on how to:
- Implement Conway’s Sport of Life algorithm utilizing OOP
- Write a
cursesview to show the Sport of Life grid - Present the sport with an
argparsecommand-line interface - Arrange the sport for set up and execution
With all this data and ability, you’re prepared to start out digging into extra complicated initiatives and challenges.
Once more, you may obtain the whole supply code and different sources for this venture by clicking the hyperlink under:
Subsequent Steps
Now that you simply’ve completed constructing your Sport of Life venture, you may go a step additional by implementing a couple of further options. Including new options by your self will assist you to find out about thrilling new subjects.
Listed here are some concepts for brand spanking new options:
- Implement different views: Having different views other than the one primarily based on
cursescould be an important addition to your venture. For instance, you would write a Tkinter view the place you show the life grid in a GUI window. - Add thrilling new life patterns: Including new life patterns to
patterns.tomlwill permit you to discover different behaviors of the sport. - Change the foundations: Up to now, you’ve been working with the normal guidelines, the place lifeless cells with three dwelling neighbors are born, and dwelling cells with two or three dwelling neighbors survive. The shorthand for that is B3/S23, however there are a number of variations that use completely different guidelines to evolve to a brand new technology. Altering the foundations permits you to expertise different life-like universes.
When you implement these new options, then you may change gears and bounce into different cool initiatives. When you’d wish to create extra conventional video games, then try a few of the following tutorials:
- Construct a Cube-Rolling Utility With Python: On this step-by-step venture, you’ll construct a dice-rolling simulator app with a minimal text-based person interface utilizing Python. The app will simulate the rolling of as much as six cube. Every particular person die could have six sides.
- Construct a Hangman Sport for the Command Line in Python: On this step-by-step venture, you’ll learn to write the sport of Hangman in Python for the command line. You’ll learn to construction the sport as a text-based interface (TUI) software.
- Construct a Tic-Tac-Toe Sport Engine With an AI Participant in Python: On this step-by-step tutorial, you’ll construct a common sport engine in Python with tic-tac-toe guidelines and two pc gamers, together with an unbeatable AI participant utilizing the minimax algorithm. You’ll additionally create a text-based graphical entrance finish in your library and discover two different entrance ends.
- Construct a Maze Solver in Python Utilizing Graphs: On this step-by-step venture, you’ll construct a maze solver in Python utilizing graph algorithms from the NetworkX library. Alongside the best way, you’ll design a binary file format for the maze, symbolize it in an object-oriented manner, and visualize the answer utilizing scalable vector graphics (SVG).
- Construct a Wordle Clone With Python and Wealthy: On this step-by-step venture, you’ll construct your individual Wordle clone with Python. Your sport will run within the terminal, and also you’ll use Wealthy to make sure your word-guessing app appears to be like good. Discover ways to construct a command-line software from scratch after which problem your mates to a wordly competitors!
What is going to you do subsequent? Share your concepts within the feedback!