

Learn NFT knowledge and even show the person’s NFTs
Moore’s legislation, which was actually extra of a rule of thumb, is the commentary that the variety of transistors in a dense built-in circuit double about each two years. I felt the impression of Moore’s legislation within the early years of my profession because the PC revolution started to increase.
Through the peak of the PC revolution, issues have been transferring quick whereas companies like Microsoft, Novell, and Borland claimed possession and helped set requirements for this new period of computing. The truth that CPU energy was doubling each 18 to 24 months turned a much-needed asset on the time to permit advanced options and functionalities to change into realities.
I really feel like Web3 is in an analogous place, with new instruments, frameworks, protocols, and ideas like multi-chain being launched always. Clearly, the variety of choices in place for Web3 18 to 24 months in the past pale as compared to what’s out there in the present day.
One instance is how Coinbase Cloud is rising its suite of instruments — with the introduction of its Node service with Superior APIs and a complete NFT API.
On this article, I’ll dive in and see how straightforward it’s to get began and create one thing of worth. However first, let’s ensure that everyone seems to be on the identical web page.
In my final article, we explored the Coinbase API from a Web2 start line. For individuals who might have missed it, I created a easy frontend that allowed us to attach our pockets and ship some ETH utilizing the Coinbase APIs.
The objective of that publication was to provide Web2 builders a primary introduction to interacting with the blockchain. It allowed early adopters to switch funds to themselves — all for a small fuel charge.
This was actually not all that the Coinbase APIs have to supply, which is why a pure development is to discover some new tech by Coinbase that may make our dapp extra practical. The recently-announced Coinbase Cloud Node and NFT APIs actually caught my eye.
The Coinbase Cloud Node and NFT APIs include some engaging advantages to drive developer adoption:
- Enterprise-grade safety is included by default.
- The answer is constructed by one of many Web3 leaders.
- Builders can get began without spending a dime — with choices to scale as you succeed.
One of many challenges Web3 builders have confronted is the power to question/transact over a number of blockchain networks. The Coinbase Cloud Node service and Superior APIs make querying and transacting on a number of blockchain networks a breeze — and embrace complete knowledge out of your queries.
From an NFT perspective, the Coinbase NFT APIs can gather NFT metadata from collections on a number of blockchains rapidly and simply, fixing the identical downside within the ever-growing NFT side of Web3.
Let’s see how we are able to put them collectively to construct a dapp that can show a person’s NFTs in a set. It’s vital to notice that of their current states, these APIs are at the moment solely out there on the Ethereum Community, in order that’s what we can be utilizing.
For the demonstration portion of this text, we are going to construct on prime of the earlier challenge from my final article and make our dapp extra practical utilizing the Coinbase Cloud Node and NFT APIs. We’ll embrace the next performance:
- Enter in an NFT contract tackle
- Coinbase Cloud Node’s superior API reads the contract metadata to point out the gathering title
- The Superior API checks the related account’s pockets for the variety of NFTs within the assortment
- Relying on the variety of NFTs, enter fields pop as much as enter the NFT ID numbers
- The NFT API makes use of these ID numbers to return the pictures of the account’s NFTs from that assortment
1. Organising your account
Earlier than getting began with the challenge although, join a Coinbase Cloud account right here.
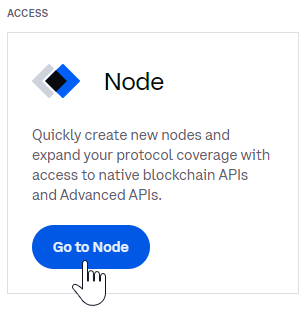
After organising your account, choose the Go to Node choice in your dashboard after which Create new challenge.
As you may see from the checklist of networks on this web page, there’s rather a lot to select from! Nevertheless, to make issues straightforward, we’ll select Ethereum Mainnet.

Choose the Free plan and provides your challenge a reputation, then click on the Go to challenge button.
Word: After clicking the button, a dialogue will pop up containing your Username and Password.
Don’t shut this dialogue till you’ve copied your password.
Coinbase doesn’t retailer your password, so should you fail to repeat your password, you’ll have to start out a brand new challenge.

After you’ve copied your username and password, click on Subsequent to obtain your Endpoint. Copy this alongside together with your username and password, and we’ll use all of it within the challenge.
2. Organising the challenge
To proceed with the remainder of the challenge, you have to the next:
In case you adopted together with my final tutorial, that’s nice! You’ll have already got a place to begin for this one. If not, don’t fear, you will discover the challenge we can be beginning right here:
https://gitlab.com/johnjvester/coinbase-wallet-example
Or simply run this command out of your terminal within the listing you want to work from:
git clone https://gitlab.com/johnjvester/coinbase-wallet-example.git
Subsequent, change directories into the brand new folder and set up dependencies:
cd coinbase-wallet-example && npm i
Now run npm begin simply to ensure every thing is working accurately up up to now. Navigate to http://localhost:3000/, and you need to have a web page that appears like this:
Together with your Web3 pockets browser extension put in, choose Join Pockets to attach and swap to the Ropsten Community. As soon as that’s full, you need to see your pockets tackle because the Linked Account.
Superior! Now that we all know every thing is working, let’s add our new performance. Open up the challenge in your code editor and navigate to the ./src/App.js file.
3.a. Credentials and headers
First, let’s add a bit code of our personal. Beneath the import statements, we’ll add our Coinbase URL, username, password, and a few code to create the headers we can be passing together with our API calls.
Subsequent, we have to modify the DEFAULT_CHAIN_ID and DEFAULT_ETHEREUM_CHAIN_ID and DEFAULT_ETH_JSONRPC_URL. We’ll change these to 1, ‘0x1’, and COINBASE_URL respectively. It’s because we can be interacting with the Ethereum Mainnet, fairly than Ropsten Testnet.
Subsequent, we are able to delete the road declaring the DONATION_ADDRESS variable, as we received’t be utilizing it.
Now we are going to add a bit code of our personal.
All of the code earlier than the App declaration ought to now appear to be this:
Word: Make sure to add your personal API Endpoint, Username, and Password within the above code.
3.b. React state variables
Add a number of new React state variables and delete the responseMessage variable. Our State variables part ought to now look this:
// React State Variables
const [isWalletConnected, setIsWalletConnected] = useState(false);
const [account, setAccount] = useState();
const [walletSDKProvider, setWalletSDKProvider] = useState();
const [web3, setWeb3] = useState();
const [nftAddress, setNftAddress] = useState();
const [ownedNFTs, setOwnedNFTs] = useState(0);
const [nftContractName, setNftContractName] = useState();
const [imageSource, setImageSource] = useState([]);
const [displayNFTs, setDisplayNFTs] = useState(false);
3.c. Create new capabilities — Coinbase cloud node superior API calls
The remainder of the code as much as the donate perform doesn’t want to vary, except you need to change the message ‘Efficiently switched to Ropsten Community’ to ‘Efficiently switched to Ethereum Mainnet’ to be extra correct.
Subsequent, we are able to delete the donate perform in its entirety, as we received’t be utilizing it anymore. In order that simply leaves the HTML. Nevertheless, earlier than we get to that, let’s add some new capabilities.
First, add the perform for getting the NFT assortment’s title and checking the related account to see what number of NFTs from the gathering they personal. Right here’s the code:
Let’s stroll via this code so we are able to perceive what’s happening.
First, we’re setting the state variable displayNFTs to false so after we enter in a brand new contract tackle it is going to reset our interface. (We’ll change the HTML for this afterward.)
Subsequent, we’re getting the NFT contract tackle from the person enter and set it to our nft_Address state variable.
Then we make two fetch requests to the Coinbase Cloud Node Superior API utilizing our COINBASE_URL, HEADERS, and NFT_ADDRESS variables and set our nftContractName and ownedNFT state variables with knowledge from the responses. Discover we’re calling the coinbaseCloud_getTokenMetadata and coinbaseCloud_getBalances superior API strategies.
3.d. Create new capabilities — add enter fields
Superior. Subsequent, we’ll add a perform to create enter fields primarily based on what number of NFTs the account owns from the gathering:
3.e. Create new capabilities — get NFT photographs
And the final perform we’ll add is one to question the Coinbase NFT API to return the NFT picture URLs primarily based on the NFT IDs the person provides and push them to the imageSource state variable array. We then set the displayNFTs state variable to true:
And that’s all of the JavaScript out of the best way. Now, let’s change the html portion of our React code to show every thing correctly.
3.f. Altering the HTML
We’ll make a number of adjustments to the HTML so it shows every thing we’d like. The HTML portion of your code ought to appear to be the next:
There are some things to notice within the above code. First, we’re supplying a default NFT contract tackle in case the person doesn’t have one. On this case, the Bored Ape Yacht Membership contract tackle.
Our Test Contract button calls the getNftContract perform after which shows what number of NFTs the related account owns from the contract tackle, and likewise the gathering’s title.
If the person owns NFTs from the equipped contract tackle, the addFields perform is known as and quite a few enter fields will seem primarily based on what number of they personal.
Lastly, the Get NFTs button will name the getImages perform and the next code iterates via the imageSource array to show the pictures from the NFT URLs it accommodates.
4. See it in motion
That’s it! If every thing was entered accurately and also you equipped your personal Coinbase Node API Endpoint, Username, and Password, you need to have a challenge that capabilities like the next:

Your entire supply code for this challenge ought to appear to be this:
Since 2021, I’ve been attempting to dwell by the next mission assertion, which I really feel can apply to any expertise skilled:
“Focus your time on delivering options/performance that extends the worth of your mental property. Leverage frameworks, merchandise, and providers for every thing else.” — J. Vester
Web3 builders discover themselves in an analogous place I used to be in at first of my profession — navigating via the hopes and desires of the PC revolution. With computing energy doubling each 18 to 24 months, it appeared like no function or performance was out of scope. Nevertheless, all of us rapidly realized that there’s extra than simply CPU energy that needs to be driving selections.
Web3 builders want the suitable set of instruments, frameworks, merchandise, and providers to assist them change into profitable. On this publication, we explored the Coinbase Cloud Node and NFT APIs which strongly adhere to my private mission assertion.
Inside an inexpensive set of program logic, we have been capable of efficiently use these APIs to learn NFT knowledge and even show the customers’ NFTs. The time saved by leveraging the Coinbase Cloud choices will permit builders to deal with their main targets and aims.
In case you are within the supply code for this text, it may be discovered on the following URL:
https://gitlab.com/johnjvester/coinbase-node-nft-api-tutorial
Moore’s legislation began slowing down again in 2010, and most agree that it’ll attain its finish of life in about three years — as a consequence of bodily limitations. This can possible pave the best way for brand spanking new options to pave the best way — like quantum computing, synthetic intelligence, and machine studying. This isn’t too totally different from how Web3 is changing into a beautiful choice for assembly enterprise wants.
Have a very nice day!