

In case you are a developer and don’t like the actual fact of embedding third occasion code senselessly into your web site, it is a excellent put up for you. We are going to undergo the method of constructing a customized electronic mail sign-up type on your web site so you may develop your viewers. We are going to use React, however the identical rules apply to any library or framework, like Gatsby or Subsequent.js.
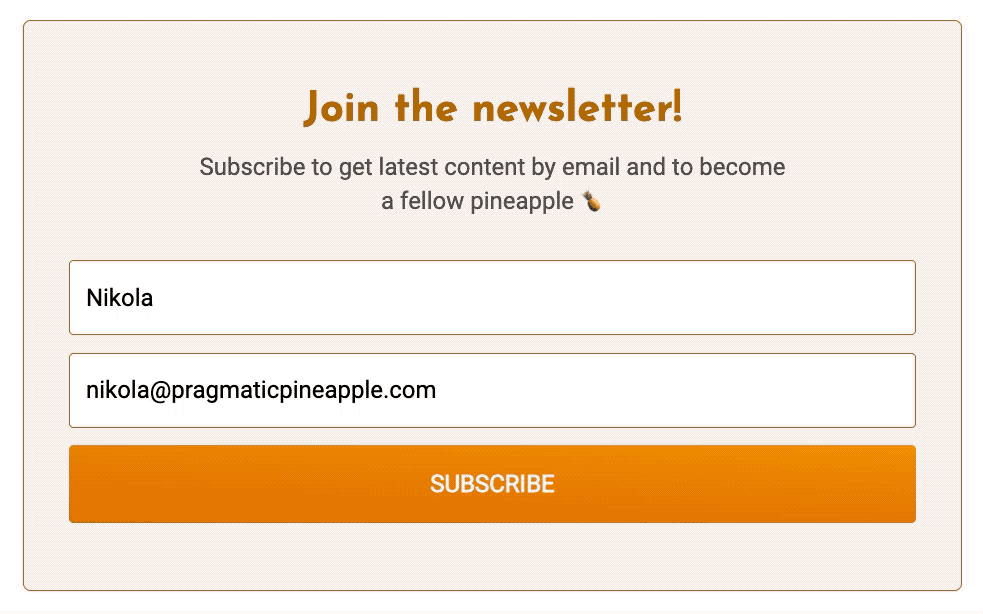
In case you are somebody returning to my weblog, you may need observed a small type on the underside of just about any web page. It’s a type the place you may join my e-newsletter, and I’ve modified it a bit over time. Under is how the shape seems to be on the time of the writing:

At first, I used some out-of-the-box options given by varied suppliers. I used to be most pleased with ConvertKit, and its type seems to be, so I went with it for some time. I designed the shape in ConvertKit’s UI and embedded its HTML on my weblog. Right here’s the way it seemed within the early days:

I used to be impressed by what you may obtain with their type builder, however being a developer, I used to be not too keen on copying loads of code and kinds that I do know little about. After all, I might have dived within the CSS and figured it out. And I needed to do precisely that at any time when I needed to tweak the shape seems to be. However I all the time wished to create a customized type with my kinds and habits that fits me.
So, with out additional ado, allow us to soar in and see how one can design and put a customized type that permits customers to subscribe.
Kind structure
If you wish to develop your e-newsletter, you in all probability want only a identify and an electronic mail of the particular person signing up. After all, you may go loopy and create this tremendous duper lengthy type, however the possibilities of folks filling it and signing up on your e-newsletter are going to go down in all probability. However hey, who am I to cease you? Knock your self out.
So to start out, we will simply construct a easy HTML type with two enter fields and a submit button. To remind you, I’ll present how that is finished within the React context, however it ought to be fairly intuitive on how one can do it in uncooked HTML or another library/framework. Right here’s the JSX model:
const SubscribeForm = () => {
  const [email, setEmail] = useState("")
  const [name, setName] = useState("")

  const handleSubmit = async (occasion: React.FormEvent) => {

  }

  const handleEmailChange = (occasion: React.ChangeEvent<HTMLInputElement>) => {
    const { worth } = occasion.goal
    setEmail(worth)
  }

  const handleNameChange = (occasion: React.ChangeEvent<HTMLInputElement>) => {
    const { worth } = occasion.goal
    setName(worth)
  }

  return (
    <type onSubmit={handleSubmit}>
      <enter
        aria-label="Your first identify"
        identify="fields[first_name]"
        placeholder="Your first identify"
        kind="textual content"
        onChange={handleNameChange}
        worth={identify}
      />
      <enter
        aria-label="Your electronic mail deal with"
        identify="email_address"
        placeholder="Your electronic mail deal with"
        required
        kind="electronic mail"
        onChange={handleEmailChange}
        worth={electronic mail}
      />
      <button>SUBSCRIBE</button>
    </type>
  )
}
Congrats, you simply noticed a basic HTML type in React’s implementation. A type tag, tied collectively by two enters and one button. However, let’s not simply soar over it. There’s essential data that may later assist us once we submit knowledge to ConvertKit. Please return a have a look at two enter fields and their names. The fields[first_name] and email_address will show worthwhile in a second.
Sending the information
OK, so we bought the shape rendering, however should you ship this type as is, no consumer will have the ability to subscribe and present up within the ConvertKit. To permit customers to subscribe, we have to ship knowledge to ConvertKit by ourselves. Right here’s how we will do it in our handleSubmit operate:
const SubscribeForm = () => {
  ...
  const FORM_URL = `your type URL, we'll describe it in a sec`

  const handleSubmit = async (occasion: React.FormEvent) => {
    occasion.preventDefault()

    const knowledge = new FormData(occasion.goal as HTMLFormElement)

    strive {
      const response = await fetch(FORM_URL, {
        technique: "put up",
        physique: knowledge,
        headers: {
          settle for: "software/json",
        },
      })
      const json = await response.json()

      if (json.standing === "success") {
        return
      }
    } catch (err) {
      console.log(err)
    }
  }

  ...
}
Cool, we added the logic that makes a POST request to a FORM_URL with the shape knowledge, and we account for any errors that occur alongside the best way. One factor we’re lacking right here to be a full answer is a correct worth for the FORM_URL. You may create your personal by making a type on ConvertKit.
After you have the shape created, copy the shape ID from ConvertKit’s type editor URL. For instance, the URL the place you edit your type may be one thing like this https://app.convertkit.com/types/designers/123456/edit. The 123456 is your type ID. Then, you may tape collectively the FORM_URL to be https://app.convertkit.com/types/123456/subscriptions.
You can even get it from ConvertKit while you attempt to embed your type. Go to the HTML choice to embed, and there you will discover one thing like this:
<type motion="https://app.convertkit.com/types/123456/subscriptions" ...>
  ...
</type>
The motion worth is what it’s good to snatch and use within the customized type.
Now, do you bear in mind these enter identify attributes we talked about earlier than? I’ll remind you – we added the fields[first_name] and email_address to our enter fields. These names will construct a correct FormData object that ConvertKit expects. So we simply mimicked what the embedded ConvertKit type does for us. Now, when the consumer clicks the “SUBSCRIBE” button, they are going to really present up in ConvertKit as a subscriber. How neat.
We are able to now improve the consumer expertise within the subsequent part. Learn on.
Private touches
Why would we construct a customized type that does the identical factor because the third half one? Properly, sure, we will higher outline its kinds, and we’ve got extra management over what’s proven to the consumer. However my purpose to do all this was so as to add a bit extra performance to the shape. For instance, while you subscribe to my e-newsletter, you get a candy transition that claims thanks and mentions your identify. It’s undoubtedly not needed, however I discover it charming and contemplate it a very good consumer expertise.
You are able to do it your self as nicely, allow us to strive it out within the instance beneath:
const SubscribeForm = () => {
  const [status, setStatus] = useState<string | null>(null)
  const [email, setEmail] = useState("")
  const [name, setName] = useState("")

  const FORM_URL = `the URL you created within the earlier part`

  const handleSubmit = async (occasion: React.FormEvent) => {
    occasion.preventDefault()

    const knowledge = new FormData(occasion.goal as HTMLFormElement)

    strive {
      const response = await fetch(FORM_URL, {
        technique: "put up",
        physique: knowledge,
        headers: {
          settle for: "software/json",
        },
      })

      setEmail("")
      const json = await response.json()

      if (json.standing === "success") {
        setStatus("SUCCESS")
        return
      }
    } catch (err) {
      setStatus("ERROR")
      console.log(err)
    }
  }

  const handleEmailChange = (occasion: React.ChangeEvent<HTMLInputElement>) => {
    const { worth } = occasion.goal
    setEmail(worth)
  }

  const handleNameChange = (occasion: React.ChangeEvent<HTMLInputElement>) => {
    const { worth } = occasion.goal
    setName(worth)
  }

  return (
    <div>
      {standing === "SUCCESS" && (
          <p>
            Welcome aboard{identify ? `, ${identify}` : ""}{" "}
            <span position="img" aria-label="Ship">
              🚢
            </span>
          </p>
          <p>Please test your inbox to verify the subscription!</p>
      )}
      {standing === "ERROR" && (
          <p>Oops, one thing went flawed...</p>
          <p>
            Please,{" "}
            <button onClick={() => setStatus(null)}>strive once more.</button>
          </p>
      )}
      {standing === null && (
          <type onSubmit={handleSubmit}>
            <enter
              aria-label="Your first identify"
              identify="fields[first_name]"
              placeholder="Your first identify"
              kind="textual content"
              onChange={handleNameChange}
              worth={identify}
            />
            <enter
              aria-label="Your electronic mail deal with"
              identify="email_address"
              placeholder="Your electronic mail deal with"
              required
              kind="electronic mail"
              onChange={handleEmailChange}
              worth={electronic mail}
            />
            <button>SUBSCRIBE</button>
          </type>
      )}
    </div>
  )
}
We’re doing an identical factor as earlier than, besides we added a STATUS of the shape. It may be both null, SUCCESS, or ERROR. We render a unique output for the consumer primarily based on these three values. Right here’s how I did it on my weblog when a consumer is subscribed:
And right here is the way it’s finished when one thing dangerous occurs:
However don’t belief the GIFs I posted. Attempt it out your self and join my e-newsletter on the backside of this weblog put up and let me know what you consider the signing up expertise.
Summing up
Having management and a closing ask on what you set in your web site is nice. It might probably enable you to customise the way it exhibits and behaves, which isn’t one thing that’s not usually obtainable. On this weblog put up, we confirmed how one can arrange your personal type for a e-newsletter so customers can enroll with a number of further touches.
My weblog is open-source, and you will discover this type (however with styling) on the weblog repo right here. Pull requests, stars, and strategies are welcome and inspired.
If you happen to appreciated it, I dare you to do it in your web site however add a bit little bit of aptitude, perhaps some animations should you’re into that. If you happen to’re focused on seeing extra `content material like this, contemplate subscribing to the e-newsletter we talked about a few instances.
I need to do an identical weblog put up, making a customized exhibiting of tweets. Normally, you copy the code from Twitter and paste it in your web site to embed tweets. I plan to construct one thing to point out tweets myself, so I don’t load loads of Twitter code. Keep tuned for that.
All in all, thanks for tuning in and following this weblog put up. Share it with your mates and coworkers on Twitter should you discover it helpful:
New put up on how one can construct a customized electronic mail enroll type on your React web site 👇https://t.co/cuCpq4kZS1
— Nikola Đuza (@nikolalsvk) February 9, 2022
Till the following one, cheers.