

Leaflet.js is at the moment one of the widespread mapping libraries. It’s a versatile, light-weight, and open-source JavaScript library for creating interactive maps.
Leaflet is a framework for presenting map knowledge. The information, together with the bottom map layer, should be supplied by the builders. The maps are composed of tile layers together with browser assist, default interactivity, panning and zooming capabilities. You can too add extra customized layers and plugins, together with all of the mapping in Leaflet. This mapping library converts your knowledge to map layers and has great assist, making it the primary alternative for many builders. It really works rather well throughout main desktop and cellular platforms, making it an ideal JavaScript library for cellular and bigger display screen maps as nicely.
On this tutorial, I’m going to indicate you easy methods to create a wonderful and interactive map of the South Pacific with HTML, CSS and Leaflet that may spotlight the most well-liked seashores. I collected the information from the TripAdvisor web site and collated the highest ten seashores of the South Pacific as rated by the Travellers’ Alternative 2021 ballot.
Have you ever seen some attention-grabbing on-line maps and wished to create one your self? Observe alongside on this thrilling journey as I present you easy methods to plot a cool map and spotlight the highest ten seashores utilizing Leaflet.
Making a Primary Leaflet Map in 4 Steps
The method for constructing a easy map with leaflet is easy. Some background data of HTML and JavaScript is useful, however don’t fear if you happen to’re a whole newbie. It’s fairly simple with this JavaScript library, and I’ll stroll you thru every line of code as I create this gorgeous, insightful map.
Create a primary HTML web page
To start out with, I create an HTML web page to render the map object. I then add a </div> to carry the map and provides it an ID like map to reference later. Subsequent, I add some type particulars the place I specify the width and top as 100vw and 100vh. This may make the map occupy the entire web page:
<!DOCTYPE html>
<html lang="en">
  <head>
    <meta charset="utf-8">
    <title>Leaflet Map</title>
    <type kind="textual content/css">
      physique{
        margin: 0;
        padding: 0;
      }
      #map {
        width: 100vw;
        top: 100vh;
      }
    </type>
  </head>
  <physique>
    <div id="map"></div>
  </physique>
</html>
Reference the recordsdata of the open-source Leaflet JavaScript library
Since I’m utilizing the Leaflet library, I would like to incorporate the required JavaScript and CSS recordsdata of this library. You’ll be able to obtain the recordsdata instantly, use the JavaScript bundle supervisor (npm) to put in the recordsdata regionally, or use the hosted model from their CDN:
<!DOCTYPE html>
<html lang="en">
  <head>
    <meta charset="utf-8">
    <title>Leaflet Map</title>
    <hyperlink rel="stylesheet" href="https://unpkg.com/leaflet@1.6.0/dist/leaflet.css" integrity="sha512-xwE/Az9zrjBIphAcBb3F6JVqxf46+CDLwfLMHloNu6KEQCAWi6HcDUbeOfBIptF7tcCzusKFjFw2yuvEpDL9wQ==" crossorigin="" />
    <type kind="textual content/css">
      physique{
        margin: 0;
        padding: 0;
      }
      #map {
        width: 100vw;
        top: 100vh;
      }
    </type>
  </head>
  <physique>
    <div id="map"></div>

    <script src="https://unpkg.com/leaflet@1.6.0/dist/leaflet.js" integrity="sha512-gZwIG9x3wUXg2hdXF6+rVkLF/0Vi9U8D2Ntg4Ga5I5BZpVkVxlJWbSQtXPSiUTtC0TjtGOmxa1AJPuV0CPthew==" crossorigin=""></script>
    <script>

    </script>
  </physique>
</html>
Word: the integrity attribute permits a browser to test the fetched script to make sure that the code isn’t loaded if the supply has been manipulated.
Put together the information
To plot any map, I require co-ordinate values like latitude and longitude. I collate the latitude and longitude for every of the information factors from this website right here. Furthermore, for the Leaflet growth, I additionally want the bottom layer, which I get from a website known as OpenStreetMap.
Arrange the Leaflet map
Now comes the attention-grabbing a part of creating the map by writing some strains of code. You gained’t imagine how few strains of code are required to create absolutely purposeful maps with Leaflet. This ease of growth, together with the truth that Leaflet is an open-source JavaScript library, places it excessive on the record of mapping libraries.
So, to start with, keep in mind that all the things on this JavaScript library is accessed by the letter “L”, and all of the features are prolonged via it.
Initialize the map
The very first thing I do is declare the map variable and initialize it with the Leaflet map. The primary parameter is the ID of the <div> beforehand outlined. The second is the place you need the centre of the map to be. The final is the zoom degree. I’ve set the zoom to three.5, however you possibly can set it to something you want.
I exploit these parameters for my map, however there are many totally different choices accessible for setting the state of map, interplay, animation and occasions which you can take a look at right here:
const map = L.map('map', {
  heart: [-29.50, 145],
  zoom: 3.5
});
Add the bottom layer
Subsequent, I’ve added the tile layer, which would be the base layer for the Leaflet map. A tile layer is a set of tiles accessed over a server by a direct URL request. This tile layer provides the geographic boundaries to the map.
You should definitely embrace attribution textual content for this, as most builders neglect to try this:
L.tileLayer('https://{s}.tile.openstreetmap.org/{z}/{x}/{y}.png', { attribution: '© <a href="https://www.openstreetmap.org/copyright">OpenStreetMap</a> contributors' }).addTo(map);
Add the default markers
To point the seashores, I add markers. Leaflet offers this function as default. Since I would like to indicate ten seashores, I’ll add a marker every with the latitude and longitude values of the respective seaside:
const marker1 = L.marker([-37.699450, 176.279420]).addTo(map);
const marker2 = L.marker([-27.643310, 153.305140]).addTo(map);
const marker3 = L.marker([-33.956330, 122.150270]).addTo(map);
const marker4 = L.marker([-34.962390, 117.391220]).addTo(map);
const marker5 = L.marker([-17.961210, 122.214820]).addTo(map);
const marker6 = L.marker([-16.505960, 151.751520]).addTo(map);
const marker7 = L.marker([-22.594400, 167.484440]).addTo(map);
const marker8 = L.marker([-37.977000, 177.057000]).addTo(map);
const marker9 = L.marker([-41.037600, 173.017000]).addTo(map);
const marker10 = L.marker([-37.670300, 176.212000]).addTo(map);
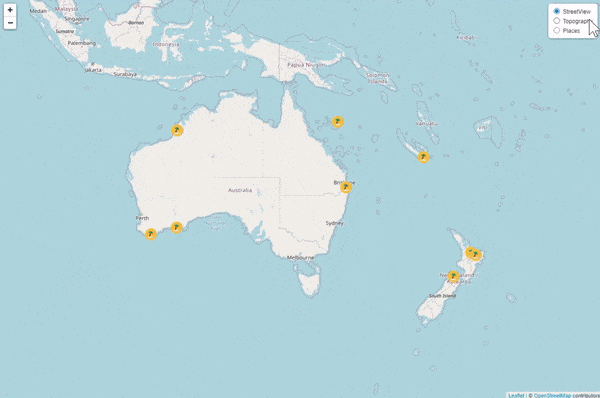
Voila! A fully beautiful and purposeful Leaflet map is all arrange and prepared. Wasn’t this Leaflet growth a breeze?
The picture beneath reveals what this all appears like thus far.
You will discover your complete code on this Pen:
See the Pen
Leaflet High South Pacific Seashores-Preliminary by SitePoint (@SitePoint)
on CodePen.
Customizing the Leaflet Map
One of many useful options of the Leaflet JavaScript library is its facility for constructing primary maps rapidly and likewise its having a load of choices to customise the maps. So, let me present you 4 methods to make this Leaflet map extra informative and aesthetically higher.
1. Disable zoom with mouse scroll
One of many main desktop points is the unintended scrolling of the map when making an attempt to navigate via a web page. To deal with this, I modify the code the place I had declared the map within the set-up stage. I’ll add the scrollWheelZoom attribute and set it to false, which ensures that the map could be zoomed solely utilizing the zoom buttons. I’ll additionally use a special technique to set the centre and the zoom degree that works effectively and is extra readable:
const map = L.map('map', {scrollWheelZoom:false}).setView([-29.50, 145], 3.5);
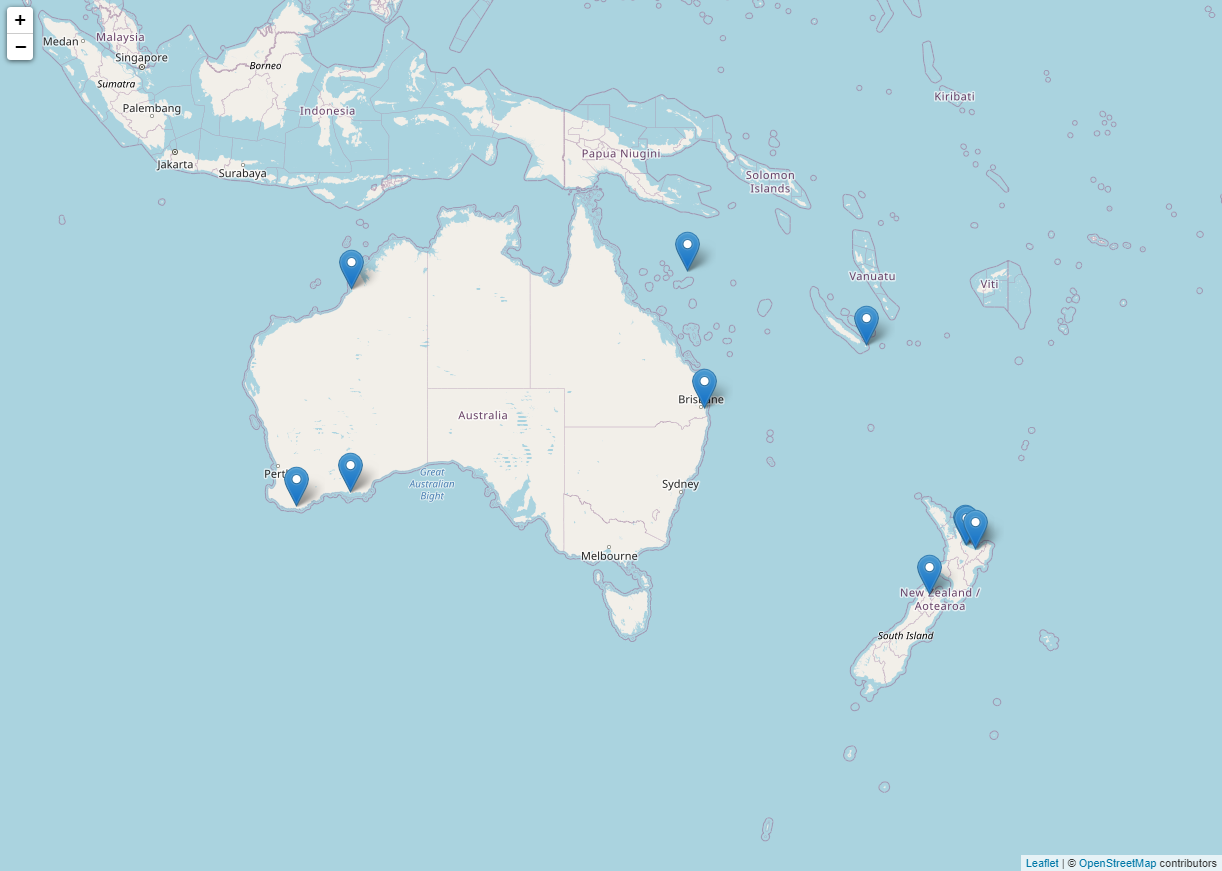
2. Add layers to the map
One other thrilling and helpful function of Leaflet is the choice so as to add a number of vector layers. Retaining the road view as one of many layers, I’ll add two extra tile layers from a website that gives free internet map service (WMS). I’ll add a topography layer and a locations layer:
const basemaps = {
StreetView: L.tileLayer('https://{s}.tile.openstreetmap.org/{z}/{x}/{y}.png', {attribution: '© <a href="https://www.openstreetmap.org/copyright">OpenStreetMap</a> contributors'}),
Topography: L.tileLayer.wms('http://ows.mundialis.de/providers/service?', {layers: 'TOPO-WMS'}),
Locations: L.tileLayer.wms('http://ows.mundialis.de/providers/service?', {layers: 'OSM-Overlay-WMS'})
};
Leaflet additionally offers the function to present the consumer management over which layer to render. Utilizing that function, I’ll add an choices menu button on the highest proper of the web page that lets you choose which of the three layers you need overlaid on the map:
L.management.layers(basemaps).addTo(map);
Lastly, I’ll set the Topography layer because the default layer to render. Within the closing model, I’ll revert to Streetview because the default possibility:
basemaps.Topography.addTo(map);
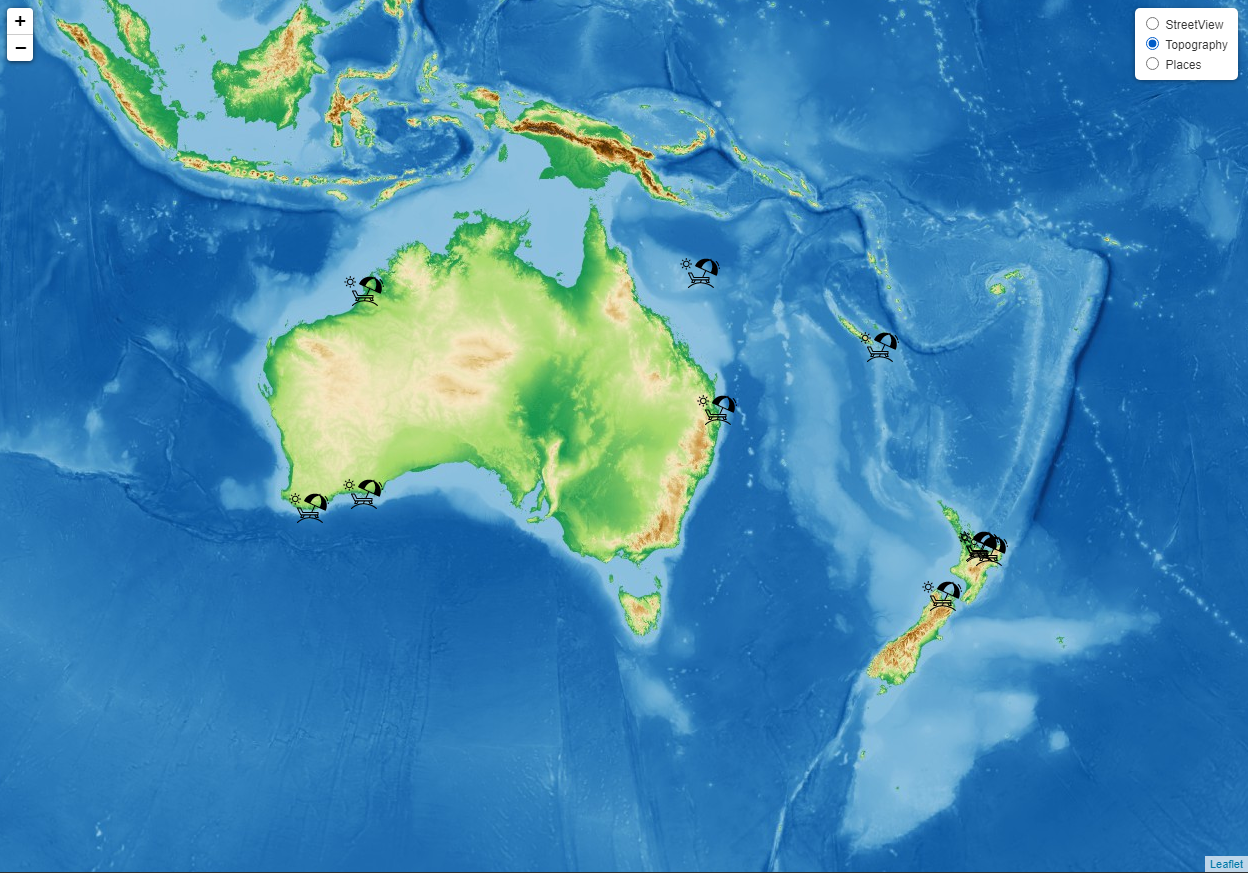
3. Customise the markers
The default marker is nice for indicating a location, however customized markers give a customized look to the map, and it’s fairly simple to set it up utilizing the Leaflet library.
To outline an icon, I’ll must specify the URL and dimension of the icon. I’ll obtain a free SVG icon and host it on my GitHub account, which offers the URL. I’ll set the scale to 40, however you possibly can preserve it roughly.
Now, I’ll merely add this icon to every marker outlined beforehand, and that’s it. All of the markers indicating the seaside are actually seaside icons:
const basicBeachIcon = L.icon({
  iconUrl: 'https://uncooked.githubusercontent.com/shacheeswadia/leaflet-map/foremost/beach-icon-chair.svg',
  iconSize: [40, 40],
});

const marker1 = L.marker([-37.699450, 176.279420], {icon: basicBeachIcon}).addTo(map);
const marker2 = L.marker([-27.643310, 153.305140], {icon: basicBeachIcon}).addTo(map);
const marker3 = L.marker([-33.956330, 122.150270], {icon: basicBeachIcon}).addTo(map);
const marker4 = L.marker([-34.962390, 117.391220], {icon: basicBeachIcon}).addTo(map);
const marker5 = L.marker([-17.961210, 122.214820], {icon: basicBeachIcon}).addTo(map);
const marker6 = L.marker([-16.505960, 151.751520], {icon: basicBeachIcon}).addTo(map);
const marker7 = L.marker([-22.594400, 167.484440], {icon: basicBeachIcon}).addTo(map);
const marker8 = L.marker([-37.977000, 177.057000], {icon: basicBeachIcon}).addTo(map);
const marker9 = L.marker([-41.037600, 173.017000], {icon: basicBeachIcon}).addTo(map);
const marker10 = L.marker([-37.670300, 176.212000], {icon: basicBeachIcon}).addTo(map);
Take a look at how this customized model appears right here and mess around with the code on CodePen.
See the Pen
Leaflet High South Pacific Seashores-Intermediate by SitePoint (@SitePoint)
on CodePen.
This icon was simply an instance, so preserve an eye fixed out for a funkier icon as I modify the customized marker within the closing model of the visualization.
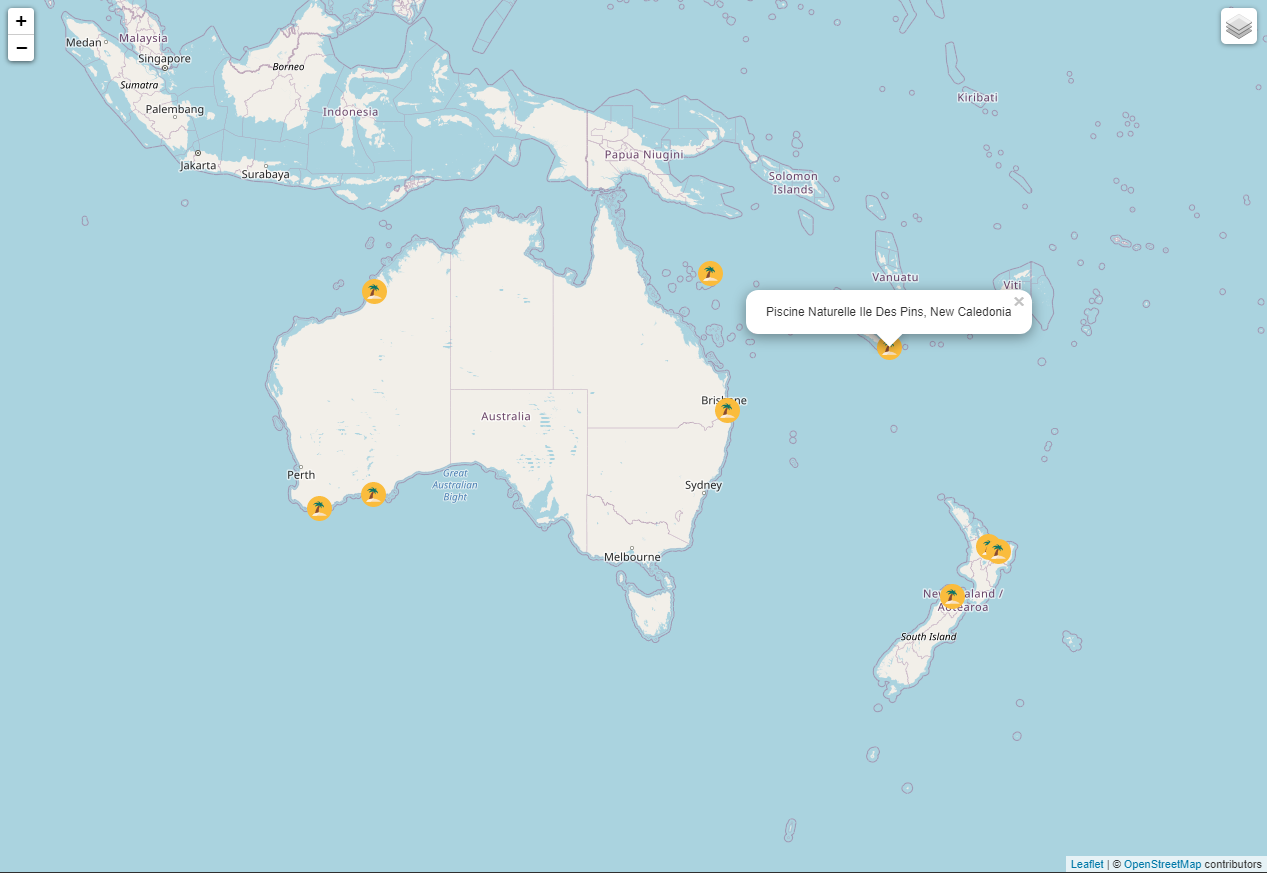
Like tooltips, pop-ups can pack in additional details about the information. A popup in maps is displayed on clicking and could be custom-made to your choice. With Leaflet, the popup function could be very simply added with a perform known as bindPopup.
Since we’re displaying seashores on our map object, I resolve to indicate the identify of every seaside within the popup. I simply add the textual content to the perform and bind it to every of the markers:
const marker1 = L.marker([-37.699450, 176.279420], {icon: basicBeachIcon})
    .bindPopup('Whitehaven Seashore, Whitsunday Island')
    .addTo(map);
const marker2 = L.marker([-27.643310, 153.305140], {icon: basicBeachIcon})
    .bindPopup('Turquoise Bay Exmouth, Australia')
    .addTo(map);
const marker3 = L.marker([-33.956330, 122.150270], {icon: basicBeachIcon})
    .bindPopup('Cape Le Grand Nationwide Park Esperance, Australia')
    .addTo(map);
const marker4 = L.marker([-34.962390, 117.391220], {icon: basicBeachIcon})
    .bindPopup('Greens Pool Denmark, Australia')
    .addTo(map);
const marker5 = L.marker([-17.961210, 122.214820], {icon: basicBeachIcon})
    .bindPopup('Cable Seashore Broome, Australia')
    .addTo(map);
const marker6 = L.marker([-16.505960, 151.751520], {icon: basicBeachIcon})
    .bindPopup('Matira Seashore, Society Islands')
    .addTo(map);
const marker7 = L.marker([-22.594400, 167.484440], {icon: basicBeachIcon})
    .bindPopup('Piscine Naturelle Ile Des Pins, New Caledonia')
    .addTo(map);
const marker8 = L.marker([-37.977000, 177.057000], {icon: basicBeachIcon})
    .bindPopup('Ohope Seashore Whakatane, New Zealand')
    .addTo(map);
const marker9 = L.marker([-41.037600, 173.017000], {icon: basicBeachIcon})
    .bindPopup('Kaiteriteri Seashore, New Zealand')
    .addTo(map);
const marker10 = L.marker([-37.670300, 176.212000], {icon: basicBeachIcon})
    .bindPopup('Mt Maunganui Predominant Seashore, New Zealand')
    .addTo(map);
And that’s a wrap! You will discover the entire code on CodePen.
See the Pen
Leaflet High South Pacific Seashores-Last by SitePoint (@SitePoint)
on CodePen.
Different customizations with Leaflet maps
Other than what I’ve proven you on this tutorial, there’s a plethora of customization choices with Leaflet — akin to including shapes like circles or polygons, customizing the popup, and including occasions. You’ll be able to take a look at the directions within the official documentation and the quite a few examples supplied by Leaflet.
A plugin opens a complete universe of customizations, and Leaflet, being open-source, has quite a few third-party plugins that present prolonged performance to the unique map. You’ll be able to seek for any plugin developed by the Leaflet group right here. You’ll be able to add extra map tiles, pages, URL templates, PNG photographs, tile photographs, superior zoom choices and enhanced tile interactions with the Leaflet plugins. There’s additionally the choice to make use of Google’s API for location and search.
Conclusion
As you possibly can see, it’s tremendous simple and fast to create interactive maps with a JS library like Leaflet. The set up is hassle-free, works effectively, the code is readable, and all of the mapping is conveniently dealt with by the library. It’s a superb alternative for creating mobile-friendly, interactive maps as nicely, since it really works nicely with all cellular platforms. Together with nice usability, there’s a complete lot of customization choices supported by Leaflet. Please let me know when you’ve got any questions or options.
So, take a stroll on the seaside or begin plotting maps. Each choices make for chilled out and enjoyable exercise!