

Again within the college days, the maths instructor stated that what he likes about math is that you could have many options for a similar downside.
Some options are simpler or more durable than others. I believe the identical about fixing UI issues with CSS.
In a nutshell, the issue is to construct a UI that accommodates nested elements with an rising indentation for every one. The issue is widespread on the internet, however I’ll spotlight those from Github, Figma, Adobe and extra.
Let’s dive in.
What we’re going to disassemble
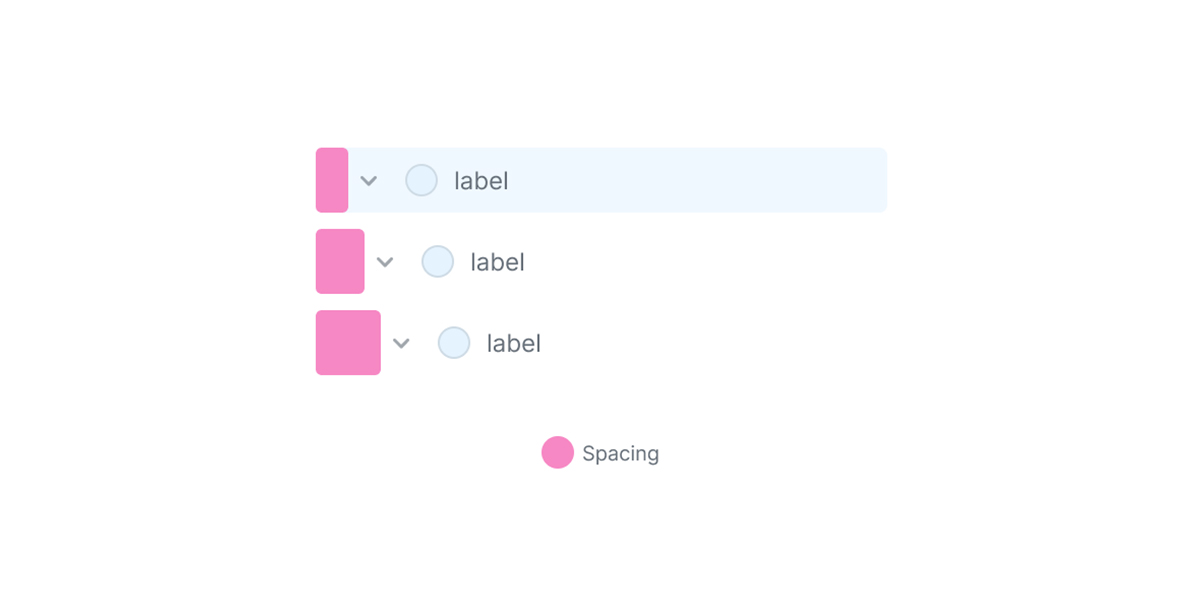
Within the following determine, we’ve an inventory of three elements. The distinction between them is that the deeper the nesting, the extra spacing the element has.

Right here is one other model with spacing highlighted:

How would you clear up that in CSS? Properly, that’s the subject of the article. I’ll present you the way GitHub, Figma, and Adobe solved this downside.
A take a look at the same UIs
This UI sample is quite common on the internet. Listed here are examples of the identical idea with totally different UIs:

Now that you’ve got an concept about what every UI seems to be like, let’s discover how every of them constructed it.
GitHub element
In GitHub, the element consists of the next:
- Spacer
- Toggle
- Content material wrapper
Right here is the HTML:
<div class="TreeView-item">
  <div class="spacer"></div>
  <div class="toggle"></div>
  <div class="content material">
    <div class="TreeView-item-visual"></div>
    <span class="TreeView-item-text">ReactART-test.js.snap</span>
  </div>
</div>
In CSS, the staff used CSS grid to deal with the format.
.TreeView-item {
  --toggle-width: 1rem;
  --spacer-col: 1rem;
  show: grid;
  grid-template-columns: var(--spacer-col) var(--toggle-width) 1fr;
  grid-template-areas: "spacer toggle content material";
}

.spacer {
  grid-area: spacer;
}

.toggle {
  grid-area: toggle;
}

.content material {
  grid-area: content material;
}
Here’s a nearer take a look at the UI:

The utilization of CSS grid for the UI is helpful. Listed here are a couple of causes:
- Through the use of the
grid-area, we will assign the column for every merchandise within the element. - The final nested layer doesn’t have a toggle. With CSS grid, its house might be reserved and received’t collapse the UI.
- Relying on the depth degree, the width of the primary column will change primarily based on a CSS variable on the element.
The spacer column
Within the CSS, the primary column is for the spacer. See the next:
.TreeView-item {
  --toggle-width: 1rem;
  --spacer-col: 1rem;
  show: grid;
  grid-template-columns: var(--spacer-col) var(--toggle-width) 1fr;
  grid-template-areas: "spacer toggle content material";
}
To calculate the spacer column width, the CSS in GitHub makes use of the toggle width and the depth degree.
.TreeView-item {
  --spacer-col: calc(
    calc(var(--level) - 1) * (var(--toggle-width) / 2)
  );
}
The minimal spacing is 8px. Whereas this works, I’m fascinated by the explanation to make use of the --toggle-width variable. I discovered no cause aside from having a minimal spacing of 8px.

Adobe method
Within the net model of Photoshop, the layers UI has the same construction to the tree view in GitHub.
Right here is the HTML
<psw-tree-view-item indent="0" layer-visible can-open dir="ltr" open>
  <div id="hyperlink">
    <span id="first-column"></span>
    <span id="second-column"></span>
    <span id="label"></span>
  </div>
</psw-tree-view-item>
And a more in-depth take a look at the tree view merchandise:

The format is constructed with CSS flexbox. For the nested gadgets, the spacing is managed through padding-right on the primary column.
:host([dir="ltr"][indent="1"]) #first-column {
  padding-right: var(--spectrum-global-dimension-size-200);
}

:host([dir="ltr"][indent="2"]) #first-column {
  padding-right: calc(2 * var(--spectrum-global-dimension-size-200));
}

Whereas this works, it’s not the very best resolution for me. I could make it a bit higher and use CSS logical properties.
:host([indent="2"]) #first-column {
  padding-inline-end: calc(
    2 * var(--spectrum-global-dimension-size-200)
  );
}
I’m not a fan of utilizing hardcoded values in CSS.
Figma method
Figma’s resolution is totally different from Adobe and GitHub. Right here is the UI:

<div class="object_row">
  <span class="object_row--indents">
    <span class="object_row--indent"></span>

    <span class="svg-container object_row--expandCaret"></span>
  </span>
  <span class="object_row--layerIcon"></span>
  <span class="object_row--rowText"></span>
  <span class="object_row--rowActions"></span>
</div>
The format is constructed with Flexbox, much like Photoshop Net. Listed here are a couple of variations:
- The toggle arrow is positioned contained in the idents group (it has
place: absolute) to take it out of the movement. - The spacing is managed through Javascript. The extra nesting, the extra spacer components.
Within the following determine, discover how 4 spans symbolize the spacing.

Not my favourite resolution.
Carbon design system
The tree view gadgets in Carbon design system don’t use depth however as an alternative have extra padding from the left facet.

The explanation you see a damaging margin within the screenshot above is that the chosen merchandise ought to be clickable. With out the damaging margin, the clickable space will solely be at the beginning of the textual content until the top of the ingredient.

Whereas it really works, I would favor to flatten all lists and hold the depth per merchandise degree.
Adobe Spectrum design system
Every tree view element is indented primarily based on the nesting degree. Nevertheless, to make an merchandise totally clickable, they used a pseudo-element that fills all the house.
See the next video:
For me, utilizing a pseudo-element is significantly better than coping with damaging margins (Like in Carbon design system).
My favourite
I like how GitHub solved this. Right here is why:
- The indentation is being dealt with per merchandise foundation. No want for advanced relationships between little one and oldsters.
- If there isn’t any toggle, its house will nonetheless be reserved.
- Works nice for left-to-right (LTR) and right-to-left (RTL) layouts.
We will do the identical through the use of CSS max() operate.
.TreeView-item {
  --spacer-col: max(8px, var(--level) * 8px);
}
That is a lot cleaner and simpler to know for me. The minimal worth is 8px and the utmost worth will depend on the nesting depth.
The ultimate factor to say is utilizing content-visibility on every treeview merchandise. I noticed this:
.PRIVATE_TreeView-item-container {
  content-visibility: auto;
  contain-intrinsic-size: auto 2rem;
}
That is very helpful for efficiency. Think about searching a tree view with hundreds of sub gadgets.
In response to MDN:
Measurement containment permits a consumer agent to put out a component as if it had a set dimension, stopping pointless reflows by avoiding the re-rendering of kid components to find out the precise dimension (thereby bettering consumer expertise).
Outro
That was a enjoyable exploration. The fascinating factor is that it’s solely concerning the indentation half. There are various extra areas to cowl, however that is what caught my eye. I hope you loved it and thanks for studying.