

On this new article about my rebuilding a structure, I’m exploring TechCrunch. I had a fast have a look at it and thought it will be fascinating to dive in and see how trendy CSS could make issues higher.
First, I’ll analyze the structure and assume aloud with you in regards to the choices that the workforce made. As soon as that’s completed, will probably be the time to dive in and share my ideas and concepts on easy methods to method the present design with trendy CSS.
Desk of contents
View desk of contents
Here’s a video that showcases the factor that I’m digging.
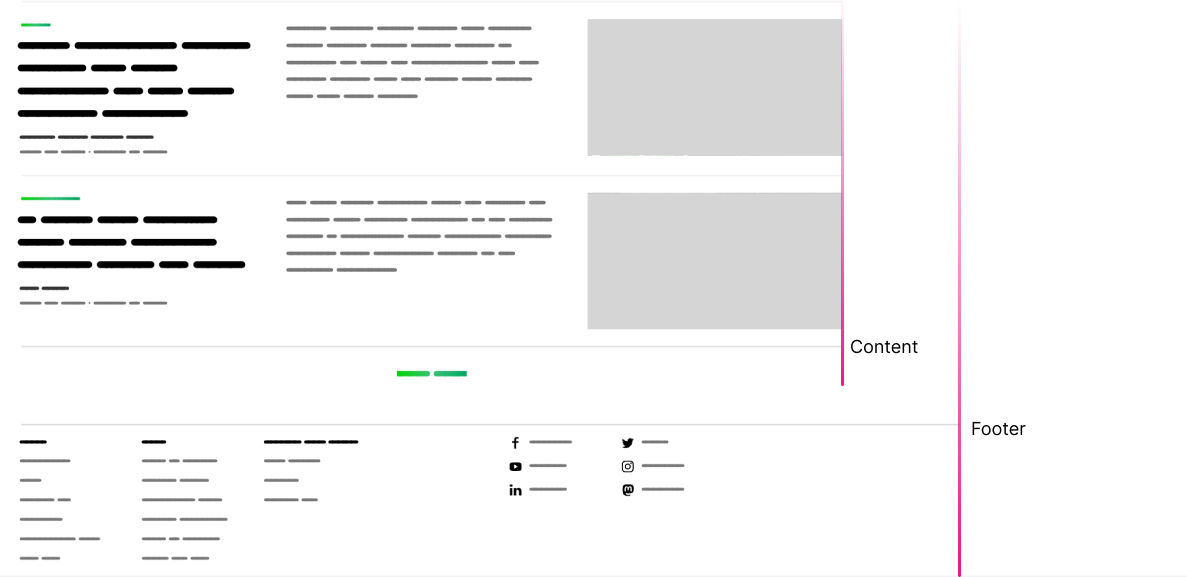
Analyzing the principle structure
I began by trying on the fundamental structure and the way it works on completely different viewport sizes.
It accommodates three columns and can turn into one because the viewport dimension will get smaller. Typical structure, proper? Probably not.
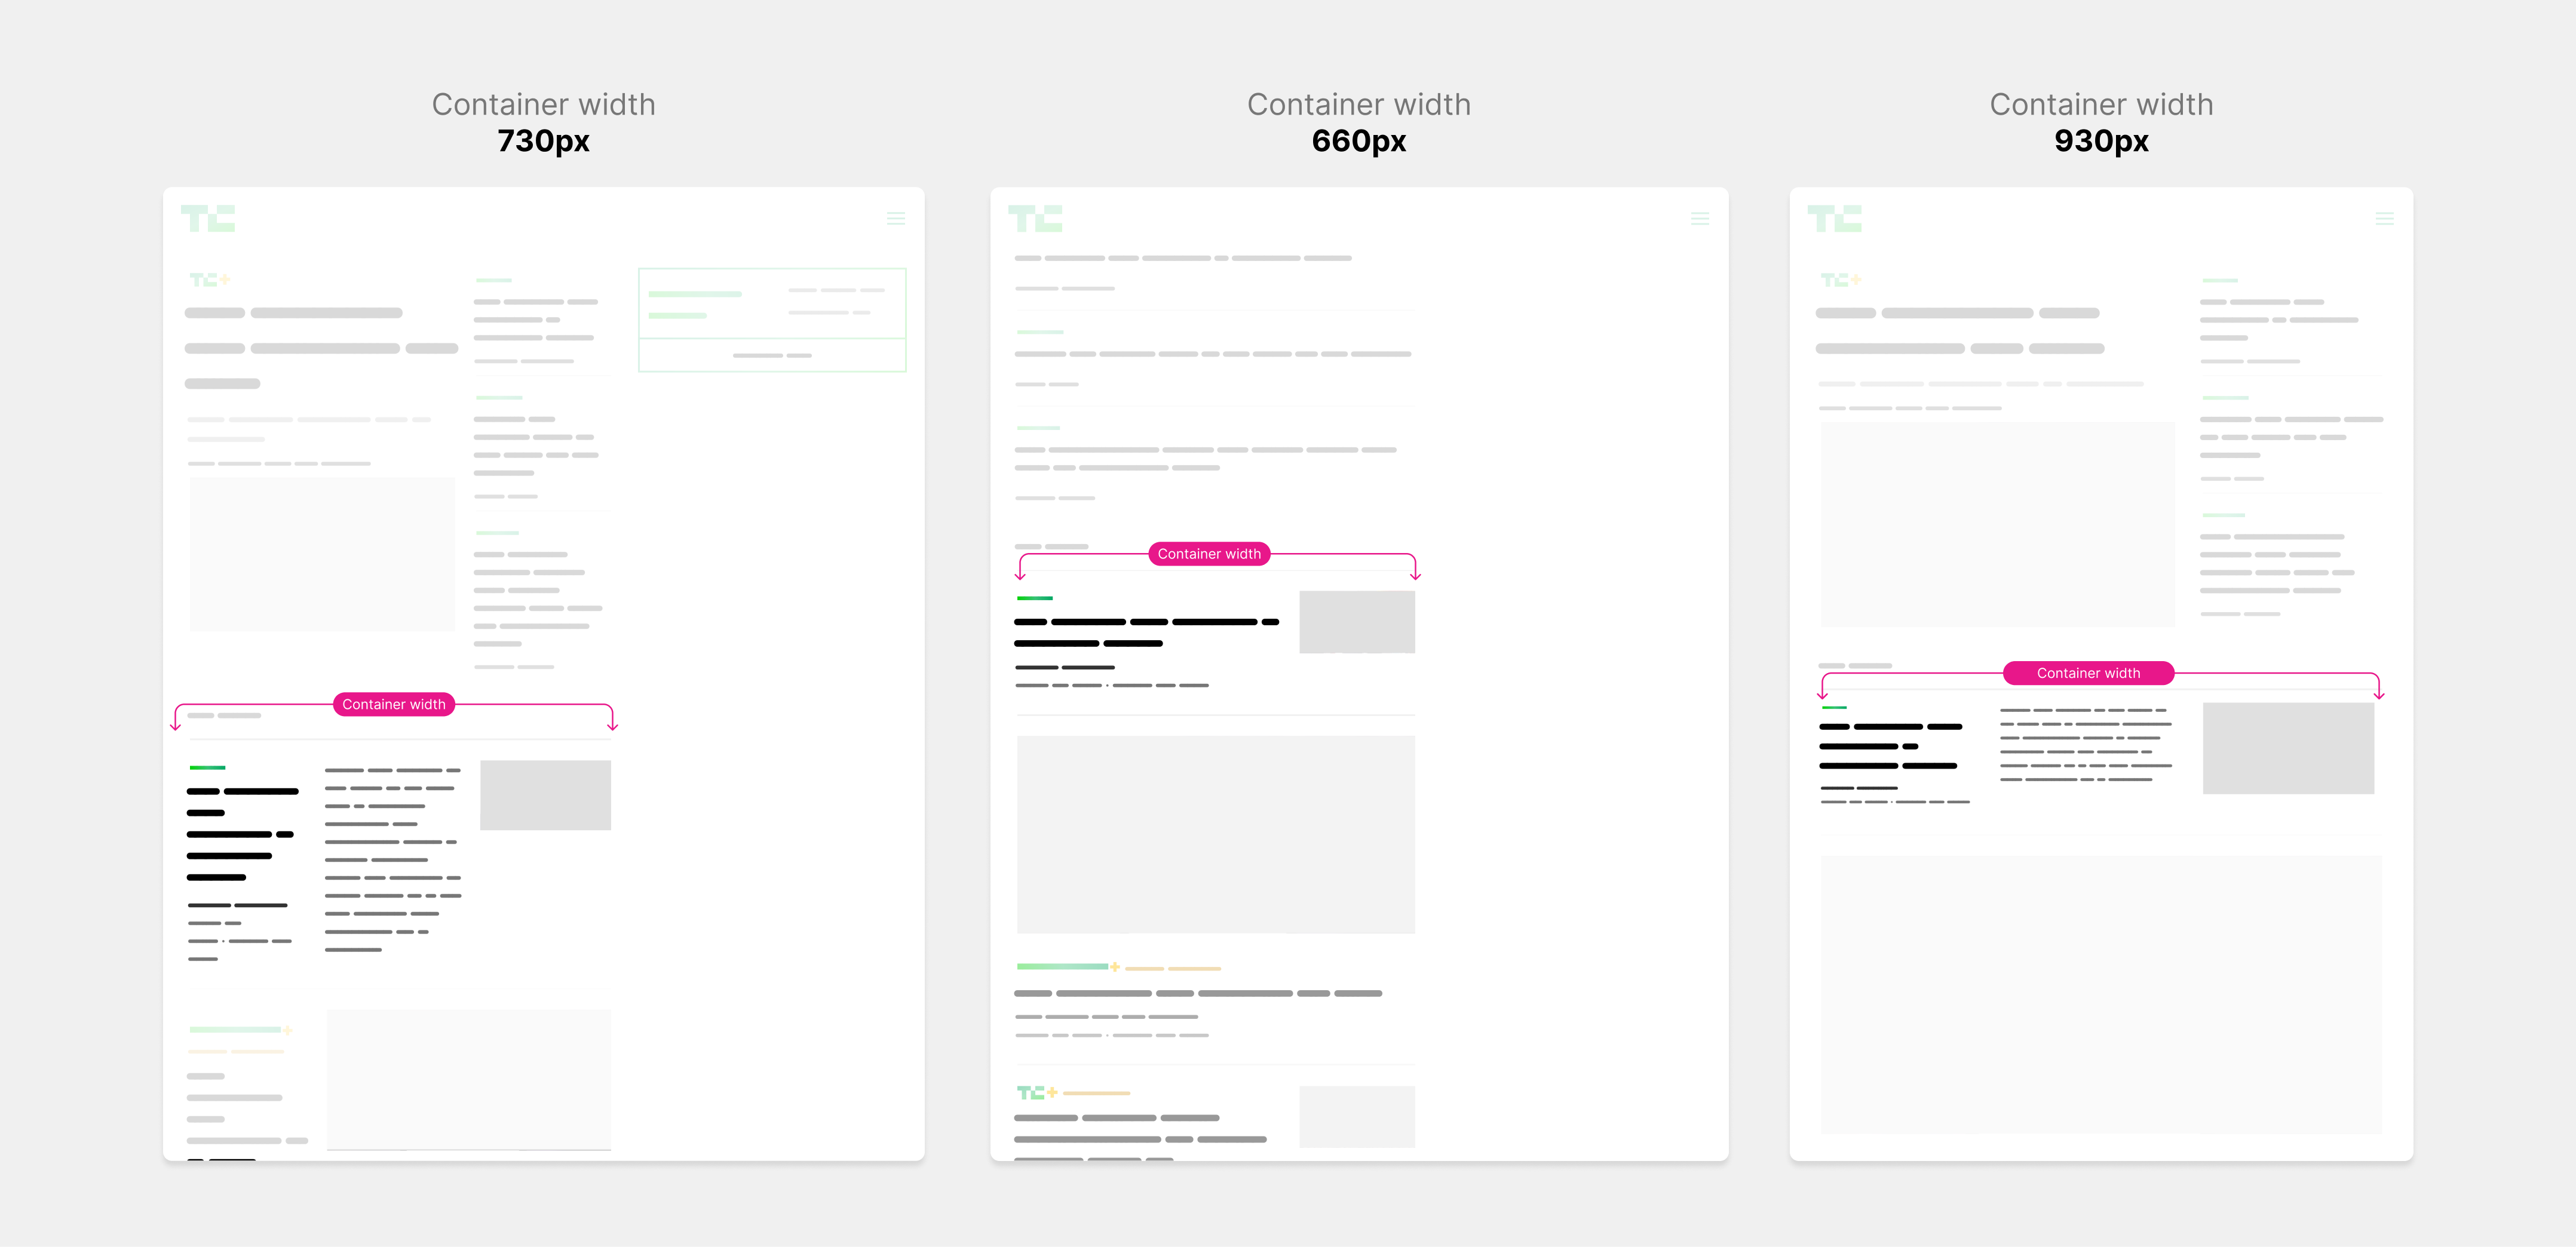
On a big display screen, the 3-column structure has a max-width and will probably be left-aligned. I hardly ever see that habits on web sites. We are likely to middle a structure as an alternative of protecting it on both facet of the viewports.
At first, I assumed that the entire structure was wrapped right into a container and that container had a max-width. Turned out it was greater than that.
<header class="navigation"></header>
<div class="main-content">
  <div class="content-wrap">
    <div class="content material content--feature-island"></div>
  </div>
  <div class="content-wrap">
    <div class="content material"></div>
  </div>
</div>
<footer class="site-footer">
  <div class="wrap"></div>
</footer>
Let’s take a more in-depth have a look at the structure.
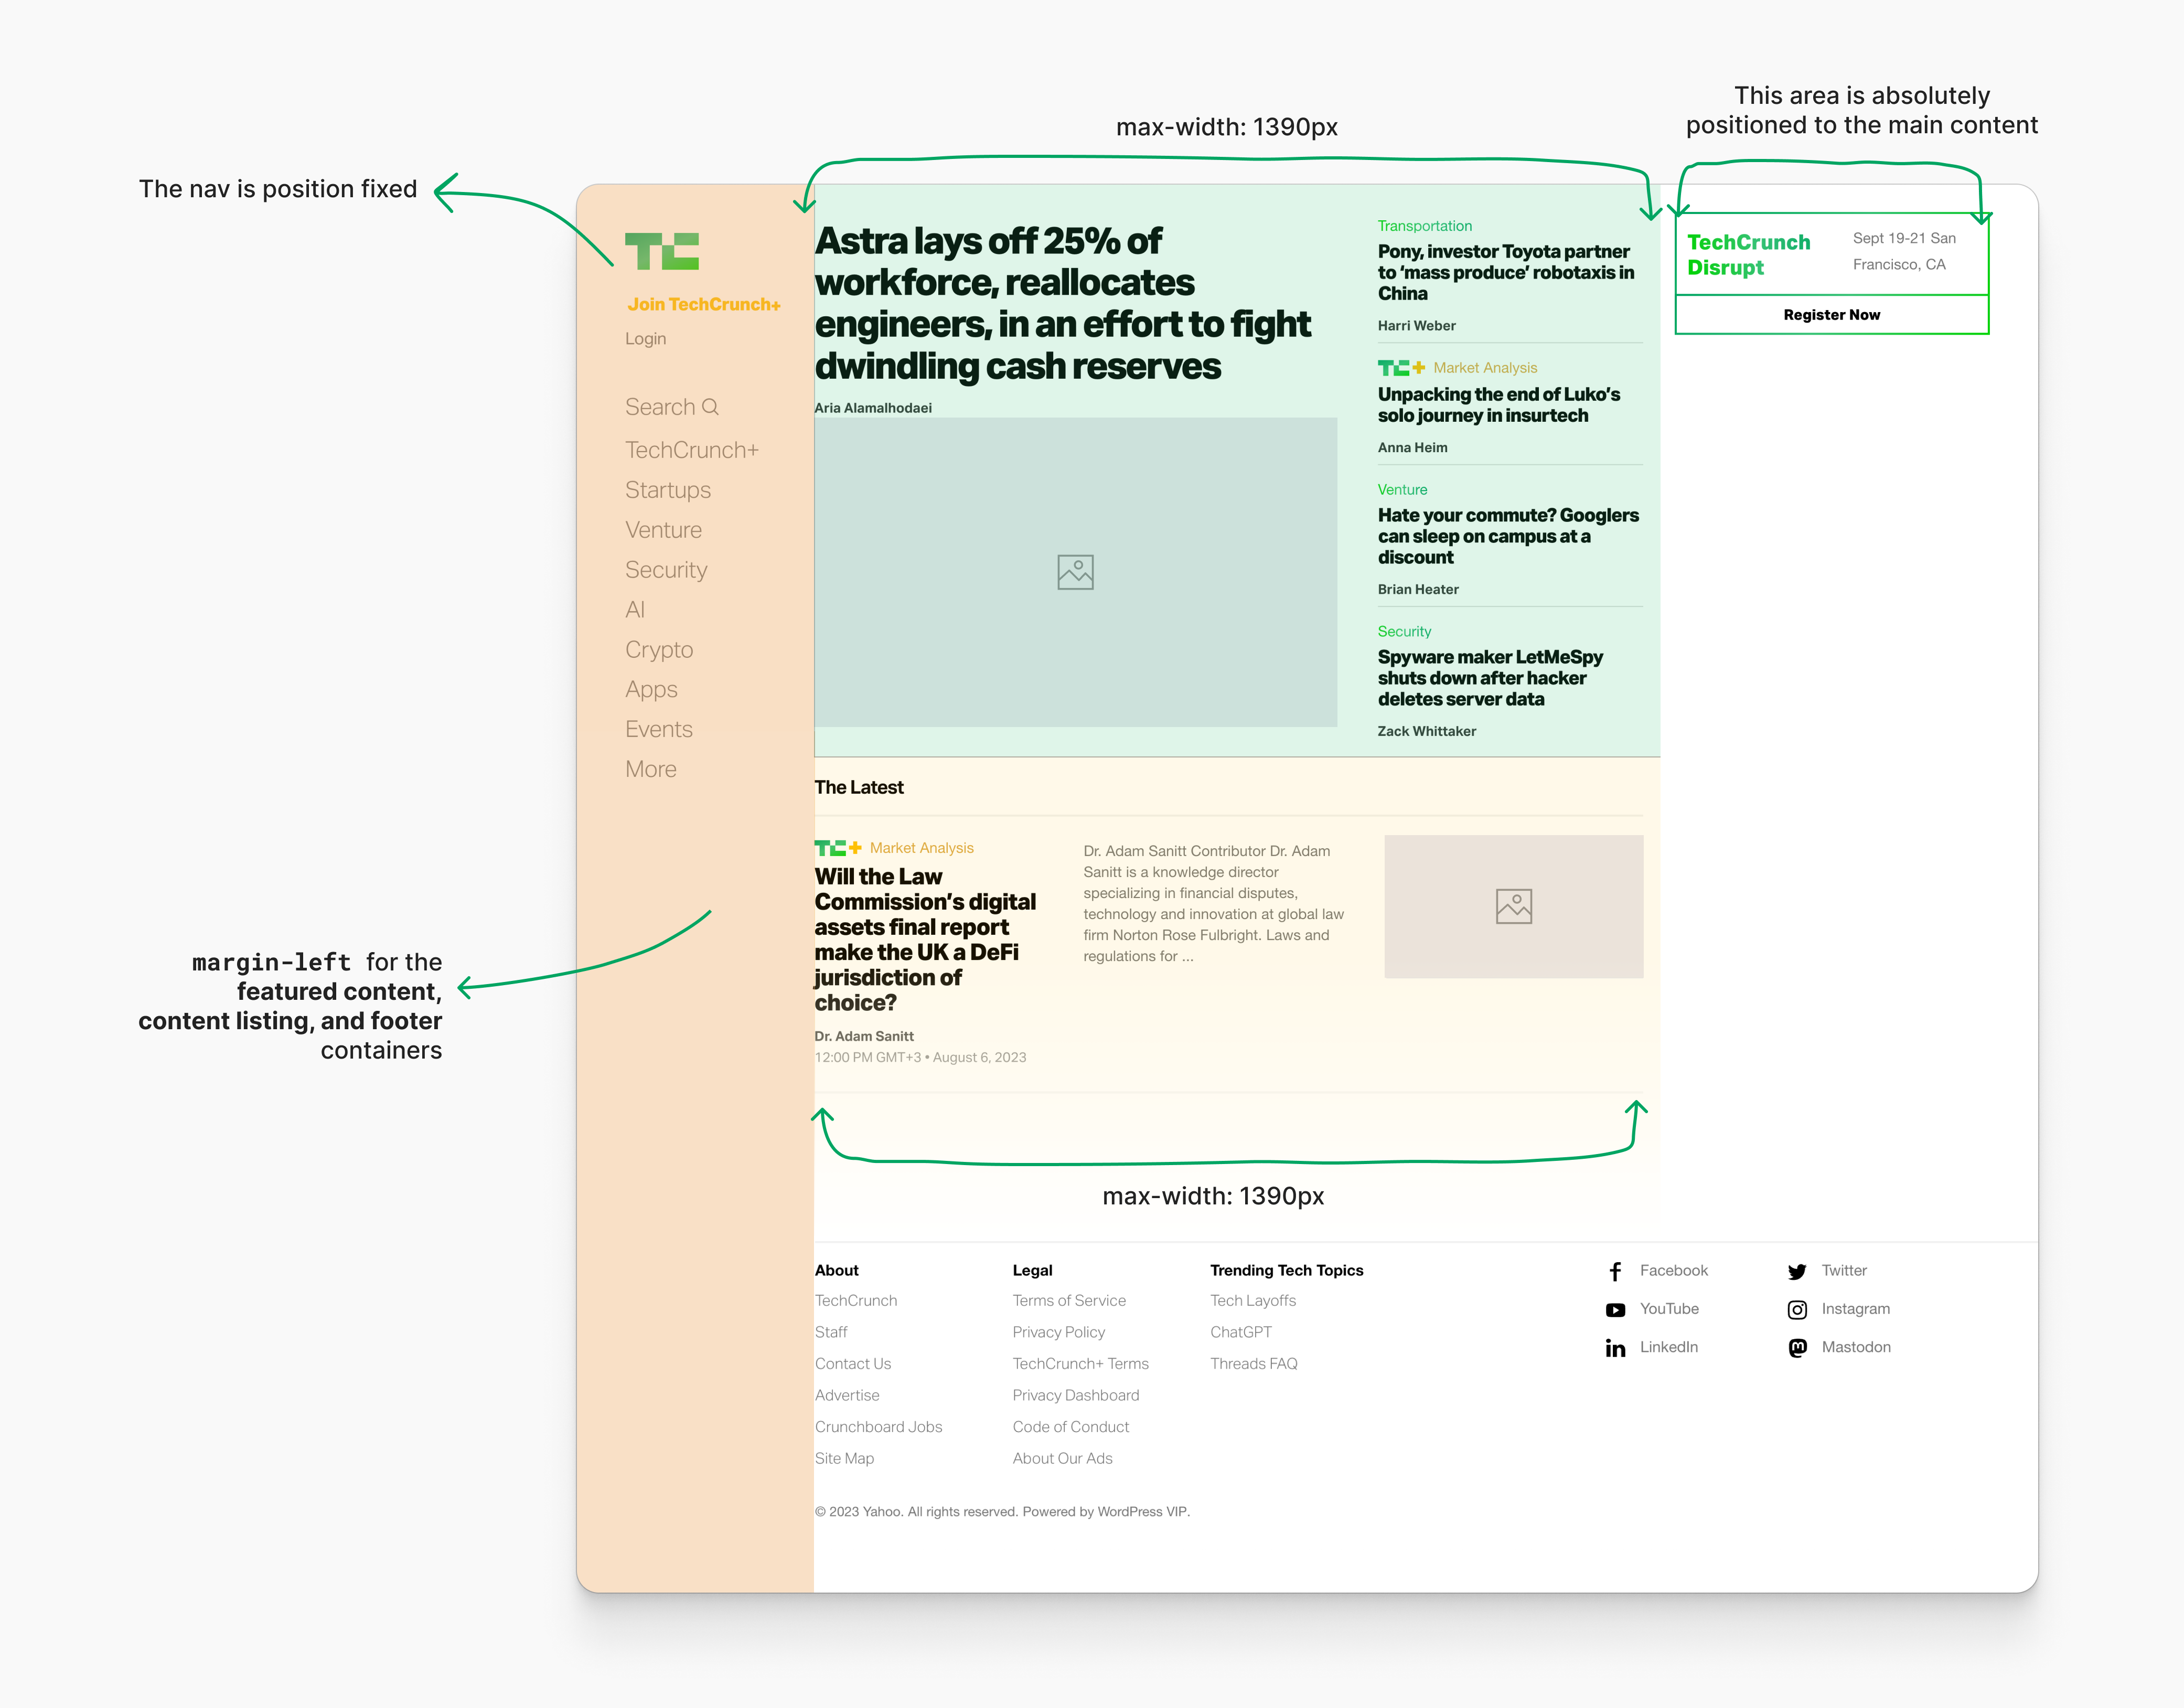
The best way the structure is constructed is a bit uncommon and a bit hacky.
- The navigation has
place: repairwith a set with. - To compensate for the navigation house, each the direct Childs of
main-contenthavemargin-leftthat is the same as the navigation width. - The footer has a
margin-leftas properly.
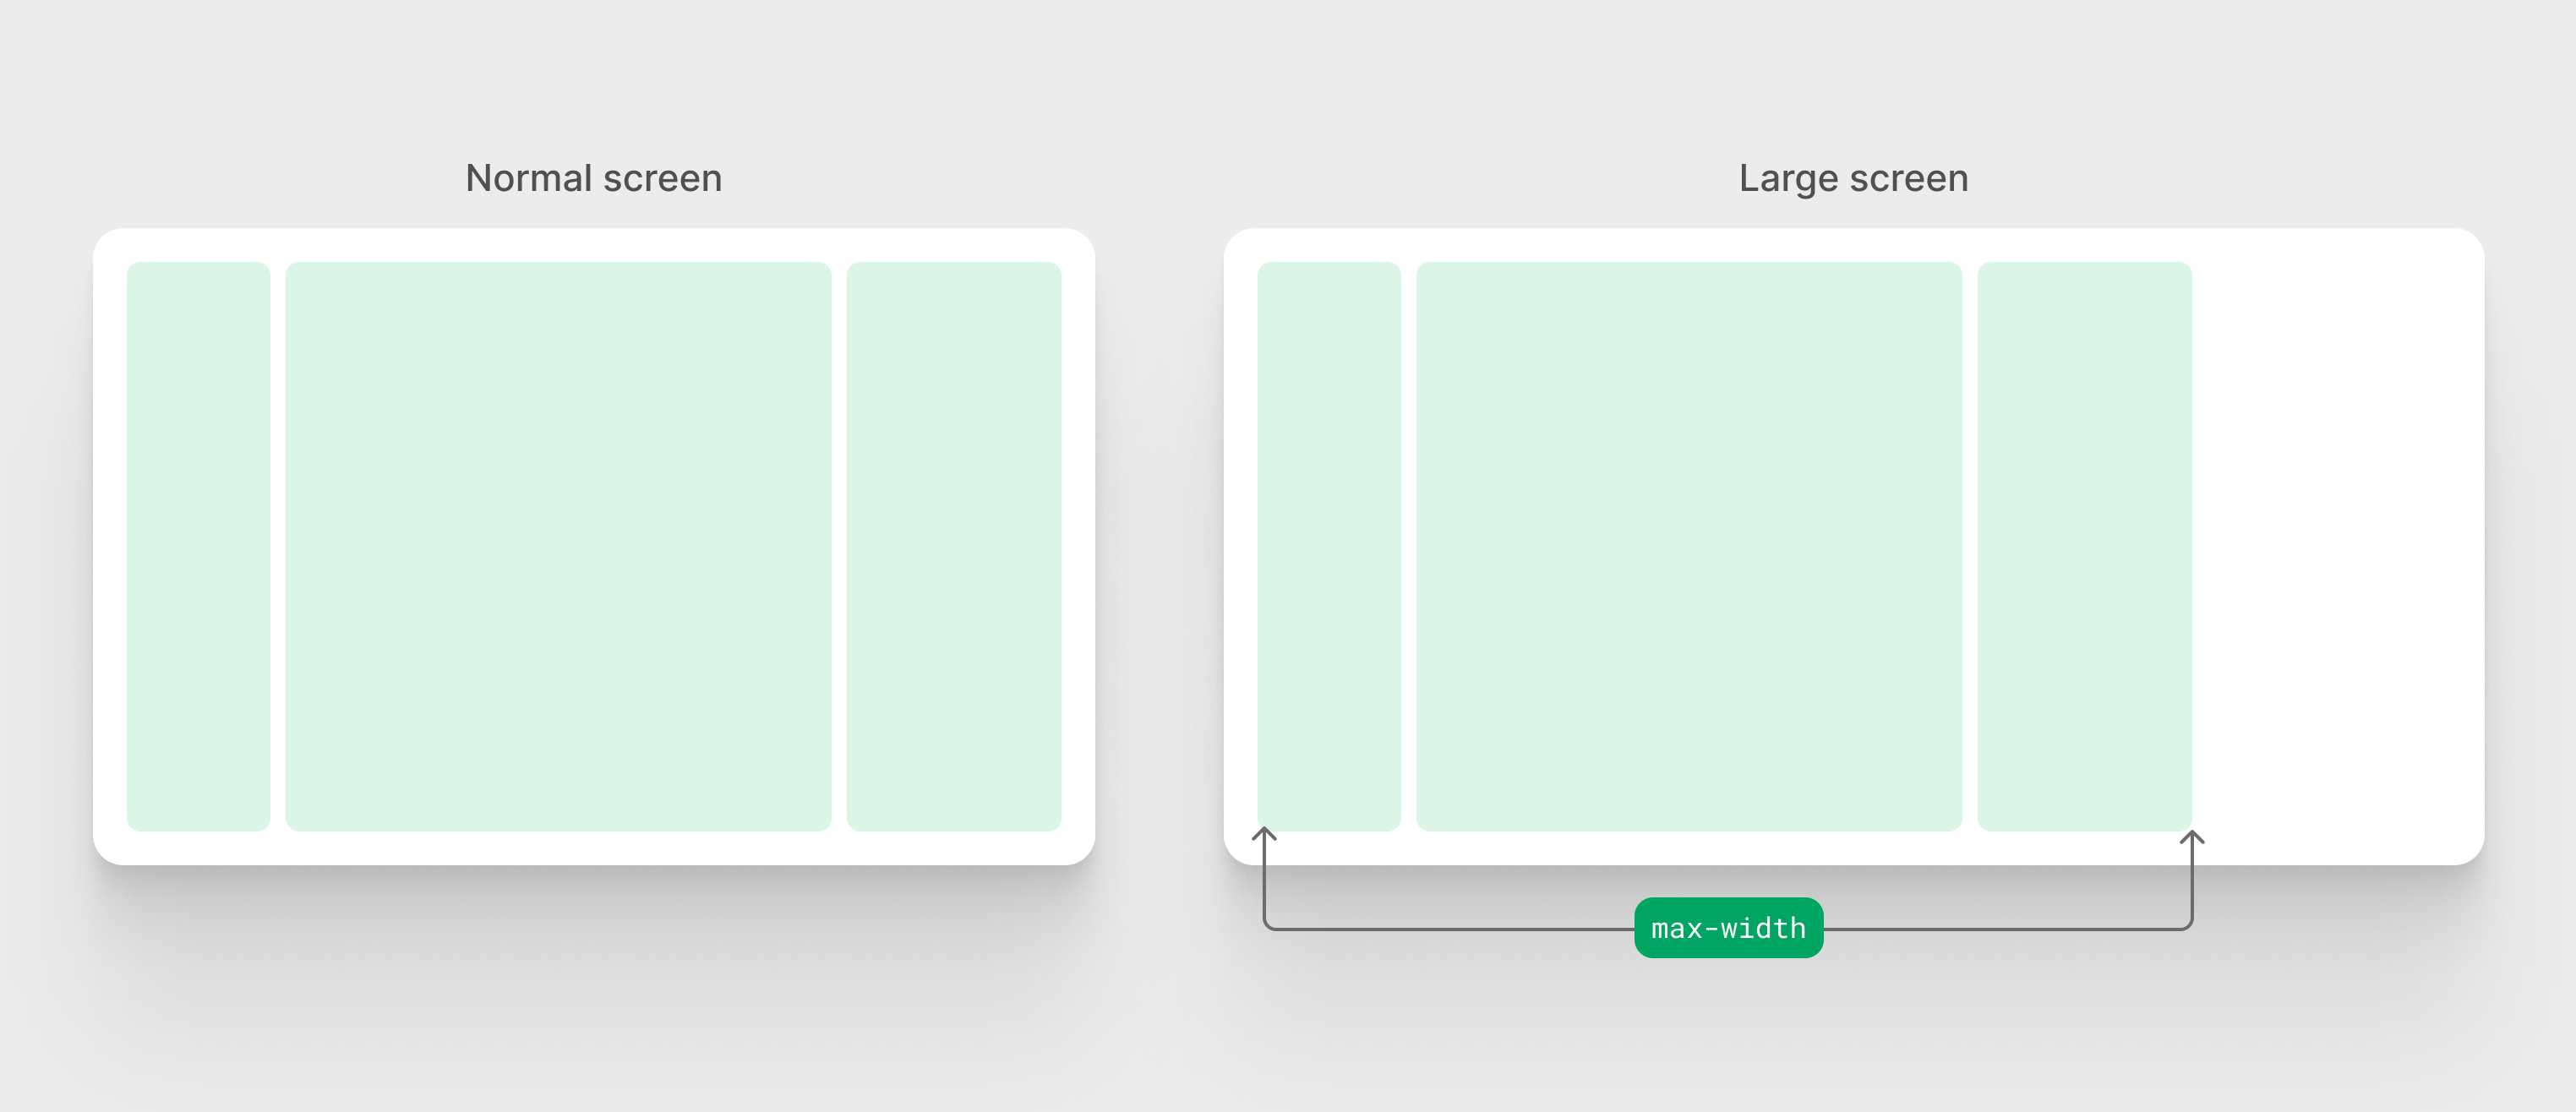
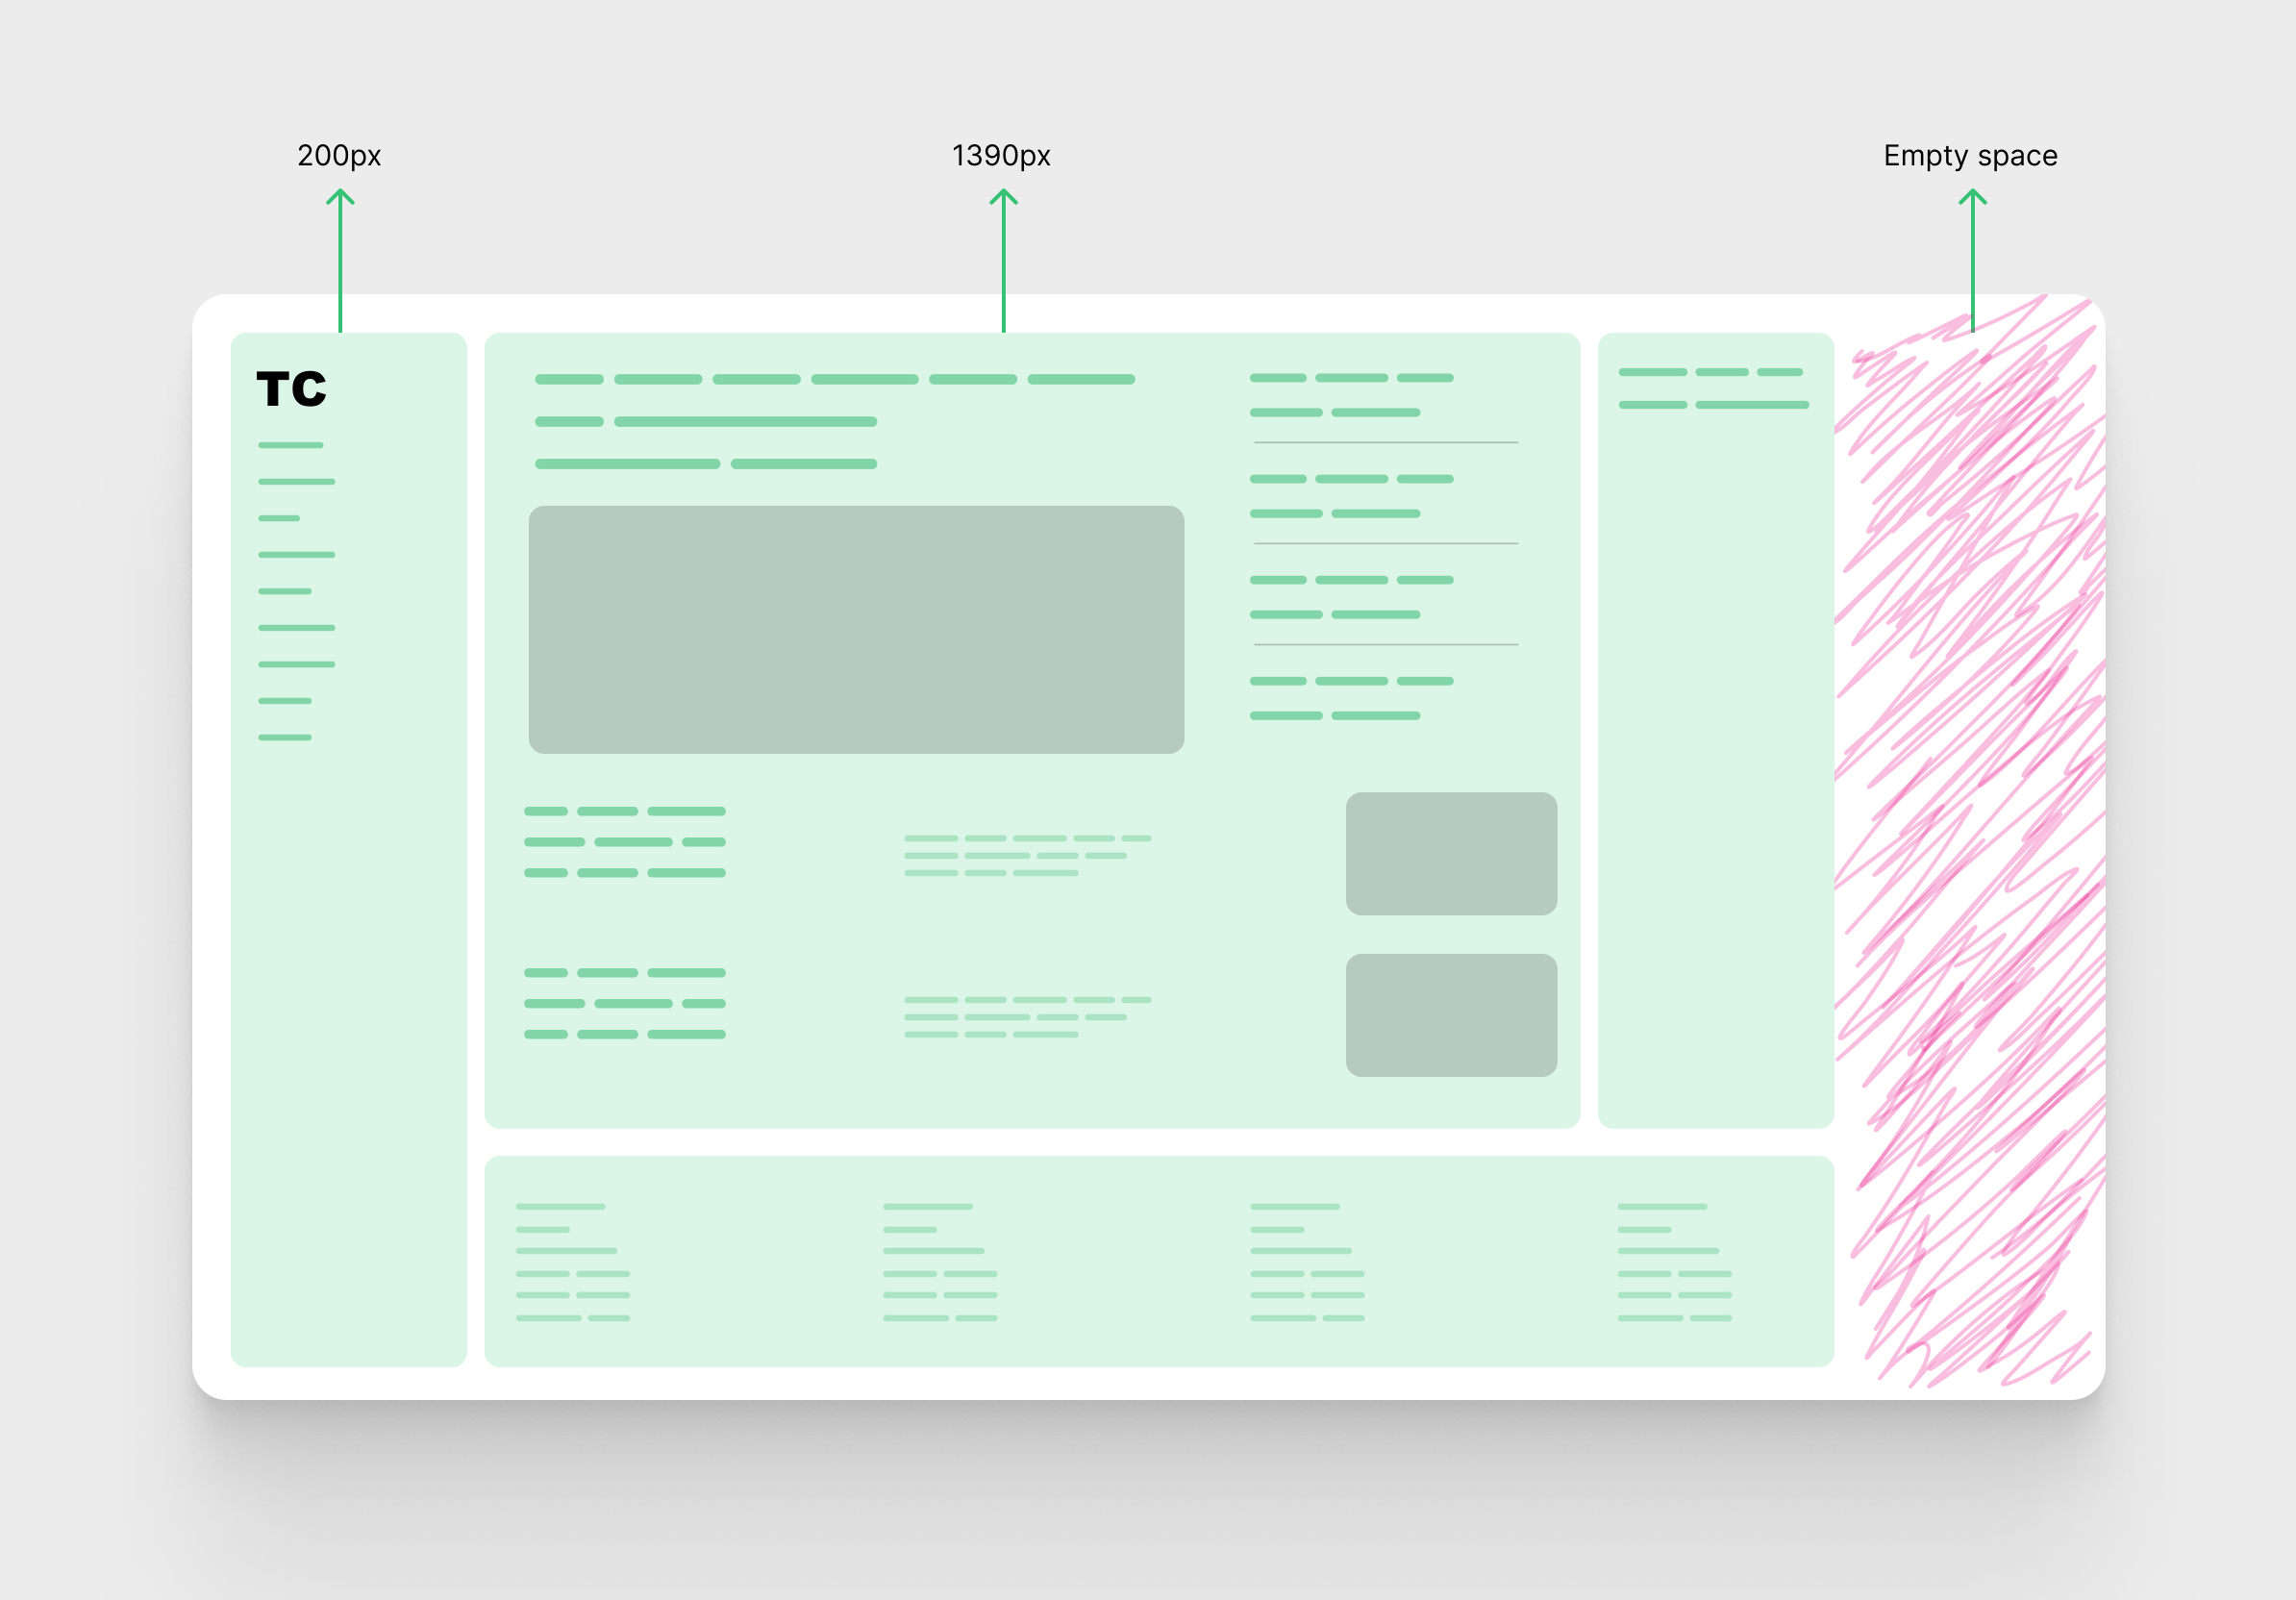
On massive screens, the structure continues to develop till the utmost width for the principle content material, which is 1390px.
Right here is the way it appears to be like:
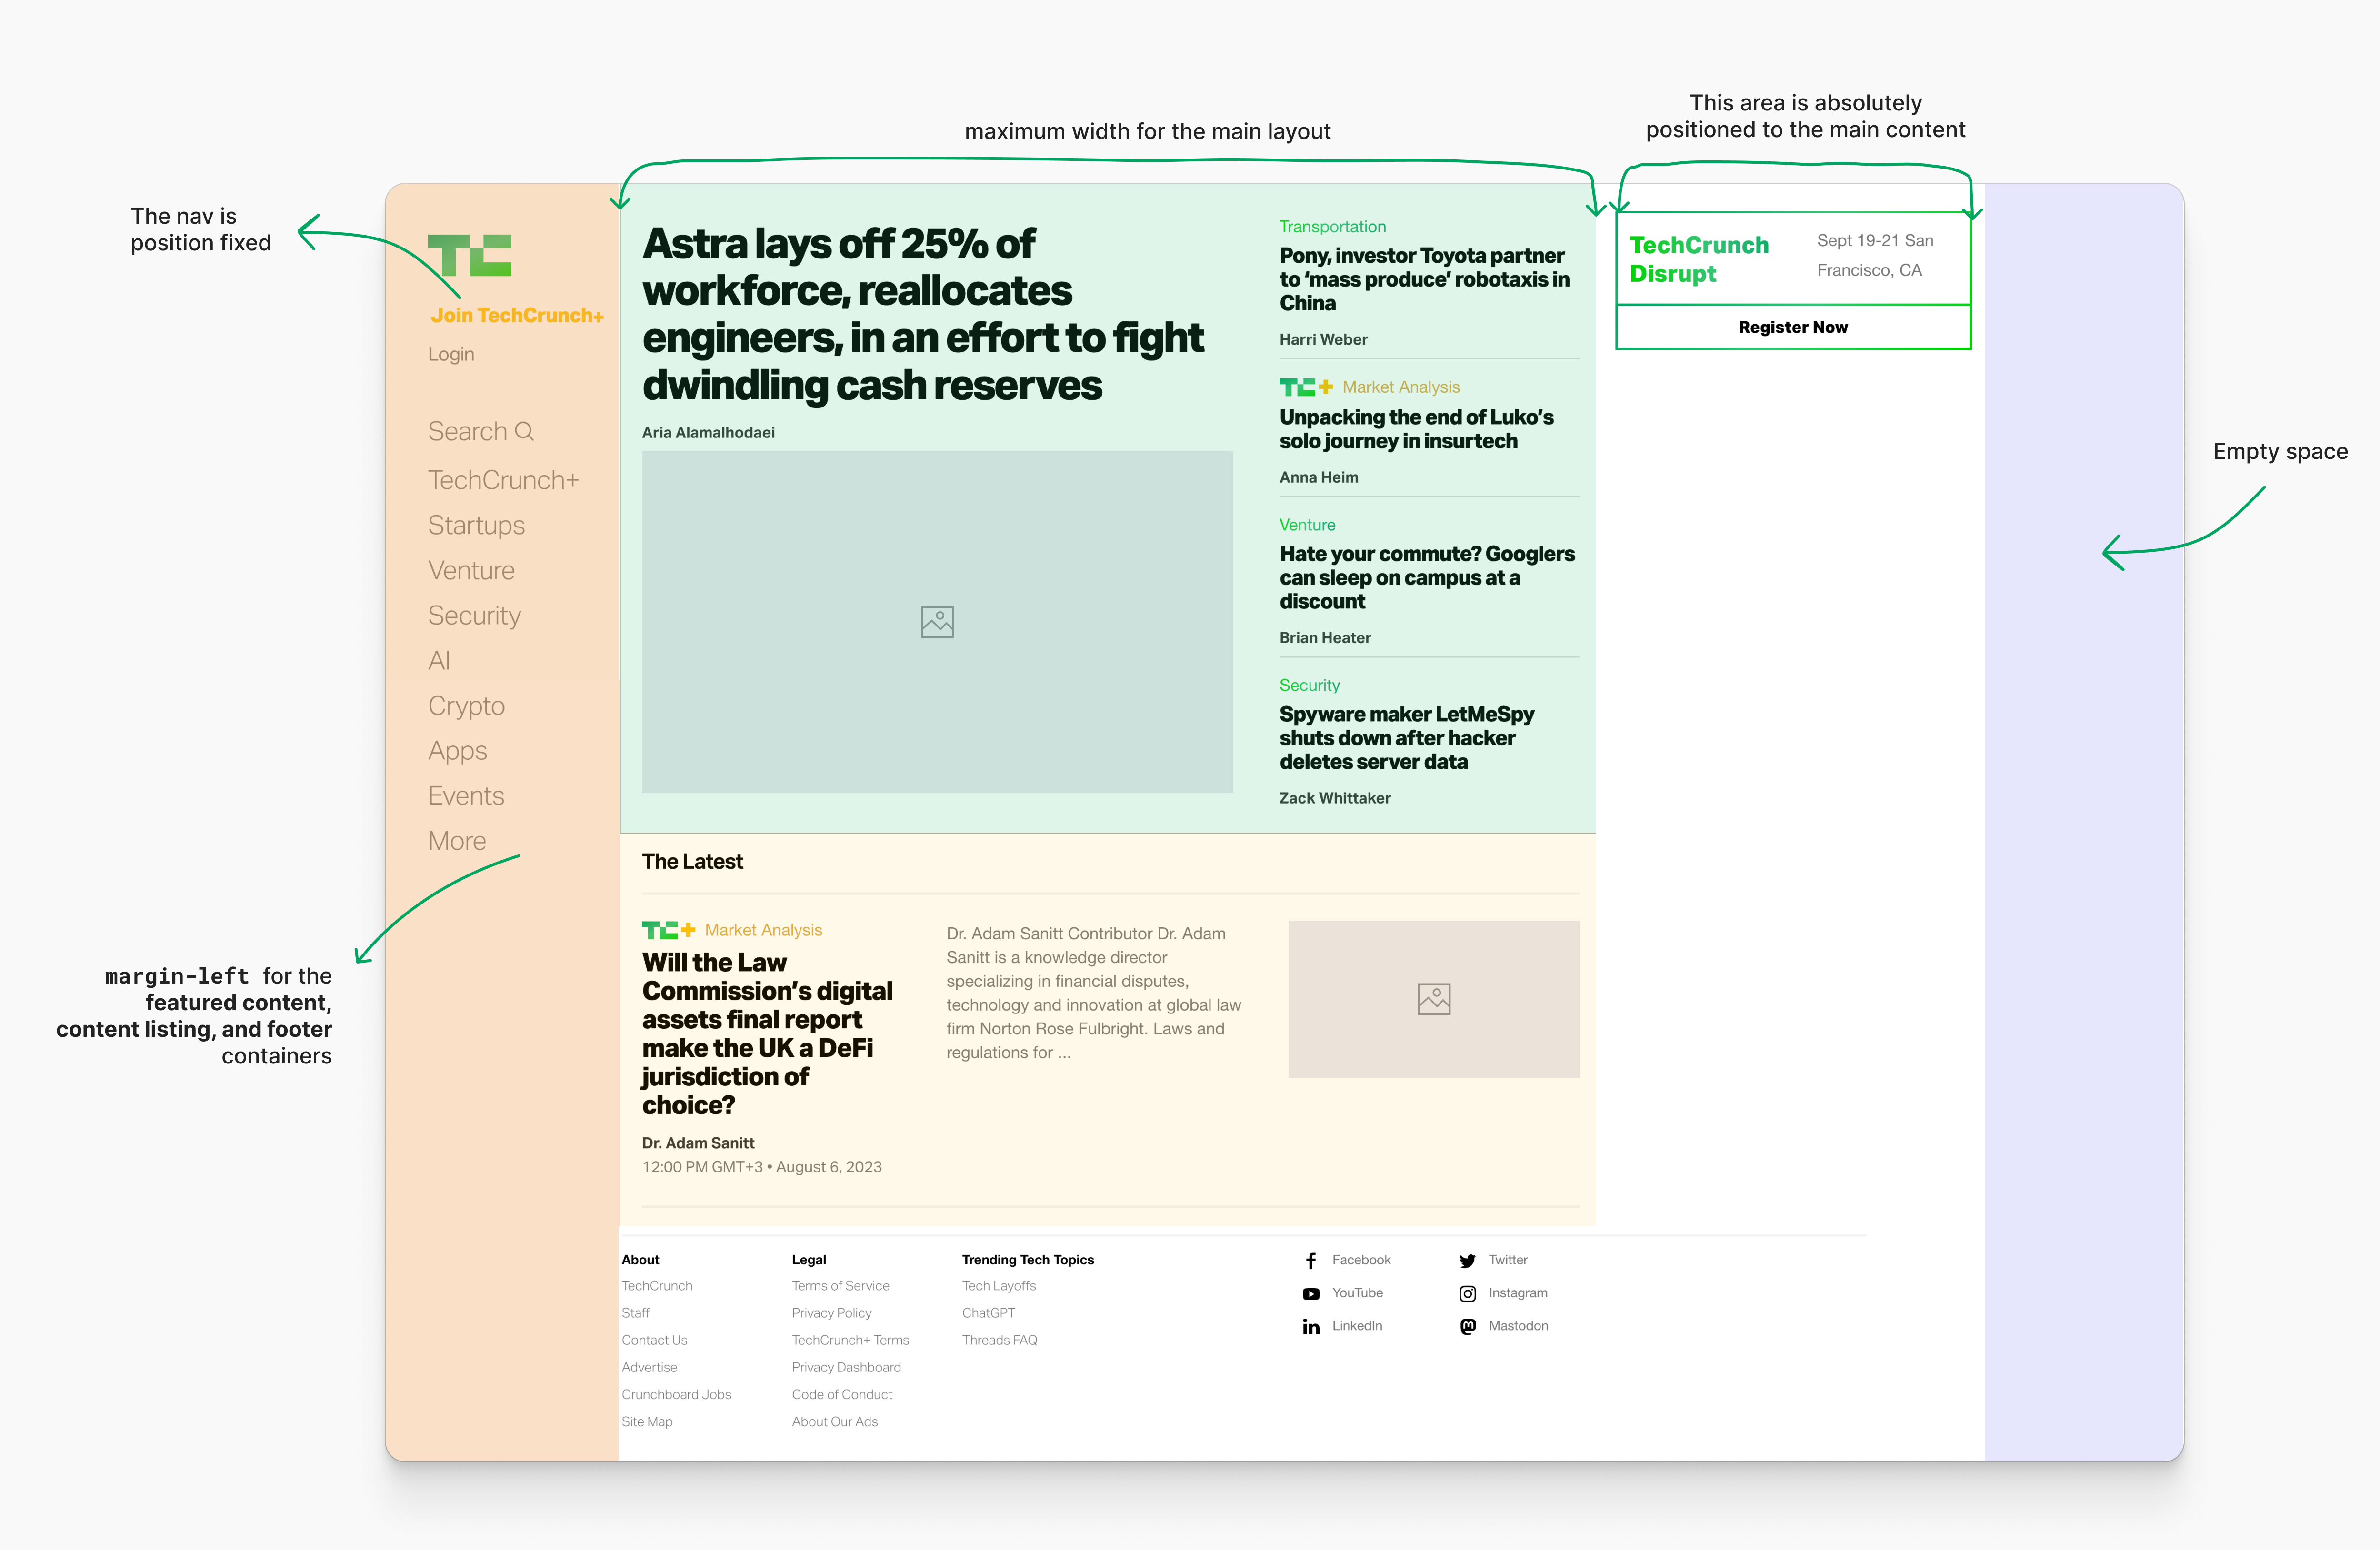
Discover how when max-width for the principle content material is taking impact, there’s a house on the suitable facet.
A have a look at how the principle structure CSS
The next is how the CSS was written to deal with the principle content material structure and different stuff.
.content material:not(.mce-content-body) {
  width: 90% !necessary;
  margin-left: 5%;
}

@media (min-width: 1100px) {
  margin-left: 250px;
  width: calc(100vw - 250px - 360px) !necessary;
  max-width: 1390px !necessary;
}

@media (min-width: 1440px) {
  margin-left: 250px;
  width: calc(100vw - 250px - 360px) !necessary;
  max-width: 1390px !necessary;
}
My evaluation:
- Utilizing
width: 90%for the principle content material on cell is only a hack so as to add a padding of5%on either side. I don’t know why, however padding may’ve solved the issue (until I’m not conscious of a particular situation). - A number of not wanted
!necessarys - The width property worth is like (viewport width – navigation – apart).
- When the viewport is the same as or larger than
1440px,max-widthis activated.
This was in-built late 2018. At the moment, flexbox was a very talked-about selection for layouts and elements. CSS grid was nonetheless new (launched in Chrome, Firefox & Safari in March 2017).
Within the following part, I’ll present you my pondering on how I’d method and take into consideration such a structure right this moment.
Constructing the principle structure right this moment
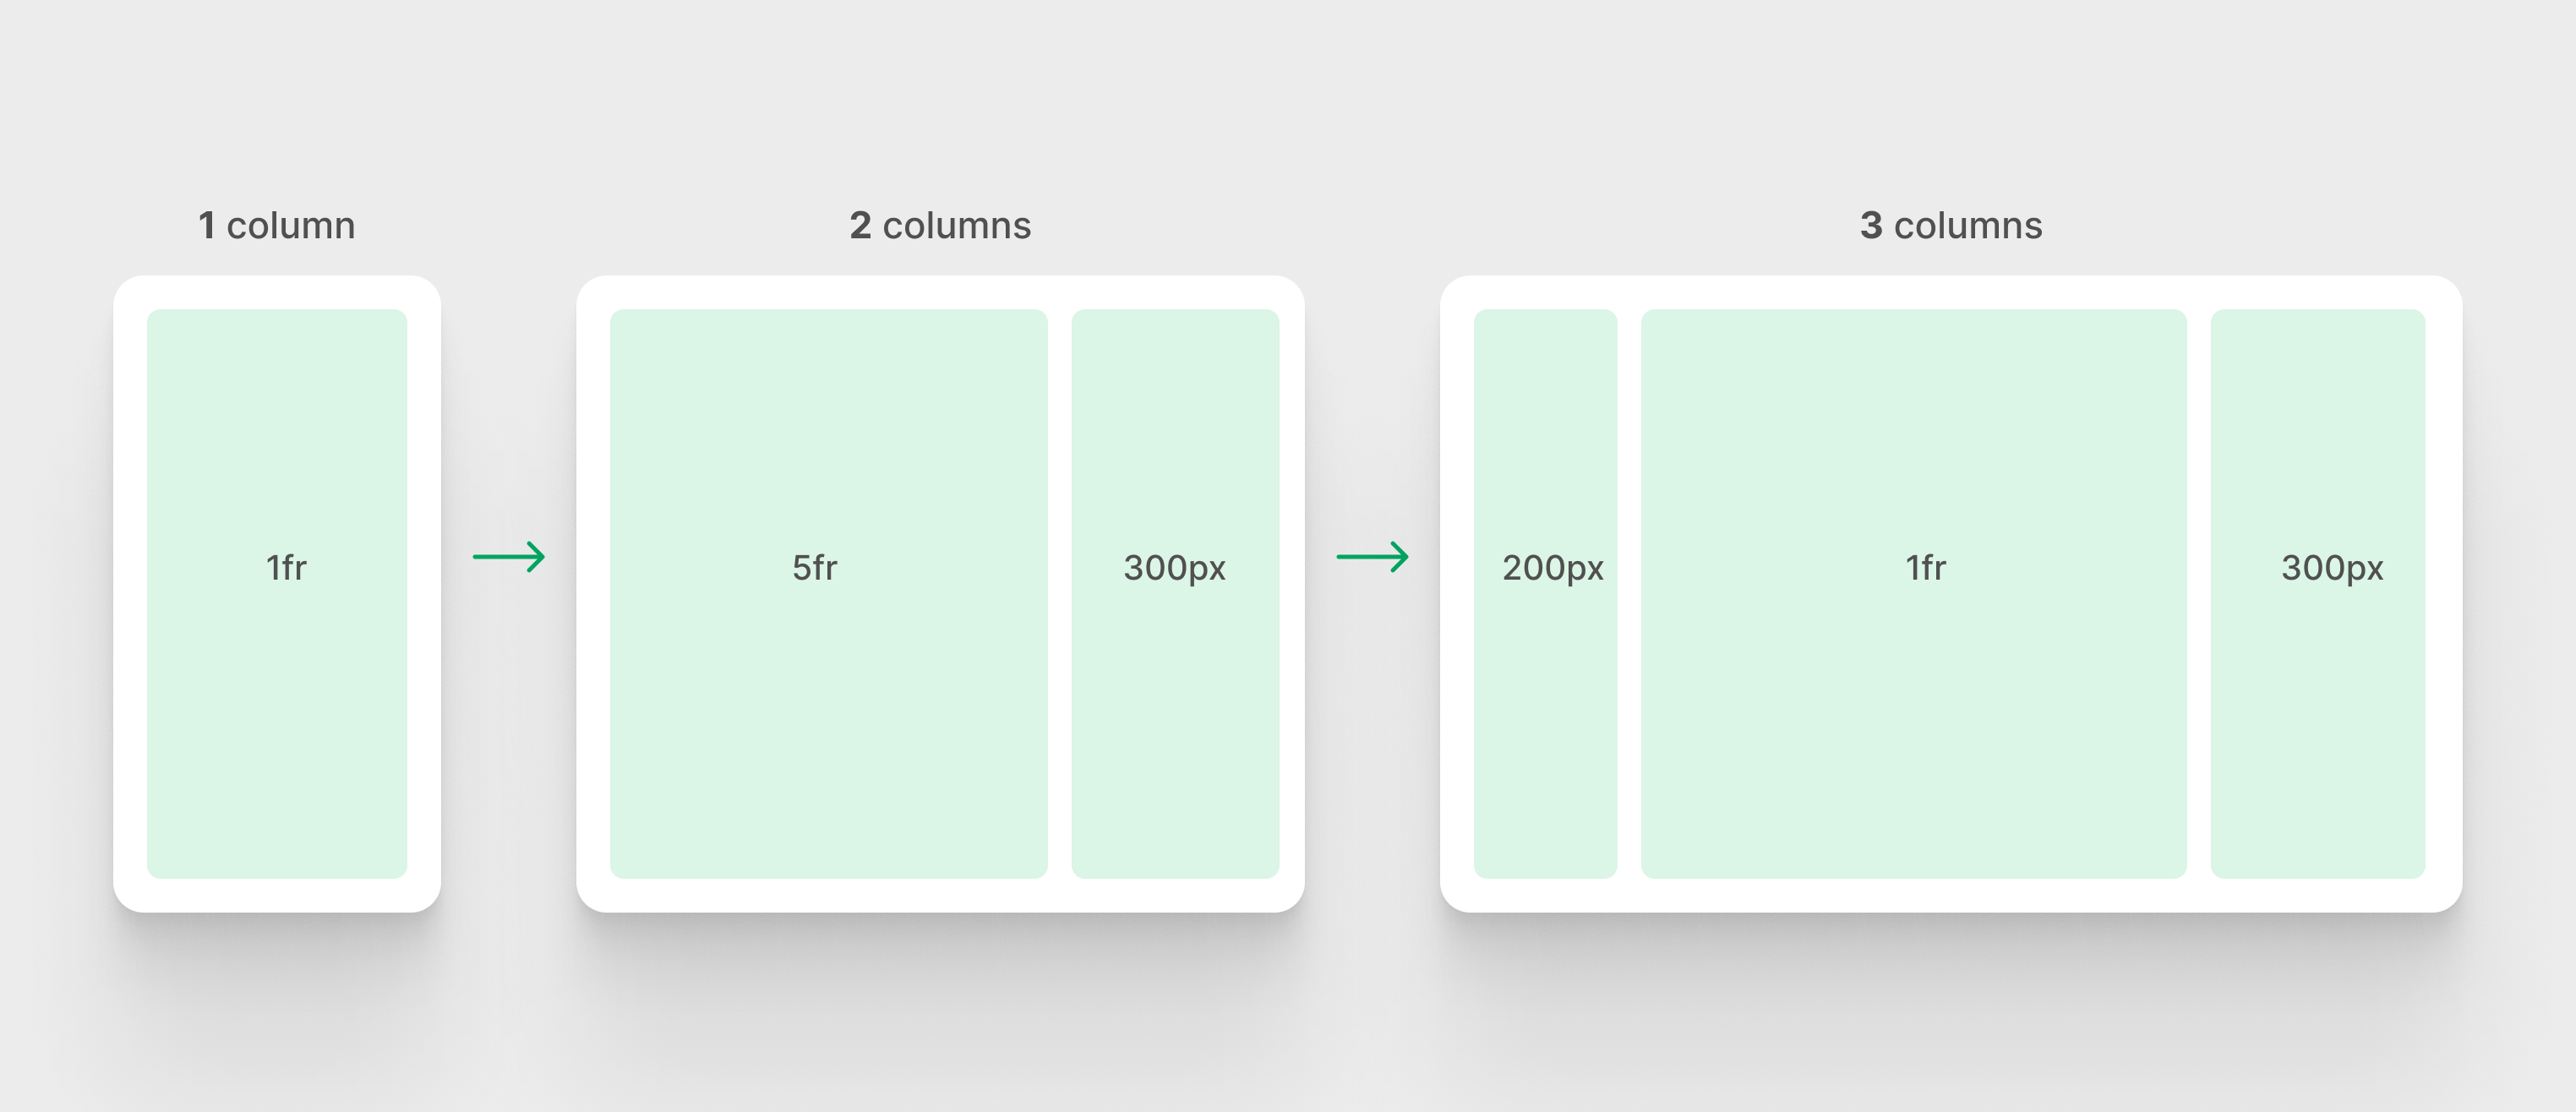
First, let’s have a look at the design necessities. Within the following determine, discover how the structure steadily modifications from one column to 3.
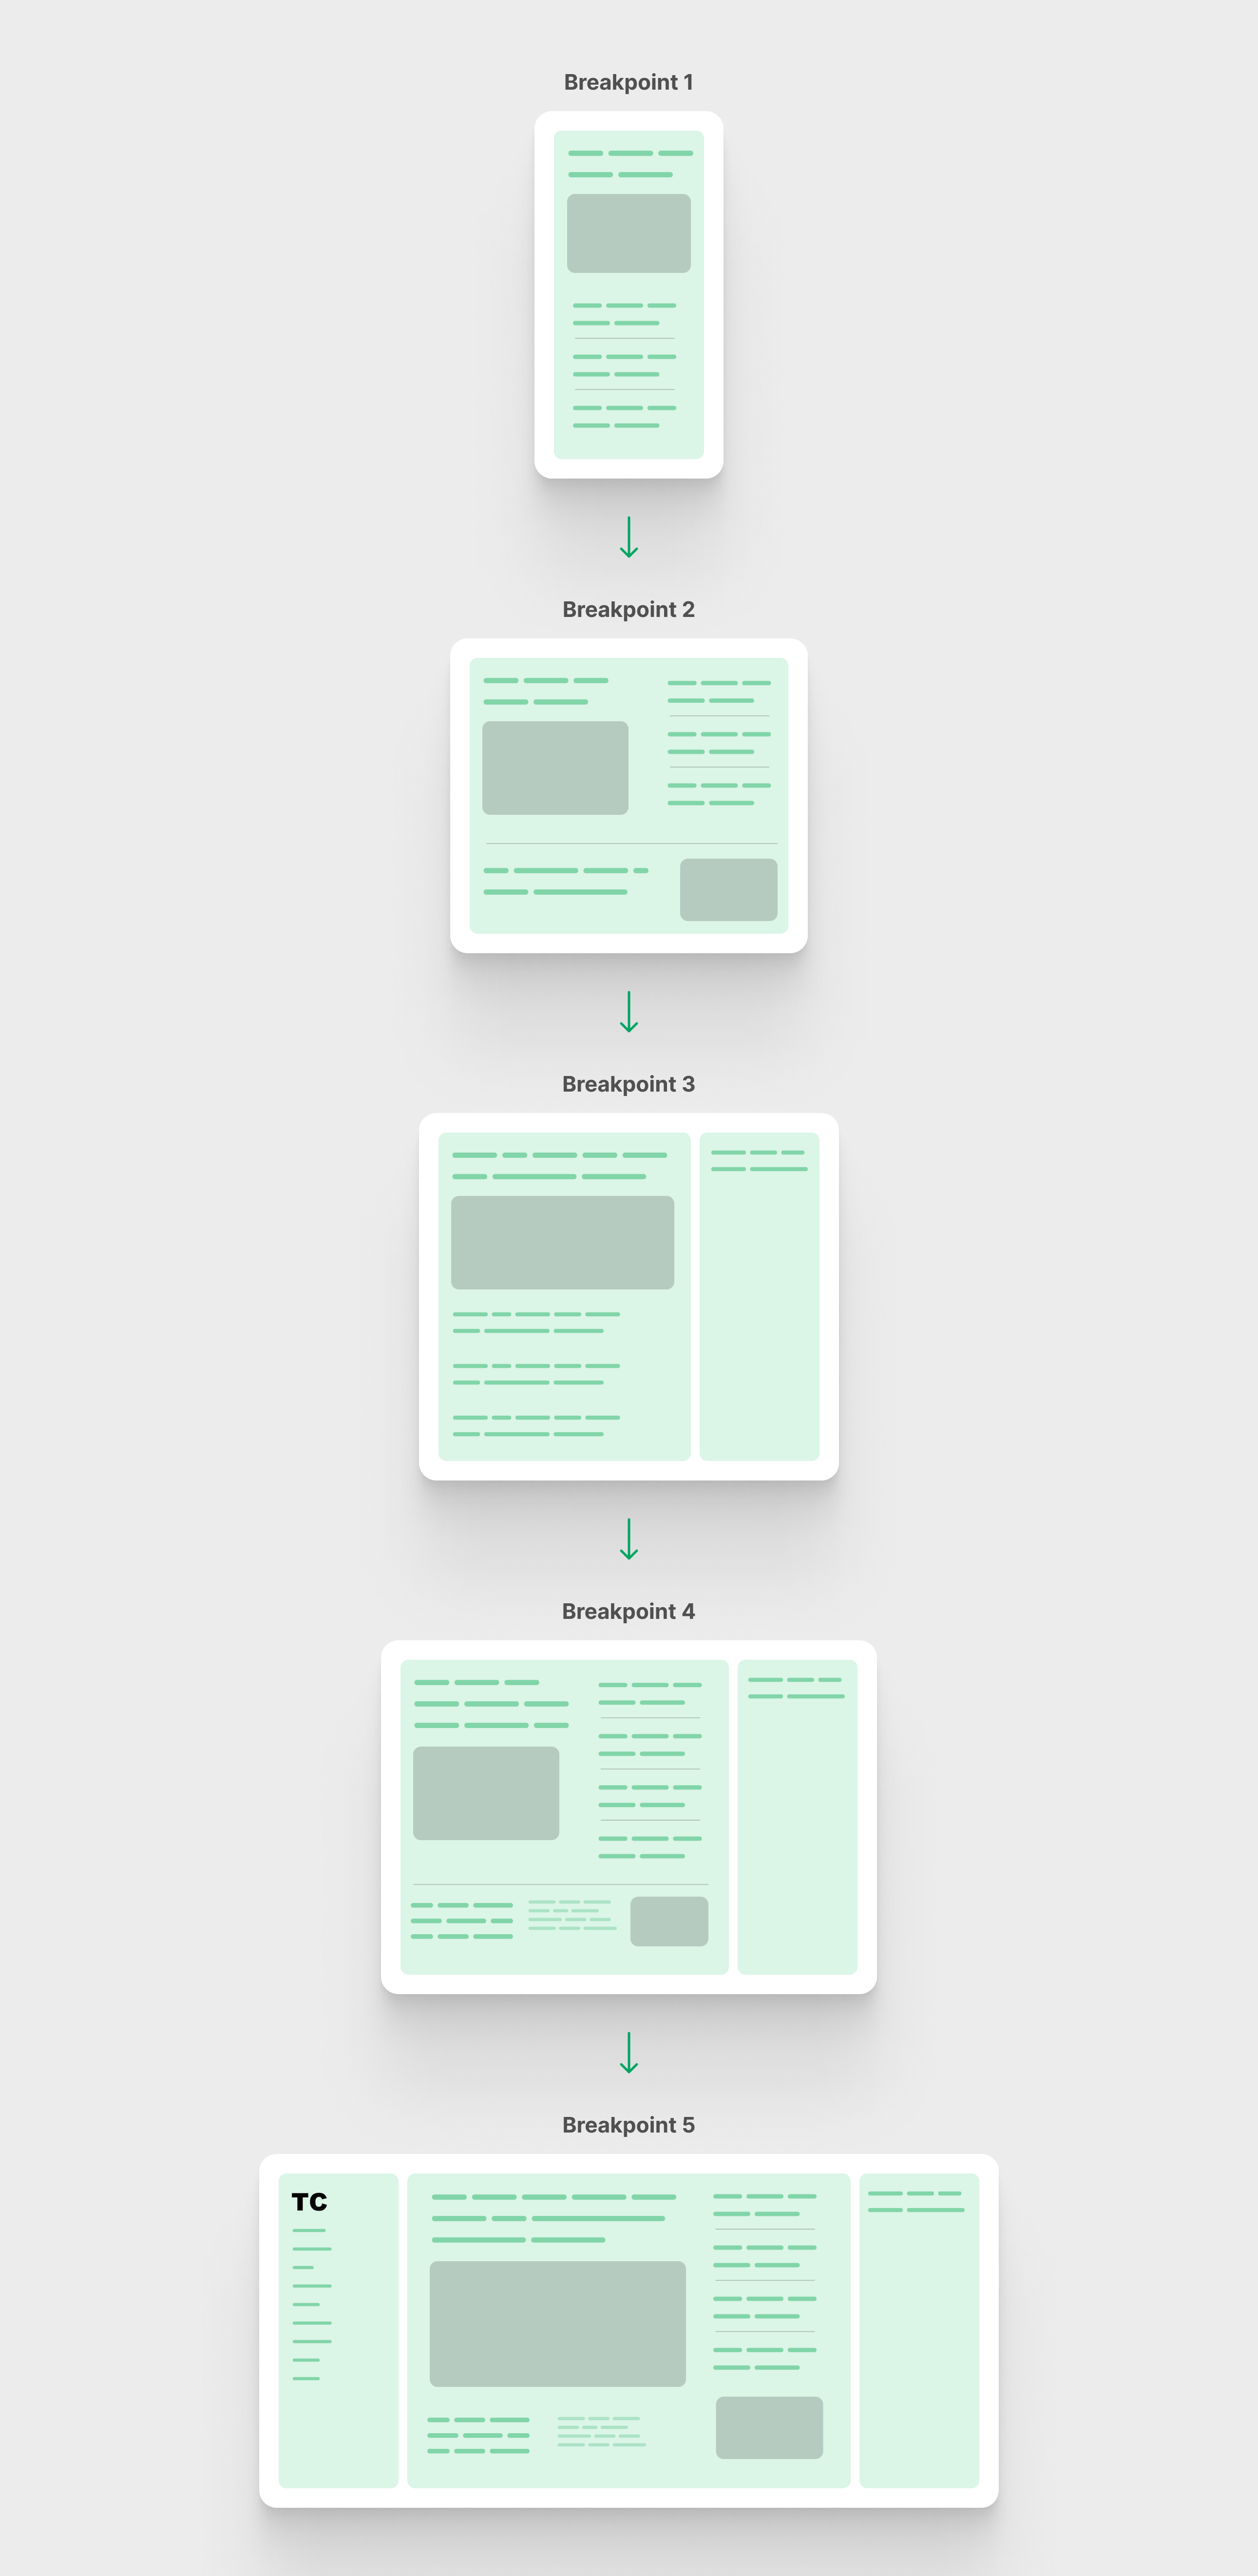
Let’s deal with the principle structure solely.
Among the columns have minimal or most width or each. See the next determine:
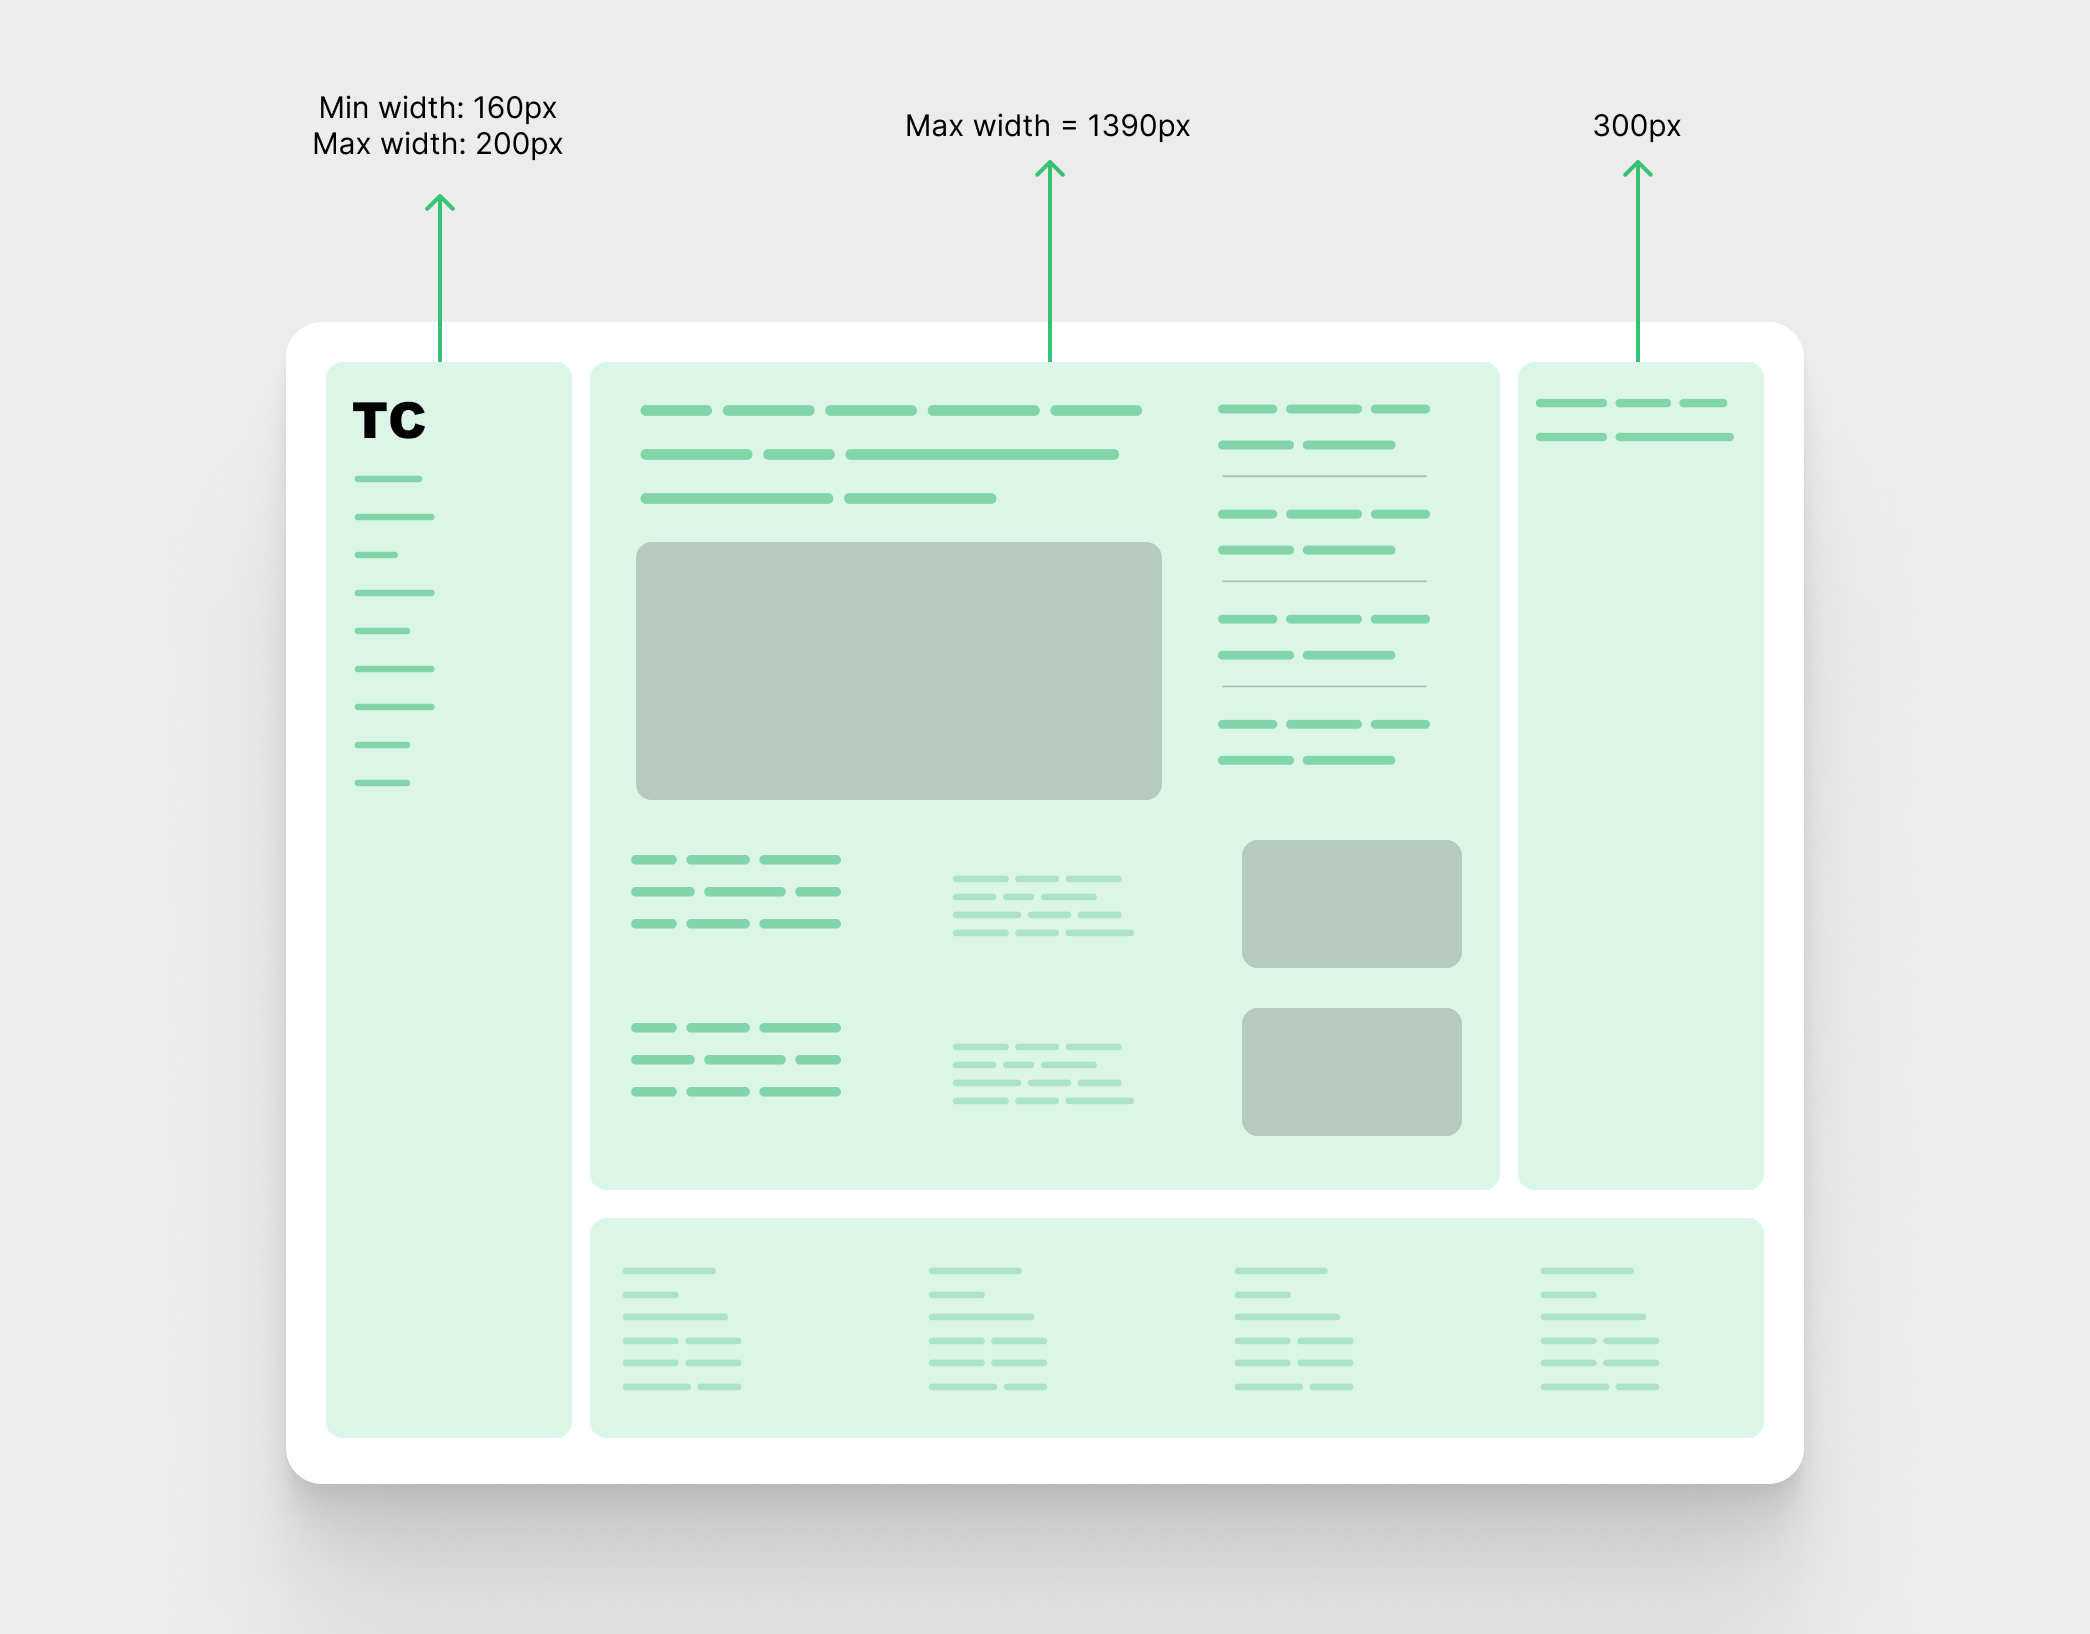
- Left column: minimal width of
160pxand most width of200px. - Center column: most width of
1390px - Proper column:
300pxwidth
I’m not a fan of utilizing left or proper for naming in CSS. Provided that now we have logical properties, their names will probably be begin and finish, respectively. I used left and proper for readability functions.
On a big display screen, the entire web site is left aligned whereas all of the column’s width are maxed-out.
First attempt: Utilizing CSS Flexbox
The very first thing I thought of was utilizing flexbox. Let’s have a look at the HTML:
<div class="structure">
  <header class="navigation"></header>
  <div class="main-content">
    <div class="content-wrap">
      <div class="content material content--feature-island"></div>
    </div>
    <div class="content-wrap">
      <div class="content material"></div>
    </div>
  </div>
  <apart class="sidebar"></apart>
  <footer class="site-footer"></footer>
</div>
For the principle structure, I used flexbox and the default path is column for cell.
.structure {
  show: flex;
  flex-wrap: wrap;
  flex-direction: column;
  hole: 1rem;

  @media (min-width: 720px) {
    flex-direction: row;
    align-items: begin;
  }
}
The .structure component is now a flexbox container. The following step is to outline the width or max-width of every little one column.
For the header, I’m utilizing clamp() to assist with the minimal and most width.
.navigation {
  place: sticky;
  prime: 1rem;
  flex: 0 0 100%;

  @media (min-width: 720px) {
    flex: preliminary;
    width: clamp(160px, 15vw, 200px);
  }
}
For the center column, I used a mixture of max-width and flex: 1.
.main-content {
  max-width: 1300px;
  flex: 1;
}
Lastly, the apart component is hidden by default and will probably be proven if the width is the same as or larger than 720px.
.sidebar {
  show: none;
  width: 300px;

  @media (min-width: 720px) {
    show: block;
  }
}
Word: The media question values I take advantage of usually are not the identical as in TechCrunch’s CSS.
Dealing with the footer for this structure method just isn’t simple.
Now to essentially the most hacky a part of this structure method. For the reason that flex-direction is ready to row, we have to pressure the footer to take the complete width of its wrapper.
Within the TechCrunch implementation, I anticipated that the footer width could be equal to the center content material, however turned out it’s someplace between the center content material and the sidebar.
Since I’m utilizing flexbox, I goal to have the footer aligned with the content material.
.site-footer {
  flex: 0 0 100%;
}
In flexbox, utilizing 100% for flex-basis will pressure a flex merchandise to wrap into a brand new line and take the complete width. This works solely when now we have flex wrapping energetic.
Subsequent step, we have to add a left margin that’s equal to the dynamic width of the navigation.
.site-footer {
  --navWidth: clamp(160px, 15vw, 200px);
  flex: 0 0 100%;
  margin-left: calc(var(--navWidth) + 16px);
}
The 16px is accounting for the hole between the columns.
That isn’t sufficient. It should trigger horizontal scrolling as a result of the footer width is 100% and we added margin-left.
The repair to that’s to deduct the margin from the width of the footer. I included the navigation width in a CSS variable to make it a bit simpler to learn.
.site-footer {
    --navWidth: clamp(160px, 15vw, 200px);
    flex: 0 0 calc(100% - var(--navWidth) + 16px));
    margin-left: calc(var(--navWidth) + 16px);
}
Now the footer takes the complete width of the viewport minus the margin-left.
The following step is to incorporate some math to have the ultimate flex-basis worth. See the next CSS:
.site-footer {
  --navWidth: clamp(160px, 15vw, 200px);
  --maxVal: calc(100vw - 1300px - 200px - 300px - 32px - 32px);
  flex: 0 0 calc(100% - calc(var(--navSize) + 16px) - max(0px, var(--maxVal)));
  margin-left: calc(var(--navWidth) + 16px);
}
As quickly as I moved ahead with this answer, I discovered that it breaks when the viewport could be very massive (2500px+).
I’ve to make use of some advanced math to deduct from the flex-basis worth. Right here is an evaluation of the above CSS:
- 1300px: center column width
- 200px: navigation width
- 300px: sidebar width
- The remainder is spacing on each side
The explanation that this answer breaks is due to flex-wrap: wrap. As quickly as there’s sufficient house for the footer to be subsequent to its sibling, the browser will try this.
That’s an excessive amount of. I didn’t like that answer.
What if merely I add a max-width to the structure wrapper, after which make the footer fill the complete width minus the navigation? It’s a lot simpler to do & perceive.
Right here is the CSS:
.structure {
  --navSize: clamp(160px, 15vw, 200px);
  show: flex;
  flex-direction: column;
  max-width: 1800px;
  hole: 1rem;

  @media (min-width: 720px) {
    flex-wrap: wrap;
    flex-direction: row;
    align-items: begin;
  }
}

fundamental {
  flex: 1;
}

.navigation {
  place: sticky;
  prime: 1rem;
  flex: 0 0 100%;

  @media (min-width: 720px) {
    flex: preliminary;
    width: var(--navSize);
  }
}

.site-footer {
  flex: 0 0 100%;

  @media (min-width: 720px) {
    flex: 0 0 calc(100% - calc(var(--navSize) + 16px));
    margin-left: calc(clamp(160px, 15vw, 200px) + 16px);
  }
}
Execs of utilizing this answer
- Doesn’t have any
place: absoluteorplace: fastened. - Nice browser assist for flexbox and comparability capabilities.
Cons of utilizing this answer
Whereas that works (kinda), rather a lot is occurring that I don’t like:
- Including the
widthon to the kid components. I would favor to have a grid shell that handles that, and the interior gadgets will simply react to it. - Having a responsive structure with flexbox requires us to alter the CSS for every little one merchandise.
- If an merchandise is unfold throughout the complete viewport width, just like the footer, it’s essential work round that or separate it from the structure.
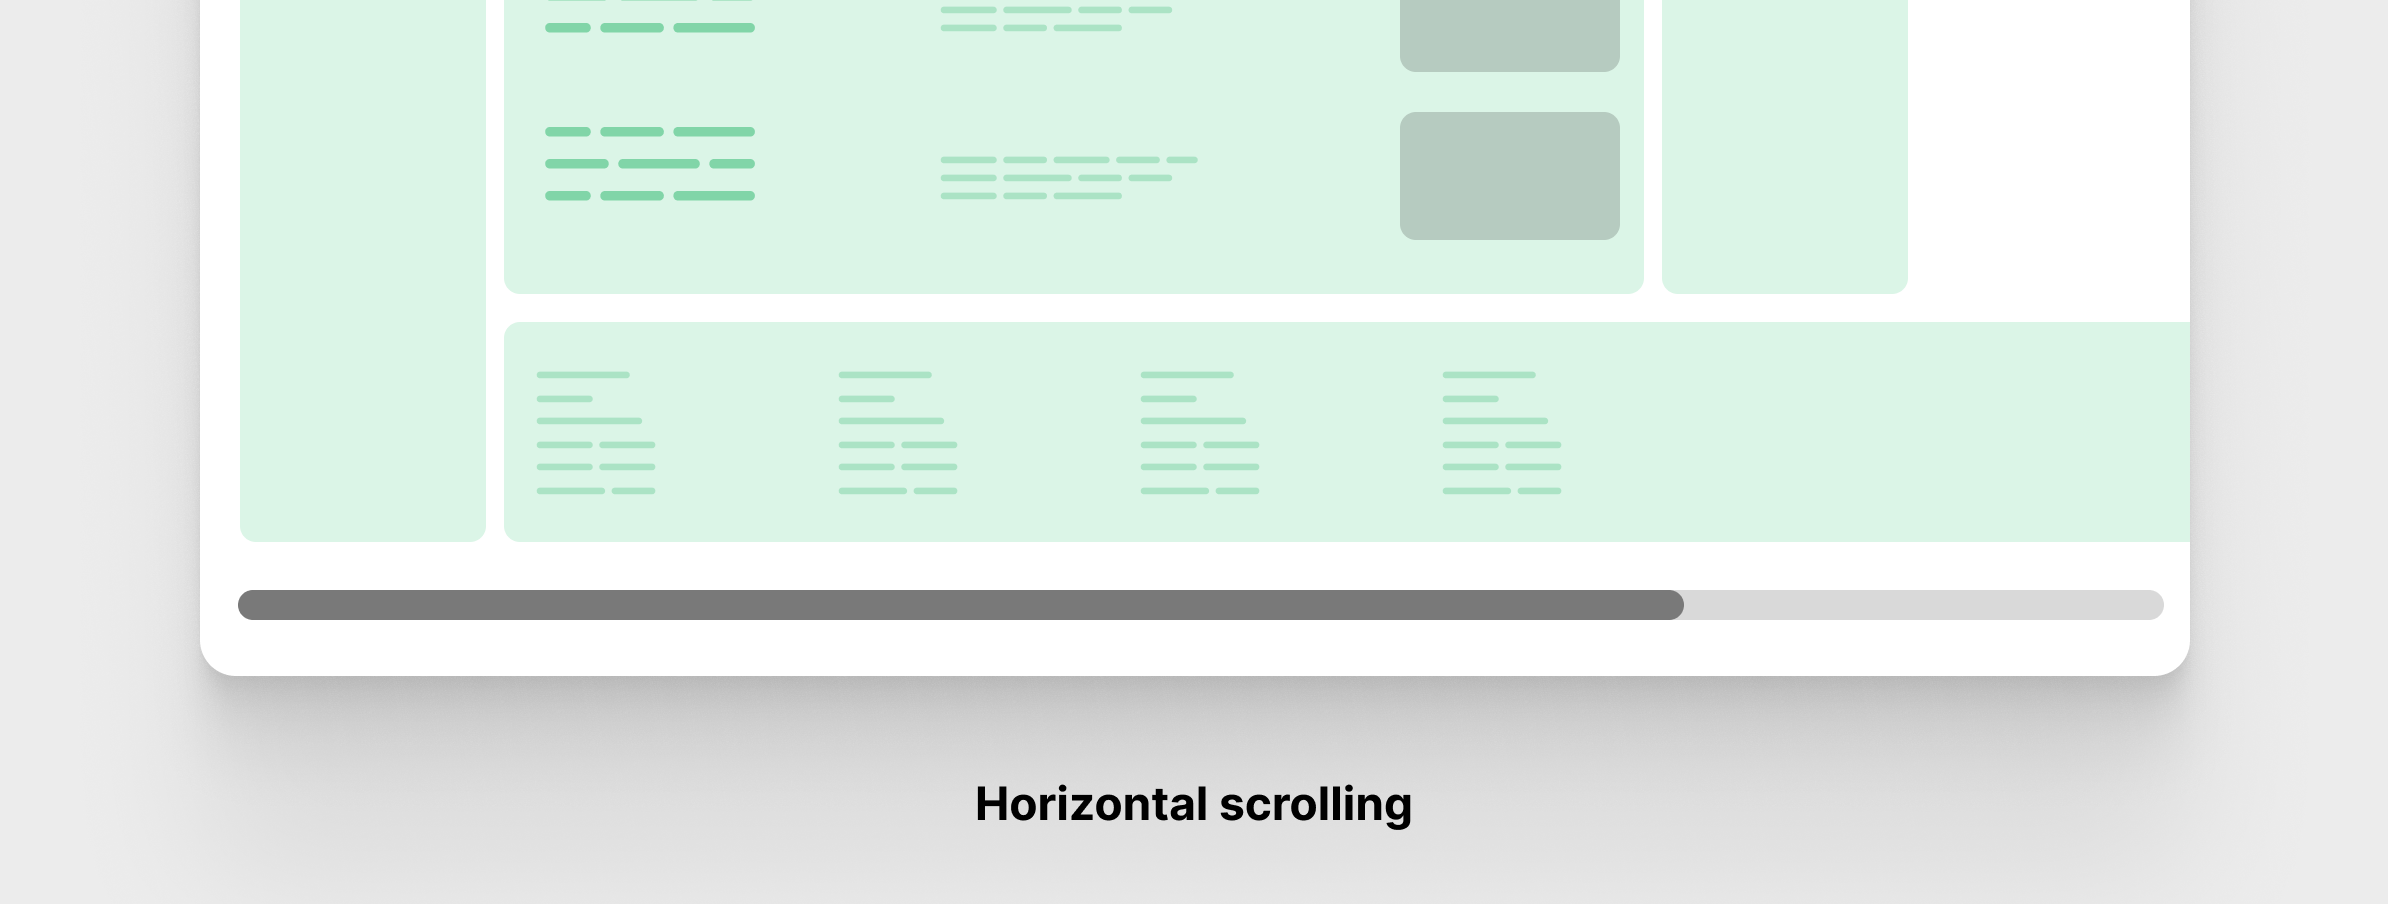
Second attempt: Utilizing CSS Flexbox spacer component
![]()
On this answer, the HTML needs to be tweaked a bit. The footer wants an extra wrapper, I named it site-footer-wrapper.
<div class="structure">
  <header class="navigation"></header>
  <div class="main-content">
    <div class="content-wrap">
      <div class="content material content--feature-island"></div>
    </div>
    <div class="content-wrap">
      <div class="content material"></div>
    </div>
  </div>
  <apart class="sidebar"></apart>
  <div class="site-footer-wrapper">
    <footer class="site-footer"></footer>
  </div>
</div>
.site-footer-wrapper {
show: flex;
hole: 1rem;
flex: 0 0 100%;
}
.site-footer {
flex: 1;
max-width: 1300px;
}Now to the answer. It’s about utilizing a flexbox spacer component.
The brand new wrapper is a flexbox container with hole: 1rem. This jogged my memory of the CSS subgrid. The footer itself has flex: 1 to fill the remaining house with a most width of 1300px (similar as the principle content material wrapper).
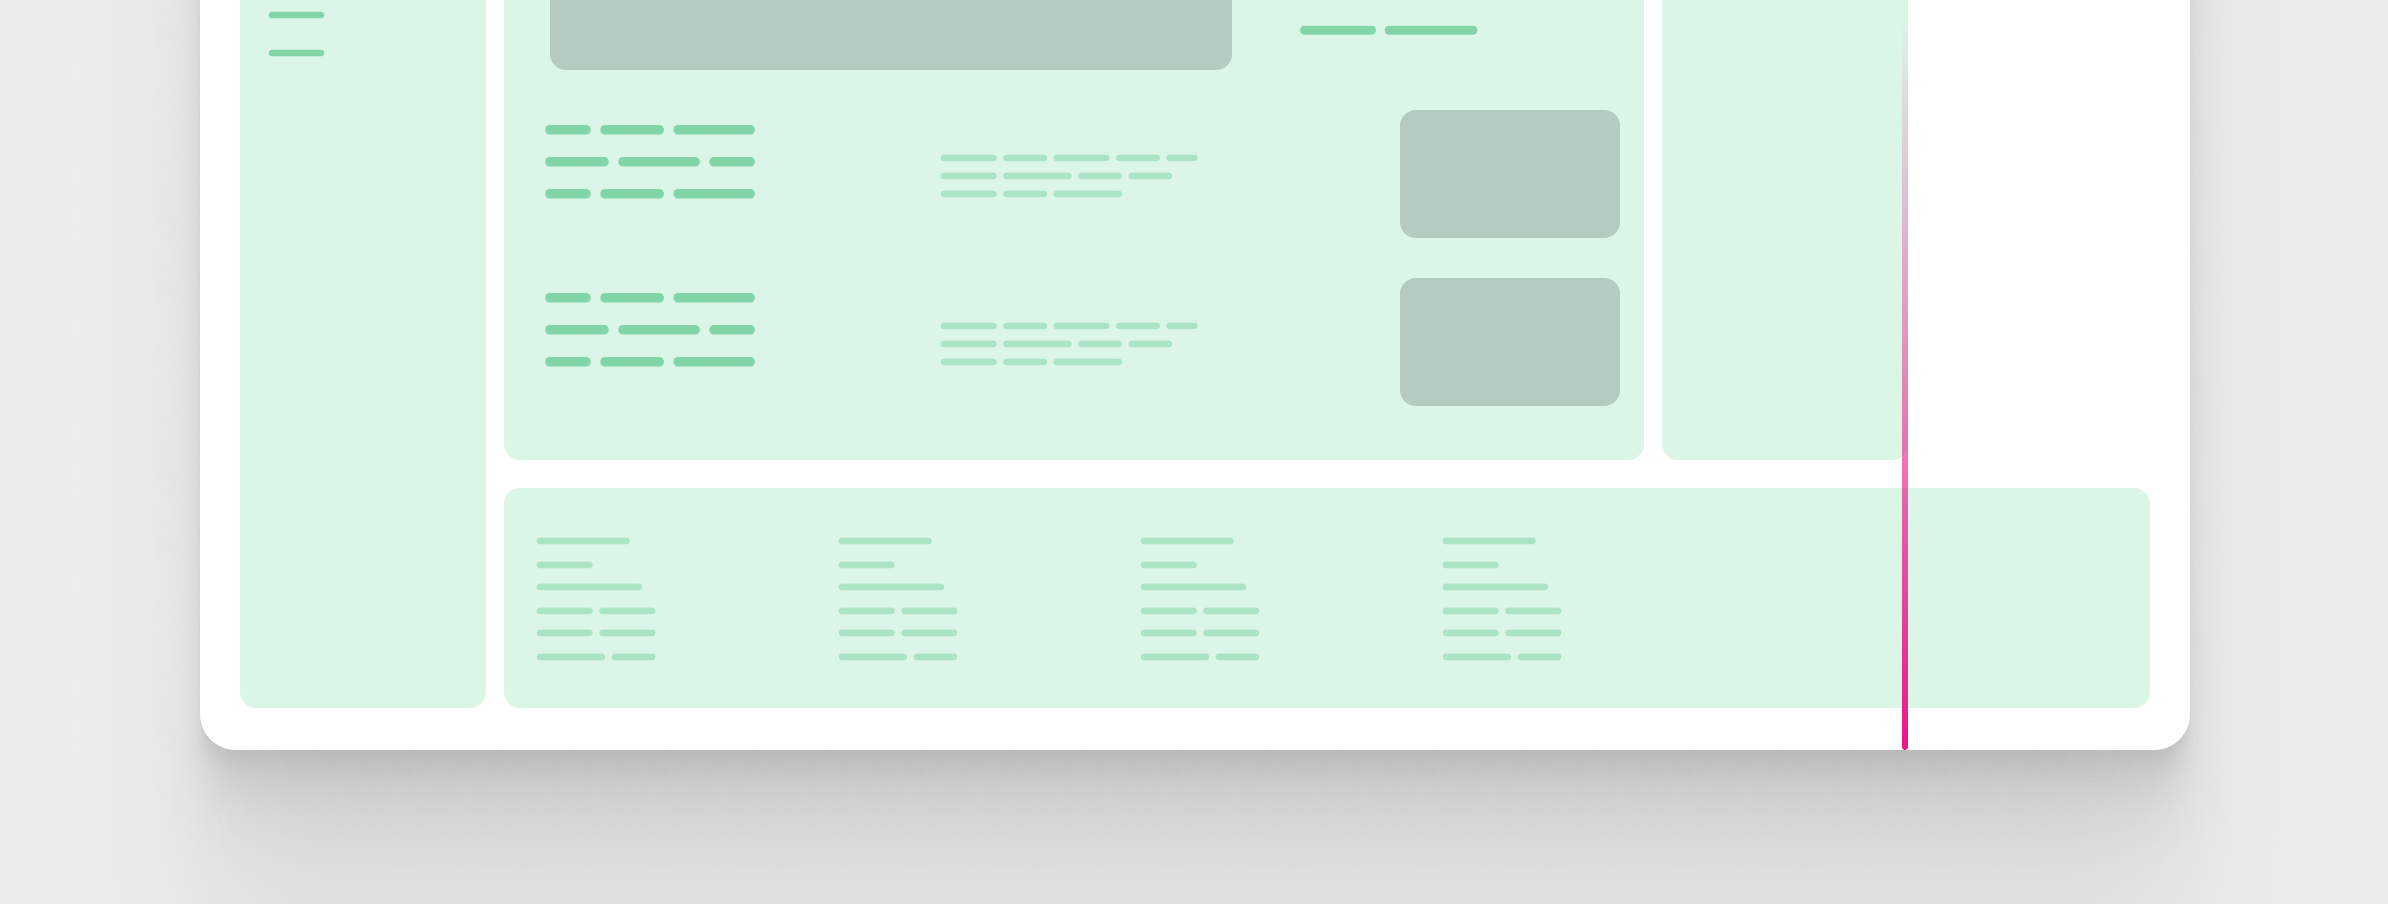
With the above CSS, we’ll have a outcome like this:
![]()
Discover that the footer is left aligned. The following step is so as to add the spacer component on the left.
@media (min-width: 720px) {
  .site-footer-wrapper:earlier than {
    content material: "";
    background-color: pink;
    width: var(--navSize);
  }
}![]()
Cool, however the footer ought to span the width until the tip of the grid (the sidebar). We will try this by including the hole and sidebar width to the utmost width of the interior footer.
.site-footer {
  flex: 1;
  max-width: calc(1300px + var(--gap) + var(--sidebarWidth));
}![]()
Third attempt: Utilizing CSS Flexbox and margin
The flexbox structure remains to be the identical because the earlier instance, but it surely’s a special method. The thought is so as to add margins on each side of the footer.
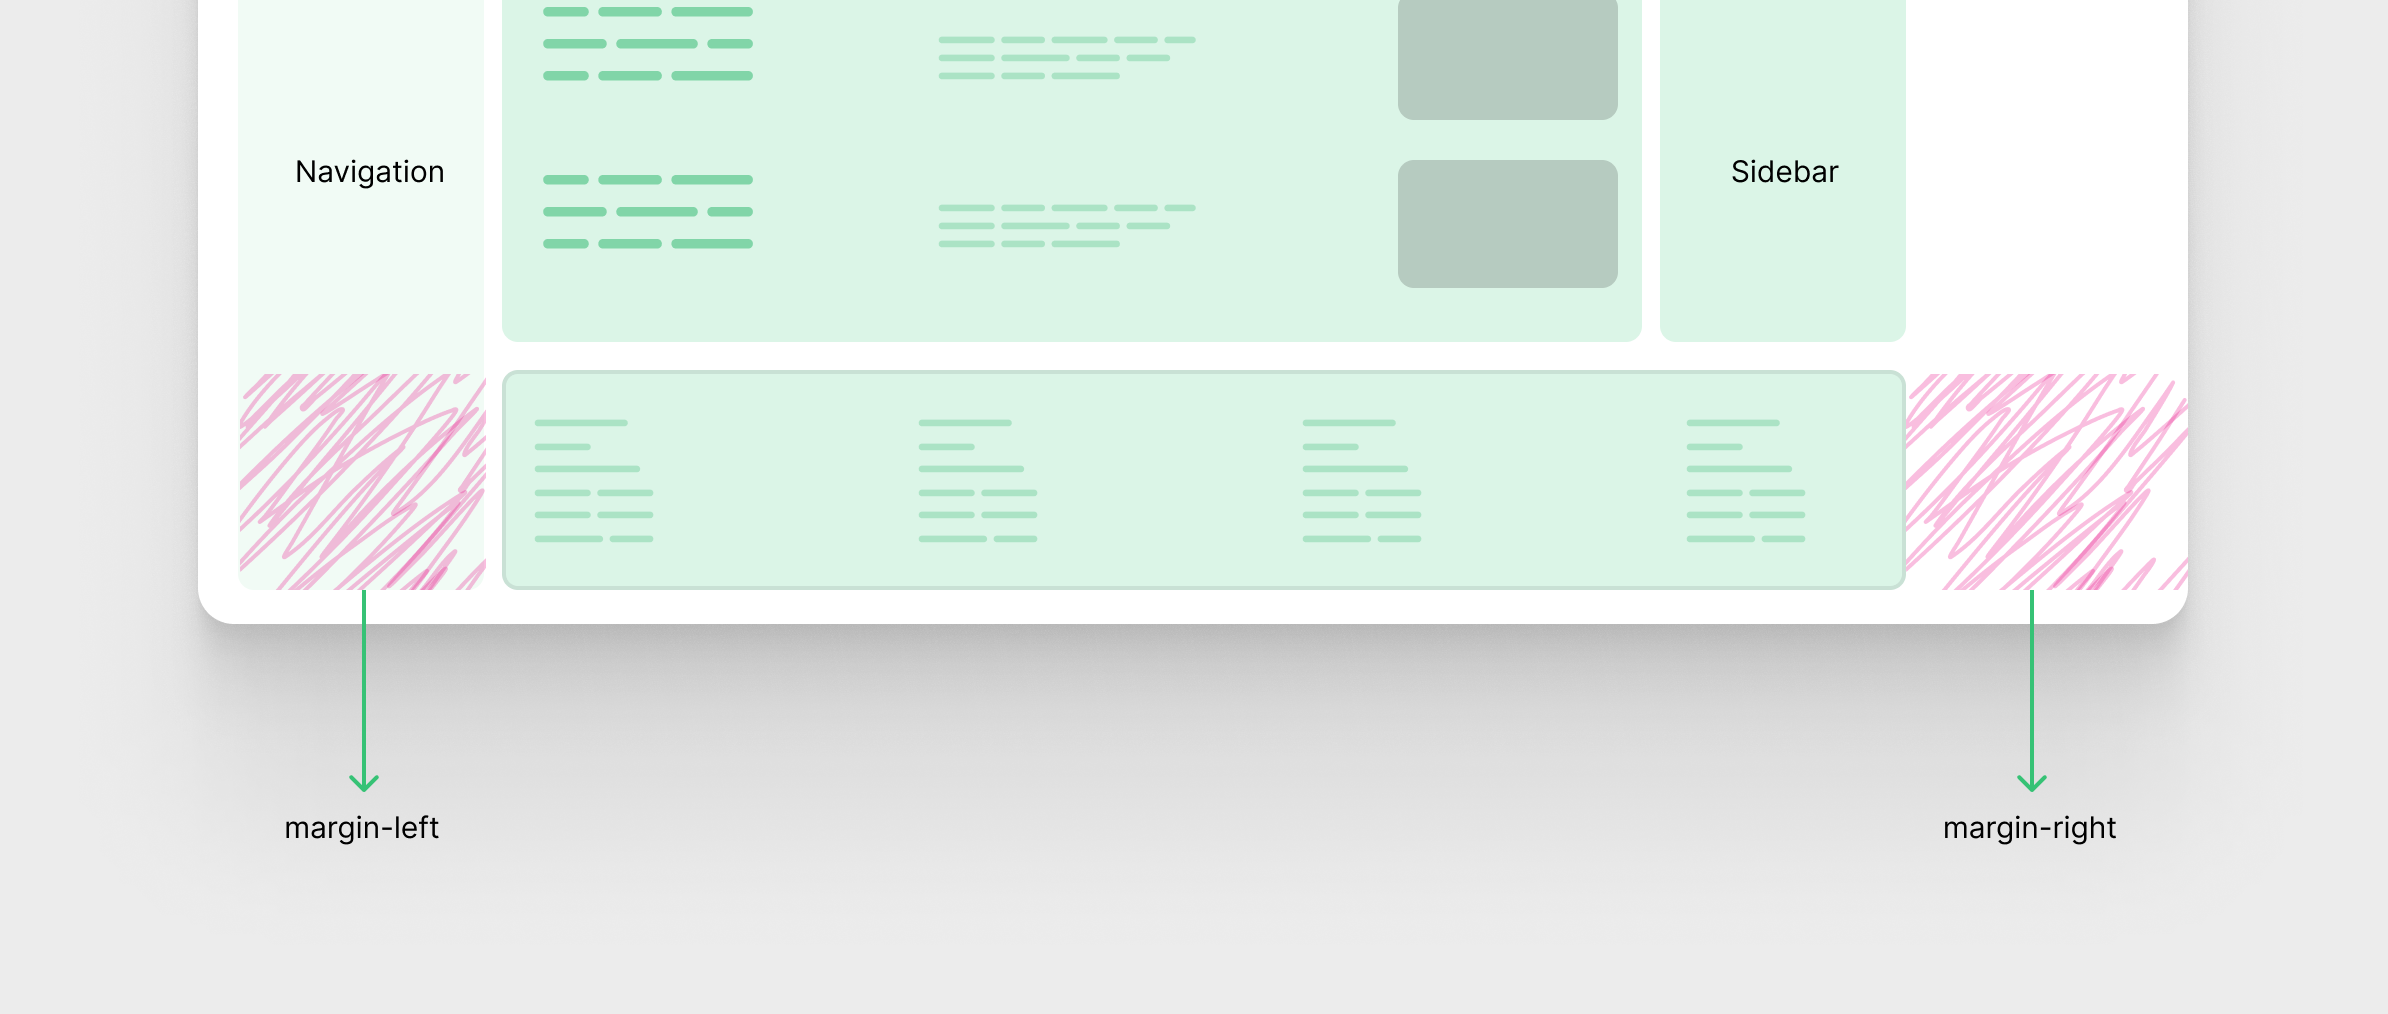
Okay. We already know the scale of the navigation, so the margin-left would be the similar because the navigation width.
What in regards to the margin-right? Nicely, it wants some math. That margin is dynamic, because it depends upon the viewport dimension. It will likely be bigger when the display screen is massive.
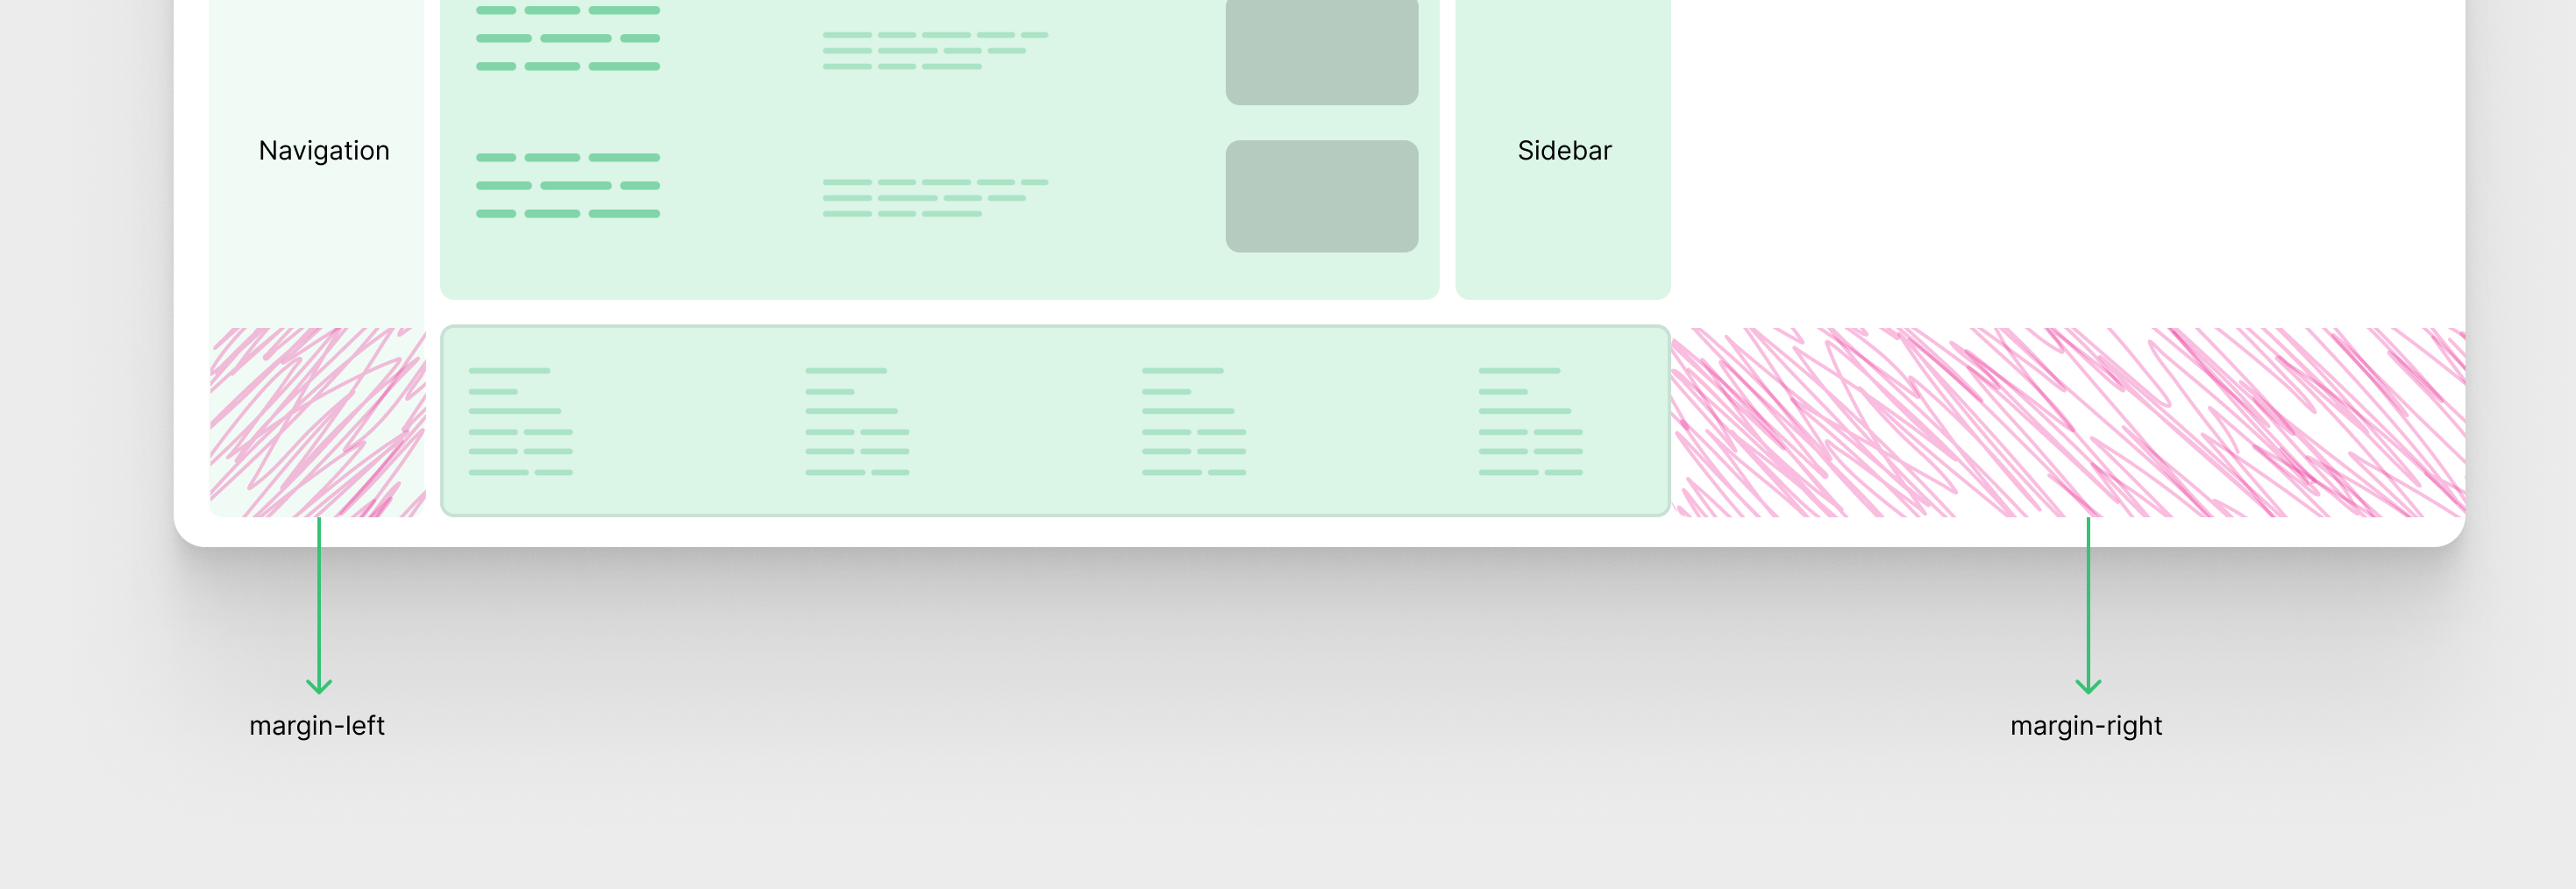
Answer necessities
- The margin worth needs to be dynamic when there’s sufficient house
- The margin ought to turn into
0when there isn’t a house - For the reason that footer
flex-basisis100%, the worth ought to change based mostly on the margin
Right here is the answer:
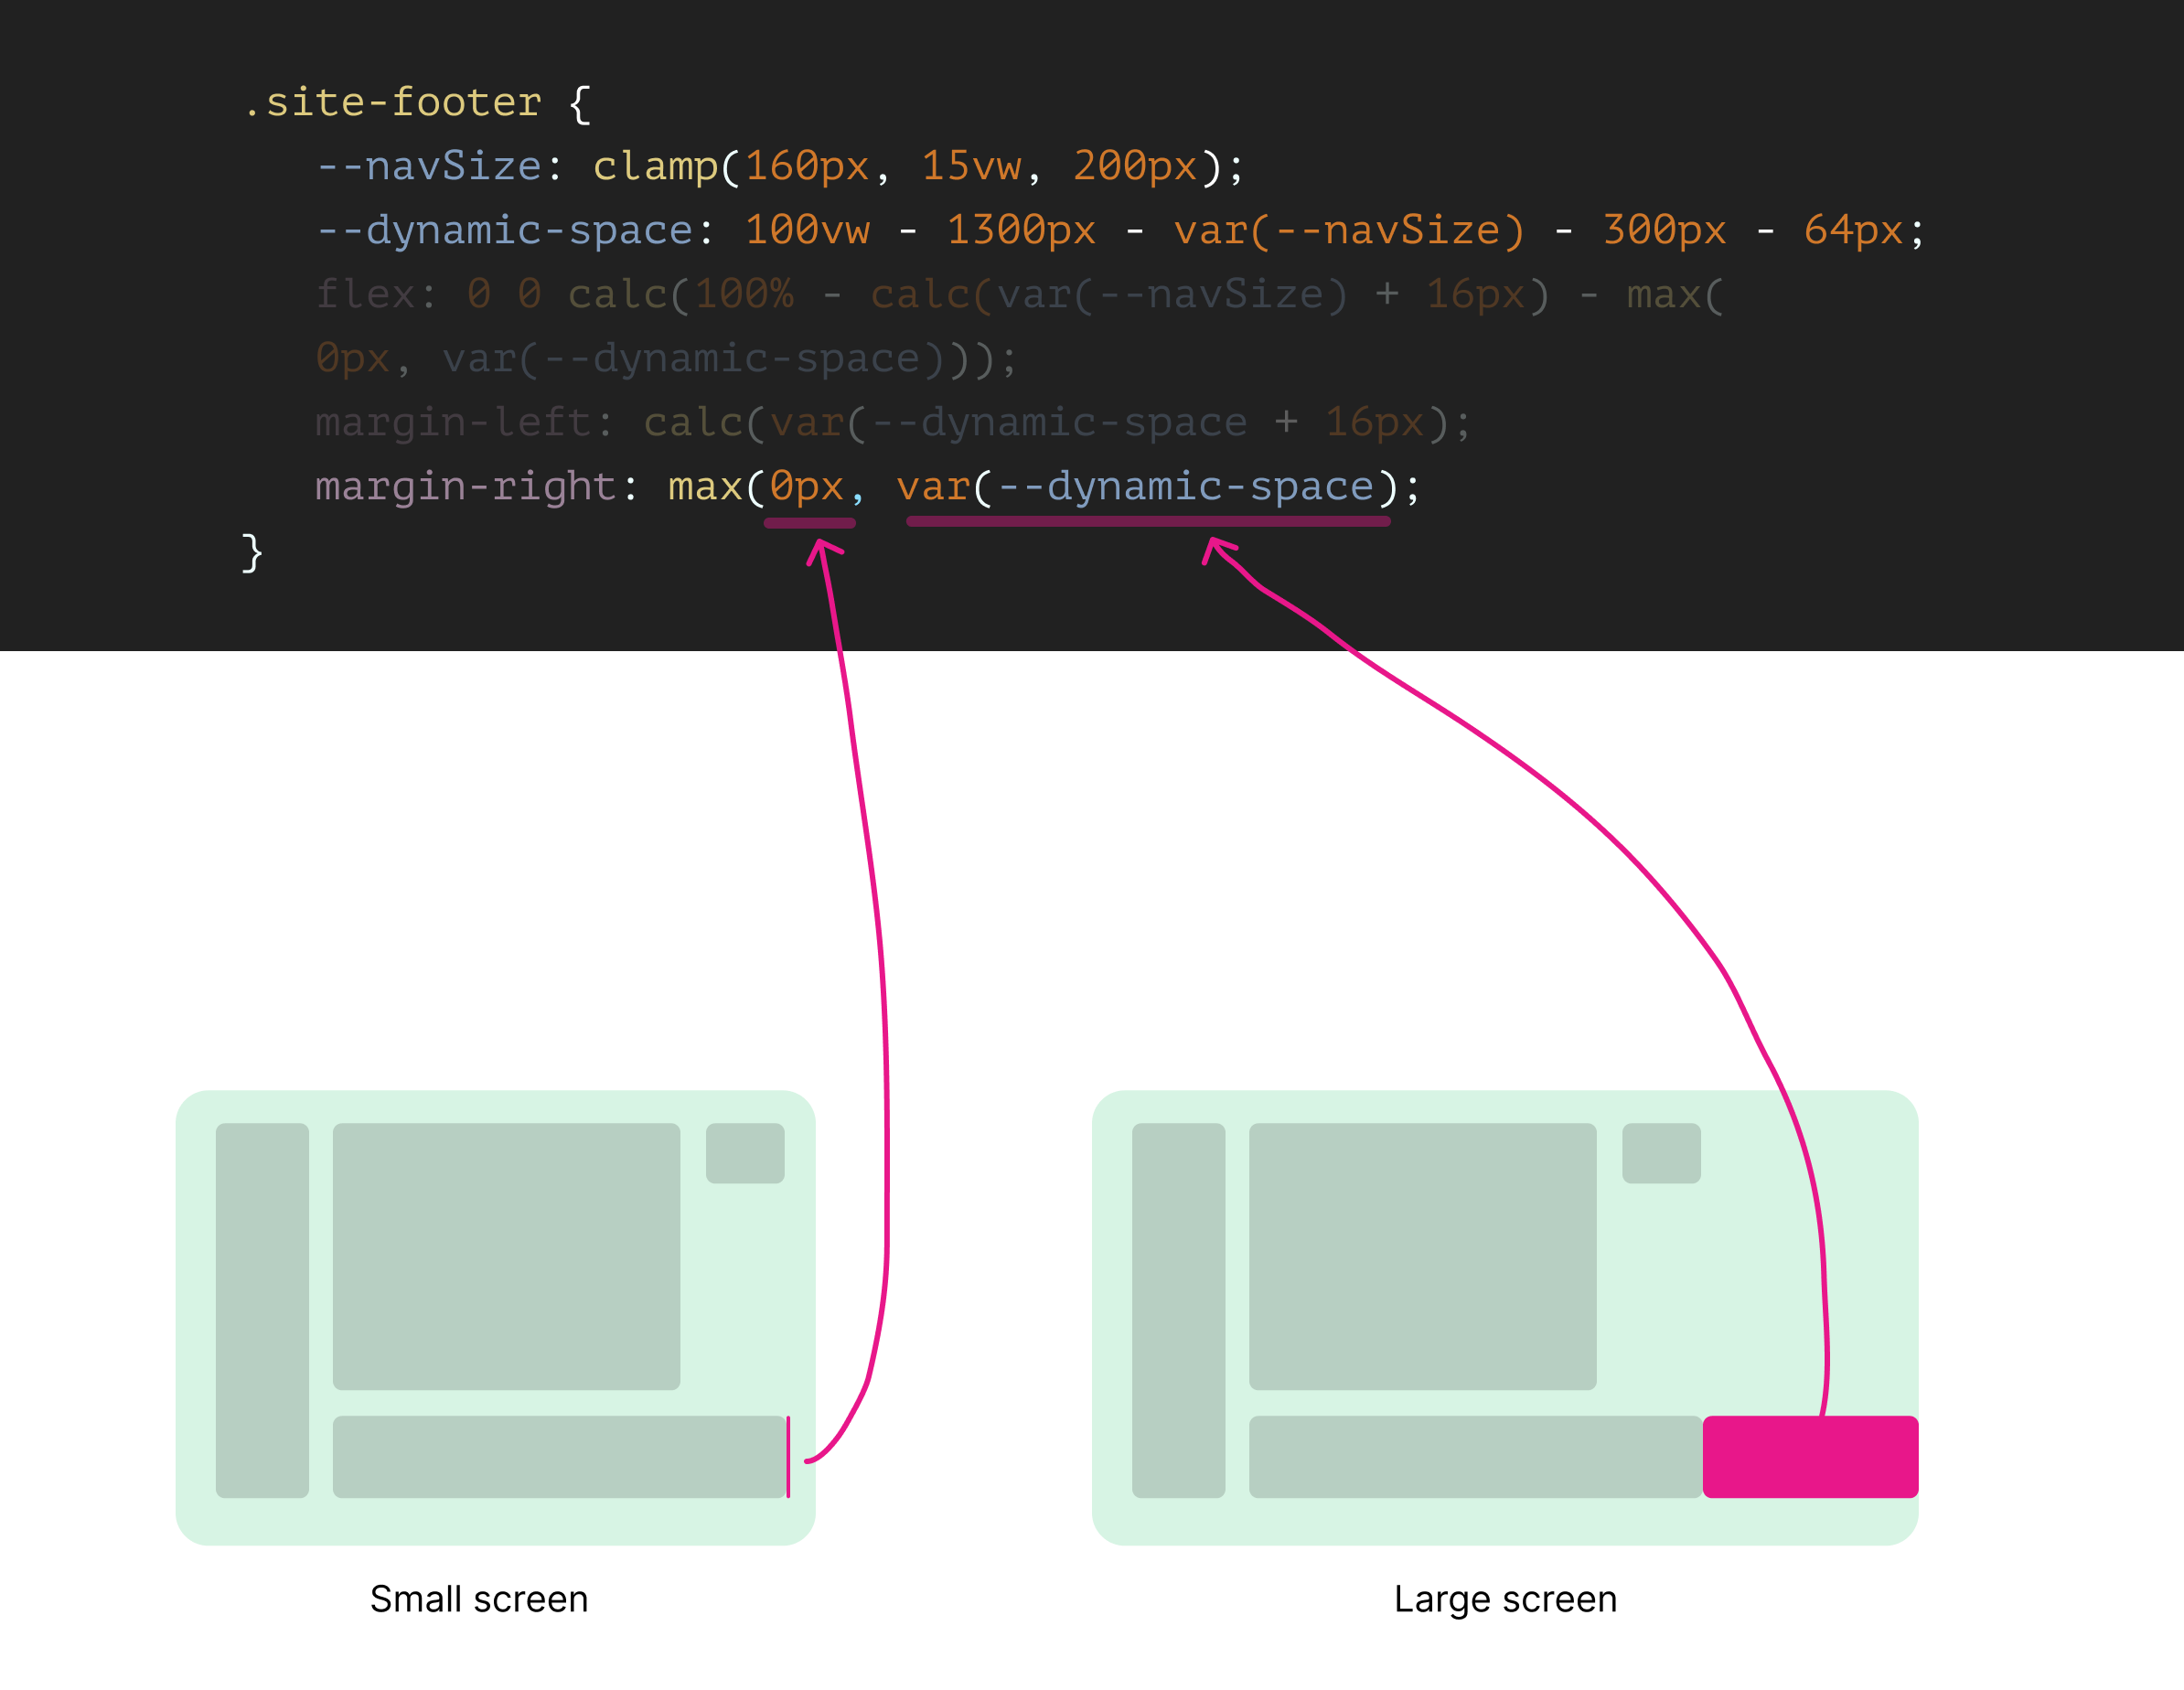
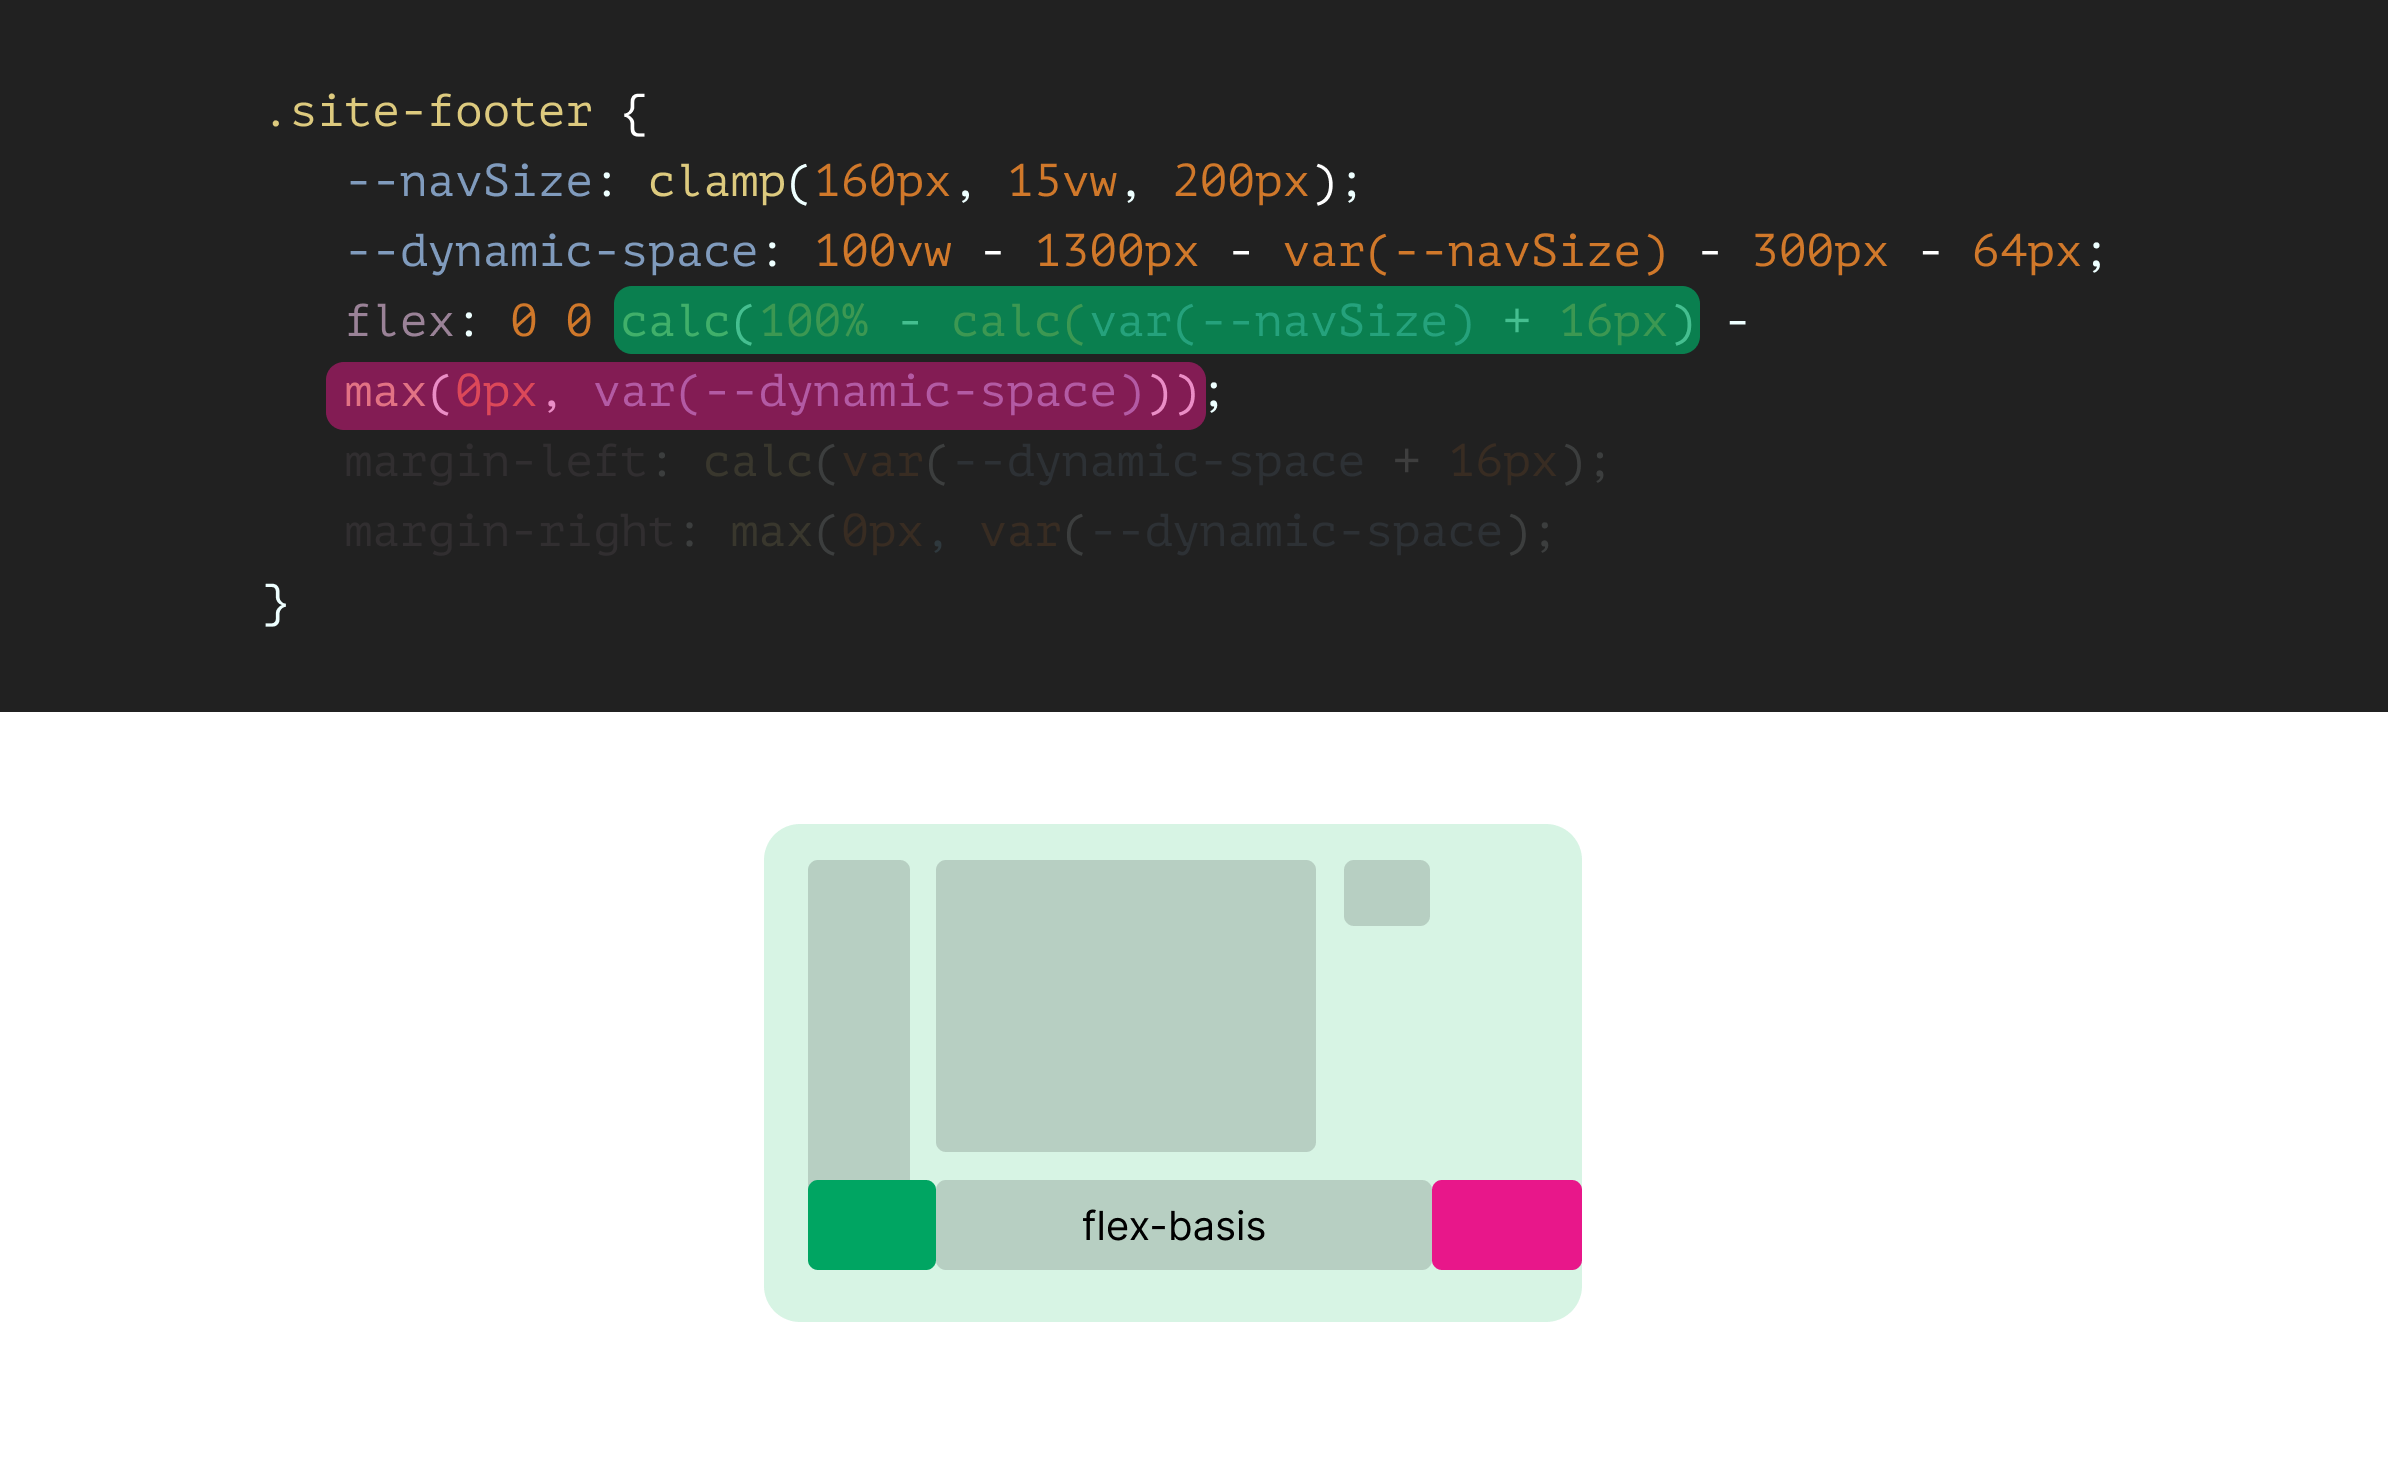
.site-footer {
  --navSize: clamp(160px, 15vw, 200px);
  --dynamic-space: calc(
    100vw - 1300px - var(--navSize) - 300px - 64px
  );
  flex: 0 0 calc(100% - calc(var(--navSize) + 16px) - max(0px, var(--dynamic-space)));
  margin-left: calc(var(--navSize) + 16px);
  margin-right: max(0px, var(--dynamic-space));
}
First, let’s break down the --dynamic-space CSS variable.

The dynamic margin on the suitable facet is the same as the results of the next:
dynamic margin = viewport width – center column – nav – sidebar – spacing
By combining that with the CSS max() comparability operate, the worth might be both 0 or the var(--dynamic-space), relying on the viewport dimension.
When the viewport dimension is massive, the dynamic margin is bigger than 0px. In any other case, the dynamic margin is unfavorable and thus the 0px is bigger.
The max() comparability operate doing its job right here.
For the flex worth, the width of the footer is dynamic and is calculated based mostly on each margins.
Execs of utilizing this answer
- Works nice on all display screen sizes
Cons of utilizing this answer
- It’s onerous to grasp it in case you refer again to it in six months. It’s even not straightforward to grasp others.
- It’d turn into ineffective if the structure modifications for some cause.
Fourth attempt: Utilizing CSS Grid – Take 1
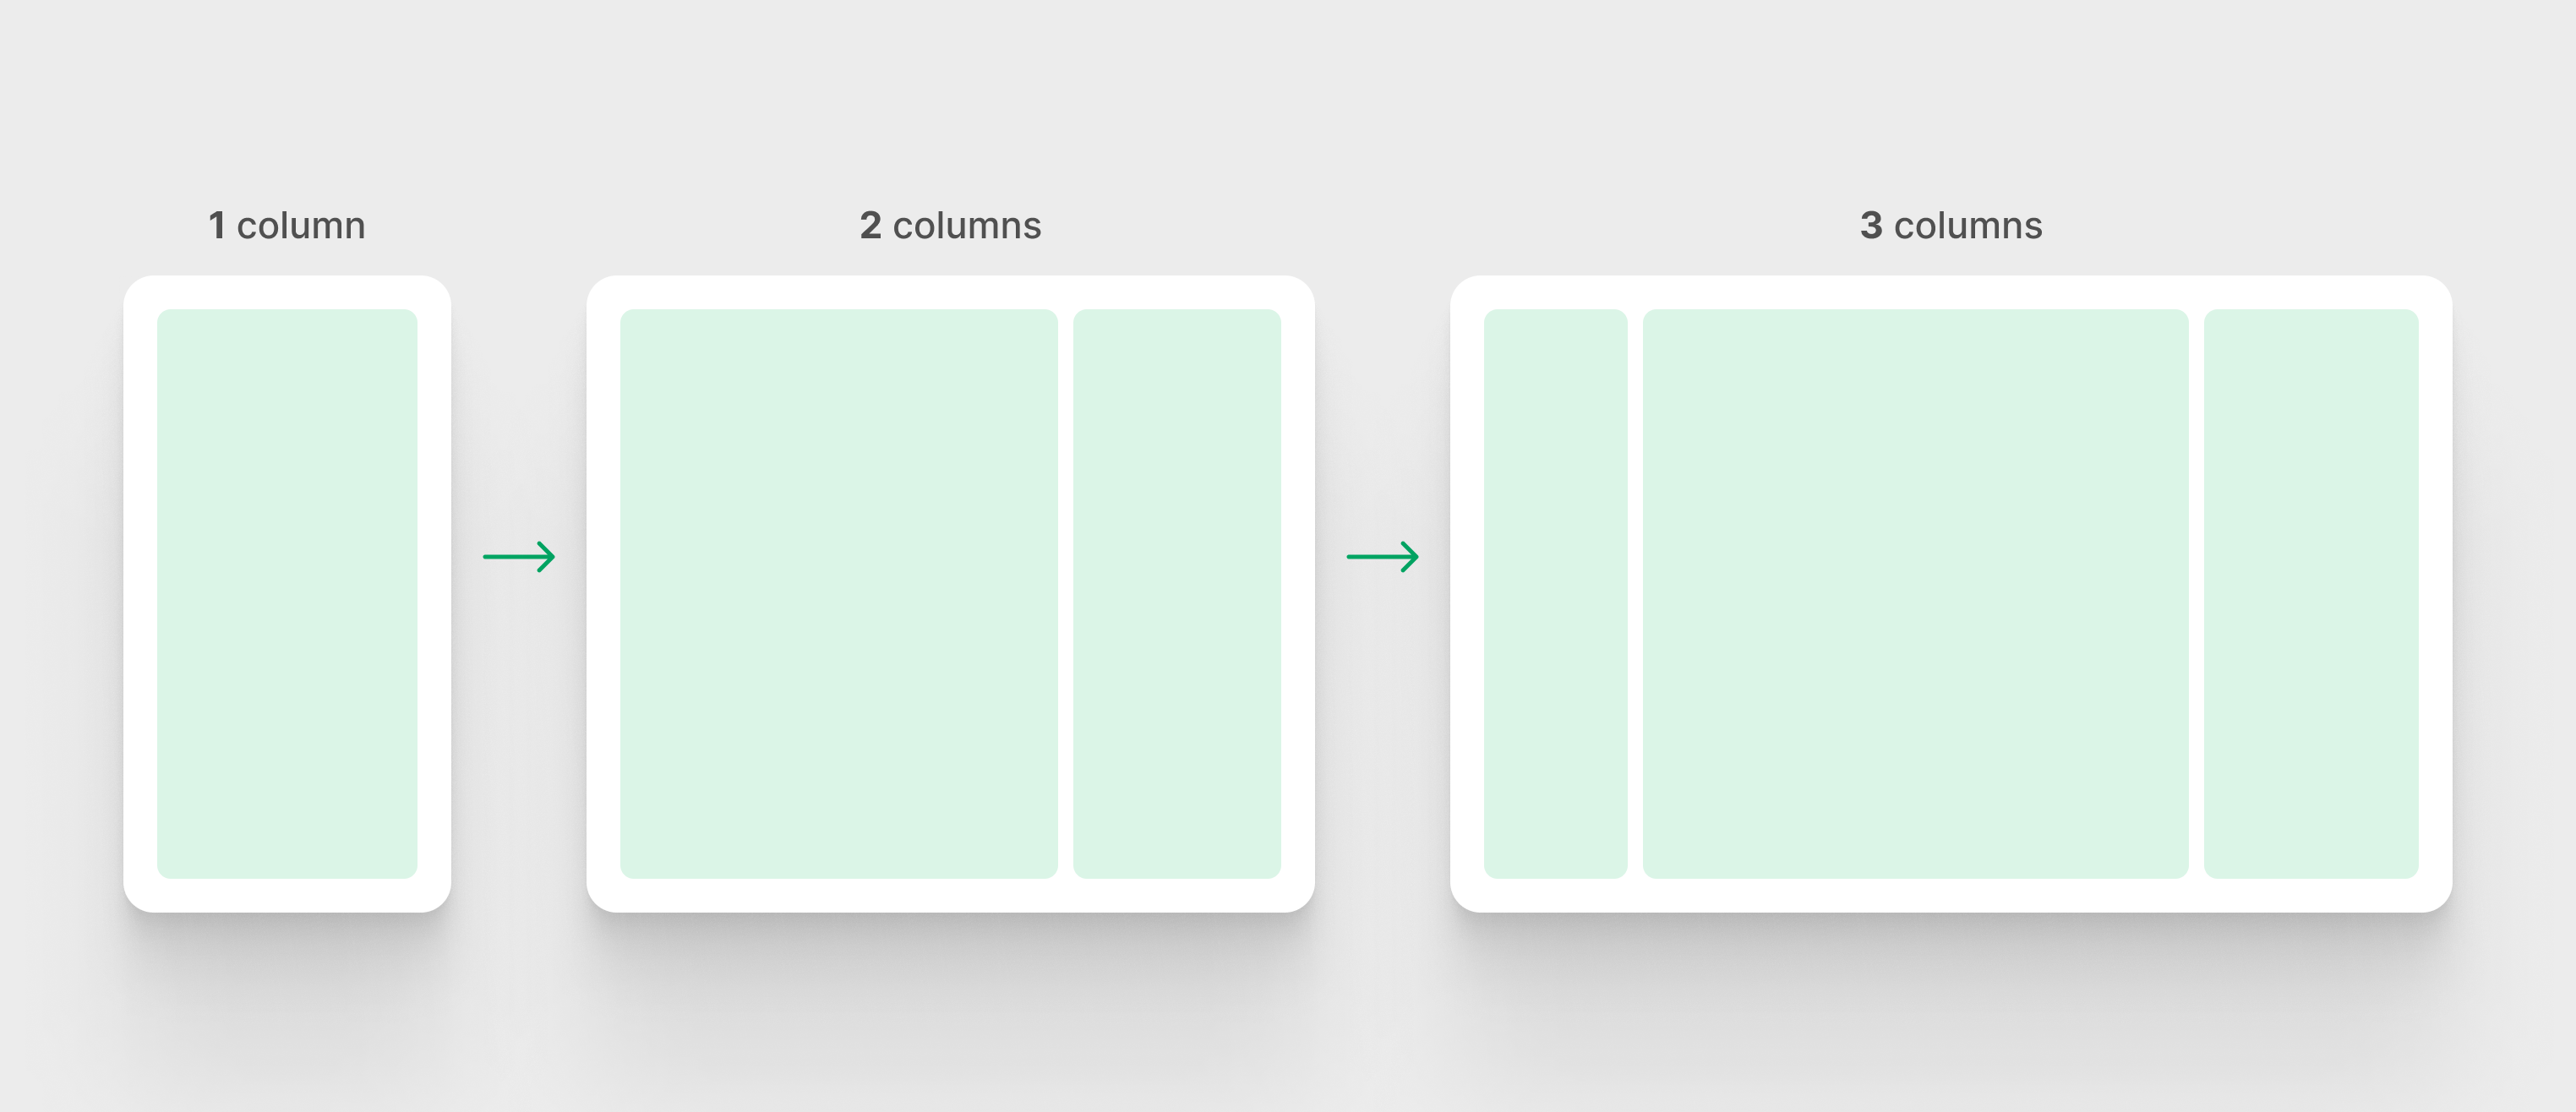
This answer is about utilizing CSS grid. We have to have 1 column on cell and three columns when the house is sufficient.
Right here is the preliminary answer with the CSS grid method.
.structure {
  --cols: 1fr;
  show: grid;
  grid-template-columns: var(--cols);
  align-items: begin;
  hole: 1rem;
  max-width: 1800px;

  @media (min-width: 720px) {
    --cols: 5fr 300px;
  }

  @media (min-width: 1020px) {
    --cols: 250px 5fr 300px;
  }
}
A number of notes:
- I used
1frfor the grid columns on cell to get the advantage of theholebetween components. - The
align-itemsis necessary to make the sticky positioning work with CSS grid. - The
--colsCSS variable is modified on completely different breakpoints.
Subsequent, we have to place each the navigation and the footer as under:
header {
  place: sticky;
  prime: 0;
  grid-column: 1 / -1;

  @media (min-width: 1020px) {
    grid-column: 1 / 2;
  }
}

.site-footer {
  grid-column: 1 / -1;

  @media (min-width: 1020px) {
    grid-column: 2 / -1;
  }
}
Whereas this works, the primary column width is fastened. I want it to vary between 160-200px. How to try this whereas CSS grid minmax() operate can’t add dynamic values?
Think about the next CSS:
.structure {

  grid-template-columns: minmax(160px, 200px) 5fr 300px;
}
This gained’t work. Let’s check out a special answer.
Fifth attempt: Utilizing CSS Grid – Take 2
I acquired the concept to make use of CSS Comparability capabilities contained in the minmax() operate and it labored. The thought is to make use of a min() operate and have a set worth and a dynamic one.
Let’s take a easy instance.
.structure {
  --dynamic-col: minmax(min(160px, 10vw), min(200px, 15vw));
}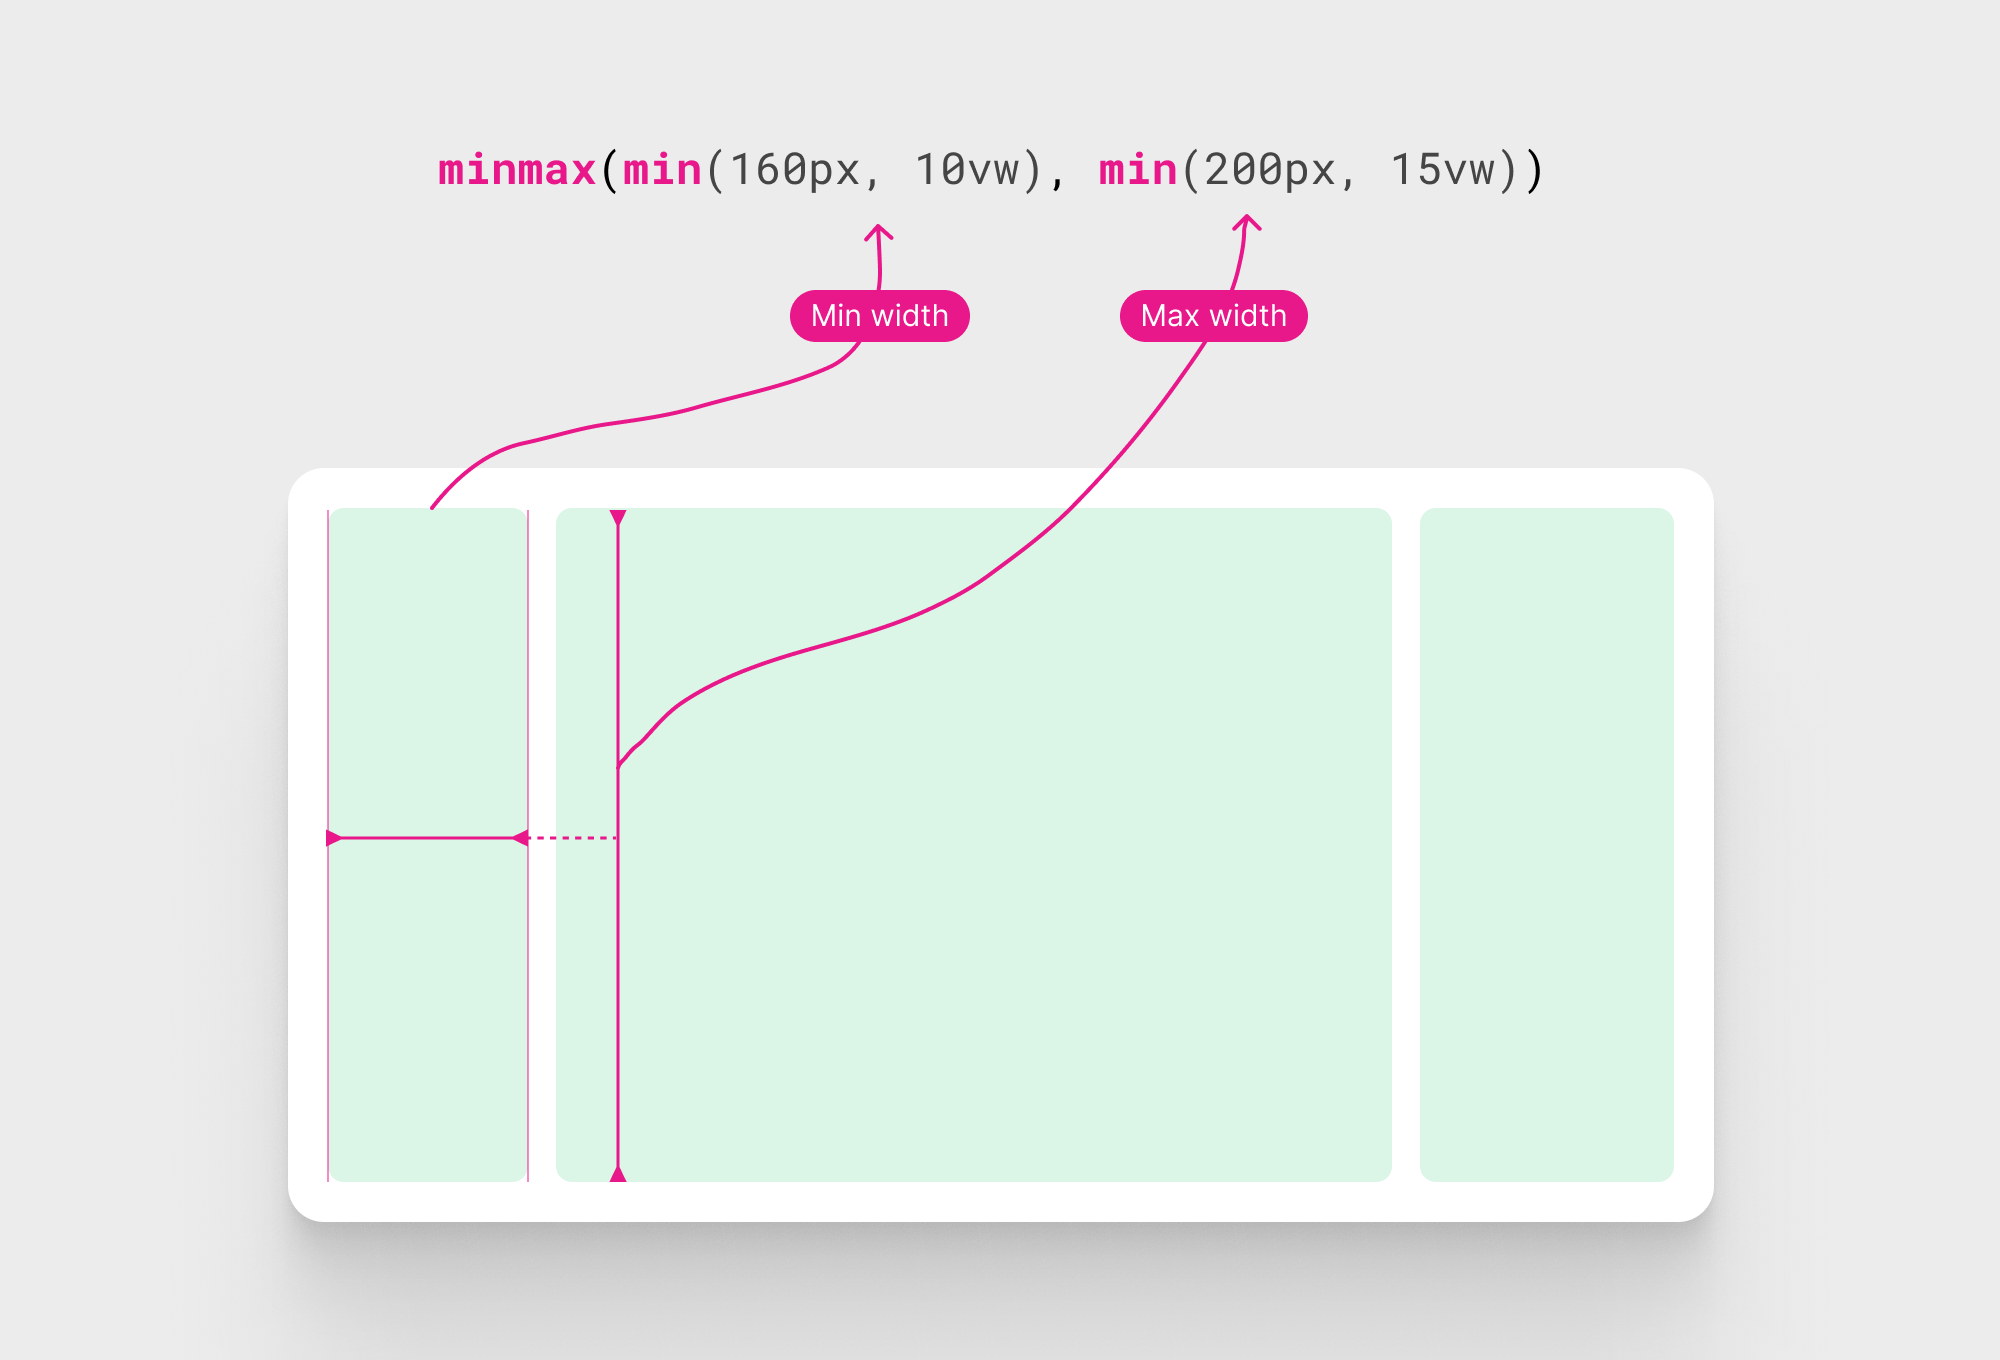
It really works! We now have a dynamic column inside CSS grid. Right here is the remainder of CSS:
.structure {
  --cols: minmax(min(160px, 10vw), min(200px, 15vw)) minmax(
      min(1200px, 0px),
      min(1390px, 100%)
    )
    300px;
}
Execs of utilizing this answer
- Nice browser assist
- Straightforward to implement and management the columns
- We will profit from subgrid to have a greater alignment for the UI. I’ll clarify about that later.
Cons
The center part grid structure
I discovered the structure of this part to be a bit buggy. Discover the way it behaves in a different way on 3 completely different breakpoints, with a 1px distinction between each.
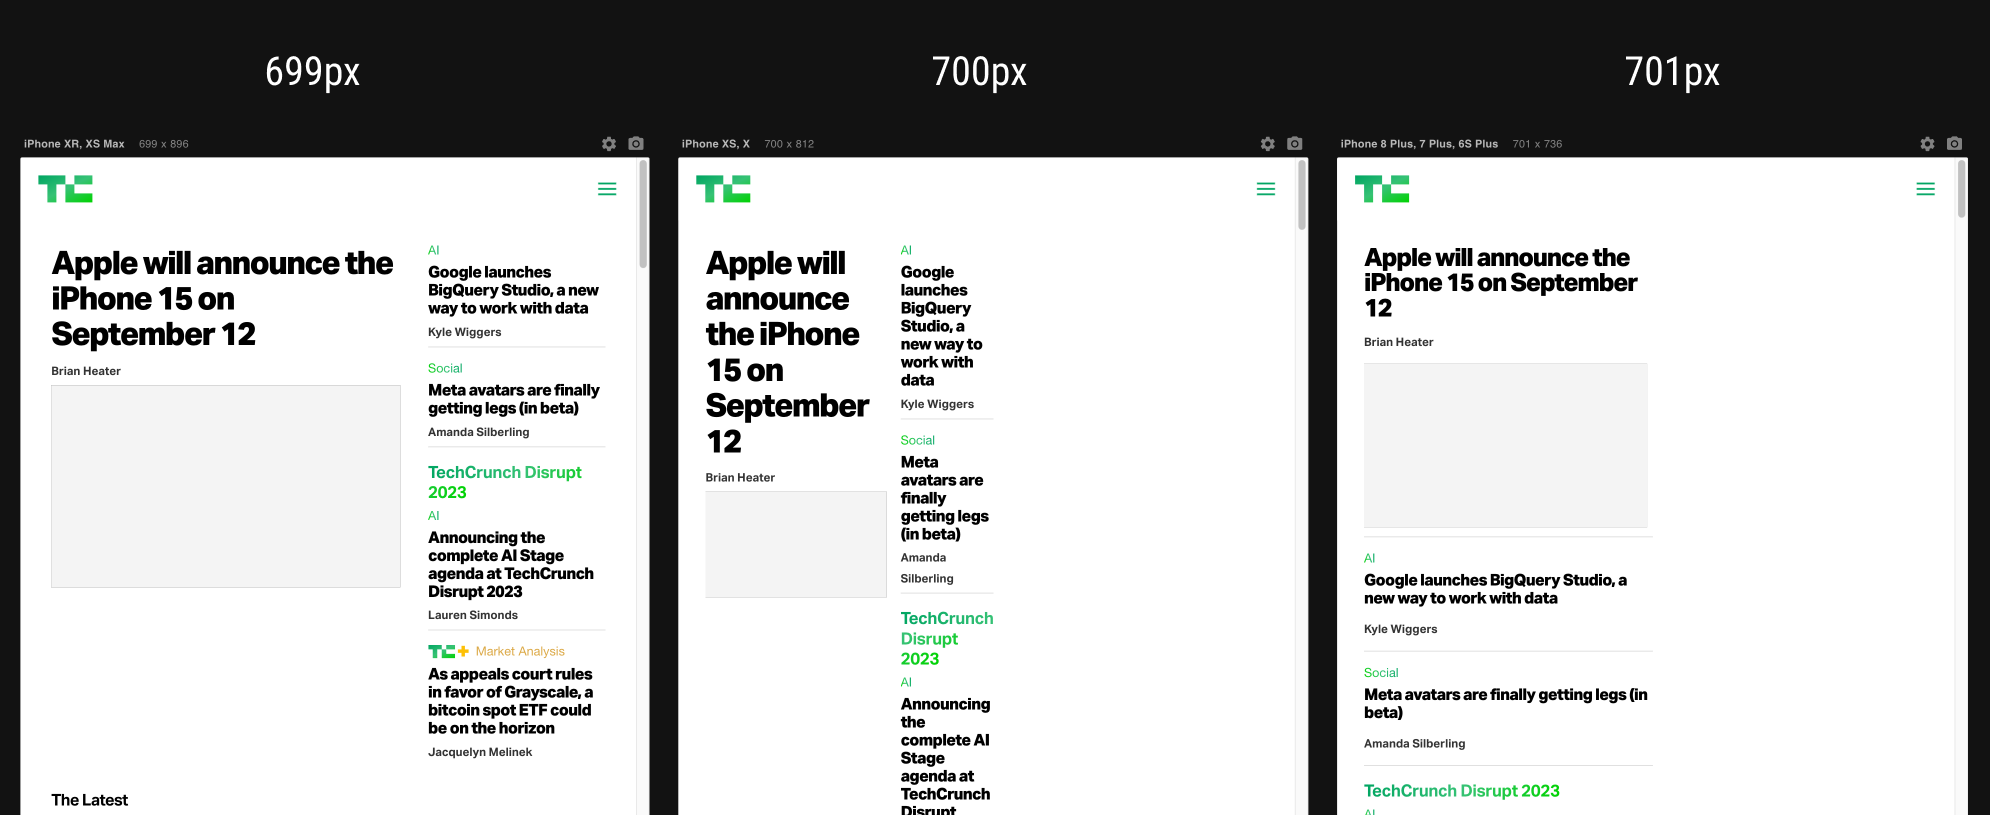
I’d construct that with CSS grid and gained’t go into the main points, as there are extra necessary stuff to cowl.
The information part
Since this TechCrunch redesign was executed a couple of years in the past, it’s anticipated to see heavy use of media queries and duplication for a number of the types or components.
Let’s take an instance of why utilizing media queries isn’t a good suggestion.
Within the following part variation, discover how the structure of the part is modified based mostly on the viewport width, not its container.
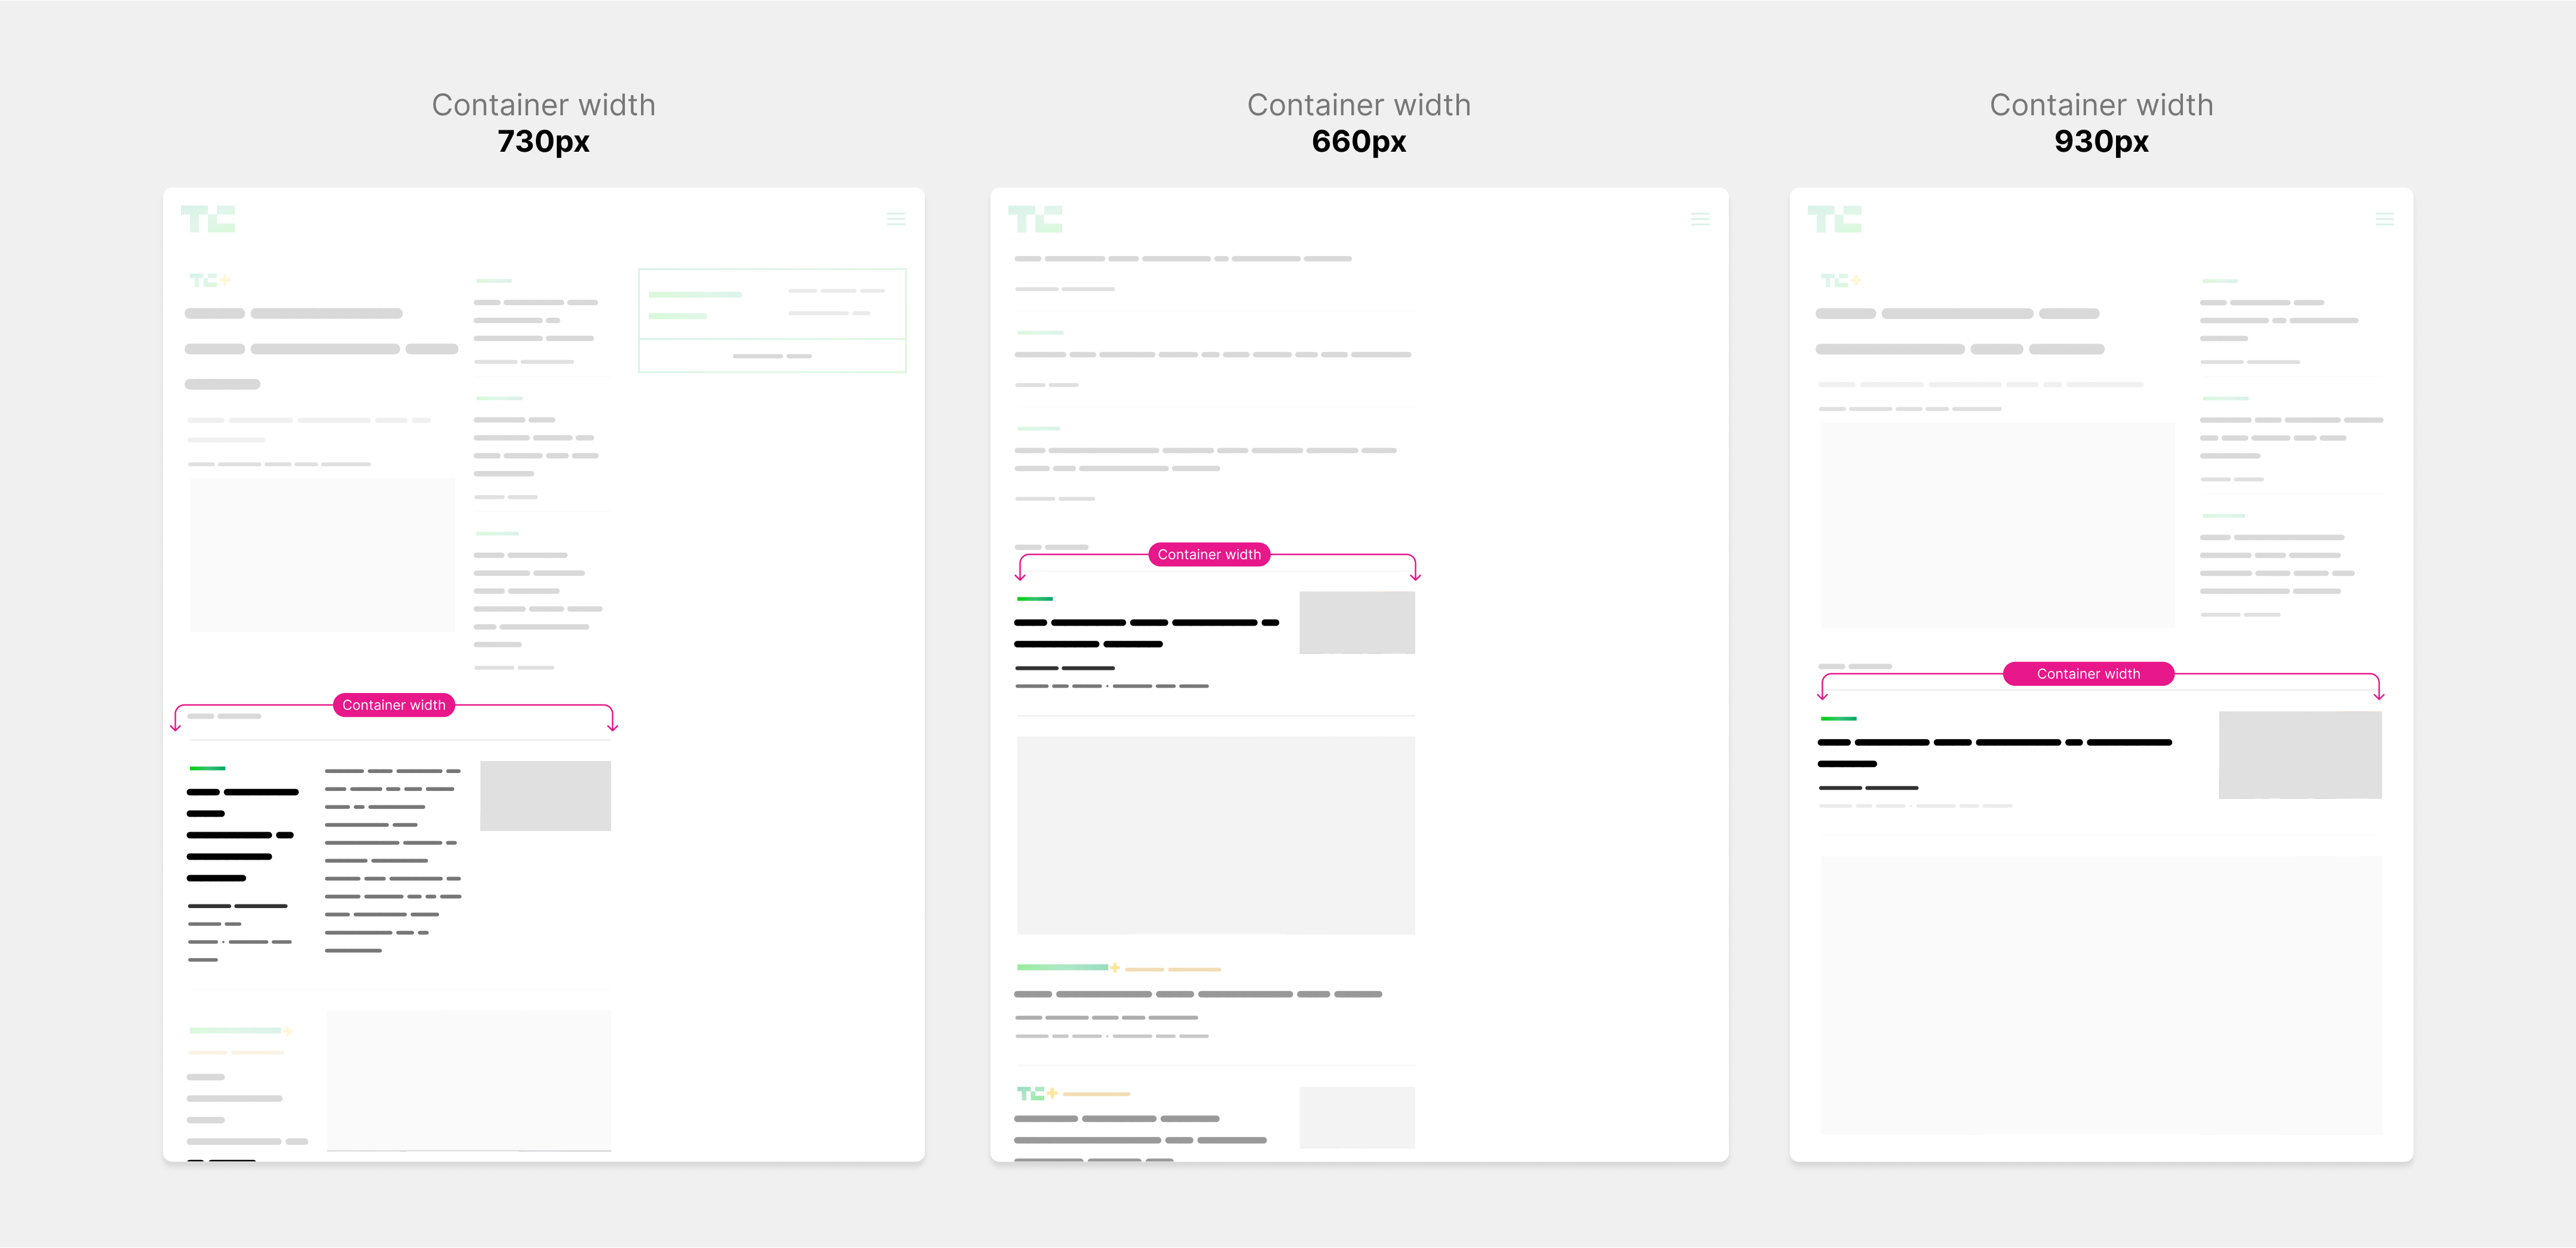
From the left, the outline textual content is proven, when the viewport dimension will get smaller, it’s hidden. Then, when the structure is 1-col solely, the part has far more house once more however stays on the mobile-y structure.
With container queries, we will merely present the outline in that case, as there’s sufficient house. All of that may be executed by querying the container for the width. Here’s a have a look at the anticipated outcome:
Now, when the viewport (or container width) is smaller, the part will simply react based mostly on that. The browser will select what’s finest.

Within the present TechCrunch implementation, every part variation has its HTML markup. Let me present you a easy instance of that:
That’s not good, and there’s a massive potential to simply use one title for all of the variations and depend on fluid sizing.
By the way in which, the identical applies to spacing and different elements. It’s not simply the title.
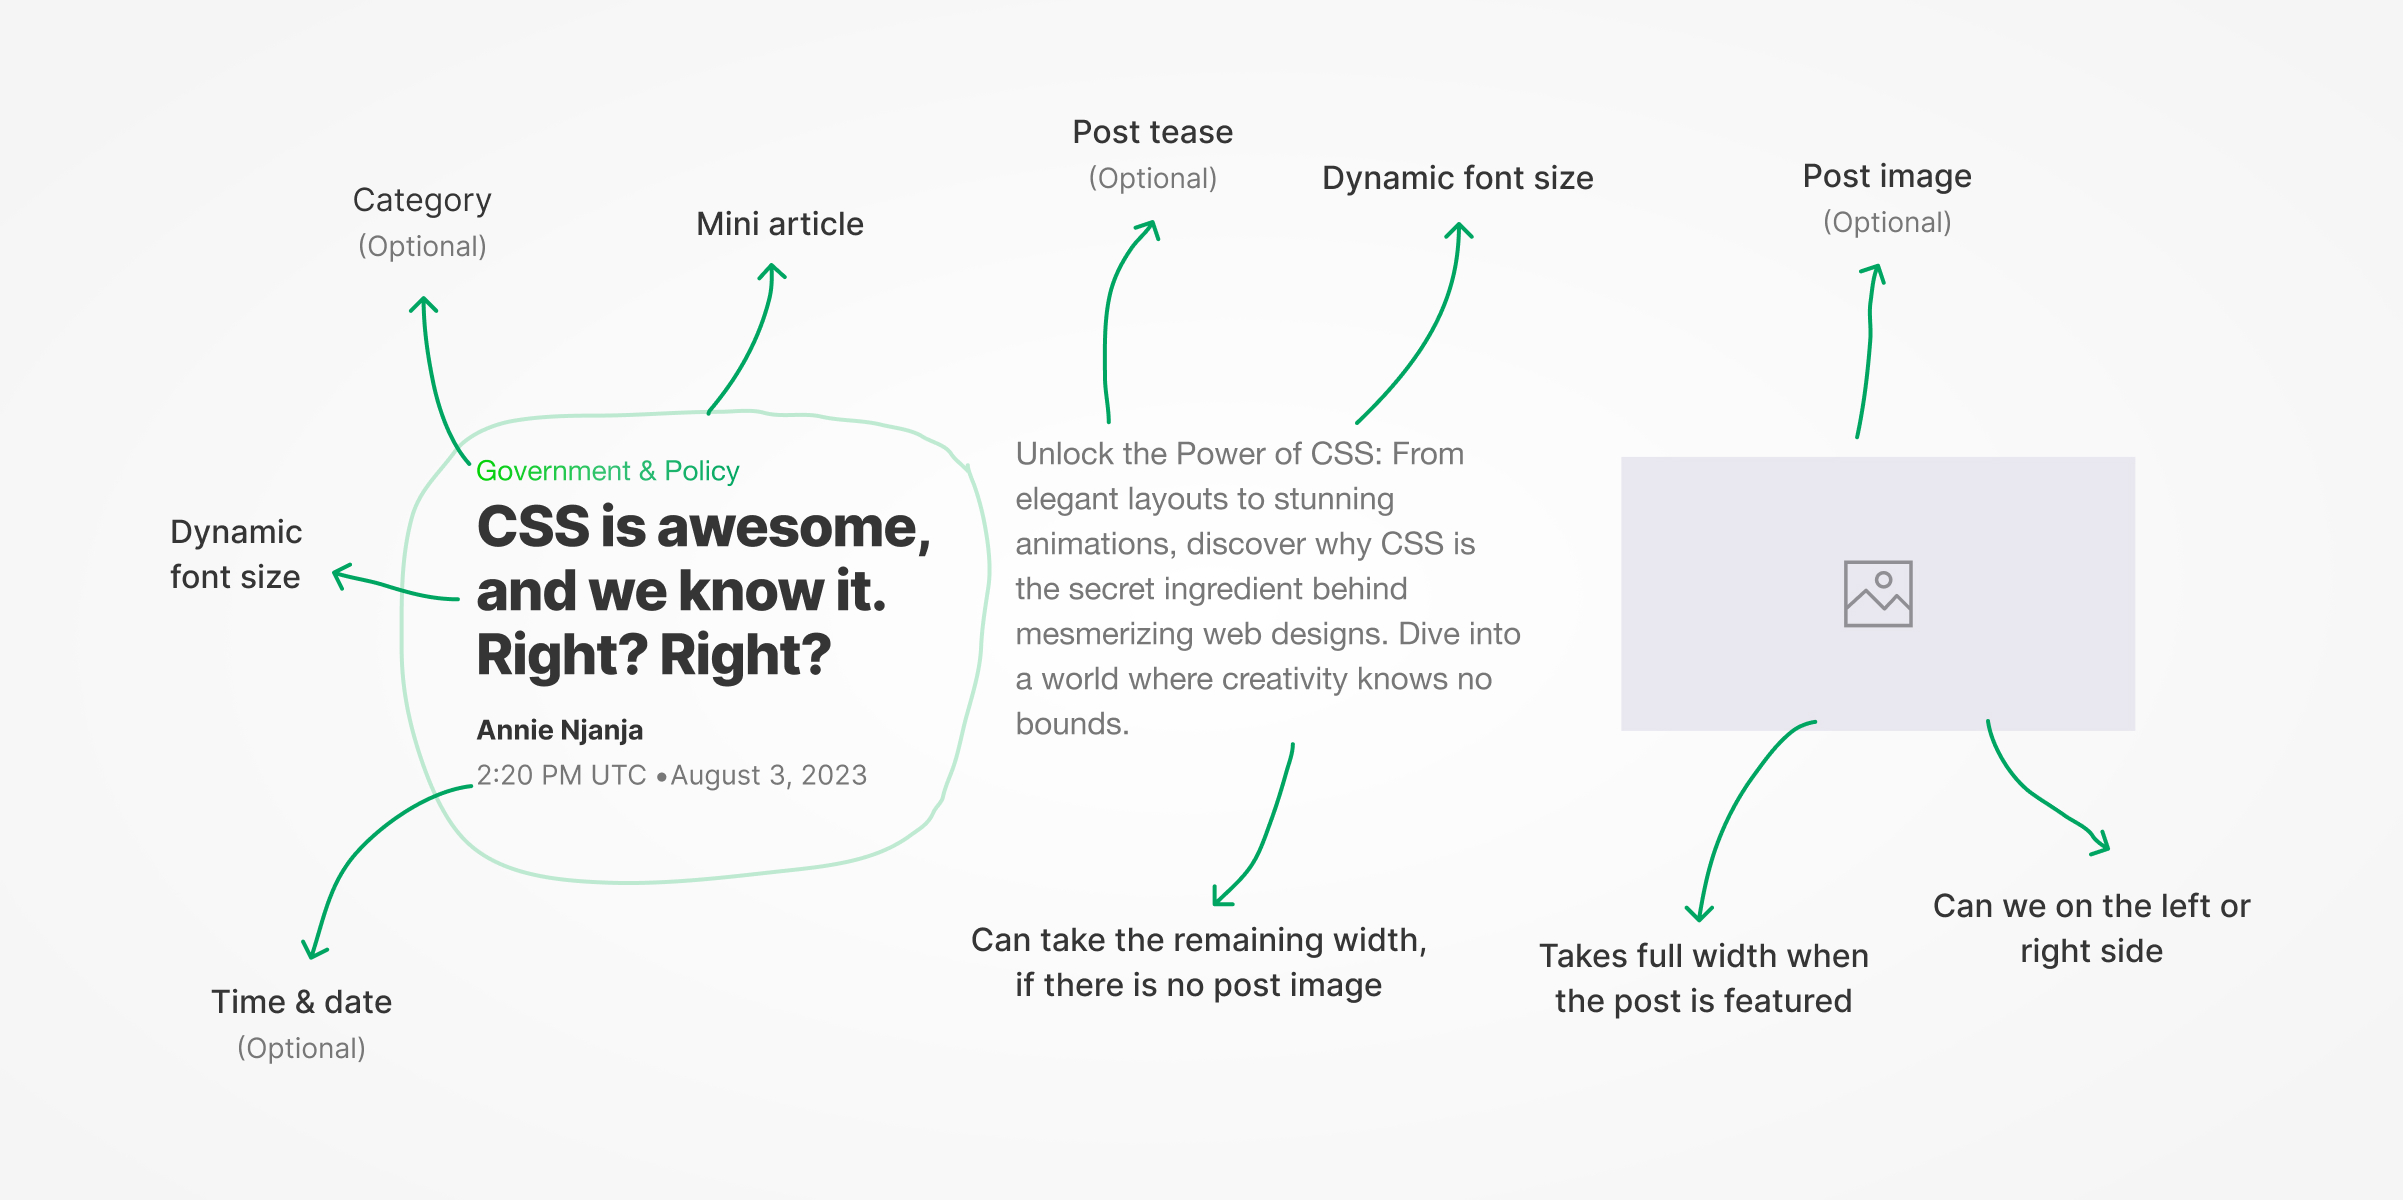
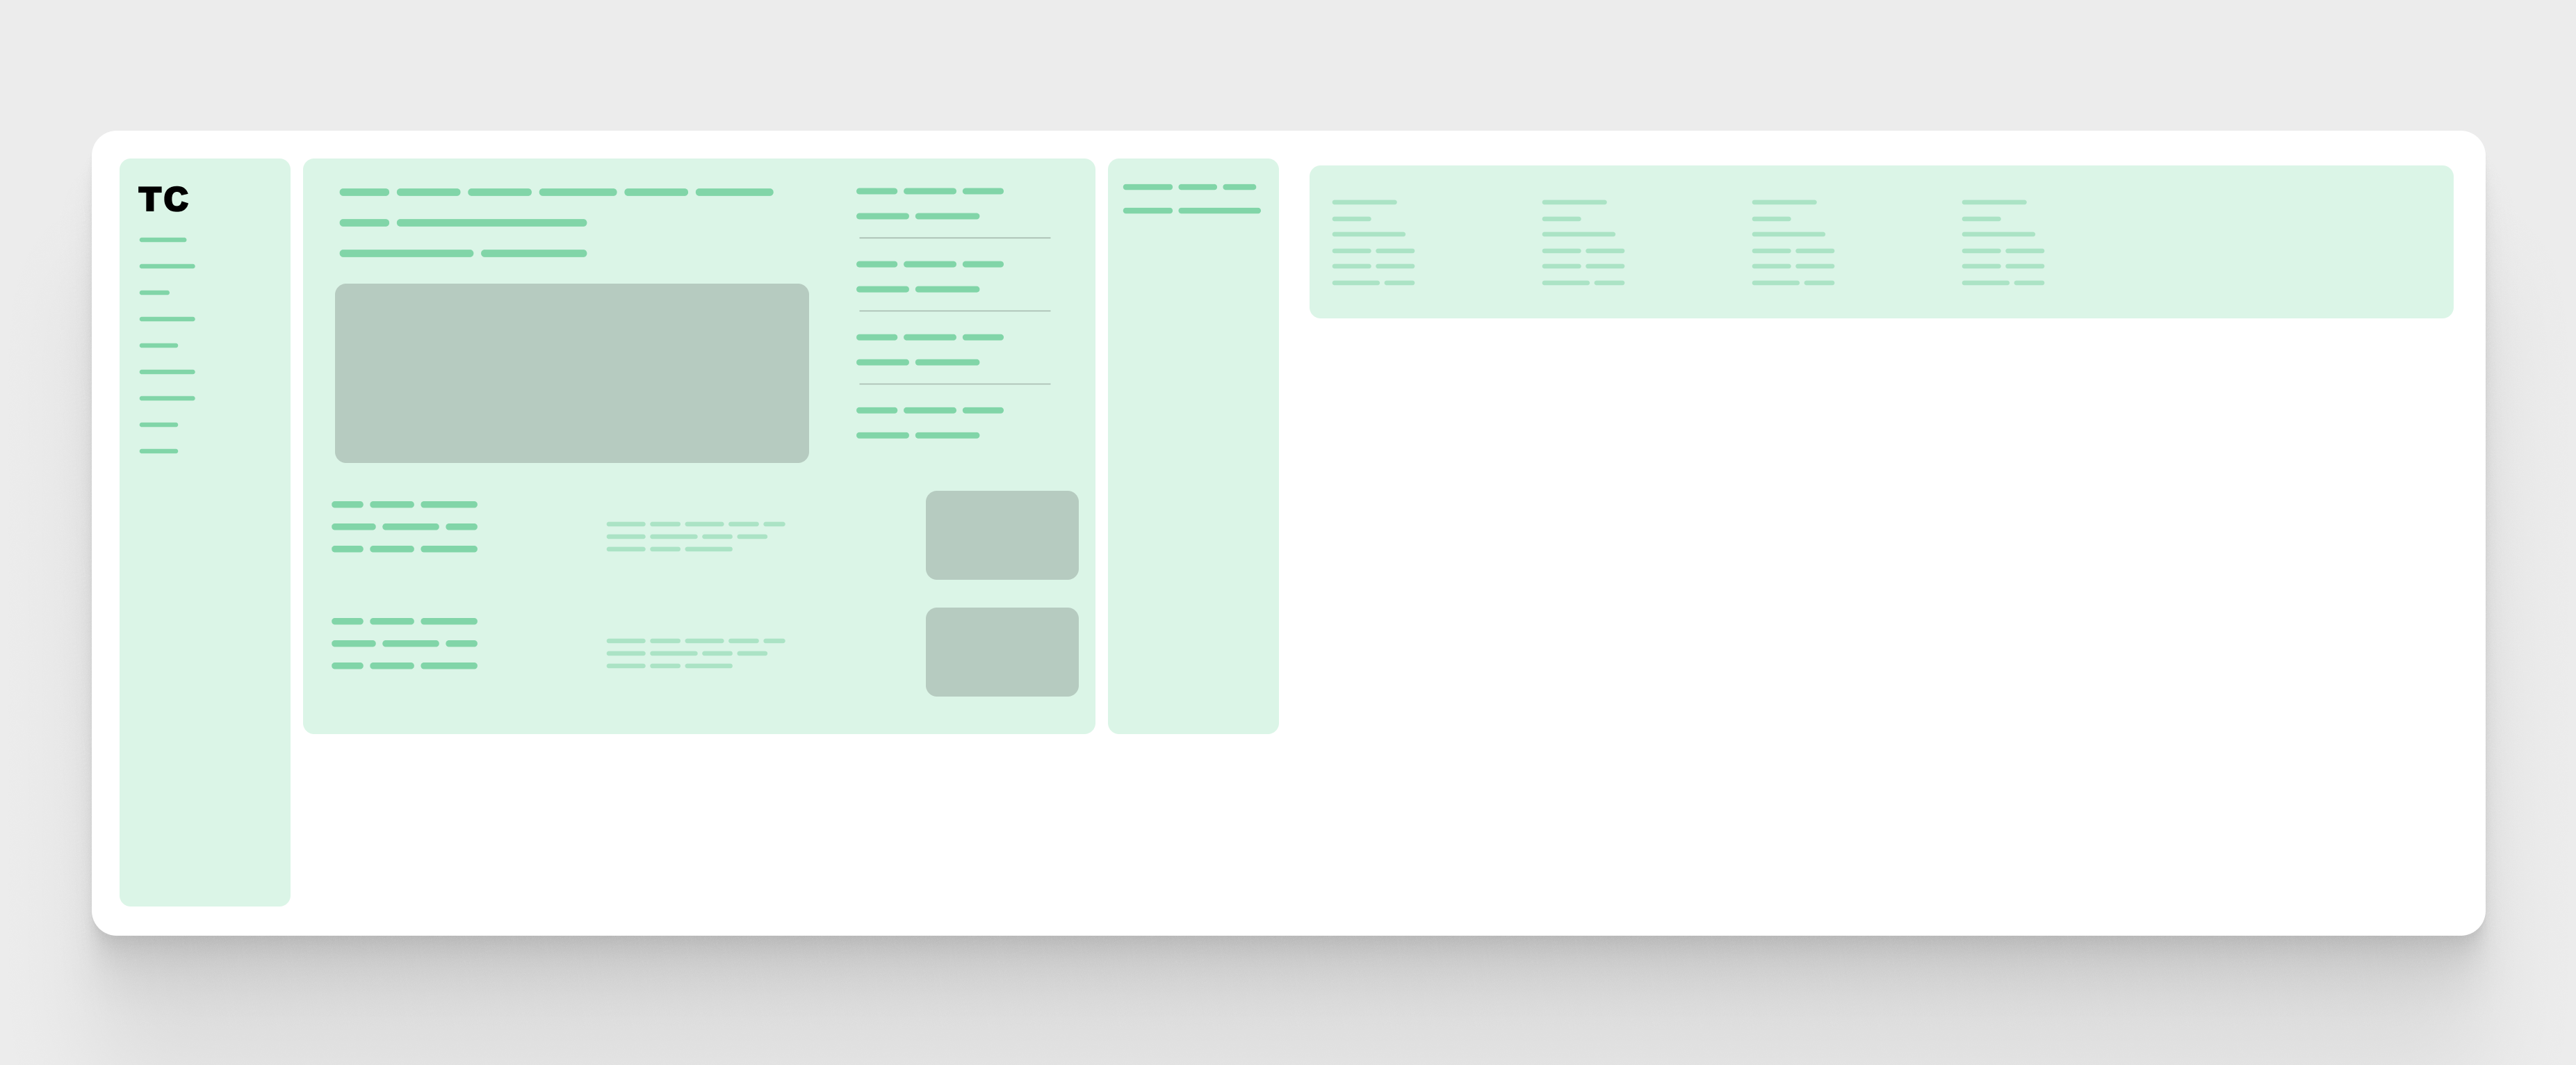
Now that now we have the principle grid, the subsequent step is to sort out the information part. I’m very excited to rethink constructing this as a result of I can already see a superb potential for contemporary CSS.
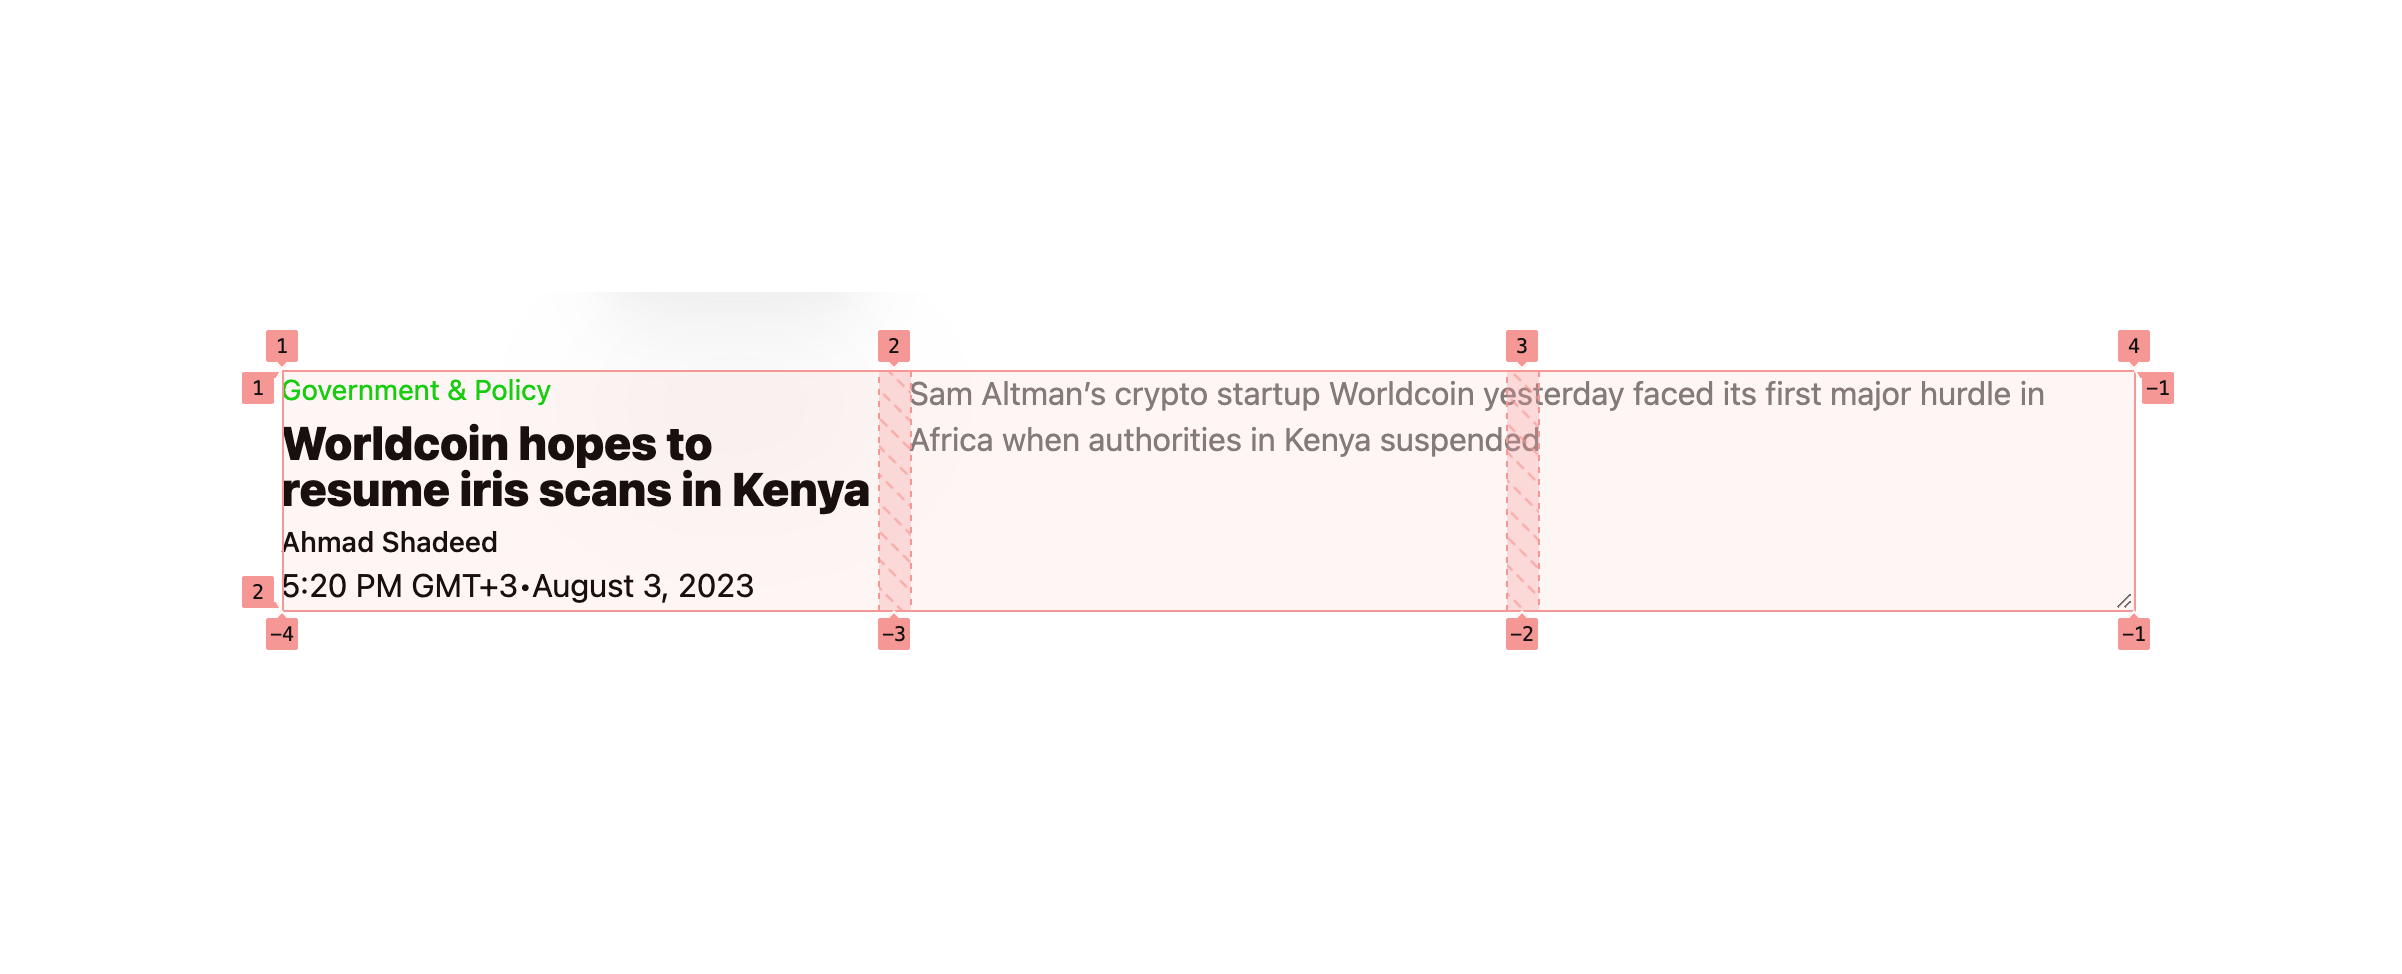
Let’s check out the brand new part. The pink define represents the container width.
It is a broad view of the information part with one variation solely. That variation can prolong to completely different different ones. It’s a technique of resizing, shifting issues round, and including or hiding issues.
Let’s have a look at the variations of the information part.
Remember the fact that every variation ought to work with all viewport sizes. Let’s discover constructing the part variations with trendy CSS.
The preliminary answer
At first, I thought of minimal wrapping as doable. Which means the part gained’t have wrappers to group components.
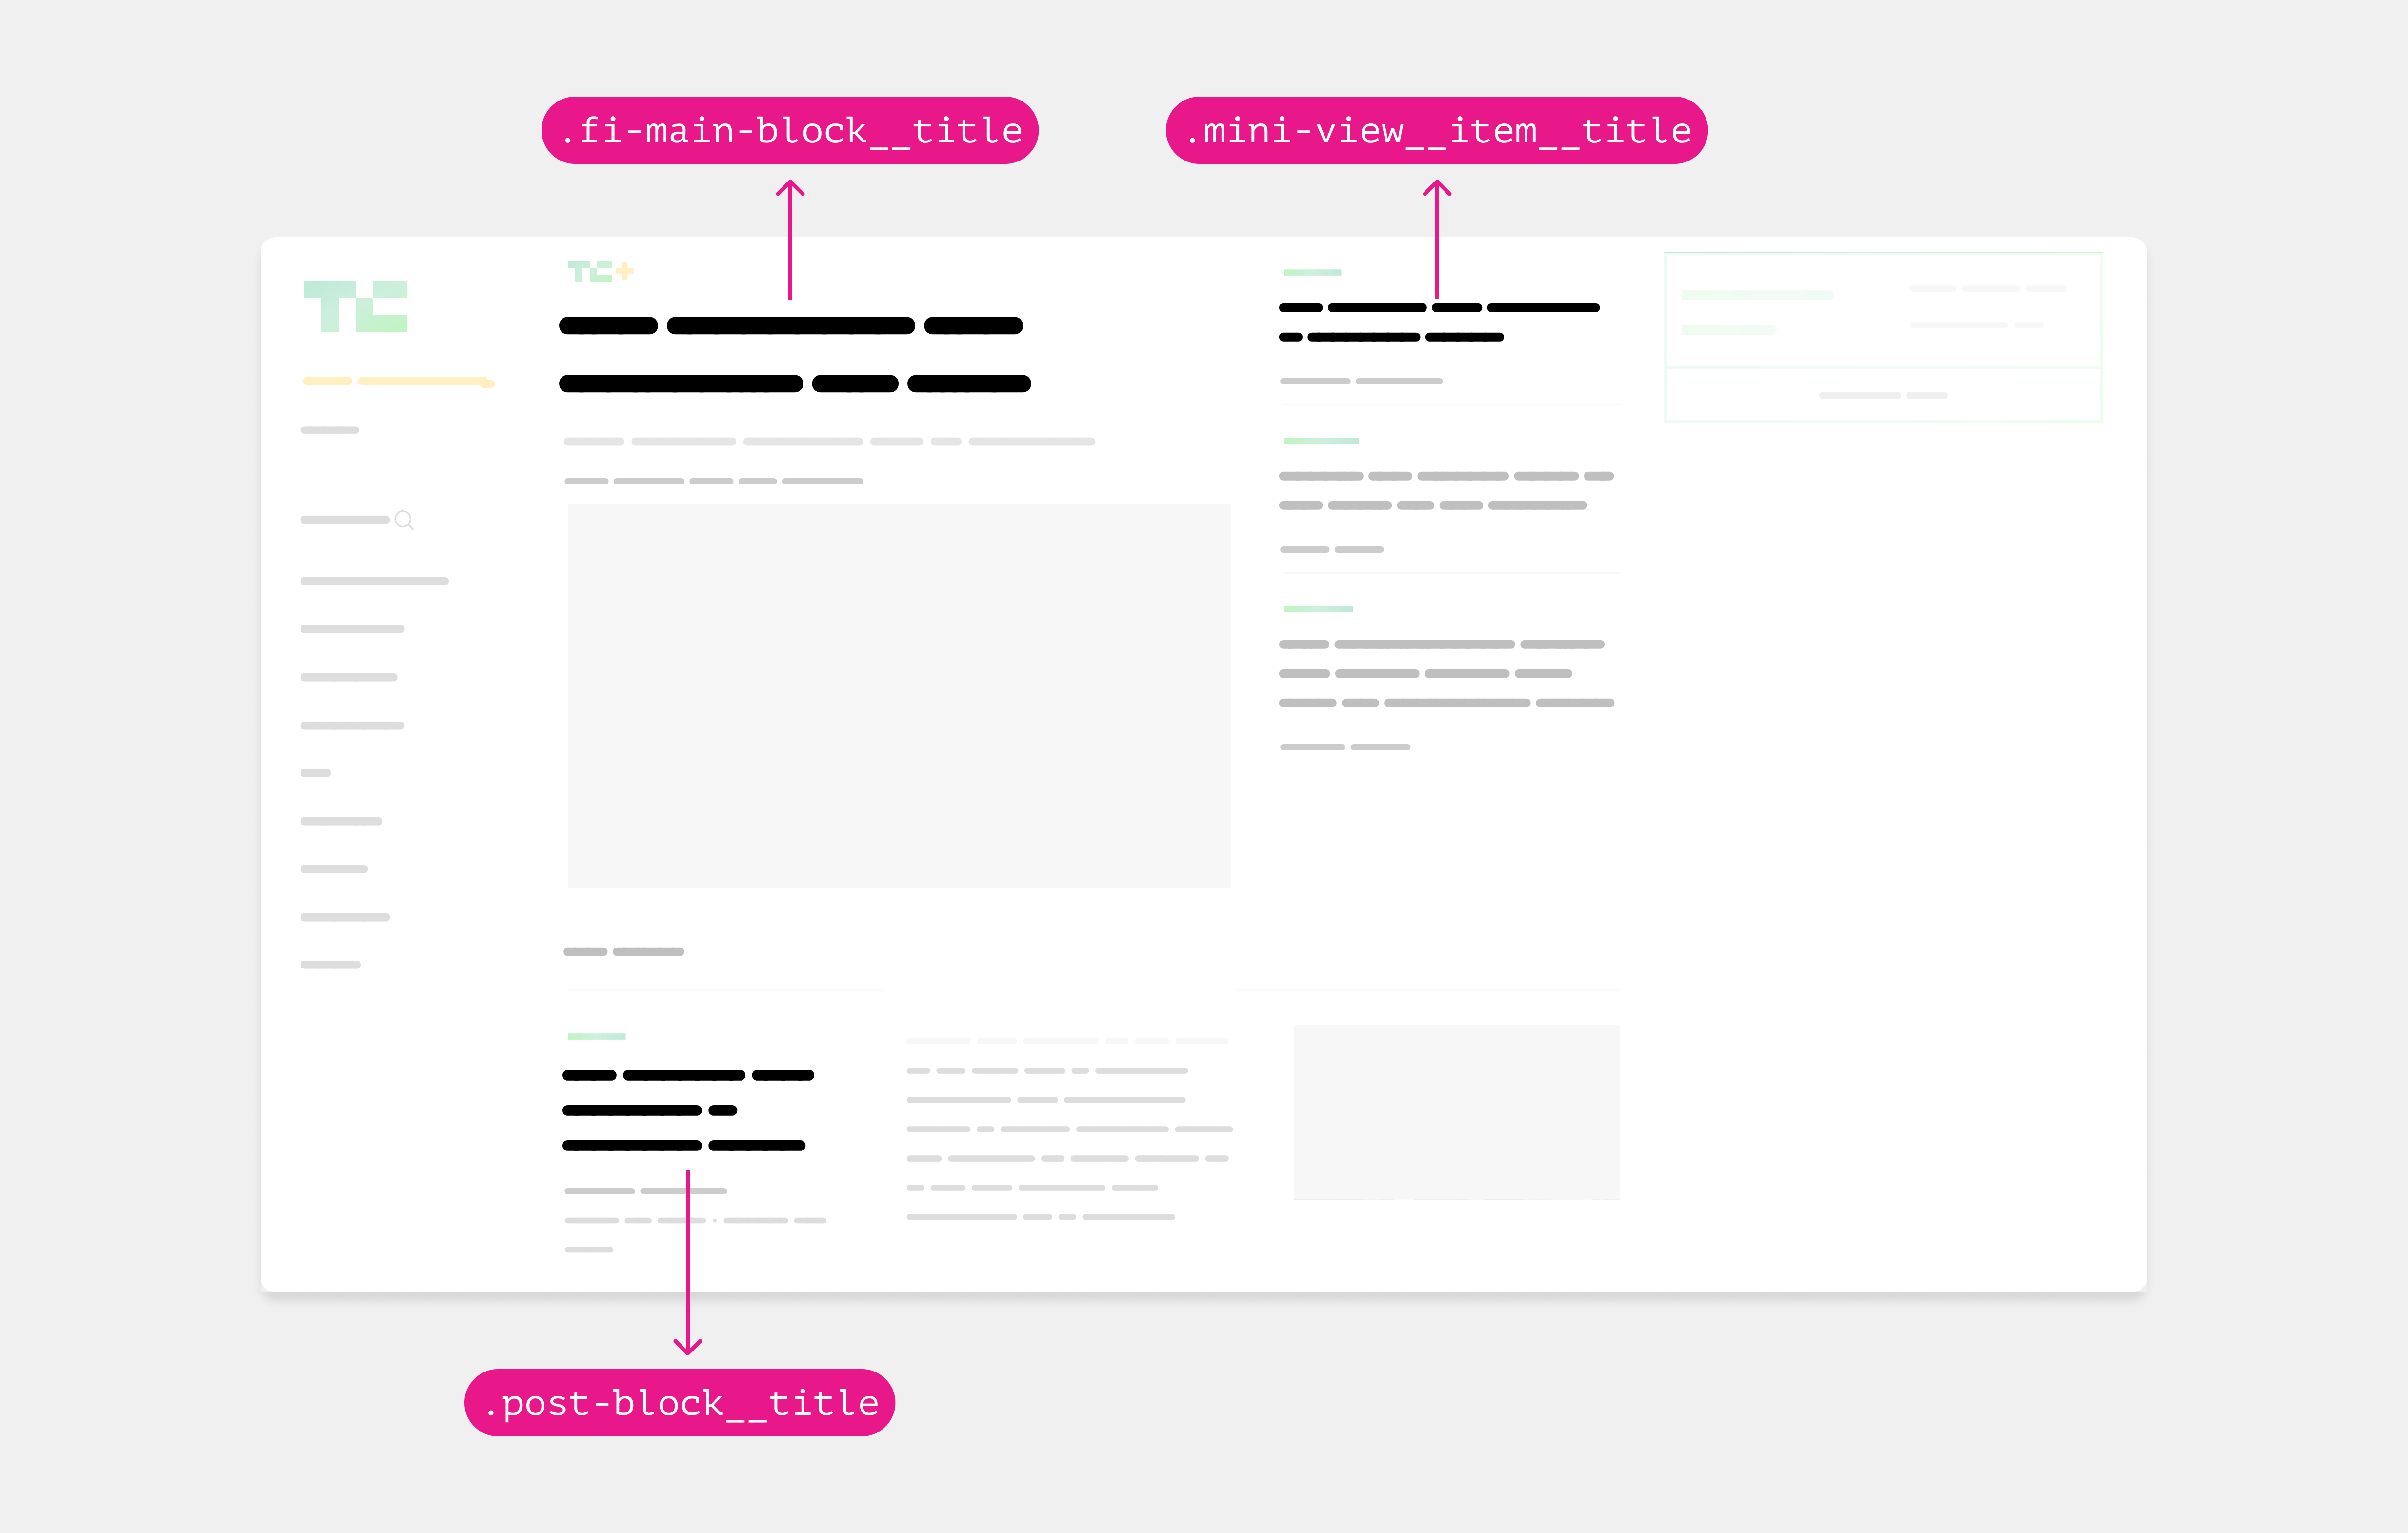
<article class="publish">
<div class="class">...</div>
<h3 class="title">...</h3>
<div class="meta">
<p>Ahmad Shadeed</p>
<time>...</time>
</div>
<div class="desc"></div>
<determine class="media"></determine>
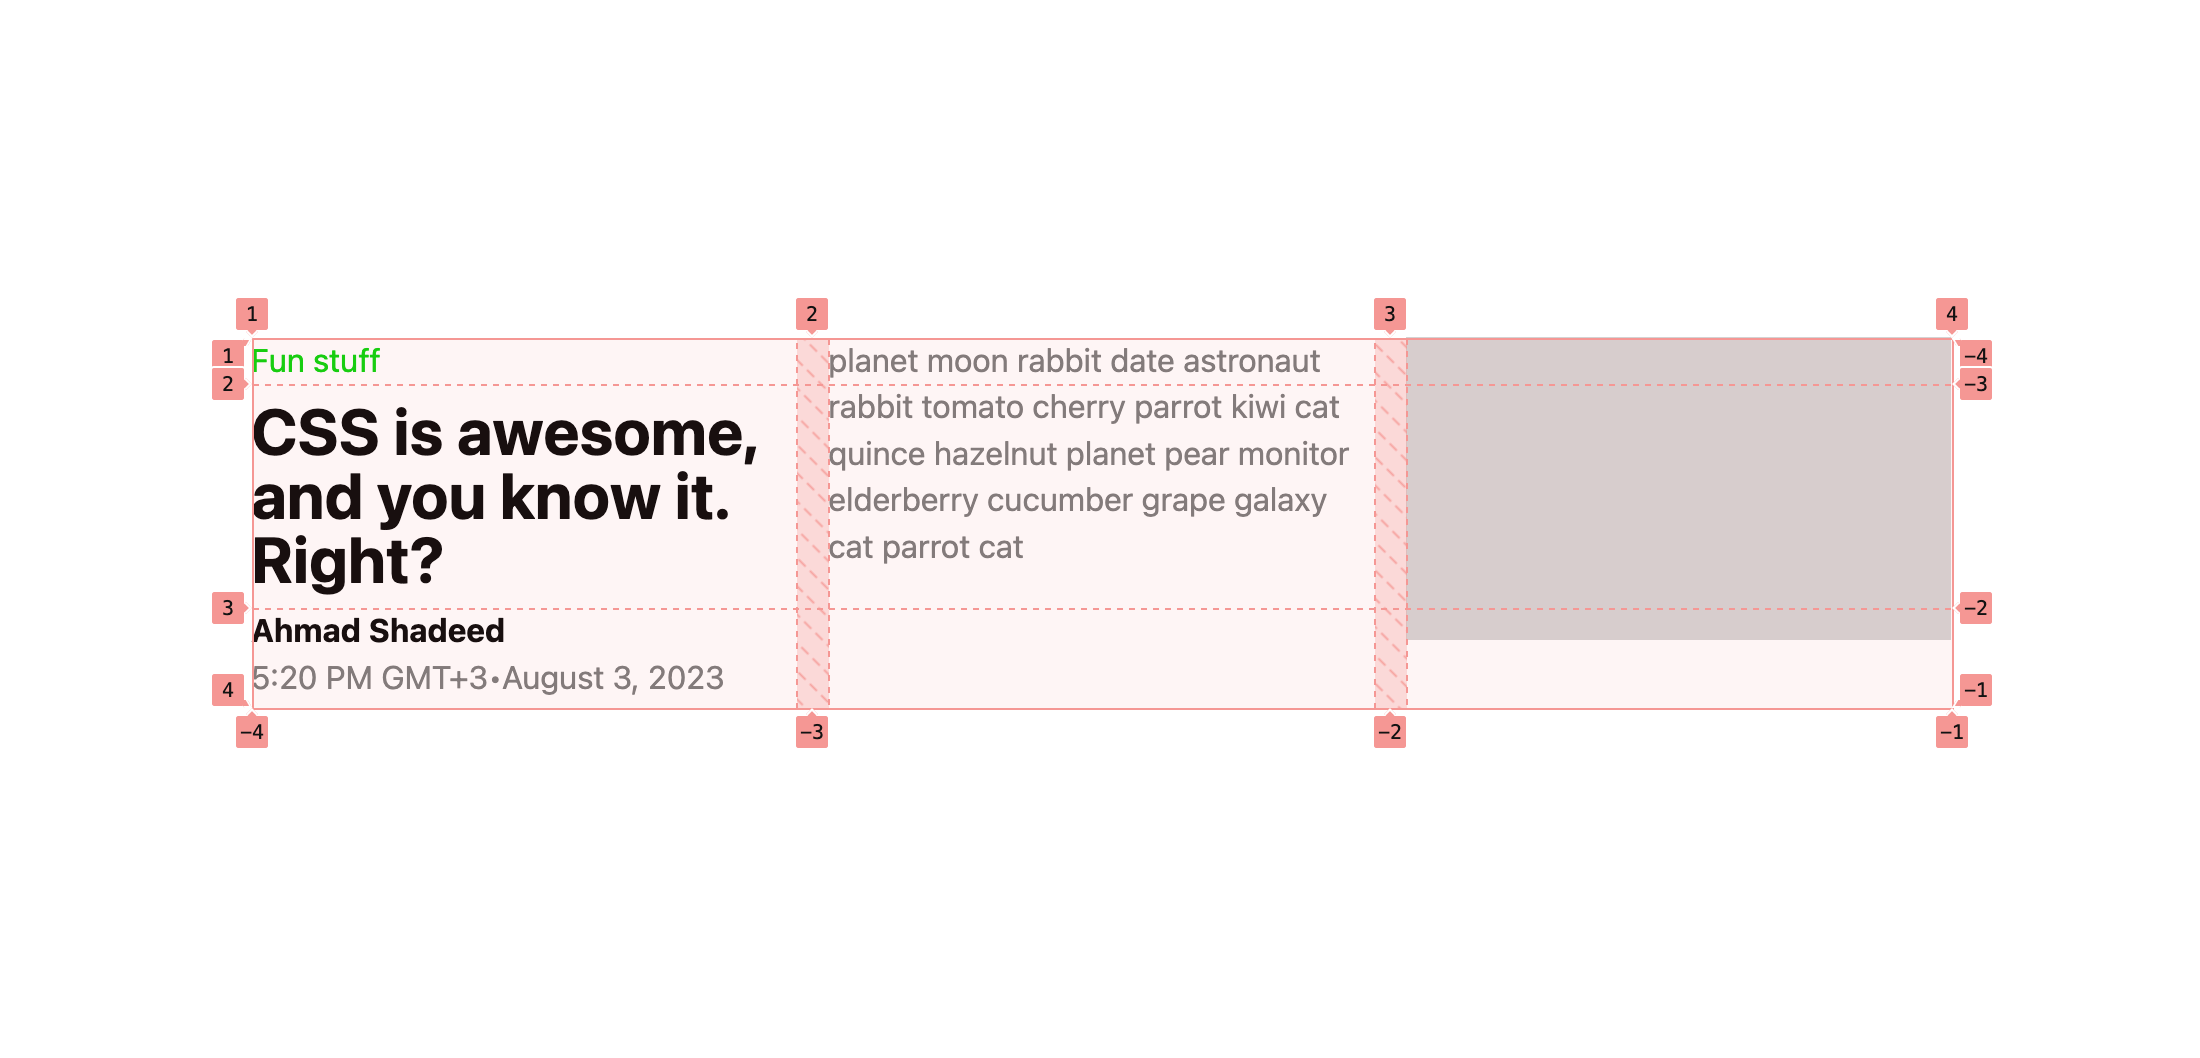
</article>I used CSS grid and positioned the gadgets individually of their column and rows.
.publish {
  show: grid;
  grid-template-columns: 1fr 1fr 1fr;
  grid-template-rows: max-content max-content 50px;
  column-gap: 1rem;
}

.title {
  grid-column: 1/2;
}

.meta {
  grid-column: 1/2;
}

.desc {
  grid-column: 2/3;
  grid-row: 1/-1;
}

.media {
  grid-row: 1/-1;
  grid-column: 3/4;
}
Right here is the outcome:
Whereas that works completely because it appears from the visible, there is a matter that may occur.
In CSS grid, the peak of grid gadgets per row is constant. If there’s a very lengthy description textual content, there will probably be a big spacing round the principle title.
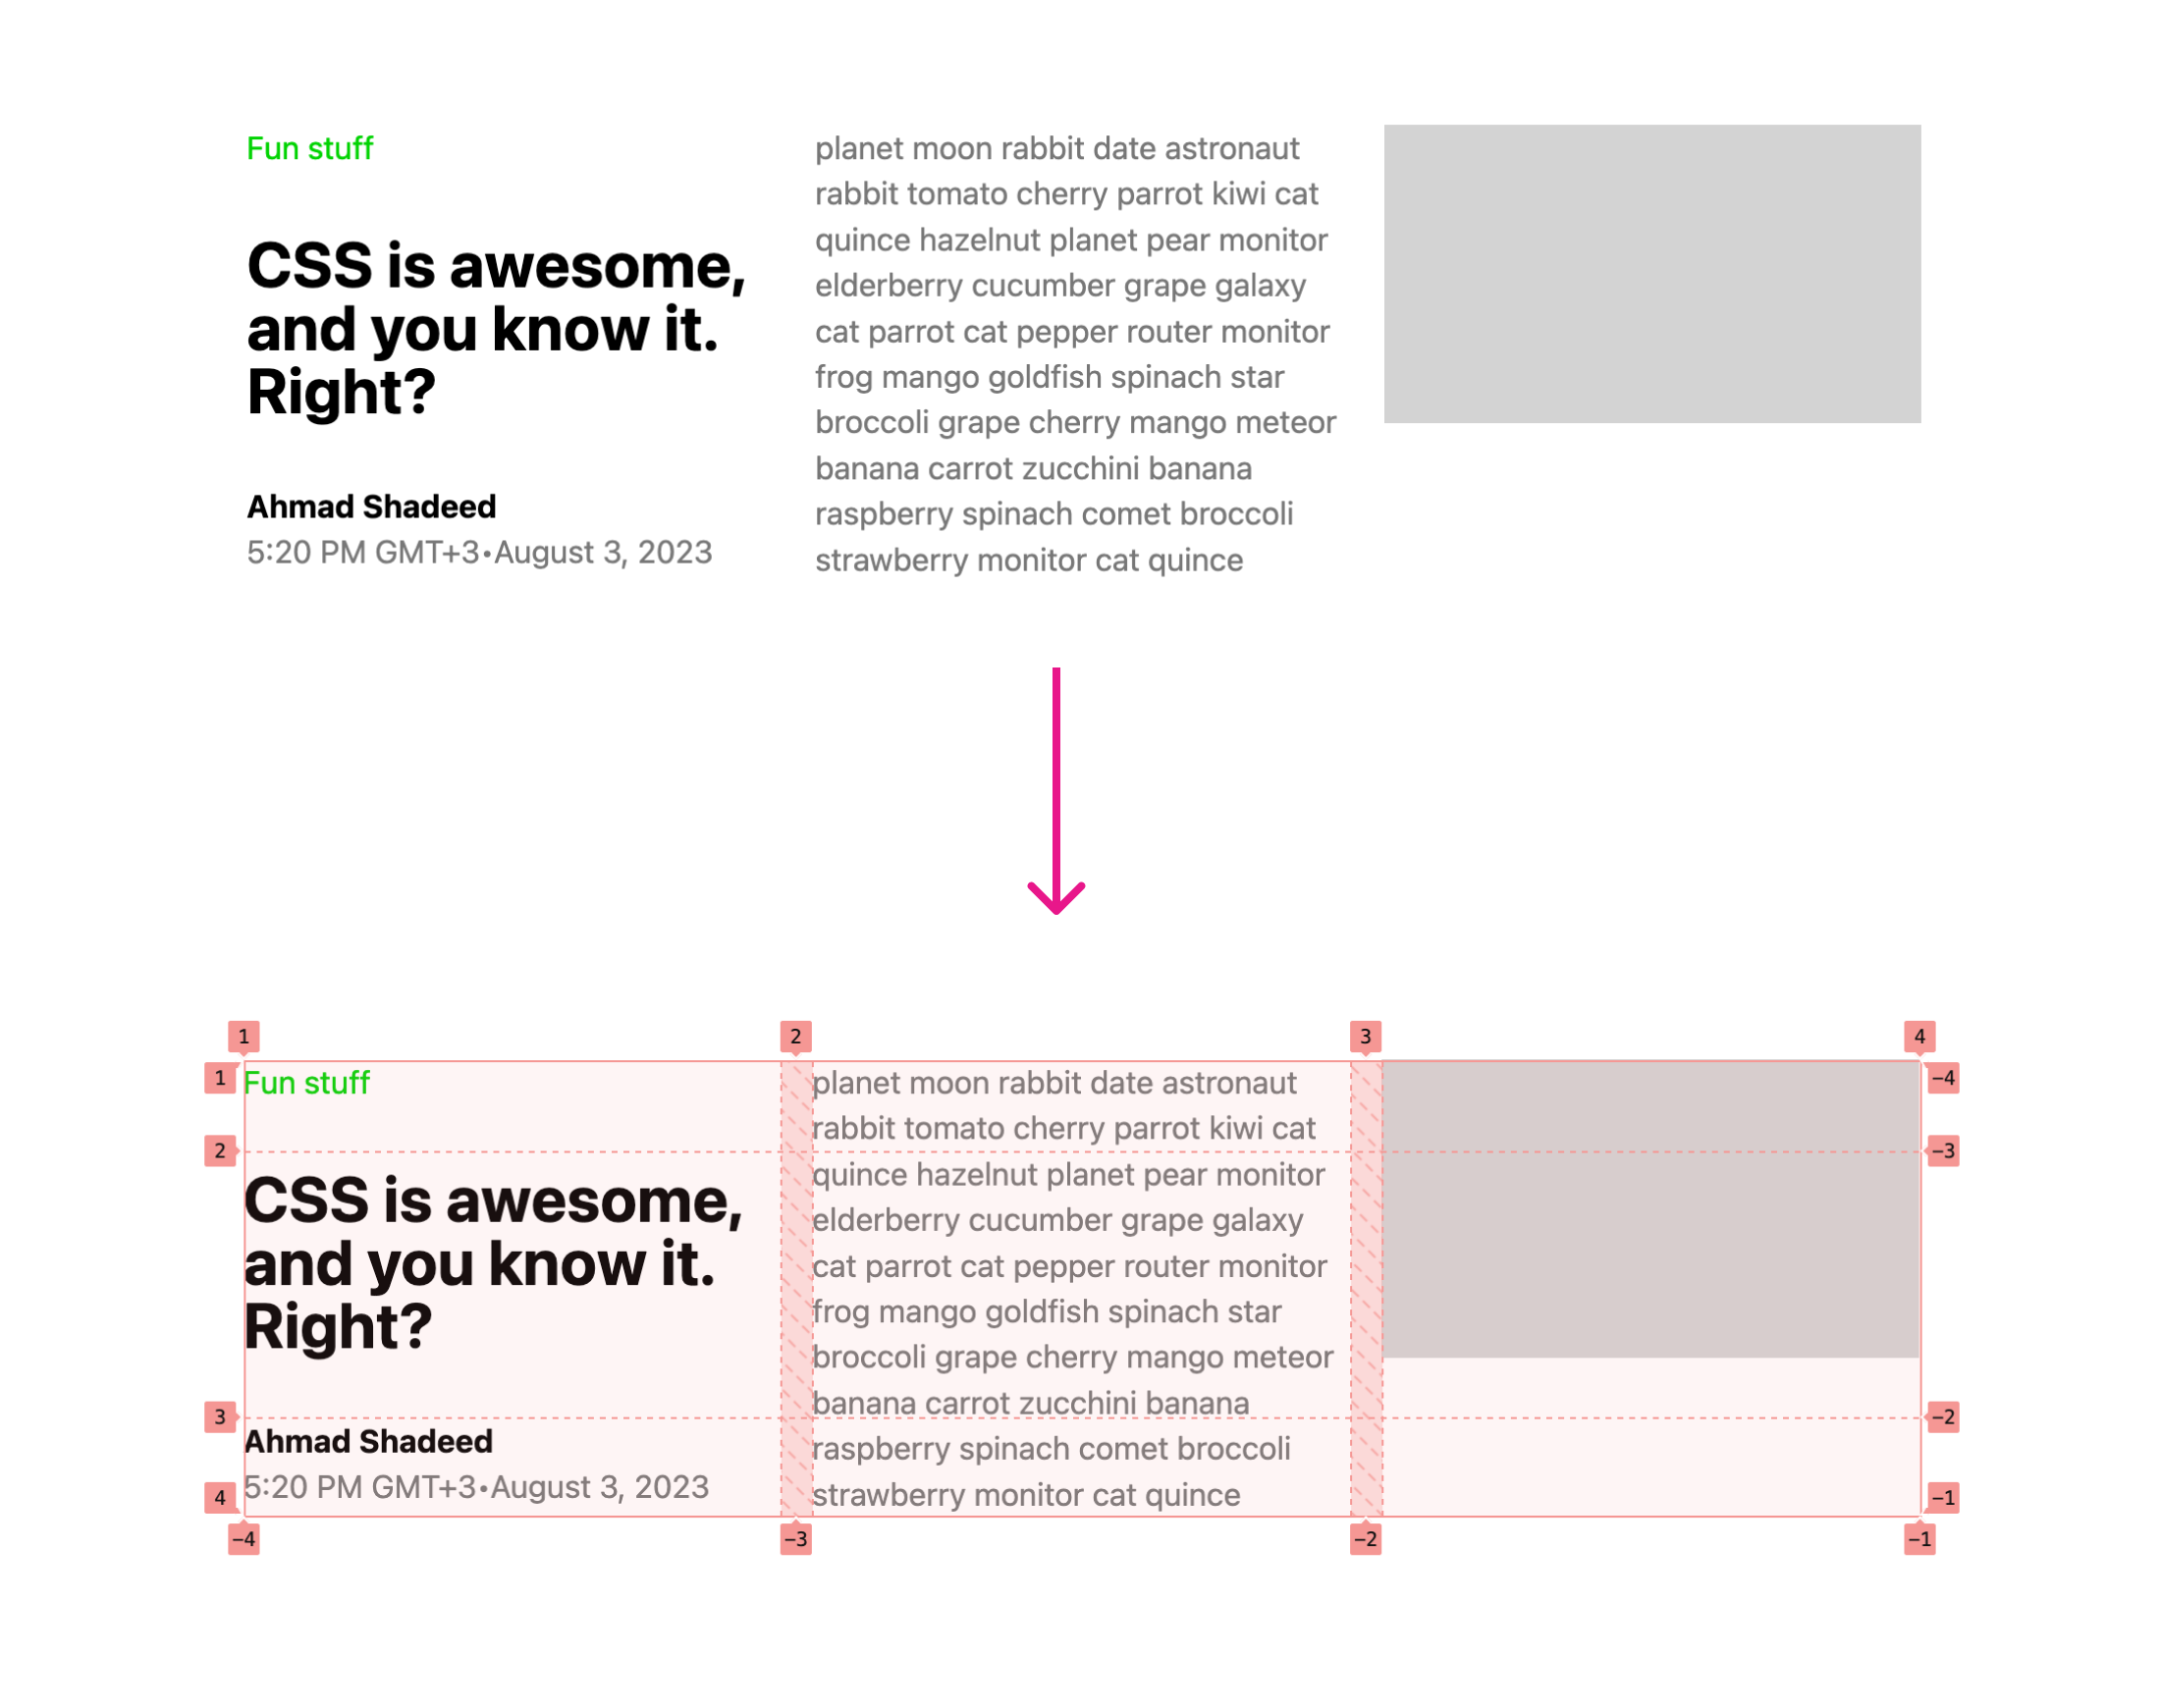
You can too attempt it your self on this interactive demo.
That’s not good and there’s no method (as per my data) to resolve that in CSS grid. It’s simply the way it works.
Replace 1 Sep 2023
It turned out that there was an answer to the difficulty. Eric Meyer kindly shared a easy answer which is to interchange 50px with 1fr and the CSS grid will work simply wonderful.
.publish {
  show: grid;
  grid-template-columns: 1fr 1fr 1fr;
  grid-template-rows: max-content max-content 1fr;
  column-gap: 1rem;
}
Try the interactive demo right here.
I admit that I missed that answer. Anyway, it’s an incredible feeling to get your work corrected by a CSS grasp like Eric Meyer.
Second spherical: up to date HTML markup
Because of this, I modified the markup and wrapped the class, headline, and meta in a .post-content component as the next.
<div class="post-wrapper">
  <article class="publish">
    <div class="post-content">
      <div class="class">...</div>
      <h3 class="title">...</h3>
      <div class="meta">
        <p>Ahmad Shadeed</p>
        <time>...</time>
      </div>
    </div>
    <div class="desc"></div>
    <determine class="media"></determine>
  </article>
</div>
Based mostly on that markup, I’ll use CSS grid to structure the publish gadgets.
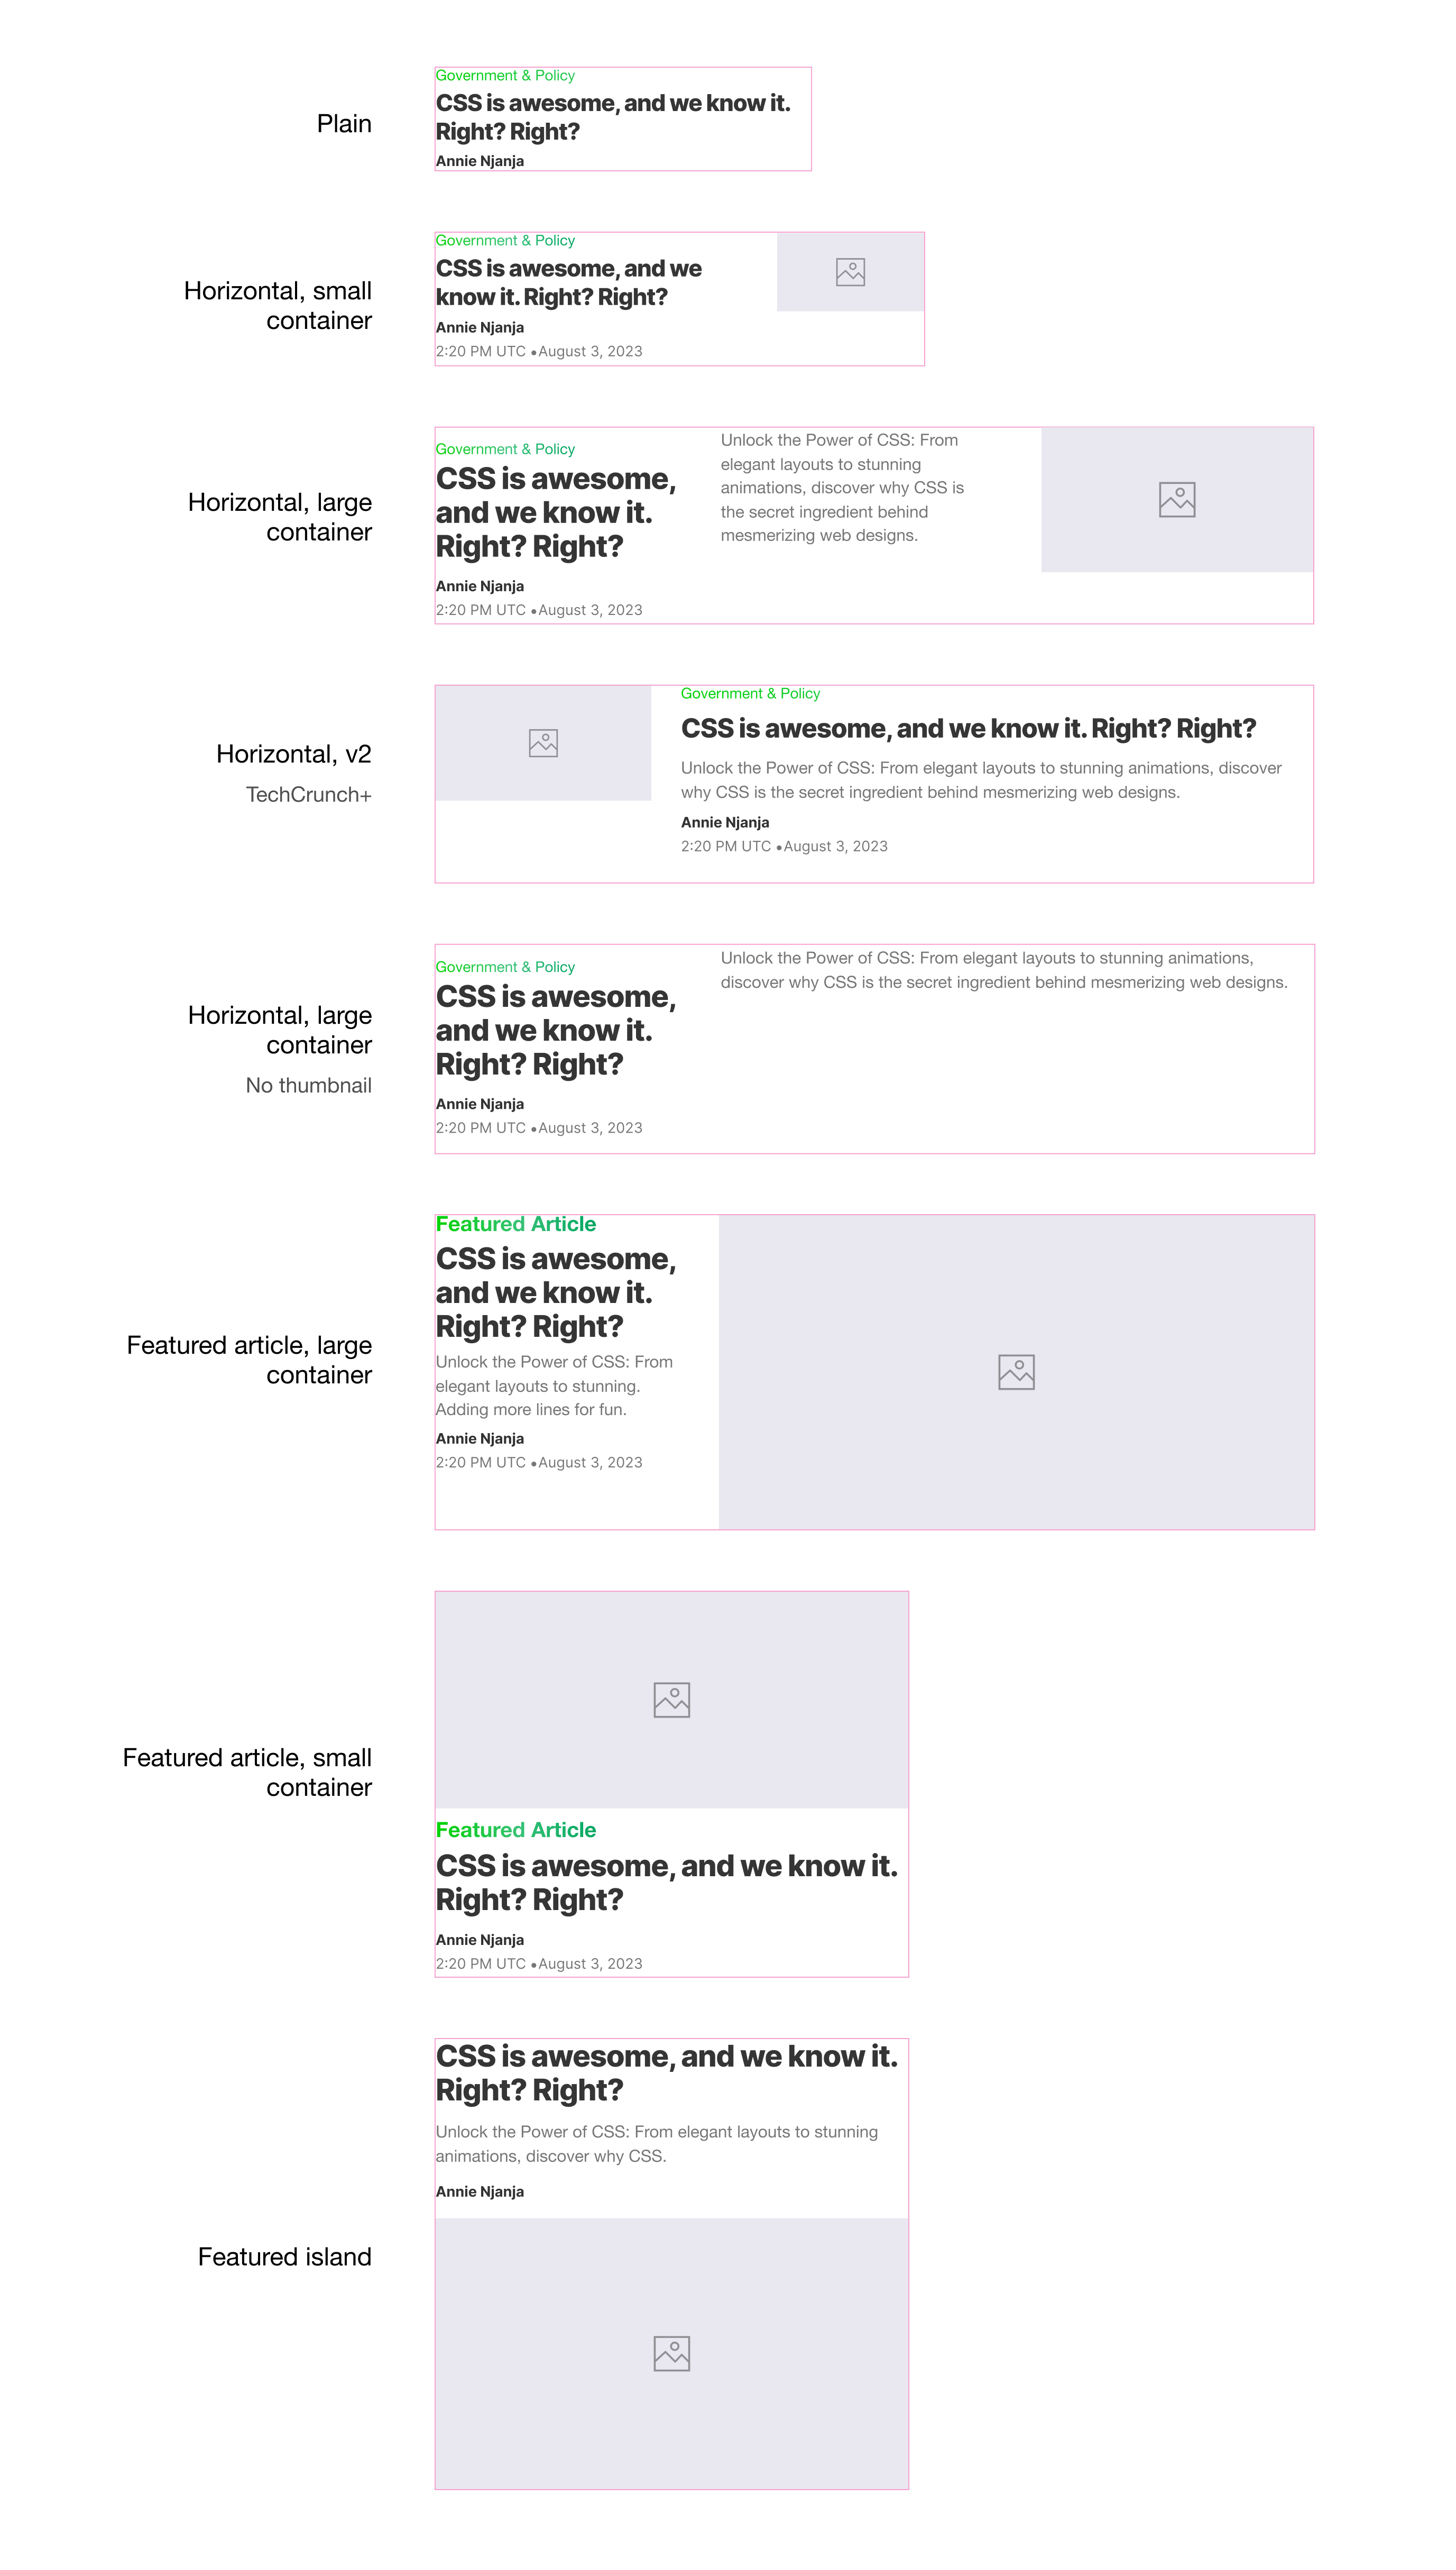
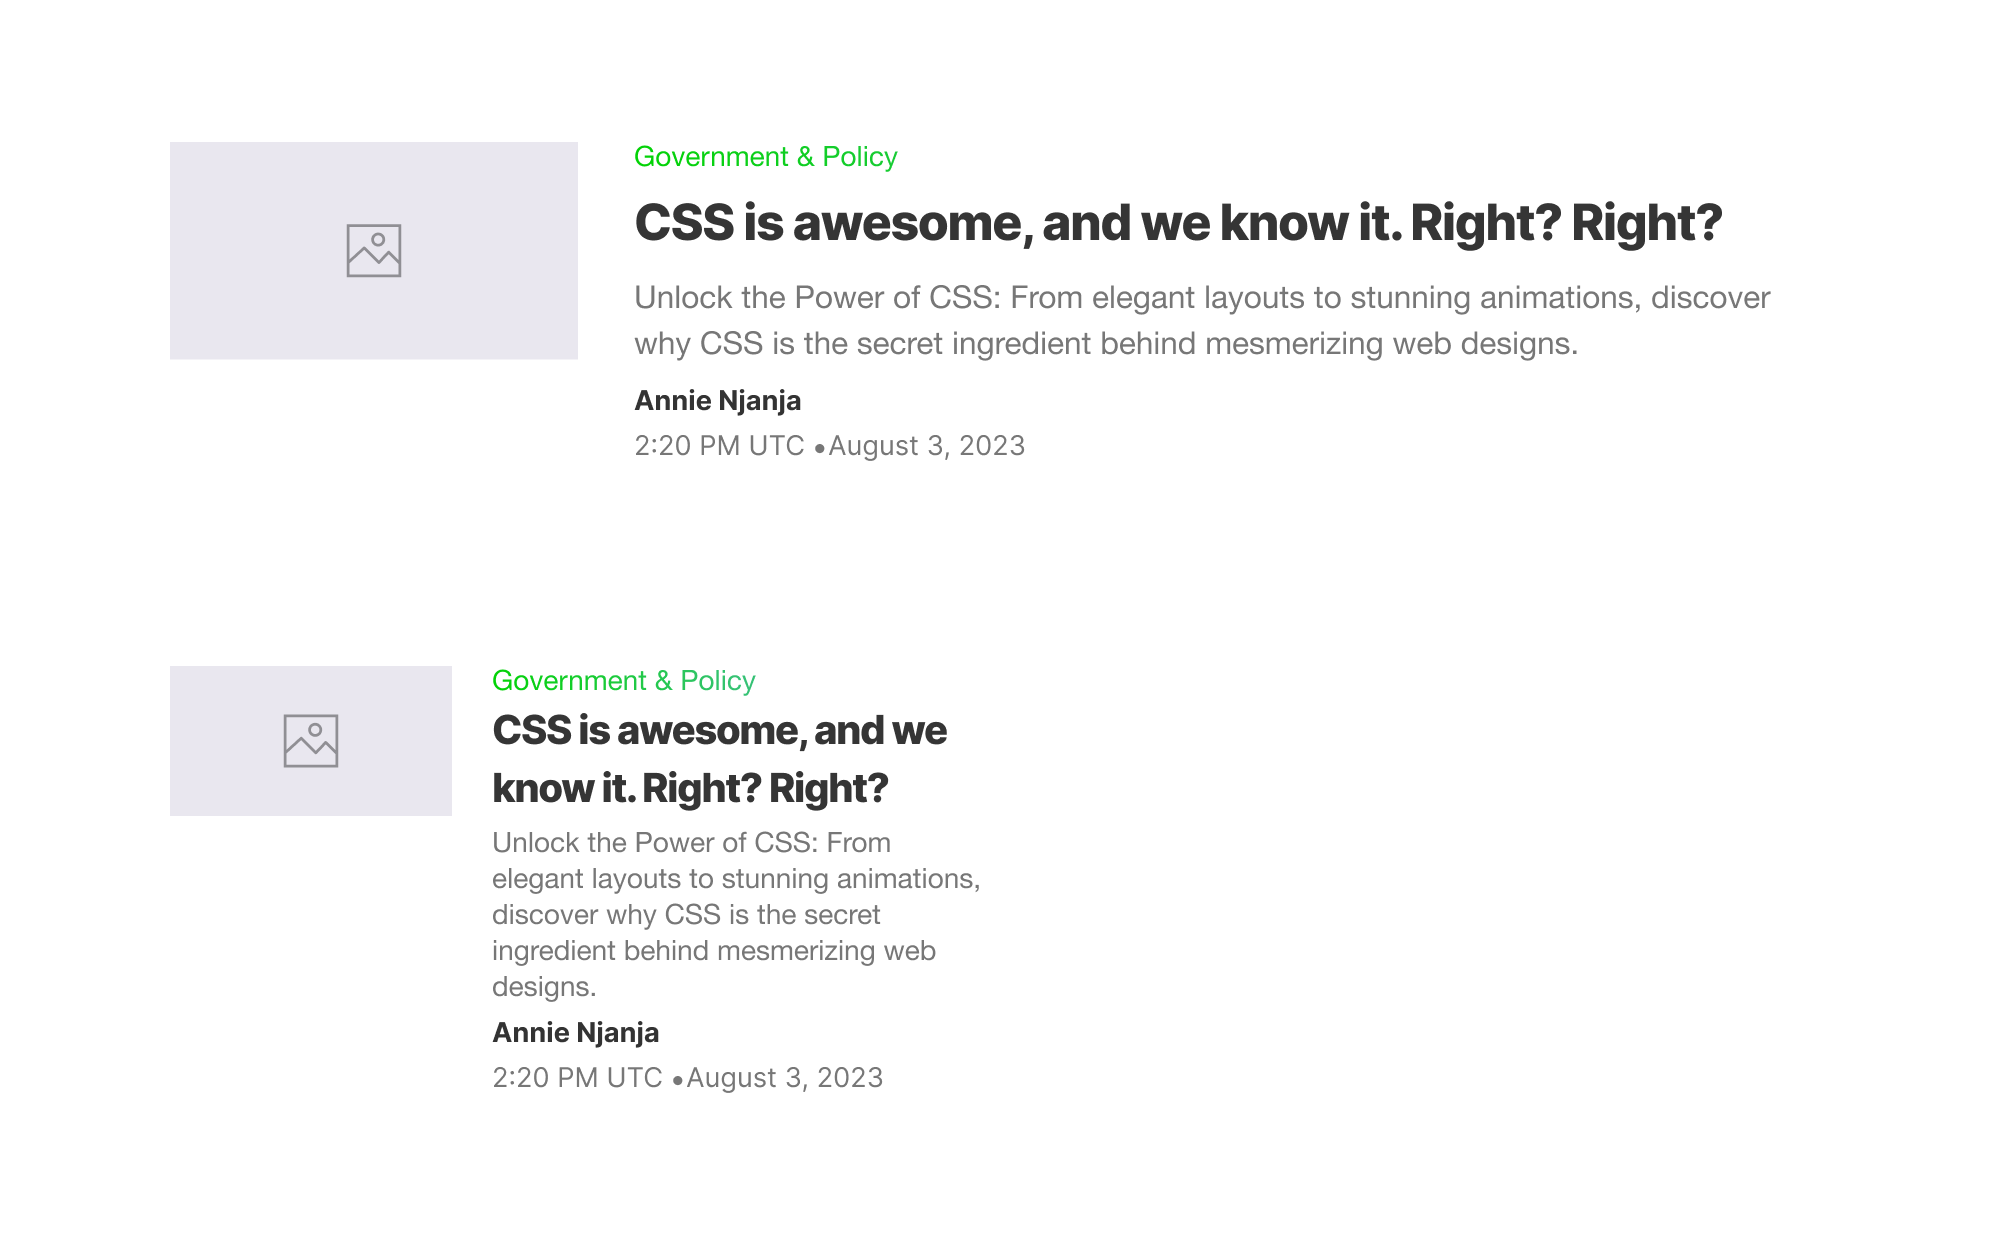
Variation 1: Horizontal with thumb
I began engaged on the next variation.
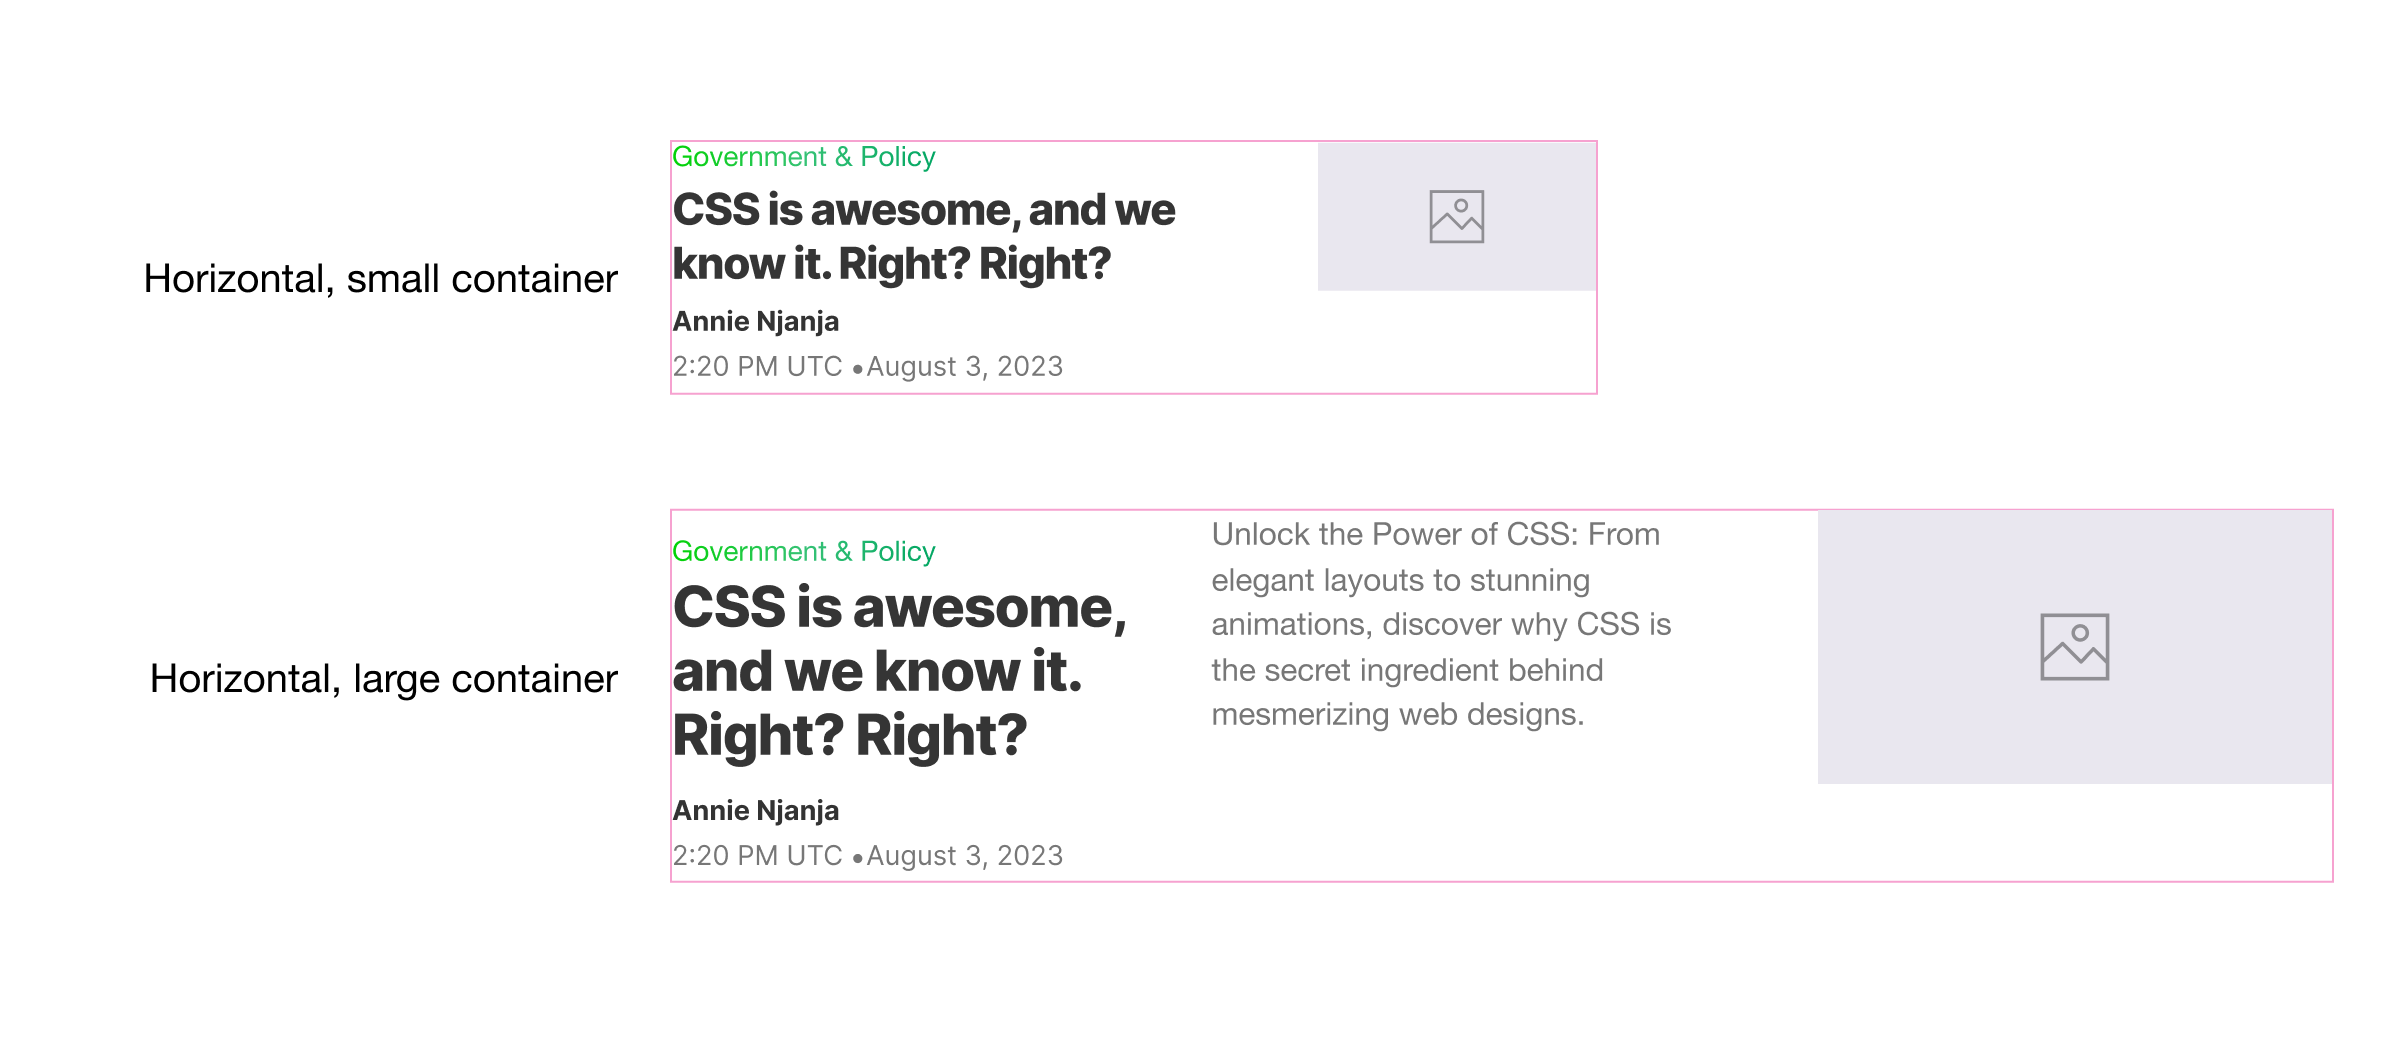
Whereas writing the CSS, I have to take the next into consideration:
- Dynamic grid that may simply be modified.
- Fluid headline
font-sizebased mostly on the container width. - Cover the outline when the container width is small.
- Fluid spacing.
First, I wrote the CSS wanted for the grid.
.publish {
  --cols: 2fr 1fr;
  show: grid;
  grid-template-columns: var(--cols);
  hole: 1rem;
}
That may change when the container width is massive sufficient. Earlier than altering the grid, I have to outline a container.
.post-wrapper {
  container-name: publish;
  container-type: inline-size;
}
With that, I can change the grid structure based mostly on the container width. Right here is the complete CSS:
.post-wrapper {
  container-name: publish;
  container-type: inline-size;
}

.publish {
  --cols: 2fr 1fr;
  show: grid;
  grid-template-columns: var(--cols);
  hole: 1rem;

  @container publish (min-width: 450px) {
    --cols: 1fr 1fr 1fr;
  }
}
Cool. Subsequent, I have to deal with the thumbnail. On small containers, it’s hidden.
I added the CSS variable --thumb: true to point that this part variation has a thumbnail.
<div class="post-wrapper" model="--thumb: true;">
    <article class="publish">
        <div class="post-content">
            <div class="class">...</div>
            <h3 class="title">...</h3>
            <div class="meta">
                <p>Ahmad Shadeed</p>
                <time>...</time>
            </div>
        </div>
        <div class="desc"></div>
        <determine class="media"></determine>
    </article>
</div>
Then, I have to examine if the --thumb: true is added to the container, and conceal the outline by default. If the container width is massive sufficient, then the outline is proven.
This CSS is made because of Type container and Measurement container queries.
.desc {
  @container model(--thumb: true) {
    show: none;

    @container publish (min-width: 450px) {
      show: block;
    }
  }
}
Please word that model queries are in Chrome Canary and there’s an intent that Safari will prototype them quickly (h/t @bramus).
Lastly, the spacing between the class, title, creator, and meta is being dealt with by the hole property.
.post-content {
  show: flex;
  flex-direction: column;
  hole: max(2px, 0.5cqw);
}
I’m utilizing the max() comparability operate to deal with a fluid spacing.
Variation 2: Horizontal with out thumb
That is much like the above, but it surely doesn’t have a thumbnail. The outline spans the width of the second and third columns.
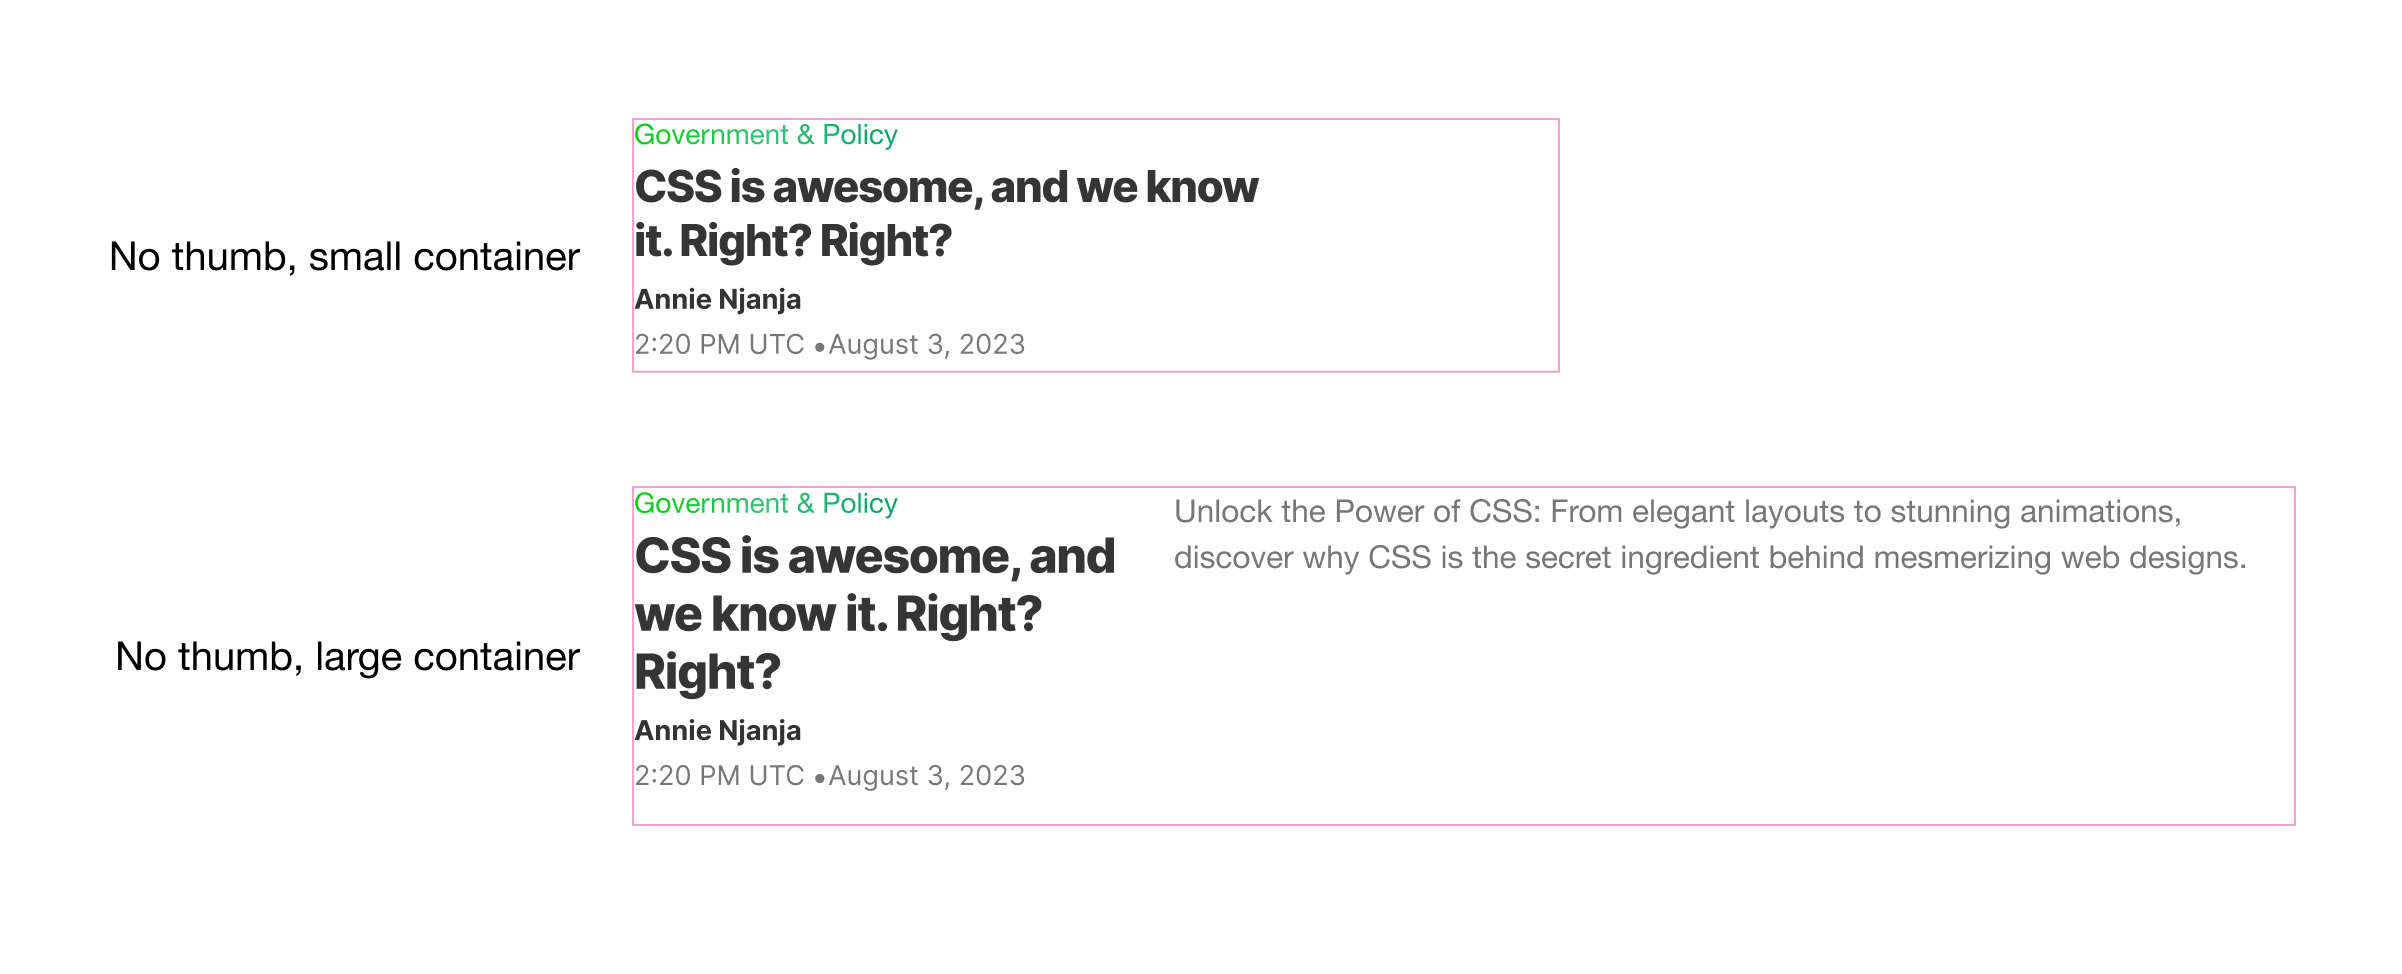
That’s doable with CSS :has and dimension container queries. Utilizing :has is a conditional CSS sample.
.publish:not(:has(.media)) {

  show: block;

  .desc {
    show: none;
  }

  @container publish (min-width: 450px) {
    show: grid;

    .desc {
      show: block;
      grid-column: 2/4;
    }
  }
}
Let’s undergo the CSS:
- If the publish doesn’t have a media component, apply these types.
- Disable CSS grid by altering the
showtoblock - Cover the outline textual content by default.
- Add
show: gridagain to activate the already added grid stuff from the earlier variation. - Present the outline textual content.
- Make the outline textual content span 2 columns.
Right here is how the CSS grid appears to be like underneath the hood:
For the title, it modifications between the small and enormous containers. Within the TechCrunch implementation, that is executed manually (a set worth for every viewport dimension).
Due to container question models, we will have a fluid font dimension based mostly on the container width.
See the next CSS. I’m utilizing the CSS max() comparability operate and it chooses between 1rem or 2.5cqw. The 2.5cqw right here is the same as 2.5% of the container width.
.title {
  font-size: max(1rem, 2.5cqw);

  @container model(--thumb: true) {
    font-size: clamp(1.25rem, 3cqw, 2rem);
  }
}
Variation 3: Featured v1
On this model, the publish content material and media are displayed subsequent to one another. The columns are one for the content material and two for the media.
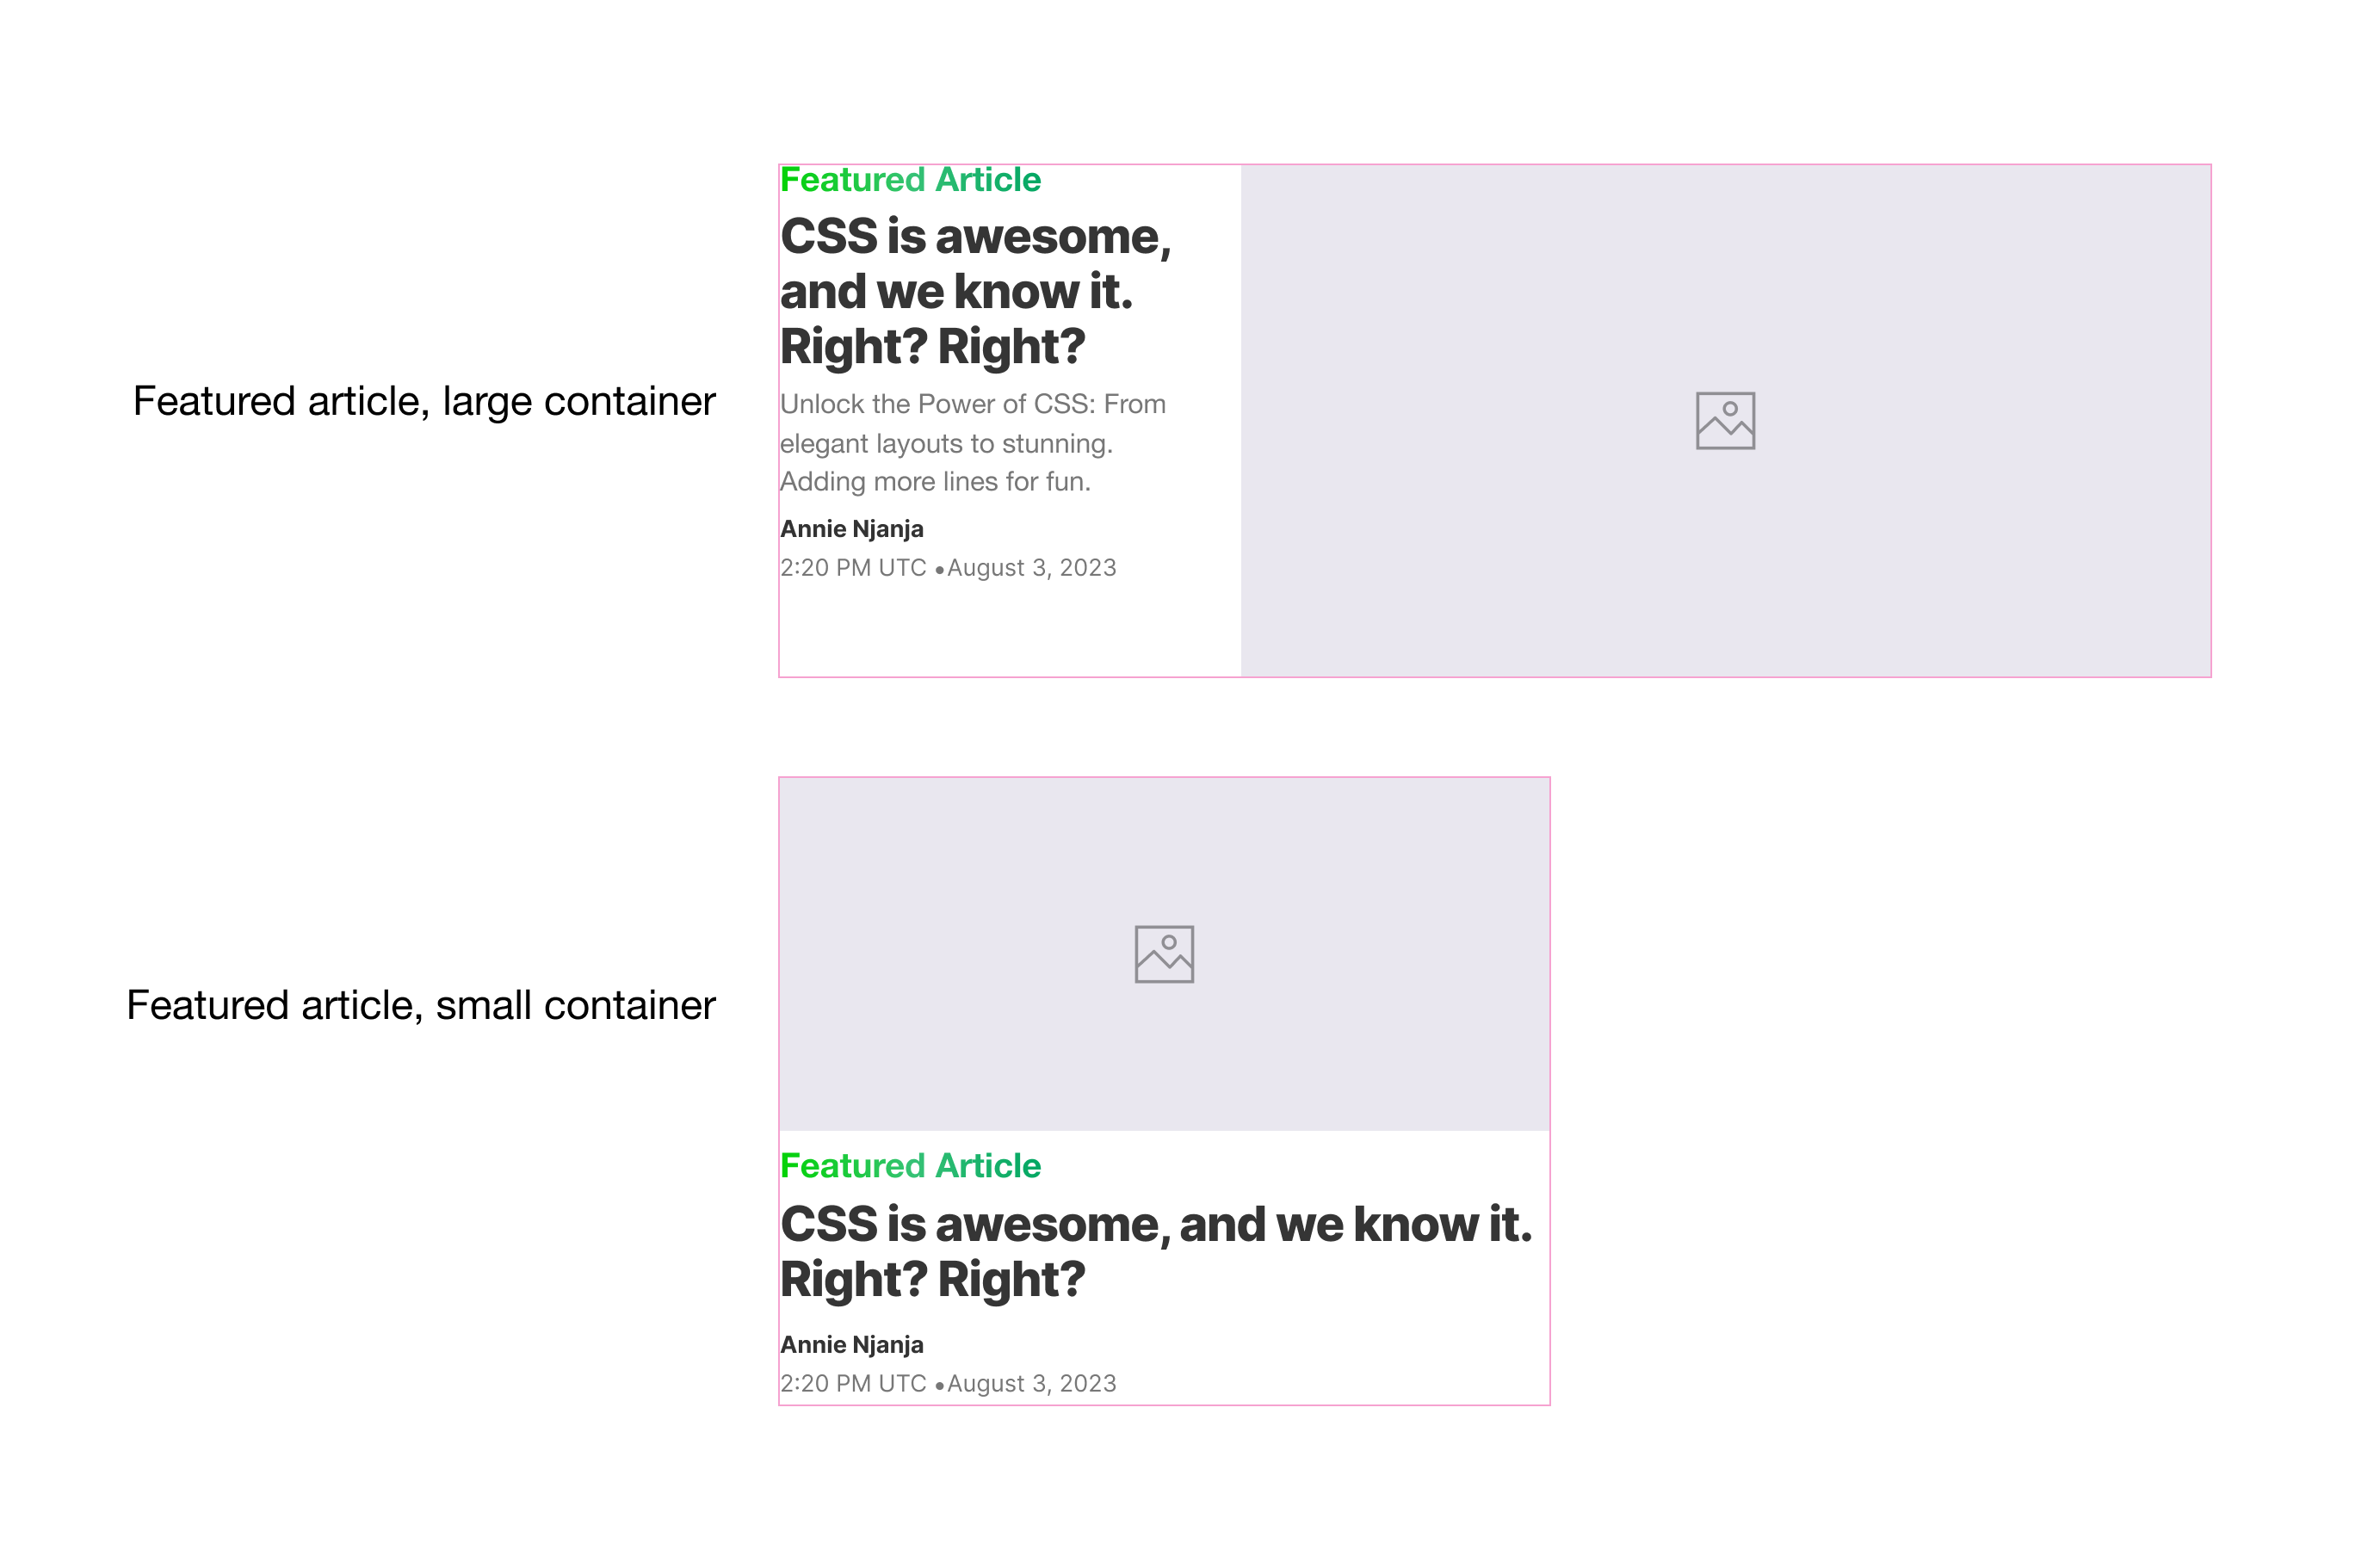
We are going to use the muse of the .publish CSS now we have however with a couple of modifications to the principle structure and interior gadgets.
Here’s what I have to do:
- Make the
.publisha flex container on small containers to get the advantage of theholeproperty. - Add a fluid dimension for the headline.
- Add the “Featured article”.
- Cover the outline and class by default. In a real-life situation, these gained’t be added to HTML in any respect.
@container model(--featured-1: true) {
  .publish {
    show: flex;
    flex-direction: column;
    column-gap: 0.5rem;
  }

  .title {
    font-size: min(28px, 6cqw);
  }

  .post-content {
    &:earlier than {
      content material: "Featured article";

    }
  }

  .desc {
    show: none;
  }

  .class {
    show: none;
  }
}
Then, I have to nest a dimension container question throughout the model question. Here’s what I did:
- Revert the CSS grid and 3-col structure.
- Place the publish content material to span 1-col.
- Place the media to span 2 columns.
@container model(--featured-1: true) {


  @container (min-width: 600px) {
    .publish {
      show: grid;
      grid-template-columns: 1fr 1fr 1fr;
      column-gap: 2rem;
      row-gap: 0;
    }

    .post-content {
      grid-column: 1/2;
      grid-row: 1;
    }

    .media {
      grid-column: 2/-1;
    }
  }
}
That’s it. Do you see how straightforward it’s to construct variations?
Variation 4: Featured v2
On this variation, the publish will turn into a stacked card. We might want to reorder a number of the gadgets.
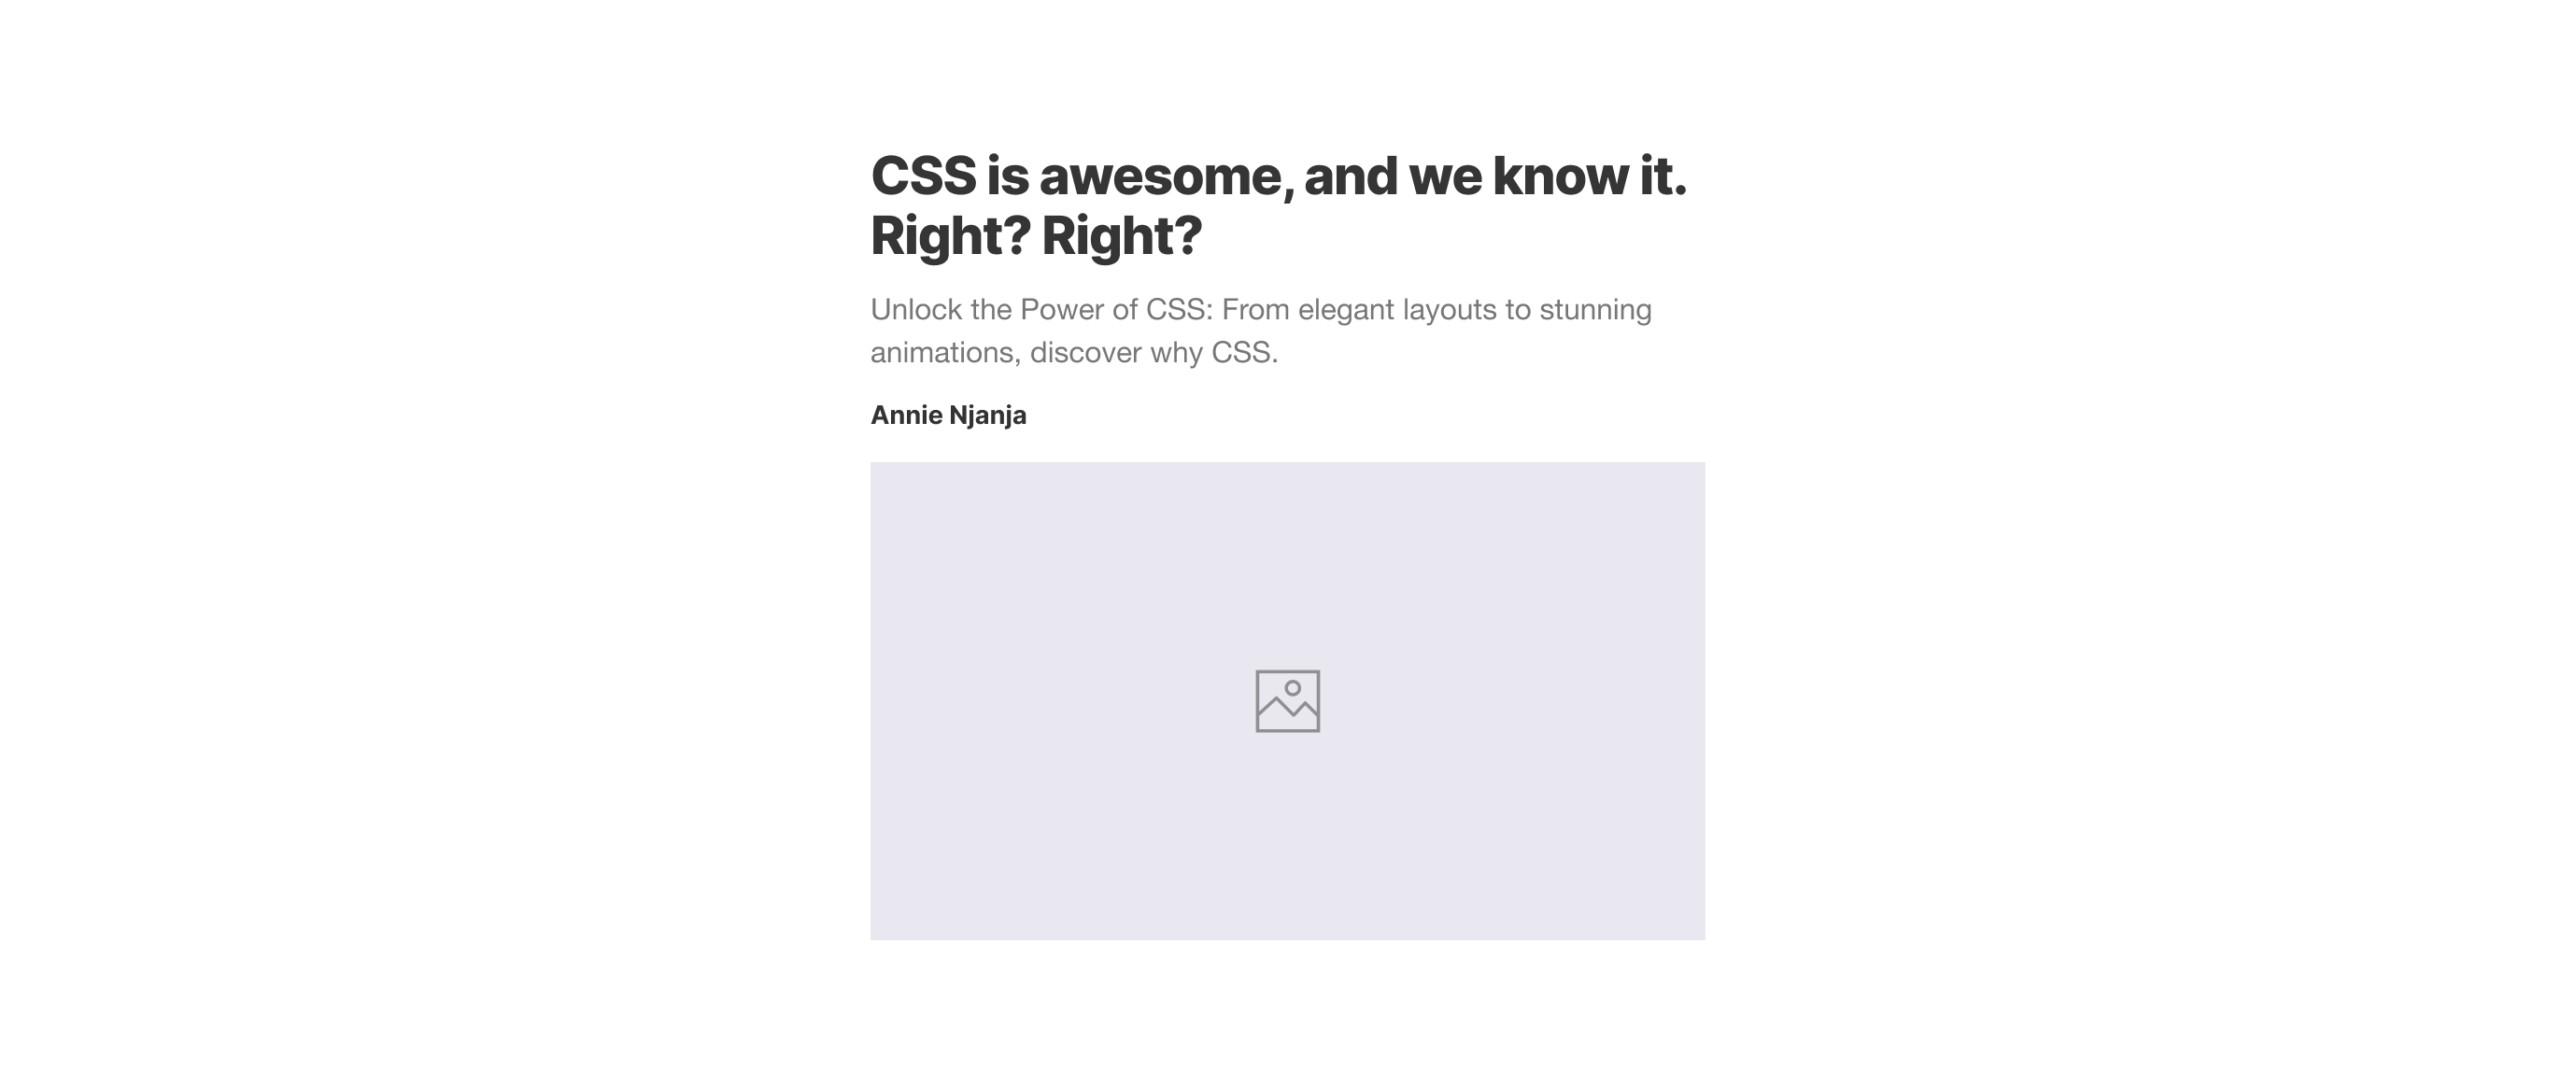
First, I used a method question to examine if the container has --featured-2: true variable. If sure, the publish will turn into a flex container with hole.
@container model(--featured-2: true) {
  .publish {
    show: flex;
    flex-direction: column;
    hole: 0.5rem;
  }
}
Cool. With Flexbox, we acquired a stacked card however there is a matter. I need to have the ability to reorder all the weather with the order property, however a few of them aren’t a direct little one of .publish flex container.

Let’s evaluation the HTML once more:
<div class="post-wrapper" model="--featured-2: true;">
    <article class="publish">
        <div class="post-content">
            <div class="class">...</div>
            <h3 class="title">...</h3>
            <div class="meta"></div>
        </div>
        <div class="desc"></div>
        <determine class="media"></determine>
    </article>
</div>
Here’s a visible that exhibits how the weather are stacked versus how they’re ordered in HTML.
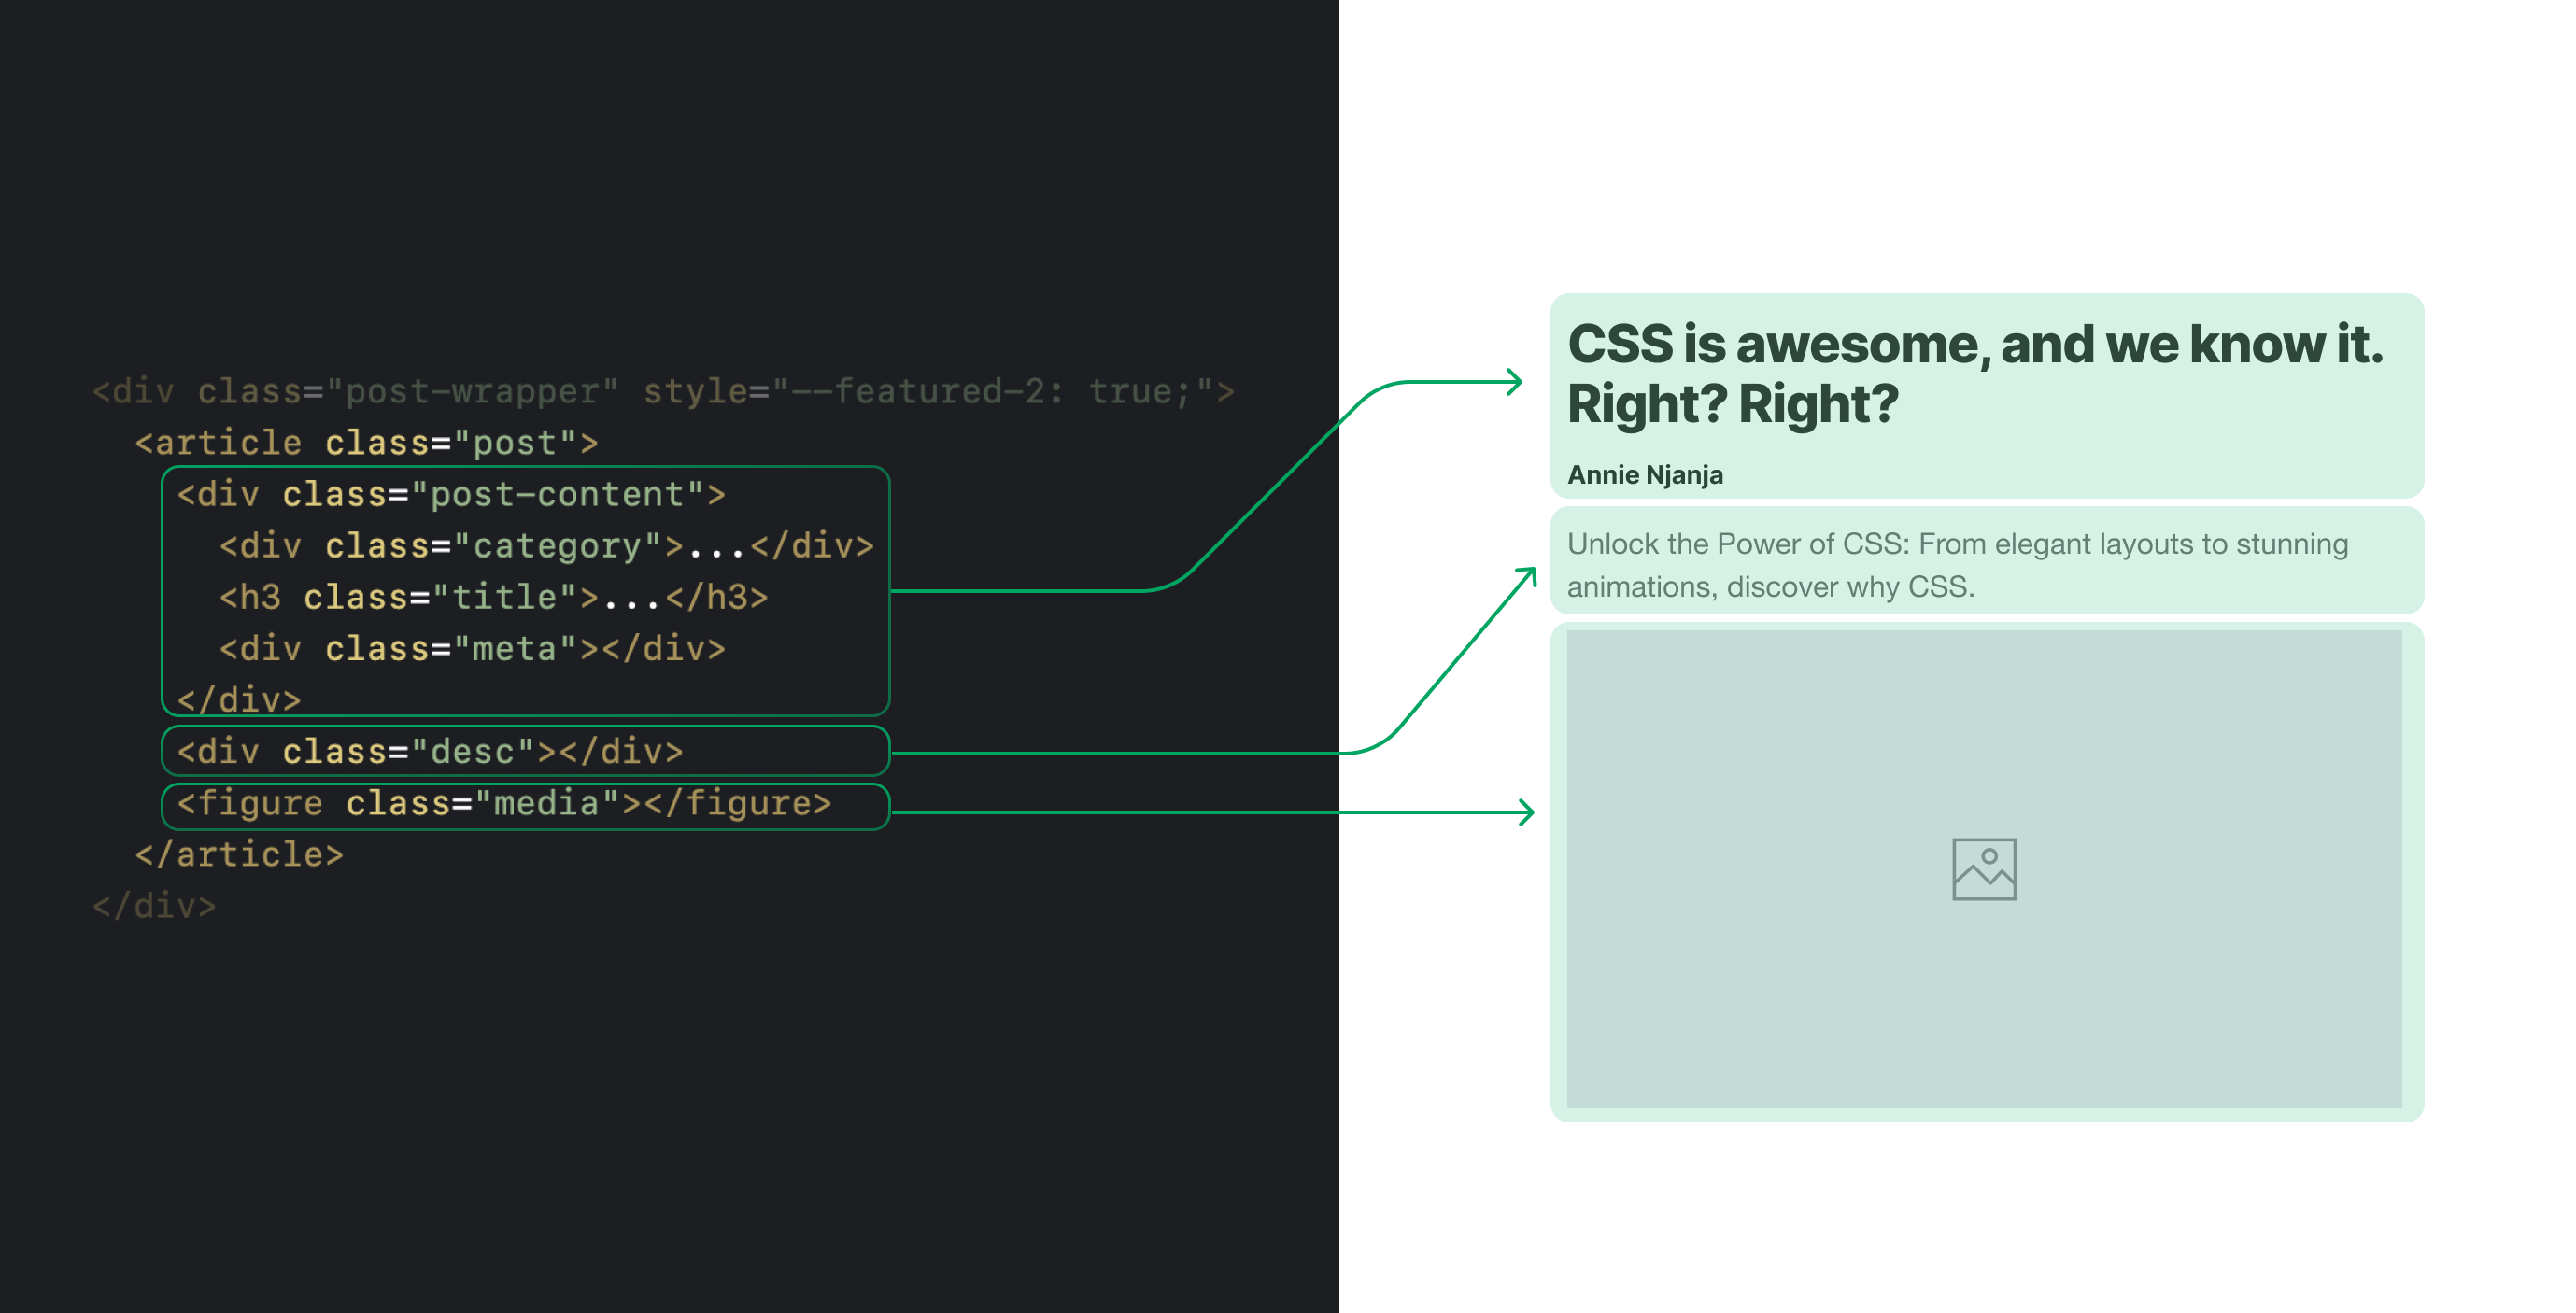
To resolve that, I want a technique to make the weather inside .post-content a direct little one of the .publish flex container.
Due to show: contents, I can take away the .post-content component and make its little one components direct ones of .publish.
@container model(--featured-2: true) {


  .post-content {
    show: contents;
  }
}
With that, the browser sees the HTML like this now. Discover that the class, title, and meta are direct little one components of .publish.
<div class="post-wrapper" model="--featured-2: true;">
    <article class="publish">
        <div class="class">...</div>
        <h3 class="title">...</h3>
        <div class="meta"></div>
        <div class="desc"></div>
        <determine class="media"></determine>
    </article>
</div>
The following step is to make use of the order property to render the weather and the remainder of the CSS for hiding components and fluid sizing.
@container model(--featured-2: true) {
.publish {
show: flex;
flex-direction: column;
hole: 0.5rem;
}
.post-content {
show: contents;
}
.meta {
order: 2;
}
.media {
order: 3;
}
.title {
font-size: clamp(1.5rem, 6cqw, 2.8rem);
}
.desc {
font-size: clamp(1rem, 3cqw, 1.5rem);
}
.class,
time {
show: none;
}
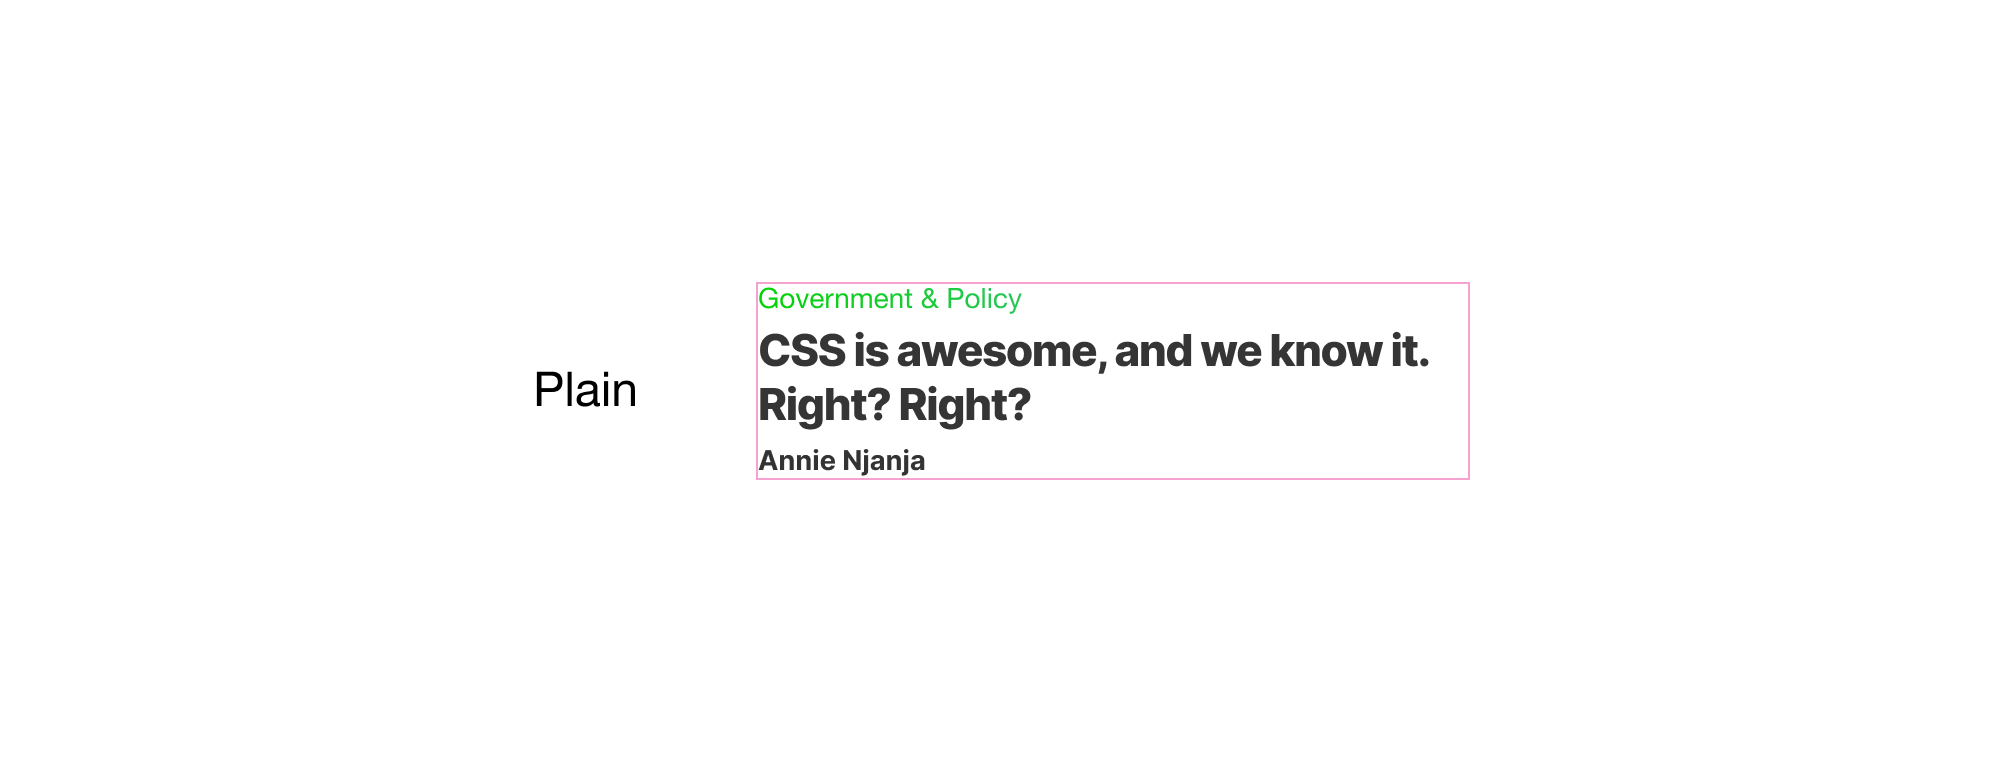
}Variation 5: Plain
The plain variation is the only one. We have to conceal the outline, time, and media. In a real-life situation, these gained’t be added to HTML within the first place, however I added them simply in case.
@container model(--plain: true) {
  .publish {
    show: block;
  }

  .desc,
  time {
    show: none;
  }

  .title {
    font-size: clamp(1rem, 3cqw, 1.5rem);
  }

  .media {
    show: none;
  }
}
I did the next:
- Eliminated the CSS grid container by including
show: block. - Including a particular
font-sizefor the headline.
Variation 6: Flipped
Lastly, the final variation is the “flipped”, that’s how I known as it with out pondering an excessive amount of in regards to the naming.
To accommodate that variation, I did the next:
- Up to date the columns.
- Changed the
.post-contentand.mediacomponents. - Added an outline textual content contained in the
.post-content, because it’s not doable with the preliminary HTML construction.
@container model(--flipped: true) {
  .publish {
    grid-template-columns: 0.3fr 1fr;
    row-gap: 0;
  }

  .post-content {
    grid-column: 2/3;
    grid-row: 1;
  }

  .media {
    grid-column: 1;
  }
}
Right here is an interactive demo on Codepen the place I showcase all of the information part variations (Finest seen in Chrome Canary).
And a demo the place I showcased the elements inside the principle structure.
Lastly, a demo that present all of the part variation without delay (With out tabs).
The promo part is displayed twice. As soon as within the apart and the opposite between the information itemizing.
Here’s a have a look at its sizes/variations.

I don’t like the next:
- Utilizing two completely different HTML for these elements, simply because every lives in a special wrapper.
- Having three name to motion: Register As we speak, Purchase Now, Register Now. I’m to be taught if it is a cause for altering the button’s copy when the viewport dimension is smaller.
We will construct that part simply with dimension and elegance container queries.
I gained’t go into the detailed styling, however I’ll spotlight a couple of particulars that matter to me. First, I outlined the container on the .event-promo-wrapper component.
.event-promo-wrapper {
  container-name: promo;
  container-type: inline-size;
}
I added fluid types to keep away from altering sizes when the container dimension modifications.
@container promo (min-width: 800px) {
    flex-direction: row;
    hole: clamp(2rem, 8cqw, 4rem);
  }
Used nested queries to use the outlined model solely when 1) viewport is 350px or much less and has the CSS variable --aside: true.
.homepage__event-promo {
@container promo (max-width: 350px) {
@container model(--aside: true) {
}
}
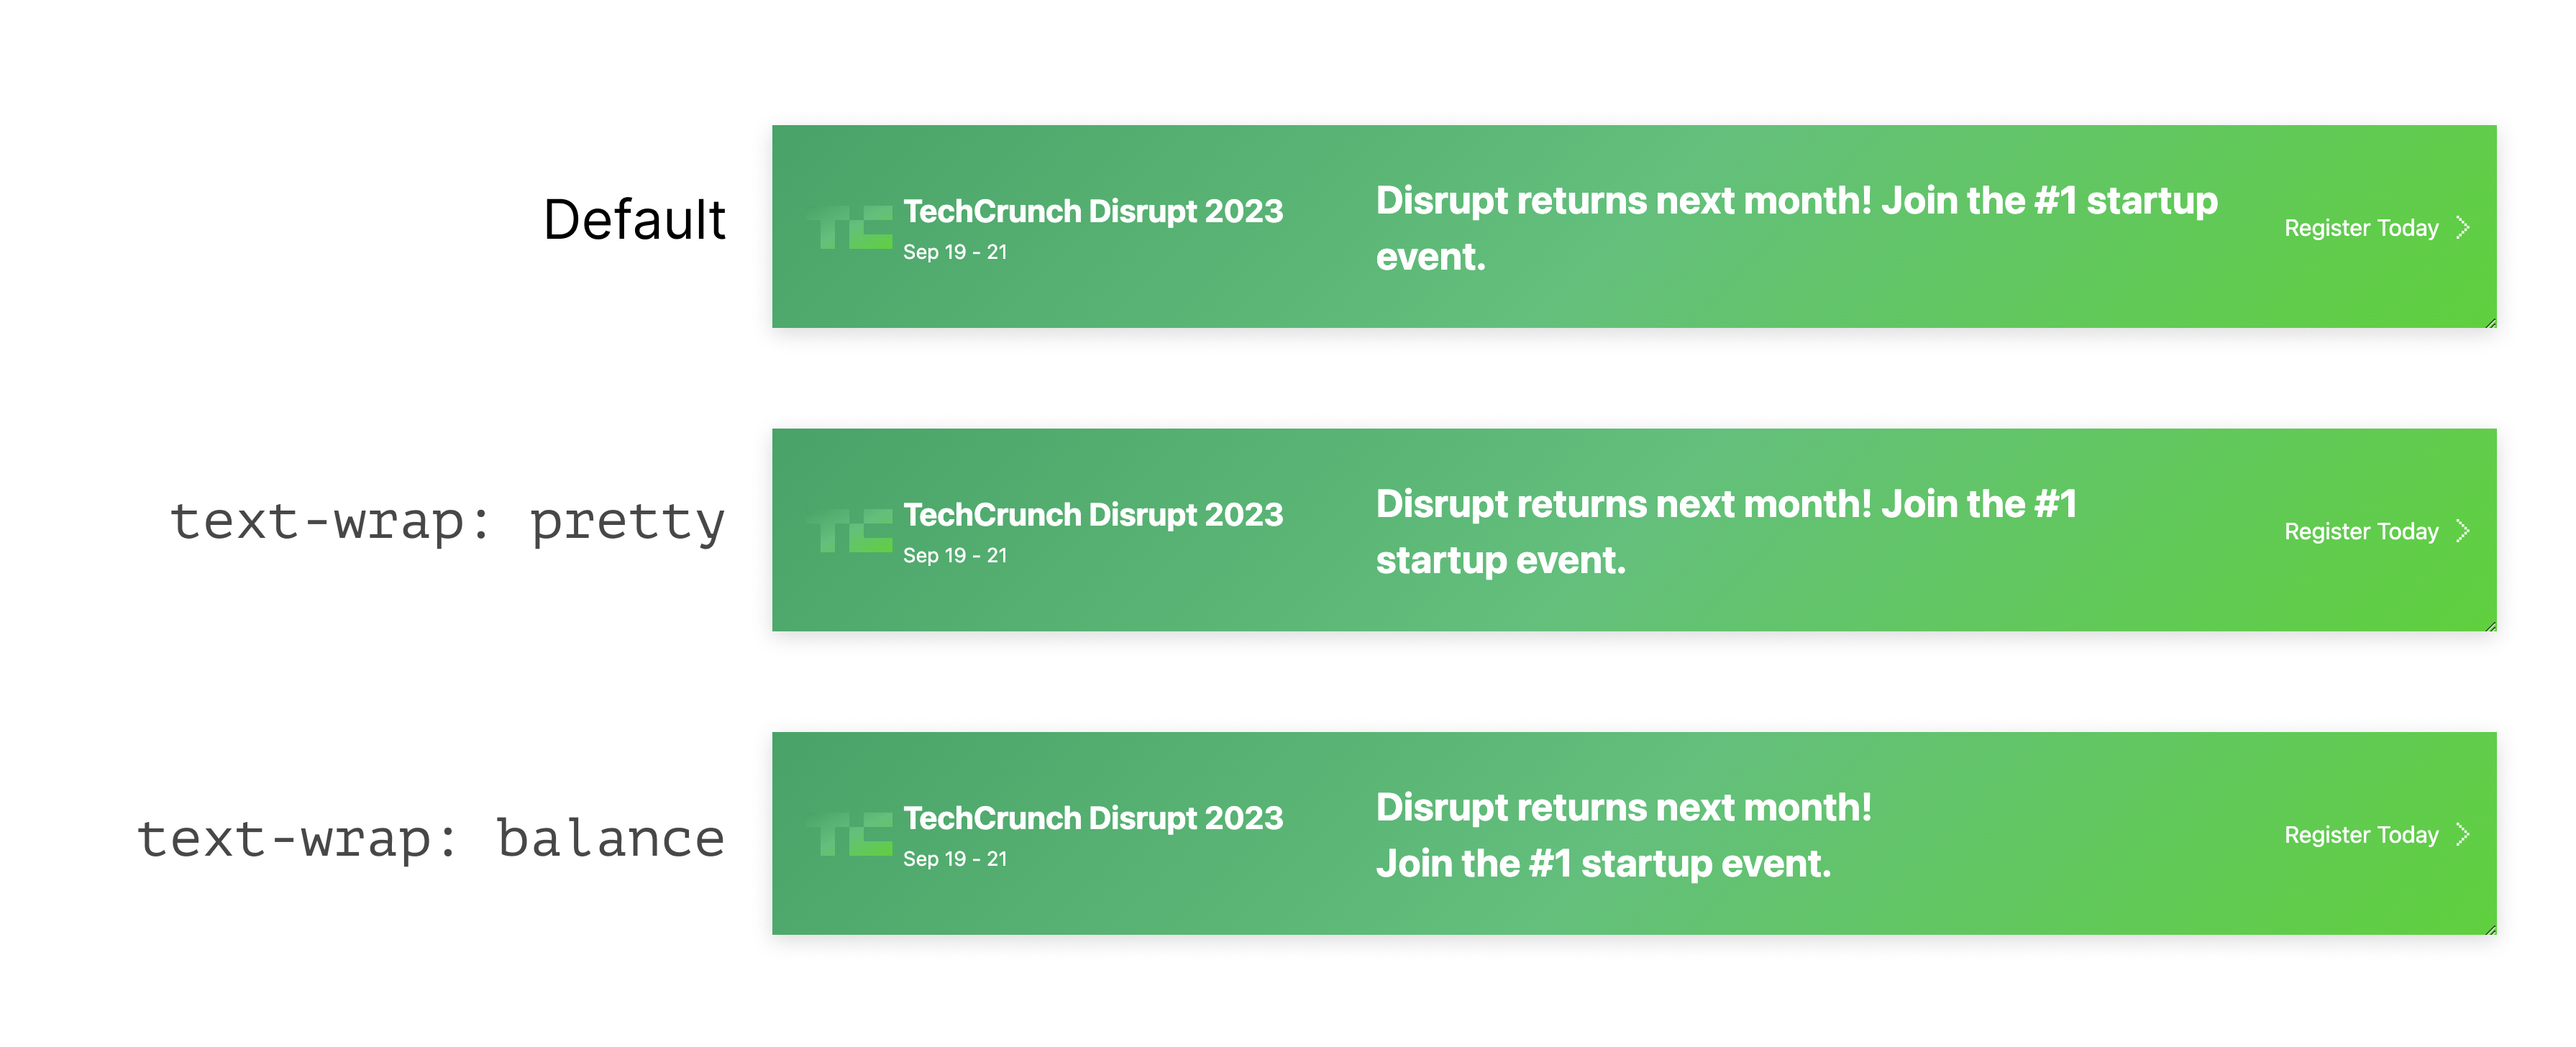
}Once more, use fluid sizing to keep away from setting completely different values for font-size.
.event-promo__content__description {
  font-size: clamp(1rem, 2.5cqw, 1.68rem);
  text-wrap: fairly;
}
I used text-wrap: fairly for the outline component in order that the textual content can wrap properly. We will use steadiness, however it can go away a whole lot of house on the suitable edge. I wrote about textual content wrap balancing however nonetheless didn’t get the prospect to replace for text-wrap: fairly (because it’s fairly new).
Try the Demo
Different concepts
If I wish to proceed this text, I can write 10K phrases. For now, I’ll point out a couple of stuff for the remainder of the stuff that has the potential to be improved with trendy CSS.
The occasion itemizing part
When there is just one occasion, why not change the structure to characteristic that occasion?

.event-listing {
  --lonely: true;
}

.event-listing(.occasion:nth-last-child(n + 2)) {

  --lonely: false;
}

@container model(--lonely: true) {

}
Cool, proper?
The e-newsletter type
Within the e-newsletter type, there’s a good likelihood to make use of a conditional grid based mostly on the variety of gadgets.

.newsletter-form {
  --item-size: 200px;
  show: grid;
  grid-template-columns: repeat(
    auto-fit,
    minmax(var(--item-size), 1fr)
  );
  hole: 1rem;
}


.newsletter-form:has(.input-group:nth-last-child(n + 3)) {
  --item-size: 150px;
}
That is only a fundamental concept. Try this demo from my lab.
Logical Properties
In fact, utilizing logical properties will guarantee a clean transition from LTR to RTL layouts. Utilizing flexbox and grid will guarantee a fair higher LTR to RTL expertise, as they may flip robotically based mostly on the web page’s path.
Conclusion
This was a really prolonged article, I do know. It took me virtually a month of onerous work to get this executed. I actually, actually take pleasure in engaged on a majority of these case research. It’s an effective way to be taught and re-learn issues.
I hope you’ve loved it, and in case you reached right here, you’re wonderful. Thanks a lot for studying the article.
Additional assets