On this tutorial, we’ll present you easy methods to create menus within the Python purposes by tkitner library.
First, the examples will clarify easy methods to add a menu. Then we’ll add menu gadgets as a consumer pulls/clicks on the menu.
Later, we will even present easy methods to add sub menus inside the principle menu.
Actions as you click on on the menu merchandise will even be lined within the examples under.
w = Menu(prime, choices)
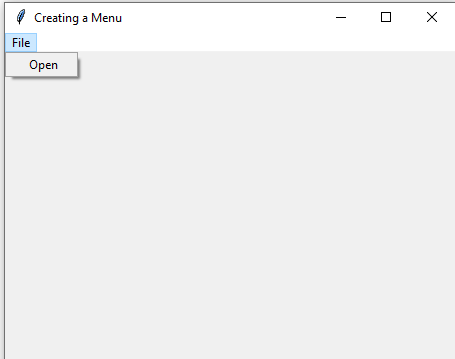
Allow us to begin with a easy instance of making a fundamental menu with a single merchandise.
We are going to create “File” fundamental menu after which it is going to comprise one merchandise “Open”.
As you open and click on on the Open menu merchandise, it closes the window.
Take a look on the code and output:
|
1 2 3 4 5 6 7 8 9 10 11 12 13 14 15 16 17 18 19 20 21 22 23 24 25 26 27 28 29 30 31 32 33 34 35 36 37 38 39 40 41 42 43 44 45 46 47 48 49 50 51 52 53 54 55 56 57 58
|
import tkinter as tk
from tkinter import Menu
# window with a menu bar
win = tk.Tk()
win.geometry(“450×350”)
win.title(‘Making a Menu’)
# create a menubar
main_menu = Menu(win)
filemenu = Menu(main_menu, tearoff=0)
# Add title of the principle menu
main_menu.add_cascade(
label=“File”,
menu=filemenu
)
# Including first menu merchandise
filemenu.add_command(
label=‘Open’,
command=win.destroy
)
win.config(menu=main_menu)
win.mainloop() |
Output:
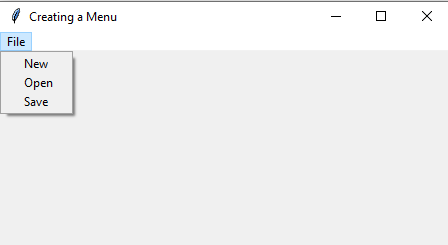
Allow us to transfer forward and add three gadgets to the “File” menu:
Code:
|
1 2 3 4 5 6 7 8 9 10 11 12 13 14 15 16 17 18 19 20 21 22 23 24 25 26 27 28 29 30 31 32 33 34 35 36 37 38 39 40 41 42 43 44 45 46 47 48 49 50 51 52 53 54 55 56 57
|
import tkinter as tk
from tkinter import Menu
# window with a menu bar
win = tk.Tk()
win.geometry(“450×350”)
win.title(‘Making a Menu’)
# create a menubar
main_menu = Menu(win)
filemenu = Menu(main_menu, tearoff=0)
# Add title of the principle menu
main_menu.add_cascade(
label=“File”,
menu=filemenu
)
#Including menu gadgets to the File menu
filemenu.add_command(label=“New”)
filemenu.add_command(label=“Open”)
filemenu.add_command(label=“Save”)
win.config(menu=main_menu)
win.mainloop() |
Output:
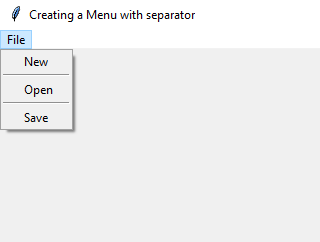
We are going to add a separator between every menu merchandise (New, Open, and Save) for the demo solely.
So as to add a separator, use the add_separator() technique of the menu widget.
All gadgets merely shut the window as you click on on any:
Code:
|
1 2 3 4 5 6 7 8 9 10 11 12 13 14 15 16 17 18 19 20 21 22 23 24 25 26 27 28 29 30 31 32 33 34 35 36 37 38 39 40 41 42 43 44 45 46 47 48 49 50 51 52 53 54 55 56 57 58 59 60 61 62
|
import tkinter as tk
from tkinter import Menu
# window with a menu bar
win = tk.Tk()
win.geometry(“450×350”)
win.title(‘Making a Menu with separator’)
# create a menubar
main_menu = Menu(win)
filemenu = Menu(main_menu, tearoff=0)
# Add title of the principle menu
main_menu.add_cascade(
label=“File”,
menu=filemenu
)
#Including menu gadgets to the File menu
filemenu.add_command(label=“New”, command=win.destroy)
filemenu.add_separator()
filemenu.add_command(label=“Open”, command=win.destroy)
filemenu.add_separator()
filemenu.add_command(label=“Save”, command=win.destroy)
win.config(menu=main_menu)
win.mainloop() |
Output:
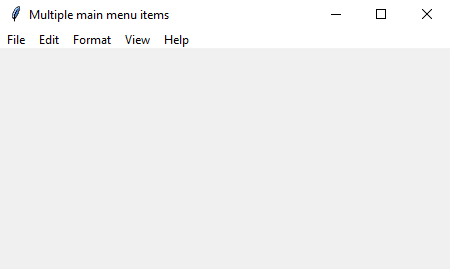
Now we’ll create extra fundamental menus like File within the above examples.
In this system under, we’ve
- File
- Edit
- Format
- View
- Assist
These are the principle gadgets. Upon clicking on any will open its personal menu. However first solely the principle menus:
Program:
|
1 2 3 4 5 6 7 8 9 10 11 12 13 14 15 16 17 18 19 20 21 22 23 24 25 26 27 28 29 30 31 32 33 34 35 36 37 38 39 40 41 42 43 44 45 46 47 48 49 50 51 52 53 54 55 56 57 58 59 60 61 62 63 64 65 66 67 68 69 70 71 72 73 74 75 76 77 78 79 80 81 82 83 84 85 86 87 88 89 90 91 92 93
|
import tkinter as tk
from tkinter import Menu
# window with a menu bar
win = tk.Tk()
win.geometry(“450×350”)
win.title(‘A number of fundamental menu gadgets’)
# create a menubar
main_menu = Menu(win)
filemenu = Menu(main_menu, tearoff=0)
editmenu = Menu(main_menu, tearoff=0)
formatmenu = Menu(main_menu, tearoff=0)
viewmenu = Menu(main_menu, tearoff=0)
helpmenu = Menu(main_menu, tearoff=0)
# Add File Menu
main_menu.add_cascade(
label=“File”,
menu=filemenu
)
# Add Edit Menu
main_menu.add_cascade(
label=“Edit”,
menu=editmenu
)
# Add Format Menu
main_menu.add_cascade(
label=“Format”,
menu=formatmenu
)
# Add View Menu
main_menu.add_cascade(
label=“View”,
menu=viewmenu
)
# Add Assist Menu
main_menu.add_cascade(
label=“Assist”,
menu=helpmenu
)
win.config(menu=main_menu)
win.mainloop() |
Output:
On this instance, we’ll add menu gadgets for every fundamental menu.
Python program:
|
1 2 3 4 5 6 7 8 9 10 11 12 13 14 15 16 17 18 19 20 21 22 23 24 25 26 27 28 29 30 31 32 33 34 35 36 37 38 39 40 41 42 43 44 45 46 47 48 49 50 51 52 53 54 55 56 57 58 59 60 61 62 63 64 65 66 67 68 69 70 71 72 73 74 75 76 77 78 79 80 81 82 83 84 85 86 87 88 89 90 91 92 93 94 95 96 97 98 99 100 101 102 103 104 105 106 107 108 109 110 111 112 113 114 115 116 117 118 119 120 121 122 123 124 125 126 127 128 129 130 131 132 133 134 135 136 137 138 139 140 141 142 143 144 145 146 147 148 149 150 151 152 153 154 155 156 157 158 159 160 161 162 163 164 165 166 167 168 169 170 171
|
import tkinter as tk
from tkinter import Menu
# window with a menu bar
win = tk.Tk()
win.geometry(“450×350”)
win.title(‘A number of fundamental menu gadgets’)
# create a menubar
main_menu = Menu(win)
filemenu = Menu(main_menu, tearoff=0)
filemenu.add_command(label=“New Ctrl+N” )
filemenu.add_command(label=“New Window Ctrl+Shift+N” )
filemenu.add_command(label=“Open… Ctrl+O” )
filemenu.add_command(label=“Save Ctrl+S”)
filemenu.add_command(label=“Save as… Ctrl++Shift+S”)
filemenu.add_separator()
filemenu.add_command(label=“Web page Setup…”)
filemenu.add_command(label=“Print…”)
filemenu.add_separator()
filemenu.add_command(label=“Exit”, command=win.destroy)
#Creating Edit Menu Gadgets
editmenu = Menu(main_menu, tearoff=0)
editmenu.add_command(label=“Undo” )
editmenu.add_separator()
editmenu.add_command(label=“Minimize” )
editmenu.add_command(label=“Copy” )
editmenu.add_command(label=“Paste” )
editmenu.add_command(label=“Delete” )
#Creating Format Menu Gadgets
formatmenu = Menu(main_menu, tearoff=0)
formatmenu.add_command(label=“Phrase Wrap” )
formatmenu.add_command(label=“Font…” )
#Creating View Menu Gadgets
viewmenu = Menu(main_menu, tearoff=0)
viewmenu.add_command(label=“Zoom” )
viewmenu.add_command(label=“Standing Bar” )
#Creating Assist Menu Gadgets
helpmenu = Menu(main_menu, tearoff=0)
helpmenu.add_command(label=“View Assist” )
helpmenu.add_command(label=“Ship Suggestions” )
# Add File Menu
main_menu.add_cascade(
label=“File”,
menu=filemenu
)
# Add Edit Menu
main_menu.add_cascade(
label=“Edit”,
menu=editmenu
)
# Add Format Menu
main_menu.add_cascade(
label=“Format”,
menu=formatmenu
)
# Add View Menu
main_menu.add_cascade(
label=“View”,
menu=viewmenu
)
# Add Assist Menu
main_menu.add_cascade(
label=“Assist”,
menu=helpmenu
)
win.config(menu=main_menu)
win.mainloop() |
Output:
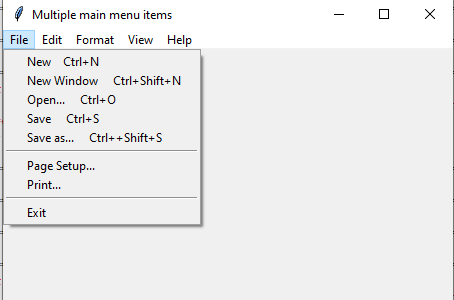
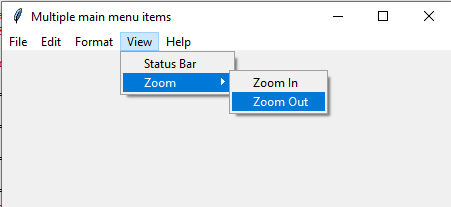
In case your menu is meant to be multi-level i.e. sub-menu then you are able to do this simply through the use of tkinter menu widget.
For instance, in our above menu, we need to add the “Zoom In” and “Zoom Out” sum menu gadgets to the “Zoom” menu merchandise. That is how we are able to do that:
Code:
|
1 2 3 4 5 6 7 8 9 10 11 12 13 14 15 16 17 18 19 20 21 22 23 24 25 26 27 28 29 30 31 32 33 34 35 36 37 38 39 40 41 42 43 44 45 46 47 48 49 50 51 52 53 54 55 56 57 58 59 60 61 62 63 64 65 66 67 68 69 70 71 72 73 74 75 76 77 78 79 80 81 82 83 84 85 86 87 88 89 90 91 92 93 94 95 96 97 98 99 100 101 102 103 104 105 106 107 108 109 110 111 112 113 114 115 116 117 118 119 120 121 122 123 124 125 126 127 128 129 130 131 132 133 134 135 136 137 138 139 140 141 142 143 144 145 146 147 148 149 150 151 152 153 154 155 156 157 158 159 160 161 162 163 164 165 166 167 168 169 170 171 172 173 174 175 176 177 178 179 180 181 182 183 184 185 186 187 188 189 190 191 192
|
import tkinter as tk
from tkinter import Menu
# window with a menu bar
win = tk.Tk()
win.geometry(“450×350”)
win.title(‘A number of fundamental menu gadgets’)
# create a menubar
main_menu = Menu(win)
filemenu = Menu(main_menu, tearoff=0)
filemenu.add_command(label=“New Ctrl+N” )
filemenu.add_command(label=“New Window Ctrl+Shift+N” )
filemenu.add_command(label=“Open… Ctrl+O” )
filemenu.add_command(label=“Save Ctrl+S”)
filemenu.add_command(label=“Save as… Ctrl++Shift+S”)
filemenu.add_separator()
filemenu.add_command(label=“Web page Setup…”)
filemenu.add_command(label=“Print…”)
filemenu.add_separator()
filemenu.add_command(label=“Exit”, command=win.destroy)
#Creating Edit Menu Gadgets
editmenu = Menu(main_menu, tearoff=0)
editmenu.add_command(label=“Undo” )
editmenu.add_separator()
editmenu.add_command(label=“Minimize” )
editmenu.add_command(label=“Copy” )
editmenu.add_command(label=“Paste” )
editmenu.add_command(label=“Delete” )
#Creating Format Menu Gadgets
formatmenu = Menu(main_menu, tearoff=0)
formatmenu.add_command(label=“Phrase Wrap” )
formatmenu.add_command(label=“Font…” )
#Creating View Menu Gadgets
viewmenu = Menu(main_menu, tearoff=0)
#viewmenu.add_command(label=”Zoom” )
viewmenu.add_command(label=“Standing Bar” )
#Sub menu for Zoom menu merchandise
sub_zoom = Menu(main_menu, tearoff=0)
sub_zoom.add_command(label=‘Zoom In’)
sub_zoom.add_command(label=‘Zoom Out’)
#Add sub menu for zoom merchandise
viewmenu.add_cascade(
label=“Zoom”,
menu=sub_zoom
)
#Creating Assist Menu Gadgets
helpmenu = Menu(main_menu, tearoff=0)
helpmenu.add_command(label=“View Assist” )
helpmenu.add_command(label=“Ship Suggestions” )
# Add File Menu
main_menu.add_cascade(
label=“File”,
menu=filemenu
)
# Add Edit Menu
main_menu.add_cascade(
label=“Edit”,
menu=editmenu
)
# Add Format Menu
main_menu.add_cascade(
label=“Format”,
menu=formatmenu
)
# Add View Menu
main_menu.add_cascade(
label=“View”,
menu=viewmenu
)
# Add Assist Menu
main_menu.add_cascade(
label=“Assist”,
menu=helpmenu
)
win.config(menu=main_menu)
win.mainloop() |
Output:
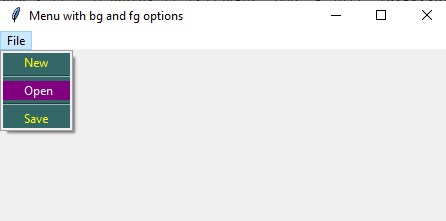
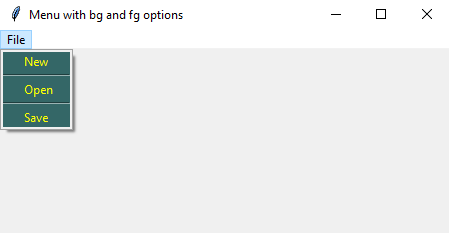
The menu widget has choices to provide background and foreground colours to the menu.
- Through the use of bg possibility, chances are you’ll specify the background shade.
- The fg possibility is used to paint the textual content of the menu gadgets.
See the instance under the place we added each choices. In fg, we supplied the colour identify and within the bg possibility we used the Hex worth of the colour:
Code:
|
1 2 3 4 5 6 7 8 9 10 11 12 13 14 15 16 17 18 19 20 21 22 23 24 25 26 27 28 29 30 31 32 33 34 35 36 37 38 39 40 41 42 43 44 45 46 47 48 49 50 51 52 53 54 55 56 57 58 59 60 61 62 63 64 65
|
import tkinter as tk
from tkinter import Menu
def closewin():
filewin = Toplevel(root)
button = Button(filewin, textual content=“Do nothing button”)
button.pack()
# window with a menu bar
win = tk.Tk()
win.geometry(“450×350”)
win.title(‘Menu with bg and fg choices’)
# create a menubar
main_menu = Menu(win)
#Right here we specify the file menu bg and fg colours
filemenu = Menu(main_menu, tearoff=0, bg=“#346767”, fg = “yellow”)
# Add title of the principle menu
main_menu.add_cascade(
label=“File”,
menu=filemenu
)
#Including menu gadgets to the File menu
filemenu.add_command(label=“New”, command=win.destroy)
filemenu.add_separator()
filemenu.add_command(label=“Open”, command=win.destroy)
filemenu.add_separator()
filemenu.add_command(label=“Save”, command=win.destroy)
win.config(menu=main_menu)
win.mainloop() |
Output:
To face out a menu merchandise from others when the mouse hovers over that merchandise, use the next two choices of the menu widget:
- activebackground – to set the background shade as mouse hovers
- activeforeground – set the textual content shade
See an instance under the place we set these choices for all three menu gadgets.
Code:
|
1 2 3 4 5 6 7 8 9 10 11 12 13 14 15 16 17 18 19 20 21 22 23 24 25 26 27 28 29 30 31 32 33 34 35 36 37 38 39 40 41 42 43 44 45 46 47 48 49 50 51 52 53 54 55 56 57 58 59 60 61 62 63 64 65
|
import tkinter as tk
from tkinter import Menu
def closewin():
filewin = Toplevel(root)
button = Button(filewin, textual content=“Do nothing button”)
button.pack()
# window with a menu bar
win = tk.Tk()
win.geometry(“450×350”)
win.title(‘Menu with bg and fg choices’)
# create a menubar
main_menu = Menu(win)
#Right here we specify the file menu bg and fg colours
filemenu = Menu(main_menu, tearoff=0, bg=“#346767”, fg = “yellow”)
# Add title of the principle menu
main_menu.add_cascade(
label=“File”,
menu=filemenu
)
#Including menu gadgets to the File menu
filemenu.add_command(label=“New”, command=win.destroy, activebackground=“#800080”, activeforeground=“white”)
filemenu.add_separator()
filemenu.add_command(label=“Open”, command=win.destroy, activebackground=“#800080”, activeforeground=“white”)
filemenu.add_separator()
filemenu.add_command(label=“Save”, command=win.destroy, activebackground=“#800080”, activeforeground=“white”)
win.config(menu=main_menu)
win.mainloop() |
Output: