


In the event you plan to start out with Microsoft Azure Cloud, nothing might be higher than launching your first Azure digital machine (VM). Azure VMs are hosted on hypervisors, the place you possibly can customise all software program, comparable to working methods (OS), configurations, and so forth,
On this tutorial, you’ll discover ways to launch your first Azure VM through Azure Cloud Shell and Azure Portal.
Learn on and begin your journey to cloud computing!
Conditions
This tutorial contains step-by-step directions. To comply with alongside, make certain you might have the next in place:
Activating the Azure Cloud Shell to Create an Azure VM
Azure presents VMs, one in all a number of on-demand, scalable computing assets that enhance operational effectivity. With Azure VMs, you possibly can migrate business-critical workloads to Azure infrastructure with out shopping for and sustaining the bodily {hardware} that runs it.
When provisioning a useful resource on Azure Cloud, like a VM, you might have two methods: Azure Cloud Shell CLI (Interfaces) and Azure Administration Console (Explorer).
These interfaces help you work with Azure Companies through the everyday Azure Cloud Shell (Commander model). However on this instance, you’ll use the Azure Cloud Shell first to launch your first occasion in Azure Cloud, as follows:
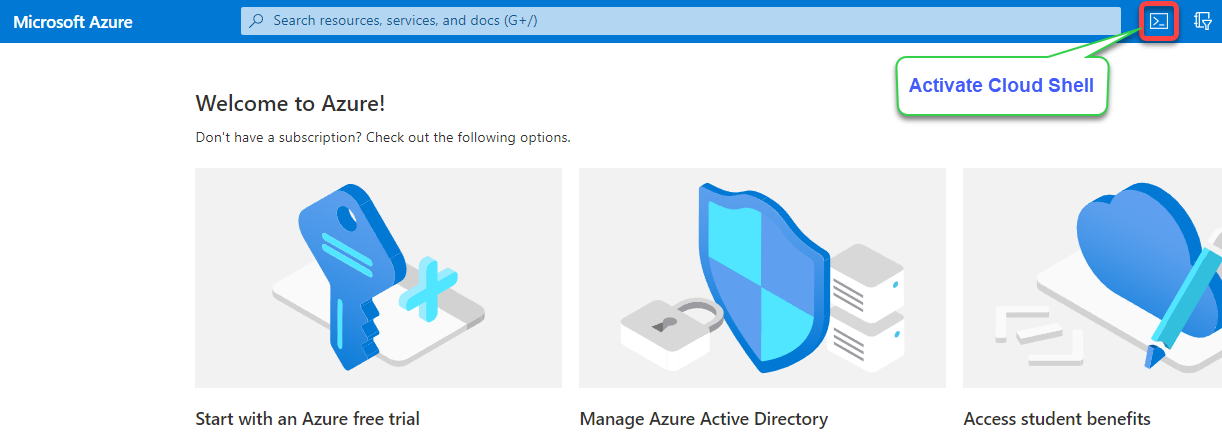
1. Open your favourite net browser, and log in to Azure Portal.
2. Subsequent, click on the Cloud Shell icon (upper-right) to launch the Azure Cloud Shell, as proven under.
3. Subsequent, run the under az vm command to launch (create) the occasion named (my-vm) on Azure Cloud. Make sure you exchange <resource-group-name> together with your precise sandbox useful resource group title. A useful resource group is a container that holds all of the associated assets inside the Azure cloud.
# THE COMMAND BELOW PERFORMS THE FOLLOWING:
# Set useful resource group <resource-group-name> the occasion will use.
# Set the title of the occasion (my-vm).
# Set Ubuntu because the picture.
# Set the admin username.
# Generate the keys you need to use to login into the occasion.
az vm create
  --resource-group <resource-group-name>
  --name my-vm
  --image UbuntuLTS
  --admin-username azureuser
  --generate-ssh-keys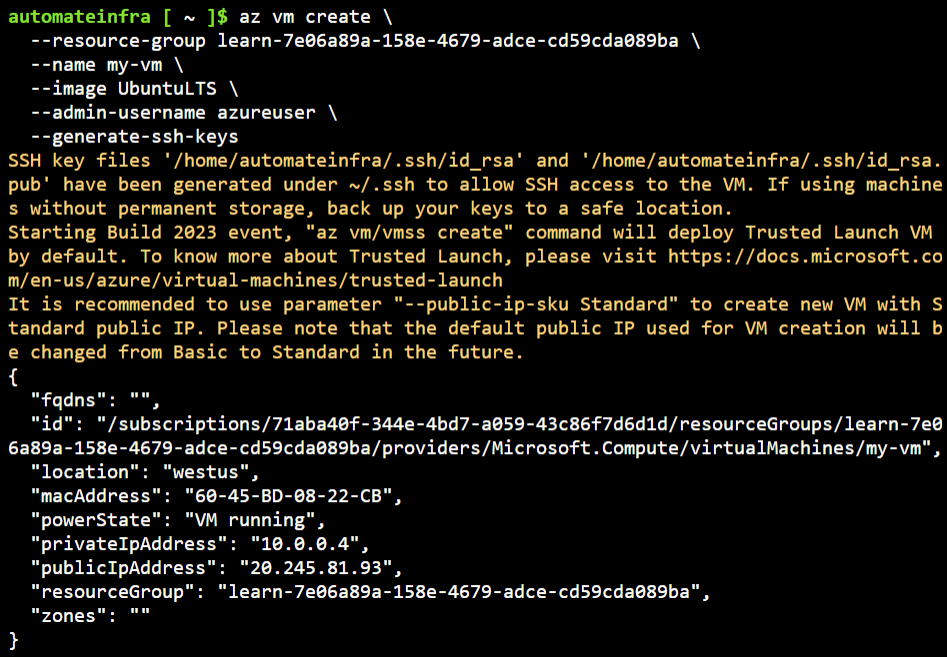
4. Lastly, run the next command to record all accessible cases by title.
Beneath, you possibly can confirm your occasion has been correctly launched.

Create an Azure VM through the Azure Portal
Launching your first Azure VM through CLI works nice because it solely requires a couple of steps. However when you choose to click on by configurations, the best choice is the Azure Portal.
The Azure Portal gives a GUI the place you possibly can create and handle all of your Azure assets, like your Azure VMs.
To create an Azure VM through Azure Portal’s GUI, comply with these steps:
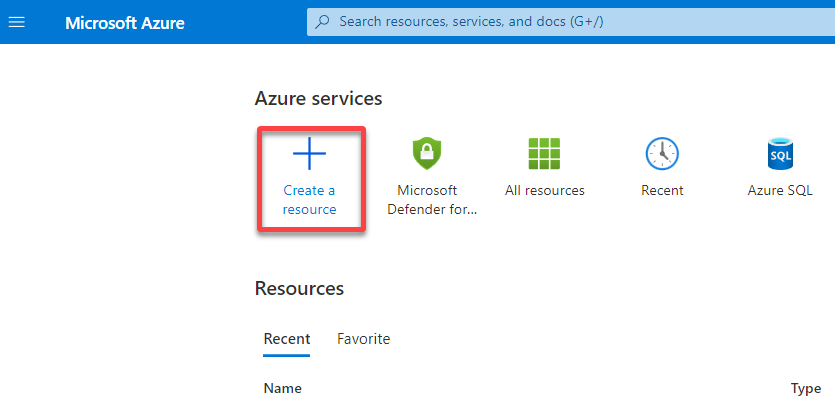
1. On the Azure Portal, click on Create a useful resource (upper-left), as proven under, to provoke creating a brand new useful resource.
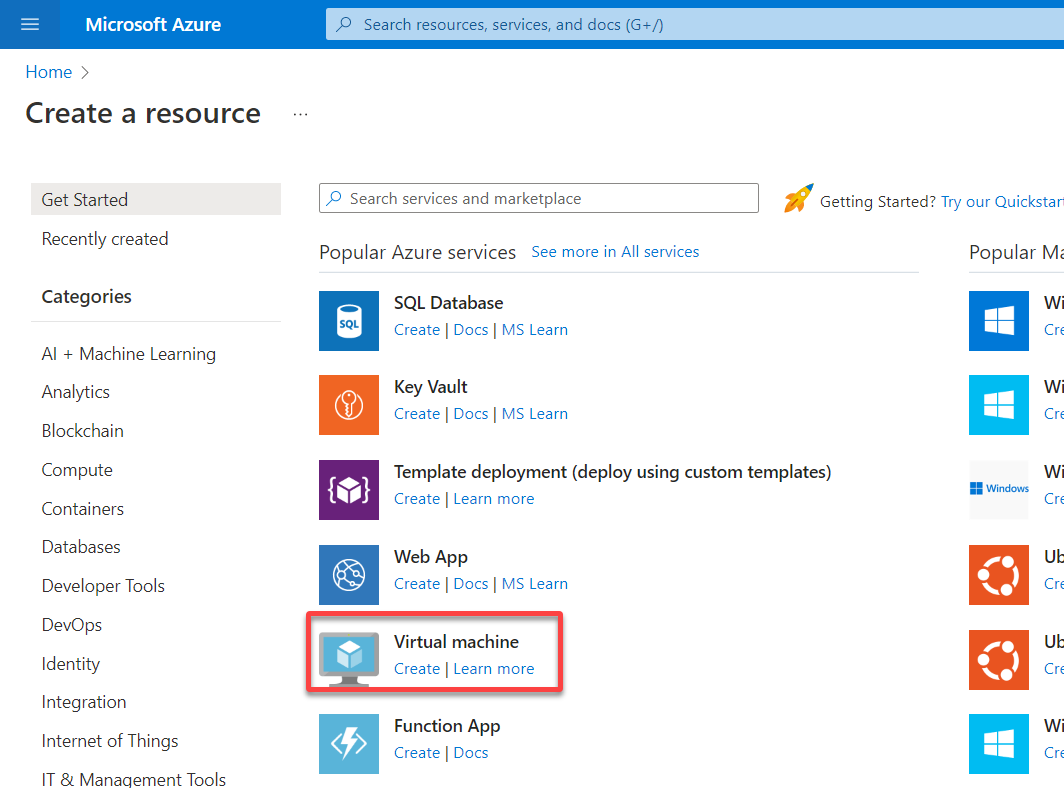
2. Subsequent, click on Digital machine, as proven under, redirecting your browser to a web page the place you possibly can configure your VM.
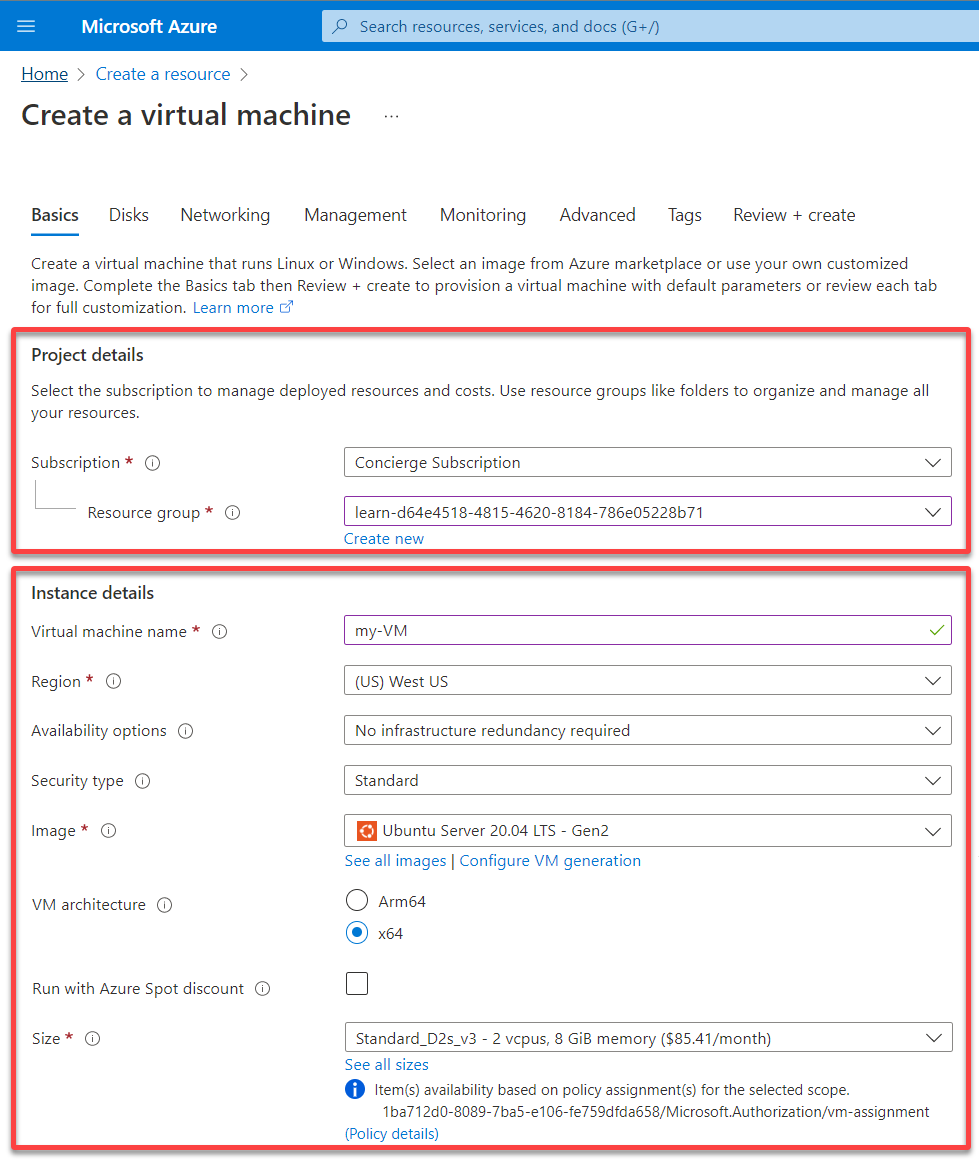
3. Configure the Challenge particulars and Occasion particulars on your VM as follows:
- Subscription – Select your Azure subscription and Assets group.
- Digital machine title – Set a novel title on your VM (i.e., my-VM).
- Area – Select the area the place you want to launch your occasion.
- Availability choices – Select the No infrastructure redundancy required possibility. Availability choices are designed to obtain excessive availability, which you don’t want for this tutorial.
- Safety kind – Preserve the Customary possibility chosen to not prohibit any guidelines, however you possibly can apply guidelines sooner or later for explicit visitors.
- Picture – Choose the picture as Ubuntu (any model above 16) or every other Linux machine you want to launch.
- VM structure – Select the 64-bit machines (x64) possibility. Whereas Arm-based gives higher value performant, 64-bit machines are far more software program appropriate.
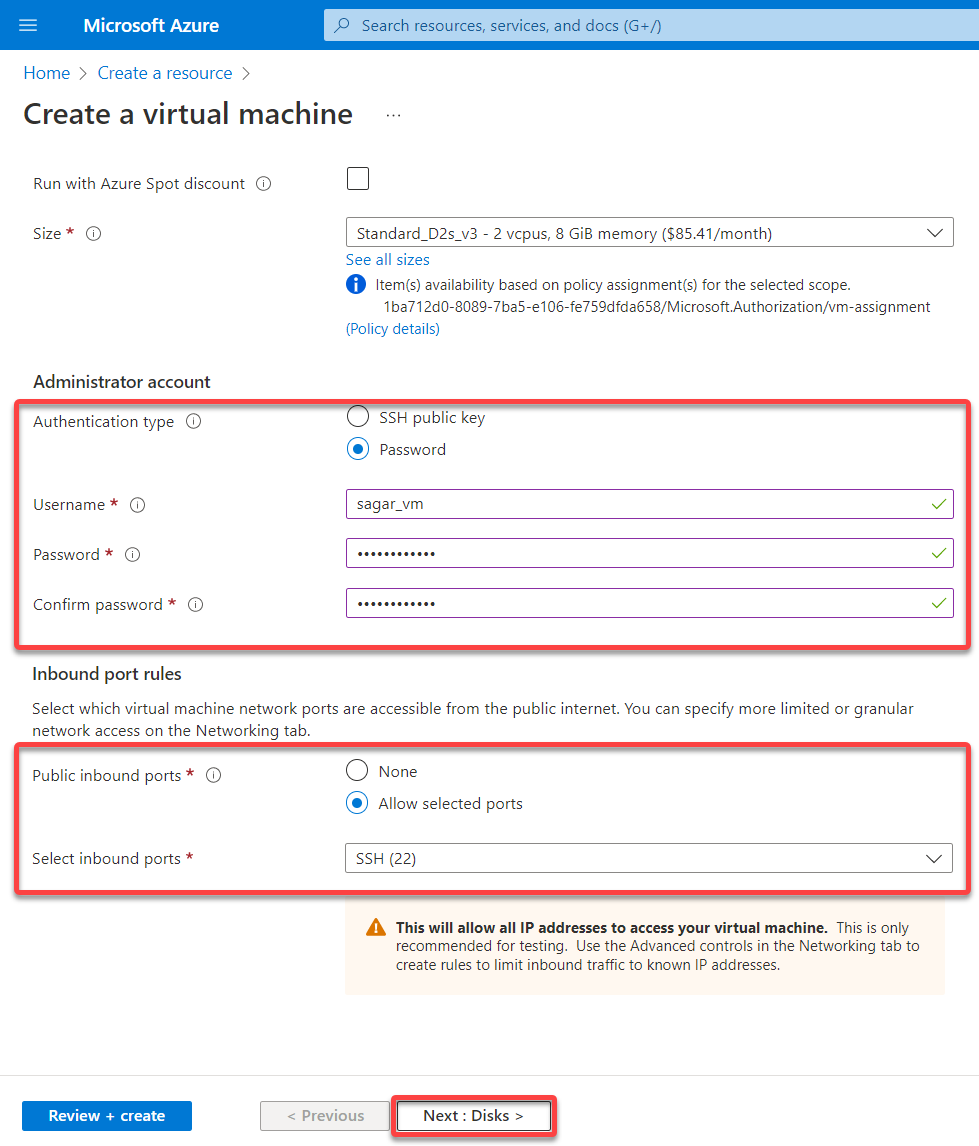
4. Now, scroll down, and configure the next:
Administrator account
- Authentication kind – Select Password because the authentication kind. You possibly can select the authentication kind as Password or SSH public key, however hold it as Password for this tutorial.
- Username, Password, and Affirm Password – Set a username and password, which you’ll use later to log in to your VM.
Inbound port guidelines
- Public inbound ports – Select the Permit chosen ports possibility to permit customers to entry your machine based mostly on the port you permit. For instance, port 22 will allow you to log in, whereas port 80 lets you entry your server utilizing an online browser.
- Choose inbound ports – Choose SSH (22) from the dropdown discipline to permit all IP addresses to entry your VM.
As soon as configured, click on Subsequent : Disks > to configure disk settings on your VM.
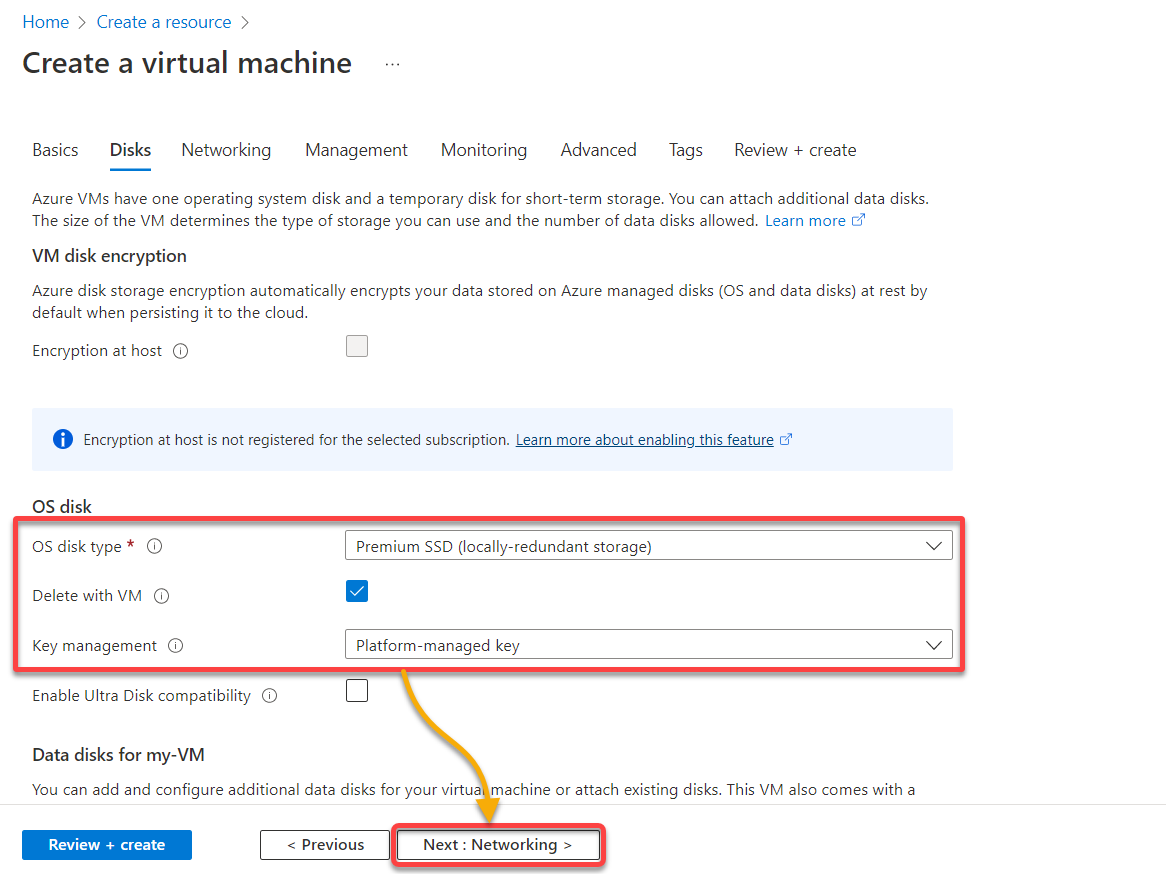
5. Set the next on your VM’s disk configuration:
- OS disk kind – Select storage per your requirement based mostly on OS disk varieties. This tutorial’s selection is Premium SSD.Delete with VM – Tick this field to set the disk together with the occasion deletion.Key administration – Select the important thing required to handle the occasion from the dropdown.
After the disk configuration, click on Subsequent : Networking > to arrange the VM’s community configuration.
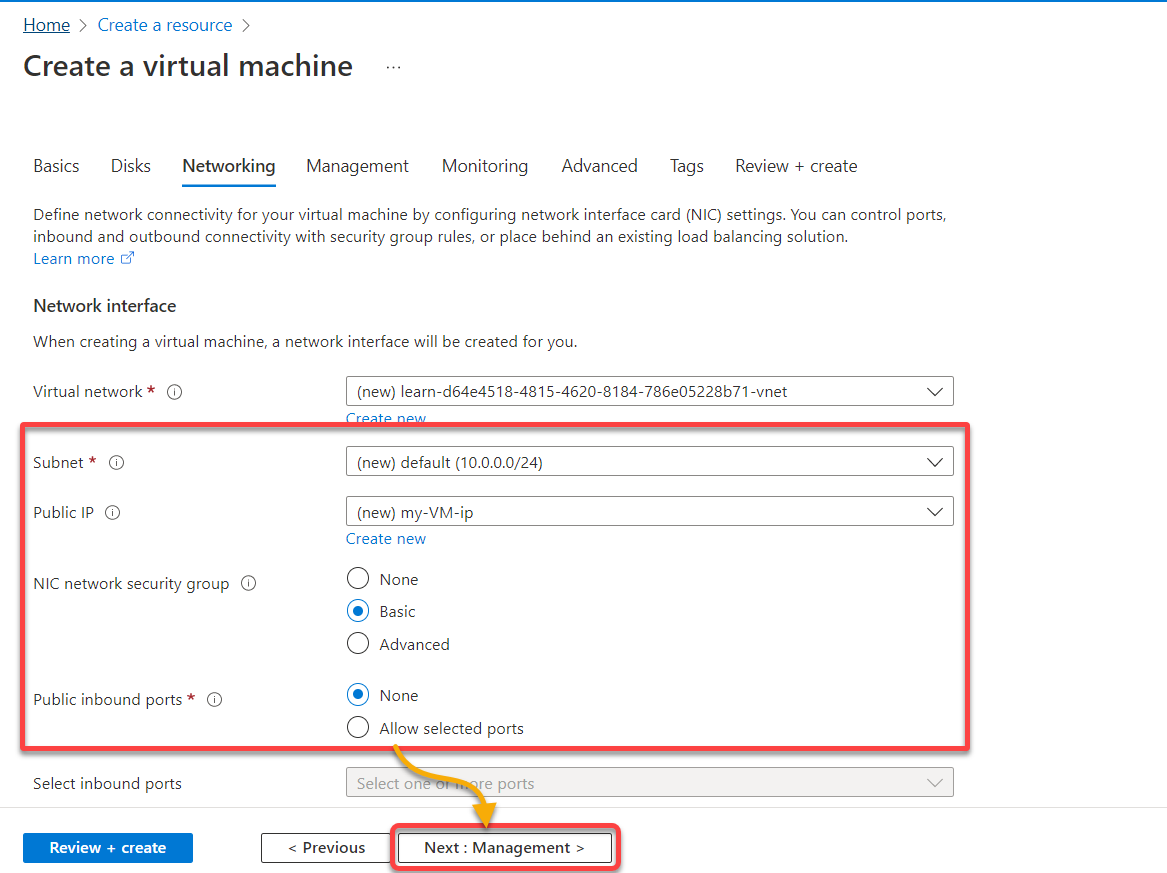
6. Subsequent, specify Community interface particulars with the next:
- Set the Subnets and the Public IP – Public IP handle is used when you want your server to be accessible on the web.
Subnets allow you to divide the digital community into a number of sub-networks. Furthermore, subnets allocate a portion of the digital community’s handle house to every subnet and additional deploy Azure assets in a particular subnet.
- NIC community safety group – Select Primary to specify the rule, comparable to which ports needs to be open to entry the server.
- Public inbound ports – Choose the None possibility, as you don’t want to decide on any port for this tutorial. Public inbound ports are extra granular community entry. This setting defines which ports needs to be open and from which supply or IP handle.
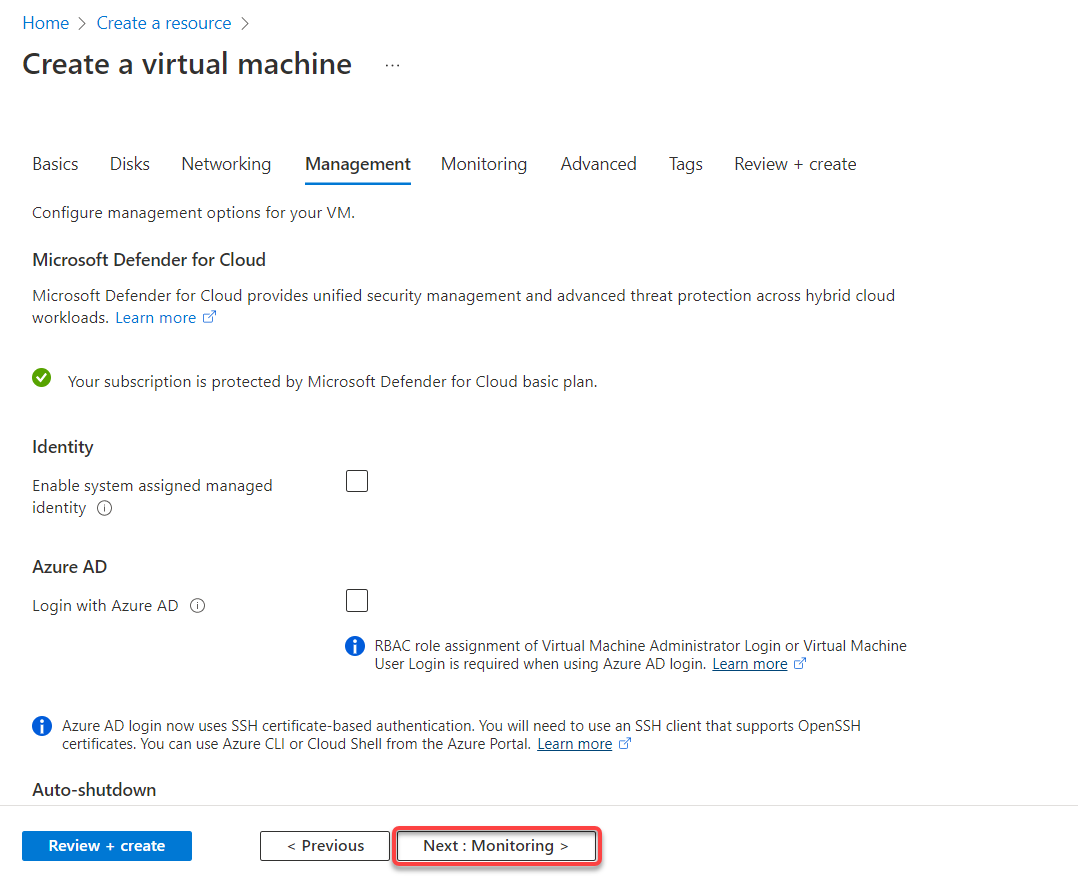
As soon as VM’s community interface is configured, click on Subsequent : Administration >to configure administration choices for the VM.
7. Underneath the Administration tab, click on Subsequent : Monitoring > to skip this step, and proceed to configure the way you want to monitor your VM.
If your organization requires heavy safety of your Azure VMs, combine with Azure Lively Listing (Azure AD) authentication.
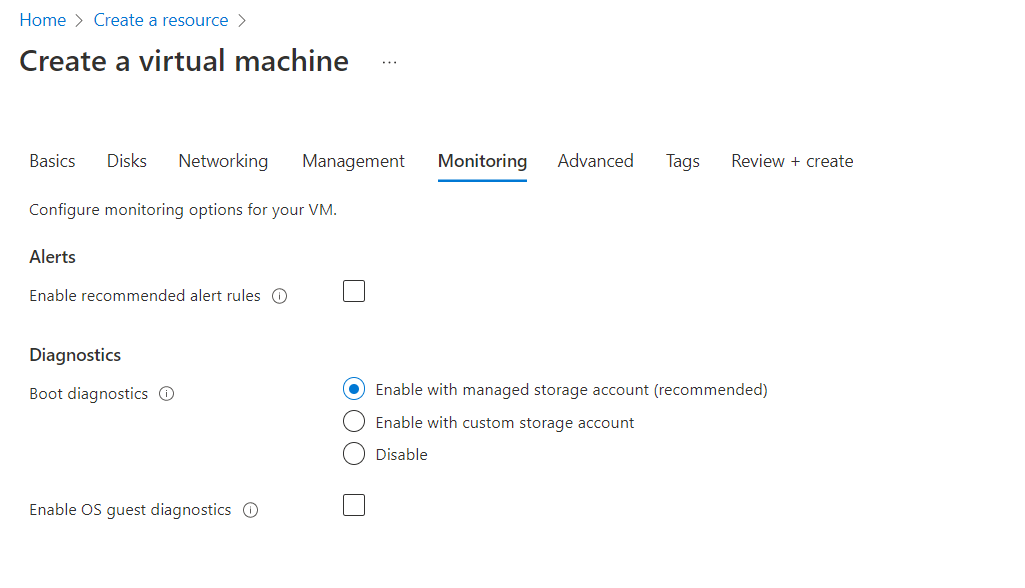
8. Now, select the monitoring particulars on your VM, whether or not it is advisable to diagnose if any reboot occurs or any points on the disk, and click on Subsequent : Superior >.
This tutorial’s selection for Boot diagnostics is the Allow with managed storage account possibility.
9. Click on Subsequent : Tags > to skip altering any superior settings. However if you want, you possibly can add the customized knowledge, generally known as consumer knowledge, within the Customized knowledge and cloud init discipline. Person knowledge is the set of instructions/knowledge you possibly can present to an occasion at launch time.

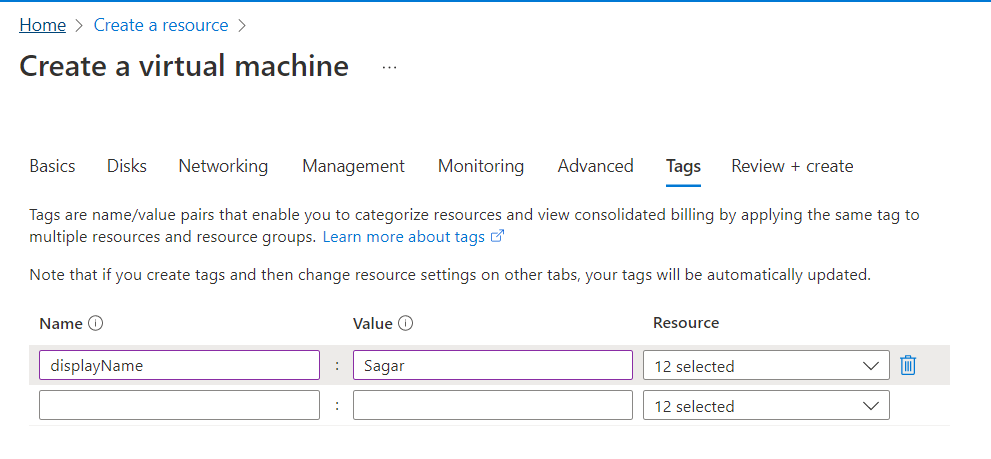
10. Underneath the Tags tab, add tags (metadata components) to use to your Azure assets. Tags are key-value pairs that turn out to be useful for directors in figuring out assets.
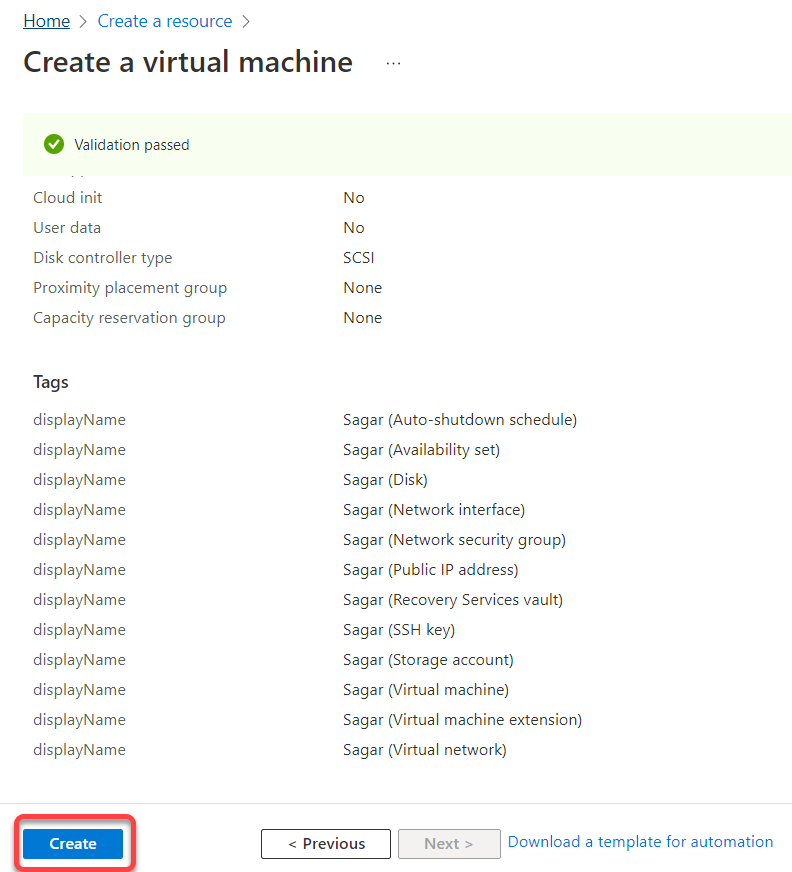
After including tags, click on Subsequent : Evaluation + Create > to validate the settings you chose on your VM.
11. After validation, click on Create (bottom-left) to launch your first VM occasion on Azure cloud.
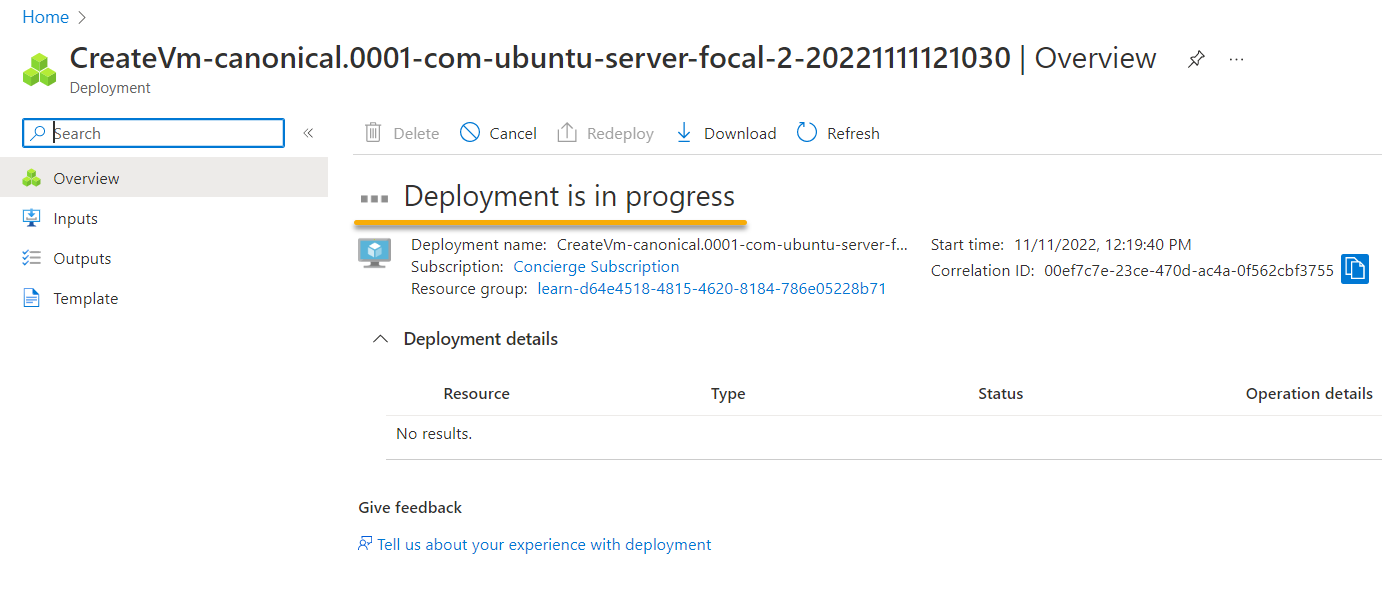
Beneath, you possibly can see the deployment is in progress.
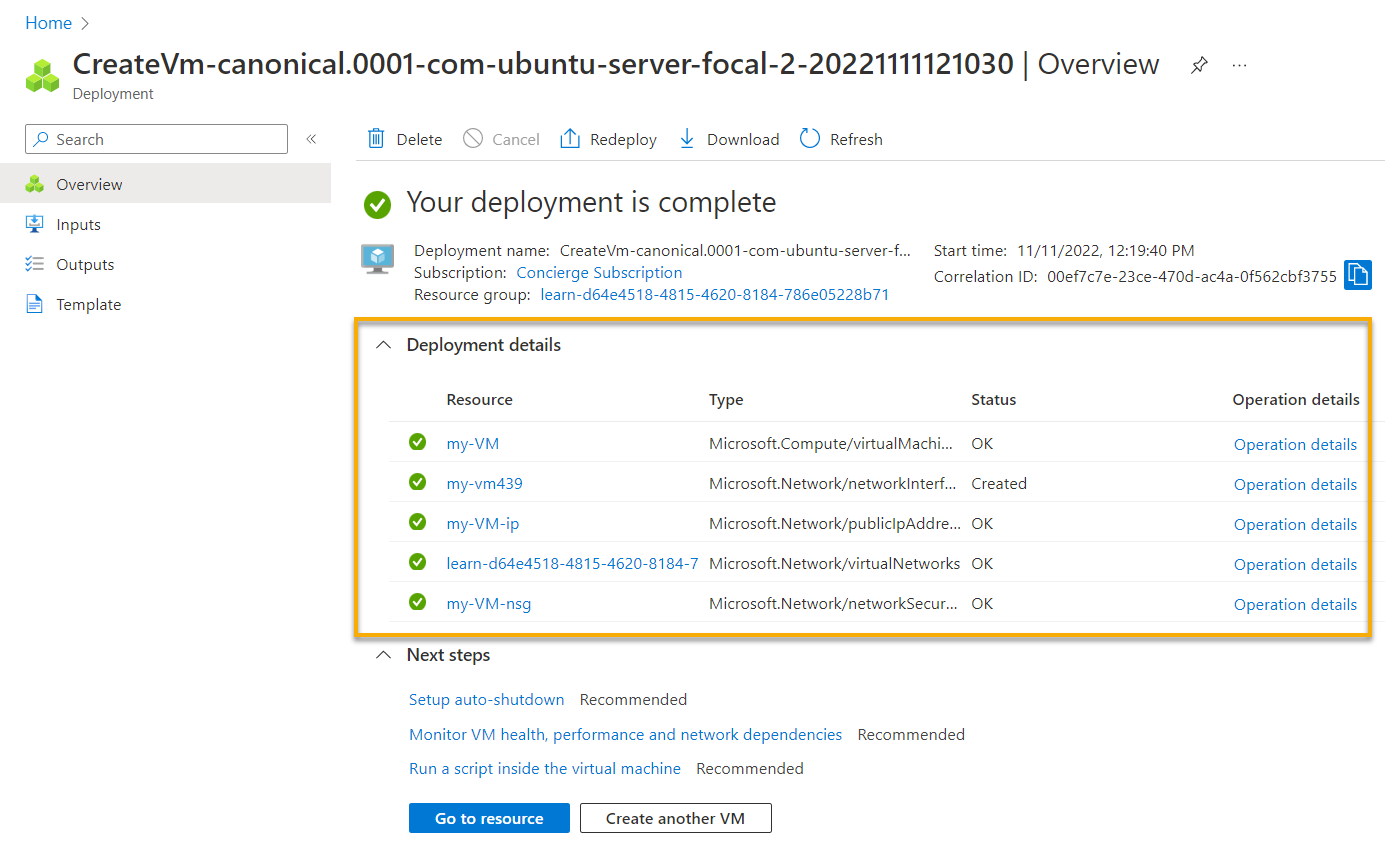
After the deployment completes, you will notice all deployment particulars, comparable to VM title allocation, IP allocation, and so forth.
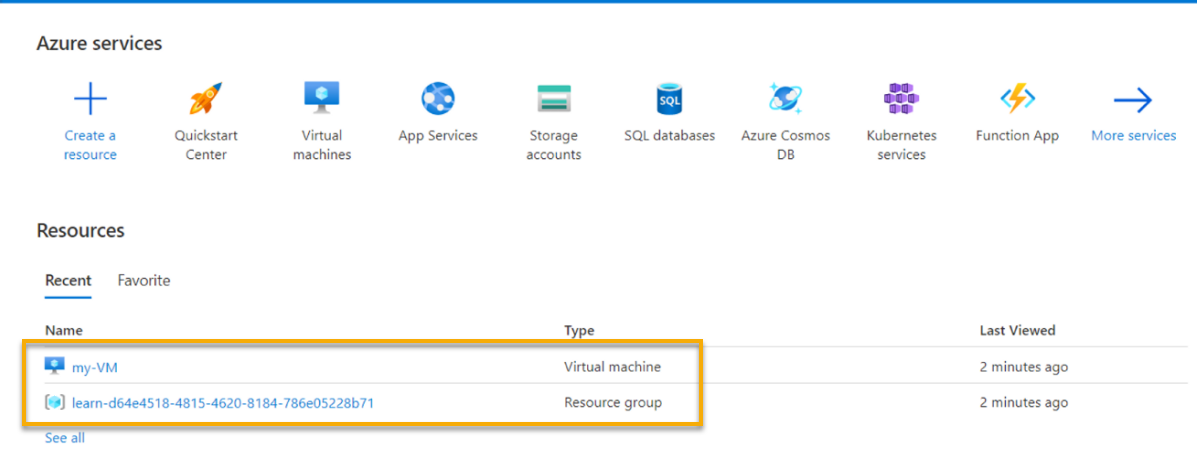
12. Lastly, navigate Azure Portal’s residence web page, and you will notice the brand new VM and useful resource group listed, as proven under.
Conclusion
On this tutorial, you might have found find out how to shortly create an Azure VM in Azure Cloud Shell, with a couple of instructions, and through the Azure Portal.
No matter which methodology you used to arrange your Azure VM, you possibly can run varied purposes in your occasion, comparable to Ansible or Kubernetes. Moreover, you possibly can arrange your Azure occasion as your deployment or monitoring occasion.
With a completely purposeful Azure occasion working, why not check varied software program, comparable to Apache NGINX and Tomcat? Or perhaps use it as an Ansible controller?