

Welcome readers, on this tutorial, we are going to perceive kind dealing with in a React-js utility.
1. Introduction
React is a versatile javascript library liable for constructing reusable UI parts. It’s an open-source component-based frontend library accountable just for the view a part of an utility and works in a digital doc object mannequin. However earlier than that permit us check out the variations between Angular and React –
| Angular | React |
| Full framework | Library |
| Object-oriented programming | Extension to the javascript library and its inside structure relies on jsx |
| Based mostly on the mannequin view controller and actual doc object mannequin | Based mostly on the digital doc object mannequin |
1.1 Establishing dependencies
To play with React allow us to arrange a number of the required dependencies.
1.2.1 Establishing Node.js
To arrange Node.js on home windows you have to to obtain the installer from this hyperlink. Click on on the installer (additionally embrace the NPM package deal supervisor) to your platform and run the installer to begin with the Node.js setup wizard. Observe the wizard steps and click on on End when it’s finished. If all the pieces goes effectively you’ll be able to navigate to the command immediate to confirm if the set up was profitable as proven in Fig. 1.

1.2.2 Establishing React-js challenge
As soon as the Nodejs setup is profitable we are going to use the under command to put in the React library and arrange the challenge. Do word that the npx package deal is on the market with the npm 5.2 model and above.
Create challenge construction
$ npx create-react-app formhandling
The above command will take a while to put in the React library and create a brand new challenge named – formhandling as proven under.

2. Type dealing with in React-js
To arrange the appliance, we might want to navigate to a path the place our challenge will reside and I can be utilizing Visible Studio Code as my most well-liked IDE.
2.1 Establishing the React code
To know a sensible implementation allow us to undergo some hands-on workouts.
2.1.1 Creating Person part
Create a folder named parts within the src folder. Add the next code to the consumer/Person.js file. The file can be accountable to deal with the Person kind enter interactions with the assistance of useState(…) hook and submitting the shape for additional work. The consumer kind additionally caters to the CSS and the file – Person.module.css may be downloaded from the Downloads part.
Person.js
import React, { useState } from "react";
import courses from "./Person.module.css";

const DUMMY_HOBBIES = [
  "swimming",
  "cricket",
  "football",
  "hockey",
  "tennis",
  "squash",
  "golf",
  "archery"
];

const Person = () => {
  // defaults
  const [enteredUsername, setEnteredUsername] = useState("");
  const [enteredAge, setEnteredAge] = useState("");
  const [selectedHobby, setSelectedHobby] = useState("archery");

  // occasion handlers for every kind area
  const usernameChangeHandler = (occasion) => {
    setEnteredUsername(occasion.goal.worth);
  };
  const ageChangeHandler = (occasion) => {
    setEnteredAge(occasion.goal.worth);
  };
  const hobbydropdownhandler = (occasion) => {
    setSelectedHobby(occasion.goal.worth);
  };

  // kind submission
  const submitHandler = (occasion) => {
    occasion.preventDefault();
    // entered particulars consumer object
    const consumer = {
      username: enteredUsername,
      age: enteredAge,
      passion: selectedHobby
    };
    // fixme - take away the alert with correct implementation
    alert(JSON.stringify(consumer));
  };

  return (
    <div className={courses.enter}>
      <kind onSubmit={submitHandler}>
        {/* username enter area */}
        <label htmlFor="username">Username</label>
        <enter
          id="username"
          sort="textual content"
          worth={enteredUsername}
          onChange={usernameChangeHandler}
        ></enter>

        {/* age enter area */}
        <label htmlFor="age">Age (years)</label>
        <enter
          id="age"
          sort="quantity"
          worth={enteredAge}
          onChange={ageChangeHandler}
        ></enter>

        {/* hobbies dropdown */}
        <label htmlFor="hobbies">Hobbies</label>
        <choose
          id="hobbies"
          worth={selectedHobby}
          onChange={hobbydropdownhandler}
        >
          {DUMMY_HOBBIES.map((merchandise, idx) => (
            <choice key={idx} worth={merchandise}>
              {merchandise}
            </choice>
          ))}
        </choose>

        {/* kind submit button */}
        <button sort="Submit">Add consumer</button>
      </kind>
    </div>
  );
};

export default Person;
2.1.2 Creating implementation file
Within the App.js part we are going to embrace the Person part.
App.js
import "./App.css";
import Person from "./parts/consumer/Person";

perform App() {
  return (
    <div className="App">
      <h2>Type dealing with in React</h2>
      <small>Dealing with kind inputs by useState(..) react hook</small>
      <Person></Person>
    </div>
  );
}

export default App;
3. Run the setup
To run the appliance navigate to the challenge listing and enter the next command as proven under within the terminal.
Run command
$ npm run begin
The appliance can be began on the default port. In case the appliance doesn’t get began on the default port you’ll be able to change the port quantity as per your requirement. I’ve modified the default port to 2001.

4. Demo
The appliance can be began within the default browser as proven under and a welcome web page with the shape fields can be proven.
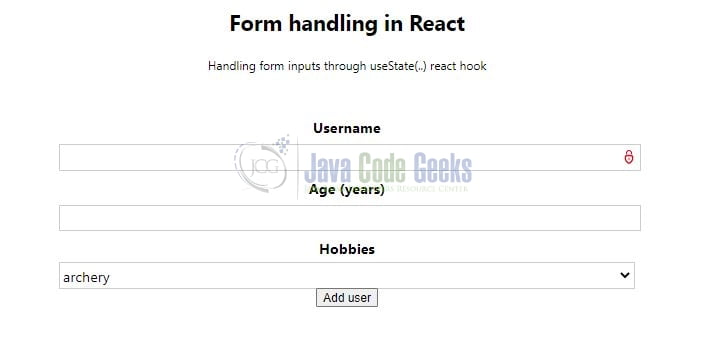
You may fill within the kind fields and click on on the Add consumer button to submit the small print and an alert pop-up can be proven with the outcomes.

That’s all for this tutorial and I hope the article served you with no matter you had been in search of. Joyful Studying and don’t forget to share!
5. Abstract
On this tutorial, we created a React utility and kind dealing with. You may obtain the supply code from the Downloads part.
6. Obtain the Undertaking
This was a tutorial to know kind dealing with in a React utility.