

Able to take the following step in structure design? On this tutorial, I will present you how you can make a booklet in InDesign. For this fashionable design, we’ll use important instruments for organising pages that may assist you to in your future tasks.
Booklets are a type of brochure containing greater than 4 pages and less than 48 pages (the web page rely ought to be divisible by 4). This non-periodical publication is nice for advertising and marketing functions as a result of it permits you or your shopper to indicate what you are promoting intimately.
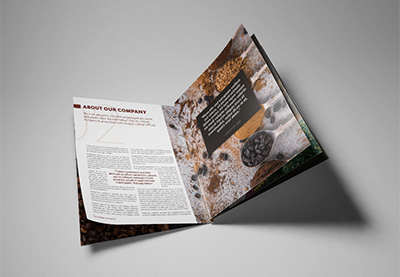
In a rush? We’ve bought wonderful InDesign booklet templates over at Envato Parts, identical to this one:


On this tutorial, I will present you how you can make a booklet in InDesign CS6 and above. You too can preserve this as a four-page doc to create a brochure in InDesign. No matter which you select to do, you may be studying important instruments that may assist develop your structure abilities. We’ll be referring to Grasp Pages, Paragraph Kinds, Shade Swatches, and plenty of different ideas and tips.
When you desire to find out about all of this by following a video tutorial, you are in luck! Watch this new video from the Envato Tuts+ YouTube channel to learn to create a booklet in InDesign CC:
What You may Study in This Booklet Template Adobe InDesign Tutorial
- The right way to create a booklet in InDesign
- The right way to arrange guides and grasp pages in your booklet design
- The right way to create the duvet of your InDesign booklet structure
- The right way to create the within spreads of your booklet template pages
- The right way to export a file for printing
What You may Want
You may want entry to Adobe InDesign; if you do not have the software program, you possibly can obtain a trial from the Adobe web site. You may additionally want the next belongings to create your booklet template for InDesign:
Obtain the belongings and ensure the font is put in in your system earlier than beginning. While you’re prepared, we will dive into this tutorial on making a booklet in InDesign!
1. The right way to Create a Booklet in InDesign
Step 1
In InDesign, go to File > New. Title the doc Booklet. We’ll create a letter dimension InDesign booklet template. Set the file to the next dimensions:
- Width to 8.5 in
- Peak to 11 in
- Orientation to Portrait
- Items to Inches
- Pages to 12
- Test Going through Pages
- Margins: 0.75 in
- Bleeds to 0.125 in (it is best to hunt your skilled printer’s desire)
Click on Create.


Step 2
For this tutorial on making a print booklet template in InDesign, we’ll work with totally different Layers. Organising layers is a vital apply to maintain all the weather within the file organised. Carry up the Layers panel by going to Window > Layers. Double-click on Layer 1 and rename it Copy (Again).
Within the Layers panel important menu, choose New Layer. Title it Background. Click on OK. Create two extra layers named Photographs and Copy (Entrance).


Step 3
Head over to Window > Shade > Swatches to develop the Swatches panel. Select New Shade Swatch button from the primary menu. Set the Swatch Title and values to the next:
- Mild: C=15 M=35 Y=45 Okay=0
- Medium: C=35 M=80 Y=80 Okay=40
- Darkish: C=65 M=70 Y=70 Okay=75
Click on Add and OK after you enter every of the colour values.


Step 4
For this tutorial, we’ll create a listing of Paragraph Kinds that we’ll use to format components of the InDesign structure for our booklet design.
Head over to Window > Kinds > Paragraph Kinds to open the Paragraph Kinds panel. In the primary menu, choose New Paragraph Model, and set the Model Title to Title. Choose the Primary Character Codecs choice from the left facet menu. Use the next settings:
- Font Household: Bw Modelica
- Font Model: Black Condensed
- Dimension: 30 pt
- Monitoring: 25
- Case: All Caps
Choose the Character Shade choice from the left facet menu. Set the colour to the Medium swatch. Click on OK.


Create a New Paragraph Model, setting the Model Title to Deck. Within the Primary Character Codecs choice, use the next settings:
- Font Household: Bw Modelica
- Font Model: Common Condensed
- Dimension: 18 pt
- Monitoring: 25
Choose the Character Shade choice from the left facet menu. Set the colour to the Medium swatch. Click on OK.
Create a New Paragraph Model, setting the Model Title to Copy. Within the Primary Character Codecs choice, use the next settings:
- Font Household: Bw Modelica
- Font Model: Common Condensed
- Dimension: 9 pt
- Main: 12 pt
- Monitoring: 10
Choose the Indents and Spacing choice from the menu on the left and set the House Between Paragraphs Utilizing Similar Model: 0.1 in.
Choose the Character Shade choice from the left facet menu. Set the colour to the Darkish swatch. Click on OK.
Create a New Paragraph Model, and set the Model Title to Pull-quote. Within the Primary Character Codecs choice, use the next settings:
- Font Household: Bw Modelica
- Font Model: Daring Condensed
- Dimension: 20 pt
- Monitoring: 10
Choose the Character Shade choice from the left facet menu. Set the colour to the [Paper] swatch. Click on OK.
Create a New Paragraph Model, setting the Model Title to Folio-Web page quantity. Within the Primary Character Codecs choice, use the next settings:
- Font Household: Bw Modelica
- Font Model: Daring Condensed
- Dimension: 8 pt
- Monitoring: 100
Choose the Character Shade choice from the left facet menu. Set the colour to the Medium swatch. Click on OK.
Create a New Paragraph Model, setting the Model Title to Folio-Part. Within the Primary Character Codecs choice, use the next settings:
- Font Household: Bw Modelica
- Font Model: Harline Condensed
- Dimension: 420 pt
- Monitoring: 10
Choose the Character Shade choice from the left facet menu. Set the colour to the Mild swatch. Click on OK.


2. The right way to Set Up Guides and Grasp Pages for Your Booklet Design
Step 1
On the Pages panel, double-click on the A-Grasp pages. Head over to Format > Create Guides. Within the Create Guides choice window, set the Rows Quantity to 5 and Gutter to 0. Set the Columns Quantity to 8 and the Gutter to 0.1875 in. Beneath Choices, choose Match Guides to: Margins. Click on OK.


Repeat this course of on the other web page of the booklet design.


Step 2
On the Layers panel, choose the Copy (Entrance) layer.
Utilizing the Textual content Software (T) from the toolbar, create a textual content field underneath the underside left nook margin. Proper-click on the textual content field and choose Insert Particular Character > Markers > Present Web page Quantity. A letter “A” will symbolize the web page quantity. On the second line, you possibly can add the title of your booklet.


Choose the textual content and head over to the Paragraph Kinds panel. Format the textual content with the Folio-page quantity model.


Choose the textual content field and press Command-C to Copy and Command-V to Paste. Place this duplicated textual content field on the other web page. Press T to activate the formatting instruments on the Management panel. Choose the paragraph formatting instrument and set the textual content field to Align Proper.


Step 3
On the Layers panel, choose the Background layer. Utilizing the Rectangle Software (M), create a small rectangle with a Width of 0.7 in and Peak of 0.4 in. Utilizing the Swatches panel, set the colour to the Medium swatch.
Place the rectangle on the left margin of the left web page. Duplicate it by urgent Possibility and drag. Place the newly duplicated aspect on the fitting margin of the fitting web page. It is a nice anchor for the title within the InDesign structure of your booklet.


Step 4
Head over to the Pages panel, right-click on A-Grasp and choose Apply Grasp to Pages. Beneath To Pages, kind 2-11. Click on OK. These are the pages the A-Grasp web page shall be utilized to.


3. The right way to Create the Cowl of Your InDesign Booklet Format
Step 1
On the Layers panel, click on on the Background layer.
Head over to Web page 1. Utilizing the Rectangle Software (M), create a form on the highest portion of the duvet of your print booklet template for InDesign.
Whereas choosing the rectangle, press Command-D to Place the Shut up of espresso seeds picture. Choose the picture with the Direct Choice Software (A) and resize the picture on the Management bar to 20%.


Create one other rectangle of the identical dimension as above. Head over to the Swatches panel, choose the Darkish swatch, and set the Tint to 60%.


Step 2
Create a rectangle for the underside portion of the duvet with the Rectangle Software (M). Utilizing the Swatches panel, set the colour to the Darkish swatch.


Utilizing the Line Software (), create a line that goes throughout the width of the web page. On the Swatches panel, set the stroke shade to the Mild shade swatch. On the Management panel, set the Stroke Weight to 5 pt.
Place the road between the picture and the underside of the duvet.


Step 3
On the Layers panel, lock all of the layers and go away Copy (Entrance) unlocked.
Utilizing the Textual content Software (T), add a title and a deck to the booklet and place it within the high left nook of the web page.
Open the Character panel (Window > Kind & Tables > Character). For the title, set the Font to Bw Modelica Daring Condensed, Dimension 55 pt, and Main 50 pt.
For the deck, set the Font to Bw Modelica Mild Condensed and Dimension 18 pt.


Step 4
Utilizing the Textual content Software (T), add a textual content field to suit the width of the web page and place it over the underside margin. Whereas choosing the textual content field, press Command-B to open the Textual content Body Choices window. Beneath Columns, set the Quantity to 3. Click on OK.


Add contact data to the textual content body. On the Character panel, set the font to Bw Modelica Mild Condensed and Dimension 9 pt.


4. The right way to Create the Inside Spreads of Your Booklet Template Pages
Step 1
Let’s work on Pages 2-3 of the booklet. On the Layers panel, unlock the Photographs layer.
Head over to Web page 2 and utilizing the Rectangle Software (M), create a rectangle that measures 10 in in Width and 11.25 in in Peak. This aspect will go over the gutter of the web page.
Choose the rectangle and press Command-D to put the Espresso cup with roasted beans picture inside it. Utilizing the Direct Choice Software (A), transfer the picture to discover a good placement.


To make the web page quantity seen, we have to change the colour. Press Shift-Command and click on on the web page quantity to unlock it from the Grasp Web page. Utilizing the Swatches panel, change the colour of the kind to [Paper].
Lock the textual content body by urgent Command-L.


Step 2
On Web page 3, add a textual content field utilizing the Textual content Software (T). Place the textual content field on the very high of the web page, and add a title and a deck. Utilizing the Paragraph Kinds panel, format the title and the deck with their corresponding kinds.


Create a textual content field utilizing the Textual content Software (T) for the underside portion of the web page—this may home the physique copy. This textual content field ought to take the remaining width of the web page. Whereas choosing it, press Command-B to open the Textual content Body Choices window. Beneath Columns, set the Quantity to 2 and the Gutter to 0.1667 in. Click on OK.


Add content material and use the Paragraph Kinds panel to format it to the Copy model.


On the Layers panel, choose the Copy (Again) layer (lock all the opposite layers if crucial). Utilizing the Textual content Software (T), draw a textual content field and add the part quantity. Utilizing the Paragraph Kinds panel, format the textual content field to the Folio-Part model. Place the part quantity wherever on the web page—I selected to show it close to the title and deck.
Now we will use this unfold as a base for the remainder of the within pages.


Step 3
For Pages 4-5 of your print booklet in InDesign, we’ll create a mirrored structure of what we created on Pages 2-3.
Choose all the weather on Pages 2-3, and press Command-C to Copy. Head over to Pages 4-5 and press Shift-Possibility-Command-V to Paste in Place.
The weather shall be pasted onto one layer, but it surely’s finest to maneuver the weather to their respective layers. You are able to do so by choosing a component on the web page, heading over to the Layers panel, and dragging the sq. on the fitting to a different layer.


Utilizing the Choice Software (V), transfer the picture to the fitting. Choose all the weather on the fitting facet of the web page and transfer them in direction of the left facet.


Let’s begin enhancing by altering up the picture. Choose the picture and press Command-D to Place the All types of espresso on spoons picture. Utilizing the Direct Choice Software (A), choose the picture adopted by R to Rotate the picture.
So as to add a pull-quote to the booklet template in InDesign, create a textual content field utilizing the Textual content Software (T). Whereas choosing the textual content field, press Command-B to open the Textual content Body Choices window. On the window, set the Inset Spacing to 0.375 in on all sides. Click on OK.
Utilizing the Paragraph Kinds panel, format the textual content field with the Pull-quote model. For the quote credit score, open the Character panel. Set the Font to Bw Modelica Mild Condensed and Dimension 14 pt.


Use the Textual content Software (T) so as to add your personal copy on Web page 4.
So as to add a pull-quote on the physique copy, create a textual content field with the Textual content Software (T). Format the textual content field on the Character panel, setting the Font to Bw Modelica Daring Condensed, Dimension 14 pt.
On the Swatches panel, set the colour to Medium.
On the Textual content Wrap panel (Window > Textual content Wrap), choose the Wrap round bounding field. Set all of the Offset sides to 0.125 in.


Step 4
For Pages 6-7, we’ll create a resting unfold to our InDesign booklet template. This may give the reader a visible break.
Press Shift-Command, choose each of the rectangles on either side on the high of the web page, and press Delete.
On the Layers panel, choose the Background layer. Utilizing the Rectangle Software (M), cowl the unfold with a rectangle. Use the Swatches panel to set the colour to the Darkish swatch. Lock the Background layer on the Layers panel and choose the Photographs layer.


Press Command-D so as to add the Skilled barista making espresso and Scorching drink heat up photographs. Be at liberty to rearrange them as you would like—right here I positioned each on reverse sides of the unfold.


Copy the pull-quote from Web page 5 by urgent Command-C. Paste the aspect by urgent Command-V on Pages 6-7. Use the Textual content Software (T) to edit the quotes.


Step 5
Pages 8-9 can have a special structure than the remainder of the booklet. This interview model unfold is an efficient visible distinction to the remainder of the structure.
Press Shift-Command, choose the rectangle on Web page 9, and press Delete.
Utilizing the Rectangle Software (M), cowl the unfold with a rectangle and ensure that is on the Background layer. Use the Swatches panel to set the colour to the Darkish swatch. Lock the layer and choose the Photographs layer.


Copy (Command-V) and Paste in Place (Shift-Possibility-Command-V) the title textual content field from Web page 4 onto Web page 8. Use the Textual content Software (T) to edit the textual content. Utilizing the Swatches panel, change the colour of the textual content to the Mild swatch.


Create a textual content field utilizing the Textual content Software (T). Head over to the Management bar, and set the Width to 2.9 in and the Peak to 5.7 in.
Utilizing the Textual content Software (T), add copy, and use the Paragraph Kinds to format the textual content to the Copy model. Choose the textual content and alter the colour on the Swatches panel to Mild.
Choose three phrases from the start of the textual content field, and head over to the Character panel. Set the Font to Bw Modelica Black Condensed. It is a nice approach to let the reader know the place every interview begins.


Choose the Ellipse Software (L), and click on on the doc to open the Ellipse choice window. Set the Width and Peak to 1 in. Click on OK. Place the ellipse over the textual content body and use the Align panel to Heart each parts.
Utilizing the Textual content Software (T), create a small textual content body underneath the ellipse. This may function the title/title textual content. Use the Paragraph Kinds to format the textual content to the Copy model. With the assistance of the Swatches panel and the Character panel, create your personal mixture of kinds.


Duplicate the textual content body and circle thrice by urgent Shift-Possibility and dragging. Repeat these parts on the other web page.
Choose every circle and press Command-D to Place the next photographs: An individual holding an indication, Portrait of fairly younger waitress, Barista cafe, and Enticing enterprise proprietor. Utilizing the Direct Choice Software (A), choose every picture throughout the ellipse to maneuver and resize.


Step 6
For Pages 10-11, we’ll return to the preliminary structure.
Copy (Command-C) and Paste in Place (Shift-Possibility-Command-V) the title, deck, part quantity and replica from Web page 4 onto Web page 10. Use the Textual content Software (T) to edit the copy.


To create a replica that extends to the following web page, we’ll use the threading choice. Duplicate the textual content body onto Web page 11 by urgent Shift-Possibility and dragging. Delete the textual content within the new textual content field.


Choose the textual content field on Web page 10. When you’ve got overflowing textual content, you may see a pink plus image on the underside proper. When you don’t have any overflowing textual content, you’ll see an empty blue field. Click on on the pink plus image or blue field, adopted by a click on on the empty textual content field on Web page 11. This may will let you proceed the textual content on the following web page or wherever you are threading the textual content field.


Press Command-D to put the Espresso picture. Place the picture within the backside left nook of Web page 10, and ensure it is bleeding out of the web page. Head over to the Textual content Wrap panel (Window > Textual content Wrap) and choose the Wrap round bounding field button.


Press Command-D to put the Barista at work picture. This time, place the picture within the high proper nook of Web page 11. Make sure that it is bleeding out of the web page and overlaying the primary inside column of Web page 10. Head over to the Textual content Wrap panel and choose the Wrap round bounding field button. Set the Offset to 0.125 in—this may assist with the textual content body beneath.


Step 7
Utilizing the Rectangle Software (M), cowl the again web page. Whereas choosing the rectangle, press Command-D to Place the Espresso beans picture.
Create one other rectangle of the identical dimension as above. Head over to the Swatches panel, choose the Darkish swatch and set the Tint to 60%.
Copy (Command-C) and Paste (Command-V) the contact data from the entrance cowl.


5. The right way to Export a File for Printing
Earlier than exporting a file for printing, it is helpful to have a look round all the sides of the design. That is to verify all the photographs and vectors bleeding out are touching the bleeds.
Step 1
To export the file, go to File > Export. Title the file Booklet and select Adobe PDF (Print) from the Format dropdown menu. Click on Save.


Step 2
Within the Export Adobe PDF window, set the Adobe PDF Preset to Press High quality. Beneath Pages, choose Export As Pages.


On the left facet of the panel, choose Marks and Bleeds. Test All Printer’s Marks and Use Doc Bleed Settings. Click on Export. You may have a ready-to-print PDF file.


Nice Job! You’ve Completed Your Booklet Template Pages!
On this tutorial, we realized how you can make a booklet in InDesign CS6 and above. We lined essential instruments that may assist you to arrange a multi-page InDesign template. When you lowered the web page rely, you should utilize this as an InDesign brochure template. In the present day, we realized to:
- create a ready-to-print InDesign file
- arrange Grasp Pages with folios
- organise Paragraph Kinds to format textual content
- add Shade Swatches
- format textual content containers into columns
- use the Textual content Wrap instrument on photographs and textual content
When you’re new to InDesign and wish booklet templates instantly, head over to Envato Parts. We’ve bought many choices to discover!


Prime InDesign Booklet Templates From Envato Parts
Booklet making in InDesign is a beneficial talent to have. It can be a time-consuming talent to place into apply. If that you must create a handout shortly, you may need to use print booklet InDesign templates from Envato Parts.
There are a couple of thousand print booklet InDesign templates to select from, however we’ll take a look at 5 right here:
1. Sq. Booklet (INDD, IDML, AI, EPS, PSD)


This sq. booklet design is a high choice in your subsequent venture. It helps you to showcase your photographs throughout 14 distinctive pages. This InDesign booklet template can be used for every type of companies. Booklet making shall be simpler and fewer time-consuming!
2. Damelan Case Examine Booklet (INDD)


Trying to spotlight some case research? There are few booklet templates for InDesign that may deal with them like Damelan. It options skilled layouts that draw consideration to your written and visible content material.
Making a booklet in InDesign does not must take without end with this feature! There are 36 pages on this print booklet InDesign template, however you possibly can all the time add or take away some.
3. Furnishings and Family Lookbook Gallery Booklet (INDD, IDML, PNG)


If you wish to promote furnishings, you may have to have a surprising lookbook. This InDesign booklet template has a up to date model that may maintain up for years to come back.
There are two sizes included right here, so you possibly can choose the one that matches your content material finest. Trendy and minimal, it is the best booklet template for Adobe InDesign in your subsequent booklet.
4. Inexperienced Way of life Brochure (INDD)


Inexperienced Way of life blends a chic model and helpful options right into a booklet template for InDesign. This booklet template for Adobe InDesign is available in US Letter dimension and makes nice use of white house for higher readability. You may additionally be capable of use options like:
- automated web page numbering
- separated and arranged layers
- grasp pages for enhancing
Select this feature should you want a flexible booklet design for vogue, enterprise, or artwork.
5. Well being Insurance coverage Brochure Vol.2 (INDD, PDF)


Let’s wrap up our checklist with this InDesign print booklet that is panorama. It has a health-oriented theme, however you possibly can customise it to suit your wants. There are 16 customized pages included on this print booklet InDesign template, in addition to placeholders in your images.
Begin Making a Booklet in InDesign In the present day
When you’re on the lookout for particular tutorials on how you can make a brochure in InDesign, we’ve bought loads of these! Our Envato Tuts+ instructors have put collectively many helpful tutorials and guides that can assist you be taught, together with this free InDesign course for newcomers:
When you favored this tutorial on making a booklet in InDesign, you would possibly like these:
Editorial Notice: This put up has been up to date with contributions from Maria Villanueva. Maria is the Affiliate Editor of the Tuts+ Design channel.