

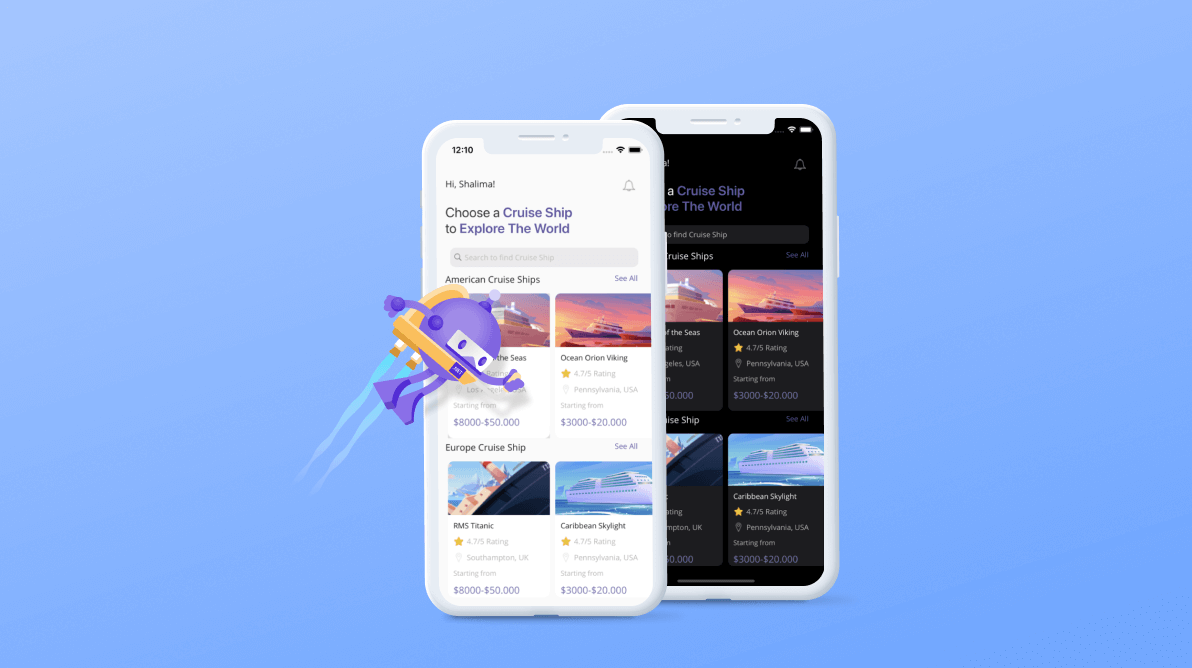
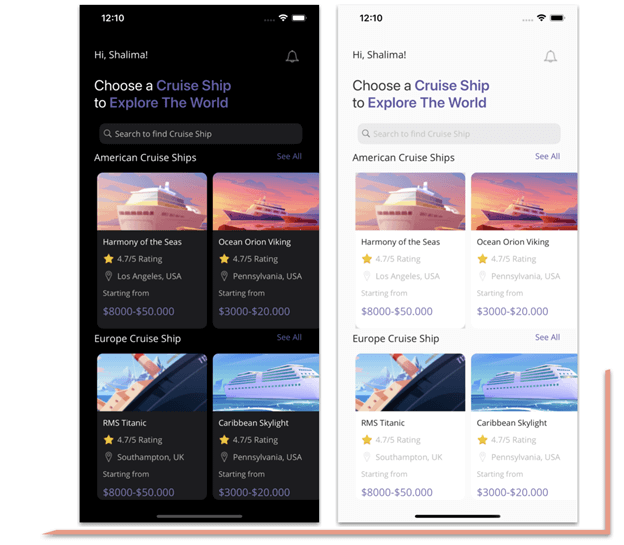
Howdy! On this weblog, we’ll replicate a cruise journey utility UI in .NET MAUI. It’s a design created by Ilham Maulana that they shared on Dribbble.
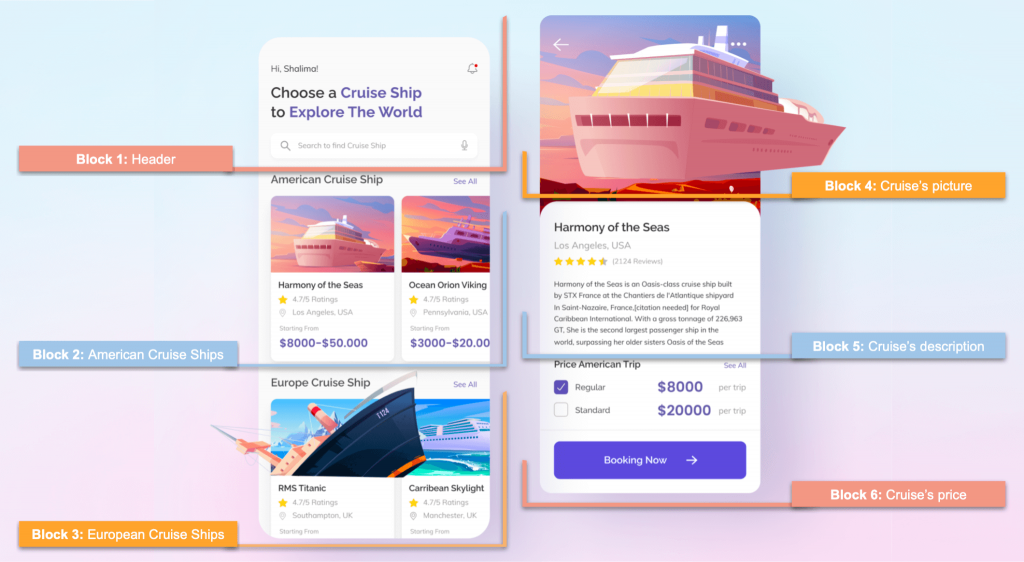
Let’s begin designing the UI by dividing it into the next block construction.
Abilities that you simply’ll develop
Along with strengthening your XAML abilities, you’ll study to implement the next .NET MAUI options on this article:

Simply construct cross-platform cell and desktop apps with the versatile and feature-rich controls of the Syncfusion .NET MAUI platform.
Discover Now
- Look modes: Handle the looks of visible parts based mostly in your UI design for each gentle and darkish modes.
- Labels:
- Deal with totally different kinds on the identical label.
- Add line breaks within the Textual content property.
- Overlapping visible parts:
- Implement the overlay impact on visible parts based mostly in your UI design.
- Exploration controls: Use the Syncfusion .NET MAUI ListView management to current lists of knowledge vertically or horizontally with totally different layouts.
Normal settings for the venture
Web page creation
Right here, we’re going to design two totally different pages. So, I like to recommend making a Views folder and, inside it creating the next pages:
- CruisePage.xaml: We’ll add the checklist of all of the ships out there within the app to this web page.
- CruiseDetailsPage.xaml: We’ll add the main points a couple of particular cruise to this web page.
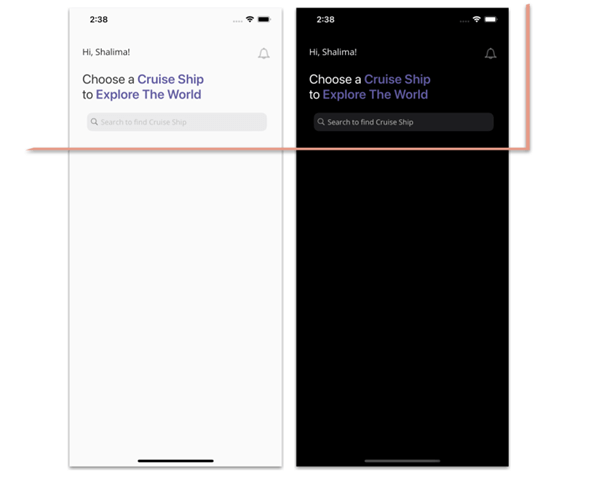
Look mode
Earlier than you start, be aware the next level concerning the habits of the looks modes: It’s not obligatory so as to add colours to your UI to adapt to the totally different look modes if a visible component doesn’t have a particular worth assigned in a property that receives a colour. The visible component will take the default values for the looks mode wherein the machine is configured (i.e. gentle or darkish).
Let’s perceive this higher with a use case!
Think about that should you don’t add the BackgroundColor property to your web page and your machine is ready to darkish mode, then your web page’s background colour can be black.
In case your machine is in gentle mode, your app will take the white background colour. If you wish to use a special colour, then it’s best to add the BackgroundColor property with the specified worth.
Conserving this data in thoughts, for the reason that CruisePage could have a special BackgroundColor for gentle mode, we now have so as to add the next line of code within the ContentPage tags:
BackgroundColor="{AppThemeBinding Gentle=#efefef,Darkish=Black}"
Step 1: Header
Each property of the Syncfusion .NET MAUI controls is totally documented to make it simple to get began.
Learn Now
Foremost structure
Let’s begin constructing the CruisePage.xaml web page. First, add the primary structure that may comprise all of the content material from blocks one via three.
Consult with the next code instance.
<ScrollView Margin="0,0,0,-30" VerticalScrollBarVisibility="By no means">
  <Grid ColumnDefinitions="*,Auto" RowDefinitions="Auto,Auto,Auto,Auto,Auto,Auto,Auto" Padding="25,30,0,0">
   <!-- Add all the knowledge corresponding to dam 1 -- >
   <!-- Add all the knowledge corresponding to dam 2 -- >
   <!-- Add all the knowledge corresponding to dam 3 -- >
  </Grid>
</ScrollView>
We have now added the whole lot inside a ScrollView to make the web page content material scrollable. Moreover, we added a Grid with two columns and 7 rows to prepare all of the web page parts.
Header parts
The header consists of the next 4 parts:
- Greetings
- Bell icon
- Foremost title
- Search bar
Let’s design them!
Syncfusion’s .NET MAUI controls suite is the professional’s selection for constructing trendy cell apps.
Discover Now
Greetings and a bell icon
Consult with the next code instance to render the greetings and bell icon.
<!-- Greetings and bell icon-->
   <Label Grid.Column="0" Grid.Row="0" Textual content="Hello, Shalima!" FontSize="17"/>
   <Picture Grid.Column="1" Grid.Row="0" Supply="bell" HeightRequest="30" WidthRequest="30" Margin="0,0,20,0"/>
<!-- Add right here all the knowledge defined within the subsequent code block -- >
Foremost title
Right here, we’re going to use the FormattedString, that enables us so as to add totally different kinds to the identical Label. You possibly can see our UI title (Select a Cruise Ship to Discover the World) has purple textual content in daring and likewise black textual content with out daring formatting.
We may also add line breaks utilizing the string that you may see in some textual content properties.
The AppThemeBinding markup extension helps us adapt to the visible traits for each gentle and darkish modes. On this case, we’ll use it to vary the textual content colour relying on the configured look mode.
Notice: For extra particulars, confer with the reply to system theme adjustments documentation web page.
<!-- Foremost title-->
<Label Grid.Column="0" Grid.Row="1" Grid.ColumnSpan="2" FontSize="25" Margin="0,20">
<Label.FormattedText>
<FormattedString>
<Span Textual content="Select a " TextColor="{ AppThemeBinding Gentle=#383838, Darkish=White}"/>
<Span Textual content="Cruise Ship " TextColor="#625ba5" FontAttributes="Daring" />
<Span Textual content="to " TextColor="{ AppThemeBinding Gentle=#383838, Darkish=White}"/>
<Span Textual content="Discover The World" TextColor="#625ba5" FontAttributes="Daring" />
</FormattedString>
</Label.FormattedText>
</Label>
<!-- Add right here all the knowledge defined within the subsequent code block -- >
Search bar
The search bar has small grey borders by default which we don’t want for this UI. So, let’s outline the borders and adverse padding as proven within the following code instance to take away them.
<!—Search bar-->
<Border Grid.Column="0" Grid.Row="2" Grid.ColumnSpan="2" Stroke="Clear" Padding="0,-20,0,0">
    <SearchBar Placeholder="Search to discover a cruise ship" BackgroundColor="{ AppThemeBinding Gentle=#fafafa, Darkish=Clear}" PlaceholderColor="Silver" Margin="0,10,20,0"/>
</Border>
<!-- Add right here all the knowledge defined within the subsequent code block -- >
Step 2: American ships
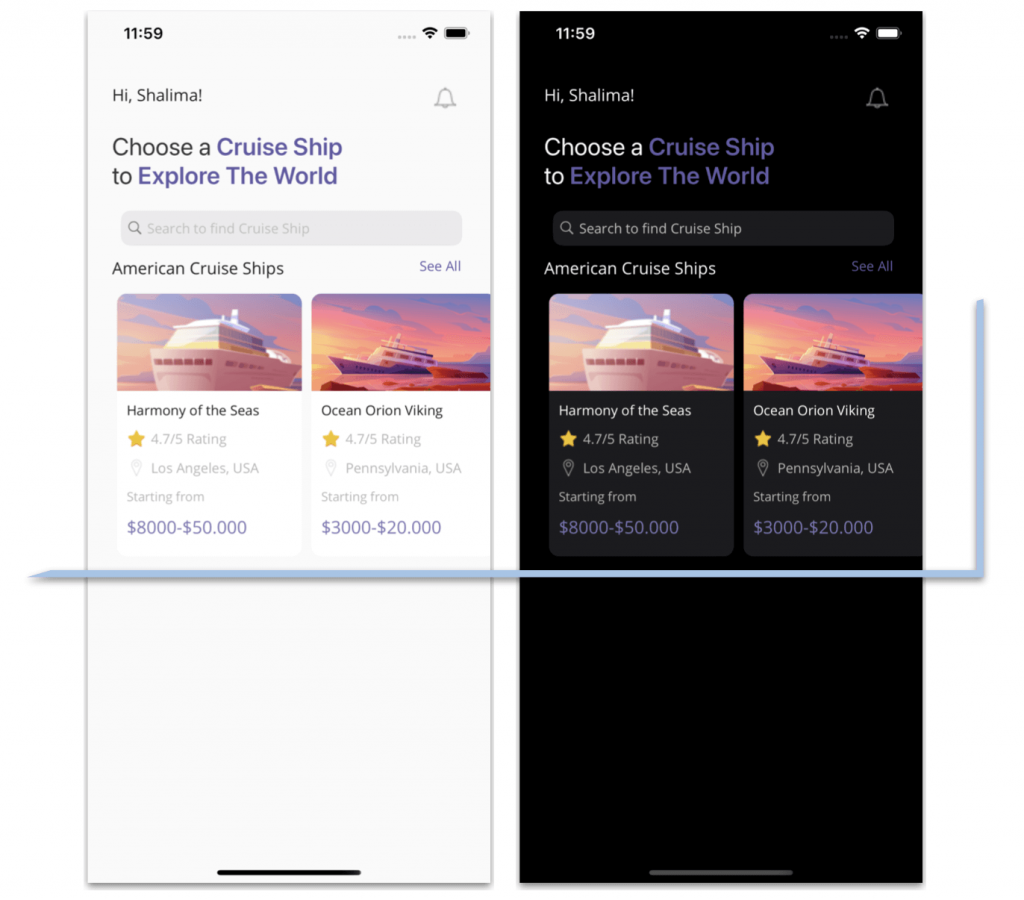
To design the checklist of American Cruise Ships, first, add the labels that comprise the ship descriptions. Then, to render the checklist, let’s use the Syncfusion .NET MAUI ListView management by following these steps:
Notice: Earlier than beginning, please confer with the .NET MAUI ListView getting began information.
- Add the Syncfusion.Maui.ListView NuGet package deal.

- Go to the MauiProgram.cs file and register the handler for the Syncfusion .NET MAUI ListView. To do that, navigate to the CreateMauiApp methodology after which simply earlier than the road return builder.Construct();, add the builder.ConfigureSyncfusionListView(); methodology.
- Then, add the Syncfusion.Maui.ListView namespace in your XAML file.
xmlns:syncfusion="clr-namespace:Syncfusion.Maui.ListView;meeting=Syncfusion.Maui.ListView"
- Now, add the next code to your XAML web page.
<!-- American Cruise Ship Descriptions-->
<Label Grid.Column="0" Grid.Row="3" Textual content="American Cruise Ships" FontSize="17" />
<Label Grid.Column="1" Grid.Row="3" Textual content="See All" Padding="0,0,30,0" TextColor="#625ba5" HorizontalTextAlignment="Finish"/>
<!--American Cruise Ship Checklist-->
<syncfusion:SfListView Grid.Column="0" Grid.Row="4" Grid.ColumnSpan="2" Margin="0,10,0,0"
                           ItemsSource="{Binding Cruise}"
                           ItemSize="190" ItemSpacing="5"
                           ScrollBarVisibility="By no means"
                           HeightRequest="280"
                           HorizontalOptions="Begin"
                           Orientation="Horizontal">
     <syncfusion:SfListView.ItemTemplate>
      <DataTemplate>
       <Body CornerRadius="10" BorderColor="Clear" Padding="10,0,0,0" IsClippedToBounds="True" HorizontalOptions="Begin" BackgroundColor="{ AppThemeBinding Gentle=White, Darkish=#1c1c1f}">
        <Grid RowDefinitions="Auto,Auto,Auto,Auto,Auto,Auto" Grid.ColumnDefinitions="Auto,*" RowSpacing="10">
         <!-- Foremost picture-->
          <Picture Grid.Column="0" Margin="-10,0" Grid.Row="0" Grid.ColumnSpan="2" Supply="{Binding Image}" WidthRequest="200" Facet="AspectFill" HeightRequest="100"/>
         <!-- Cruise's name-->
          <Label Grid.Column="0" Grid.Row="1" Grid.ColumnSpan="2" Textual content="{Binding Identify}" FontAttributes="Daring"/>
         <!-- Score-->
          <Picture Grid.Column="0" Grid.Row="2" Supply="star" HeightRequest="20" WidthRequest="20" />
          <Label Grid.Column="1" Grid.Row="2" Textual content="{Binding Charge}" Padding="5,0,0,0" TextColor="#B9B9B4"/>
         <!-- Location-->
          <Picture Grid.Column="0" Grid.Row="3" Supply="location" HeightRequest="20" WidthRequest="20" Facet="AspectFill"/>
          <Label Grid.Column="1" Grid.Row="3" Textual content="{Binding Location}" Padding="5,0,0,0" TextColor="#B9B9B4"/>
         <!-- Beginning From -->
          <Label Grid.Column="0" Grid.Row="4" Grid.ColumnSpan="2" Textual content="Ranging from" FontSize="13" TextColor="#B9B9B4"/>
          <Label Grid.Column="0" Grid.Row="5" Grid.ColumnSpan="2" Textual content="{Binding StartingFrom}" FontSize="18" FontAttributes="Daring" TextColor="#7c77b4"/>
        </Grid>
       </Body>
     </DataTemplate>
  </syncfusion:SfListView.ItemTemplate>
</syncfusion:SfListView>
<!-- Add right here all the knowledge defined within the subsequent code block -- >
Syncfusion .NET MAUI controls are well-documented, which helps to shortly get began and migrate your Xamarin apps.
Learn Now
Step 3: European Ships
To design the checklist of European cruise ships, we’re going to use the identical visible parts and steps used within the earlier block.
Consult with the next code instance.
<!-- European Cruise Ship Descriptions-->
 <Label Grid.Column="0" Grid.Row="5" Textual content="Europe Cruise Ship" FontSize="17"/>
 <Label Grid.Column="1" Grid.Row="5" Textual content="See All" Padding="0,0,30,0" TextColor="#625ba5" HorizontalTextAlignment="Finish"/>

<!--European Cruise Ship Checklist-->
<syncfusion:SfListView Grid.Column="0" Grid.Row="6" Grid.ColumnSpan="2" Margin="0,10,0,0"
                        ItemsSource="{Binding EuropeCruise}"
                        ItemSize="190" ItemSpacing="5"
                        ScrollBarVisibility="By no means"
                        HeightRequest="280"
                        HorizontalOptions="Begin"
                        Orientation="Horizontal">
  <syncfusion:SfListView.ItemTemplate>
   <DataTemplate>
    <Body CornerRadius="10" BorderColor="Clear" Padding="10,0,0,0" IsClippedToBounds="True" HorizontalOptions="Begin" BackgroundColor="{ AppThemeBinding Gentle=White, Darkish=#1c1c1f}">
     <Grid RowDefinitions="Auto,Auto,Auto,Auto,Auto,Auto" Grid.ColumnDefinitions="Auto,*" RowSpacing="10">
      <!-- Foremost picture-->
       <Picture Grid.Column="0" Margin="-10,0" Grid.Row="0" Grid.ColumnSpan="2" Supply="{Binding Image}" Facet="AspectFill" HeightRequest="100" WidthRequest="200"/>
      <!-- Cruise's name-->
       <Label Grid.Column="0" Grid.Row="1" Grid.ColumnSpan="2" Textual content="{Binding Identify}" FontAttributes="Daring"/>
      <!-- Score-->
       <Picture Grid.Column="0" Grid.Row="2" Supply="star" HeightRequest="20" WidthRequest="20" />
       <Label Grid.Column="1" Grid.Row="2" Textual content="{Binding Charge}" Padding="5,0,0,0" TextColor="#B9B9B4"/>
      <!-- Location-->
       <Picture Grid.Column="0" Grid.Row="3" Supply="location" HeightRequest="20" WidthRequest="20" Facet="AspectFill"/>
       <Label Grid.Column="1" Grid.Row="3" Textual content="{Binding Location}" Padding="5,0,0,0" TextColor="#B9B9B4"/>
      <!-- Beginning From -->
       <Label Grid.Column="0" Grid.Row="4" Grid.ColumnSpan="2" Textual content="Ranging from" FontSize="13" TextColor="#B9B9B4"/>
       <Label Grid.Column="0" Grid.Row="5" Grid.ColumnSpan="2" Textual content="{Binding StartingFrom}" FontSize="18" FontAttributes="Daring" TextColor="#7c77b4"/>

     </Grid>
    </Body>
   </DataTemplate>
  </syncfusion:SfListView.ItemTemplate>
</syncfusion:SfListView>
Step 4: Cruise’s image
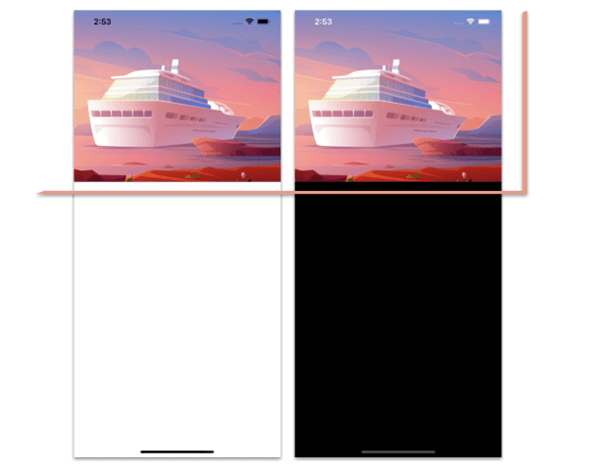
On this block, we’ll design the second web page, the CruiseDetailsPage.xaml web page, to show the main points of a particular ship.
As within the first block, earlier than beginning with the code so as to add the picture, let’s outline the most important structure.
Foremost structure
Right here, we’re going to outline a Grid with two rows, one for the primary picture, and the opposite for the body which comprises all of the remaining data of the web page.
<Grid RowDefinitions="Auto,*">
 <!-- Add all the knowledge corresponding to dam 4 -- >
 <!-- Add all the knowledge similar to blocks 5 and 6 -- >
</Grid>
Cruise image
Now, add the primary image and place it in row quantity 0.
<Picture Grid.Row="0" Supply="cruise" Facet="AspectFill" HeightRequest="350" Margin="0,-50,0,0"/>
<!-- Add right here all the knowledge defined within the subsequent code block -- >
Step 5: Cruise’s description
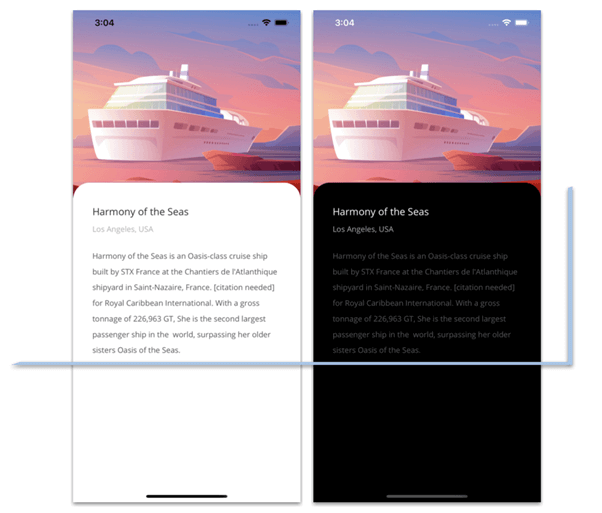
We’re going to design the cruise’s description and value blocks inside a Body.
First, let’s see the right way to render the cruise’s description.
Body and overlapping
Add a Body and place it in row no 1. Then, add a adverse margin to design the rounded edges of the Body and overlap it on the highest of the picture of the earlier block.
As well as, contained in the Body, add a Grid to prepare the extra data. Consult with the next code instance.
<Body Grid.Row="1" CornerRadius="30" Margin="0,-30,0,0" VerticalOptions="FillAndExpand" BorderColor="Clear">
 <Grid ColumnDefinitions="*,Auto" RowDefinitions="Auto,Auto,*,Auto,Auto,Auto,Auto" Margin="0,20" RowSpacing="10" Padding="15,0">
   <!-- Add all the knowledge similar to blocks 5 and 6 -- >
 </Grid>
</Body>
Cruise description
We’re going to modify this block a bit from the unique design by rendering the next elements:
- Identify
- Location
- Description
Consult with the next code instance.
<!--Identify-->
<Label Grid.Column="0" Grid.Row="0" Textual content="Concord of the Seas" FontAttributes="Daring" FontSize="18" TextColor="{AppThemeBinding Gentle=#303030, Darkish=White}"/>
<!-- Location-->
<Label Grid.Column="0" Grid.Row="1" Textual content="Los Angeles, USA" TextColor="#aeaeb2"/>
<!-- Description-->
<Label Grid.Column="0" Grid.Row="2" Grid.ColumnSpan="2" TextColor="#565659" LineHeight="1.5" Padding="0,0,0,20" Textual content="Concord of the Seas is an Oasis-class cruise ship constructed by STX France on the Chantiers de l'Atlanthique shipyard in Saint-Nazaire, France. [citation needed] for Royal Caribbean Worldwide. With a gross tonnage of 226,963 GT, She is the second largest passenger ship on the earth, surpassing her older sisters Oasis of the Seas."/>
<!-- Add right here all the knowledge defined within the subsequent code block -- >
Step 6: Cruise’s value
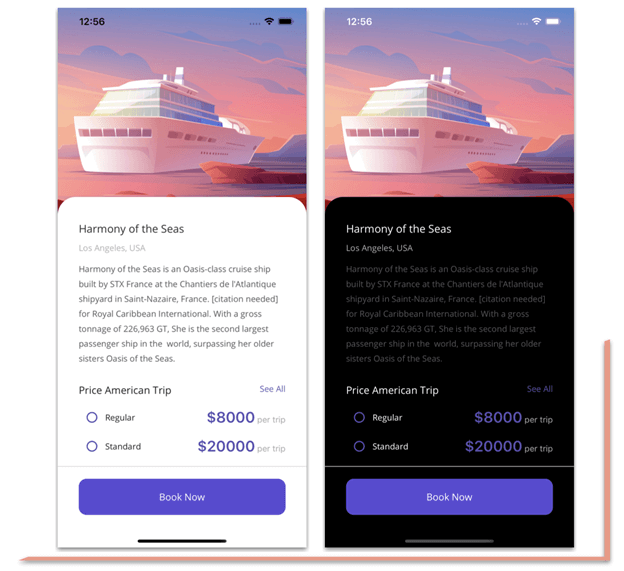
Lastly, let’s develop the worth block with the next parts:
- Worth checklist
- Separator
- E book Now button
To make it simple for builders to incorporate Syncfusion .NET MAUI controls of their initiatives, we now have shared some working ones.
Discover Now
Worth checklist
Consult with the next code instance to design the title and outline of the Cruise Ship, Worth American Journey, and See All labels.
<!-- Worth American Journey Description-->
<Label Grid.Column="0" Grid.Row="3" Textual content="Worth American Journey" FontSize="17"/>
<Label Grid.Column="1" Grid.Row="3" Textual content="See All" TextColor="#625ba5" HorizontalTextAlignment="Finish"/>
<!-- Add right here all the knowledge defined within the subsequent code block -- >
Now, let’s design the next elements:
- Checkboxes for the choices to pick.
- Checkbox descriptions.
- The value and a label of different textual content descriptions with totally different codecs. To design this, we’ll use FormattedText.
All of that is wrapped within the Syncfusion .NET MAUI ListView management.
<syncfusion:SfListView Grid.Column="0" Grid.Row="4" Grid.ColumnSpan="2"
                         ItemsSource="{Binding Plan}"
                         ScrollBarVisibility="By no means"
                         HeightRequest="85"
                         HorizontalOptions="Begin">
  <syncfusion:SfListView.ItemTemplate>
   <DataTemplate>
    <Grid ColumnDefinitions="Auto,Auto,*">
      <CheckBox Grid.Column="0" Coloration="#5b50b2"  HeightRequest="20" WidthRequest="20" HorizontalOptions="Begin"/>
      <Label Grid.Column="1" Textual content="{Binding Identify}" VerticalTextAlignment="Middle" />
      <Label Grid.Column="2" HorizontalTextAlignment="Finish" VerticalTextAlignment="Middle">
      <Label.FormattedText>
       <FormattedString>
        <Span Textual content="{Binding Worth}" TextColor="#5b50b2" FontAttributes="Daring" FontSize="25"/>
        <Span Textual content=" per journey" TextColor="#a9a9a9"/>
       </FormattedString>
      </Label.FormattedText>
     </Label>
    </Grid>
   </DataTemplate>
  </syncfusion:SfListView.ItemTemplate>
</syncfusion:SfListView>
<!-- Add right here all the knowledge defined within the subsequent code block -- >
Separator and button
To design the separator line, we’ll use a BoxView, and for the reserving choice, we’re going to add a button.
Consult with the next code instance.
<!--Separator and Button-->
<BoxView Grid.Column="0" Grid.Row="5" Grid.ColumnSpan="2" HorizontalOptions="FillAndExpand" HeightRequest="1" Coloration="#d8d5d5" Margin="-35,10"/>
<Button Grid.Column="0" Grid.Row="6" Grid.ColumnSpan="2" BackgroundColor="#594ad5" TextColor="White" Textual content="E book Now" FontAttributes="Daring" HeightRequest="60" FontSize="16" CornerRadius="13"/>
That’s all! We have now now completed growing our cruise journey app UI!
GitHub reference
To see the whole code construction, confer with our Cruise Journey App UI in .NET MAUI demo on GitHub.
Syncfusion .NET MAUI controls permit you to construct highly effective line-of-business functions.
Discover Now
Conclusion
Thanks for studying! On this weblog, we noticed the right way to replicate a cruise journey app UI utilizing the Syncfusion .NET MAUI controls. Check out the steps on this weblog submit and depart your suggestions within the feedback part beneath!
Syncfusion .NET MAUI controls have been constructed from scratch utilizing .NET MAUI, in order that they really feel like framework controls. They’re fine-tuned to work with an enormous quantity of knowledge. Use them to construct elite cross-platform cell and desktop apps!
Additionally, in case you have any questions, you may contact us via our assist discussion board, assist portal, or suggestions portal. We’re at all times blissful to help you!
See you subsequent time!