


As a system administrator, you understand how annoying getting paged at (largely) the improper time every time a website underneath your in a position hand produces errors. Certainly, you’ve seen the NGINX 502 errors, some of the annoying errors to cope with. However no worries. This tutorial has bought you coated!
On this tutorial, you’ll discover ways to repair the NGINX 502 errors on this sensible, scenario-based tutorial that includes NGINX and a PHP-FPM upstream app server.
Learn on and save the day from NGINX 502 errors!
Stipulations
- Two Linux machines to host NGINX and PHP-FPM – This tutorial makes use of Fedora 35 on each machines with hostnames wbserver and appserver.
- PHP-FPM put in on the appserver machine to function an upstream server – This tutorial makes use of PHP-FPM 8.1.
Putting in NGINX and Configuring a 502 Error Web page
With all of the stipulations in place, it’s time to put in NGINX and allow the service to begin at bootup. You’ll later configure an error web page to show how one can repair the NGINX 502 error.
1. Log in to the NGINX-hosting machine (wbserver).
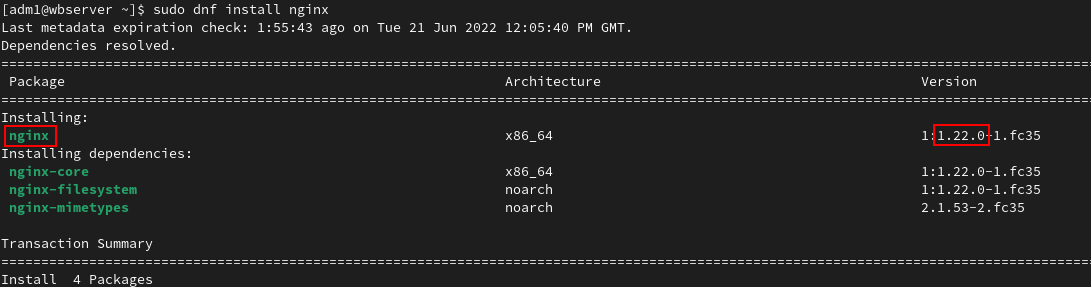
2. Execute the dnf set up command under to put in nginx and its dependencies.
sudo dnf set up -y nginxYou’ll see an output just like the one under, signifying that the set up of NGINX model 1.22.0 is beginning.
3. After putting in NGINX, run the next systemctl command to begin the nginx service –now and allow the service to begin at bootup.
sudo systemctl allow --now nginx.service
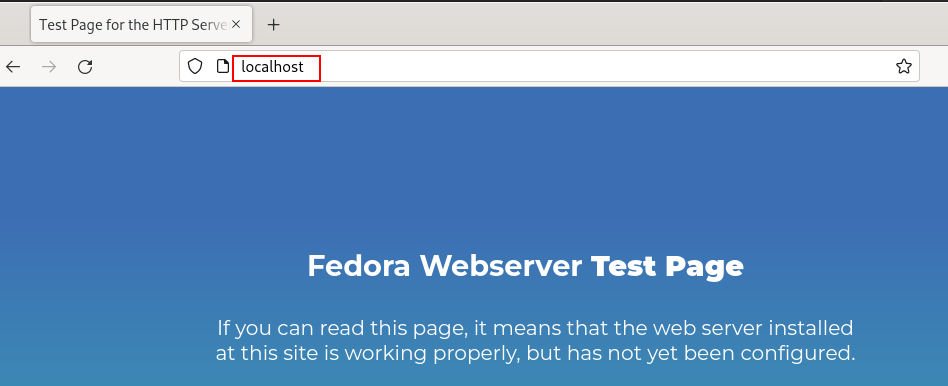
4. Now, open your favourite net browser, and navigate to http://localhost, which might be your check browser for the remainder of the tutorial.
As proven under, you’ll see the default Fedora Webserver Take a look at Web page if all goes nicely.
5. Create an HTML file together with your favourite textual content within the /usr/share/nginx/html listing known as 502.html. Populate the code under to the HTML file, which prints a 502 error message.
By default, NGINX makes use of a single error web page for all server-related errors. However this HTML file lets you determine 502 errors.
<html>
  <head>
    <title>502: Error</title>
    <meta charset="utf-8">
  </head>
  <physique>
    <h1 type="text-align:middle" >Error 502: Dangerous gateway</h1>
    <p type="text-align:middle">Sorry, however the net server obtained an invalid response whereas contacting the upstream server.</p>
  </physique>
</html>
6. Run the bash instructions under, which don’t present output, however carry out the next:
- Append the appserver IP deal with to the hosts file. Doing so lets you confer with the machines by domains as if utilizing an exterior DNS service.
Make sure to substitute 192.168.8.171, and 192.168.8.176 with your individual IP addresses all through this tutorial.
sudo bash -c "echo '192.168.8.171 wbserver' >> /and so on/hosts"
sudo bash -c "echo '192.168.8.176 appserver' >> /and so on/hosts"
7. Create a brand new file (ata-block.conf) within the customized configuration listing for NGINX (/and so on/nginx/conf.d/).
vi /and so on/nginx/conf.d/ata-block.conf8. Lastly, add the next code into the ata-block.conf file.
The code under configures the NGINX webserver to ahead all requests for .php recordsdata to appserver’s port 9000 and serve the 502.html file for all 502 errors.
server {
  hear 0.0.0.0:80;
  server_name wbserver;

  location / {
    root   /usr/share/nginx/html;
    index  index.html index.htm;
  }

  # ship all .php requests to exterior php-fpm server
  location ~ .php$ {
    fastcgi_pass appserver:9000;
    fastcgi_index index.php;
    embody fastcgi.conf;
  }

  # redirect 502 errors to /502.html
  error_page   502  /502.html;
  location = /502.html {
    root   /usr/share/nginx/html;
  }

  # redirect different server error to the static web page /50x.html
  error_page   500 503 504  /50x.html;
  location = /50x.html {
    root   /usr/share/nginx/html;
  }
}
Configuring PHP-FPM as Upstream Server
Now that NGINX is put in, you will need to arrange PHP-FPM. You don’t need incoming requests out of your NGINX server to be a large number, so that you want an upstream server to deal with requests correctly.
1. Log in to the appserver, open PHP-FPM’s configuration file (/and so on/php-fpm.d/www.conf) in your textual content editor, and add the next directives.
These directives enable PHP-FPM to serve requests from wbserver solely on port 9000 with default configuration settings
[www]
person = nginx
hear = 9000
hear.allowed_clients = 192.168.8.171
hear.acl_users = apache,nginx
pm = dynamic
pm.max_children = 50
pm.start_servers = 5
pm.min_spare_servers = 5
pm.max_spare_servers = 35
slowlog = /var/log/php-fpm/www-slow.log
php_admin_value[error_log] = /var/log/php-fpm/www-error.log
php_admin_flag[log_errors] = on
php_value[session.save_handler] = recordsdata
php_value[session.save_path] = /var/lib/php/session
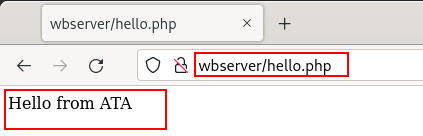
php_value[soap.wsdl_cache_dir] = /var/lib/php/wsdlcache2. Create a brand new file named howdy.php within the /usr/share/nginx/html/ listing, and add the next line. This howdy.php web page might be requested all through this tutorial to substantiate that the fixes have taken impact.
<?php echo "Whats up from ATA"; ?>3. Subsequent, run the systemctl allow command under to arrange php-fpm as a service –now, and allow the service to begin at bootup.
sudo systemctl allow --now php-fpm
In case you get errors whereas making an attempt to begin the service, double-check the configuration file for typos.
4. Finally, execute the next command, which doesn’t present output however appends (>>) the IP deal with of wbserver to the hosts file (/and so on/hosts) for native DNS decision.
sudo bash -c "echo '192.168.8.171 wbserver' >> /and so on/hosts"Fixing the Unavailable Upstream Server 502 Error
All of the items are in place, and also you’re virtually prepared to research and repair your first 502 error. However first, you’ll create a situation the place the upstream server is unavailable as a consequence of a crash or energy cycle.
1. Execute the shutdown command under on appserver to show off the machine instantly (now) to imitate an unavailable server.
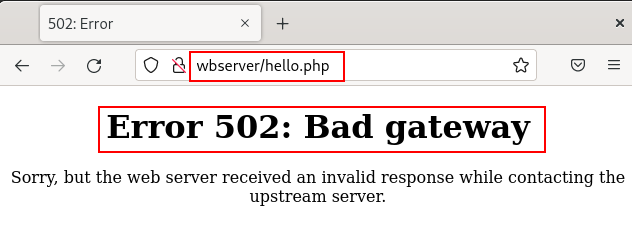
2. Subsequent, log in to wbserver and navigate to http://wbserver/howdy.php within the check net browser. You’ll be greeted with a 502 error, as proven under.
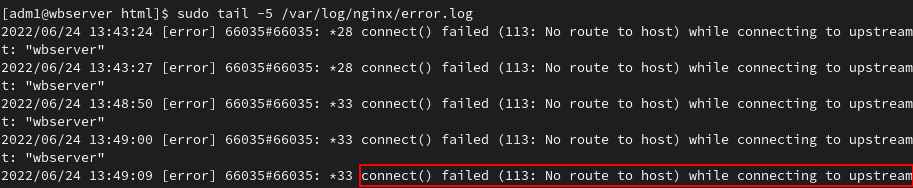
3. Run the under tail command to view the final (-n) 5 (5) traces of error.log to research the reason for the error.
sudo tail -n 5 /var/log/nginx/error.logYou’ll see error log entries containing the textual content join() failed (113:No path to Host) whereas connecting to upstream, as proven under.
This log message signifies that the problem lies within the connection to the upstream node, not in NGINX itself.
4. Lastly, flip the upstream server (appserver) again on to repair the 502 error.
Refresh the browser web page in wbserver to substantiate the problem has been fastened, as proven under.

Guaranteeing PHP-FPM is Working within the Upstream Server
One other frequent reason for NGINX 502 errors is when the PHP-FPM service is down on a reachable server. For this tutorial, you’ll kill the PHP-FPM course of to copy a 502 error and how one can repair the error.
1. Log in to appserver, and execute the pkill command, which doesn’t present output, however kills all PHP-related companies.
2. Subsequent, navigate to the howdy.php web page in wbserver, and also you’ll get a 502 error in your check browser, as proven under.

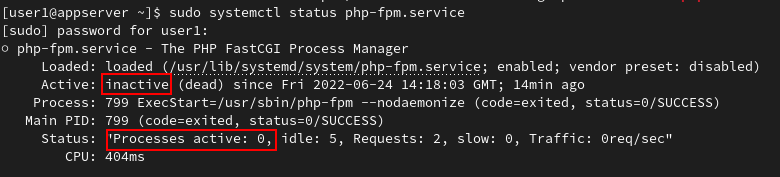
3. Run the systemctl command under to substantiate the standing of the php-fpm service.
sudo systemctl standing php-fpm.serviceBeneath, you’ll discover that the PHP-FPM service is inactive and has 0 lively processes.
This standing is the results of once you manually killed the underlying processes. However the service might crash and die within the wild for a number of causes.
4. Now, execute the systemctl standing command once more to show extra details about the stopped php-fpm service.
sudo systemctl standing php-fpm.serviceTake note of the log part of the output under. If errors have an effect on the beginning or steady working of the service, cope with these errors.
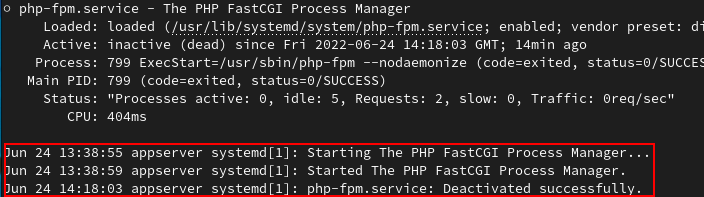
Test the default log file(/var/log/php-fpm/error.log) for additional pointers about why the service can not begin.
5. Run the systemctl begin command, which doesn’t have an output, however begins the php-fpm service.
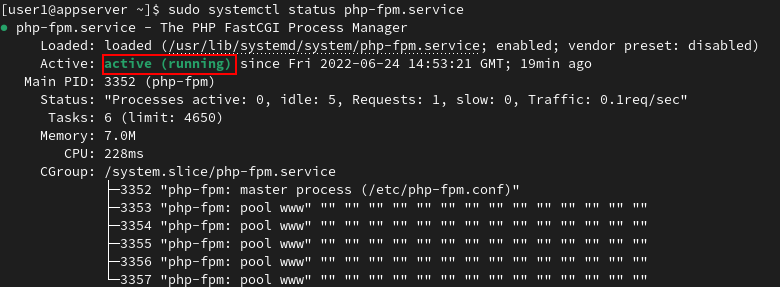
sudo systemctl begin php-fpm.service6. Subsequent, rerun the systemctl standing command to substantiate the state of the php-fpm service.
sudo systemctl standing php-fpm.serviceAs you possibly can see under, the PHP-FPM service is now lively (working).
7. Lastly, reload your check browser web page in wbserver to substantiate the 502 error is resolved, as proven under.
Modifying Firewall Guidelines to Repair NGINX 502 Errors
A correctly configured and working NGINX and PHP-FPM companies shouldn’t be all it’s essential to dodge NGINX 502 errors. A misconfigured firewall will also be a supply of 502 errors.
To see how one can repair this error, you’ll first recreate a firewall-caused 502 error situation:
1. Run the firewall-cmd command under to indicate the firewall’s state. Fedora 35 makes use of firewall-cmd as a command-line interface for its firewall resolution, Firewalld.
By default, on a Fedora system, the firewall is working, as proven under.

2. Subsequent, execute the under firewall-cmd command to take away entry to port 9000 over Transmission Management Protocol (TCP).
Blocking port 9000 makes PHP-FPM inaccessible to exterior machines, together with the NGINX host, wbserver.
sudo firewall-cmd --remove-port 9000/tcp
3. Refresh your check browser web page. As soon as once more, you’ll get a 502 error, as proven under.

4. Now, run the next firewall-cmd command so as to add port 9000 to the listing of allowed ports over TCP.
sudo firewall-cmd --add-port 9000/tcpIt’s best to obtain successful notification as within the screenshot under.

5. Run the firewall-cmd command to make the present runtime configuration everlasting. Doing so prevents additional 502 errors attributable to blocked firewall ports, particularly after reboots.
sudo firewall-cmd --runtime-to-permanentThe output under signifies the 502 error has been fastened. However you possibly can by no means be too certain, proper?

6. Lastly, reload the check browser web page in wbserver to substantiate the problem has been resolved, as proven under.

Altering DNS Decision Goal for the Upstream Server
By now, all needs to be working positive, however what’s going to you do should you get one other 502 error? An error in DNS decision can even trigger NGINX 502 errors.
To repair a DNS-caused NGINX 502 error:
1. Log in to the NGINX host machine (wbserver).
2. Edit the hosts file (/and so on/hosts) in your textual content editor.
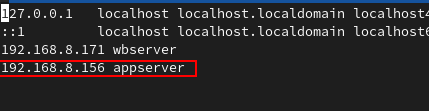
3. Change the IP deal with for the PHP-FPM server (appserver) to an incorrect IP.
Select an IP that’s not assigned to any machine, save the adjustments and shut the editor. This tutorial makes use of the IP deal with 192.168.8.156.
4. Now, refresh the check net web page (http://wbserver/howdy.php).
As proven under, you’ll get the 502 error since PHP-FPM shouldn’t be listening at 192.168.8.156.

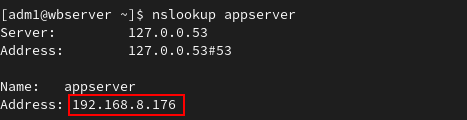
5. Run nslookup to view the results of DNS decision for the area identify appserver.
As anticipated, DNS queries for appserver return the improper IP deal with, as proven under.

6. Edit the hosts file on wbserver together with your textual content editor, and put the proper IP deal with for the appserver.
This step varies relying on the way you’re performing DNS decision. This tutorial makes use of native hosts recordsdata, so this step suffices.

In a typical enterprise setting, DNS decision is offered by Energetic Listing or a internet hosting supplier. Regardless of the case, NGINX expects to be directed to a socket on the PHP-FPM server when it has to cope with PHP requests.
Discuss to your DNS administrator (if that’s not you). For NGINX hosted on servers on the web, you may need to take a look at your internet hosting supplier’s CPANEL or related instrument.
7. Rerun the nslookup command to substantiate the repair has taken impact.
8. Finally, refresh your check browser web page in wbserver to substantiate the problem has been resolved.
Beneath, you possibly can see that you just’re now not getting 502 errors.

Conclusion
By making it this far, you’ve discovered about coping with 502 errors in an NGINX setup. Whether or not a service or server is down or a firewall is obstructing ports, now you can confidently repair NGINX 502 errors.
This newfound data is simply one other milestone, so why not try extra NGINX-related tutorials to deepen your expertise.