

The continued sequence protecting my journey into the world of cloud native observability continues on this article, the place I’m persevering with to discover an open supply dashboard and visualization undertaking. In case you missed any of the earlier articles, head on again to the introduction for a fast replace.
After laying out the groundwork for this sequence within the preliminary article, I spent a while within the second article sharing who the observability gamers are. I additionally mentioned the groups that these gamers are on on this world of cloud native o11y. For the third article I seemed on the ongoing dialogue round monitoring pillars versus phases. Within the fourth article I talked about conserving your choices open with open supply requirements. My final installment, the fifth article on this sequence, I talked about bringing monolithic purposes into the cloud native o11y world. In my sixth article, I supplied you with an introduction to a brand new open supply dashboard and visualization undertaking and shared the best way to set up the undertaking in your native developer machine. The seventh article I explored the API and tooling supplied by the Perses undertaking. Then I hung out in an article protecting the open dashboard specification that it’s good to comply with to start out creating your first dashboard. Lastly, in the earlier article, you constructed your very first dashboard.
On this article you’ll flush out that first dashboard finishing two rows of charts, gauges, and different elements visualizing the efficiency of the goal occasion.
Being a developer from my early days in IT, it’s been very attention-grabbing to discover the complexities of cloud native o11y. Monitoring purposes goes method past simply writing and deploying code, particularly within the cloud native world. One factor stays the identical, sustaining your group’s structure at all times requires each a vigilant outlook and an understanding of obtainable open requirements.
This text is a part of my ongoing effort to get sensible hands-on expertise within the cloud native o11y world. I’m going to get you began utilizing a primary template for a minimal dashboard from the earlier lab, and begin designing elements to your very first dashboard. That is one lab within the extra in depth free on-line workshop. Be at liberty to start out from the very starting of this workshop right here should you missed something beforehand:
Now let’s dive into designing your first dashboard. Word this text is just a brief abstract, so please see the entire lab discovered on-line because the lab 4.6 right here to work via the information mannequin for dashboards your self:
The next is a brief overview of what’s on this particular lab of the workshop.
Advancing the dashboard
Every lab begins with a aim, on this case it’s pretty easy:
To construct out your first primary dashboard, extending it with extra elements till you have got a sophisticated dashboard with in depth metrics examples.
The lab kicks off with a view of what your server ought to be displaying you after finishing the earlier lab. It’s a dashboard with the primary Reminiscence Utilization stat chart within the first position and nothing else. This lab jumps proper in the place you left off and also you begin including new Complete Reminiscence stat chart:
1 2 3 4 5 6 7 8 9 10 11 12 13 14 15 16 17 18 19 20 21 22 23 24 25 26 27 |
"statTotalMemory": {
  "variety": "Panel",
  "spec": {
    "show": {
      "title": "Complete Reminiscence",
      "description": "That is my second stat chart!"
    },
    "plugin": {
      "variety": "StatChart",
      "spec": {
        "question": {
          "variety": "TimeSeriesQuery",
          "spec": {
            "plugin": {
              "variety": "PrometheusTimeSeriesQuery",
              "spec": {
                "question": "node_memory_MemTotal_bytes{job='$job',occasion=~'$occasion'}"
              }
            }
          }
        },
        "calculation": "LastNumber",
        "unit": { "variety": "%" }
      }
    }
  }
}
|
Once more that is adopted by an extra part added to the layouts part which we are going to let the reader pursue within the lab on-line.
Word that within the workshop lab you might be given these code snippets as helpers however I’ve additionally tried to share correct testing and validation as you’re employed in direction of a last dashboard utilizing the supplied CLI tooling:
$ ./bin/percli lint -f [PATH_TO_RESOURCE]/myfirstdashboard.json

your assets look good

$ ./bin/percli apply -f [PATH_TO_RESOURCE]/myfirstdashboard.json

object "Dashboard" "MyFirstDashboard" has been utilized within the undertaking "WorkshopProject"
Then confirm that they have been utilized in your dashboard:

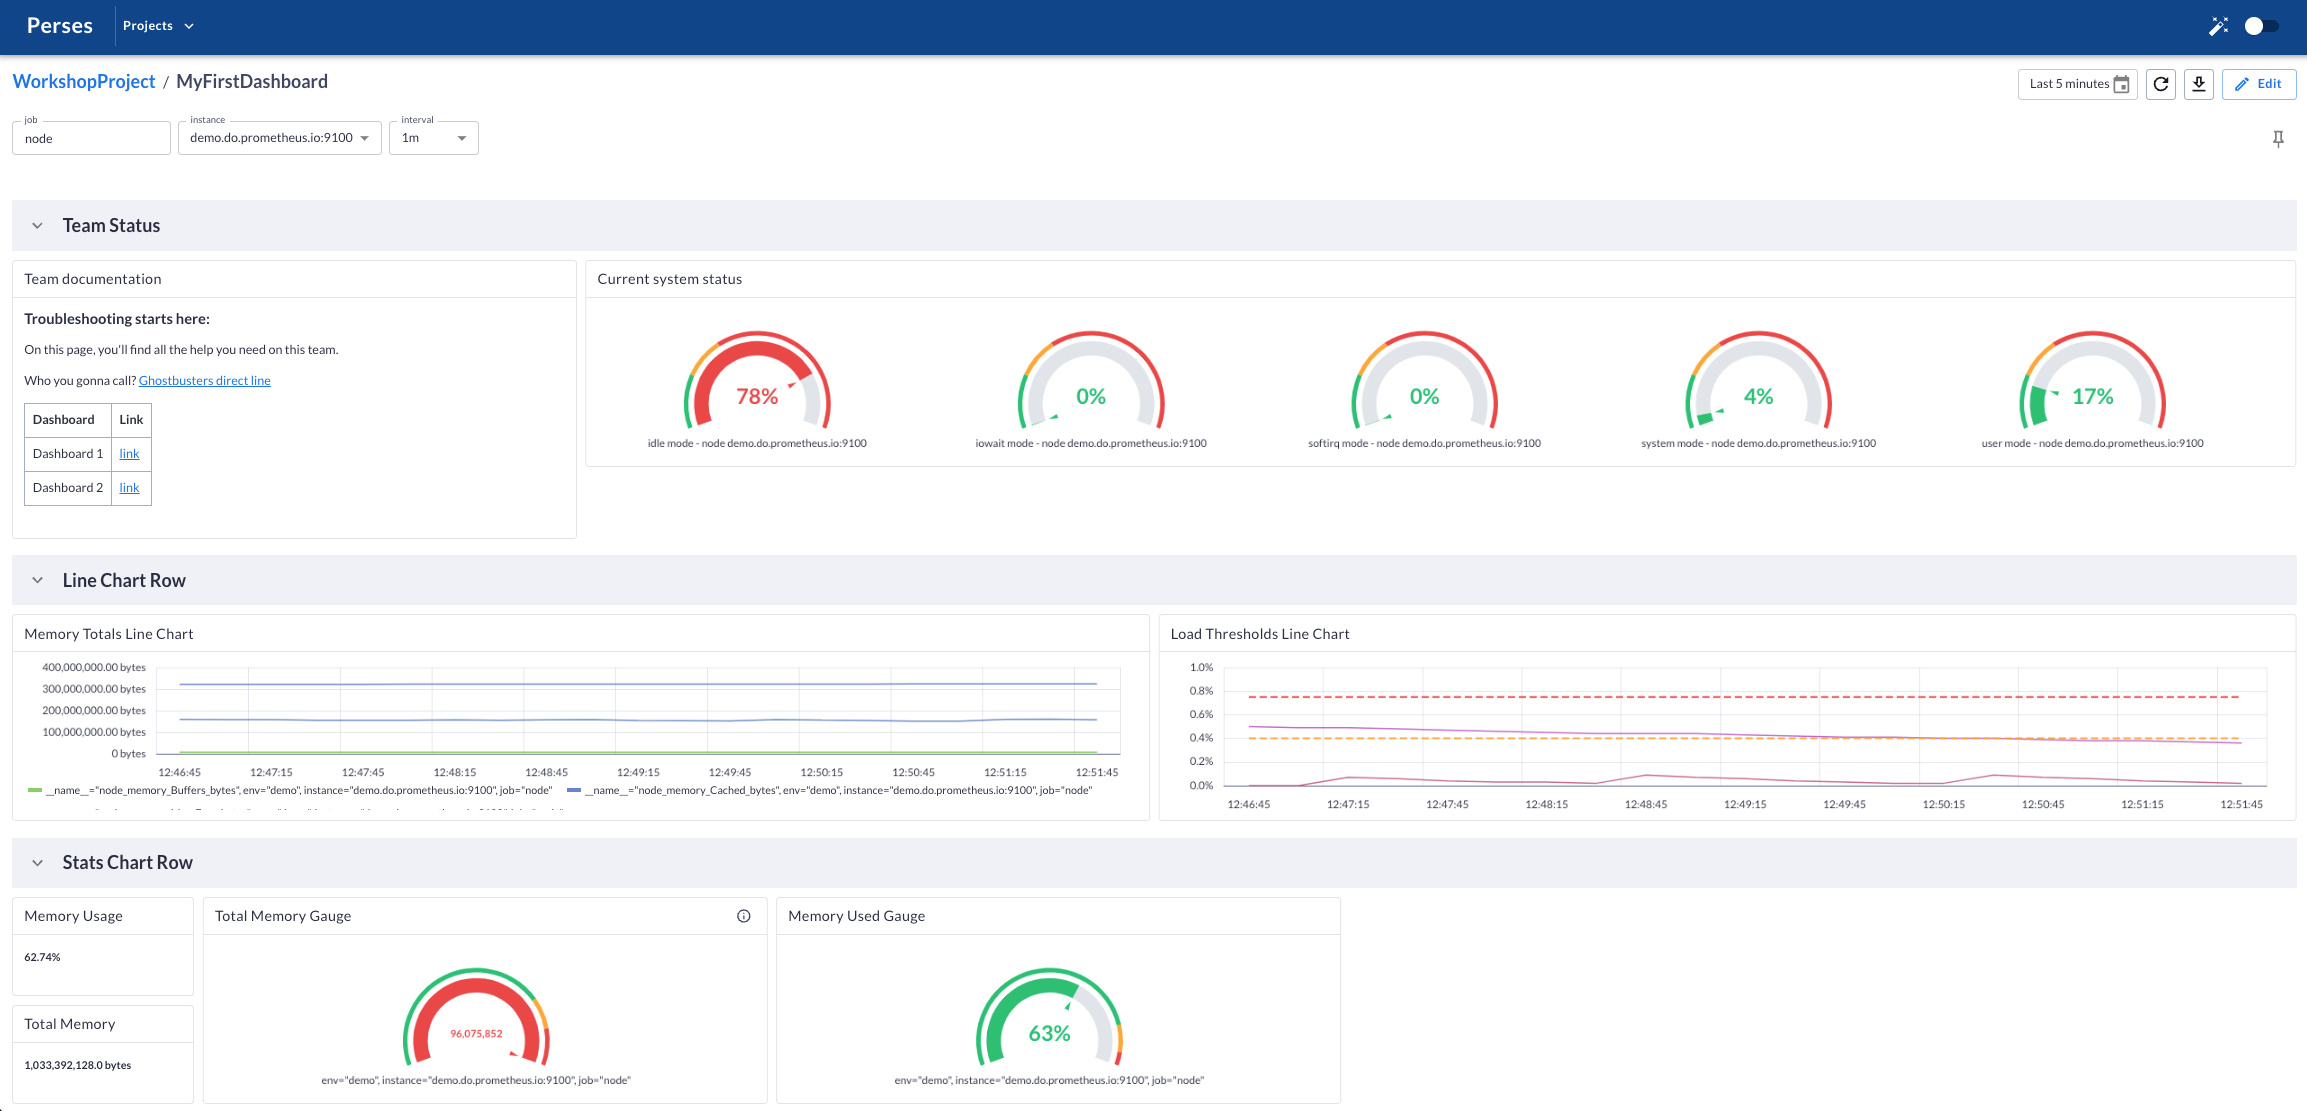
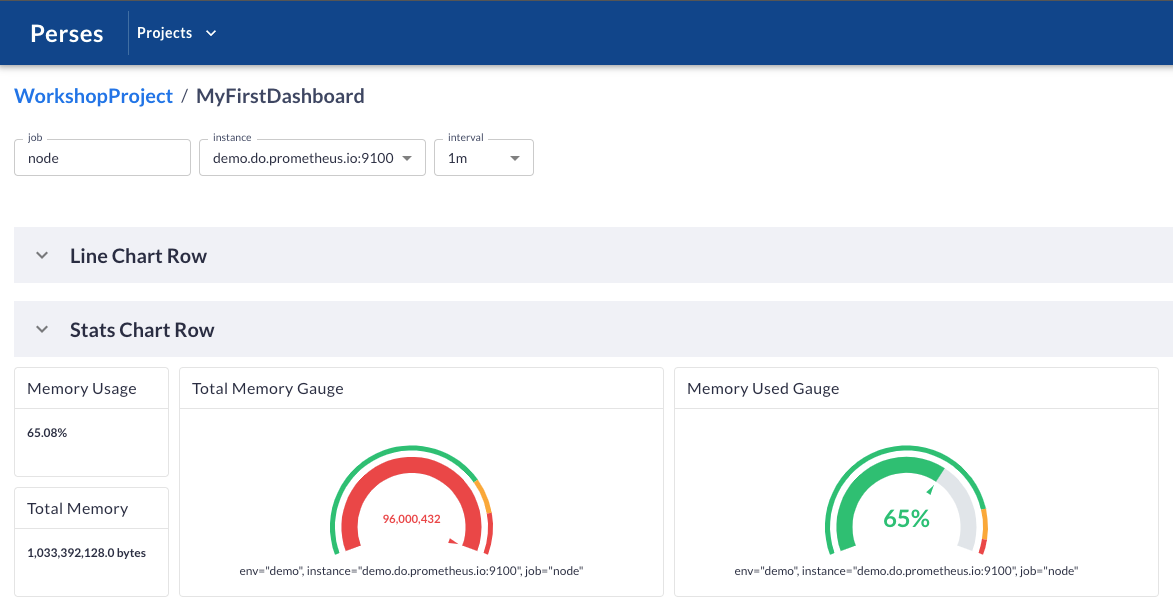
You possibly can see that your reminiscence utilization and whole reminiscence elements are positioned within the first row of your dashboard and reporting on the present values for the server occasion chosen.
You then proceed on and add two gauges, used to visualise the identical two metrics because the stat charts. When you full these sections your first row of this dashboard is trying fairly stable:

Subsequent up, you create a brand new row and rename this primary row whereas transferring it to second in your dashboard utilizing the next changes to your layouts part:
1 2 3 4 5 6 7 8 9 10 11 12 13 14 15 16 |
"layouts": [
  {
    "kind": "Grid",
    "spec": {
      "display": { "title": "Line Chart Row", "collapse": { "open": true } },
      "items": []
    }
  },
  {
    "variety": "Grid",
    "spec": {
      "show": { "title": "Stat Chart Row", "collapse": { "open": true } },
      "gadgets": []
    }
  }
]
|
Now you’re prepared to start out including some new metrics in line chart elements:
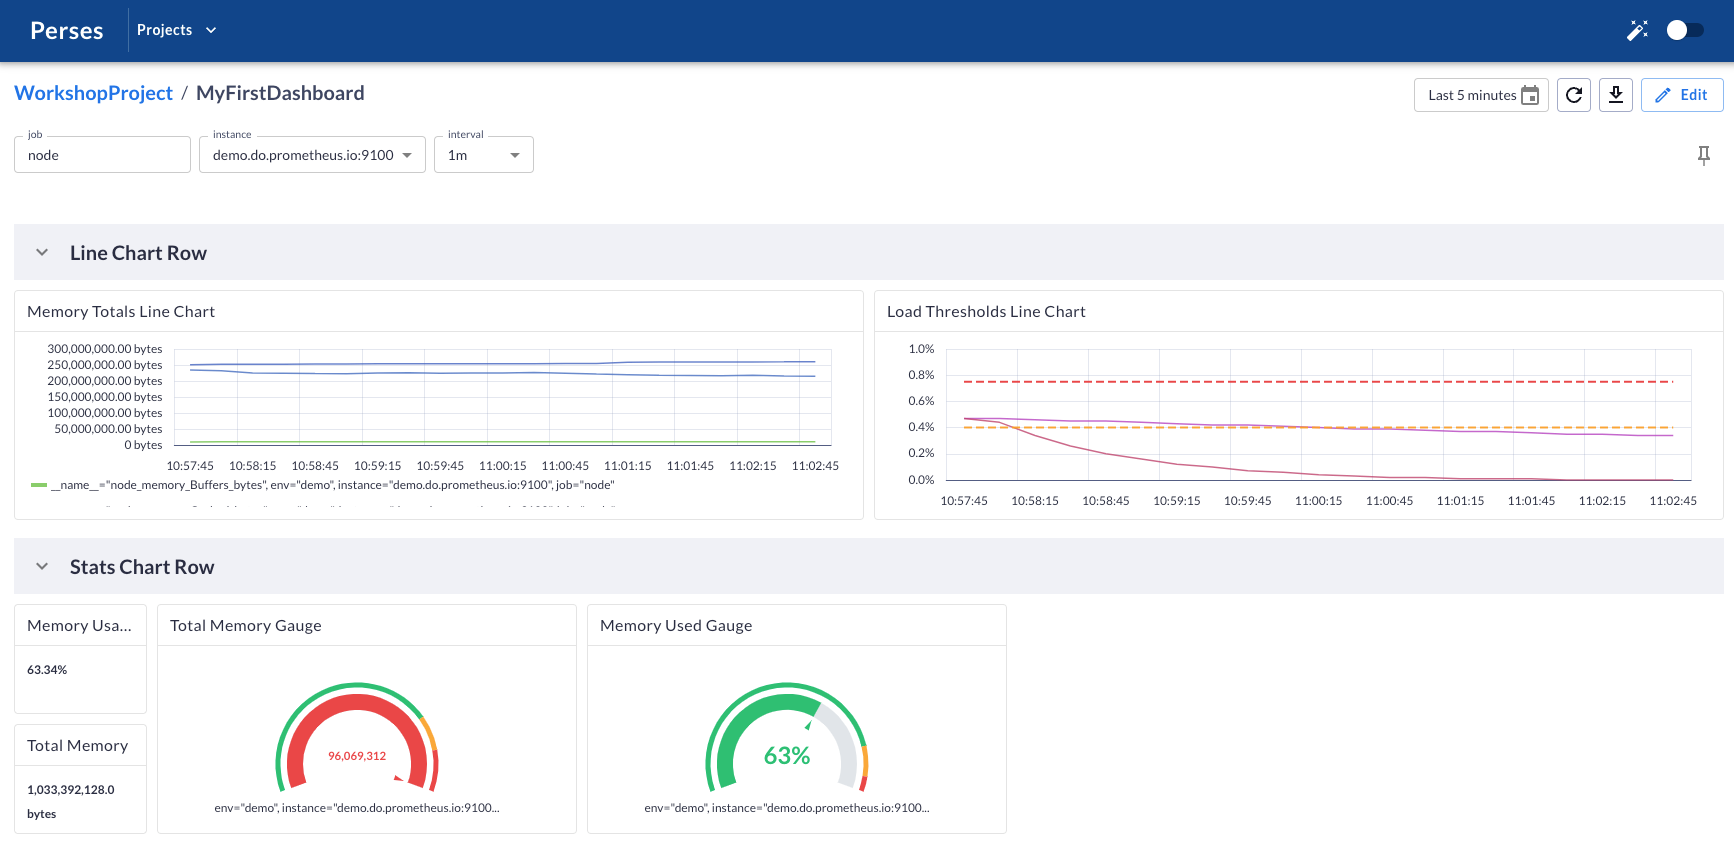
You add two new line chart elements, the primary goes to visualise reminiscence totals from the goal occasion. The second visualizes load on the occasion and contains thresholds for indicating when values cross via the degrees that require an alert. The reader is referred to the lab Content material to work via each of those line chart elements and the ultimate outcomes ought to be as follows:
This was a brief tour of including gauges and charts to increase your primary dashboard. Keep tuned for the ultimate step in realizing your superior dashboard.
Extra to return
I’ll take you thru the final little bit of this workshop exploring the Perses undertaking. Keep tuned for extra insights into actual sensible expertise as my cloud native o11y journey continues.