


Safe your apps with face authorization
Authentication is essentially the most essential a part of a web site. If not dealt with accurately, it might result in unimaginable circumstances. With latest technological developments, many various tech stacks and frameworks are created to construct essentially the most environment friendly net software potential. However builders focus little or no on bettering the authentication system and constructing one thing new and modern within the net authentication area.
With the development of synthetic and machine studying methods, face recognition has develop into straightforward to implement and really dependable. Most smartphones these days include optical facial recognition methods to unlock the telephone. However within the net growth subject, we are able to’t see the adoption of facial recognition as a method of authenticating a person.
On this article, I’m discussing the issues of our conventional authentication methods, methods to clear up this concern utilizing face recognition, and an in depth step-by-step information to implement the identical utilizing reactjs and taiwindCSS.
At the moment, e-mail password-based authentication is the preferred on the internet. However the principle disadvantage of this method is to memorize distinctive passwords for each web site you signed up for. Should you neglect your password, you want your e-mail deal with to reset the password. Should you lose management over your e-mail, it’s nearly not possible to get better your account.
To resolve all these points, oAuth comes into the image. OAuth is a protocol to join a web site utilizing an OAuth supplier. You may even see an choice to log in utilizing Google, Fb, GitHub, and so on on numerous web sites. That is an instance of oAuth. In our system as a person, it’s a must to preserve just one account and provides permission to make use of the data on different web sites. As a developer, it’s a must to belief the OAuth supplier to offer the suitable data.
These days, Passwordless sign-in or magic hyperlink authentication may be very widespread. On this system, you want to enter your e-mail deal with on the web site. Then you definitely obtain an e-mail containing a sign-in hyperlink. Should you browse this hyperlink, you might be authenticated and signed up on the respective web site. It is a very straightforward system to log in and also you don’t have to memorize passwords.
In all of the above examples you’ll find a well-known sample. All these authentication processes want your e-mail. Electronic mail is so essential in all of the above methods that if you happen to by some means lose management over it, you might be unable to retain management over all of your accounts. It is a main downside in authentication methods. However as issues have an answer, this downside additionally has some options. Let’s focus on it within the subsequent part.
To take away e-mail from the authentication stack, we’ve some choices like fingerprint authentication and facial recognition.
The issue with fingerprint authentication is that it requires specialised {hardware} to work. Fingerprint readers don’t come by default with most laptop {hardware}. As there isn’t any native standardized API on the internet to work together with machine fingerprint readers, fingerprint authentication is possible within the close to future.
As a result of fast progress in synthetic intelligence and machine studying, facial recognition will not be very laborious. The presence of open-source machine studying libraries makes it simpler for builders to rapidly develop operate AI for his or her net purposes.
However this wants some earlier publicity to machine studying. Should you don’t have that have, you should use machine studying SaaS choices like faceIO to simply create a facial recognition authentication system in your web site.
On this tutorial, we’re utilizing the FaceIO library to show face authentication in our net software. Create a free account of FaceIO to observe alongside.
We’re utilizing vite to create the ReactJs challenge on this tutorial. Open your terminal and run the next command to scaffold your React challenge utilizing vite.
npm create vite@newest my-project — — template react
Now observe the terminal immediate to scaffold your challenge. After you accomplished this step, open this challenge in your favourite code editor. The challenge construction ought to appear like this.
.
├── index.html
├── package deal.json
├── package-lock.json
├── public
│ └── vite.svg
├── src
│ ├── App.css
│ ├── App.jsx
│ ├── property
│ │ └── react.svg
│ └── primary.jsx
└── vite.config.js
Now, to put in tailwind CSS in your vite challenge, observe these steps fastidiously.
npm set up -D tailwindcss postcss autoprefixer
npx tailwindcss init -p
Now open your tailwind.config.cjs file and add your challenge supply path.
Inside your src/App.css file, add tailwind CSS directives.
Now you could have efficiently put in tailwind CSS in your React and vite challenge. Let’s give attention to methods to combine face authentication in our challenge within the subsequent part.
The beauty of FaceIO is that they supply a really easy-to-use Javascript library. This library comes with two main features enroll and authenticate. However earlier than discussing these features, let’s hyperlink the FaceIO library to the react software.
Open the index.html file in your challenge and hyperlink FaceIO CDN to your challenge.
After efficiently linking the FaceIO CDN, open App.jsx file and delete all of the boilerplate code inside App element. To provoke our FaceIO library, we add an useEffect react hook. The code inside this hook runs solely as soon as when the element is initiated.
You may see we’re utilizing an ID as an argument whereas instantiating the faceIO object. If you signup for a faceIO account, you may entry these IDs contained in the faceIO console.
All of the setup is now accomplished and let’s give attention to authenticating the person utilizing FaceIO.
Register New Customers Utilizing FaceIO
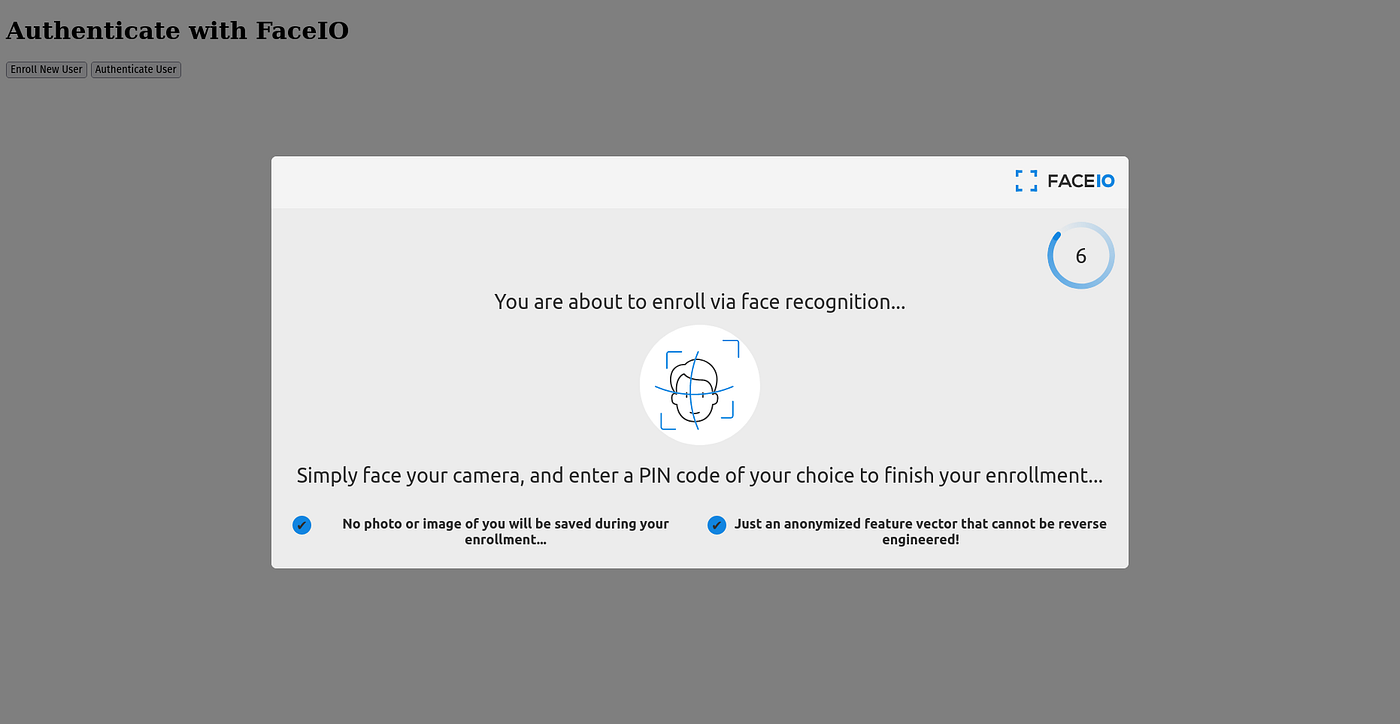
FaceIO gives a quite simple interface to register new customers. We use enroll operate to register a brand new person. As FaceIO wants your webcam permission, do settle for the permission dialogue when prompted.
The enroll operate has 2 aliases. You should use register and file features as drop-in replacements for enroll.
If you run this operate in your browser, it launches faceIO widgets. At first, it takes person consent to scan their face, then immediate to just accept the webcam permission. If all necessities are glad, the faceIO widget opens your digicam and scans your face. It converts your face knowledge into an array of floating level numbers.

After accumulating the facial knowledge, faceIO is prompted to enter a PIN code. This PIN code is used to tell apart customers with extraordinarily comparable faces. You consider this as a two-factor auth when one thing goes south.

Let’s add faceIO enroll in our react software. We maintain the app quite simple. Due to this fact, let’s create a button known as register when somebody clicks on that button, we run the enroll operate to enroll a brand new person.
After including the register button and the javascript handler on the button click on, App.jsx file seems to be like this.
Within the above code, you may see I wrap the code inside a try-catch block. If one thing goes improper, FaceIO throws some errors. The error messages are very useful and you may get a whole listing of error codes within the official documentation.
The enroll operate accepts solely an elective parameter object. These elective parameters settle for properties to configure the person registration course of. Within the above instance, I outline locale and payload properties contained in the elective parameter of the enrolling operate. the locale property represents the default interplay language of your person. In our case, we offer auto to routinely detect the language.
Contained in the payload, you may add any JSON serializable worth distinctive to your person. On this instance, we’re including the e-mail of the person as a payload. At any time when use log-in sooner or later, we are able to entry the e-mail payload from the FaceIO return object.
Enroll operate in FaceIO returns a promise. Due to this fact within the instance, I’m utilizing the async/await function of javascript. Should you don’t choose async/await, you should use .then as an alternative.
When the promise completes, it ends in an userInfo object. Through the use of the thing, we are able to entry the distinctive facial ID of the person. Along with this, the userInfo object additionally gives a particulars property from which, we are able to get the possible age and gender of the person.
After registering the person efficiently, that is the time to authenticate registered customers. For this goal, Pixlab gives the authenticate operate. This authenticate operate additionally has 3 aliases, auth, acknowledge and establish.
The authentication operate wants solely a single body for the person to acknowledge. Due to this fact, it is vitally bandwidth pleasant. After profitable authentication, it returns a userData object. This userData accommodates the payload you could have specifies within the registration and the face of the person.
Inside our App.jsx file, we make one other button known as Log-in. When a person clicks on this button, it invokes the handleLogIn helper operate. This operate is in the end accountable to invoke the “authenticate” operate. Let’s see all of those in code.
Contained in the handleLogIn operate, we use the try-catch block to catch errors if authentication fails. Because the authenticate operate returns a promise, we’ve used async await strategies to get the worth when the promise completes.
The authentication operate accepts some elective parameters to customise the faceIO authentication widget. You may primarily customise the timeouts utilizing permissions timeout, idleTimeout and replyTimeout parameters. After the compilation, our net software ought to appear like this.
Whereas creating your account in FaceIO, you can be assigned an API key. Yow will discover this API key within the faceIO console. Through the use of this API key, you may work together with the FaceIO back-end with RESTful API. The bottom URL of the REST API is https://api.faceio.web/.
At the moment, the FaceIO REST API helps 3 features. Deleting the face of a person, setting the extra payload to a faceID, and setting the Pin code for a faceID. Do keep in mind to make use of these API endpoints from a secured atmosphere or out of your backend server. Don’t run these APIs from the consumer facet.
Delete a faceID
To delete a faceID, we’ve to make a get request to https://api.faceio.web/deletefacialid endpoint. This endpoint has two request parameters. One is the key that accepts the API key, one other is the fid which accepts the faceID which you need to delete.
curl — request GET — url 'https://api.faceio.web/deletefacialid?key=APIkey&fid=FaceID'
As a response, FaceIO returns a standing code and a `payload` boolean that tells if the info together with the payload is efficiently deleted or not.
Set payload to FaceID
Through the use of this API endpoint, you may set a payload to an already current FaceID. The requested URL is https://api.faceio.web/setfacialidpayload. This endpoint requires 3 request parameters. the key is the API key, fid is the facial ID with which you need to connect the payload with, and the payload is to outline your customized payload knowledge.
curl — request POST — url 'https://api.faceio.web/setfacialidpayload?key=APIkey&fid=FaceID&payload=%22namepercent3AHrishikeshpercent22'
As a response, FaceIO returns a standing code and a `payload` boolean that tells if the info together with the payload is efficiently deleted or not.
Set Pincode to FaceID
In the course of the faceID enrollment part, we mentioned the necessity for Pincode to tell apart between two very similar-looking faces. If you wish to modify their Pincode, you may simply achieve this, through the use of the https://api.faceio.web/setfacialidpincode endpoint.
Just like the earlier endpoint, this additionally requires 3 parameters. One is the API key, one other is the faceID and the final one is the PIN. The curl request to the endpoint is as follows.
curl — request POST — url 'https://api.faceio.web/setfacialidpincode?key=APIkey&fid=FaceID&pin=12345'
Webhooks are used as a communication methodology between servers. FaceIO gives a wealthy webhook expertise that you should use to replace your back-end server. FaceIO sends a webhook on 3 occasions. enroll when a brand new person enrolls in your system, auth when an already registered person is authenticated utilizing faceIO, and deletion when a faceID is deleted utilizing the REST API we’ve mentioned above.
Every webhook request is a POST request from the faceIO server and a JSON object. The request physique seems to be like this.
Identify of the every subject is self-explanatory about what worth it accommodates.
Comply with these steps to configure the webhook with the faceIO server.
- Hook up with your account by way of the FACEIO Console first.
- On the console primary view, go to the Utility Supervisor.
- Choose the goal software for which you need to arrange webhooks.
- As soon as the goal software is chosen. Enter your Webhook Endpoint URL for receiving occasions and save your modification.
- You’re all set. Upon an occasion is triggered, FACEIO shall make an HTTP POST request to the URL you could have configured.
That is an in-depth information on including facial authentication to your React software. Should you like this information and need to know extra about faceIO, please go to the official documentation web page. Should you like my writing, you may learn extra on my web site and I’m on Twitter as @hrishikshpathak.