

Probably the most frequent causes of confusion in CSS is dealing with specificity whereas writing kinds. For instance, altering the show worth for a component by no means works as a result of one other component within the cascade overrides it as a result of having a better specificity. Or when one other component has !necessary That normally occurs when the codebase is rising and we’re not organizing CSS in a manner that forestalls (or reduces) such issues.
To beat the fights with the cascade and specificity points, we must be cautious about the place to jot down a particular CSS block. In small initiatives, this may be okay, however for giant ones, it’s a time-consuming job. Because of this, we began to see totally different strategies to assist us set up our CSS higher and thus decreasing the cascade points. The primary three that got here to my thoughts are the BEM (Block, Component, Modifier), Smacss by Jonathan Snook and Inverted Triangle CSS by Harry Roberts.
On this article, we’ll discover how cascade layers work, and the way they may assist us write CSS with extra confidence, together with use-cases and examples.
Are you prepared? Let’s dive in!
Desk of contents
The issue
The primary drawback cascade layers resolve is offering a assured technique to write CSS with out worrying about specificity and supply order. Let’s take an instance for instance the issue.

We have now a button with two kinds, the default and the ghost ones. In HTML, right here how we’ll use them:
<footer class="form-actions">
    <button class="button">Save edits</button>
    <button class="button button--ghost">Cancel</button>
</footer>
The above work nice in that case. However what if we have to have a 3rd variation for the button however we will’t write it proper after the .button declaration?

The .button is coming after the .button--facebook. Because of this, it’s going to override it. In that case, we would workaround this by rising the specificity for .button-facebook like:
.some-parent .button--facebook {
    background-color: var(--brand-fb);
    colour: #fff;
}
Or we will do that (don’t do that at house!)
.button--facebook {
    background-color: var(--brand-fb) !necessary;
    colour: #fff !necessary;
}
Both resolution isn’t that good. The perfect one is to jot down them within the appropriate place, proper after the .button declaration. It’s not a straightforward job to try this with out getting assist from a CSS pre-processor (like Sass, for instance) to assist in dividing the CSS recordsdata into partials and parts.
Introducing CSS Cascade Layers
Cascade layers is a brand new CSS function that can assist us builders achieve extra management once we write CSS for giant initiatives. In keeping with the the spec creator, Miriam Suzanne:
Cascade Layers will enable authors to handle their inner cascade logic, with out relying totally on the specificity heuristic or supply order.
Let’s apply cascade layers to the earlier instance.
The very first thing to do is to outline a layer. To try this, we write @ adopted by the layer identify.
I outlined a layer known as parts. Inside that layer, I want so as to add the default button kinds.
@layer parts {
    .button {
        colour: #fff;
        background-color: #d73a7c;
    }
}
Cool. Subsequent, we have to add one other layer for the variations.
@layer parts {
    .button {
        colour: #fff;
        background-color: #d73a7c;
    }
}

@layer variations {
    .button--ghost {
        background-color: clear;
        colour: #474747;
        border: 2px strong #e0e0e0;
    }
}
Here’s a visualization of the layers. There are much like Photoshop layers since what’s outlined final in CSS, would be the first within the record of layers within the visible.

In our instance, the variation layer is the final outlined one, so it’s going to have extra precedence over the parts layer.
There’s additionally one other technique to set up which layer override one other, which is by defining the layers directly.
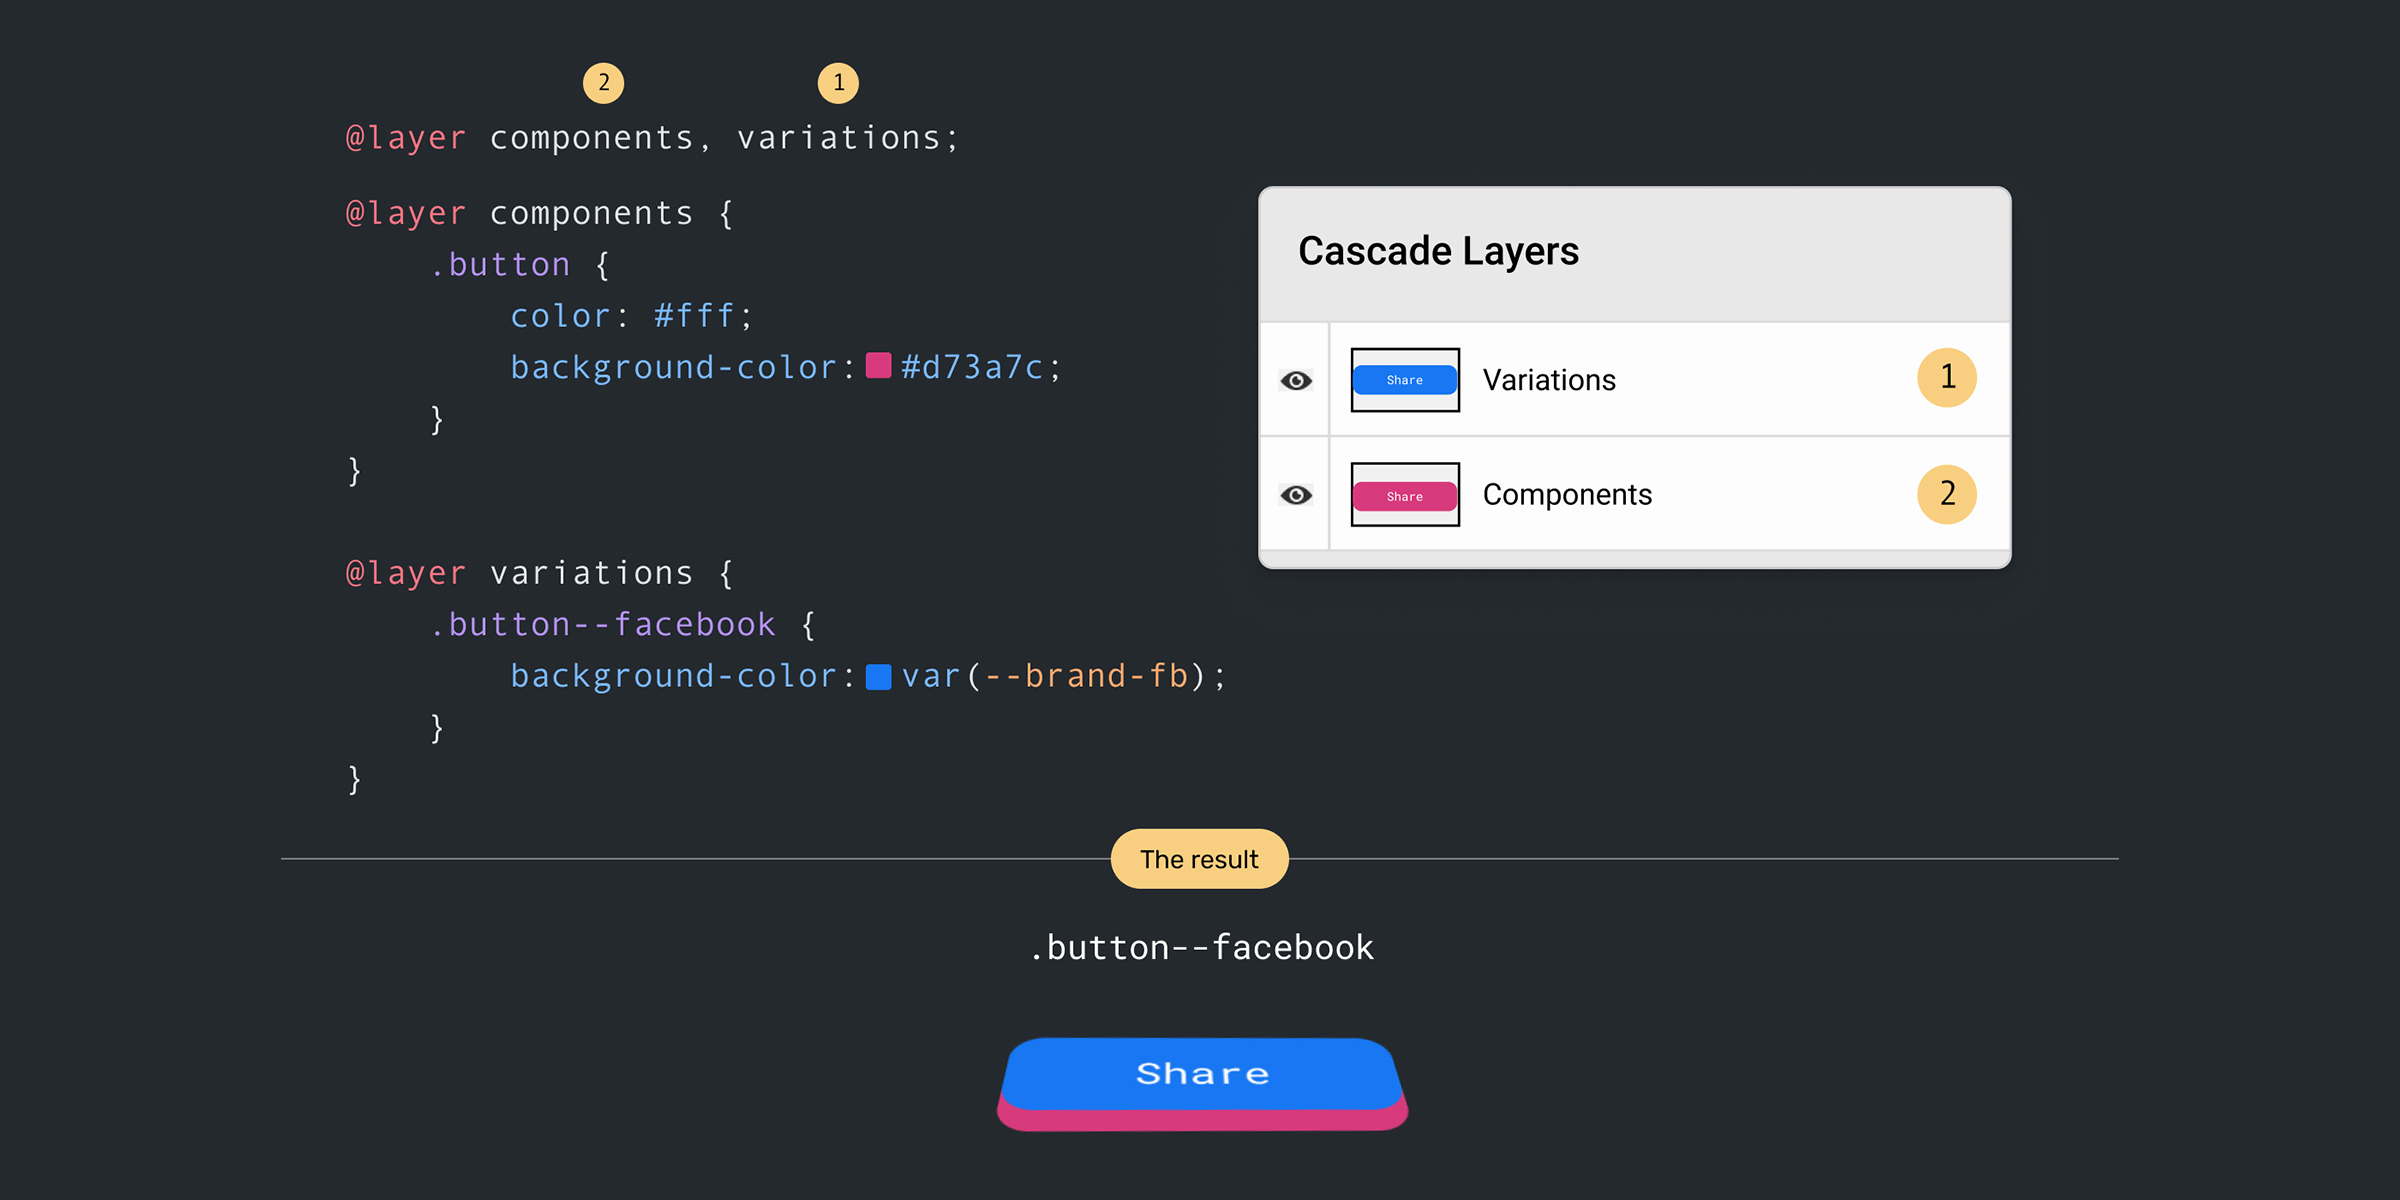
@layer parts, variations;
Again to our instance. The preliminary drawback was that we would have liked to create one other variation of the button however we added it in a spot that makes the variation button have much less specificity. With Cascade layers, we will add the CSS within the variations layer.
@layer parts, variations;

@layer parts {
    .button {
        colour: #fff;
        background-color: #d73a7c;
    }
}

@layer variations {
    .button--ghost {
        background-color: clear;
        colour: #474747;
        border: 2px strong #e0e0e0;
    }

    .button--facebook {
        background-color: var(--brand-fb);
    }
}
That manner, we will at all times be sure that the element variation will at all times take precedence over the bottom kinds. Let’s discover the reason above visually.
Within the layers panel, discover how every button lives in a layer. The order is per the @layer definition on the high.

When the order of layers is modified, the parts layer will override the variations one. Because of this, the default button fashion will win.

Including fashion guidelines to layers
In cascade layers, the browser combines kinds from the identical @layer definitions and reads them directly, as per their order.
Think about the next:
@layer parts, variations;

@layer parts {
    .button {..}
}

@layer variations {
    .button--ghost {..}
}

/* 500 traces later */
@layer variations {
    .button--facebook {..}
}
The browser will add the .button--facebook proper after the .button--ghost within the variations layer. Here’s a visible for extra readability:

Browser help
That is a very powerful query to consider for a brand new CSS function. As per Can I Use and on the time of writing this text, it’s supported in Firefox, Chrome, Safari TP.
Can we use them as an enhancement? No, we will’t. Until we use a Javascript polyfill (which isn’t there but).
The place do layers dwell within the cascade?
To reply that query, let’s take an summary of the CSS cascade.
The CSS cascade is ordered as beneath (Larger ones have extra precedence):
- Origin and Significance
- Inline Types
- Layer
- Specificity
- Order of look
Think about the next determine. The thicker the road, the extra precedence the fashion has within the cascade.

Origin and Significance
The origin and significance of a method rule are two totally different (however associated) issues, so I’ll clarify each beneath.
A mode rule origin can come from one of many following, in descending order of precedence:
- Developer Types (AKA creator kinds)
- Consumer Types
- Browser Types
Meaning the CSS {that a} developer wrote will at all times win over the consumer and browser kinds.
Let’s take for instance.
html {
    font-size: 16px;
}
If a consumer tried to alter their browser’s default font measurement, the above CSS rule will override the consumer’s choice (since developer kinds win over the consumer’s one).

That’s a foul apply for accessibility. Please don’t do that in real-life initiatives. I simply added it for the sake of explaining the origin of kinds.
Relating to browser kinds, they’re for the consumer agent stylesheets. For instance, the default <button> fashion differs from one browser to a different. We will override the default fashion, you guessed it as a result of the developer kinds wins over the browser ones.
Should you examine the default button, you’ll discover consumer agent stylesheet, which exhibits all of the default kinds that the button has.

All of the above was regular guidelines. This implies they don’t have the !necessary key phrase. In case it’s there, then the order might be:
- Necessary Browser Types
- Necessary Consumer Types
- Necessary Developer Declarations
- Regular Developer Types
- Regular Consumer Types
- Regular Browser Types
Inline kinds
If a component has an inline fashion, then it’s going to have the very best specificity amongst its siblings with the identical significance.
Within the following instance, the <button> colour might be #fff since inline kinds take priority.
<button fashion="colour: #fff;">Ship</button>
Layers
Oh, good day layers! That is the brand new visitor within the cascade. Cascade layers have extra precedence over the specificity of a selector. Within the following instance, are you able to guess the font measurement of the p component within the customized layer?
@layer base, customized;

@layer base {
  #web page .prose p {
    font-size: 1rem;
  }
}

@layer customized {
  p {
    font-size: 2rem;
  }
}
The font measurement is 2rem. In cascade layers, regardless of the component specificity, will probably be ignored if the component is being overridden within the subsequent layer.
Specificity
After layers, the browser seems to be on the CSS guidelines and decides which one wins over the opposite primarily based on its selector specificity.
Right here is an easy instance. The button inside a publication has a better specificity than the .button. Because of this, the primary rule might be overridden.
.button {
    padding: 1rem 1.5rem;
}

/* This wins */
.publication .button {
    padding: 0.5rem 1rem;
}
Order of Look
Lastly, the order of look takes motion. When two parts have the identical specificity, then their order within the CSS doc will decide which one wins.
Think about the next instance:
.publication .button {
    padding: 1rem 1.5rem;
}

/* This wins */
.publication .button {
    padding: 0.5rem 1rem;
}
Each of the above guidelines have the identical specificity. The latter wins as a result of it got here after the primary rule.
Now that you’ve an concept about the place layers dwell within the cascade, let’s get into some use circumstances.
Use circumstances for Cascade Layers
I attempted to have a look at present initiatives and see the place cascade layers will shine, and I got here up with the next use makes use of.
UI Theme Switching
For a mission I’m engaged on, utilizing cascade layers for theming the UI would be the excellent resolution. The issue it solves right here is to permit me as a developer to modify between themes with out altering the CSS or reorder it in a technique or one other.
@layer base, parts, objects, parts, pages, themes;
I’ve totally different layers, and the final one is themes. The layer themes can comprise a number of layers (Sure, cascade layers help nesting).
Discover on the high, I outlined @layer customized, default. The default theme will override the customized one.
@layer base, parts, objects, parts, pages, themes;

@layer themes {
    @layer customized, default;

    @layer default {
        :root {
            --color-primary: #1877f2;
        }
    }

    @layer customized {
        :root {
            --color-primary: #d73a7c;
        }
    }
}
If you wish to change themes, you’ll be able to simply reorder the layers within the first definition inside @layer themes.
@layer base, parts, objects, parts, pages, themes;

@layer themes {
    /* Customized is energetic */
    @layer default, customized;

    @layer default {
        :root {
            --color-primary: #1877f2;
        }
    }

    @layer customized {
        :root {
            --color-primary: #d73a7c;
        }
    }
}
Third celebration CSS
I took an instance that makes use of flickity carousel. Take a look at all these! necessary values.
.flickity-page-dots {
    backside: 20px !necessary;
}

.flickity-page-dots .dot {
    background: #fff !necessary;
    opacity: 0.35 !necessary;
}

.flickity-page-dots .dot.is-selected {
    opacity: 1 !necessary;
}
With the cascade layers, we will add the third-party CSS earlier than the parts layer. We will import an exterior CSS file and assign it to a layer.
@layer base, distributors, parts;

@layer base {
    /* Base kinds */
}

/* Import a .css file and assign it to a layer */
@import url(flickity.css) layer(distributors);

@layer parts {
    .flickity-page-dots {
        backside: 20px;
    }

    .dot {
        background: #fff;
        opacity: 0.35;
    }

    .dot.is-selected {
        opacity: 1;
    }
}
Much less worrying about specificity points
Say we’ve a list element, and we’d like a variation the place the record has a smaller margin.
<ul class="record">
    <li class="list__item list__item--compact">Merchandise 1</li>
    <!-- Different objects -->
</ul>
Because the :not pseudo selector provides the component extra specificity, it may well’t be overridden with out reusing :not. Think about the next:
/* This wins */
.list__item:not(:last-child) {
    margin-bottom: 2rem;
    define: strong 1px #222;
}

.list__item--compact {
    margin-bottom: 1rem;
}
The .list__item--compact received’t override the .list__item, as a result of the latter has extra specificity as a result of utilizing :not. To make it work, we have to do the next:
.list__item:not(:last-child) {
    margin-bottom: 2rem;
    define: strong 1px #222;
}

.list__item--compact:not(:last-child) {
    margin-bottom: 1rem;
}
Let’s discover the issue solved with cascade layers.
Think about the next the place the @layer record accommodates base and overrides layer. Within the overrides, I wrote the variation class, and it labored as anticipated for the reason that overrides is the final layer.
@layer record {
    @layer base, overrides;

    @layer base {
        .list__item:not(:last-child) {
            margin-bottom: 2rem;
        }
    }

    @layer overrides {
        .list__item--compact {
            margin-bottom: 1rem;
        }
    }
}
Nested parts

On this instance, we’ve an inventory of actions (like, remark) for the primary social feed merchandise, and one other record per every remark.
The icon within the feed merchandise has a measurement of 24px. Within the remark element, the dimensions is smaller.
@layer feed, feedback;

@layer feed {
  .feed-item .c-icon {
    width: 24px;
    peak: 24px;
  }
}

@layer feedback {
  .comment__icon {
    width: 18px;
    peak: 18px;
  }
}
Discover that .feed-item .c-icon has extra specificity than .comment__icon, however that’s the advantage of utilizing cascade layers!
Utility CSS
We’ve gotten used to including !necessary to utility CSS lessons to make sure that they may at all times apply to the component. With cascade layers, we will place the utility within the final 12 months.
Think about the next instance. We have now a web page header with a utility class p-0. We need to reset the padding to 0.
<div class="c-page-header p-0">
    <!-- Content material -->
</div>
Right here is how this seems to be with cascade layers.
@layer base, distributors, parts, utils;

@layer parts {
    @layer page-header {
        .c-page-header {
            padding: 1rem 2rem;
        }
    }
}

@layer utils {
    .px-0 {
        padding-left: 0;
        padding-right: 0;
    }
}
Extra particulars about cascade layers
Unlayered kinds have extra specificity
If there are CSS kinds that aren’t assigned to a layer, then we might be added to an implicit last layer.
Think about the next instance.
.button {
    border: 2px strong lightgrey;
}

@layer base, parts;

@layer base {/* Base kinds */}

@layer parts {
    .button {
        border: 0;
    }
}
On this instance, the .button rule is outlined and not using a @layer, however for the browser, this can place the rule in an implicit layer.
@layer base, parts;

@layer base {/* Base kinds */}

@layer parts {
    .button {
        border: 0;
    }
}

/* Implicit layer */
@layer {
    .button {
        border: 2px strong lightgrey;
    }
}
Conclusion
Cascade layers are an thrilling CSS function, and as you’ve seen within the examples, it may be fairly helpful. The one limitation for me is that we received’t be capable to use it as an enhancement with CSS alone. That may decelerate the adoption of layers a bit within the net group.