


In the case of constructing a structure, CSS Grid presents us quite a few totally different selections for putting gadgets. On this article we’ll check out the totally different placement strategies, learn how to use auto-flow to keep away from having to explicitly place each merchandise, and why generally grid gadgets won’t be positioned the place you count on them to be.
I like to think about utilizing Grid as two distinct components:
- Scaffolding – or constructing the construction of the grid itself. This entails defining the properties performing on the grid container, starting with
show: grid, and describing the form of the grid and the way it ought to behave utilizing any mixture ofgrid-template-columns,grid-template-rows,grid-auto-columnsandgrid-auto-rows(orgrid/grid-templateif utilizing the shorthand). - Furnishing the grid – telling the browser the place every youngster of our grid container needs to be positioned.
On this article we’ll take a deeper take a look at the second half, and particularly auto placement.
Alternative ways to position a grid merchandise
Express placement
The properties that permit us to explicitly place gadgets on a grid are:
grid-column-startgrid-column-endgrid-row-startgrid-row-endgrid-column(shorthand forgrid-column-start/grid-column-end)grid-row(shorthand forgrid-row-start/grid-row-end)grid-area(shorthand forgrid-row-start/grid-column-start/grid-row-end/grid-column-end)
The above properties are outlined on the gadgets themselves. Attainable values embrace line numbers, line names, span values or space names. There are not any guidelines for which it’s best to and shouldn’t use, and you may combine and match as you want. For instance:
.item--a {
  grid-area: a;
}

.item--b {
  grid-area: 2 / 2 / 4 / 4;
}

.item--c {
  grid-row: span 2 / 5;
  grid-column: 1 / 3;
}
grid-template-areas
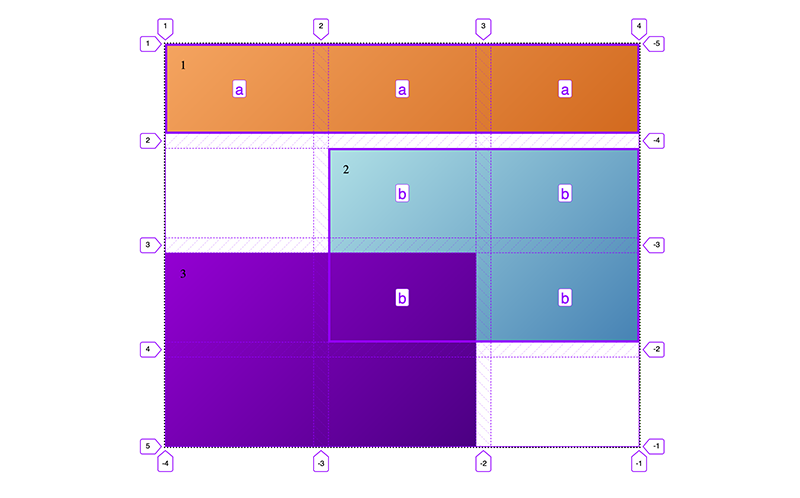
Moreover, now we have grid-template-areas. This property it’s outlined on the grid container. It permits us to outline grid areas with names, then reference these areas to position the gadgets:
.grid {
  show: grid;
  grid-template-columns: repeat(3, 1fr);
  grid-template-rows: repeat(4, 120px);
  grid-template-areas:
    'a a a'
    '. b b'
    '. b b'
    '. . .';
}

.a {
  grid-area: a;
}

.b {
  grid-area: b;
}
That is fairly cool, because it means we might change the structure considerably by solely altering the grid-template-areas worth. We don’t want so as to add or change any properties on the gadgets themselves. An enormous win for responsive design!
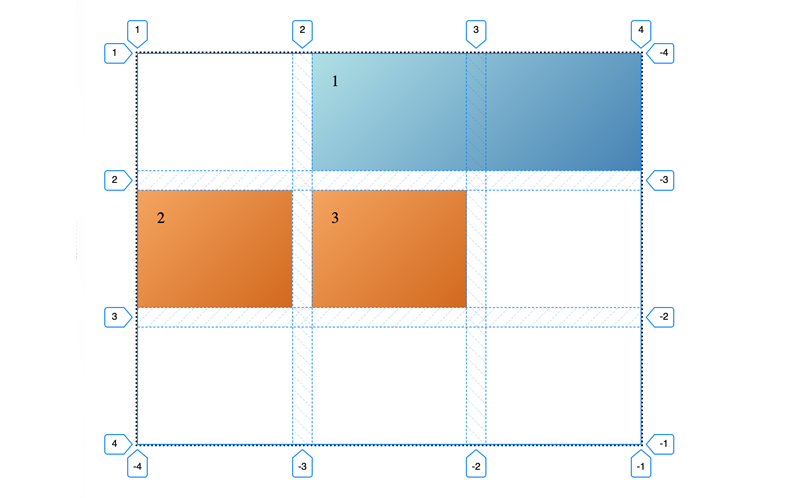
We is likely to be tempted to position each merchandise explicitly utilizing grid-template-areas. However there’s one disadvantage: You may’t outline overlapping areas. Making a structure like Fig 01 couldn’t be performed with grid-template-areas alone.
However we might use grid-template-areas as well as to inserting gadgets by line identify or space.
.a {
  grid-area: a;
}

.b {
  grid-area: b;
}

.c {
  grid-area: 3 / 1 / 5 / 3;
}
Auto placement
If we don’t explicity place gadgets on our grid, they are going to be auto-placed. By default every grid gadgets have a span of 1 on each the row and the column axis, so they may every be positioned into the following accessible grid cell. We will use this to our benefit: If now we have one thing like a information feed, we don’t need to have to position every merchandise explicitly, particularly if we don’t know what number of gadgets there will probably be.
Predicting auto placement
Within the above instance the foundations of auto placement are pretty intuitive: Gadgets are positioned alongside the row (or inline) axis till they replenish the row, after which they’ll wrap onto the following row (creating a brand new row if there isn’t one outlined).
But when now we have some gadgets which can be explicity positioned, and others that aren’t, them how can we determine the cells the auto positioned be positioned into?
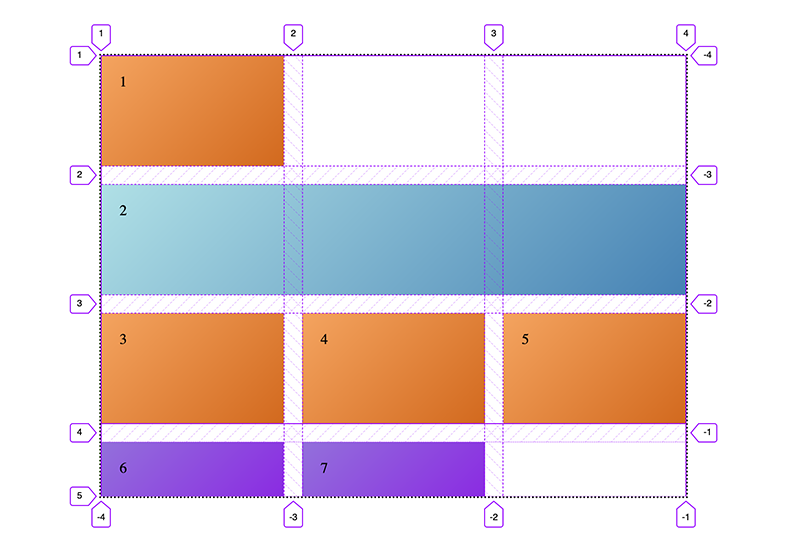
If I place an merchandise on my grid utilizing grid-column: 2 / span 2 I’d count on that any auto positioned gadgets succeeding that one will probably be positioned after the one I’m inserting (Fig 03):
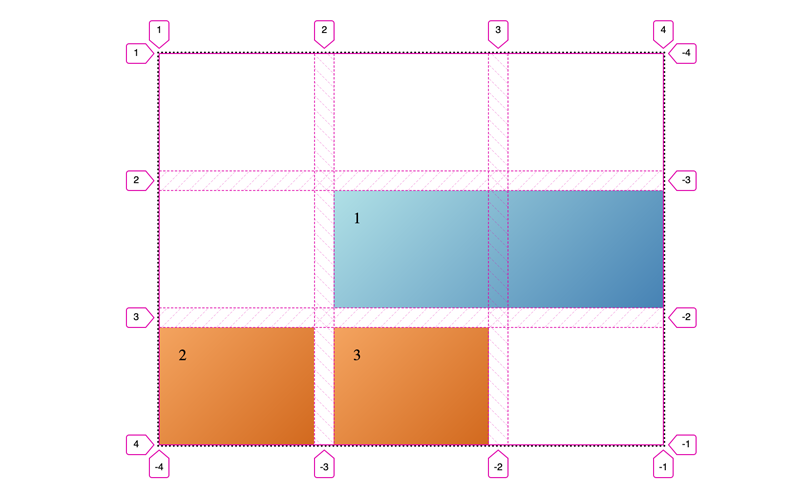
What really occurs with the above code is the succeeding gadgets are positioned earlier than the positioned merchandise. They’re positioned into the primary accessible cells, which occur to be the primary two in our grid.
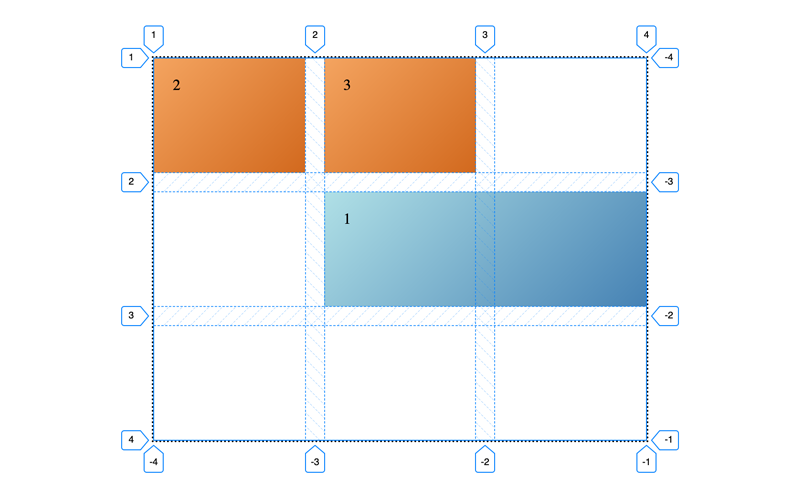
But when we place the blue merchandise solely on the column axis, the gadgets are positioned after the primary one:
So why is the location behaviour totally different? If we perceive the foundations of auto placement, issues turn out to be clearer.
Understanding circulate
A great way to consider that is to think about our grid as a flowing river. Any explicitly positioned gadgets are boats anchored within the river. Auto positioned gadgets circulate round these, from left to proper (Fig 06).

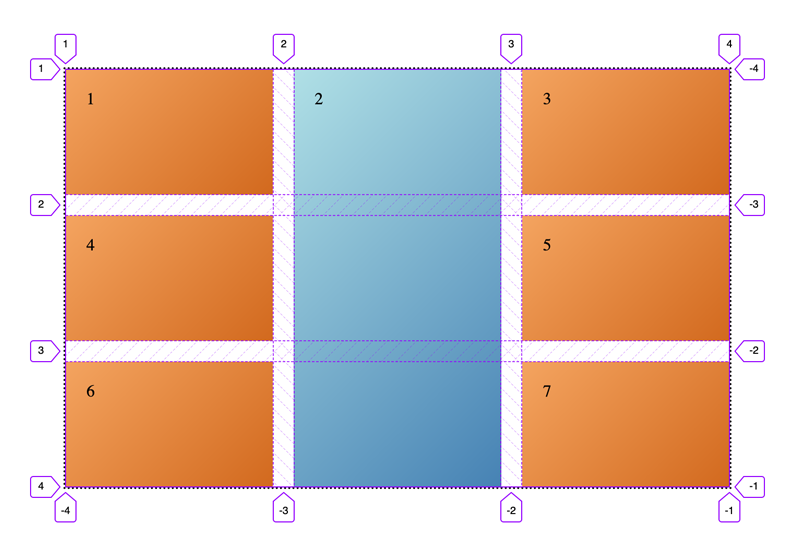
Grid gadgets which can be solely explicitly positioned on one axis are extra loosly anchored. They take part within the grid circulate on the remaining axis.
Gadgets positioned utilizing a span worth alone will nonetheless circulate just like the others, however they’ll be restricted by their very own specific measurement. An merchandise with a span of two will circulate onto the following row if there are lower than 2 grid columns accessible. We will consider these as being semi-auto positioned (Fig 07).
In Fig 07 we’re solely inserting the merchandise on the column axis once more (utilizing span), so successive gadgets are positioned after it. Now we have sufficient gadgets to fill the grid precisely – however quite than filling earlier grid cell, the sixth and seventh gadgets create an implicit observe. This doesn’t occur if we solely place it explicitly on the row axis (Fig 08).
That is to do with the order by which merchandise placement is resolved within the grid placement algorithm.
Altering the circulate of your grid
There are two totally different properties we will use to vary the order of things within the grid. The primary is grid-auto-flow. This modifications the course of circulate, and subsequently how gadgets will probably be auto positioned. Attainable values are row (default), column, row dense and column dense.
grid-auto-flow: column
By altering the worth from row to column, we will see within the second part on this demo that the behaviour has now reversed: Gadgets positioned on the column axis are actually resolved forward of these on the row axis. Inserting an merchandise on the column axis not generates an implicit grid observe, as gadgets are packed into each cell, however inserting an merchandise on the row axis does.
See the Pen Auto circulate and distribution by Michelle Barker
(@michellebarker) on CodePen.
grid-auto-flow: dense
Utilizing the dense key phrase along with row or column (row is the default), we will
specify that auto positioned gadgets ought to pack themselves into any accessible grid cells (together with ones preceeding any explicitly positioned gadgets). This may guarantee there are not any gaps, even when an merchandise is positioned on just one axis. Within the above demo you possibly can see how every of the values for grid-auto-flow alter the behaviour of the grid.
Order
The order property will not be unique to Grid – it will also be used with flexbox. It permits us to vary the order of particular person gadgets throughout the circulate. Gadgets have a default order of 0. Altering an auto positioned merchandise’s order to -1 will place it firstly of the grid auto positioned grid gadgets – after explicitly positioned gadgets, if there are any positioned firstly of the grid.
The order property will solely have an effect on auto and semi-auto positioned gadgets (these utilizing a single span worth). Within the demo under the purple merchandise’s place is altered utilizing the order property, however the blue merchandise, which is explicitly positioned, will not be affected.
See the Pen Order by Michelle Barker
(@michellebarker) on CodePen.
Course
You may need observed, grid-auto-flow permits us to vary the course of circulate from row to column, however it doesn’t permit us to make gadgets circulate from proper to left. As an alternative, we will use the course property. That is a part of the CSS Writing Modes, which is designed to help worldwide writing modes the place textual content flows in a distinct course from left-to-right. To make our grid circulate from proper to left we will use this:
.grid {
  course: rtl;
}
⚠️ Use with warning ⚠️
Properties that have an effect on the visible order of grid gadgets needs to be used with the utmost warning, because the don’t change the supply order, and might subsequently adversely have an effect on accessibility. Rachel Andrew has written extensively about it in her article, Grid, content material re-ordering and accessibility.
I imagine there are some instances the place visible re-ordering is smart, however in my expertise they most frequently contain specific merchandise placement.
Conclusion
I hope this text has helped demystify some points round placement of auto circulate grid gadgets. You may additionally have an interest to learn half 1 of this collection, Understanding Implicit Tracks, which additionally offers with placement of grid gadgets.