


With digital knowledge rising at an incomprehensible fee, absorbing, storing, and analyzing knowledge shortly whereas retaining your prices low could be tough. So why not take into account AWS Redshift?
With its scalable, cloud-based structure and highly effective knowledge warehousing capabilities, AWS Redshift permits you to handle and analyze massive quantities of knowledge shortly. And on this tutorial, you’ll get began with AWS Redshift and study the way it works, its options, advantages, and limitations.
Sounds promising? Keep tuned and declare helpful insights that may assist drive enterprise choices!
Conditions
This tutorial will likely be a hands-on demonstration. To comply with alongside, make certain you might have an AWS account with an Amazon Easy Storage Service (S3) bucket. This tutorial makes use of an S3 bucket named redshift-samp-data and pattern knowledge recordsdata offered by AWS.
What’s AWS Redshift?
AWS Redshift is a cloud-based knowledge warehousing service constructed to handle huge quantities of knowledge shortly and effectively. This service allows you to use your current enterprise intelligence instruments and customary SQL to retailer and analyze your knowledge.
One other issue that makes Redshift stand out is that it prices lower than every other cloud knowledge warehouse. Efficiency-wise, AWS Redshift is without doubt one of the quickest knowledge warehouses out there.
AWS Redshift permits faster question instances and extra exceptional efficiency. How? By profiting from a massively parallel processing (MPP) structure that spreads question processing throughout a number of nodes.
Creating an IAM Function to Handle the AWS RedShift Service
AWS Redshift knowledge warehouse includes a set of computing nodes referred to as a cluster. You may be making a Redshift cluster, including knowledge to it, and likewise querying it.
However since you may be loading the information from Amazon S3, you want an IAM function with the right permissions. This IAM function will enable your cluster to speak or work together with different Amazon providers.
To create an IAM function with the required privileges:
1. Open your favourite net browser, and log in to your AWS Administration Console.
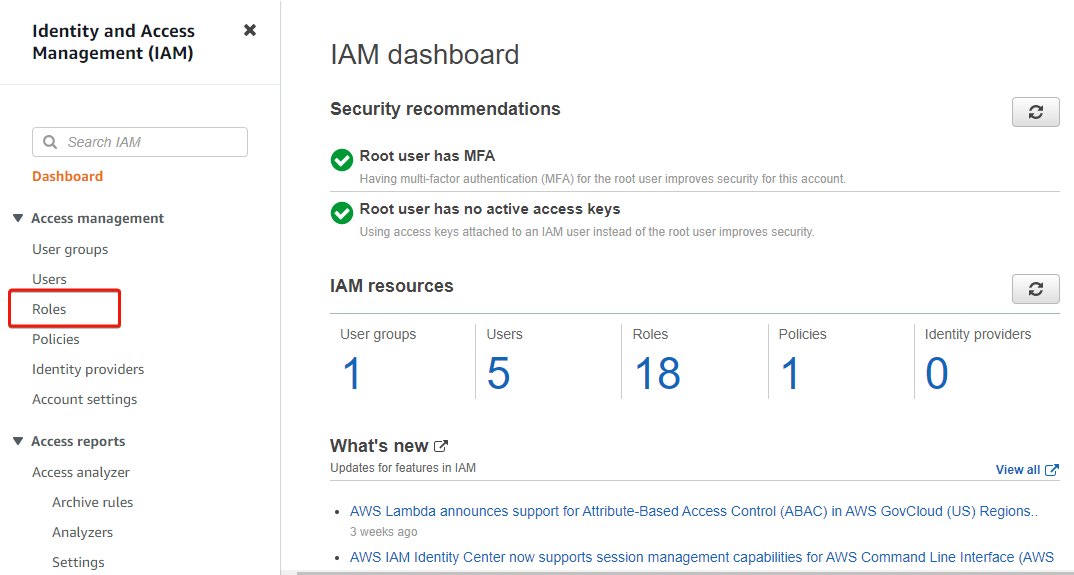
2. Subsequent, seek for iam and choose IAM underneath Providers from the search outcomes, as proven beneath, to entry the IAM dashboard.

3. On the IAM dashboard, click on Roles (left panel) to entry the web page the place you’ll be able to handle roles.
4. Now, click on Create function (upper-right) on the Roles web page to provoke creating a task.

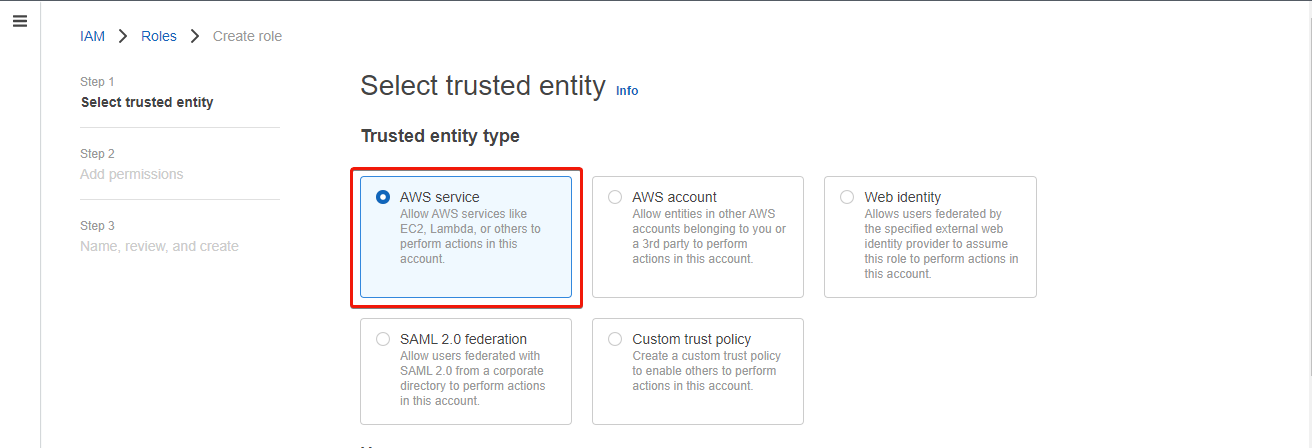
5. On the subsequent web page, choose AWS service because the Trusted entity sort.
A trusted entity is an AWS service, utility, or person who’s trusted to tackle an IAM function.
6. Subsequent, scroll down and choose Redshift within the dropdown discipline proven beneath, select Redshift – Customizable choice that seems beneath, and click on Subsequent.
The Redshift – Customizable choice permits AWS Redshift to entry AWS providers.

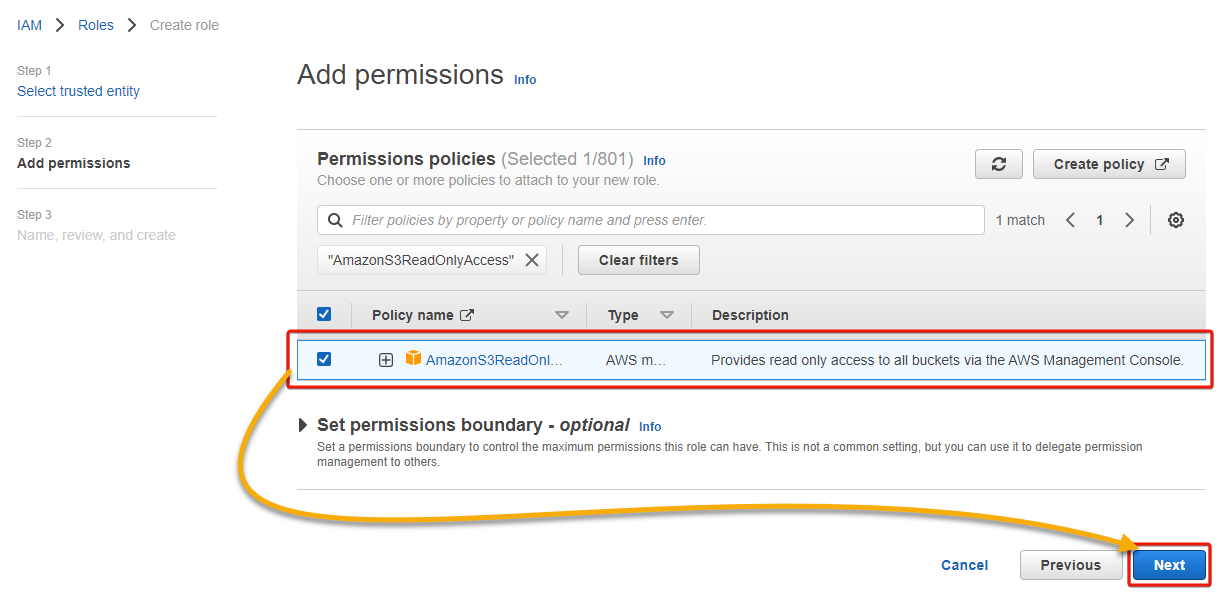
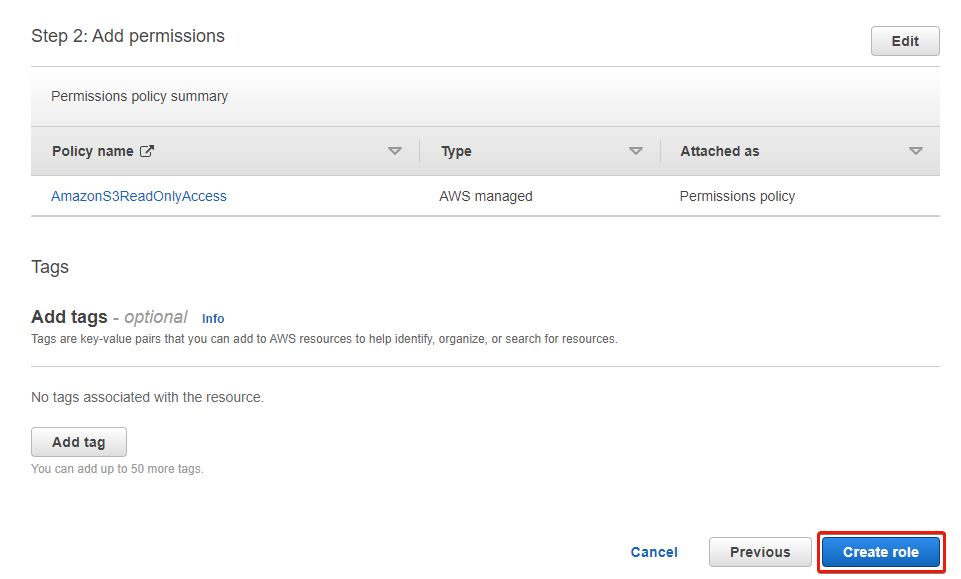
7. On the Permissions insurance policies web page, seek for and tick the AmazonS3ReadOnlyAccess coverage to pick it, go away different default settings, and click on Subsequent.
The AmazonS3ReadOnlyAccess coverage supplies read-only entry to all of your S3 buckets through the AWS Administration Console.
8. Now, present a singular identify (i.e., redshiftRole) for the function.
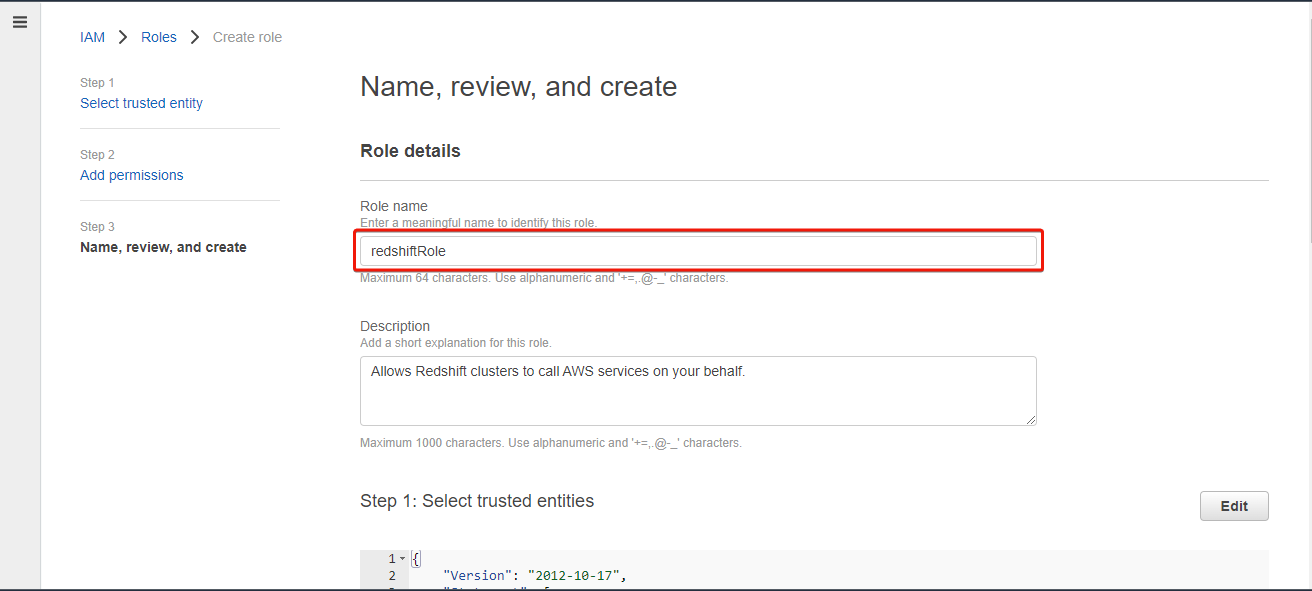
9. Assessment the function particulars, and click on Create function to finalize creating the function.
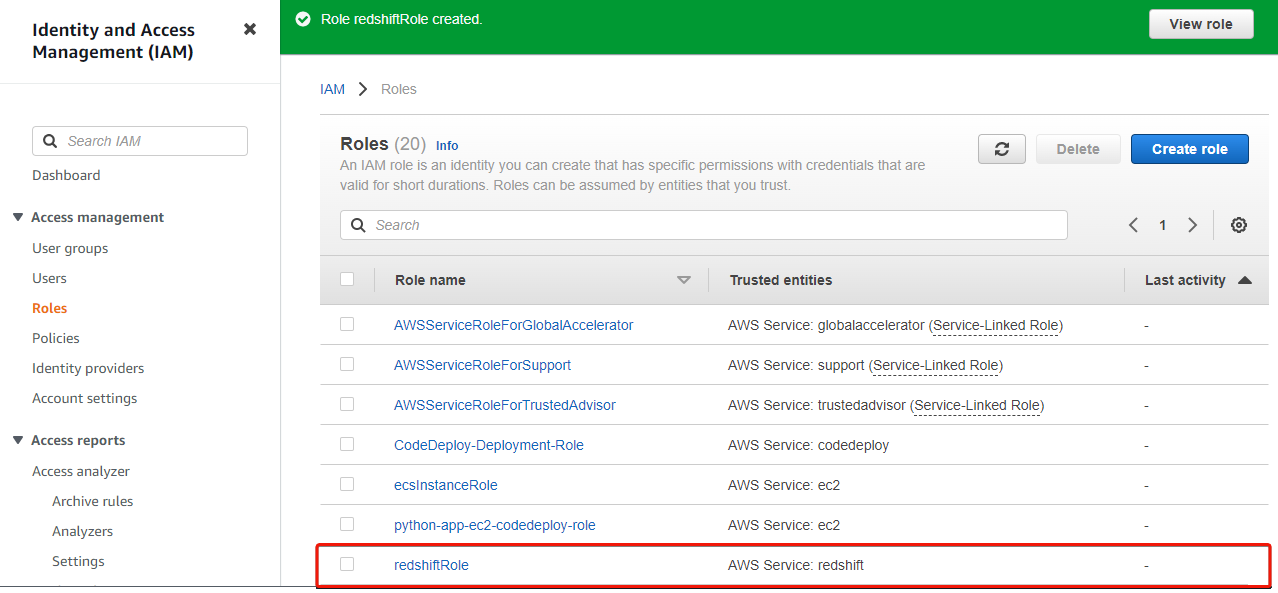
As soon as created, your browser redirects to the Roles web page, the place you will note the newly-created function, as proven beneath.
Creating an AWS Redshift Cluster
After you have created the IAM function, you’re able to create an AWS Redshift cluster. A Redshift cluster includes nodes, every containing a set of processing energy (CPU, reminiscence, and storage) for storing and processing knowledge.
To create a Redshift cluster, comply with these steps:
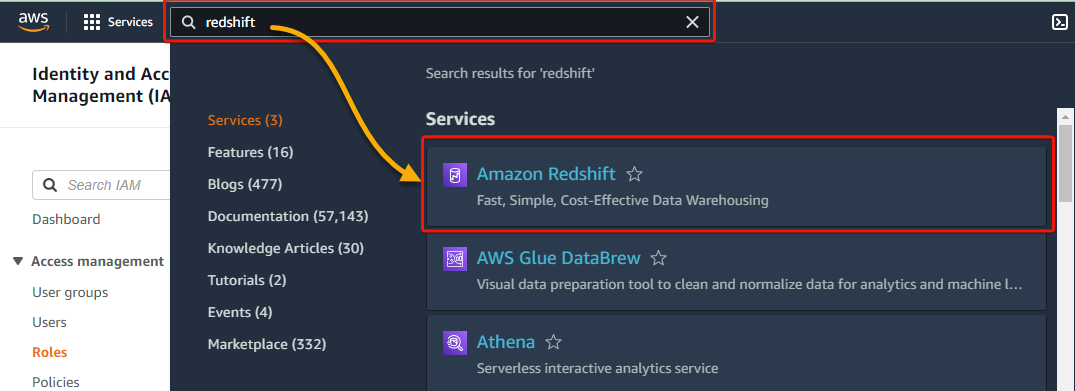
1. Within the AWS Administration Console, seek for redshift and choose Amazon Redshift underneath Providers within the search outcomes.
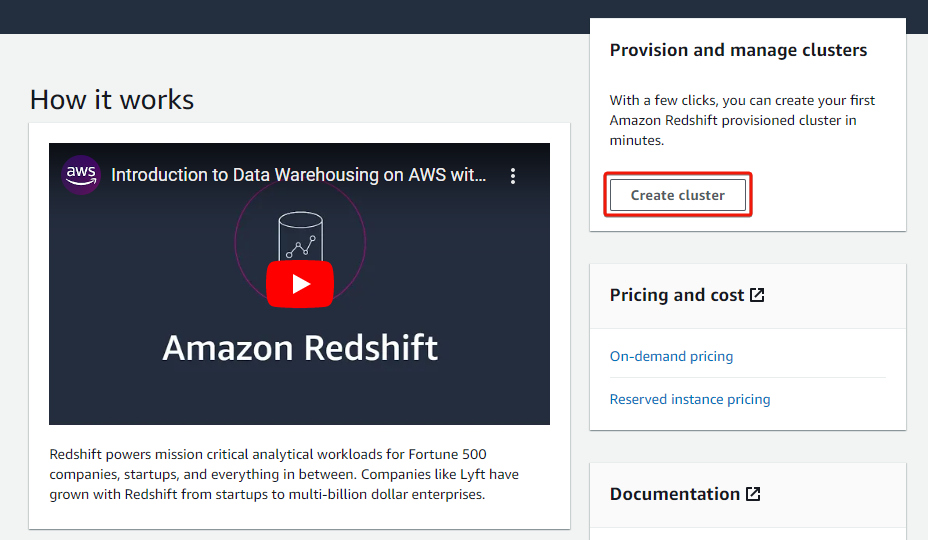
2. Subsequent, click on Create cluster to provoke creating an AWS Redshift Cluster.
3. Present a cluster identify within the Cluster identifier discipline (i.e., redshift-demo-cluster), and select whether or not you need to use this cluster for Manufacturing or Free trial. However this tutorial goes for Manufacturing.

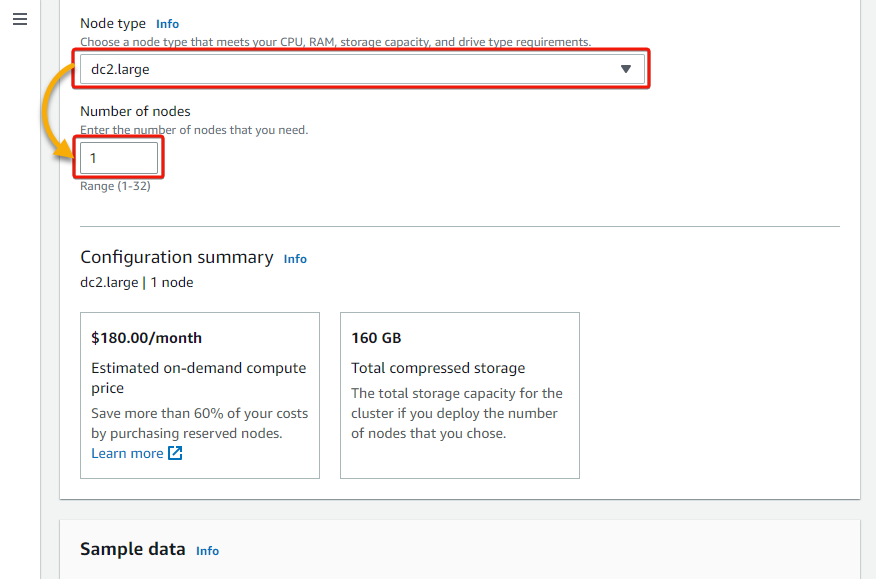
4. Now, choose dc2.massive for the Node sort and put 1 for the Variety of nodes.
Your alternative of node sort would rely in your workload necessities or elements, such because the complexity of your queries and knowledge amount. dc2.massive is ample for this demonstration.
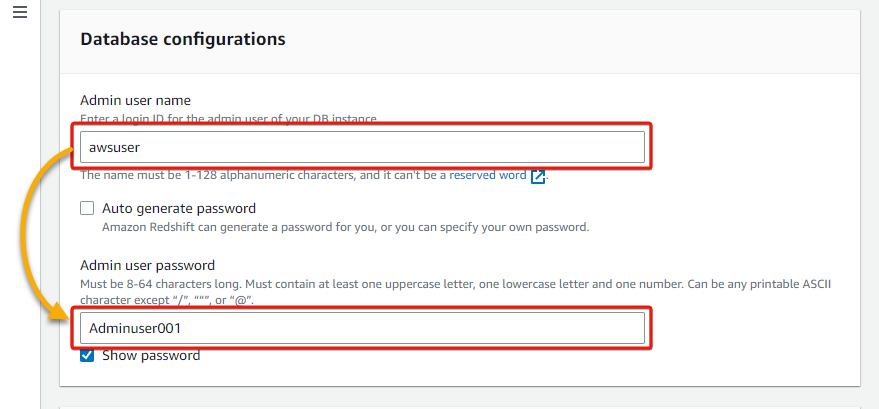
5. Below the Database configurations part, present a database Admin person identify and password.
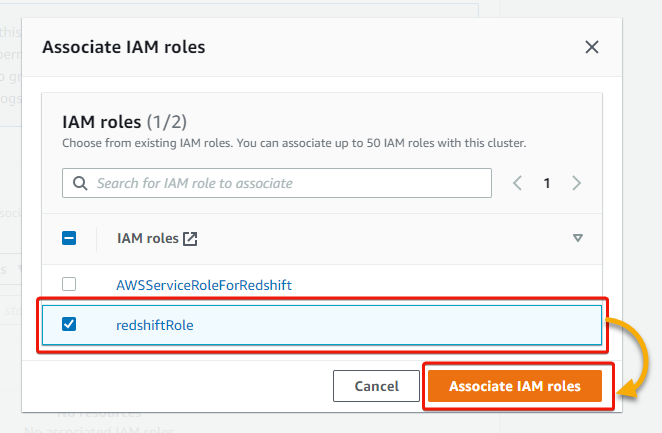
6. Subsequent, click on Affiliate IAM function, which brings up an inventory of your IAM roles.
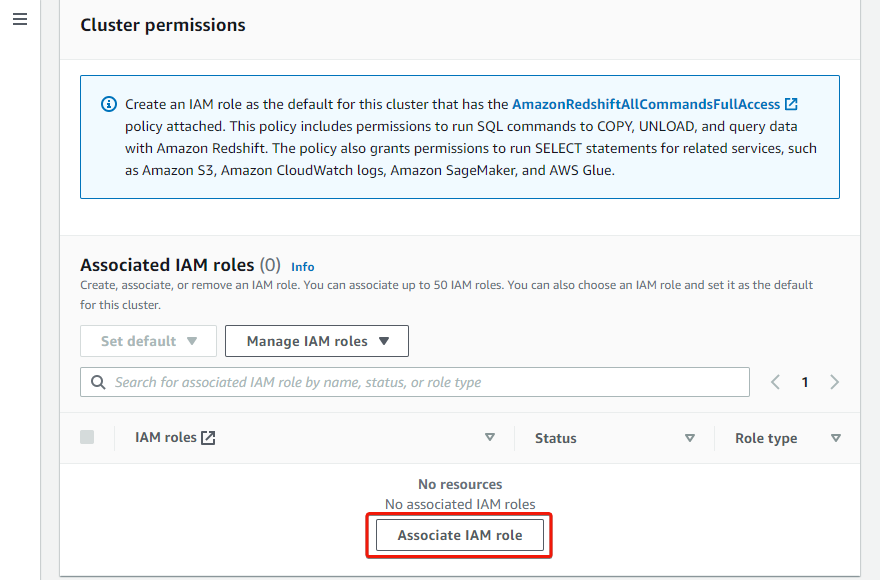
7. Within the pop-up window, tick the checkbox beside the IAM function you created and click on Affiliate IAM roles so as to add an related IAM function. You will notice the function listed as an related function afterward.
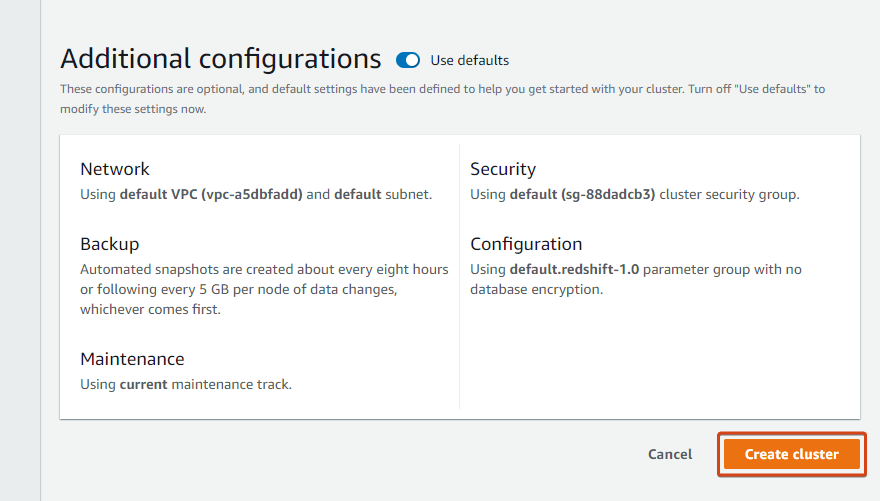
8. Lastly, scroll all the way down to the Extra configurations part, go away the default settings, and click on Create cluster to create your cluster.
However if you happen to select to not use the defaults, you can also make adjustments as follows:
- Create a cloud watch alarm.
- Change the database identify and port.
- Modify the backup and community settings, and so forth.
Creating the cluster takes a couple of minutes, and you will note successful notification, as proven beneath, as soon as the cluster is on the market to be used.

Connecting to an AWS Redshift Cluster
With an out there AWS Redshift cluster, now you can check if the cluster works. Why? You’ll connect with your cluster utilizing the Redshift Question Editor or different SQL shopper instruments similar to SQL Workbench.
However on this tutorial, you’ll use the Redshift Question Editor, which supplies a visible interface for creating and working SQL queries.
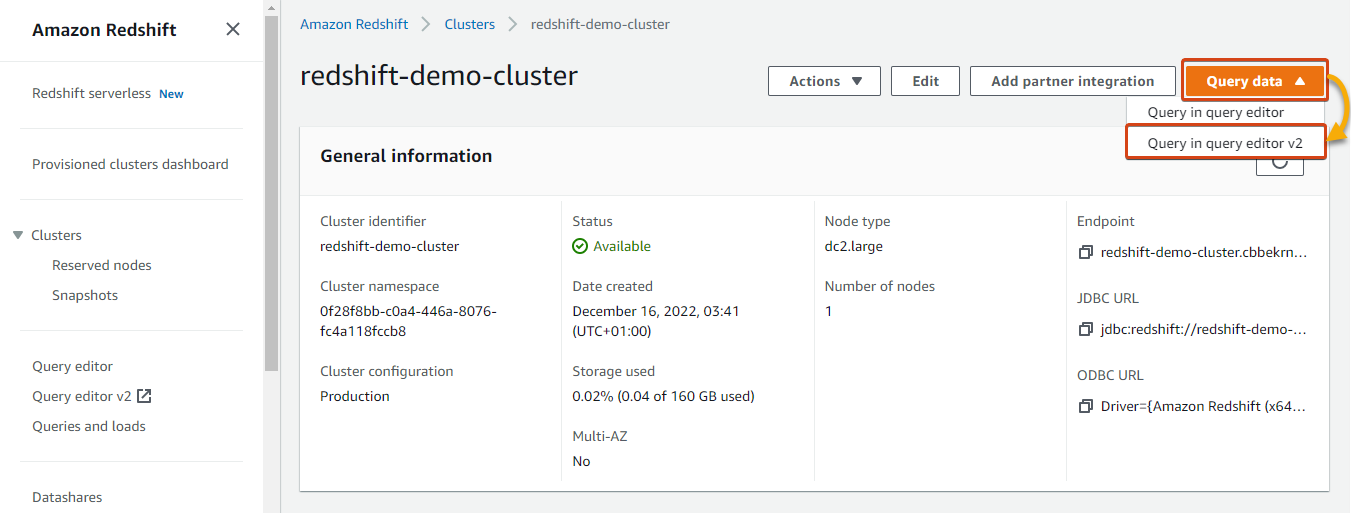
Below the Clusters record, click on in your cluster to entry its particulars web page.

Subsequent, click on on the Question knowledge dropdown (upper-right) and choose Question editor v2 to open a linked question editor in a brand new tab.
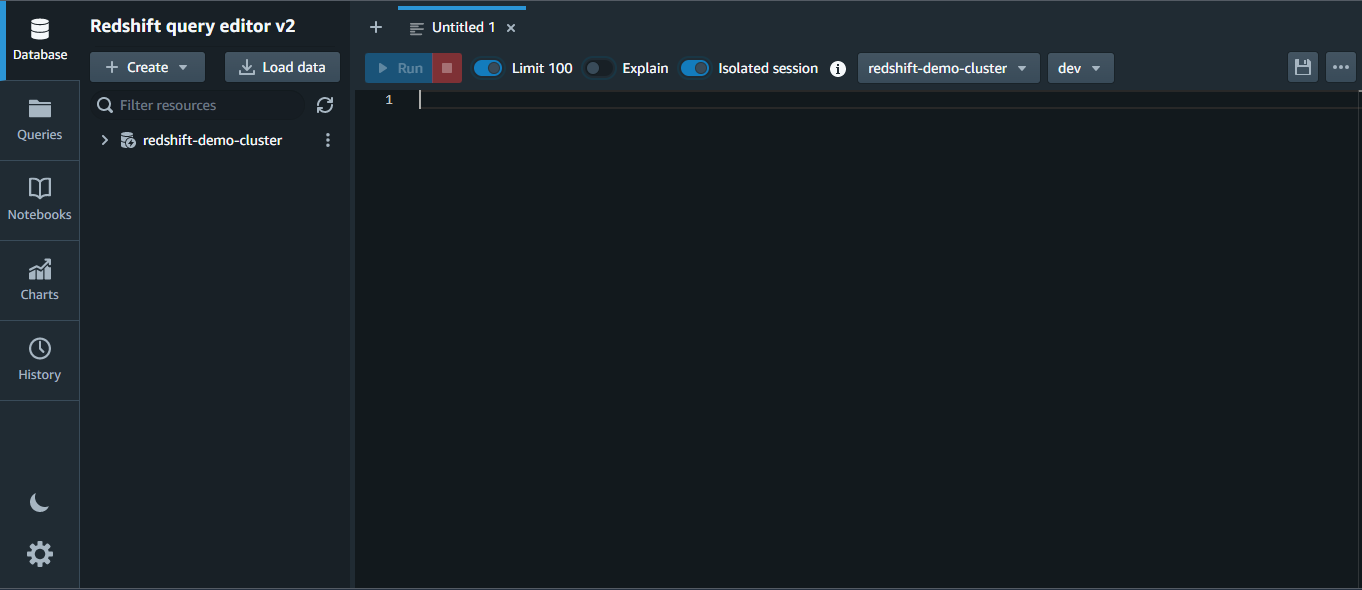
Beneath, you’ll be able to see the Redshift Question Editor v2.
Loading Information into AWS Redshift Cluster
Earlier than you’ll be able to run queries or analyze knowledge utilizing AWS Redshift, you need to load the information into the AWS Redshift cluster. On this instance, you’d load knowledge into the AWS Redshift cluster from an AWS S3 bucket.
This tutorial makes use of pattern knowledge recordsdata offered by AWS.
💡 Only S3, DynamoDB, and Amazon EMR allow simultaneous knowledge uploads. In case your knowledge is housed in Amazon S3, relational DynamoDB, or Amazon EMR, Redshift can load your knowledge effectively utilizing MPI. However for every other sources, parallel add will not be supported.
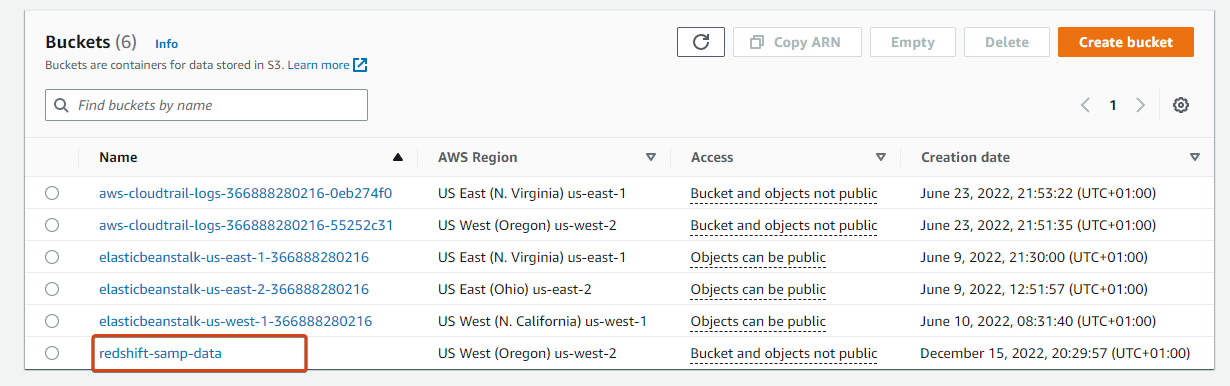
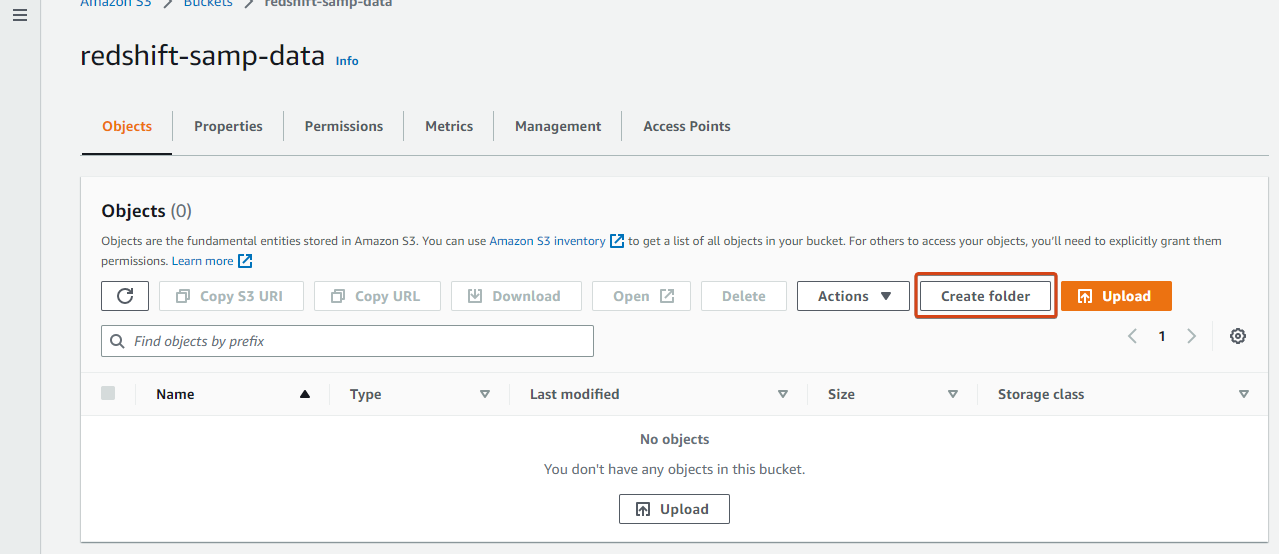
1. Navigate to your Buckets record, and click on your S3 bucket (redshift-samp-data) to entry it.
2. Subsequent, click on Create folder to provoke making a folder within the bucket that may include your knowledge recordsdata.
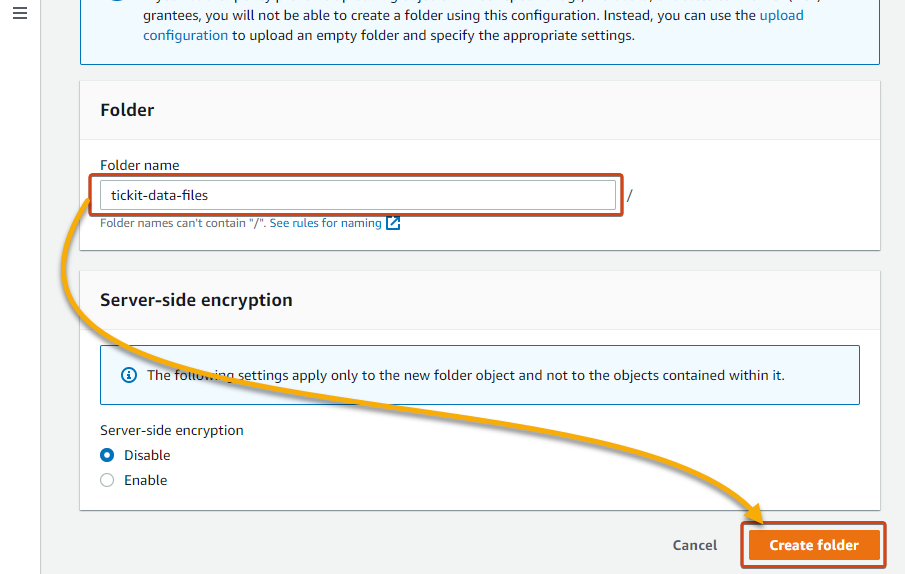
3. Enter a reputation for the folder (i.e., tickit-data-files), and click on Create folder to create the folder.
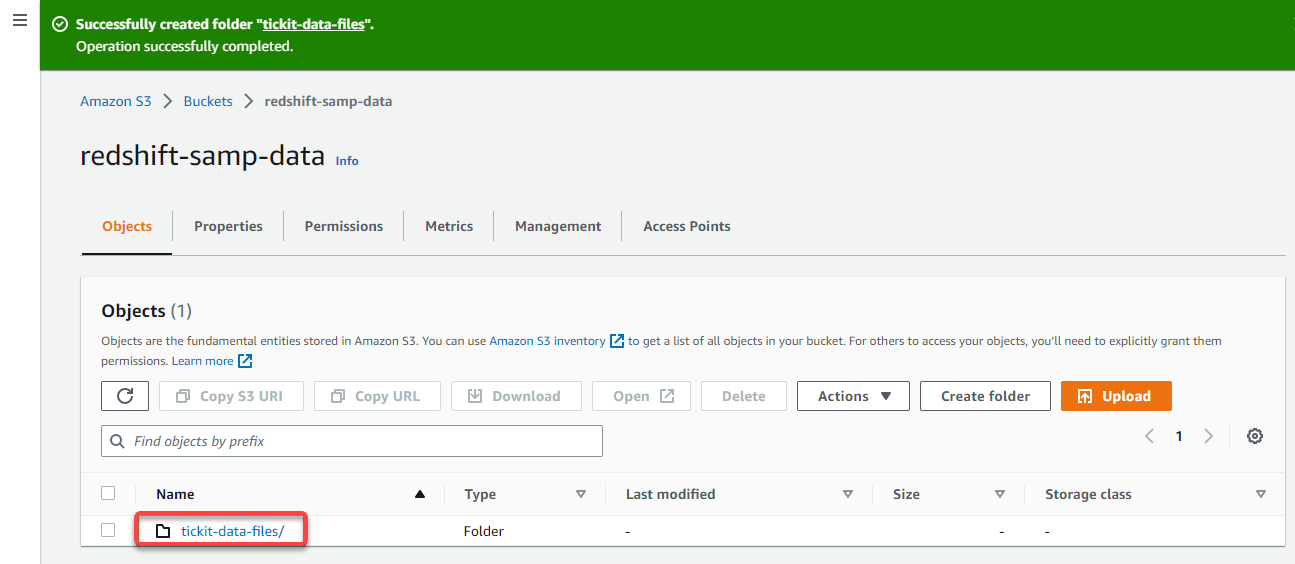
4. Now, click on the folder identify from the Objects desk, as proven beneath, to navigate contained in the folder.
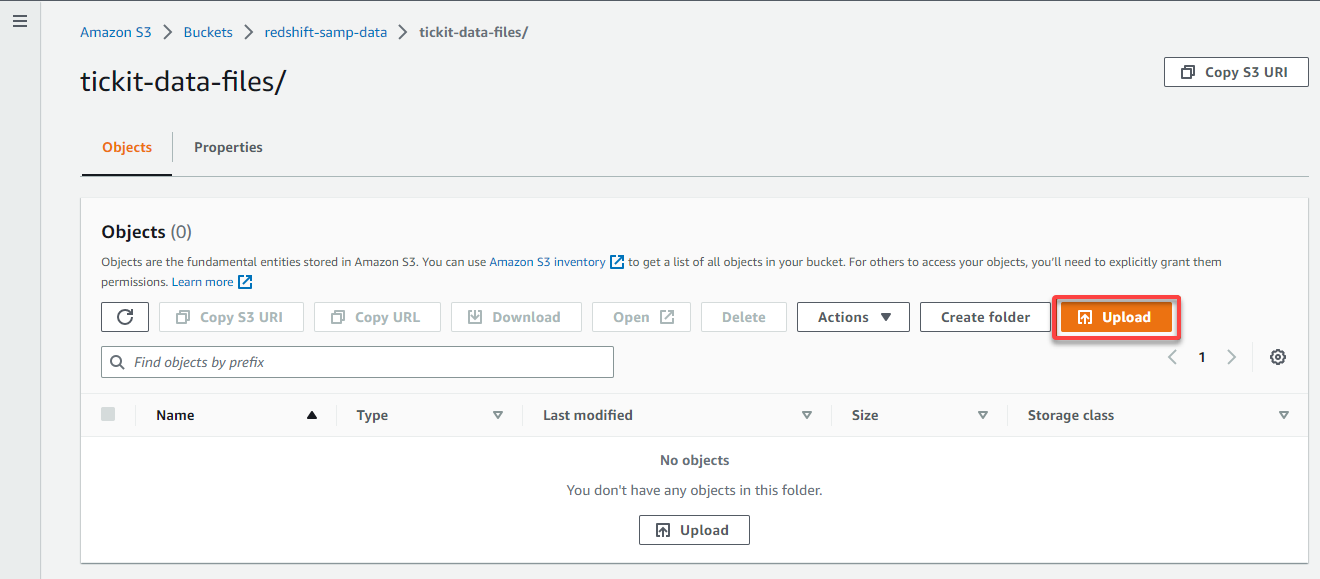
5. Within the folder’s Objects tab, click on Add to entry the web page the place you’ll be able to add knowledge recordsdata to add.
6. On the Add web page, click on Add recordsdata, and find your knowledge recordsdata to add to your S3 bucket.
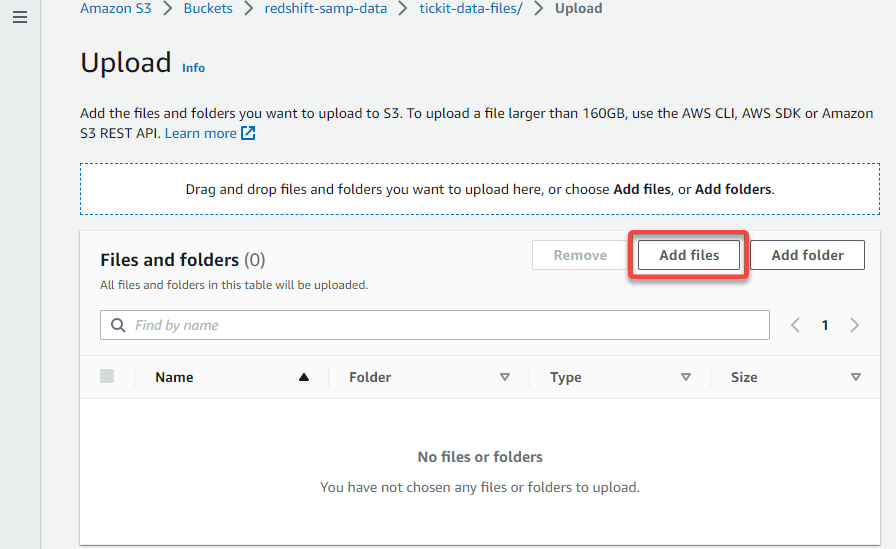
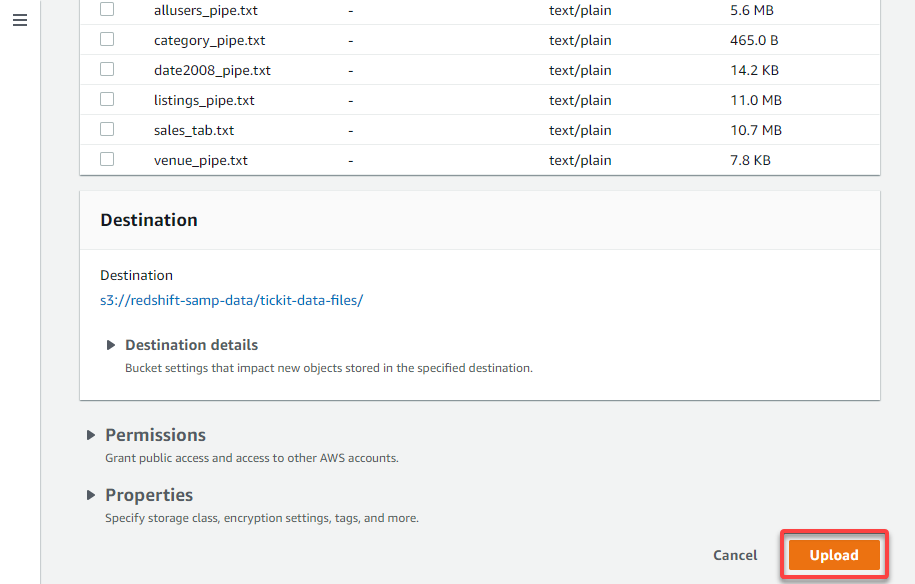
7. Now, click on Add (bottom-right) to add the chosen knowledge recordsdata to your folder.
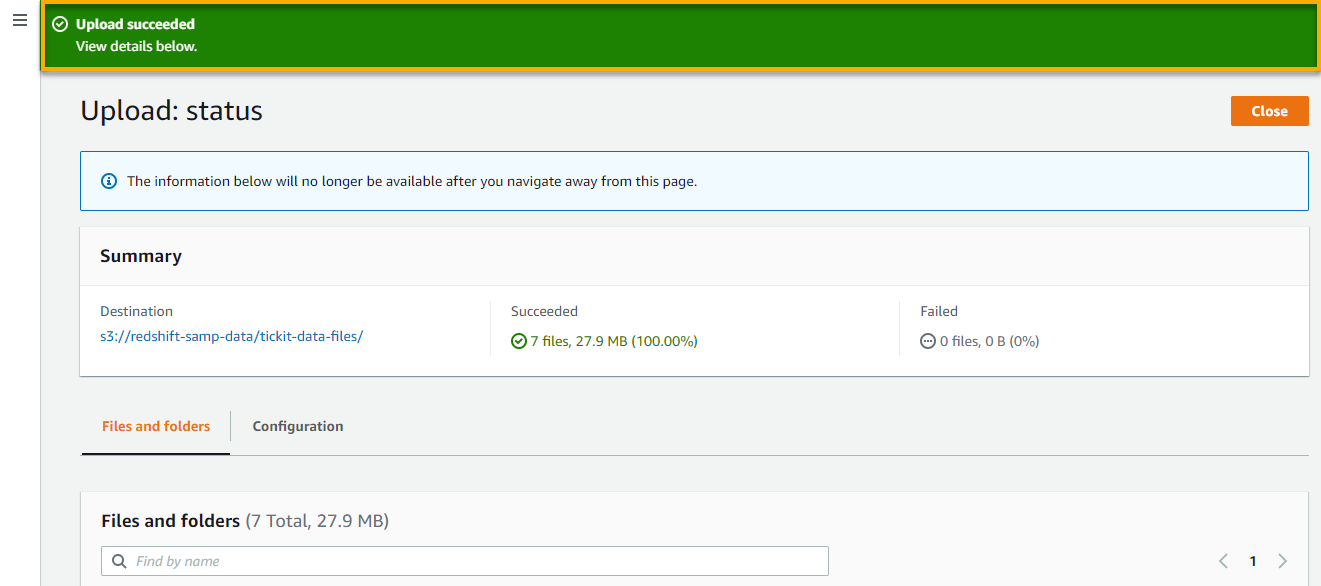
As soon as the add completes, you’ll get a notification on the prime of the web page, just like the one beneath.
Creating Tables through the Redshift Question Editor
When inserting knowledge from the recordsdata you uploaded to your S3 bucket, you first have to create tables. How? If you have already got the Redshift Question Editor up, you’re good to go.
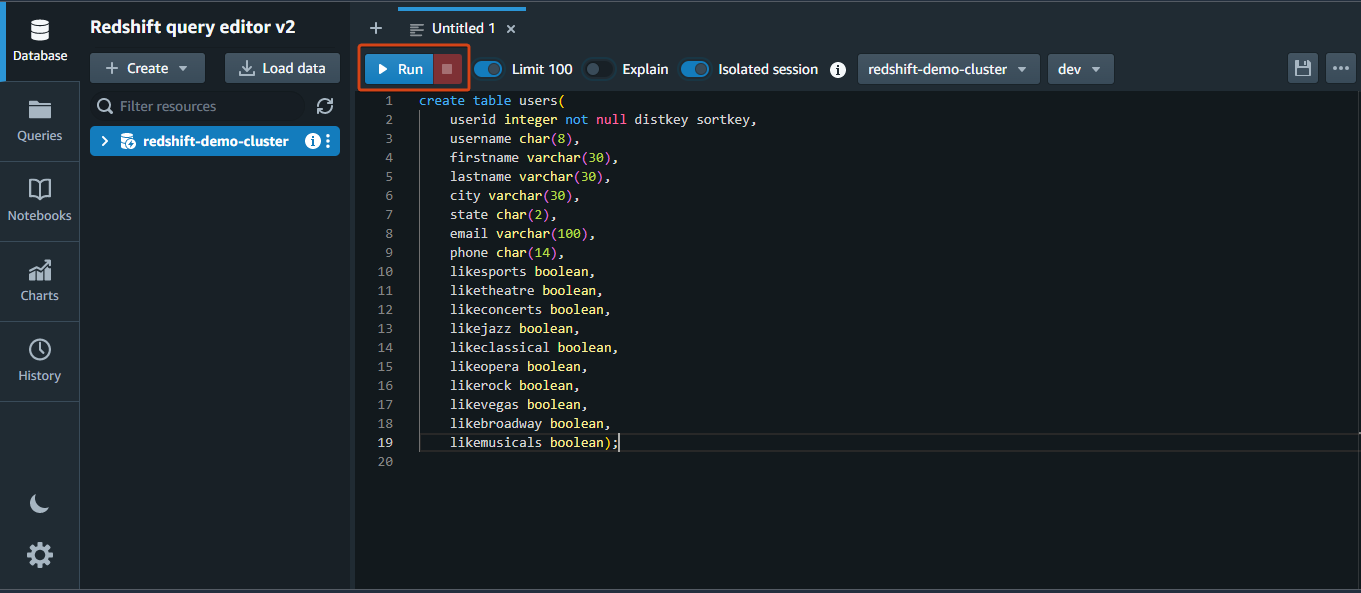
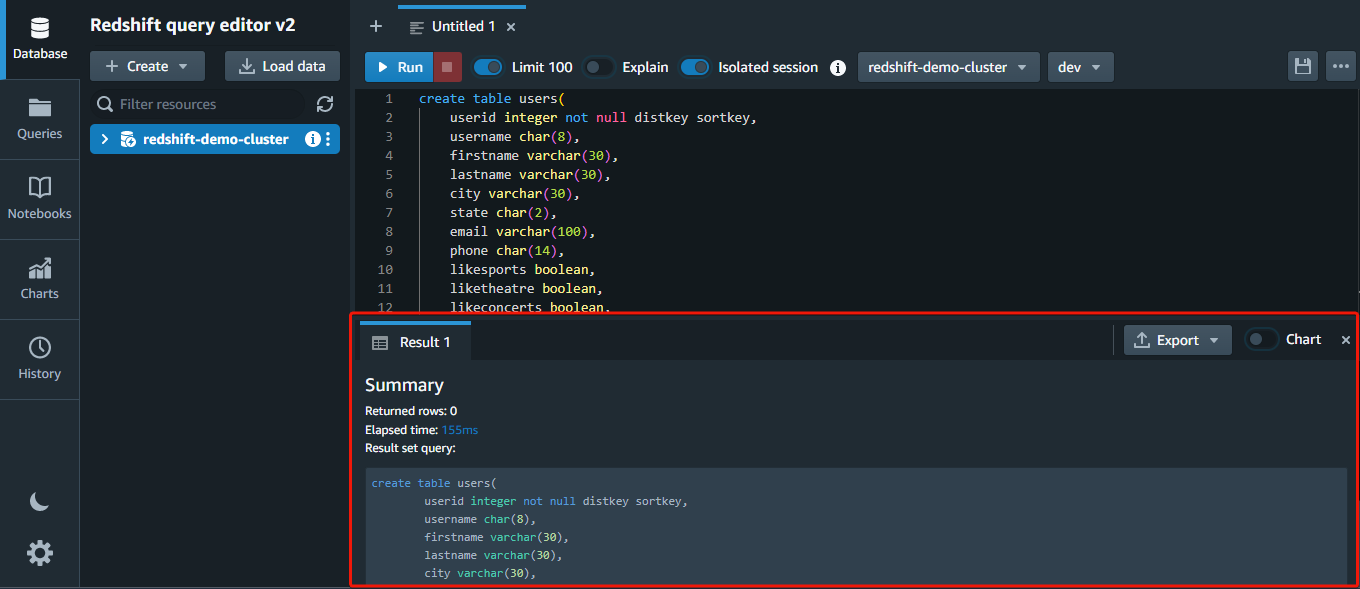
Run the next SQL assertion within the question editor to create a desk named customers.
create desk customers(
	userid integer not null distkey sortkey,
	username char(8),
	firstname varchar(30),
	lastname varchar(30),
	metropolis varchar(30),
	state char(2),
	e-mail varchar(100),
	cellphone char(14),
	likesports boolean,
	liketheatre boolean,
	likeconcerts boolean,
	likejazz boolean,
	likeclassical boolean,
	likeopera boolean,
	likerock boolean,
	likevegas boolean,
	likebroadway boolean,
	likemusicals boolean);
💡 Notice that the Kind and Dist keys have to be totally understood as they management how knowledge is organized and listed throughout all AWS Redshift nodes.
You will notice a abstract of the execution on the backside after working the statements. If any assertion has an issue, an error message will likely be proven as an alternative.
Now, run the remainder of the SQL statements beneath to maintain creating tables.
create desk venue(
	venueid smallint not null distkey sortkey,
	venuename varchar(100),
	venuecity varchar(30),
	venuestate char(2),
	venueseats integer);
create desk class(
catid smallint not null distkey sortkey,
catgroup varchar(10),
catname varchar(10),
catdesc varchar(50));create desk date(
dateid smallint not null distkey sortkey,
caldate date not null,
day character(3) not null,
week smallint not null,
month character(5) not null,
qtr character(5) not null,
yr smallint not null,
vacation boolean default('N'));create desk occasion(
eventid integer not null distkey,
venueid smallint not null,
catid smallint not null,
dateid smallint not null sortkey,
eventname varchar(200),
starttime timestamp);create desk itemizing(
listid integer not null distkey,
sellerid integer not null,
eventid integer not null,
dateid smallint not null sortkey,
numtickets smallint not null,
priceperticket decimal(8,2),
totalprice decimal(8,2),
listtime timestamp);create desk gross sales(
salesid integer not null,
listid integer not null distkey,
sellerid integer not null,
buyerid integer not null,
eventid integer not null,
dateid smallint not null sortkey,
qtysold smallint not null,
pricepaid decimal(8,2),
fee decimal(8,2),
saletime timestamp);Loading Information to Tables
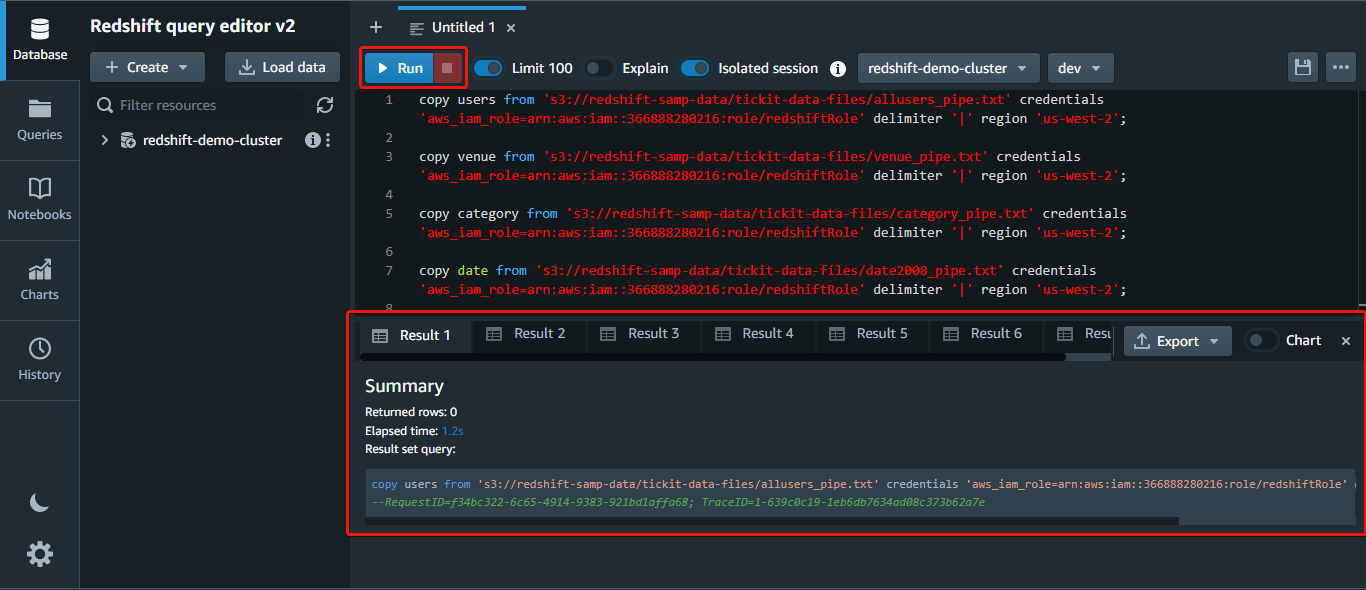
You now have your tables, however they’re all virtually empty. After creating the tables, you’ll be able to load knowledge from Amazon S3 through the use of the copy command.
AWS Redshift integrates with many different AWS providers, so you’ll be able to shortly load knowledge from sources similar to Amazon S3 and Amazon DynamoDB. You too can analyze knowledge utilizing different providers similar to Amazon EMR and Amazon Athena.
Beneath is the syntax of the copy command:
copy table_name [ column_list ] FROM data_source CREDENTIALS access_credentials [options]Run the next command to load the information from the *allusers_pipe.txt* file out of your S3 bucket to your customers desk, changing the next:
<aws_account_id>– Your AWS account ID.<role_name>– The identify of your IAM function. On this case,redshiftRole.us-west-2– The area you set to your S3 bucket.s3://redshift-samp-data/tickit-data-files– The folder path in your S3 bucket.
💡 Suppose you’re fearful about knowledge safety; no have to be. AWS Redshift makes use of superior encryption and safety measures to guard your knowledge.
copy customers from 's3://redshift-samp-data/tickit-data-files/allusers_pipe.txt' credentials 'aws_iam_role=arn:aws:iam::<aws_account_id>:function/<role_name>' delimiter '|' area 'us-west-2';
Now, repeat the identical copy command to load knowledge from the remainder of the recordsdata, changing customers and allusers_pipe.txt with the corresponding desk names and file names.
Querying a Cluster through the Redshift Question Editor
Now that you’ve got loaded some knowledge into your cluster, you need to use customary SQL queries to filter, type, and combination the information. For instance, you need to use the SELECT assertion to retrieve knowledge out of your tables, the INSERT assertion so as to add new rows to a desk, and so forth.
💡 Notice that AWS Redshift is designed for batch-style querying and will not be well-suited for purposes that require low-latency queries or excessive ranges of concurrency.
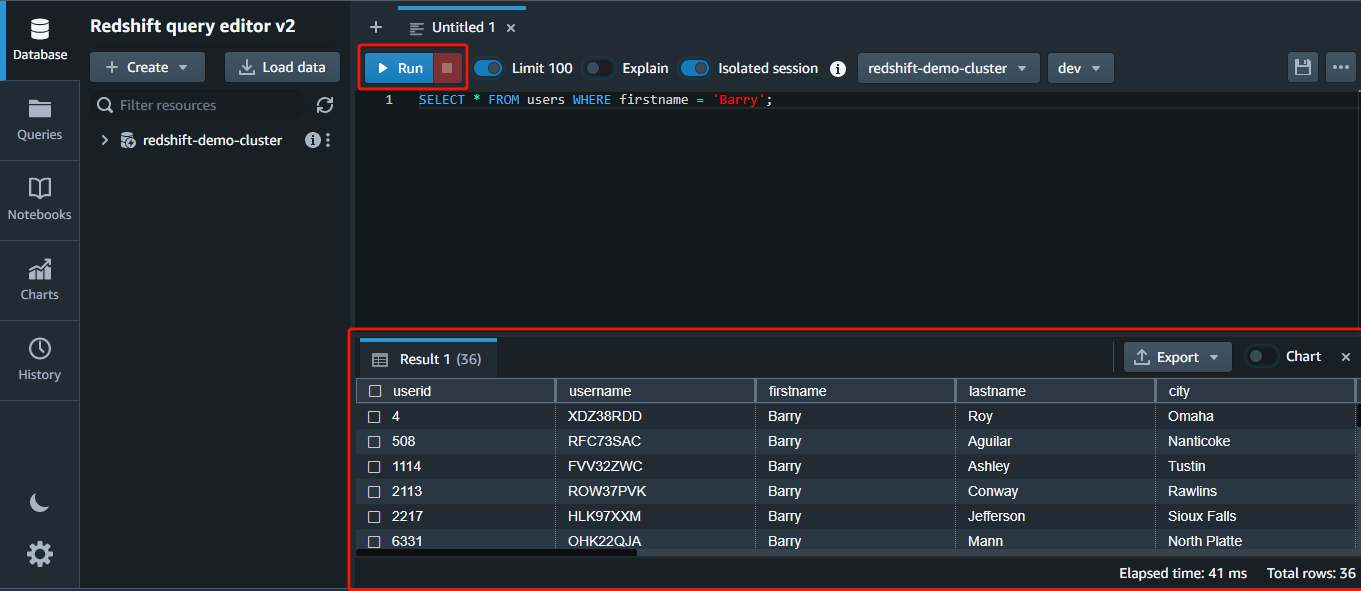
1. Run the next question within the editor to shortly return all (*) rows FROM the customers desk WHERE the firstname column has the worth Barry.
AWS Redshift presents knowledge compression, which reduces storage necessities, thereby lowering disk I/O and bettering question efficiency. While you execute a question, the compressed knowledge is learn into reminiscence, then uncompressed throughout question execution.
SELECT * FROM customers WHERE firstname="Barry";💡 Redshift makes use of a columnar storage format, the place knowledge is organized into columns as an alternative of rows. This conduct permits quicker querying and evaluation of knowledge, as solely the related columns have to be accessed and processed.
💡 AWS Redshift supplies end result caching that shops the outcomes of incessantly executed queries in reminiscence. Because of this, the outcomes could be shortly retrieved and returned to the person with out recomputing. This characteristic improves question efficiency by lowering the quantity of labor that the database has to carry out.
2. Subsequent, run the beneath question to return the sum of all (*) the values within the pricepaid column FROM the gross sales desk.
SELECT sum(pricepaid) FROM gross sales;
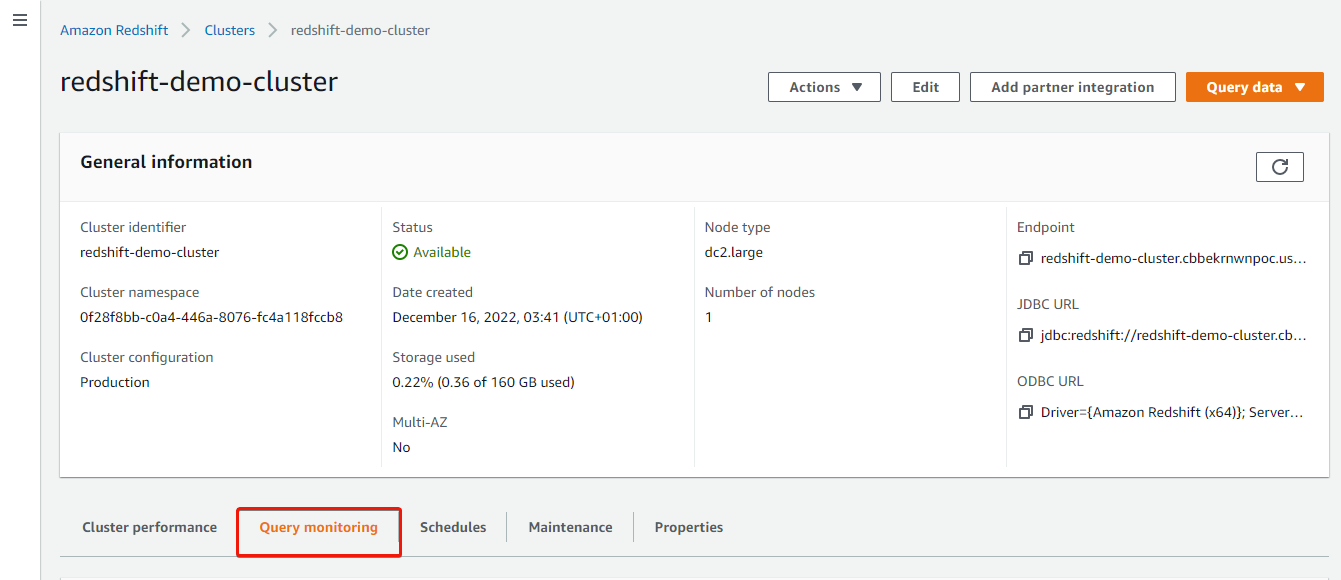
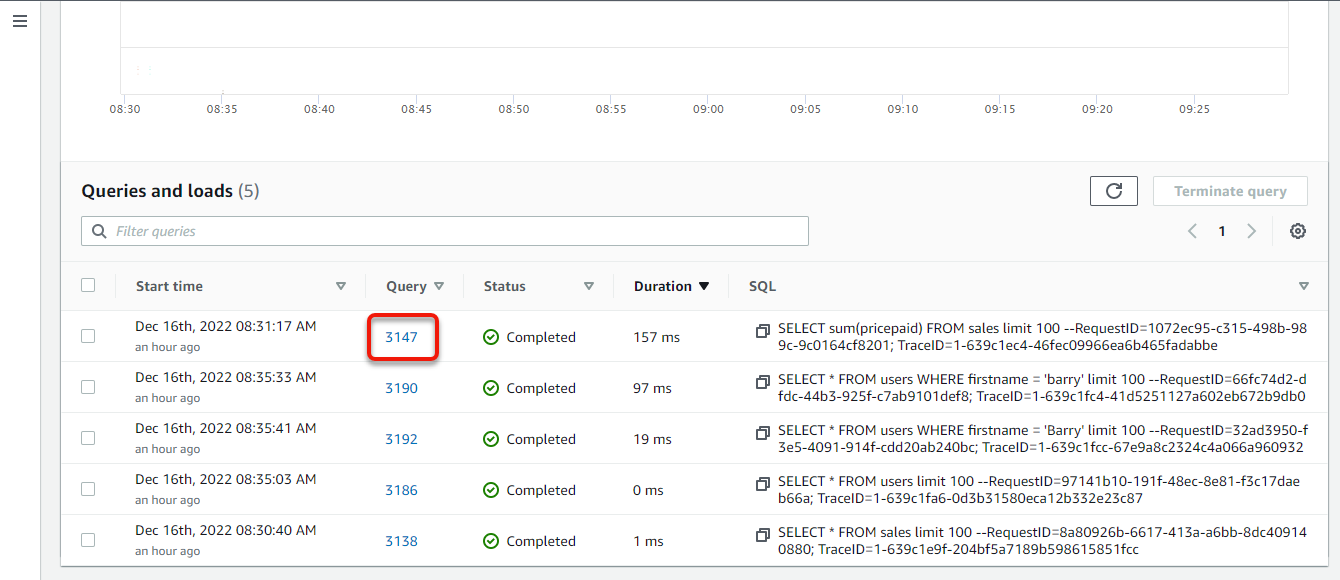
3. Return to your cluster’s particulars web page, and click on the Question monitoring tab to view your question logs.
4. Now, scroll all the way down to the Queries and masses part to view the queries you might have carried out to date, and click on the variety of the newest question to view its execution particulars.
The desk introduced ought to load your most up-to-date question on the prime.
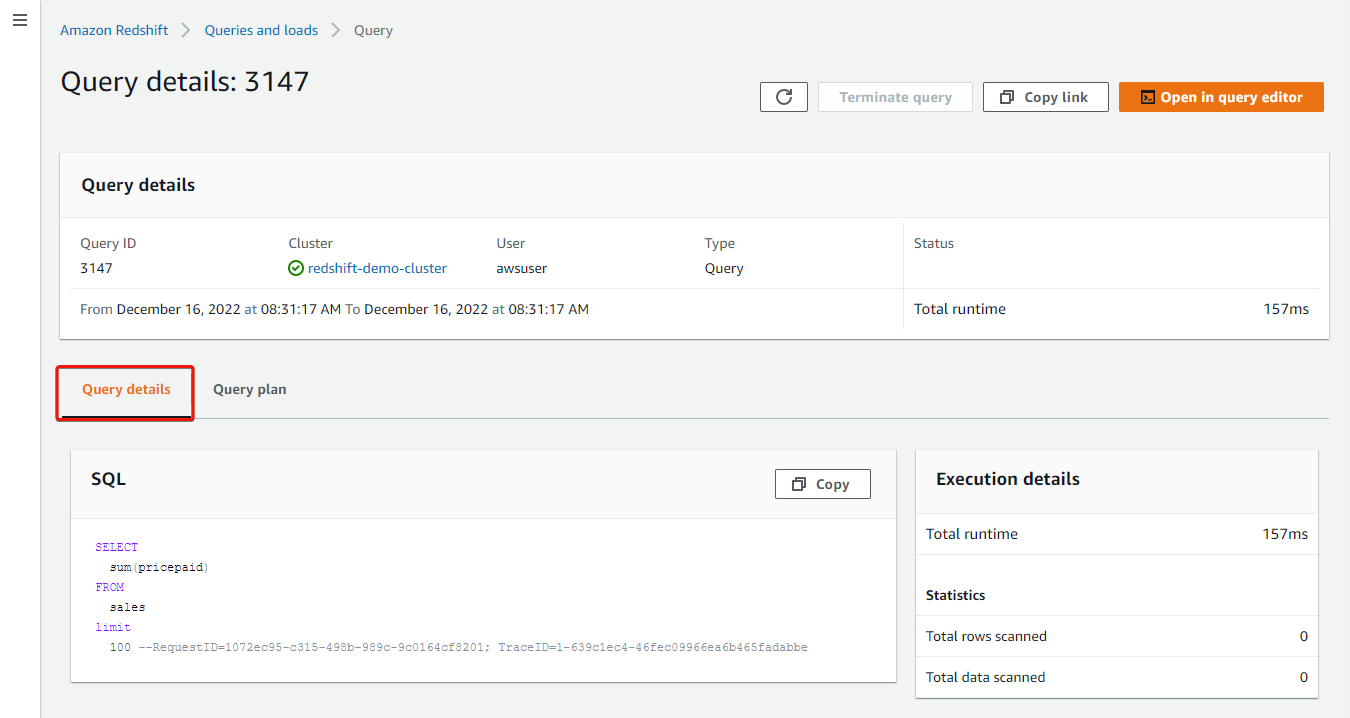
Your browser redirects to the Question particulars, the place you’ll be able to see what transpired within the question execution.
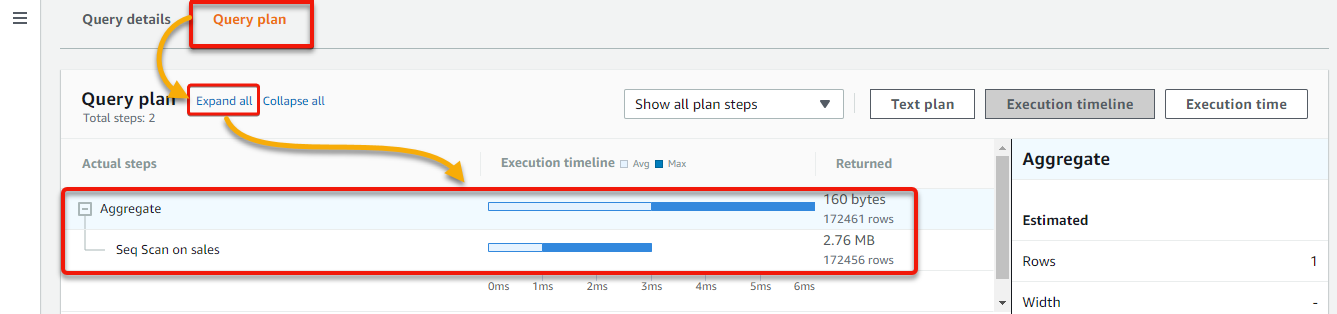
5. Lastly, click on the Question plan tab → Broaden all to see the precise steps and statistics for the question, and click on any bar within the chart whereas scanning the diagram. Doing so helps you to dig down into extra step specifics.
Precise question statistics are offered within the Execution timeline and Execution time views, together with the size of time taken by every question step. This knowledge can be utilized for question optimization or debugging.
The variety of rows that the question would learn or replace in every step is proven within the Textual content plan view. You too can get efficiency metrics and the well being standing of the cluster.
Resizing an AWS Redshift Cluster
Apprehensive about messing up the infrastructure? AWS Redshift is a completely managed service, so you’ll be able to shortly scale up or down with out worrying concerning the underlying infrastructure.
As your storage and efficiency wants fluctuate, you’ll be able to resize a Redshift cluster. Chances are you’ll have to scale as much as deal with extra knowledge or difficult queries. Or maybe scale down to chop prices when there may be much less demand for the cluster. However how? By including or eradicating nodes.
To resize an AWS Redshift cluster:
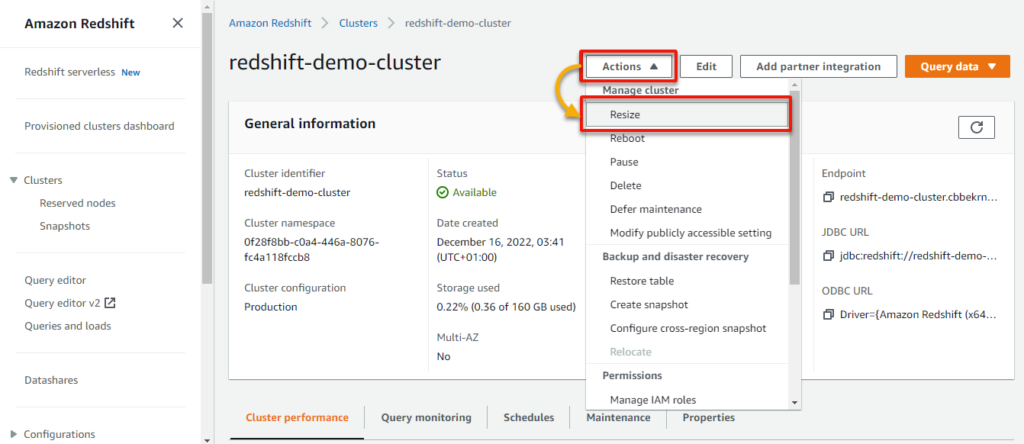
1. Return to your cluster’s element web page, click on the Actions dropdown, and click on Resize to provoke resizing your cluster.
2. Set the Nodes worth to 2, and click on Resize cluster (bottom-right) to resize your cluster with one extra node.

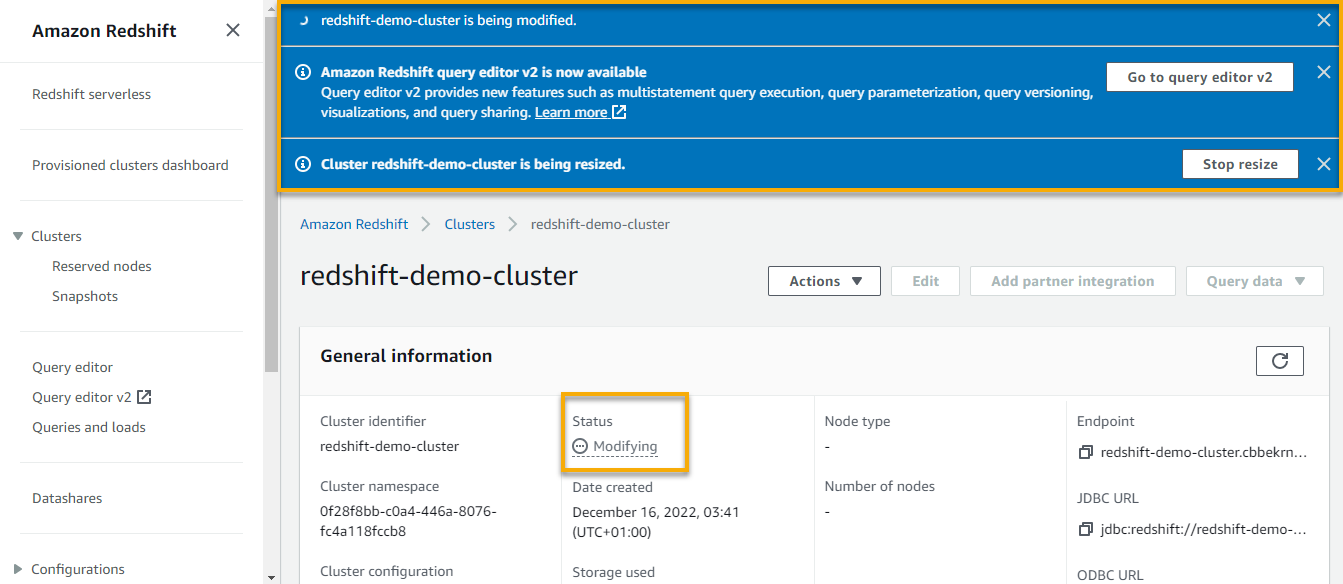
A notification seems on the prime, which signifies your cluster is being resized, whereas the Standing part of your cluster signifies it’s in a Modifying state.
The method could take as much as 15 or 20 minutes to resize and duplicate your knowledge. Redshift terminates all connections throughout a resizing operation and restarts the unique cluster in read-only mode.
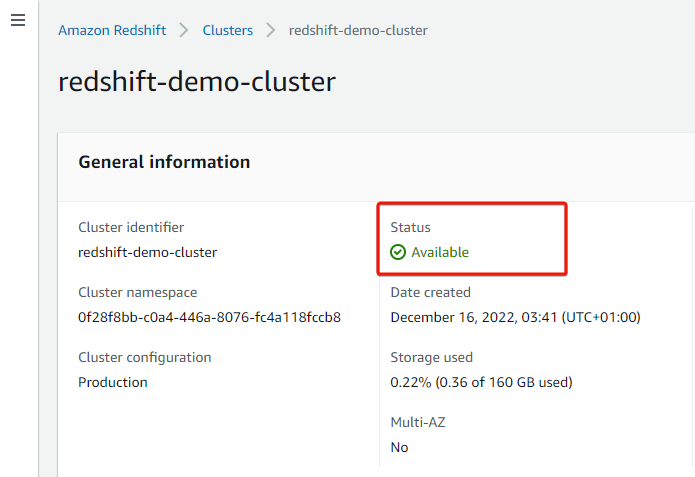
You possibly can confirm that the resize is full when the cluster Standing reads Obtainable, as proven beneath.
Deleting an AWS Redshift Cluster
Maintaining pointless clusters solely results in undesirable expenses. Why not clear your sources by deleting AWS Redshift clusters which might be not wanted?
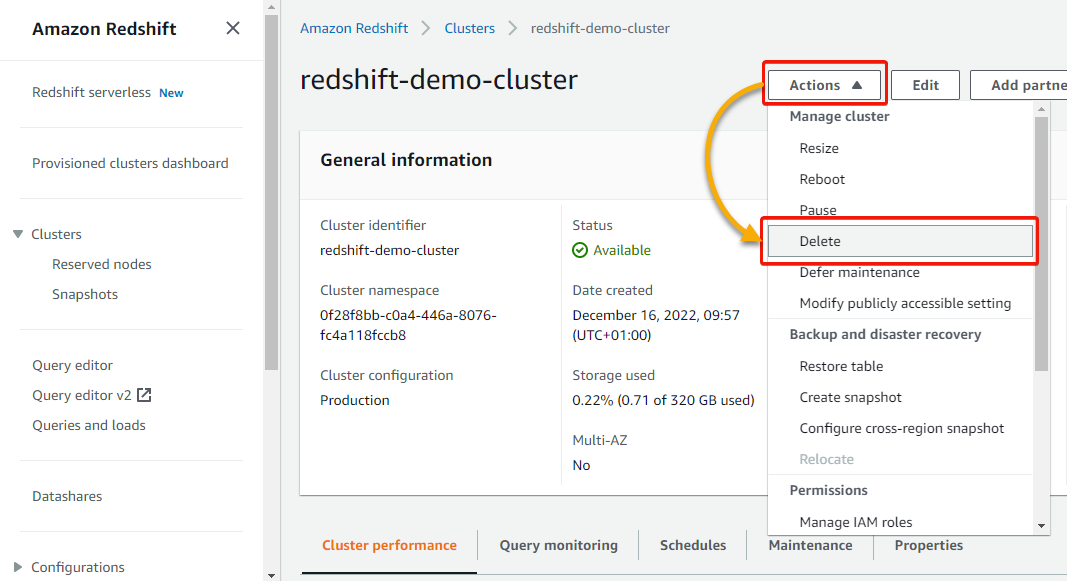
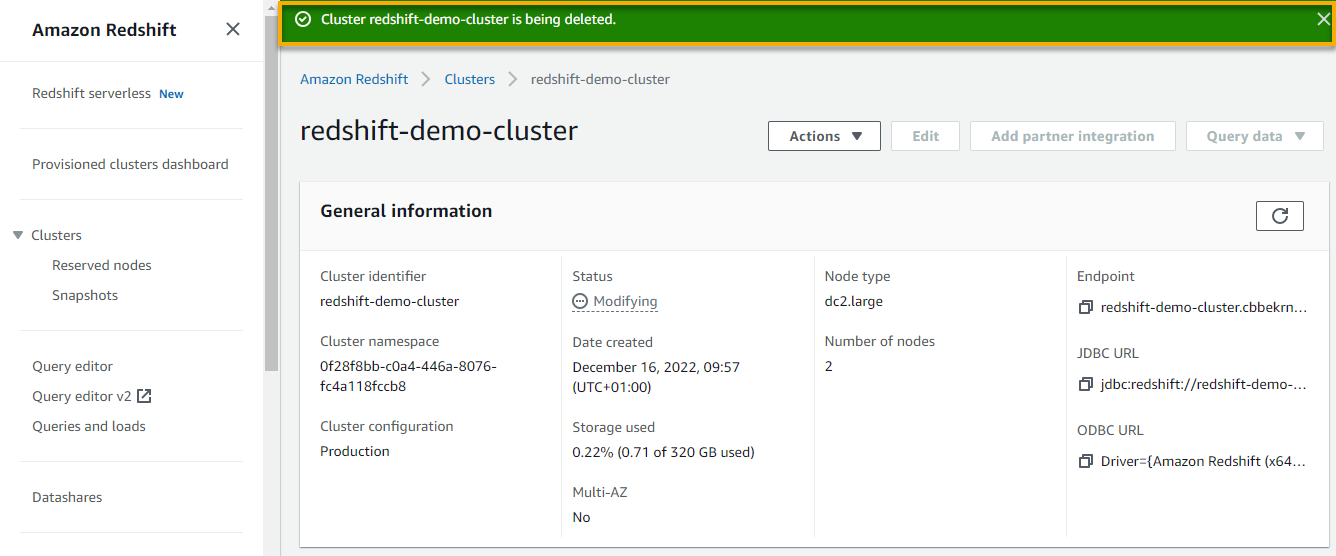
1. In your cluster’s particulars web page, click on the Actions dropdown and choose Delete to delete the cluster.
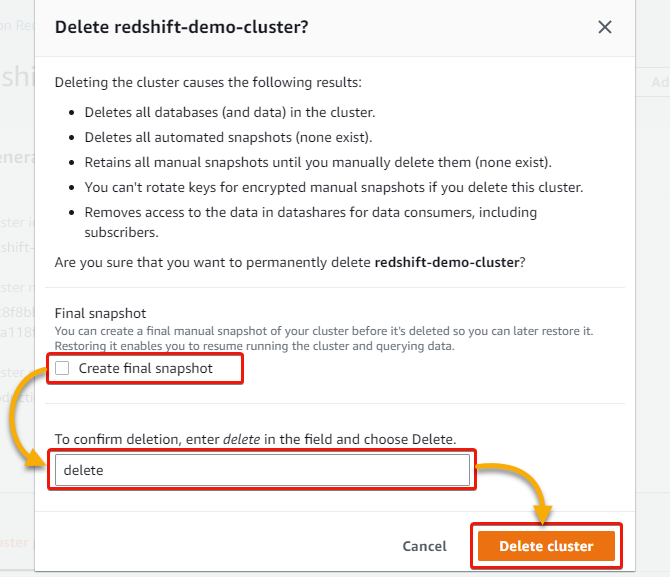
2. Within the type that pops up, underneath Closing snapshot, untick the Create last snapshot field, sort Delete within the discipline, and click on Delete cluster to verify deleting the cluster.
Conclusion
AWS Redshift is quick, dependable, and an effective way to handle your knowledge with numerous options. And this tutorial helped you get began with AWS Redshift by creating your first cluster and loading knowledge to tables with the Redshift Question Editor.
With this newfound data, why not attempt loading and managing knowledge to AWS Redshift with a third-party SQL instrument, like SQL Workbench/J and pgAdmin?