


The Syncfusion .NET MAUI DataForm (SfDataForm) is used to collect, edit, and show knowledge in a user-friendly interface. It helps built-in and customized knowledge editors to create knowledge entry types akin to contact, worker, sign-in, and sign-up types. This management is on the market with the 2022 Quantity 4 launch.
This weblog will clarify how one can create a contact kind utilizing the .NET MAUI DataForm management and its primary options in cellular and desktop functions from a single shared codebase.
Notice: Check with the .NET MAUI DataForm documentation earlier than getting began.
Step 1: Initializing the .NET MAUI DataForm management
- First, create a brand new .NET MAUI software in Visible Studio.
- Syncfusion .NET MAUI controls can be found within the NuGet Gallery. So as to add the SfDataForm to your mission, open the NuGet package deal supervisor in Visible Studio, seek for Syncfusion.Maui.DataForm, after which set up it.
- Import the management namespace Syncfusion.Maui.DataForm in your XAML web page.
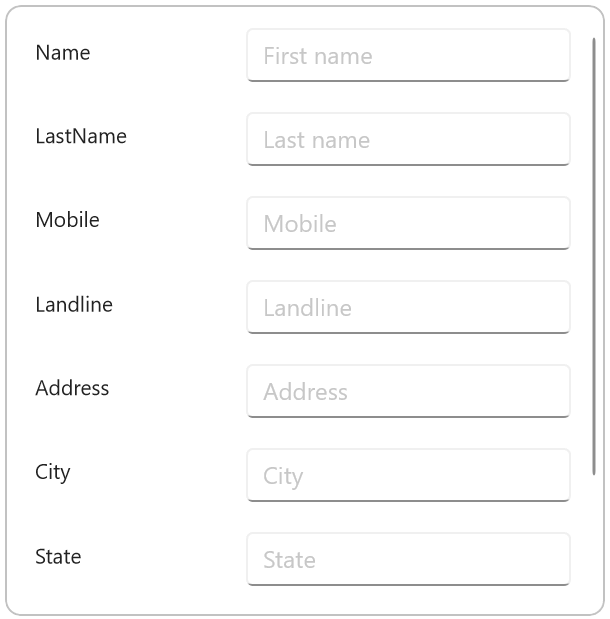
- Now, initialize the SfDataForm.
<ContentPage>
  …..
  xmlns:dataForm="clr-namespace:Syncfusion.Maui.DataForm;meeting=Syncfusion.Maui.DataForm"
  …..
  <dataForm:SfDataForm/>
</ContentPage>
- The Syncfusion.Maui.Core NuGet is a dependent package deal for all Syncfusion .NET MAUI controls. So, within the MauiProgram.cs file, register the handler for the Syncfusion core meeting. Check with the next code.
builder.ConfigureSyncfusionCore();
Step 2: Including a mannequin class to create a contact kind
Let’s create the info kind mannequin class (ContactFormModel), which incorporates fields that retailer particular data akin to names, addresses, and telephone numbers. You can even use attributes to the info mannequin class properties to successfully deal with knowledge.
Check with the next code instance.
public class ContactFormModel
{
    [DataFormDisplayOptions(ColumnSpan = 2, ShowLabel = false)]
    public string ProfileImage { get; set; }

    [Display(Prompt = "First name")]
    public string Title { get; set; }

    [Display(Prompt = "Last name")]
    public string LastName { get; set; }

    [Display(Prompt = "Mobile")]
    public double? Cellular { get; set; }

    [Display(Prompt = "Landline")]
    public double? Landline { get; set; }

    [Display(Prompt = "Address")]
    [DataFormDisplayOptions(ColumnSpan = 2)]
    public string Handle { get; set; }

    [Display(Prompt = "City")]
    [DataFormDisplayOptions(ColumnSpan = 2)]
    public string Metropolis { get; set; }

    [Display(Prompt = "State")]
    public string State { get; set; }

    [Display(Prompt = "Zip code")]
    [DataFormDisplayOptions(ShowLabel = false)]
    public double? ZipCode { get; set; }

    [Display(Prompt = "Email")]
    public string E-mail { get; set; }
}
Step 3: Defining the editors
By default, the .NET MAUI DataForm autogenerates editors primarily based on primitive knowledge sorts akin to string, enumeration, DateTime, and TimeSpan within the DataObject property.
A number of the built-in editors are textual content, password, multi-line, combo field, autocomplete, date, time, checkbox, change, and radio group.
Check with the next code to set the info kind mannequin (ContactFormModel) to the DataObject property.
XAML
<Grid.BindingContext>
     <native:ContactFormViewModel/>
</Grid.BindingContext>
<dataForm:SfDataForm x:Title="contactForm"
                       DataObject="{Binding ContactFormModel}" />
C#
public ContactFormViewModel()
{
   this.ContactFormModel = new ContactFormModel();
}

/// <abstract>
/// Will get or units the contact kind mannequin.
/// </abstract>
public ContactFormModel ContactFormModel { get; set; }
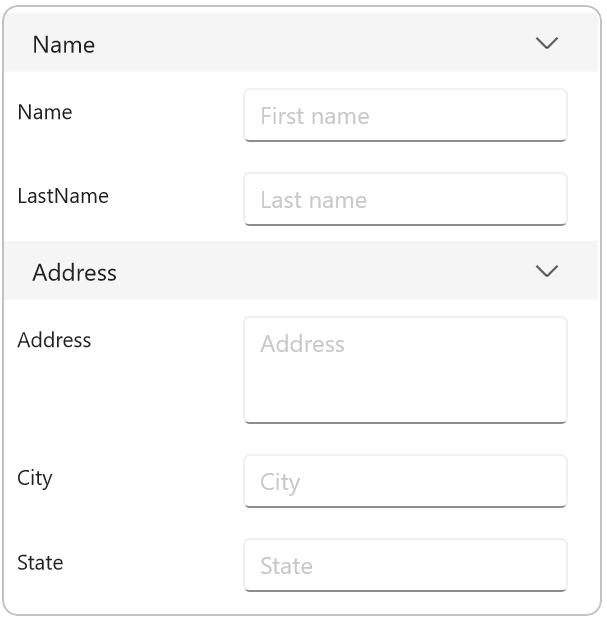
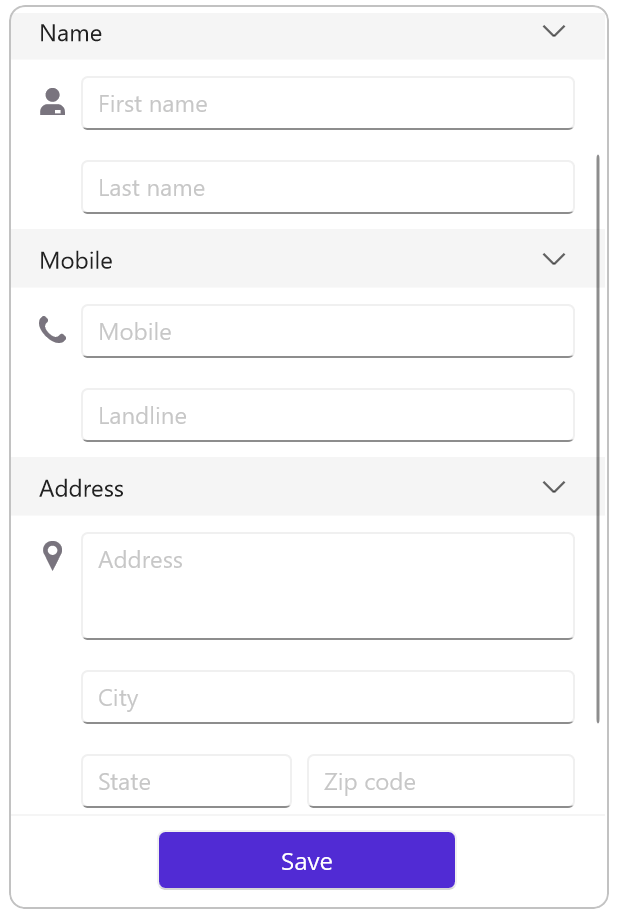
Step 4: Grouping the editors within the contact kind
The .NET MAUI DataForm lets you group or categorize associated knowledge. For instance, we will create a Title group with the primary and final identify fields.
Check with the next code instance. In it, we’ve got created the Title and Handle teams.
<dataForm:SfDataForm x:Title="contactForm"
                         DataObject="{Binding ContactFormModel}"
                         AutoGenerateItems="False" >
      <dataForm:SfDataForm.Objects>
        <!--Title group-->
        <dataForm:DataFormGroupItem Title="Title">
          <dataForm:DataFormGroupItem.Objects>
            <dataForm:DataFormTextItem FieldName="Title" Padding="0, 10, 10, 10" />
            <dataForm:DataFormTextItem FieldName="LastName"  Padding="0, 10, 10, 10"/>
          </dataForm:DataFormGroupItem.Objects>
        </dataForm:DataFormGroupItem>
        <!--Handle group-->
        <dataForm:DataFormGroupItem Title="Handle">
          <dataForm:DataFormGroupItem.Objects>
            <dataForm:DataFormMultilineItem FieldName="Handle" RowSpan="2" Padding="0, 10, 10, 10"/>
            <dataForm:DataFormTextItem FieldName="Metropolis"  Padding="0, 10, 10, 10"/>
            <dataForm:DataFormTextItem FieldName="State" Padding="0, 10, 10, 10"/>
          </dataForm:DataFormGroupItem.Objects>
        </dataForm:DataFormGroupItem>
    </dataForm:SfDataForm.Objects>
</dataForm:SfDataForm>
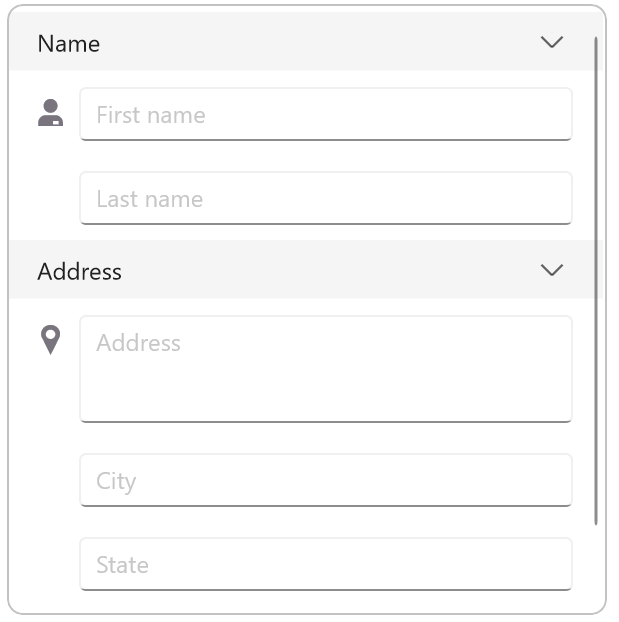
Step 5: Creating image-based labels
Let’s add customized fonts to the labels. To take action, we’ve got so as to add the font file (.ttf) within the Fonts folder. Then, register the customized font within the CreateMauiApp technique within the MauiProgram.cs file.
Check with the next code instance.
C#
builder
    .UseMauiApp<App>()
    .ConfigureFonts(fonts =>
    {
       fonts.AddFont(“OpenSans-Common.ttf”, “OpenSansRegular”);
       fonts.AddFont(“OpenSans-Semibold.ttf”, “OpenSansSemibold”);
       //// Register customized font.
       fonts.AddFont(“InputLayoutIcons.ttf”, “InputLayoutIcons”);
    });
XAML
<dataForm:SfDataForm.Objects>
  <dataForm:DataFormGroupItem Title="Title">
     <dataForm:DataFormGroupItem.Objects>
        <dataForm:DataFormTextItem FieldName="Title" Padding="0, 10, 10, 10" >
           <!--Add customized font to label-->
           <dataForm:DataFormTextItem.LeadingLabelIcon>
              <FontImageSource Glyph="F" Shade="#79747E" FontFamily="InputLayoutIcons" Measurement="18" />
           </dataForm:DataFormTextItem.LeadingLabelIcon>
         </dataForm:DataFormTextItem>
         <dataForm:DataFormTextItem FieldName="LastName" LeadingLabelIcon="" Padding="0, 10, 10, 10"/>
     </dataForm:DataFormGroupItem.Objects>
  </dataForm:DataFormGroupItem>
  …
</dataForm:SfDataForm.Objects>
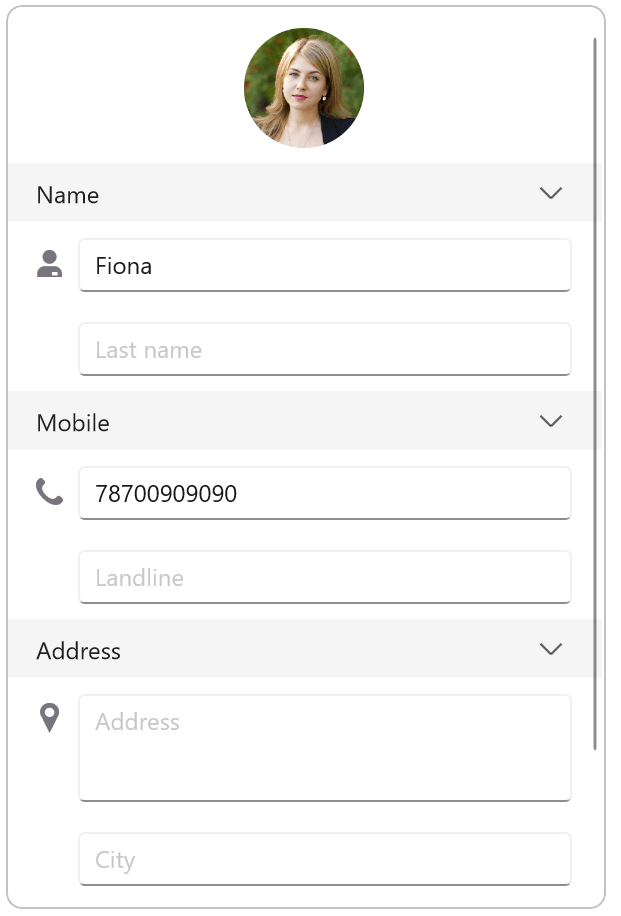
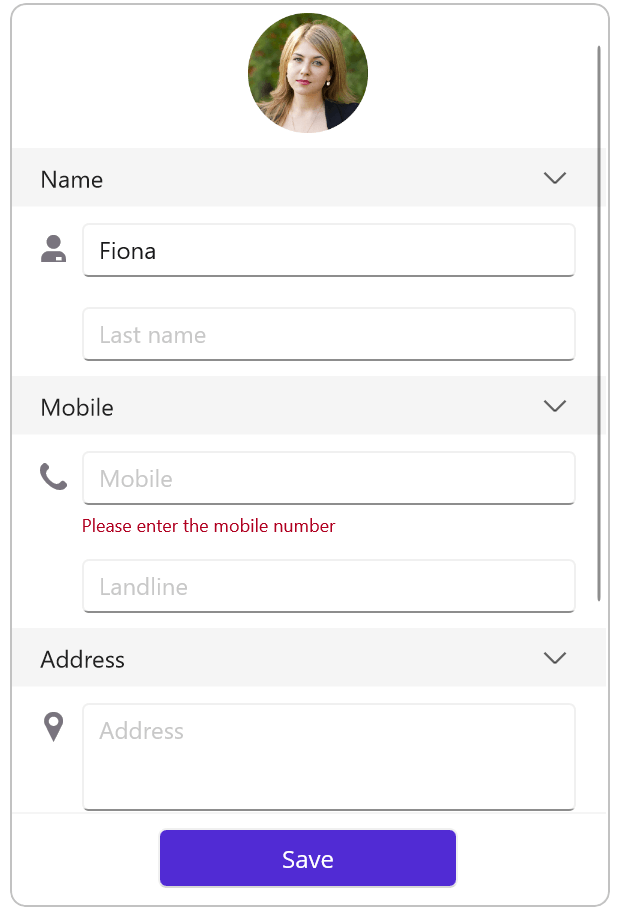
Step 6: Including a customized picture editor
You can even add a customized picture editor within the DataForm to show the individual’s picture within the contact kind.
Check with the next code instance.
<dataForm:SfDataForm.Objects>
   <!--Customized picture editor added-->
   <dataForm:DataFormCustomItem FieldName="ProfileImage">
     <dataForm:DataFormCustomItem.EditorView>
       <Picture Supply="individuals.png"
               HeightRequest="80"/>
     </dataForm:DataFormCustomItem.EditorView>
   </dataForm:DataFormCustomItem>
   ….
</dataForm:SfDataForm.Objects>
Step 7: Validating the info fields
The .NET MAUI DataForm helps validating the consumer enter. Validation will make sure that the customers enter solely right values within the knowledge kind.
It helps the next knowledge validations:
- Required area validation: To examine whether or not all of the required knowledge has been entered. For instance, the shape may be submitted solely after filling in all the info fields.
- Enter format validation: To examine that the info being entered is within the right format. For instance, e-mail handle knowledge ought to embody the @ character.
- Date vary validation: To examine that the info being entered is throughout the particular vary. For instance, dates must be chosen inside a selected date vary.
We’re going to add the required area validation to the telephone quantity area within the contact kind.
XAML
<dataForm:SfDataForm x:Title="contactForm" DataObject="{Binding ContactFormModel}" ColumnCount="1" AutoGenerateItems="False" ValidationMode="PropertyChanged"/>
C#
dataForm.ValidateProperty += this.OnDataFormValidateProperty;

personal void OnDataFormValidateProperty(object? sender, DataFormValidatePropertyEventArgs e)
{
    if (e.PropertyName == nameof(ContactFormModel.Cellular) && !e.IsValid)
     string.IsNullOrEmpty(e.NewValue.ToString()) ? "Please enter the cellular quantity" : "Invalid cellular quantity";

}
Step 8: Committing the info to the database
Now, it can save you or submit the entered knowledge within the underlying database with the assistance of the next commit modes within the .NET MAUI DataForm:
- LostFocus: The default commit mode, it commits the worth to the underline knowledge object when the editor loses focus.
- PropertyChanged: Instantly commits the worth to the underline knowledge object when the worth adjustments.
- Guide: Manually commits the worth by calling the Commit technique.
Notice: For extra particulars, discuss with the knowledge committing within the .NET MAUI DataForm management documentation.
Step 9: Designing the contact kind with layouts
You’ll be able to elegantly design the contact kind with the next layouts within the .NET MAUI DataForm management:
- Grid structure: To rearrange the editors within the kind in a grid-like sample with rows and columns.
- Linear structure: To rearrange the editors in a single column.
On this demo, I’ve added the grid structure to the Handle group of the contact kind.
<dataForm:DataFormGroupItem Title="Handle" ColumnCount="2">
  <dataForm:DataFormGroupItem.Objects>
   <dataForm:DataFormMultilineItem FieldName="Handle" RowSpan="2" Padding="0, 10, 10, 10">
    <dataForm:DataFormMultilineItem.LeadingLabelIcon>
     <FontImageSource Glyph="C" Shade="#79747E" FontFamily="InputLayoutIcons" Measurement="20" />
    </dataForm:DataFormMultilineItem.LeadingLabelIcon>
   </dataForm:DataFormMultilineItem>
   <dataForm:DataFormTextItem FieldName="Metropolis" LeadingLabelIcon="" Padding="0, 10, 10, 10"/>
   <dataForm:DataFormTextItem FieldName="State" LeadingLabelIcon="" Padding="0, 10, 10, 10">
    <dataForm:DataFormTextItem.DefaultLayoutSettings>
     <dataForm:DataFormDefaultLayoutSettings LabelWidth="{OnIdiom Desktop=0.2*, Telephone=0.3*}" EditorWidth="{OnIdiom Desktop=0.8*, Telephone=0.7*}"/>
     </dataForm:DataFormTextItem.DefaultLayoutSettings>
   </dataForm:DataFormTextItem>
   <dataForm:DataFormCustomItem FieldName="ZipCode" Padding="0, 10, 10, 10" />
  </dataForm:DataFormGroupItem.Objects>
 </dataForm:DataFormGroupItem>
GitHub reference
For extra particulars, discuss with the making a contact kind utilizing the .NET MAUI DataForm management GitHub demo.
Conclusion
Thanks for studying! On this weblog, we’ve got seen how one can create a contact kind simply utilizing the Syncfusion .NET MAUI DataForm management. Check out the steps on this weblog and go away your suggestions within the feedback part under!
For present Syncfusion prospects, the latest model of Important Studio is on the market from the license and downloads web page. In case you are not but a buyer, you possibly can attempt our 30-day free trial to take a look at these options.
You probably have any questions, you possibly can contact us by means of our help boards, suggestions portal, or help portal. We’re at all times completely happy to help you!