


On this Laravel tutorial, we’re going to see the way to combine Stripe checkout in a Laravel utility. It makes use of the Laravel Cashier bundle to realize this. This code makes use of Stripe-hosted checkout.
This instance makes you perceive and recreate it in your Laravel surroundings simply. It describes the conditions and the step-by-step strategy of including the Stripe checkout possibility.
Steps to combine a Stripe checkout in Laravel
- Set up the Laravel cashier bundle.
- Create a config with the product information array.
- Construct merchandise and thank-you templates.
- Create Laravel Stripe checkout routes.
- Make controllers to course of Stripe checkout.
If you’re searching for a Stripe Checkout code with PHP, the linked article has an instance.
The Laravel Cashier bundle is for dealing with subscription billing. On this instance, it makes use of this bundle for non-recurring, one-time product promoting. This can be helpful to allow cost choices for buying cart functions.
1. Set up the Laravel cashier bundle
Laravel Cashier is for checkout funds requested by the App consumer. The cost requests are made with respect to the logged-in consumer() occasion.
So it wants the Laravel authentication mannequin to course of Cashier cost requests.
The checkout function is enabled by extending the Laravel Cashier Billable trait to the Person mannequin.

The under steps have the required instructions and pointers to create the setup.
i) Set up Laravel authentication with the Breeze package
Create a Laravel challenge
composer create-project --prefer-dist laravel/laravel laravel-stripe-checkout
Go to the created Mission folder
cd laravel-stripe-checkout
Then, set up Laravel Breeze to have an authentication module.
composer require laravel/breeze --dev
php artisan breeze:set up
ii) Putting in Laravel Cashier
Set up Laravel Cashier and publish the bundle dependencies.
composer require laravel/cashier
php artisan vendor:publish --provider="LaravelCashierCashierServiceProvider" --tag="cashier-migrations"
iii) Migrate consumer and cost database tables
The under command migrates the authentication and Stripe tables to the configured database. The database particulars are configured within the .env file. We’ve got already seen this within the Laravel newcomers’ tutorial.
php artisan migrate
iv) Generate stripe API key
Add the under constants to the Laravel .env file. Exchange the values along with your Stripe keys and the product’s worth ID. These configurations can be used on the time of sending the Stripe checkout request to the API.
STRIPE_SECRET=Your Stripe Secret Key
STRIPE_KEY=Your Stripe Publishable Key
STRIPE_PRICE_ID=Your Stripe Product Worth ID
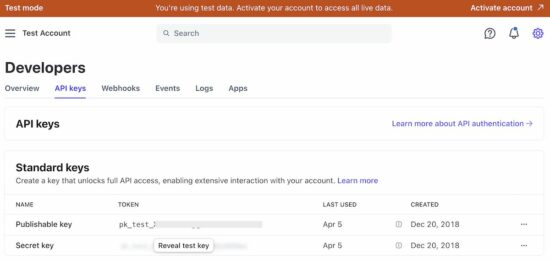
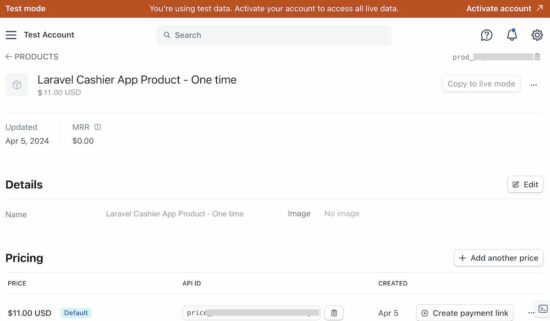
Navigate to Builders -> Product Catalog -> Add Product to create the Stripe product and worth.
v) Embrace Billable within the Person mannequin to request Stripe checkout
The Laravel cashier checkout depends on authenticated customers. The checkout() is the a part of the Billable class. Add this class’s “use assertion” to the Person mannequin.
use LaravelCashierBillable;
class Person extends Authenticatable
{
    use Billable;
}
As soon as the above steps are applied, the Laravel challenge is able to sending the checkout request.
2. Create a config with the product information array
This instance makes use of product information from a config file. You’ll be able to change it with a database desk.
config/product-details.php
<?php

return [
    'product' => [
        'name' => 'Mirrorless Digital Camera',
        'description' => 'Compact, versatile, and powerful, our mirrorless digital camera captures life"s moments with unmatched clarity and convenience.',
        'price' => 11,
        'image' => 'images/camera.jpg'
    ]
];
3. Construct merchandise and thank-you templates
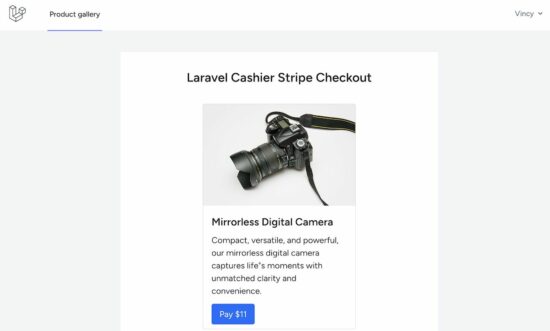
As soon as logged in, the dashboard template reveals the product gallery tile with the pay button. In a earlier tutorial, we’ve got proven the “Add to cart” choice to the product gallery tiles.
assets/views/dashboard.blade.php
<x-app-layout>
  <div class="dashboard-container">
    <h1 class="card-heading text-center">Laravel Cashier Stripe Checkout</h1>
    <div class="card-container">
      <div class="card">
        <img src="https://phppot.com/laravel/integrate-stripe-checkout-in-laravel/{{ $product["image'] }}" alt="...">
        <div class="card-body">
          <div class="card-title">{{ $product['name'] }}</div>
          <p class="card-text">{{ $product['description'] }}</p>
          <a href="{{ route('checkout')}}" class="btn btn-primary">Pay ${{ $product['price'] }}</a>
        </div>

      </div>
    </div>
  </div>
</x-app-layout>
The under templates show the acknowledgment to the browser. The Laravel internet guidelines hyperlink URLs with these templates.
These URLs have been despatched with the Stripe checkout request. After processing the checkout, the Stripe redirects the consumer. The redirected web page renders one among these templates primarily based on the cost standing between “success” and “cancelled”.
assets/views/success.blade.php
<!DOCTYPE html>
<html>

<head>
    <meta charset="utf-8">
    <meta identify="viewport" content material="width=device-width, initial-scale=1">
    <title>Laravel Stripe integration tutorial</title>
    <hyperlink href="https://phppot.com/laravel/integrate-stripe-checkout-in-laravel/{{ asset("css/custom-style.css') }}" rel="stylesheet">
</head>

<physique>
    <div class="success-cancel-container">
        <img src="https://phppot.com/laravel/integrate-stripe-checkout-in-laravel/{{ asset("check-circle.svg') }}" class="tick-img">
        <h1 class="success-cancel-heading">Thanks for making cost</h1>
        <p class="success-cancel-text">{{ $successMessage }}</p>
        <div class="continue-btn">
            <a href="{{ route('dashboard') }}" class="btn bg-warning">Proceed Purchasing</a>
        </div>
    </div>
</physique>

</html>

When the consumer clicks the “again arrow” from the Stripe-hosted checkout web page, it reveals the next cancel template.
assets/views/cancel.blade.php
<!DOCTYPE html>
<html>

<head>
    <meta charset="utf-8">
    <meta identify="viewport" content material="width=device-width, initial-scale=1">
    <title>Laravel Stripe integration tutorial</title>
    <hyperlink href="https://phppot.com/laravel/integrate-stripe-checkout-in-laravel/{{ asset("css/custom-style.css') }}" rel="stylesheet">
</head>

<physique>
    <div class="success-cancel-container">
        <img src="https://phppot.com/laravel/integrate-stripe-checkout-in-laravel/{{ asset("cancel.svg') }}" class="tick-img">
        <h1 class="success-cancel-heading">Fee Cancelled</h1>
        <p class="success-cancel-text">{{ $cancelMessage }}</p>
        <a href="{{ route('dashboard') }}" class="btn bg-warning">Proceed Purchasing</a>
    </div>
</physique>

</html>

Create Laravel Stripe checkout routes
The under PHP file reveals the Laravel internet routes. A lot of the URLs are created by organising the authentication module.
The Stripe checkout-related URLs like /checkout/, /cost/success/ and /cost/cancel/ is created manually for this instance.
routes/internet.php
<?php

use AppHttpControllersProfileController;
use IlluminateSupportFacadesRoute;
use AppHttpControllersStripeCheckoutController;
use AppHttpControllersDashboardController;

Route::get("https://phppot.com/", perform () {
    return view('welcome');
});

Route::get('/dashboard', [DashboardController::class, 'index'])->middleware(['auth', 'verified'])->identify('dashboard');

Route::middleware('auth')->group(perform () {
    Route::get('/profile', [ProfileController::class, 'edit'])->identify('profile.edit');
    Route::patch('/profile', [ProfileController::class, 'update'])->identify('profile.replace');
    Route::delete('/profile', [ProfileController::class, 'destroy'])->identify('profile.destroy');
});

Route::get('checkout/', [StripeCheckoutController::class, 'cashierStripeCheckout'])->identify('checkout');

Route::get('/cost/success', [StripeCheckoutController::class, 'success'])->identify('checkout-success');

Route::get('/cost/cancel', [StripeCheckoutController::class, 'cancel'])->identify('checkout-cancel');

require __DIR__.'/auth.php';

?>
Make controllers to course of Stripe checkout
First, the DashboardController is modified to load the product tile from the config.
That is created as a part of the Laravel Breeze set up. By default, it reveals the welcome message for the logged-in consumer.
app/Http/Controllers/DashboardController.php
<?php

namespace AppHttpControllers;

use IlluminateSupportFacadesConfig;

class DashboardController extends Controller
{
    public perform index()
    {
        // Get product array from Laravel config/product-details.php
        $product = Config::get('product-details.product');

        // Load product tile view to the browser
        return view('dashboard', compact('product'));
    }
}

?>
On this StripeCheckoutController, the checkout() request is shipped with the next parameter.
- Stripe worth id.
- Amount which is about to 1.
- Stripe success callback URL.
- Cancel callback URL.
As soon as the request is processed within the Stripe server, it redirects to the corresponding callback URLs.
app/Http/Controllers/StripeCheckoutController.php
<?php

namespace AppHttpControllers;

use IlluminateHttpRequest;

class StripeCheckoutController extends Controller
{
    public perform cashierStripeCheckout(Request $request)
    {
        $stripePriceId = env('STRIPE_PRICE_ID');

        $amount = 1;
        return $request->consumer()->checkout([$stripePriceId => $quantity], [
            'success_url' => route('checkout-success'),
            'cancel_url' => route('checkout-cancel'),
        ]);
    }
    public perform success()
    {
        $successMessage = "We've got acquired your cost request and can let you realize shortly.";
        /* Present success template to show the acknowledgement
         of receiving the checkout request */
        return view('success', compact('successMessage'));
    }
    public perform cancel()
    {
        $cancelMessage = "You may have cancelled the cost. Contact store admin to publish your message.";
        return view('cancel', compact('cancelMessage'));
    }
}
?>
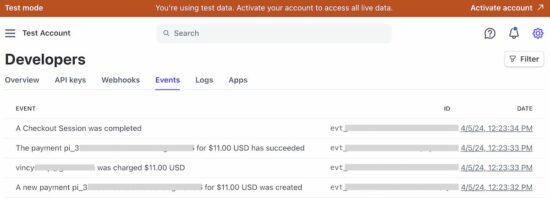
This screenshot reveals the sequence of occasions that occurred through the Stripe checkout. This picture shows the Stripe builders’ dashboard with the listing of occasions.
Thus, we’ve got created the Stripe checkout integration with Laravel/Cashier. If you’re trying to find a Laravel Stripe Integration with the Laravel/stripe bundle, the linked tutorial has a code.
